9. Thinking in Pictures: The Photoshop Projects
That which is static and repetitive is boring. That which is dynamic and random is confusing. In between lies art.
—John A. Locke
Photoshop serves as fertile ground for graphics automation, providing unparalleled tools for producing photo-realistic images, and containing more automation tools than any of the other applications in Creative Suite. You will also find more free automation agents for Photoshop on the Web.
The Projects
As mentioned earlier, our scenario is that you run a graphic design firm whose client—Star & Fey Seed Co., a gardening retail and nursery business with in-store coffee shops—is betting its future on using customized marketing to connect to and retain customers.
Even though your firm is a design studio, you do an increasing amount of production work to provide more services to your design clients. Your clients feel more comfortable with the one-stop shopping, and you get an additional revenue stream—one that makes production work even more profitable and frees your employees up to design. The following are some Photoshop automation projects you could perform for your customers.
Project 1: Metadata
The premise for this project is that someone, ideally the photographer, enters the name of the subject of the photograph (in this case, a flower name) in Photoshop’s Description field (Figure 9.1). Not only does this help in image file searches but since you can access text via scripting, it can also serve as a database of sorts for accessing the text of the flower’s name.

This project involves adding black bars to the bottom of your flower photographs, inserting the name of each flower (in white text) in those bars, and saving them as JPEGs for use on a Web site (Figure 9.2). Since the flower names are contained in the files’ metadata, you don’t need to rekey the text by hand. Not only does this reduce human error, it provides a way to automate the process.

Because these photos arrive a few at a time, you need a quick way to process smatterings of files on an ongoing basis. On the Mac you can attach an AppleScript to a folder that’s triggered when a folder state changes (for example, by adding files to or deleting files from the folder). Using these “folder actions,” you can set up a “watched” folder. As you receive the files, you can drag them into the folder, triggering the automation agents so that the process automatically runs. On Windows you can manually run a script on a folder of images or set up a time-based script trigger using Task Scheduler.
Photoshop’s File Info provides one means of storing a file’s metadata; the file’s name—interestingly enough—provides another. Filenames can be constructed to contain a surprising amount of metadata. For instance, the filename CP500507.TIF could indicate that that the file contains a photograph of a California poppy (“CP”), formatted for a 500-mg. seed packet (“500”), which grows best in Zone 5 (“5”) and that was entered in the company database in 2007 (“07”). The filename’s extension, as usual, indicates which format the file is stored in (in this case, TIFF). All of that metadata can be accessed and acted upon when building, editing, and handling the file (or the file that contains it—for example, an Illustrator file).
Another interesting feature of this project is that the script triggers two actions within Photoshop for part of this process. By combining automation methods, you’re taking advantage of their different strengths. You could achieve the same ends with scripting, but actions can be much faster and easier to create and generally require less troubleshooting to get up and running.
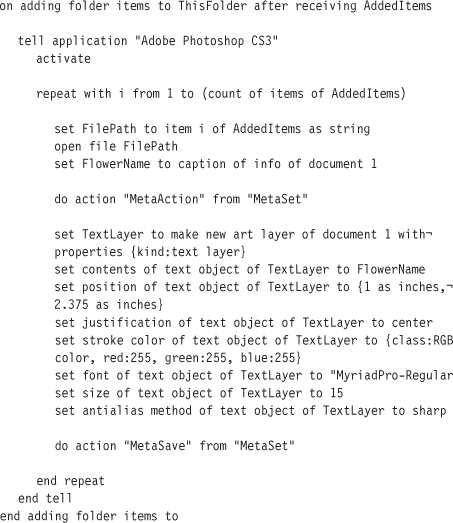
Here’s the full script; I’ll explain how it works as we go along:
You can download a JavaScript version of this AppleScript at www.peachpit.com/apprentice. Since the folder action portion of this script can only be performed in AppleScript, the JavaScript contains basically everything but the first and last lines of the AppleScript.
Once you see that most of the code in the middle simply specifies how the text should look, you’ll realize that the script isn’t that complicated. Now let’s break it down and build it back up in pieces.
Setting Up the Folder Action Wrapper
The first thing you need to do is create the folder to which you will attach the folder script. I’ve created a folder on the Desktop called MetaFolder. This script will process images and export them as JPEGs, so you also need a folder in which to put the processed images. I’ve created a folder within the MetaFolder folder called MetaDone to store the finished images.
This is the basic structure of a folder action that triggers when any file is added to the folder:
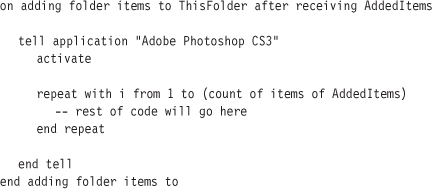
The first line sets up the trigger (on adding folder items), a variable (ThisFolder) that is the file path to the folder to which the script is attached, and a variable (AddedItems) containing a list of all items added to the folder. The last line (end adding folder items to) is the closing tag for the first line.
The second line (tell application "Adobe Photoshop CS3") directs everything until the end tell line (the closing tag to the “tell application” line) at Photoshop. The next line (activate) brings Photoshop to the front so that you can watch it do its thing.
The line beginning with repeat sets up your loop. The code with i from 1 to starts the loop counter (i) to begin at 1 and end at (count of items of AddedItems). Remember that the variable AddedItems contains a list of all the files (or, more accurately, their file paths) added to the folder. This means that the code (count of items of AddedItems) simply counts those files and makes that the number at which the loop stops. This ensures that every file added is taken through the loop.
You will now replace the line -- rest of code will go here with the rest of the script.
The two hyphens in front of rest of code will go here make everything on that line a nonexecuting comment. Comments are most often used to briefly describe what a script is doing. If you come back to a script you wrote weeks or months earlier, it may take you some time to figure out exactly how it works. Comments can quickly get you (or anyone editing your code) up to speed.
Opening the Image and Copying Metadata
The following lines open the current image and copy the name of the flower from the Description field (referred to in Photoshop scripting as caption) from the File Info window:
![]()
The first line loads the file path of AddedItems’ first item. (Remember that AddedItems is the variable name for the list of files added to the folder.) The second line opens that first file. The third line grabs the flower name from the file’s metadata and stores it in the variable FlowerName.
Building and Triggering the First Action
At this point, you’ve opened the first file and copied the flower name into a variable. Next, you need to build a black bar at the bottom of the image to contain the flower name. Even though you could do this with a script, it’s much faster to build an action in Photoshop and trigger it from the script.
To create the black bar, you must first reset the default foreground and background colors to black and white and increase the canvas size with the image anchored to the top.
Create a new action set (Actions panel menu > New Set) and name it MetaSet (Figure 9.3). Next, create a new action (Actions panel menu > New Action) and name it MetaAction, then from the Set pull-down menu select MetaSet and click Record (Figure 9.4). Photoshop is now recording your mouse movements. Press the D key to reset the foreground and background colors to black and white, respectively. Press the X key to switch the two colors (so that black is now the background color). The flower images you’ll work with are 2 inches wide and 2.125 tall at 72 dpi. Choose Image > Canvas Size, set the height to 2.5 inches, and anchor the image to the top (Figure 9.5). Click the square at the bottom of the Actions panel to stop recording.
All you need is one line in the script to trigger this action:
do action "MetaAction" from "MetaSet"
Figure 9.3. From the Actions panel menu (left), choose New Set, and in the resulting New Set window (right) name the set MetaSet.
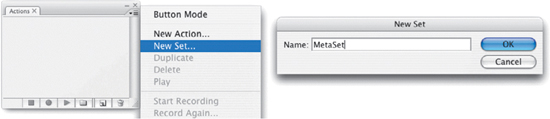
Figure 9.4. From the Actions panel menu (left) choose New Action, and in the resulting New Action window (right) name the action MetaAction.
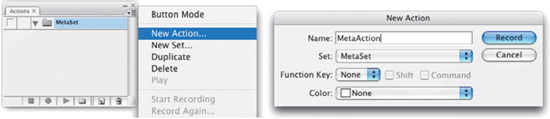
Figure 9.5. The settings in the Canvas Size dialog box (left) produce a black bar across the bottom of the image (right).

Creating the Type
The next block of code creates the text for the flower name and sets its properties line by line.
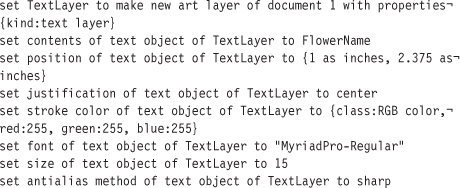
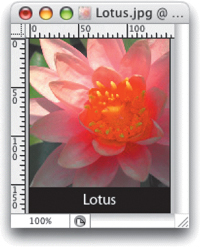
The first line of the above code creates a new type layer. This is like clicking the image with the Text tool. The next line “sets” the contents of that type layer to the flower name contained in the Description field of the File Info window. Each subsequent line sets another property of that type layer: position, justification, color, font, size, and the anti-aliasing method (it makes a difference). The file now looks like Figure 9.6.
Saving the File
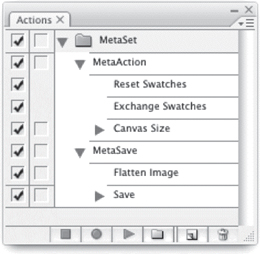
Now it’s time to save the file. Again, you could do this via the script, but it’s much faster and easier to create an action: From the Actions panel menu, choose New Action; name the action MetaSave; put it in the MetaSet set; and click Record. Photoshop is now recording your mouse movements.
Flatten the image (Layers panel menu > Flatten Image). Save the image as a JPEG (using whatever quality settings you wish) into the MetaDone folder that you created in Step 1. Now, close the file and click the square at the bottom of the Actions panel to stop recording (Figure 9.7).
One line in the script will trigger the action (do action "MetaSave" from "MetaSet"), and you’re finished writing the script.
Attaching the Script to the Folder
It’s important that you save your script in the correct folder (Applications > AppleScript > Example Scripts > Folder Action Scripts) so that it will be available for attaching to the MetaFolder (created in Step 1). I’ve saved the script with the name MetaScript.
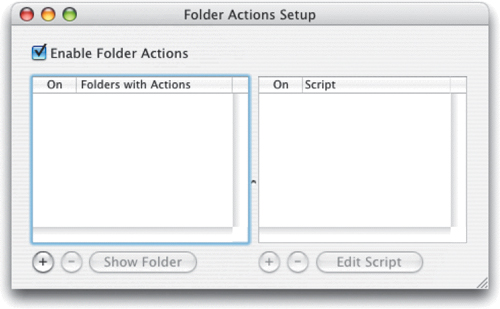
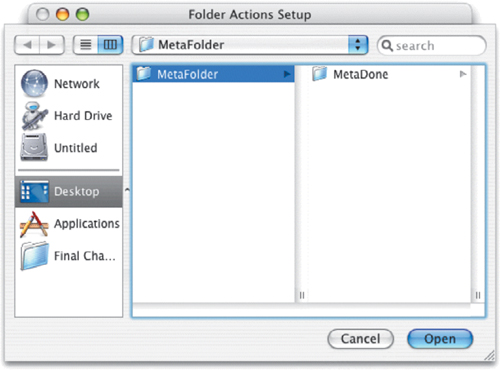
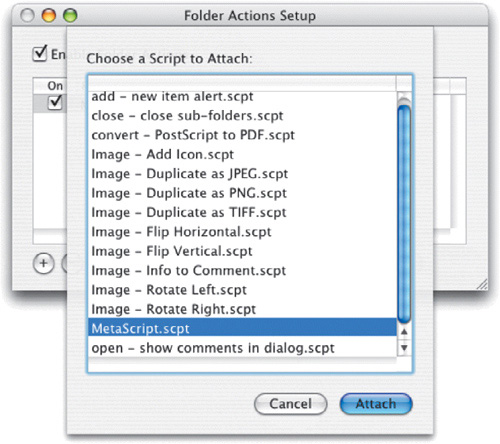
To attach the script to the folder, open the Folder Actions Setup application (Applications > AppleScript > Folder Actions Setup) and make sure the Enable Folder Actions box is checked (Figure 9.8). Click the Plus button in the lower-left corner to navigate to the MetaFolder on the Desktop, then click Open (Figure 9.9). Once you’ve done so, you’ll be presented with a list of all of the available folder action scripts. Select the MetaScript script, click the Attach button, and quit Folder Actions Setup (Figure 9.10).
That’s it. To test your script, drag an image (of the specified size) onto the MetaFolder. Frankly, few automations work the first time out—meaning you’ll probably need to do some tinkering to get yours to run. If for some reason your script doesn’t work, notice at what point the process halts: This will provide a clue to the error’s location.
Some examples of things that might go wrong include mistyped Photoshop action names (resulting in an error message stating the application isn’t currently available) and flower names missing from the file’s metadata (preventing a caption from appearing with the image). And if the text starts to be added to the image but then disappears, you might have forgotten to type “in inches” on the set position of text object line. (If no units are specified, the units set in Photoshop’s Preferences will be used.)
Project 2: Bridge Mini Projects
Bridge is a stand-alone application that acts as a centralized tool for managing and organizing Creative Suite files. You can search for files using filenames and metadata as well as run certain Creative Suite automation agents from this single location. Although most of the automation agents are for Photoshop (seven in all), there are also two agents for Illustrator and one for InDesign.
Bridge offers three advantages over standard OS dialog boxes (such as those you see when selecting Open from the File menu): You can use thumbnails to organize files (you can also view thumbnails in Adobe’s dialog boxes); you can select files from different folders; and you can easily see and manage metadata for one or many files.
But how useful is Bridge when it comes to automation? Using Bridge, you can run a limited group of Photoshop scripts (Batch, Contact Sheet, Image Processor, Merge to HDR, PDF Presentation, Photomerge, and Picture Package). The advantage of running these scripts from Bridge rather than Photoshop is the flexibility it provides in selecting multiple images. True, you can also select multiple files in Photoshop, but you can’t select files from different folders and/or based on searches. In contrast, you can do both by searching for files in Bridge—and you can save the searches for later use. You can also set the metadata and filenames for multiple files in Bridge.
Mini Project 1: Batch Rename
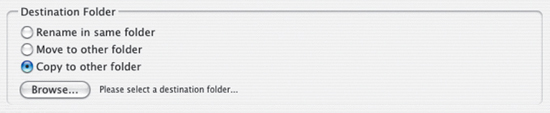
Bridge has a great feature for renaming groups of files (whether or not they’re of Adobe origin). To open it, choose Tools > Batch Rename. A quick tour of Bridge’s Batch Rename window (Figure 9.11) reveals that the Destination Folder area at the top contains three radio button selections (Figure 9.12): The first (“Rename in same folder”) renames the files and leaves them where they are. The second (“Move to other folder”) moves the files to another location (which you specify by clicking the Browse button) and renames them there. The last (“Copy to other folder”) copies the files, moves the copies to another folder, and renames them.
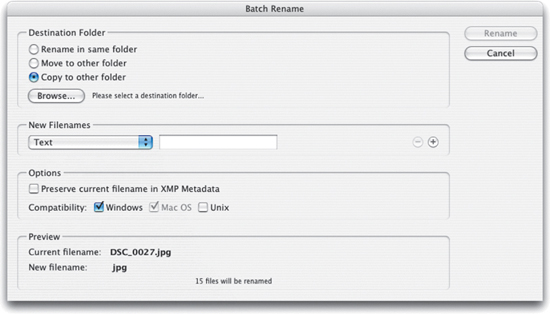
The New Filenames area is where you specify the naming elements (Figure 9.13). The elements are combined in the order they appear to create the new filename. You can add as many name elements as you want, but be careful because filename lengths can get out of hand pretty quickly. You can add or delete elements by clicking the Plus or Minus buttons to the right of each.

The Options section allows you to store the current filename in the metadata field called Preserve Filename (Figure 9.14). This gives you a historical record of the previous filename.

For this project you’ll select a group of files by running a filename search and then renaming all the resulting files. Imagine this scenario: You’ve taken some digital photographs for next month’s newsletter, and they’ve all ended up in different folders. You know, however, that you color-corrected and saved them all on the same day (May 3, 2007). The camera has started the name of each file with the letters DSC. You’ll use both pieces of information in the file search. After the search, you’ll rename all of the files with the same name (JuneNews) and number them sequentially.
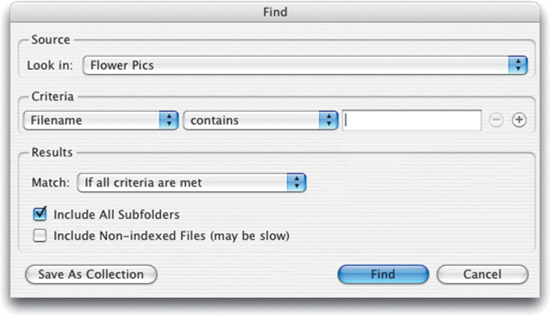
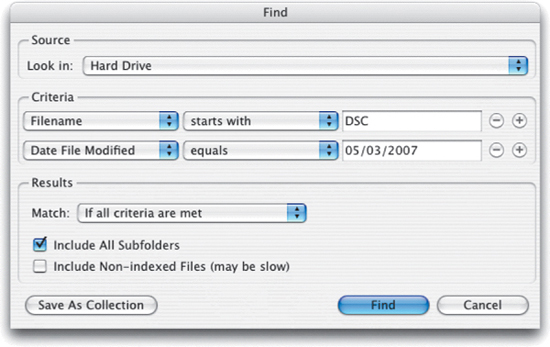
To create a search, choose Edit > Find (Figure 9.15). You can quickly build a complex search by using multiple search criteria. Use the pull-down menus to choose the first set of criteria: Filename, “starts with,” and DSC. You’ll add a second set of criteria by clicking the Plus button to the right of the first criteria fields. Select Date File Modified, “equals,” and 05/03/2007 (Figure 9.16). In the Results section, make sure “If all criteria are met” is selected in the Match pull-down menu, and then click Find. The results will look like Figure 9.17. (Note that these files are located in multiple folders.)

Once you’ve built a search, you can save it by clicking the Save As Collection button in the lower-left portion of the Find window. This will save an actual search file that you can use for future searches. A cool thing to do is drag that file into Bridge’s Favorites column; then, all you need to do is click it to perform that search again.
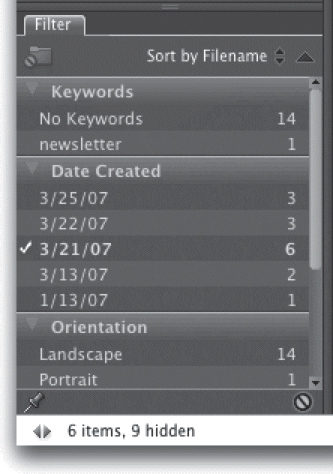
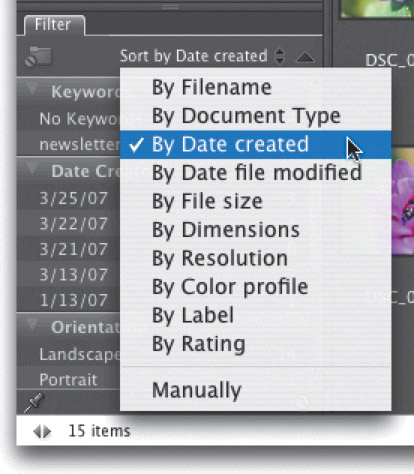
You can further refine and sort the search results using the Filter panel (Figure 9.18). By selecting various filter criteria (such as Date Created, Date Modified, Orientation, and Aspect Ratio), you can weed out undesirable search results. You can quickly sort the search results by choosing Sort Manually in the Filter panel title bar and selecting from the pop-up list (Figure 9.19).
Select all the files in the Search Results window and open the Batch Rename window (Tools > Batch Rename). In the Destination Folder area, select “Copy to other folder,” then click the Browse button and create a new folder on the Desktop called Flowers Redux. In the New Filenames area of the Batch Rename dialog box, first create the text element JuneNews-. Click the Plus button to create a new name element. Then use the pull-down menus to choose Sequence Number, 1, and Three Digits. Note that at the bottom of the window you can see a preview of the filenames; the preview should read JuneNews-001.jpg (Figure 9.20).

In the Options area, click “Preserve current filename in XMP Metadata” and select both Windows and Mac OS (whichever platform you’re currently using will be selected and grayed out). Click Rename, and you’re finished.
Mini Project 2: PDF Presentation
Imagine you want to quickly send a batch of photographs for your customer to review. You could send individual JPEGs, but that’s not very professional. Alternatively, you could build a custom slide show in Flash, but that takes a lot of time. Adobe Acrobat PDF files, on the other hand, make great slide shows, and you can build them right out of Bridge.
PDFs provide both great image compression and slide transitions. By using the PDF Presentation Photoshop script in Bridge, creating a slide show becomes a matter of a few painless clicks.
Some people like to start filenames with sequential numbers if the rest of the filenames will vary—that way, they stack up nicely in Folder view. Since the filenames for all your project files will be the same up to the sequential number, in this case it makes no difference.
In Bridge, select the photos you want to include (this works for almost any image file format). This selection process could follow the lines of that described in Mini Project 1 (searching, filtering, and sorting), or you could simply select a group of images by clicking or dragging. Unfortunately, you have to select individual images (rather than a folder) for this script.
Go to Tools > Photoshop > PDF Presentation, and you’ll see what must be the tallest Creative Suite dialog box (Figure 9.21). In the Source Files area at the top, you’ll see the files you selected in Bridge. (By the way, at this point Bridge has switched you to Photoshop.) You can select and drag files to reorder them, add more files by clicking the Browse button, and duplicate and remove files by clicking the appropriate buttons.
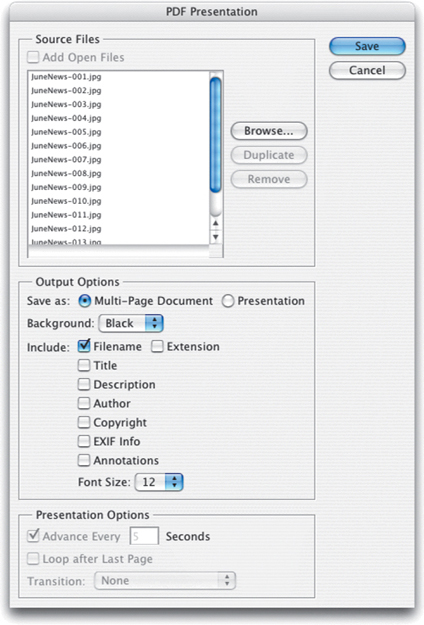
In the Output Options area, you can specify how you want the PDF document to be built. A Multi-Page Document is just that: a standard PDF with multiple pages that the user flips through manually. If you select the Presentation radio button, the PDF will open in Slide Show mode and use the slide transitions you’ve specified in the Presentation Options area of the dialog box.
You have three choices for background color and seven choices for the text that will appear below the file on its PDF page. If you selected the Presentation radio button, you can set additional options in the Presentation Options section at the bottom of the window.
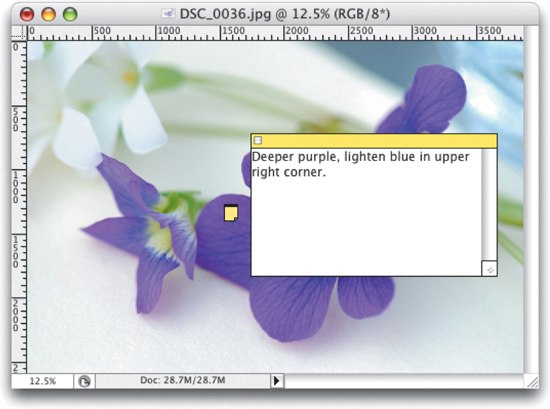
Project 3: Annotations
Photoshop annotations are like sticky notes that you can attach to an image as if you were sticking them to your monitor—except that annotations remain with their files (Figure 9.22). Another kind of annotation stores audio instead of written words. You can attach these nonprinting comments to a file for someone else to read or hear.
Photoshop can import annotations from PDF and FDF (Form Data Format) files—the latter of which store only annotations to PDFs (and the contents of PDF form fields, as you’ll see in the next chapter). You may wonder how annotations can be used for graphics automation and how it’s done. Production environments often use a handful of similar workflows that require a few standard communications. For instance, product shots might require reminders that the food law department needs to approve them, people shots might require notes to confirm that a model release has been obtained, and shots from a particular photographer might need annotations instructing someone else in the workflow to check them against certain production standards.
You could set up an automated system to attach a prewritten note to Photoshop files based on some characteristic, such as an element of the images’ metadata (like date created or creator); you could also use information from a database to determine which images needed a note. For this project, however, you’ll use the images’ filenames as the trigger to append a note. (Remember the tip in the metadata project about using filenames to convey information about files’ contents.) To do so, you’ll create a simple file-naming convention with four numbers. Each number identifies that file as requiring a certain prebuilt annotation to be imported or a voice annotation to be created. A file could have none, one, all, or a combination of the four. For the purposes of this project, let’s assume that a person examines each image and appends the appropriate number codes to the filename. You could devise a more automated and perhaps less error-prone method of renaming the files, but this project focuses on getting the annotations onto the images.
For our project, you’ll create three text annotations for import: Legal, Marketing, and Resolution. If a filename contains the numeral 1, the Legal annotation will be imported; if it contains the numeral 2, the Marketing annotation will be imported; if it contains the numeral 3, the Resolution annotation will be imported; and if it contains the numeral 4, an action will be triggered leading you to add a voice annotation explaining some special circumstances.
Photoshop cannot selectively import PDF or FDF annotations from a file—it must import all of them. This means that you must set up one annotation per PDF if you’re to import them individually.
Using Annotated Images in a Workflow
After you’ve used this kind of automation to append notes to an image, your next likely step will be to either send the image around for review or send it along to the next phase of production. To route this kind of annotated image for review, you could save the file in the Photoshop PDF format and send it via e-mail. Reviewers could then use Adobe Acrobat or the free Adobe Reader to review the document and make comments. Routing a PDF of your image for review probably means that you will need to go through a second round of importing comments into the original Photoshop image, and of course you have to maintain two files: the original Photoshop production file and the PDF.
For a reviewer to use the free Adobe Reader, you would need to first open the review file in Acrobat, then select Comments > Enable for Commenting in Adobe Reader, and save the file before distributing.
To use an annotated image in a production workflow, you could save the file as a Photoshop PSD file, which reviewers would open and review in Photoshop. One potential downside is that all reviewers have to own Photoshop, and the review file will be larger than a typical PDF. But this approach has the advantage of using just one file for both production and review.
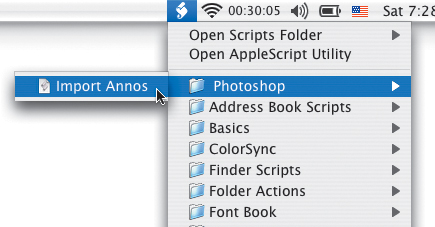
Triggering the Script
You can choose how and when to trigger the script that annotates the images. How you initiate the script depends on whether you want to annotate individual images as you work on them or batches of images. For individual images, you can use the AppleScript provided below. Copy the script to the Library > Scripts folder (and put it in its own folder, named something like Photoshop), then access it from the Mac’s script menu (Figure 9.23). You’ll first need to make sure the script menu is visible in the menu bar by opening AppleScript Utility and checking the “Show Script Menu in menu bar” check box (Figure 9.24). You could, of course, switch from Photoshop to the script editor of your choice and run it from there, but that’s not an elegant solution. Note that you cannot trigger an AppleScript (or a VBScript) from either Photoshop’s actions or its Script Events Manager.

You can further streamline this process by triggering the script from within Photoshop, if you download and install the JavaScript version (available from www.peachpit.com/apprentice). To do so, place the script in Photoshop’s Presets > Scripts folder to make it accessible from the File > Scripts menu. (You’ll need to restart Photoshop to get it to appear.) You can also set up a script event in Photoshop’s Script Events Manager (File > Scripts > Script Events Manager) so the JavaScript can be triggered by an event, such as a file being opened. Another excellent option is to trigger the JavaScript from a Photoshop action, which you can assign to a Function key. (For a refresher on how to assign Function keys to actions, see Chapter 3.)
If you want to run the script later on a batch of files, you can do so by using Photoshop’s Batch feature (File > Automate > Batch). As a hybrid approach, you could arrange to trigger the AppleScript whenever a new file is added to a particular folder, using the Mac’s Folder Actions (see the “Setting Up the Folder Action Wrapper” section of Project 1).
Building the Annotation Files
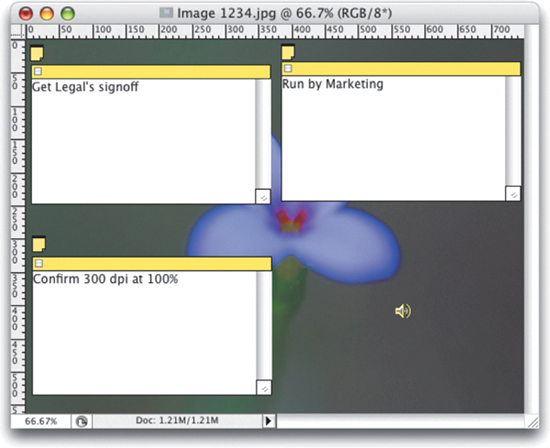
After being imported, annotations are placed in the same location as they were in their files of origin. Since there’s a chance that all three types of sticky note annotations could be imported (and the audio annotation has a icon position as well), it would be nice if they didn’t overlap. You will position the annotations as if the image were divided in quarters.
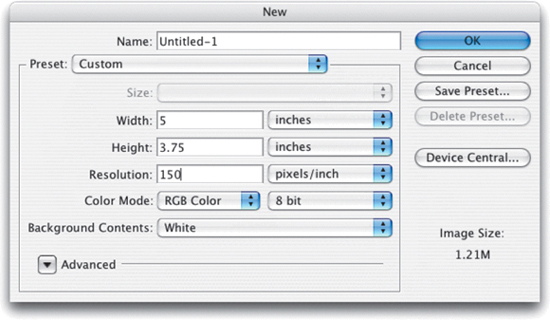
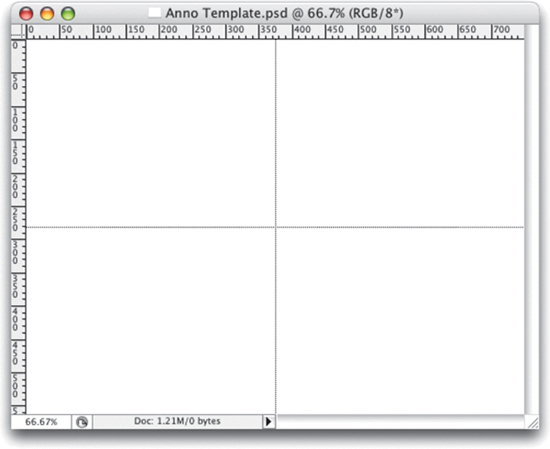
All the images you’ll be working with are 5 inches wide by 3.75 inches high at 150 dpi, so you’ll create a new document with those dimensions (Figure 9.25). You’ll drag two guidelines out to make it easier to see the quadrants and save the file as Anno Template.psd (Figure 9.26). This is the template you’ll use to create the three annotation files.
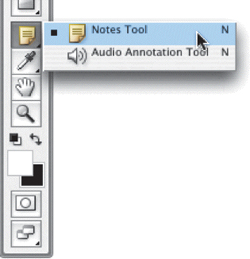
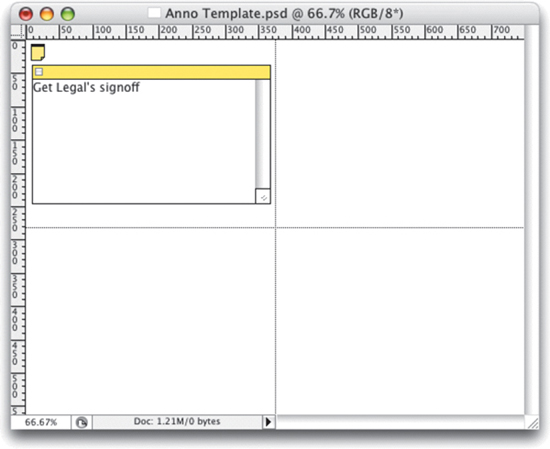
Using the Notes tool, click in the top-left quadrant (Figure 9.27). A sticky note will appear; type Get Legal’s signoff in it (Figure 9.28). Save this file as a Photoshop PDF named LegalAnno.pdf and put it in a new folder on the Desktop named The Four Annos.
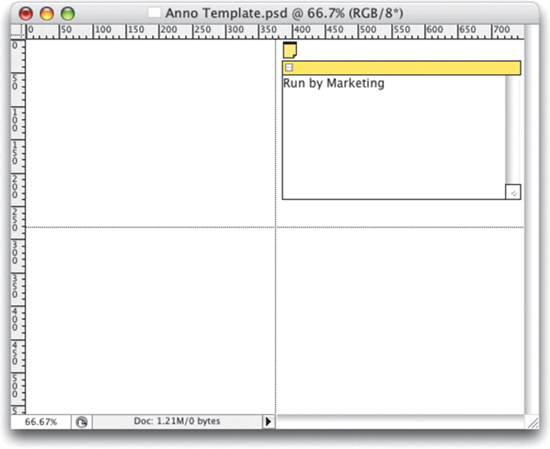
Open the Anno Template.psd file again (remember, it contains no annotations) and with the Notes tool, click in the upper-right quadrant. Type Run by Marketing in the resulting sticky note (Figure 9.29). Save the file as MarketAnno.pdf in the same folder as the first one.
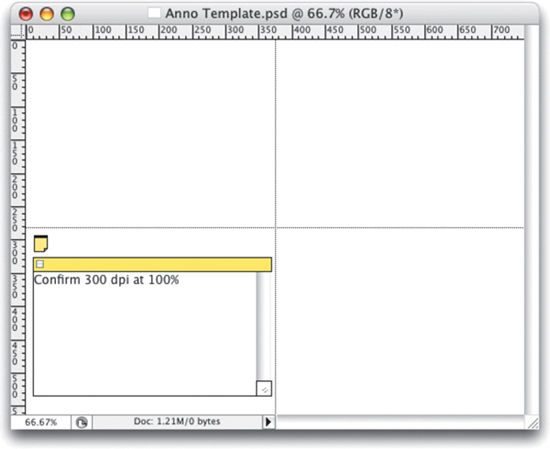
Open the Anno Template.psd file again and add an annotation in the lower-left quadrant that reads Confirm 300 dpi at 100%, and save it as dpiAnno.pdf (Figure 9.30).
Building the Audio Annotation Action
The action you are about to build will add an audio annotation icon in the lower-right quadrant of the file. It will then prompt the user to record a voice annotation—handy when a file includes peculiar issues best explained with a voice message.
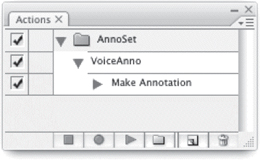
Open the Anno Template.psd file, create an action set (Actions panel menu > New Set), and name it AnnoSet. Create a new action, name it VoiceAnno, and click Record. Make sure you have a microphone plugged into your computer’s audio-in port.
With the Voice Annotation tool, click in the center of the lower-right quadrant of the file (it will add only a speaker icon); an Audio Annotation dialog box will appear (Figure 9.31). Click the Start button, record your message into the microphone, and when you’re finished, click Stop. Now, click the Stop Recording button (the small square) at the bottom of the Actions panel to finish the action (Figure 9.32). This action will be triggered if the filename contains the numeral 4.

Writing the Script
Writing this AppleScript is going to be easy. Take a look at the entire script below before proceeding:
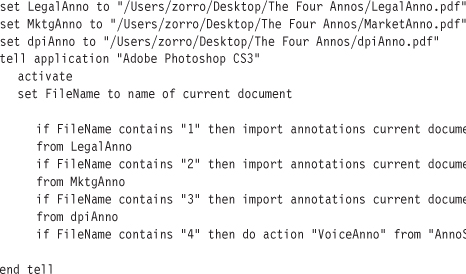
The first three lines of the script (all of which start with the word set) assign the path to the annotation files to the variables. The tell application line indicates that Photoshop will execute the following lines. The activate line makes Photoshop the active application (bringing it to the front). And the set FileName line assigns the name of the current document (whichever file is open in Photoshop and frontmost) to the variable FileName.
Now that the FileName variable stands for a particular file, you can “ask” that file if it contains any of the four numbers—and the next four lines do just that. For the first three of these lines, if the answer is yes, the annotation will be imported from the respective annotation PDF files. If it contains the numeral 4, the VoiceAnno action will be triggered and the user will be prompted to record a voice annotation.
Create a few test files with various combinations of the four digits in their filenames and run them through the script (Figure 9.33).