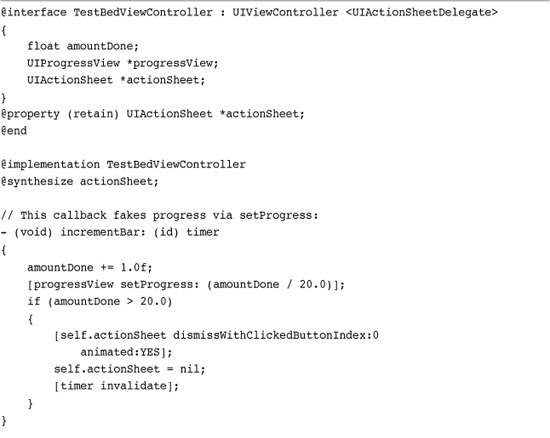
10. Alerting Users
At times, you need to grab your user’s attention. New messages might arrive or the system status might change. You might want to tell your user that there’s going to be a wait before anything more happens—or that the wait is over and it’s time to come back and pay attention. The iPhone offers many ways to provide that heads-up to the user: from alerts and progress bars to audio pings. In this chapter, you discover how to build these indications into your applications and expand your user-alert vocabulary. You see real-life examples that showcase these classes and discover how to make sure your user pays attention at the right time.
Talking Directly to Your User Through Alerts
Alerts speak to your user. Members of the UIAlertView and UIActionSheet classes pop up or scroll in above other views to deliver their messages. These lightweight classes add two-way dialog to your apps. Alerts visually “speak” to users and can prompt them to reply. You present your alert onscreen, get user acknowledgment, and then dismiss the alert to move on with other tasks.
If you think that alerts are nothing more than messages with an attached OK button, think again. Alert objects provide incredible versatility. With alert sheets, you can actually build menus, text input, queries, and more. In this chapter’s recipes, you see how to create a wide range of useful alerts that you can use in your own programs.
Building Simple Alerts
To create alert sheets, allocate a UIAlertView object. Initialize it with a title and a button array. The title is an NSString, and the button array includes NSStrings, where each string represents a single button that should be shown.
The method snippet shown here creates and displays the simplest alert scenario. It shows a message with a single OK button. The alert is autoreleased, avoiding any requirements for a delegate and callbacks. When you use non-autorelease alerts, make sure a delegate takes responsibility for releasing the alert after a user taps a button.
To add more buttons, introduce them as parameters to otherButtonTitles:. Make sure you end your list of buttons with nil. This argument takes an arbitrary number of parameters. Adding nil tells the method where your list finishes.
The following snippet creates an alert with three buttons (Cancel, Option, and OK). Since this code does not declare a delegate, there’s no way to recover the alert and determine which of the three buttons was pushed. The alert displays until a user tap and then it automatically dismisses without any further effect.
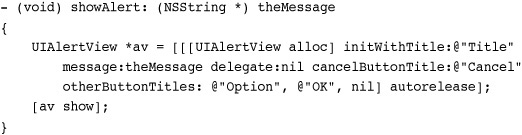
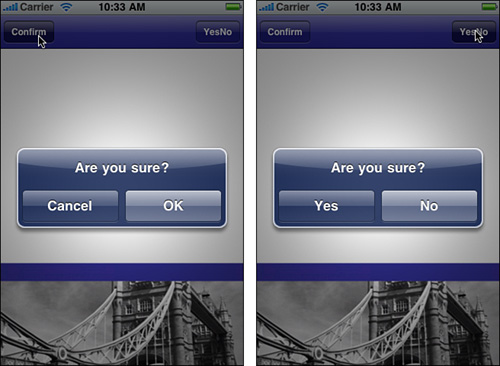
When working with alerts, space is often at a premium. Adding more than two buttons causes the alert to display in multiline mode. Figure 10-1 shows a pair of alerts depicting both two-button (side-by-side display) and three-button (line-by-line display) presentations. Limit the number of alert buttons you add at any time to no more than three or four. Fewer buttons work better; one or two is ideal. If you need to use more buttons, consider using action sheet objects, which are discussed later in this chapter, rather than alert views.
Figure 10-1 Alerts work best with one or two buttons (left). Alerts with more than two buttons stack the buttons as a list, producing a less elegant presentation (right).
UIAlertView objects provide no visual “default” button highlights. The only highlighting is for the Cancel button, as you can see in Figure 10-1. As a rule, Cancel buttons appear at the bottom or left of alerts.
Alert Delegates
Alerts use delegates to recover user choices. Unless you have some compelling reason to do otherwise, set the delegate to your primary (active) UIViewController object. The delegate implements the UIAlertViewDelegate protocol. UIAlertView instances require this delegate support to respond to button taps, at a minimum.
Delegate methods enable you to customize your responses when different buttons are pressed. As you’ve already seen, you can omit that delegate support if all you need to do is show some message with an OK button.
After the user has seen and interacted with your alert, they raise the following delegate method call: alertView:clickedButtonAtIndex:. This call indicates which button was pressed with its second argument. Button numbering begins with zero. The Cancel button, when defined, is always button 0. Even though it appears at the left in some views and the bottom at others, its button numbering remains the same. This is not true for action sheet objects, which are discussed later in this chapter.
Here is a simple example of an alert presentation and callback, which prints out the selected button number to the debugging console:
When working with many alerts at once, tag your objects. Tags help you identify which alert produced a given callback. Unlike controls that use target-action pairs, all alerts trigger the same methods. Adding an alert-tag-based switch statement lets you differentiate your responses to each alert.
Note
Notice that this snippet does not use an autorelease alert. The object is released in the callback.
Displaying the Alert
As you’ve seen, the show method is used to tell your alert to appear onscreen. When shown, the alert works in a modal fashion. That is, it dims the screen behind it and blocks user interaction with your application behind the modal window. This modal interaction continues until your user acknowledges the alert through a button tap, typically by selecting OK or Cancel.
After creating the alert sheet, you may customize the alert by updating its message property. That’s the optional text that appears below the alert title and above its buttons. As you see in recipes later in this chapter, you can also change the alert’s frame and add subviews.
Alert Classes
In early releases of the iPhone firmware, UIActionSheet and UIAlertView were implemented by the same class, UIAlertView. This one class provided both pop-up alert and menu functionality. Then Apple replaced alert sheets with UIModalView and subclassed these new objects from that base class.
Later, Apple removed UIModalView, and in new versions of the SDK, UIActionSheet and UIAlertView are no longer derived from that class. (They both descend from UIView.) Like their predecessors, they remain siblings in their behavior and use similar underlying technology to present themselves onscreen.
This history presents an important lesson. Although Apple stands behind its APIs and published methods, you cannot depend on the underlying classes to remain stable. The iPhone is a rapidly evolving platform.
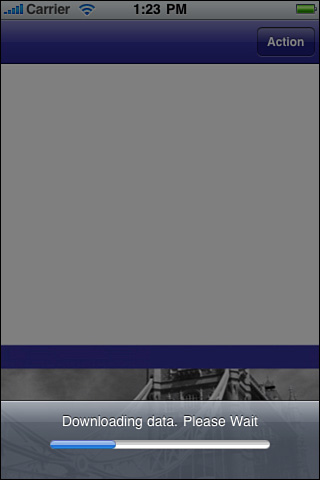
Recipe: No-Button Alerts
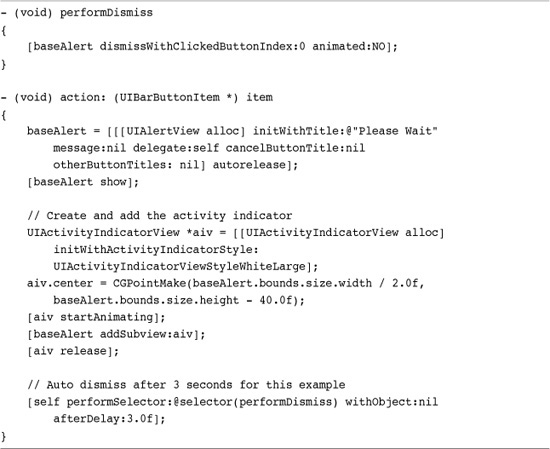
When you want to display an asynchronous message without involving user interaction, you can create a UIAlertView instance without buttons. You can build this alert and show it just as you would a normal buttoned version. No-button alerts provide an excellent way to throw up a “Please Wait” message, as shown in Figure 10-2.
Figure 10-2 Removing buttons from an alert lets you create heads-up displays about ongoing actions.
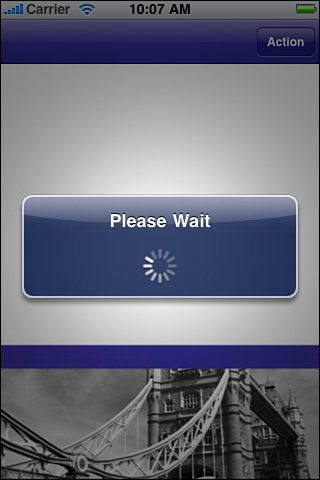
No-button alerts present a special challenge because they do not properly call back to a delegate method. They do not autodismiss, even when tapped. Instead, you must manually dismiss the alert when you are done displaying it. Call dismissWithClickedButtonIndex:animated: to do so.
Recipe 10-1 adds a UIActivityIndicator instance below the alert title. This creates the progress wheel you see at the bottom of the alert in Figure 10-2. This provides visual feedback to the user that some activity or process is ongoing that prevents user interaction. In Recipe 10-1 that “activity” is simply a three-second wait. In real applications, you’d use this kind of alert more meaningfully.
Recipe 10-1 Displaying and Dismissing a No-Button Alert
Get This Recipe’s Code
To get the code used for this recipe, go to http://github.com/erica/iphone-3.0-cookbook-, or if you’ve downloaded the disk image containing all of the sample code from the book, go to the folder for Chapter 10 and open the project for this recipe.
Once an alert is created, it works like any other view and you can add subviews and otherwise update its look. Unfortunately, Interface Builder does not offer alert views in its library so all customization must be done in code, as shown here. Recipe 10-1 builds the subview and adds it to the alert after first presenting the alert with show. Showing the alert allows it to build a real onscreen view that you can modify and customize.
Be aware that alerts display in a separate window. The view is not part of your main window’s hierarchy. Another thing to note is that removing buttons can create an imbalance in the overall presentation geometry. The space that the buttons normally occupy does not go away. In Recipe 10-1, that space is used for the activity indicator. When just using text, adding a carriage return (@"
") to the start of your message helps balance the bottom where buttons normally go with the spacing at the top.
Recipe: Creating Modal Alerts with Run Loops
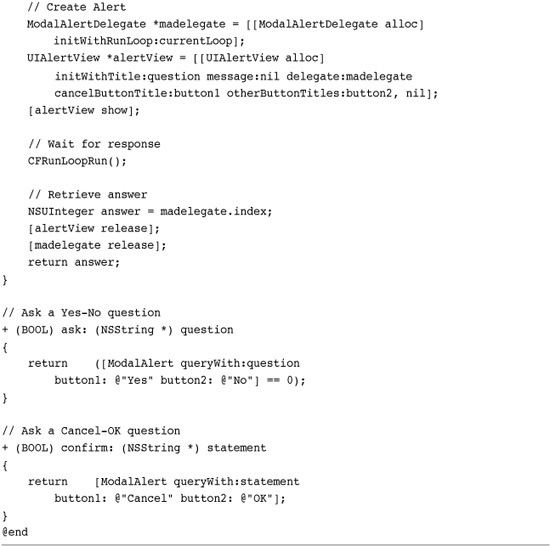
The indirect nature of the alert, namely its delegate callback approach, can produce unnecessarily complex code. It’s relatively easy to build a custom class that directly returns a button choice value. Consider the following code. It requests an answer from the alert shown in Figure 10-3 (left) and then uses the answer that the class method returns.
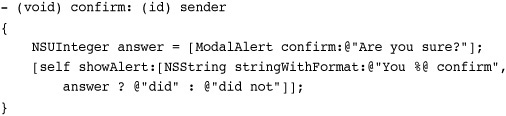
Figure 10-3 These modal alerts return immediate answers because they are built using their own run loops.
To create an alert that returns an immediate result requires a bit of ingenuity. The ModalAlert class in Recipe 10-2 introduces a second run loop. It creates the alert as you’d normally do but after presentation, the code calls CFRunLoopRun(). This makes the method sit and wait until the user finishes interacting with the alert. The method goes no further as the run loop runs.
Recipe 10-2 Creating Alerts That Return Immediate Results

Get This Recipe’s Code
To get the code used for this recipe, go to http://github.com/erica/iphone-3.0-cookbook-, or if you’ve downloaded the disk image containing all of the sample code from the book, go to the folder for Chapter 10 and open the project for this recipe.
It’s up to the custom modal alert delegate class (ModalAlertDelegate) to cancel that run loop on a button click and return the value of the selected item. When the user finishes interacting, the calling method can finally proceed past the run loop.
This ModalAlert class offers two class methods that display the Cancel/OK and Yes/No styles shown in Figure 10-3. These return either 0 or 1, or 1 and 0, respectively. (Cancel and No are the 0-value choices.)
This recipe could easily be generalized for other button counts and titles. When you’re unsure of how many buttons you need to work with, it helps to pass an array to custom classes. The UIAlertView addButtonWithTitle: method lets you avoid the variadic declaration (that is, the initialization call that uses a series of arguments separated by commas and that ends with a nil argument) to add buttons from an array, for example:
Be aware that while you can run one alert after another using this method that sometimes the calls may crowd each other. Leave enough time for the previous alert to disappear before presenting the next. Should an alert fail to show onscreen, it’s probably due to this overlap issue. In such a case, use a delayed selector to call the next alert request. A tenth of a second offers plenty of time to allow the new alert to show.
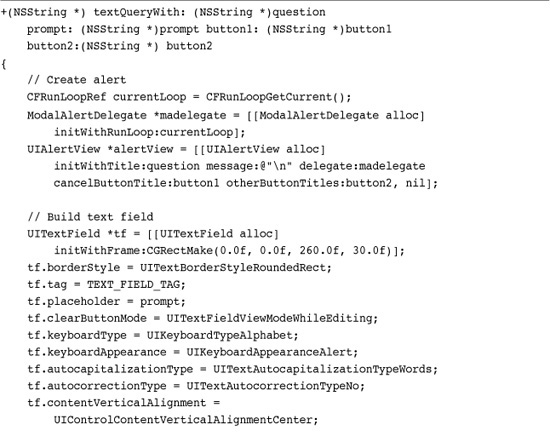
Recipe: Soliciting Text Input from the User
Alert views provide an especially simple way to prompt your user for text. Instances take hold of the screen, focusing the user on providing an answer before moving forward with those results. As with Recipe 10-2, it helps to retrieve an answer directly without having to deal with delegate callbacks. For example, the following code snippet requests the user’s name and then uses that string immediately.
To make this happen you can use the same run loop approach and the same ModalAlert and ModalAlertDelegate classes from Recipe 10-2 with a few slight alterations.
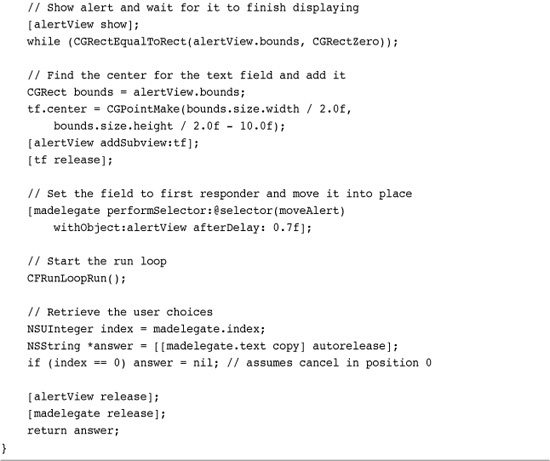
Recipe 10-3 builds an alert, adds a text field to it, and displays it. Unfortunately, the normal onscreen alert position precludes using a keyboard with that text field. The keyboard would partially block the alert. You can work around this issue by moving the alert into place to allow the keyboard to appear beneath it.
Recipe 10-3 Building a Modal Text Query Alert
Get This Recipe’s Code
To get the code used for this recipe, go to http://github.com/erica/iphone-3.0-cookbook-, or if you’ve downloaded the disk image containing all of the sample code from the book, go to the folder for Chapter 10 and open the project for this recipe.
This method animates the text field above the space normally occupied by the keyboard so the keyboard will not block it. This approach uses hard-coded values for the alert center. A better approach would query the keyboard for its bounds to calculate how much to move.
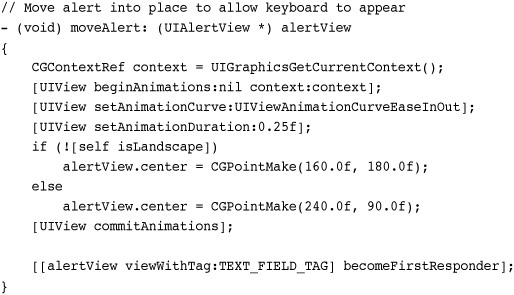
The preceding code, which is called from Recipe 10-3, animates the alert out of the way and sets the text field as first responder. Doing so calls out the keyboard, showing both the alert and keyboard at once, as shown in Figure 10-4.
Figure 10-4 Using careful space management and omitting the title and body text, you can add several text entry fields to a UIAlertView at once. You probably want to limit your UIAlertViews to one or two text fields.
Note
A console message regarding “wait_fences: failed to receive reply” usually indicates that a child view is rendered before its parent. You can avoid this message by removing custom views from an alert in the alertView:clickedButtonAtIndex: method.
Recipe: Using Variadic Arguments with Alert Views
Methods that can take a variable number of arguments are called variadic. They are declared using ellipses after the last parameter. Both NSLog and printf are variadic. You can supply them with a format string along with any number of arguments.
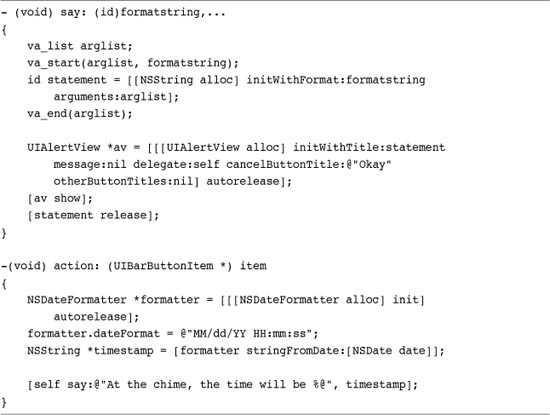
Since most alerts center on text, it’s handy to build methods that create alerts using format strings. Recipe 10-4 creates the say: method that collects the arguments passed to it and builds a string with them. The string is then passed to an autoreleased alert view, providing a handy instant display.
Recipe 10-4 Using a Variadic Method for UIAlertView Creation
Get This Recipe’s Code
To get the code used for this recipe, go to http://github.com/erica/iphone-3.0-cookbook-, or if you’ve downloaded the disk image containing all of the sample code from the book, go to the folder for Chapter 10 and open the project for this recipe.
The say: method does not parse or otherwise analyze its parameters. Instead, it grabs the first argument, uses that as the format string, and passes the remaining items to the NSString initWithFormat:arguments: method. This builds a string, which is then passed to a one-button alert view as its title.
Defining your own utility methods with variadic arguments lets you skip several steps where you have to build a string with a format and then call a method. With say: you can combine this into a single call, as follows:
[self say:@"I am so happy to meet you, %@", yourName];
Note
You must import <stdarg.h> to use the variadic argument calls shown in Recipe 10-4.
Recipe: Presenting Simple Menus
When it comes to menus, UIActionSheet instances supply the iPhone answer. They slide choices, basically a list of buttons representing possible actions, onto the screen and wait for the user to respond. Action sheets are different from pop-ups. Pop-ups stand apart from the interface and are better used for demanding attention. Menus slide into a view and better integrate with ongoing application work. Cocoa Touch supplies two ways to present menus:
• showInView—Presenting your sheet in a view is pretty much the ideal way to use menus and is the method used here. This method slides the menu up from the exact bottom of the view (see Figure 10-5).
Figure 10-5 Use showInView: to create simple menu presentations. The menu slides in from the bottom of the view. Although the Delete File menu button appears gray here (left), it is red on your iPhone and indicates permanent actions with possible negative consequences to your users. Adding many menu items produces the scrolling list on the right.

• showFromToolBar: and showFromTabBar—When working with toolbars, tab bars, or any other kinds of bars that provide those horizontally grouped buttons that you see at the bottom of many applications, these methods align the menu with the top of the bar and slide it out exactly where it should be.
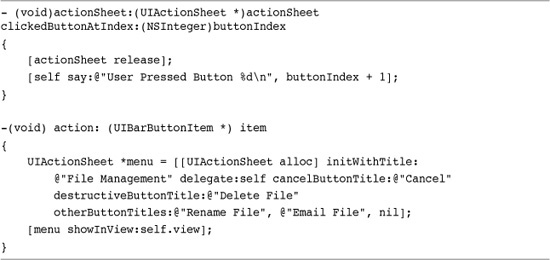
Recipe 10-5 shows how to initialize and present a simple UIActionSheet instance. Its initialization method introduces a concept missing from UIAlertView: the destructive button. Colored in red, a destructive button indicates an action from which there is no return, such as permanently deleting a file (see Figure 10-5). Its bright red color warns the user about the choice. Use this option sparingly.
Recipe 10-5 Displaying Simple Menus
Get This Recipe’s Code
To get the code used for this recipe, go to http://github.com/erica/iphone-3.0-cookbook-, or if you’ve downloaded the disk image containing all of the sample code from the book, go to the folder for Chapter 10 and open the project for this recipe.
Action sheet values are returned in button order. In the Figure 10-5 example, the Delete button is number 0 and the Cancel button is number 3. This behavior contradicts alert view values, where the Cancel button returns 0.
Scrolling Menus
As a rough rule of thumb, you can fit a maximum of about seven buttons (including Cancel) into a portrait orientation and about four buttons into landscape. Going beyond this number in iPhone OS 3.0 and later triggers the scrolling presentation shown in Figure 10-5 (right). Notice that the Cancel button is presented below the list. Its numbering remains consistent with shorter menu presentations. The Cancel button is always numbered after any previous buttons. As Figure 10-5 demonstrates, this presentation falls low on the aesthetics scale and should be avoided where possible.
Note
You can use the same second run loop approach shown in Recipe 10-2 to retrieve results with action sheets as you can with alert views.
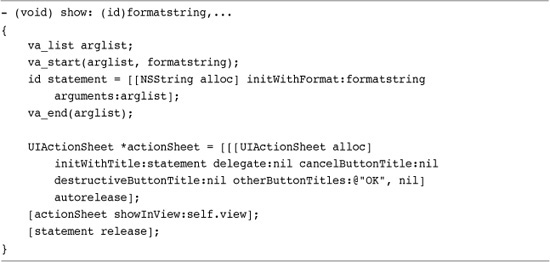
Recipe: Displaying Text in Action Sheets
Action sheets offer many of the same text presentation features as alert views, but they do so with a much bigger canvas. Recipe 10-6 demonstrates how to display a text message using a UIActionSheet object. This code builds off Recipe 10-4 but adapts that method to an action sheet presentation.
Recipe 10-6 Presenting Text in Action Sheets
Get This Recipe’s Code
To get the code used for this recipe, go to http://github.com/erica/iphone-3.0-cookbook-, or if you’ve downloaded the disk image containing all of the sample code from the book, go to the folder for Chapter 10 and open the project for this recipe.
“Please Wait”: Showing Progress to Your User
Waiting is an intrinsic part of the computing experience and will remain so for the foreseeable future. It’s your job as a developer to communicate that fact to your users. Cocoa Touch provides classes that tell your user to wait for a process to complete. These progress indicators come in two forms: as a spinning wheel that persists for the duration of its presentation and as a bar that fills from left to right as your process moves forward from start to end. The classes that provide these indications are as follows:
• UIActivityIndicatorView—A progress indicator offers a spinning circle that tells your user to wait without providing specific information about its degree of completion. The iPhone activity indicator is small, but its live animation catches the user’s eye and is best suited for quick disruptions in a normal application. Recipe 10-1 showed a simple alert that embedded an activity indicator.
• UIProgressView—This view presents a progress bar. The bar provides concrete feedback as to how much work has been done and how much remains while occupying a relatively small onscreen space. It presents as a thin, horizontal rectangle that fills itself from left to right as progress takes place. This classic user interface element works best for long delays, where users want to know to what degree the job has finished.
Be aware of blocking. Both of these classes must be used on your main thread, as is the rule with GUI objects. Computationally heavy code can keep views from displaying in real time. Should you need to display asynchronous feedback, use threading. The edge-detection discussed in Recipe 7-11 in Chapter 7, “Working with Images,” provides a good example. It uses a UIActivityIndicatorView on the main thread and performs its computation on a second thread.
Using UIActivityIndicatorView
UIActivityIndicatorView instances offer lightweight views that display a standard rotating progress wheel, as shown previously in Figure 10-2. The keyword to keep in mind when working with these views is small. All activity indicators are tiny and do not look right when zoomed past their natural size.
The iPhone offers several different styles of the UIActivityIndicatorView class. UIActivityIndicatorViewStyleWhite and UIActivityIndicatorViewStyleGray are 20×20 pixels in size. The white version looks best against a black background, and the gray looks best against white. It’s a thin, sharp style.
Take care when choosing whether to use white or gray. An all-white presentation does not show at all against a white backdrop. Unfortunately, UIActivityIndicatorViewStyleWhiteLarge is available only for use on dark backgrounds. It provides the largest, clearest indicator at 37×37 pixels in size.

You need not center indicators on the screen. Place them wherever they work best for you. As a clear-backed view, the indicator blends over whatever backdrop view lies behind it. The predominant color of that backdrop helps select which style of indicator to use.
For general use, just add the activity indicator as a subview to the window, view, toolbar, or navigation bar you want to overlay as shown previously in Recipe 10-1. Allocate the indicator and initialize it with a frame, preferably centered within whatever parent view you’re using.
Start the indicator in action by sending startAnimating. To stop, call stopAnimating. Cocoa Touch takes care of the rest, hiding the view when not in use.
Recipe: Building a UIProgressView
Progress views enable your users to follow task progress as it happens rather than just saying “Please wait.” They present bars that fill from left to right. The bars indicate the degree to which a task has finished. Progress bars work best for long waits where providing state feedback enables your users to retain the feel of control.
To create a progress view, allocate it and set its frame. To use the bar, issue setProgress:. This takes one argument, a floating-point number that ranges between 0.0 (no progress) and 1.0 (finished). Progress view bars come in two styles: basic white or light gray. The setStyle: method chooses the kind you prefer, either UIProgressViewStyleDefault or UIProgressViewStyleBar.
Unlike the other kinds of progress indicators, it’s completely up to you to show and hide the progress bar’s view. There’s no setVisible: method. Adding progress bars to action sheets simplifies both bringing them onto the screen and dismissing them. Another advantage is that when alert sheets display, the rest of the screen dims. This forces a modal presentation as your task progresses. Users cannot interact with the GUI until you dismiss the alert. Recipe 10-7 shows a UIActionSheet/UIProgressView sample that produces the display shown in Figure 10-6. Several line feeds in the action sheet’s title keep the progress bar from obscuring the title text.
Figure 10-6 Use UIProgressView instances to track progress over an extended delay. Adding them to a UIActionSheet simplifies their presentation and dismissal.
Recipe 10-7 Presenting Progress on an Action Sheet
Get This Recipe’s Code
To get the code used for this recipe, go to http://github.com/erica/iphone-3.0-cookbook-, or if you’ve downloaded the disk image containing all of the sample code from the book, go to the folder for Chapter 10 and open the project for this recipe.
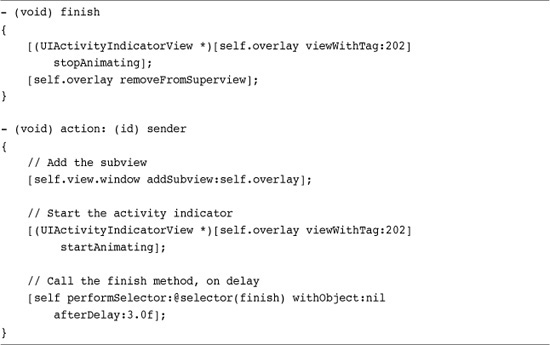
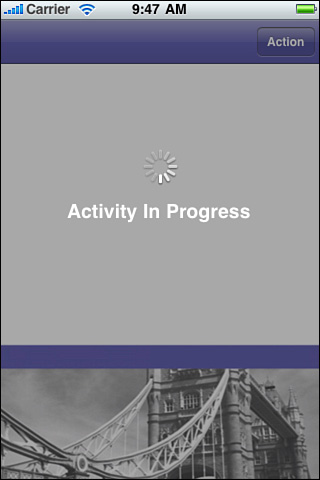
Recipe: Building Custom Overlays
Although UIAlertView and UIActionSheet provide excellent modal progress indicators, you can also roll your own completely from scratch. Recipe 10-8 uses a simple tinted UIView overlay with a UIActivityIndicatorView to present the modal “in-progress” feedback shown in Figure 10-7.
Recipe 10-8 Presenting and Hiding a Custom Alert Overlay
Get This Recipe’s Code
To get the code used for this recipe, go to http://github.com/erica/iphone-3.0-cookbook-, or if you’ve downloaded the disk image containing all of the sample code from the book, go to the folder for Chapter 10 and open the project for this recipe.
Figure 10-7 Custom views provide handy modal alerts without using prebuilt Apple classes.
This view was laid out in Interface Builder and connected to a custom class property called overlay. The view occupies the entire screen size so no simulated screen elements were enabled. Using the entire screen lets the overlay fit over the navigation bar. That’s because the overlay view must be added to the application window and not, as you might think, to the main UIViewController’s view. That view only occupies the space under the navigation bar, allowing access to any buttons and other control items in the bar.
To restrict any user touches with the screen, the overlay sets its userInteractionEnabled property to YES. This catches any touch events, preventing them from reaching the normal GUI below the alert, creating a modal presentation where interaction cannot continue until the alert has finished.
This example uses a portrait-only presentation. As the view does not belong to a view controller, it cannot and will not update itself during iPhone orientation changes. If you need to work with a landscape/portrait aware system, you can catch that value before showing the overlay as demonstrated in the upcoming Recipe 10-10.
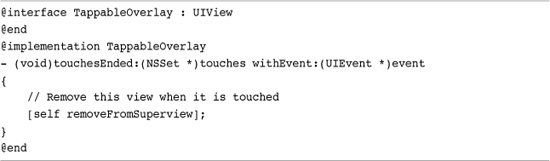
Recipe: Tappable Overlays
Use custom overlays to present information as well as to establish modal sequences. Recipe 10-9 creates a custom class called TappableOverlay. When tapped, this view removes itself from the screen. This behavior makes it particularly suitable for showing information in a way normally reserved for the UIAlertView class.
Recipe 10-9 Building a Custom Dismissible Alert View That Responds to User Taps
Get This Recipe’s Code
To get the code used for this recipe, go to http://github.com/erica/iphone-3.0-cookbook-, or if you’ve downloaded the disk image containing all of the sample code from the book, go to the folder for Chapter 10 and open the project for this recipe.
To use this class, create a view instance in Interface Builder. Add as many subviews and design elements as needed. Use File > Read Class Files to import the TappableOverlay.h header file. Then change the view class from UIView to TappableOverlay using the Identity Inspector (Command-4) and save the project.
To present the view, add it to the window just as Recipe 10-8 did.
No further programming is needed. The view waits for a user tap and when one is received, it removes itself from the window.
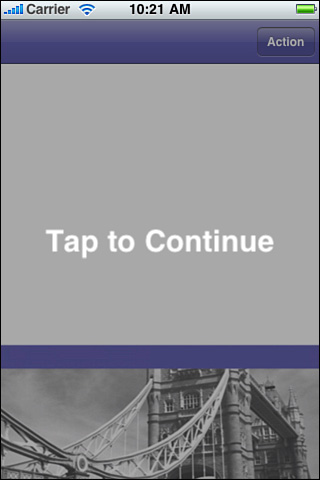
Figure 10-8 shows a simple example of this kind of overlay; it displays “Tap to Continue.” It’s easy to see how you can extend this concept to show any kind of pertinent information, creating a custom alternative to the UIAlertView class. As with Recipe 10-8, this example does not use any orientation awareness.
Figure 10-8 This simple overlay dismisses itself on receiving a user touch.
Recipe: Orientable Scroll-Down Alerts
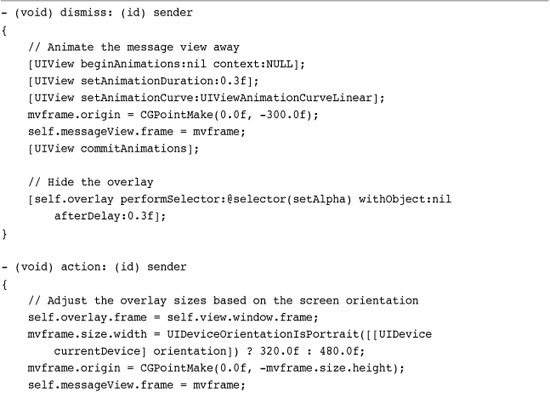
You can extend the modal concepts introduced in Recipe 10-8 to create a noninteractive overlay that acts as a backdrop for a scroll-down alert. In Recipe 10-10, that overlay hosts a view with an embedded button as shown in Figure 10-9. This view is presented and dismissed via a pair of simple UIView animation blocks; the OKAY button triggers the dismiss: method that scrolls the view offscreen.
Recipe 10-10 Creating an Orientable Scroll-Down Overlay
Get This Recipe’s Code
To get the code used for this recipe, go to http://github.com/erica/iphone-3.0-cookbook-, or if you’ve downloaded the disk image containing all of the sample code from the book, go to the folder for Chapter 10 and open the project for this recipe.
Figure 10-9 This modally presented message scrolls down into view and is dismissed by tapping the OKAY button.
The message view was created in Interface Builder as a standard UIView. It’s added to the overlay as a subview in the viewDidLoad method. Rather than adding and removing the overlay from the main window, as Recipe 10-8 did, this recipe uses the overlay’s alpha property to hide and show itself.
Unlike the previous two recipes, this recipe does pay attention to screen orientation. It adapts its size and presentation to match the current iPhone orientation. It accomplishes this in two ways. First, it applies an affine transform to the overlay when the orientation changes. Second, it adjusts the overlay and message view frames before presentation, matching the shape of the current window.
Although this example scrolls in from the top of the screen, it’s trivial to adapt the math to have it scroll in from the sides (use the x origin rather than the y origin) or bottom (add 320 or 480 to the view height). Alternatively, you might center the view and animate its size so that it pops rather than slides into view.
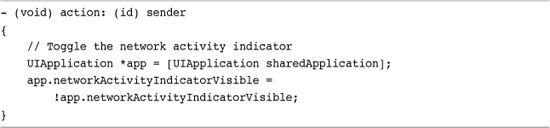
Recipe: Using the Network Activity Indicator
When your application accesses the Internet from behind the scenes, it’s polite to let your user know what’s going on. Rather than create a full-screen alert, Cocoa Touch provides a simple application property that controls a spinning network activity indicator in the status bar. Figure 10-10 shows this indicator in action, to the right of the WiFi indicator and to the left of the current time display.
Figure 10-10 The network activity indicator is controlled by a UIApplication property.
Recipe 10-11 demonstrates how to access this property, doing little more than toggling the indicator on or off. In real-world use, you’ll likely perform your network activities on a secondary thread. Make sure you perform this property change on the main thread so the GUI can properly update itself.
Recipe 10-11 Accessing the Status Bar’s Network Activity Indicator
Get This Recipe’s Code
To get the code used for this recipe, go to http://github.com/erica/iphone-3.0-cookbook-, or if you’ve downloaded the disk image containing all of the sample code from the book, go to the folder for Chapter 10 and open the project for this recipe.
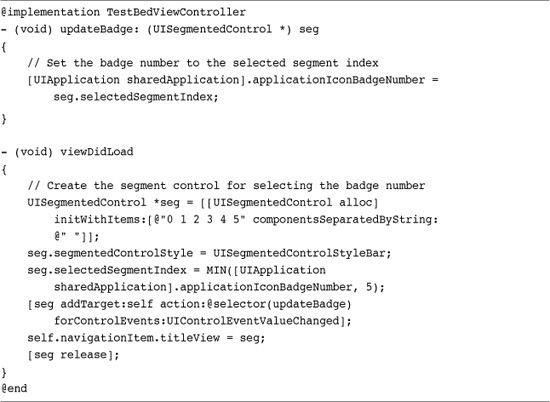
Recipe: Badging Applications
If you’ve used the iPhone or iPod touch for any time, you’ve likely seen the small, red badges that appear over applications on the home screen. These might indicate the number of missed phone calls or unread e-mails that have accumulated since the user last opened Phone or Mail.
To set an application badge from within the program itself, set the applicationIconBadgeNumber property to an integer. To hide badges, set applicationIconBadgeNumber to 0 (the number zero). Recipe 10-12 demonstrates how to read and set an application badge. It matches the value of its segmented control to the most recently used badge number. When users change the segmented control setting, it updates the badge accordingly. Figure 10-11 shows this in action, displaying the interface within the application and the badge number it generates.
Figure 10-11 The segmented control in Recipe 10-12 updates the application badge number.

Recipe 10-12 Reading and Updating Application Badges
Get This Recipe’s Code
To get the code used for this recipe, go to http://github.com/erica/iphone-3.0-cookbook-, or if you’ve downloaded the disk image containing all of the sample code from the book, go to the folder for Chapter 10 and open the project for this recipe.
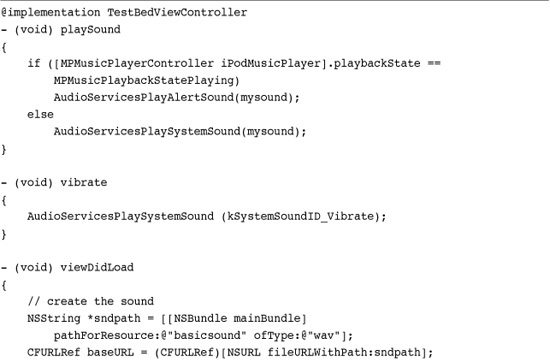
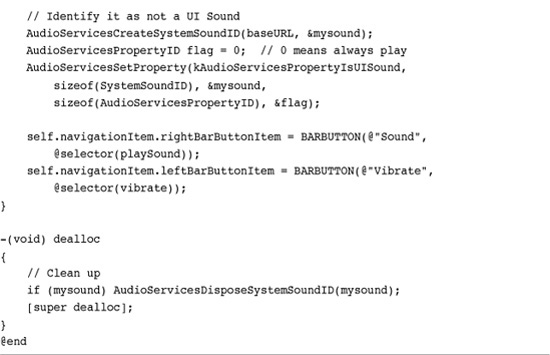
Recipe: Simple Audio Alerts
Audio alerts “speak” directly to your users. They produce instant feedback—assuming users are not hearing impaired. Fortunately, Apple built basic sound playback into the Cocoa Touch SDK through System Audio services. This works very much like system audio on a Macintosh.
The alternatives include using Audio Queue calls or AVAudioPlayer. Audio Queue playback is expensive to program and involves much more complexity than simple alert sounds need. In contrast, you can load and play system audio with just a few lines of code. AVAudioPlayer also has its drawbacks. It interferes with iPod audio. In contrast, System Audio can perform a sound without interrupting any music that’s currently playing, although that may admittedly not be the result you’re looking for, as alerts can get lost in the music.
Alert sounds work best when kept short, preferably 30 seconds or shorter according to Apple. System Audio plays PCM and IMA audio only. That means limiting your sounds to AIFF, WAV, and CAF formats.
System Sounds
To build a system sound, call AudioServicesCreateSystemSoundID with a file URL pointing to the sound file. This call returns an initialized system sound object, which you can then play at will. Just call AudioServicesPlaySystemSound with the sound object. That single call does all the work.
AudioServicesPlaySystemSound(mySound);
The default implementation of system sounds allows them to be controlled by the Sound Effects preference in Settings. When effects are disabled, the sound will not play. To override this preference and always play the sound, you can set a property flag as such.

When iPod audio is playing, the system sound generally plays back at the same volume, so users may miss your alert. Consider using vibration in addition to or in place of music. You can check the current playback state by testing as follows. Make sure you include <MediaPlayer/MediaPlayer.h> and link to the MediaPlayer framework.
![]()
Add an optional system sound completion callback to notify your program when a sound finishes playing by calling AudioServicesAddSystemSoundCompletion. Unless you use short sounds that are chained one after another, this is a step you can generally skip.
Clean up your sounds by calling AudioServicesDisposeSystemSoundID with the sound in question. This frees the sound object and all its associated resources.
Note
To use these system sound services, make sure to include AudioToolbox/AudioServices.h in your code and link to the Audio Toolbox framework.
Vibration
As with audio sounds, vibration immediately grabs a user’s attention. What’s more, vibration works for nearly all users, including those who are hearing or visually impaired. Using the same System Audio services, you can vibrate as well as play a sound. All you need is the following one-line call to accomplish it, as used in Recipe 10-13:
AudioServicesPlaySystemSound (kSystemSoundID_Vibrate);
Recipe 10-13 Playing Sounds, Alerts, and Vibrations Using Audio Services
Get This Recipe’s Code
To get the code used for this recipe, go to http://github.com/erica/iphone-3.0-cookbook-, or if you’ve downloaded the disk image containing all of the sample code from the book, go to the folder for Chapter 10 and open the project for this recipe.
You cannot vary the vibration parameters. Each call produces a short one- to two-second buzz. On platforms without vibration support (like the iPod touch), this call does nothing—but will not produce an error.
Alerts
Audio Services provides a vibration/sound mashup called an alert sound, which is invoked as follows.
AudioServicesPlayAlertSound(mySound);
This call, which is also demonstrated in Recipe 10-13, plays the requested sound and, possibly, vibrates or plays a second alert. On iPhones, when the user has set Settings > Sound > Ring > Vibrate to ON, it vibrates the phone. Second generation and later iPod touch units play the sound sans vibration (which is unavailable on those units) through the onboard speaker. First generation iPod touches play a short alert melody in place of the sound on the device speaker while playing the requested audio through to the headphones.
Delays
The first time you play back a system sound on the iPhone, you may encounter delays. You may want to play a silent sound on application initialization to avoid a delay on subsequent playback.
Note
When testing on iPhones, make sure you have not enabled the silent ringer switch on the left side of the unit. This oversight has tripped up many iPhone developers. If your alert sounds must always play, consider using the AVAudioPlayer class, which is discussed in Chapter 15, “Audio, Video, and MediaKit.”
One More Thing: Showing the Volume Alert
The iPhone offers a built-in alert that you can display to allow users to adjust the system volume. Figure 10-12 shows this alert, which consists of a slider and a Done button. Invoke this alert by issuing the following Media Player function.
Figure 10-12 The Media Player class’s utility volume alert panel.
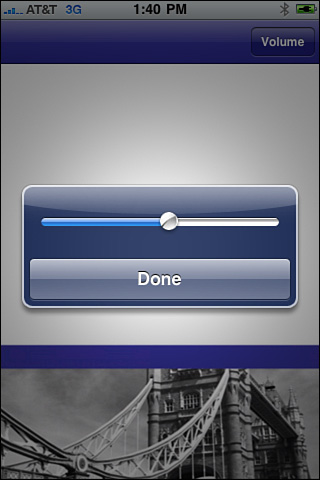
Test whether this alert is visible by issuing MPVolumeSettingsAlertIsVisible(). This returns a Boolean value reflecting whether the alert is already onscreen. Hide the alert with MPVolumeSettingsAlertHide(), which dismisses the alert regardless of whether the user taps Done. For these functions to work, you must link to the MediaPlayer framework and import the media player headers.
Summary
This chapter introduced ways to interact directly with your user. You learned how to build alerts—visual, auditory, and tactile—that grab your user’s attention and can request immediate feedback. Use these examples to enhance the interactive appeal of your programs and leverage some unique iPhone-only features. Here are a few thoughts to carry away from this chapter:
• Whenever any task will take a noticeable amount of time, be courteous to your user and display some kind of progress feedback. The iPhone offers many ways to do this, from heads-up displays to status bar indicators and beyond. You may need to divert the non-GUI elements of your task to new thread to avoid blocking.
• Alerts take users into the moment. They’re designed to elicit responses while communicating information. And, as you saw in this chapter, they’re almost insanely customizable. It’s possible to build entire applications around the simple UIAlertView.
• Don’t be afraid of the run loop. A modal response from an alert or action sheet lets you poll users for immediate choices without being dependent on asynchronous callbacks.
• If blue colored system-supplied features do not match your application design needs, skip them. You can easily build your own alerts and menus using UIView instances and animation.
• Audio feedback including beeps and vibration can enhance your programs and make your interaction richer. Using system sound calls means that your sounds play nicely with iPod functionality and won’t ruin the ongoing listening experience. At the same time, don’t be obnoxious. Use alert sounds sparingly and meaningfully to avoid annoying your users.