14. Device Capabilities
Each iPhone device represents a meld of unique, shared, momentary, and persistent properties. These properties include the device’s current physical orientation, its model name, its battery state, and its access to onboard hardware. This chapter looks at the device from its build configuration to its active onboard sensors. It provides recipes that return a variety of information items about the unit in use. You read about testing for hardware prerequisites at runtime and specifying those prerequisites in the application’s Info.plist file. You discover how to solicit sensor feedback and subscribe to notifications to create callbacks when those sensor states change. This chapter covers the hardware, file system, and sensors available on the iPhone device and helps you programmatically take advantage of those features.
Recipe: Accessing Core Device Information
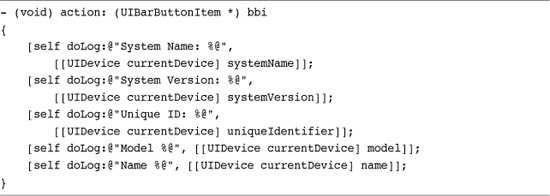
The UIDevice class enables you to recover key device-specific values, including the iPhone or iPod touch model being used, the device name, and the OS name and version. As Recipe 14-1 shows, it’s a one-stop solution for pulling out certain system details. Each method is an instance method, which is called using the UIDevice singleton, via [UIDevice currentDevice].
Recipe 14-1 Using the UIDevice Class
Get This Recipe’s Code
To get the code used for this recipe, go to http://github.com/erica/iphone-3.0-cookbook-, or if you’ve downloaded the disk image containing all of the sample code from the book, go to the folder for Chapter 14 and open the project for this recipe.
The information you can retrieve from UIDevice includes these items:
• System name—This returns the name of the operating system currently in use. For current generations of iPhones, there is only one OS that runs on the platform: iPhone OS.
• System version—This value lists the firmware version currently installed on the unit, for example, 2.2.1, 3.0, 3.1, and so on.
• Unique identifier—The iPhone unique identifier provides a hexadecimal number that is guaranteed to be unique for each iPhone or iPod touch. According to Apple, the iPhone produces this identifier by applying an internal hash to several hardware specifiers, including the device serial number. The iPhone’s unique identifier is used to register devices at the iPhone portal for provisioning, including Ad Hoc distribution.
• Model—The iPhone model returns a string that describes its platform, namely iPhone and iPod touch. Should the iPhone OS be extended to new devices, additional strings will describe those models.
• Name—This string presents the iPhone name assigned by the user in iTunes such as “Joe’s iPhone” or “Binky.” This name is also used to create the local host name for the device. See Chapter 13, “Networking,” for more details about host name retrieval.
Adding Device Capability Restrictions
When you submit 3.0 applications to iTunes, you no longer specify which platforms your application is compatible with. Instead, you tell iTunes what device features your application needs.
Each iPhone and iPod touch provides a unique feature set. Some devices offer cameras and GPS capabilities. Others don’t. Some support OpenGL ES 2.0. Others are limited to OpenGL ES 1.1. Starting in firmware 3.0, you can specify what features are needed to run your application on a device.
When you include the UIRequiredDeviceCapabilities key in your Info.plist file, iTunes limits application installation to devices that offer the required capabilities. Provide this list as an array of strings, whose possible values are detailed in Table 14-1. Only include those features that your application requires. If your application can provide workarounds, do not add the restriction.
Table 14-1 Required Device Capabilities

For example, consider an application that offers an option for taking pictures when run on a camera-ready device. If the application otherwise works on iPod touch units, do not include the still-camera restriction. Instead, use check for camera capability from within the application and present the camera option when appropriate. Adding a still-camera restriction eliminates all first, second, and third generation iPod owners from your potential customer pool.
Adding Device Requirements
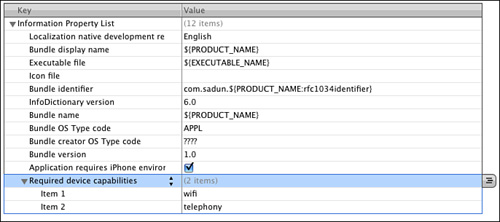
To add device requirements to the Info.plist file open it in the Xcode editor. Select the last row (usually Application Requires iPhone Environment) and press Return. A new item appears, already set for editing. Enter “Req”, and Xcode auto completes to “Required device capabilities”. This is the “human readable” form of the UIRequiredDeviceCapabilities key. You can view the normal key name by right-clicking (Ctrl-clicking) any item in the key list and choosing Show Raw Keys/Values.
Xcode automatically sets the item type to an array and adds a new Item 1. Edit the value to your first required capability. To add more items, select any item and press Return. Xcode inserts a new key-value pair. Figure 14-1 shows the editor in action.
Figure 14-1 Adding required device capabilities to the Info.plist file in Xcode.
Recipe: Recovering Additional Device Information
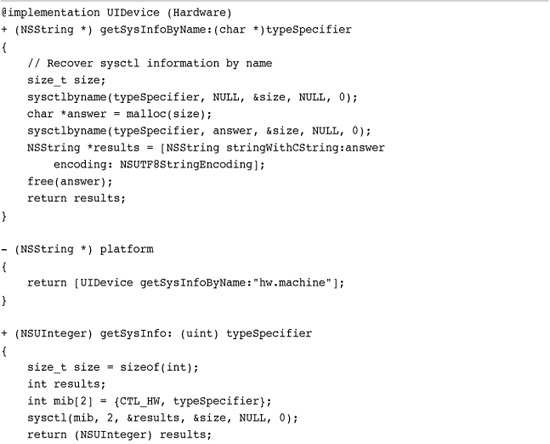
Both sysctl() and sysctlbyname() allow you to retrieve system information. These standard UNIX functions query the operating system about hardware and OS details. You can get a sense of the kind of scope on offer by glancing at the /usr/include/sys/sysctl.h include file on the Macintosh. There you find an exhaustive list of constants that can be used as parameters to these functions.
These constants allow you to check for core information like the system’s CPU frequency, the amount of available memory, and more. Recipe 14-2 demonstrates this. It introduces a UIDevice category that gathers system information and returns it via a series of method calls.
Recipe 14-2 Accessing Device Information Through sysctl() and sysctlbyname()

Get This Recipe’s Code
To get the code used for this recipe, go to http://github.com/erica/iphone-3.0-cookbook-, or if you’ve downloaded the disk image containing all of the sample code from the book, go to the folder for Chapter 14 and open the project for this recipe.
You might wonder why this category includes a platform method, when the standard UIDevice class returns device models on demand. The answer lies in distinguishing different types of iPhones and iPod touch units.
An iPhone 3GS’s model is simply “iPhone,” as is the model of an iPhone 3G and the original iPhone. In contrast, this recipe returns a platform value of “iPhone2,1” for the 3GS. This allows you to programmatically differentiate the unit from a first generation iPhone (“iPhone1,1”) or iPhone 3G (“iPhone1,2”).
Each model offers distinct built-in capabilities. Knowing exactly which iPhone you’re dealing with helps you determine whether that unit supports features like accessibility, GPS, and magnetometers.
Recipe: Monitoring the iPhone Battery State
The 3.0 and later API allows you to keep track of the iPhone’s battery level and charge state. The level is a floating-point value that ranges between 1.0 (fully charged) and 0.0 (fully discharged). It provides an approximate discharge level that you can use to query before performing operations that put unusual strain on the device.
For example, you might want to caution your user about performing a large series of convolutions and suggest that the user plug in to a power source. You retrieve the battery level via this UIDevice call. The value returned is produced in 5% increments.
![]()
The iPhone charge state has four possible values. The unit can be charging (i.e., connected to a power source), full, unplugged, and a catchall “unknown.” Recover the state using the UIDevice batteryState property.

Don’t think of these choices as persistent states. Instead, think of them as momentary reflections of what is actually happening to the device. They are not flags. They are not or’ed together to form a general battery description. Instead, these values reflect the most recent state change.
Recipe 14-3 monitors state changes. When it detects that the battery state has changed, only then does it check to see what that state change indicated. In this way, you can catch momentary events, such as when the battery finally recharges fully, when the user has plugged in to a power source to recharge, and when the user disconnects from that power source.
Recipe 14-3 Monitoring the iPhone Battery

Get This Recipe’s Code
To get the code used for this recipe, go to http://github.com/erica/iphone-3.0-cookbook-, or if you’ve downloaded the disk image containing all of the sample code from the book, go to the folder for Chapter 14 and open the project for this recipe.
To start monitoring, set the batteryMonitoringEnabled property to YES. During monitoring, the UIDevice class produces notifications when the battery state or level changes. Recipe 14-3 subscribes to both notifications. Please note that you can also check these values directly, without waiting for notifications. Apple provides no guarantees about the frequency of level change updates, but as you can tell by testing this recipe, they arrive in a fairly regular fashion.
Recipe: Enabling and Disabling the Proximity Sensor
Unless you have some pressing reason to hold an iPhone against body parts (or vice versa), enabling the proximity sensor accomplishes little. When enabled, it has one primary task. It detects whether there’s a large object right in front of it. If so, it switches the screen off and sends off a general notification. Move the blocking object away and the screen switches back on. This prevents you from pressing buttons or dialing the phone with your ear when you are on a call. Some poorly designed protective cases keep the iPhone’s proximity sensors from working properly.
The Google Mobile application on App Store used this feature to start a voice recording session. When you held the phone up to your head it would record your query, sending it off to be interpreted when moved away from your head. The developers didn’t mind that the screen blanked as the voice recording interface did not depend on a visual GUI to operate.
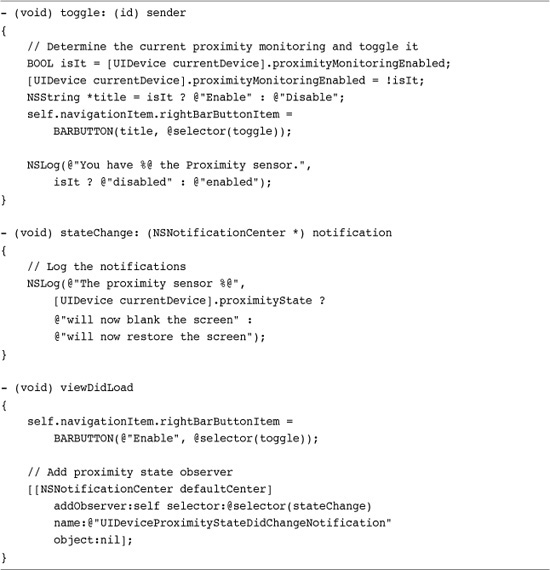
Recipe 14-4 demonstrates how to work with proximity sensing on the iPhone. It uses the UIDevice class to toggle proximity monitoring and subscribes to UIDeviceProximityStateDidChangeNotification to catch state changes. The two states are on and off. When the UIDevice proximityState property returns YES, the proximity sensor has been activated.
Recipe 14-4 Enabling Proximity Sensing
Get This Recipe’s Code
To get the code used for this recipe, go to http://github.com/erica/iphone-3.0-cookbook-, or if you’ve downloaded the disk image containing all of the sample code from the book, go to the folder for Chapter 14 and open the project for this recipe.
Note
Prior to the 3.0 firmware, proximity used to be controlled by the UIApplication class. This approach is now deprecated. Also be aware that setProximityState: is documented, but the method is actually nonexistent. Proximity state is a read-only property.
Recipe: Using Acceleration to Locate “Up”
The iPhone provides three onboard sensors that measure acceleration along the iPhone’s perpendicular axis; that is, left/right (X), up/down (Y), and front/back (Z). These values indicate the forces affecting the iPhone, from both gravity and user movement. You can get some really neat force feedback by swinging the iPhone around your head (centripetal force) or dropping it from a tall building (freefall). Unfortunately, you might not be able to recover that data after your iPhone becomes an expensive bit of scrap metal.
To subscribe an object to iPhone accelerometer updates, set it as delegate. The object set as the delegate must implement the UIAccelerometerDelegate protocol.
[[UIAccelerometer sharedAccelerometer] setDelegate:self]
Once assigned, your delegate receives accelerometer:didAccelerate: messages, which you can track and respond to. Normally, you assign the delegate as your primary view controller, but you can also do so with a custom helper class.
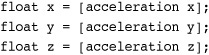
The UIAcceleration object sent to the delegate method returns floating-point values for the X, Y, and Z axes. Each value ranges from -1.0 to 1.0.
Recipe 14-5 uses these values to help determine the “up” direction. It calculates the arctangent between the X and Y acceleration vectors, returning the up-offset angle. As new acceleration messages are received, the recipe rotates a UIImageView with its picture of an arrow, which you can see in Figure 14-2, to point up. The real-time response to user actions ensures that the arrow continues pointing upward, no matter how the user reorients the phone.
Figure 14-2 A little math recovers the “up” direction by performing an arctan function using the x and y force vectors. In this sample, the arrow always points up, no matter how the user reorients the iPhone.

Recipe 14-5 Catching Acceleration Events

Get This Recipe’s Code
To get the code used for this recipe, go to http://github.com/erica/iphone-3.0-cookbook-, or if you’ve downloaded the disk image containing all of the sample code from the book, go to the folder for Chapter 14 and open the project for this recipe.
Recipe: Using Acceleration to Move Onscreen Objects
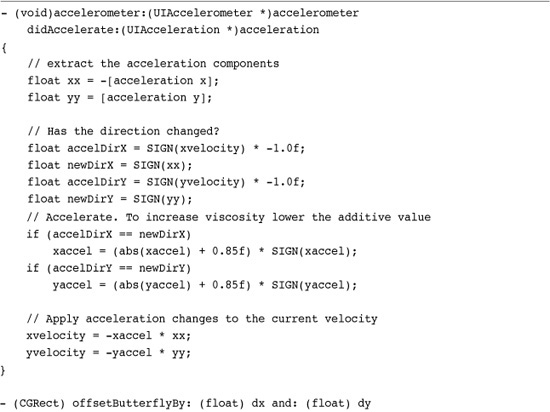
With a bit of clever programming, the iPhone’s onboard accelerometer can make objects “move” around the screen, responding in real time to the way the user tilts the phone. Recipe 14-6 builds an animated butterfly that users can slide across the screen.
Recipe 14-6 Sliding an Onscreen Object Based on Accelerometer Feedback


Get This Recipe’s Code
To get the code used for this recipe, go to http://github.com/erica/iphone-3.0-cookbook-, or if you’ve downloaded the disk image containing all of the sample code from the book, go to the folder for Chapter 14 and open the project for this recipe.
The secret to making this work lies in adding what I call a “physics timer” to the program. Instead of responding directly to changes in acceleration, the way Recipe 14-5 did, the accelerometer callback does nothing more than measure the current forces. It’s up to the timer routine to apply those forces to the butterfly over time by changing its frame.
• As long as the direction of force remains the same, the butterfly accelerates. Its velocity increases, scaled according to the degree of acceleration force in the X or Y direction.
• The tick routine, called by the timer, moves the butterfly by adding the velocity vector to the butterfly’s origin.
• The butterfly’s range is bounded. So when it hits an edge, it stops moving in that direction. This keeps the butterfly onscreen at all times. The slightly odd nested if structure in the tick method checks for boundary conditions. For example, if the butterfly hits a vertical edge, it can still move horizontally.
Recipe: Detecting Device Orientation
The iPhone orientation refers to the way that a user is holding the device. Query the device orientation at any time by retrieving [UIDevice currentDevice].orientation. This property returns a device orientation number. This number is equal to one of the following orientation states.
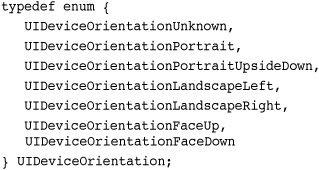
The portrait and landscape orientations are self-explanatory. The face up/face down orientations refer to an iPhone sitting on a flat surface, with the face facing up or down. These orientations are computed by the SDK using the onboard accelerometer and math calculus that is similar to the one presented in the previous recipe.
Usually, the most important thing to know about the current orientation is whether it is portrait or landscape. To help determine this, Apple offers two built-in helper macros. You pass an orientation to these macros, which are shown in the following code snippet. Each macro returns a Boolean value, YES or NO, respectively indicating portrait or landscape compliance, as shown here.
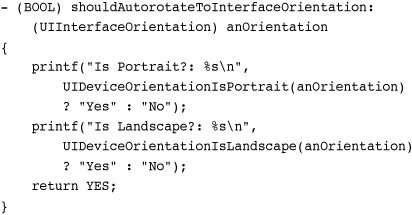
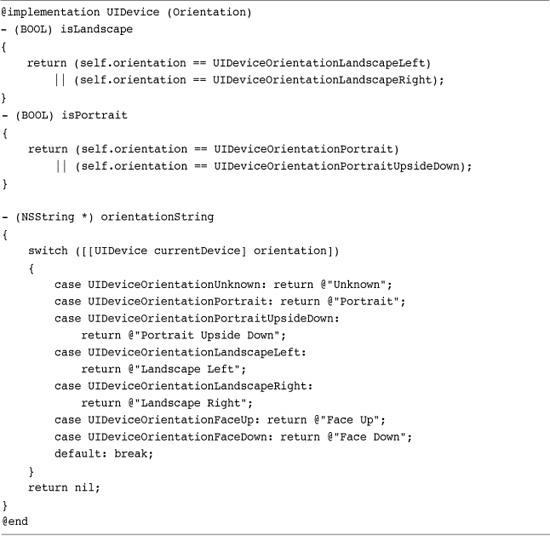
When you want to determine the orientation outside the “should autorotate” callback for the view controller, the code becomes a little tedious and repetitious. Recipe 14-7 creates an Orientation category for the UIDevice class, providing isLandscape and isPortrait properties. In addition, the recipe creates an orientationString property that returns a text-based description of the current orientation.
Recipe 14-7 A UIDevice Orientation Category
Get This Recipe’s Code
To get the code used for this recipe, go to http://github.com/erica/iphone-3.0-cookbook-, or if you’ve downloaded the disk image containing all of the sample code from the book, go to the folder for Chapter 14 and open the project for this recipe.
Note
At the time of writing, the iPhone does not report a proper orientation when first launched. It updates the orientation only after the iPhone has been moved into a new position. An application launched in portrait orientation will not read as “portrait” until the user moves the device out of and then back into the proper orientation. This bug exists on the simulator as well as on the iPhone device and is easily tested with Recipe 14-7. For a workaround, consider using the angular orientation recovered from Recipe 14-5. This bug does not affect proper interface display via the UIViewController class.
Recipe: Detecting Shakes Using Motion Events
When the iPhone detects a motion event, it passes that event to the current first responder, the primary object in the responder chain. Responders are objects that can handle events. All views and windows are responders and so is the application object.
The responder chain provides a hierarchy of objects, all of which can respond to events. When an object toward the start of the chain receives an event, that event does not get passed further down. The object handles it. If it cannot, that event can move on to the next responder.
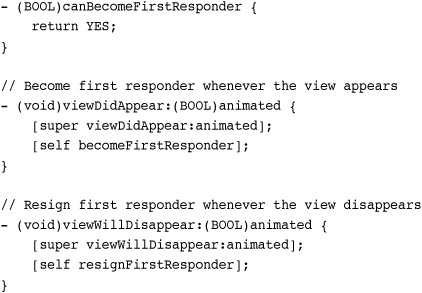
Objects often become first responder by declaring themselves to be so, via becomeFirstResponder. In this snippet, a UIViewController ensures that it becomes first responder whenever its view appears onscreen. Upon disappearing, it resigns the first responder position.
First responders receive all touch and motion events. The motion callbacks mirror the touch ones discussed in Chapter 8, “Gestures and Touches.” They are
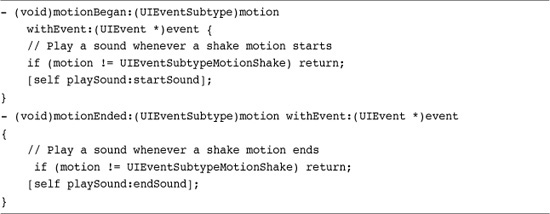
• motionBegan:withEvent:—This callback indicates the start of a motion event. At the time of writing this book, there was only one kind of motion event recognized: a shake. This may not hold true for the future, so you might want to check the motion type in your code.
• motionEnded:withEvent:—The first responder receives this callback at the end of the motion event.
• motionCancelled:withEvent:—As with touches, motions can be cancelled by incoming phone calls and other system events. Apple recommends that you implement all three motion event callbacks (and, similarly, all four touch event callbacks) in production code.
Recipe 14-8 shows a pair of motion callback examples. If you test this out on a device, you’ll notice several things. First, the began- and ended-events happen almost simultaneously from a user perspective. Playing sounds for both types is overkill. Second, there is a bias toward side-to-side shake detection. The iPhone is better at detecting side-to-side shakes than front-to-back or up-down versions. Finally, Apple’s motion implementation uses a slight lockout approach. You cannot generate a new motion event until a second or so after the previous one was processed. This is the same lockout used by Shake to Shuffle and Shake to Undo events.
Recipe 14-8 Catching Motion Events in the First Responder
Get This Recipe’s Code
To get the code used for this recipe, go to http://github.com/erica/iphone-3.0-cookbook-, or if you’ve downloaded the disk image containing all of the sample code from the book, go to the folder for Chapter 14 and open the project for this recipe.
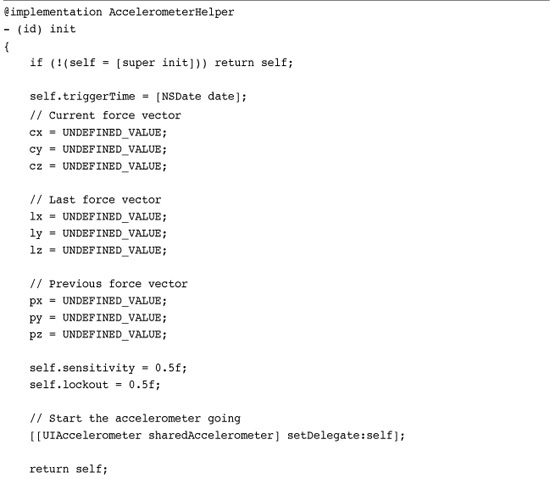
Recipe: Detecting Shakes Directly from the Accelerometer
Recipe 14-9 mimics the Apple motion detection system while avoiding the need for the event consumer to be the first responder. It’s built on two key parameters: a sensitivity level that provides a threshold that must be met before a shake is acknowledged and a lockout time that limits how often a new shake can be generated.
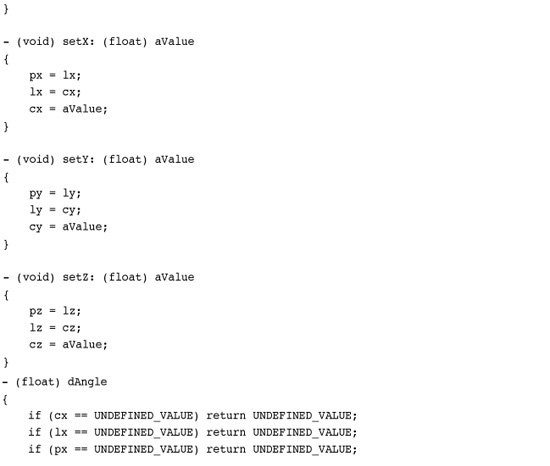
Recipe 14-9 Detecting Shakes with the Accelerometer Helper
Get This Recipe’s Code
To get the code used for this recipe, go to http://github.com/erica/iphone-3.0-cookbook-, or if you’ve downloaded the disk image containing all of the sample code from the book, go to the folder for Chapter 14 and open the project for this recipe.
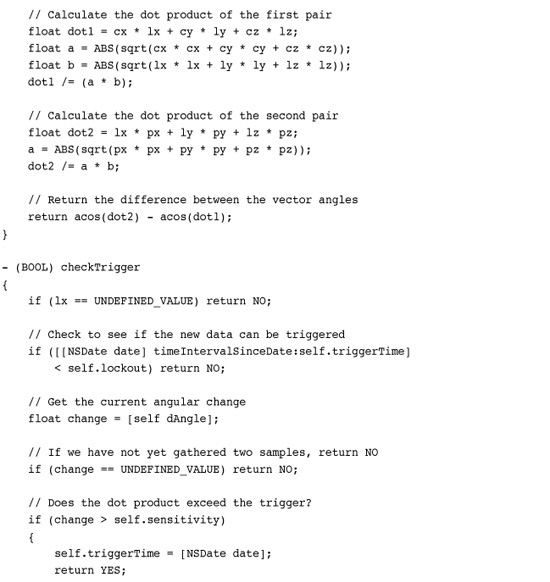
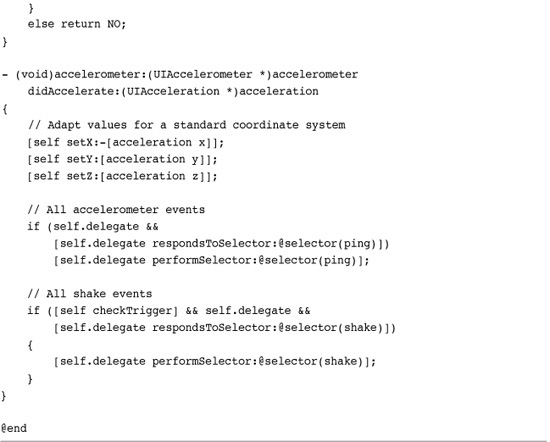
This AccelerometerHelper class stores a triplet of acceleration values. Each value represents a force vector in 3D space. Each successive pair of that triplet can be analyzed to determine the angle between the two vectors. In this example, the angles between the first two items and the second two help determine when a shake happens. This code looks for a pair whose second angle exceeds the first angle. If the angular movement has increased enough between the two (i.e., an acceleration of angular velocity, basically a “jerk”), a shake is detected.
The helper generates no delegate callbacks until a second hurdle is passed. A lockout prevents any new callbacks until a certain amount of time expires. This is implemented by storing a trigger time for the last shake event. All shakes that occur before the lockout time expires are ignored. New shakes can be generated after.
Apple’s built-in shake detection is calculated with more complex accelerometer data analysis. It analyzes and looks for oscillation in approximately eight to ten consecutive data points, according to a technical expert informed on this topic. Recipe 14-9 provides a less complicated approach, demonstrating how to work with raw acceleration data to provide a computed result from those values.
One More Thing: Checking for Available Disk Space
The NSFileManager class allows you to determine both how much space is free on the iPhone, plus how much space is provided on the device as a whole. Listing 14-1 demonstrates how to check for these values and show the results using a friendly comma-formatted string. The values returned represent the free space in bytes.
Listing 14-1 Recovering File System Size and File System Free Size

Summary
This chapter introduced core ways to interact with an iPhone device. You saw how to recover device info, check the battery state, and subscribe to proximity events. You discovered the accelerometer and saw it in use through several examples, from the simple “finding up” to the more complex shake detection algorithm. You learned how to differentiate the iPod touch from the iPhone and determine which model you’re working with. Here are a few parting thoughts about the recipes you just encountered:
• The iPhone’s accelerometer provides a novel way to complement its touch-based interface. Use acceleration data to expand user interactions beyond the “touch here” basics and to introduce tilt-aware feedback.
• Low-level calls can be SDK friendly. They don’t depend on Apple APIs that may change based on the current firmware release. UNIX system calls may seem daunting, but many are fully supported by the iPhone.
• Remember device limitations. You may want to check for free disk space before performing file-intensive work and for battery charge before running the CPU at full steam.
• When submitting to iTunes, remember that 3.0 and later applications no longer specify which device to use. Instead, use your Info.plist file to determine which device capabilities are required. iTunes uses this list of required capabilities to determine whether an application can be downloaded to a given device and run properly on that device.