21. Accessibility and Other iPhone OS Services
Applications interact with standard iPhone services in a variety of ways. This chapter introduces several approaches. Applications can define their interfaces to the iPhone’s VoiceOver accessibility handler, creating descriptions of their GUI elements. Developers can create bundles to work with the built-in Settings applications so that users can access applications’ defaults using that interface. Applications can also declare public URL schemes allowing other iPhone applications to contact them and request services that they themselves offer. This chapter explores these application service interactions. It shows you how to implement these features in your applications. You see how to build these service bridges through code, through Interface Builder, and through supporting files.
Adding VoiceOver Accessibility to Your Apps
Accessibility enhancements open up the iPhone to users with disabilities. iPhone OS features allow users to magnify (or “zoom”) displays, invert colors, and more. As a developer, accessibility enhancement centers on VoiceOver, a way that visually impaired users can “listen” to their GUI. VoiceOver converts an application’s visual presentation into an audio description.
Don’t confuse VoiceOver with Voice Control. The former is a method for presenting an audio description of a user interface and is highly gesture-based. The latter refers to Apple’s proprietary voice recognition technology for hands-free interaction.
This section offers a brief overview of VoiceOver accessibility. You read about adding accessibility labels and hints to your applications and testing those features in the simulator and on the iPhone. Accessibility is available and can be tested on third generation or later devices, including the iPhone 3GS and the third generation iPod touch.
Accessibility in Interface Builder
Use the Identity Inspector > Accessibility pane in Interface Builder (see Figure 21-1) to add labels and hints to the UIKit elements in your interface. Enter strings in either or both of the two fields provided. As you do so, know that these fields and the text they contain play different roles in the bigger accessibility picture. Labels identify views; hints describe them. In addition to these fields, you’ll find a general accessibility Enabled check box and a number of Traits check boxes.
Figure 21-1 Interface Builder’s Identity Inspector lets you specify object accessibility information.

Labels
A good label tells the user what an item is, often with a single word. Label an accessible GUI the same way you’d label a button with text. “Edit,” “Delete,” and “Add” all describe what objects do. They’re excellent button text and accessibility label text.
But accessibility isn’t just about buttons. “Feedback,” “User Photo,” and “User Name” might describe the contents and function of a text view, an image view, and a text label. If an object plays a visual role in your interface, it should play an auditory role in VoiceOver. Here are a few tips for designing your labels:
• Do not add the view type into the label—For example, don’t use “Delete button,” “Feedback text view,” or “User name text field.” VoiceOver adds this information automatically, so “Delete button” in the identity pane becomes “Delete button button” in the actual VoiceOver playback.
• Capitalize the label but don’t add a period—VoiceOver uses your capitalization to properly inflect the label when it speaks. Adding a period typically causes VoiceOver to end the label with a downward tone, which does not blend well into the object-type that follows. “Delete. button” sounds wrong. “Delete button” does not.
• Aggregate information—When working with complex views that function as a single unit, build all the information in that view into a single descriptive label and attach it to that parent view. For example, in a table view cell with several subviews but without individual controls, you might aggregate all the text information into a single label that describes the entire cell.
• Label only at the lowest interaction level—When users need to interact with subviews, label at that level. Parent views, whose children are accessible, do not need labels.
• Localize—Localizing your accessibility strings opens them up to the widest audience of users.
Hints
Hints tell users what to expect from interaction. In particular, they describe any nonobvious results. For example, consider an interface where tapping on a name, for example, John Smith attempts to call that person by telephone. The name itself offers no information about the interaction outcome. So offer a hint telling the user about it—for example, “Places a phone call to this person,” or even better, “Places a phone call to John Smith.” Here are tips for building better hints.
• Use sentence form—Start with a capital letter and end with a period. Do this even though each hint has a missing subject. This format ensures that VoiceOver speaks the hint with proper inflection.
• Use verbs that describe what the element does, not what the user does—“[This text label] Places a phone call to this person.” provides the right context for the user. “[You will] Place a phone call to this person.” does not.
• Do not say the name or type of the GUI element—Avoid hints that refer to the UI item being manipulated. Skip the GUI name (its label, such as “Delete”) and type (its class, such as “button”). VoiceOver adds that information where needed, preventing any overly redundant playback such as “Delete button [label] button [VoiceOver description] button [hint] removes item from screen.” Use “Removes item from screen.” instead.
• Avoid the action—Do not describe the action that the user takes. Do not say “Swiping places a phone call to this person” or “Tapping places a phone call to this person.” VoiceOver uses its own set of gestures to activate GUI elements. Never refer to gestures directly.
• Be verbose—“Place call” does not describe the outcome as well as “Place a call to this person,” or, even better, “Place a call to John Smith.” A short but thorough explanation better helps the user than one that is so terse that the user has to guess about details. Avoid hints that require the user to listen again before proceeding.
• Localize—As with labels, localizing your accessibility hints works with the widest user base.
Enabling Accessibility
The Enabled check box controls whether a UIKit view works with VoiceOver. As a rule, keep this item checked unless the view is a container whose subviews need to be accessible. Enable only those items at the most direct level of interaction or presentation. Views that organize other views don’t play a meaningful role in the voice presentation. Exclude them.
Table view cells offer a good example of accessibility containers, that is, objects that contain other objects. The rules for table view cells are as follows:
• A table view cell without embedded controls should be accessible.
• A table view cell with embedded controls should not be. Its child controls should be.
Outside Interface Builder, nonaccessible containers are responsible for reporting how many accessible children they contain and which child views those are. See Apple’s Accessibility Programming Guide for iPhone for further details about programming containers for accessibility. Custom container views need to declare and implement the UIAccessibilityContainer protocol.
Traits
Traits characterize UIKit item behaviors. VoiceOver uses these traits while describing interfaces. As Figure 21-1 shows, there are 12 possible traits you can assign to views. Select the traits that apply to the selected view, keeping in mind that you can always update these choices programmatically.
Apple’s accessibility documents request that you only check one of the following four mutually exclusive items at any time: Button, Link, Static Text, or Search Field. If a button works as a link as well, choose either the button trait or the link trait but not both. You choose which best characterizes how that button is used. At the same time, a button might show an image and play a sound when tapped, and you can freely add those traits.
Working with Accessibility from Code
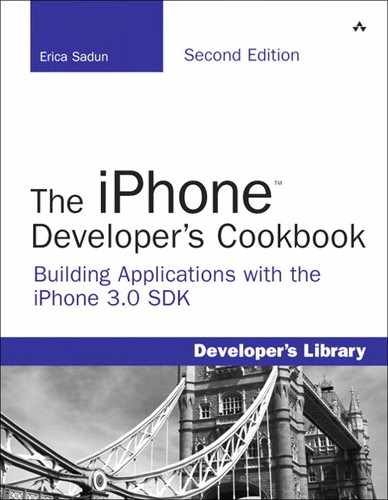
Every UIKit view conforms to the UIAccessibility protocol, offering properties that let you set labels and hints, along with the other accessibility features shown in Figure 21-1. You can set those properties in Interface Builder or use them directly in code. Listing 21-1 sets the accessibilityHint property to update a button’s hint as a user types a username into a related text field. As the text in that field changes, the button’s hint updates to reflect that value.
Listing 21-1 Programmatically Updating Accessibility Information
Testing with the Simulator
The iPhone simulator’s Accessibility Inspector is designed for testing accessible applications before deploying them to the iPhone. The simulator’s inspector simulates VoiceOver interaction with your application, providing immediate visual feedback via a floating pane (there is no actual voice produced) without having to use the VoiceOver gesture interface directly. As you cannot replicate many VoiceOver gestures with the simulator (such as triple-swipes and sequential hold-then-tap gestures), the inspector focuses on describing interface items rather than responding to VoiceOver gestures.
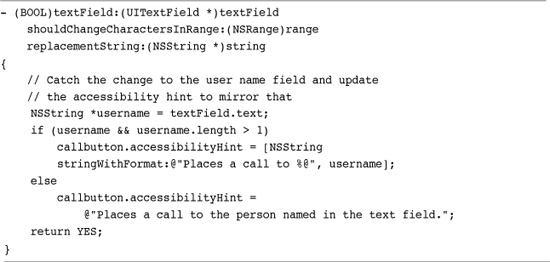
Enable this feature by opening Settings > General > Accessibility. Switch the Accessibility Inspector to On. The inspector, shown in Figure 21-2 immediately appears. It lists the current settings for the currently selected accessible element.
Figure 21-2 The iPhone simulator’s Accessibility Inspector highlights the currently selected GUI feature, revealing its label, hint, and other accessibility properties.
Know how to enable and disable the inspector: The circled X in the top-left corner of the inspector controls that behavior. Click it once to shrink the inspector to a disabled single line. Click again to restore the inspector to active mode. For the most part, keep the inspector disabled until you actually need to inspect a GUI item.
Like VoiceOver, the inspector interferes with normal application gestures. It will slow down your work, so use it sparingly, normally when you are ready to test. You want to launch your application with the inspector disabled but available. Navigate to the screen you want to work with and then enable the inspector.
The application shown in Figure 21-1 uses the code from Listing 21-1. The Call button’s accessibility hint updates as the text in the field changes. Activating the inspector allows you to view the current hint as you update the text field, ensuring that the button hint properly matches the label text.
Testing Accessibility on the iPhone
Testing on the iPhone is a critical part of accessibility development. The iPhone allows you to work with the actual VoiceOver utility rather than a window-based inspector. You hear what your users will hear and are able to test your GUI with your fingers and ears rather than with your eyes.
Like the Simulator, the iPhone provides a way to enable and disable VoiceOver on the fly. Although you can enable VoiceOver in Settings and then test your application with VoiceOver running, you’ll find that it’s far easier to use a special toggle. The toggle lets you avoid the hassle of navigating out of Settings and over to your application using VoiceOver gestures. You can switch VoiceOver off, use normal iPhone interactions to get your application started, and then switch VoiceOver back on when you’re ready to test.
Here are the steps you need to take to enable that toggle.
1. Go to the Accessibility settings pane. Navigate to Settings > General > Accessibility.
2. Locate the Triple-click Home choice. The Triple-click Home button provides a user-settable shortcut for accessibility choices. Tap on Triple-click Home to open the Home pane.
3. Choose Toggle VoiceOver. Select Toggle VoiceOver to set it as your triple-click action. Once selected (a check appears to its right), you can enable and disable VoiceOver by triple-clicking the physical Home button at the bottom of your iPhone. A spoken prompt confirms the current VoiceOver setting.
This VoiceOver toggle offers you the ability to skip many of the laborious details involved in navigating to your application using triple-fingered drags, and multistage button clicks. At the same time, you should be conversant with VoiceOver gestures and interactions. Table 21-1 offers a summary of VoiceOver gestures that you need to know for testing your application.
Table 21-1 Common VoiceOver Gestures for Applications as of iPhone OS 3.1
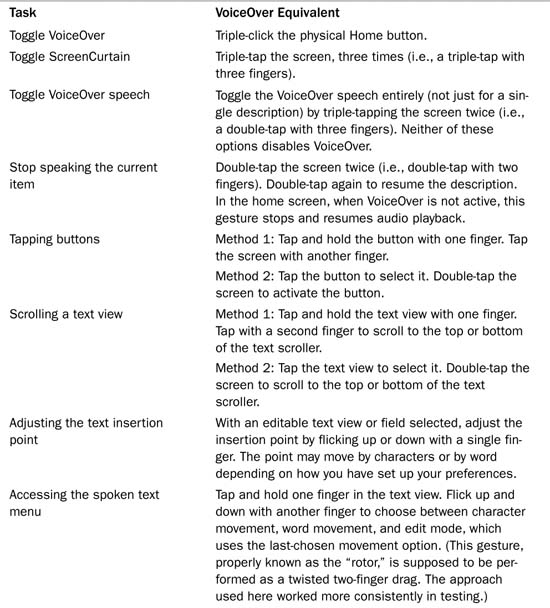
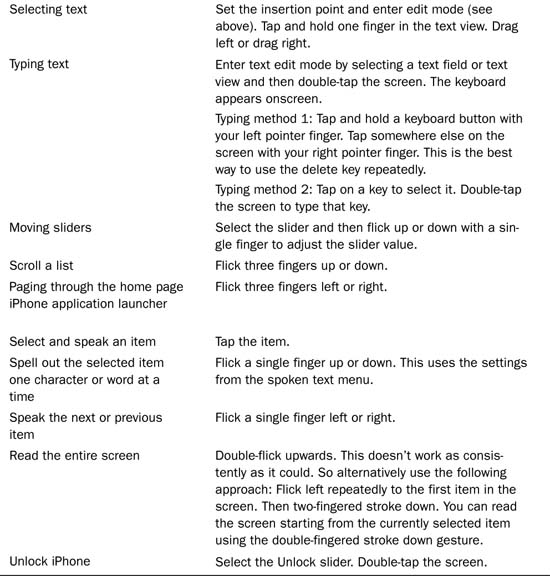
Take special note of ScreenCurtain, which allows you to blank your iPhone display, offering a true test of your application as an audio-based interface. Try the iPhone calculator application with ScreenCurtain enabled to gain a true sense of the challenge of using an iPhone application without sight.
Recipe: Adding Custom Settings Bundles
The iPhone uses the NSUserDefaults class to access and manage application preferences. With it, you can store information that your application needs to preserve between successive runs. For example, you might save a current player name, a list of high scores, or the last-used view configuration. User defaults programmatically assign values to a persistent database associated with your application. These defaults are stored in your application sandbox’s Library folder, in a property list file named with your application identifier.
Treat user defaults as a mutable dictionary. Set and retrieve objects using keys, just as you would with that dictionary. Defaults entries are limited to standard property list types—that is, NSString, NSNumber, NSDate, NSData, NSArray, and NSDictionary. When you need to store information that does not fall into one of these classes, consider using another file (such as one that resides in your sandbox’s Library or Documents folders) or serialize your object into NSData and store that data in defaults.
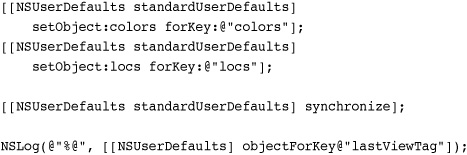
The synchronize method forces the defaults database to update to the latest changes made in memory. Synchronizing assures you that the file-based defaults data is up-to-date, an important factor if your application gets interrupted for some reason. The following snippet demonstrates setting, synchronizing, and retrieving data from the user defaults system, per Recipe 8-5.
The Settings App
iPhone applications can add custom preferences into the main Settings app (see Figure 21-3). These preferences access the same application-specific user defaults that you work with programmatically. The difference is that Settings provides a friendly GUI for your users. Any changes your users make to these screens update and synchronize with standard user defaults.
Figure 21-3 (Left) Custom settings bundles for third-party applications appear on the Settings screen after the built-in settings. On the iPhone, you may have to scroll down a bit to find them. (Right) Developer-defined preferences elements can include text fields (both regular and secure), switches, sliders, multivalue choices, group titles, and child panes.
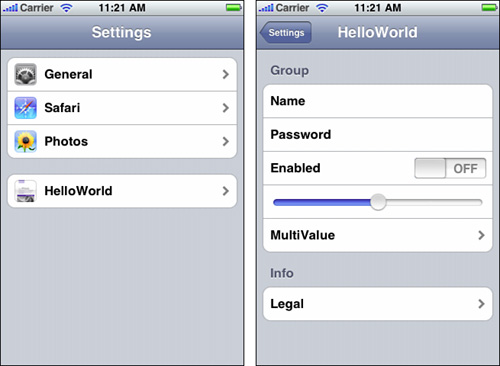
Custom settings are listed after system settings, but otherwise look and act like the ones that Apple preloaded into your system. As the screenshots in Figure 21-3 show, custom preferences provide a variety of data interaction styles, including text fields, switches, and sliders.
Because these settings create standard NSUserDefaults entries, you can easily query and modify any of these settings from code. For example, Recipe 21-1 defines a field called “Name” (see Figure 21-3, right screenshot, first item in the top Group). This text field stores its value to the @"name_preference" key. You can see whether the user has entered a value for this key from your application.
NSLog(@"% objectForKey:@"name_preference"];
Recipe 21-1 Creating a Custom Settings Pane


Get This Recipe’s Code
To get the code used for this recipe, go to http://github.com/erica/iphone-3.0-cookbook-, or if you’ve downloaded the disk image containing all of the sample code from the book, go to the folder for Chapter 21 and open the project for this recipe.
Avoid Sensitive Information
Use settings to store nonsensitive account preferences such as usernames and option toggles. Although passwords are visually obscured with dots, they’re stored in clear text in your application sandbox. When working with sensitive information, use your iPhone’s secure keychain instead. Settings bundles do not offer keychain integration at this time. Keychain recipes appear in Chapter 13, “Networking.”
Settings Schema
A copy of the settings schema resides in your Developer folder at /Developer/Platforms/iPhoneOS.platform/Developer/Library/Xcode/Plug-ins/iPhoneSettingsPlistStructDefs.xcodeplugin. Xcode uses this file to check its property list syntax. In the file, you can see all the definitions and the required and optional attributes used to specify custom preferences. If Apple should ever expand or change its definitions, you’ll be able to find those changes in this file.
Defining a Settings Bundle
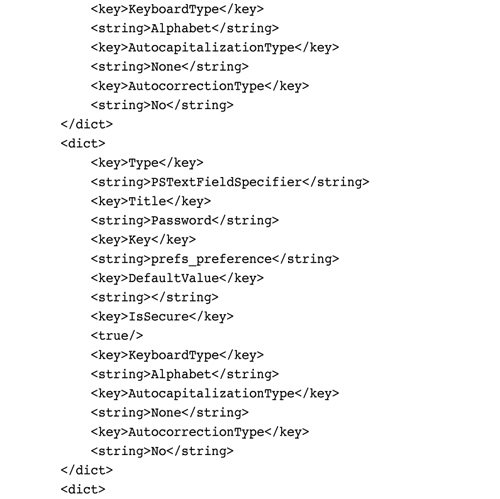
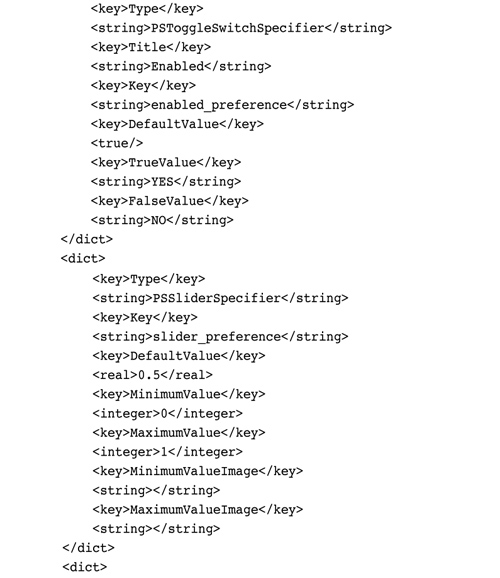
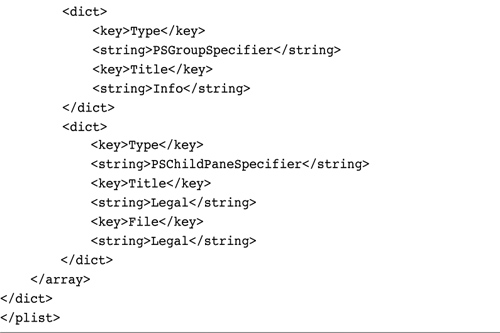
Each settings pane corresponds to one property list file. Recipe 21-1 shows the source for the pane in Figure 21-3 (right). It demonstrates each SDK settings type and provides a sample definition. Types include text fields (strings), sliders (floating-point numbers), switches (Boolean values), and multiple selection (one-of-n choices). In addition, you can group items and link to child panes.
To add new settings, build a dictionary and add it to the PreferencesSpecifiers array. Each individual preference dictionary needs, at a minimum, a type and a title. Some settings, like the PSGroupSpecifier group item, require nothing more to work. Others, such as text fields, use quite a few properties. You want to specify capitalization and autocorrection behaviors as well as the keyboard type and whether the password security feature obscures text, as you can see in Recipe 21-1.
To add a settings bundle to your program, follow these steps. Alternatively, you can create a new settings bundle by choosing File > New File > iPhone OS > Resource > Settings Bundle.
1. Create each of the property lists, one for each screen. The primary plist must be named Root.plist.
2. Create a new folder and add your property lists.
3. Rename the folder to Settings.bundle. OS X warns you about the name; go ahead and confirm the rename. The folder transforms into a bundle. (To view the contents of your new bundle, right-click [Control-click] and choose Show Package Contents from the contextual pop-up.)
4. Drag the bundle into the Groups & File column of your Xcode project (see Figure 21-4).
Figure 21-4 Add the Settings.bundle into your project’s Groups & Files list. Double-click the property lists to edit them further in Xcode.
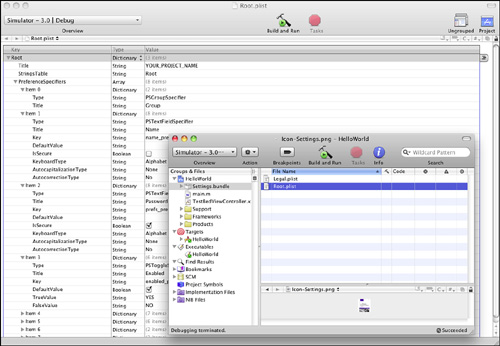
5. Create a 29×29 version of your main application icon file (typically icon.png) and add it to your project with the name Icon-Settings.png. This art is used by the Settings application to label your bundle along with the application name. You can see this in Figure 21-3 (left). The small icon to the left of HelloWorld uses this special icon.
When you next run your program, the settings bundle installs and makes itself available to the Settings application. Should your source have any syntax errors, you find a blank screen rather than the settings you expect. It helps to build your settings in stages to avoid this.
Xcode offers a limited interactive syntactically aware editing window. Open the property list and then choose View, Property List Type, iPhone Settings plist. You may find it easier to edit by hand in TextEdit or the stand-alone Property List Editor if you’re comfortable with lower-level tools.
Note
In Recipe 21-1, the File property uses no extension; the .plist extension is understood.
Settings and Users
Although settings bundles offer a well-defined resource for developers to centralize their user-defined defaults, real-world experience suggests they’re a feature you may not actually want to use. Few iPhone users are aware of third-party settings outside their applications. Even fewer actually use those settings on a regular basis. Most users want to stay within the bounds of an application for all app-related tasks, including settings.
Because of this, many (if not most) App Store developers have moved away from settings bundles and brought their settings directly into the application. Adding settings views allows users to find and set preferences easily. Unfortunately, creating those screens is labor intensive and fussy.
There is, fortunately, a middle ground between relying solely on settings bundles and building your own views. The Llama Settings project at Google Code (http://code.google.com/p/llamasettings/) offers a set of classes that read property lists (including from your settings bundles), allowing you to display settings screens within your application without much extra work or overhead. The project was developed and is maintained by Scott Lawrence.
Open sourced, the Llama Settings classes provide similar kinds of display and interactive elements including group titles, sliders, and switches. In addition, the project adds support for color selectors, URL launchers, and more. Although these items are not supported in Apple’s Settings app, you can use them within your program by defining standard property lists without further programming.
Checking User Defaults
You may solicit and set defaults via settings bundles, application-based views, code-level access, or a hybrid of these approaches. When using those settings, be aware that certain items may not yet exist. If a user hasn’t opened your settings bundle, the default settings you specified in the bundle’s property lists may not have ever been set. For most objects, you can test for this via objectForKey:. This method returns nil for nonexistent keys.
Here’s one reason a nil value may play a role in your programming. One default that you’ll always want to set through code is a “last version” key. This key records the application version that was most recently run. You’ll want to check for this default whenever your application launches.
If that default is nil, the application is a new install. You may want to prepare files and perform other setup tasks at first run. After that setup, set a value for the key, one that indicates the currently deployed app version. (And don’t forget to synchronize after setting that key.)
It doesn’t end with a check for nil, though. You’ll always know when the user has just upgraded from a previous version by checking that setting. When the last run version differs from your current version, you have the opportunity to perform any updates that bring your user into data compliance for the most recent release.
Recipe: Creating URL-Based Services
Apple’s built-in applications offer a variety of services that can be accessed via URL calls. You can ask Safari to open Web pages, Maps to show a map, or use the mailto: style URL to start composing a letter in Mail. A URL scheme refers to the first part of the URL that appears before the colon, such as http or ftp.
These services work because the iPhone knows how to match URL schemes with applications. A URL that starts with http: opens in Mobile Safari. The mailto: URL always links to Mail. What you may not know is that you can define your own URL schemes and implement them in your applications. Not all standard schemes are supported on the iPhone. The ftp scheme is not available for use.
Custom schemes allow applications to launch whenever Mobile Safari (or another application) opens a URL of that type. For example, should your application register xyz, any xyz:// links go directly to your application for handling, where they’re passed to the optional application: handleOpenURL: method. The applications launch whether you’ve defined a handler method or not. If all you want to do is run an application, adding the scheme and opening the URL enables cross-application launching.
Handlers extend launching to allow applications to do something with the URL that’s been passed to it. They might open a specific data file, retrieve a particular name, display a certain image, or otherwise process information included in the call.
Using URL Schemes
The advantages of scheme-based launching are many. Take the Iconfactory’s Twitterrific, for example. Developer Craig Hockenberry introduced a custom service that lets users and third-party developers launch his application and open a prefilled, ready-to-post tweet.
This lets developers add Twitter support to their applications without any programming needed. Since Twitterrific already stores sensitive username and password information, all that you have to supply is the body text. When invoked, control passes to Twitterrific, which takes over and allows users to finish tweeting. When done, users quit Twitterrific and may return to the original application if desired.
These kinds of services work best when they provide some kind of performance boost or data leverage. In the case of Twitterrific, it’s not about tweeting. It takes very little code to tweet. (See Chapter 13.) At the same time, doing so requires you to take on either the responsibility of securely storing user credentials or forcing users to enter those credentials on each use. The Twitterrific service lets you bypass those issues and expand the way your application works.
Service Downsides
It’s not all good news on the services front; there’s definitely a downside to third-party services. Once your application depends on a service, you basically force your users to download a second application. And that application may not always be the one they want to use. Consider the loyal Echofon (formerly TwitterFon) user who might not have Twitterrific installed on his or her phone. If you demand Twitterrific, you may meet resistance.
Any features that depend on third-party services must always be optional. Consider if, for example, Echofon were to introduce its own tweeting URL scheme. If your application offered service-based tweeting, you should in response make your application robust and flexible enough to allow users to choose their preferred client.
Another downside is this: iPhone applications cannot tell what schemes are available. There’s no way to poll for on-offer services. Apple provides no public registry that you can scan through to see what’s out there. Using services is basically a matter of trust.
That being said, you can test whether a URL service is available. If the UIApplication’s canOpenURL: method returns YES, you are guaranteed that openURL: will be able to launch another application to open that URL. You are not guaranteed that the URL is valid, only that its scheme is registered properly to an existing application.
if ([[UIApplication sharedApplication] canOpenURL:aURL])
[[UIApplication sharedApplication] openURL:aURL];
Cross-Promotion
There is another important business-oriented aspect to scheme-based launching, namely cross-promotion. Defining URL schema allows your application to test whether other applications exist from your company’s lineup. If the application cannot handle the URL (i.e., canOpenURL: returns NO), you can provide links to App Store, encouraging users to download other applications from your company.
Registering Schemes: Declaring the URL
It takes two steps to add services to your application. First, declare your URL scheme in your Info.plist. Second, add a handler to your application delegate. Here are the steps you take to do this.
To declare your URL scheme, you need to specify information for the iPhone’s Launch Services. Add a CFBundleURLTypes entry into your Info.plist. This consists of an array of dictionaries that describe the URL types the application can open and handle. Each dictionary contains two keys: a CFBundleURLName and an array of CFBundleURLSchemes.
The URL name is an abstract name (also known as its “kind”). You can use any string. On the Mac, this provides the visible description shown in Finder. On the iPhone, it’s just a way of keeping your schemes straight.
The Schemes array is a list of prefixes that belong to the abstract name. You can add one scheme or many. The following declares just one. You may want to prefix your name with an x. Although the iPhone is not part of any standards organization, the x prefix indicates that this is an unregistered name.

iPhone developer Emanuele Vulcano has started an informal registry over at the CocoaDev Web site (http://cocoadev.com/index.pl?ChooseYourOwniPhone URLScheme). iPhone Developers can share their schemes in a central listing, so that you can discover services you want to use and promote services that you offer. The registry lists services, their URL schemes, and describes how these services can be used by other developers.
Registering Schemes: Adding the Handler Method
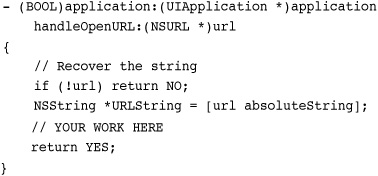
The second part of implementing URL handling means providing an application delegate method called application:handleOpenURL:.
- (BOOL)application:(UIApplication *)application
handleOpenURL:(NSURL *)url {}
When implemented by your app delegate, this method lets you respond to an openURL: call made by another application. Your method must return a Boolean value, either YES to indicate that the URL handling succeeded or NO when it fails. Here’s the basic skeleton of the function:
With iPhone URL schemes, the colon is mandatory, but you need not use forward slashes after. For example, mailto:[email protected] is a valid URL. You need not use mailto://[email protected].
To parse out your calling string, you want to remove the initial URL scheme up to the colon.

It’s up to your handler to deal with whatever request has been forwarded. You define the protocol and you implement how that is recovered. Consider the following sample request protocol:
x-sadun-services:command?param1=p1¶m2=p2¶m3=p3&...
This protocol assumes that a command will be followed by a question mark, followed by a set of parameter pairs. Each pair uses the equal symbol and provides a plain-text parameter name and a URI-encoded text-based parameter value.
Your code handles all request parsing. Could providing URL scheme support open an attack vector from third parties? No. The reality is that the danger is minimal or nonexistent. You can choose to handle the request, ignore the request, and so forth. NSStrings present little danger to your application.
Returning Control to a Calling Application
With careful programming, you can allow the calling application to regain control after handling a URL request. An application might send back requested material along with a status indication of whether the operation was a success. It depends on how you define and implement your protocol. Here’s a sample of a paste request from an application that supports interapplication copy and paste.
x-sadun-services:paste?scheme=iping&data=hello+world&
clipboard=test1&password=foobar&expire=1500
This example URL shows a request to paste “Hello World” into a clipboard named test1. It’s a secured clipboard whose data will expire after 1,500 seconds (25 minutes). What’s notable here is the “scheme” parameter. It tells this service who to respond to. After performing the paste, the service opens a new URL with the results, using that scheme to call home.
On most iPhones and iPod touch units, the entire trip has a latency of about 4.5 to 5 seconds. You can try this for yourself. The sample code for this recipe contains two applications. One (iPong) is a copy/paste server, another (iPing) is a test client. The client keeps track of time from when it first sends out its request to when it receives the response URL. Once you have installed the server, you can mess with the client to test out all kinds of scenarios to test the service and its protocol.
A minor vulnerability is exposed here. Should the calling client lie or provide the wrong scheme parameter, control may be transferred to a third application. If the scheme does not refer to a real application, the request will simply hang. On the other hand, allowing the service to return to the originating application is a huge win. It keeps the user from having to quit and relaunch that first application and is a feature more applications should offer once they have finished handling a request, be it sending e-mail or posting a tweet.
Implementing Custom Schemes
When the iPhone installs an application, its Info.plist list tells the iPhone OS to associate that application with any schemes you’ve defined. Thereafter, whenever the OS encounters a matching scheme, the proper application launches to handle the URL. Recipe 21-2 shows a sample method skeleton that handles the opening of that URL.
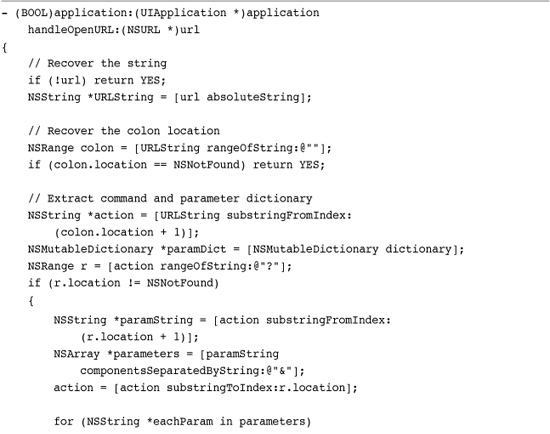
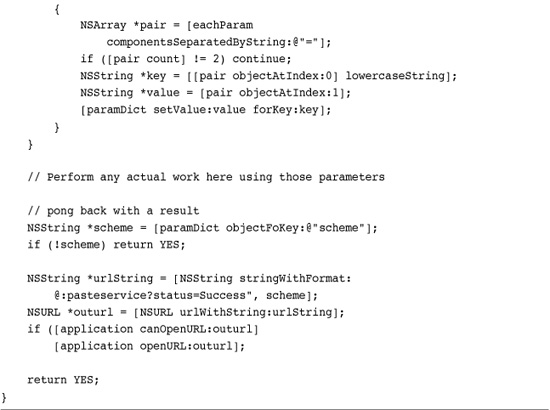
Recipe 21-2 Responding to URL Scheme Requests
Get This Recipe’s Code
To get the code used for this recipe, go to http://github.com/erica/iphone-3.0-cookbook-, or if you’ve downloaded the disk image containing all of the sample code from the book, go to the folder for Chapter 21 and open the project for this recipe.
This recipe demonstrates how to recover the URL scheme and break it down into parameters, and how to return to a calling application. The actual sample code for iPong contains all these components but uses a more complicated handler than the method shown in Recipe 21-2.
Note
Use the following native URL strings for opening videos in YouTube: http://www.youtube.com/watch?v=VIDEO_IDENTIFIER, or http://www.youtube.com/v/VIDEO_IDENTIFIER. The iPhone does not use a YouTube-specific schema.
Summary
When an iPhone application opens itself to iPhone OS services, it becomes an active participant in a wider ecosystem. Accessibility, settings, and URL schemes all demonstrate how an application can fit into the iPhone OS beyond the immediate functionality provided by the application itself. Here are a few thoughts to take away with you as you finish this chapter:
• VoiceOver and the iPhone’s accessibility features as a whole are still very, very new. Expect them to develop further as the platform matures. This is a feature that will continue to change as Apple grows the iPhone’s disabled audience.
• Including accessibility labels and hints creates new audiences for your application, just like language localizations do. Adding these takes relatively little work to achieve and offers excellent payoffs to your users.
• Although most users do not use third-party preferences in the Settings apps, some do. Consider offering your settings both inside and outside your application.
• Expand your application’s user base by exposing helpful functionality to other applications. URL schemes let you create a demand by other application developers that can trickle down into end-user sales for your product. A great set of services that’s easy to use can be marketed to other developers through custom URL schemes.