Lesson 5. Handling Events
An important part of building a rich Internet application (RIA) is building an effective client-side architecture. When you use Flash Builder as an authoring tool, you have the ability to follow object-oriented best practices and an event-based programming model that allows for loosely coupled applications. This type of development is very different for web application developers, because it does not follow a page-based, flow-driven model. Ultimately, using this client-side, event-based architecture can result in better-performing applications that contain more reusable code and consume less network traffic because page refreshes are no longer needed. During this lesson, you will become familiar with an event-based programming model and learn how events are used throughout Flex.
Events are added to the FlexGrocer application to allow the user to interact with the application.
Understanding Event Handling
Flex uses an event-based, or event-driven, programming model: Events determine the flow of the application. For example, a user clicking the mouse button or a server returning data determines what should happen next.
These events come in two types: user events and system events. User events are just what you’d most likely guess—a user clicking a mouse or pressing a key. System events include the application being instantiated, an invisible component becoming visible, and many others. The Flex developer handles these events by writing code for what happens next.
Tip
![]()
Many server-side developers are accustomed to a flow-driven programming model, in which the developer determines the flow of the application rather than having to react to events generated by the user or system; recognizing and understanding that difference is crucial to success with Flex.
For the moment, we are going to personify Flex’s event-based model to make its operation clear. Pretend that you and a friend are standing on opposite sides of a parking lot. Your friend is going to act as an event dispatcher, an object that notifies others when something occurs.
While you are in the parking lot, your friend may shout a variety of things. He may exclaim, “Car arriving!” “Car departing!” or “Car parking!” Perhaps he periodically decides to simply yell, “Nothing has changed!” In all cases, he is shouting the information, and anyone close can hear it. He has no real control over who hears it, and certainly no control over what a person who overhears these messages might do in response. His only job in this scenario is to announce information, which is precisely the job of an event dispatcher.
Now, on the other side of the parking lot, you hear these various messages being announced. You may choose to react to all, some, or none of them. When you hear that a car is parking, for example, you may wish to go and greet the new arrival. However, you may blatantly ignore your friend announcing that nothing has changed or that a car is departing.
In this case you are an event listener. While you can hear all the information being broadcast, you decide which messages are important and how you react to them. Just as hearing something is different from actually listening to it in the real world, the same concept exists in event-driven programming. Code that listens to and reacts to a given event is called an event listener or an event handler.
Now, as a last step in our example, imagine that another individual arrives at the parking lot. He can also hear your friend shouting. He may choose to listen and react to the same messages as you, or different ones altogether. Perhaps when he hears that a car is departing, he walks up to the car and asks for payment for parking, while ignoring the other messages.
This is the wonderful part about event-based programming. Many people can hear a message, and each can decide whether to react to it. If they do choose to react, they can do so in different ways. Finally, the person doing the shouting doesn’t need to know what might happen as a result; his only job is to keep shouting.
Bringing this back to Flex, we may say that an object such as a Button instance dispatches a click event. What we mean is that the Button shouts for all to hear that it has just been clicked. Every other object in the system can choose to listen to that event and to handle it (react). In Flex, if we don’t choose to listen to an event on an object, then we implicitly ignore it.
Keeping that in mind, the following general steps occur when a user event occurs and a developer then wants something to happen:
- The user interacts with the application.
- The object on which the user interacts dispatches an event (for example, when a button has been clicked).
- Another object is listening for that event and reacts when the event occurs.
- Code inside the listening object is executed
Analyzing a Simple Example
Let’s examine a concrete example: A user clicks a button and text appears in a label. The following code makes this happen.
<s:Label id="myL"/>
<s:Button id="myButton"
label="Click Me"
click="myL.text='Button Clicked'"/>
A button appears with the label “Click Me”. When the user clicks the button, the click event is dispatched. In this case the ActionScript code myL.text='Button Clicked' is executed. The text property of the label is assigned the Button Clicked string value.
Note
![]()
There are nested quotes in this example. The double quotes surround the code for the click event, and the nested single quotes delineate the string. This can become difficult to read and, as you will see in the next section, is not the ideal way to write code.
Until now, when you have assigned values to an attribute in MXML, you have supplied one of two types: scalar values or bindings. Scalar values are simple data types like String, Number, or Boolean values. You have used these when setting x and y values, widths, and label text values. You have also used bindings for properties. This was done whenever you used braces ({}) in a value. Remember from the last lesson that the braces let you enter ActionScript for the property value.
When supplying a value to an MXML attribute that represents an event (that is, the click event in the previous code), the Flex compiler is smart enough to implicitly understand that the string inside the quotes is ActionScript. That’s why you can enter ActionScript directly for the click event, click="myL.text='Button Clicked'", without using the braces you used in the previous lesson.
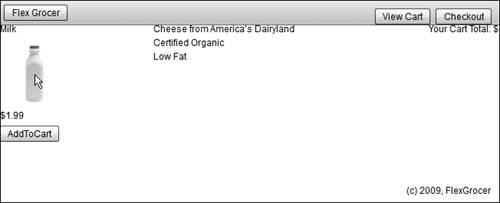
Just as code hinting assisted you when you were entering property names, so code hinting will assist with event names. In the following figure, you see the clear and click events displayed with the lightning bolt icon in front of them, which designates events.
Handling the Event with an ActionScript Function
The code in the last example successfully sets the text of the Label object when the Button is clicked. However, a problem with this approach soon develops when you want to execute more than one line of ActionScript when the event occurs. To do this, you could place many separate chunks of code inside the quotes for the click event, each separated by a semicolon. Although this works, it is messy and far from a best practice. Also, you may want the same lines of code to be executed when several different events occur. In the approach shown earlier, you would have to copy and paste the same code into several places. That can become a big nightmare if you ever need to edit that code, as you now need to find and edit each copy.
A better approach is to handle the event in an ActionScript function. The function will be built in an <fx:Script> block that simply tells the Flex compiler that the code in the Script block is ActionScript. So instead of placing the actual ActionScript to be executed as a value for the click event, you will call a function instead. Following is a refactoring of the code examined earlier, using the best practice of placing the code to be executed in a function.
<fx:Script>
<![CDATA[
private function clickHandler():void {
myL.text="Button Clicked";
}
]]>
</fx:Script>
<s:Label id="myL"/>
<s:Button id="myButton"
label="Click Me"
click="clickHandler()"/>
Note
![]()
The <![CDATA[ ]]> block inside the Script block marks the section as character data. This tells the compiler that the data in the block is character data, not well-formed XML, and that it should not show XML errors for this block.
Now when the Button is clicked, the function clickHandler() is called, and the string is written to the label. In this case, because no quotes were nested, you can use double quotes around the string in the function.
The function has a return type of void. This means that the function will not return a value. It is a best practice to always specify the return type of functions you build, even if you use void to indicate that no data will be returned. The compiler will give you a warning if you do not specify a return type on a function. It is best to heed those warnings, as specifying types enables the compiler to ensure that you don’t make simple typos, like assigning a variable that is supposed to contain a Button to something that is supposed to contain a Number.
Passing Data When Calling the Event Handler Function
You may wish to pass data when calling the function. This works in ActionScript just as you’d expect. You place the data to pass inside the parentheses following the function name, and then modify the event handler to accept the parameter. Just as you will always specify a return type on your function, so will you need to specify the type for any parameter that the function will accept.
In the following code example, the string to be displayed in the label is passed to the clickHandler() when the button is clicked.
<fx:Script>
<![CDATA[
private function clickHandler(toDisplay:String):void {
myL.text=toDisplay;
}
]]>
</fx:Script>
<s:Label id="myL"/>
<s:Button id="myButton"
label="Click Me"
click="clickHandler('Value Passed')"/>
In this case, when the Button is clicked, the string Value Passed is sent to the event handler function. The function accepts the parameter in the toDisplay variable, which has a data type of String. The value stored in the toDisplay variable is then displayed in the label’s text property.
Using Data from the Event Object
So far you have examined a few different ways of handling events but, before you try it yourself, there is one last item to understand, the event object. When personifying the event model, we discussed it in terms of a message being shouted. In reality, when an event is dispatched, it is more than just a message; it is an entire object. This object, referred to as the event object, can have many different properties.
The most basic event in the Flex world is the aptly named Event class. This is an ActionScript class that defines only the most basic properties needed to be an event. The most important among these properties are type, which is a String containing the name of the event (the message being shouted)—for example, click or creationComplete—and the target, which is the component dispatching the event (your friend shouting).
Note
![]()
Target may seem like an odd name for this property. It might be more aptly named source, as it refers to the object that broadcasts the event. This property name will make a little more sense once you finish Lesson 11, “Creating Event Classes,” and learn about event flow.
In practice, subclasses of Event are used much more often than the Event class. Imagine a situation where you drag an item from one place on the screen to another. Knowing that an item was dragged, and where it was dragged to, are both important, but you would likely want some additional information as well: what item was being dragged, for example, and what the x and y positions of the mouse were when the item was dropped. To provide this more specific information, Event subclasses and additional properties are added, meaning you will often interact with event types such as DragEvents or ResultEvents. The following figure from the documentation shows how many other event classes are based on, or subclassed from, the generic Event object.

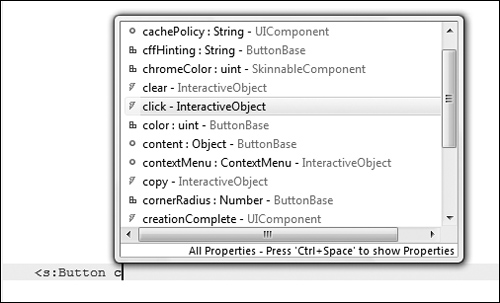
Examine the following code that sends an event object, in this case a MouseEvent object, to the event handler.
In the code, an event is passed to the event handler, and the word click will be displayed in the Console view when the application is debugged. You are now going to refactor the FlexGrocer application to use a function for the View Cart buttons.
- Open the FlexGrocer.mxml file that you created in the previous lesson.
Alternatively, if you didn’t complete the previous lesson or your code is not functioning properly, you can import the FlexGrocer.fxp project from the Lesson05/start folder. Please refer to Appendix A for complete instructions on importing a project should you ever skip a lesson or if you ever have a code issue you cannot resolve.
- Directly below the closing
</fx:Declarations>tag, insert a new<fx:Script>tag pair. When you do so, Flash Builder will automatically insert a CDATA (character data) block for you. Your code should look like the following:
<fx:Script>
<![CDATA[
]]>
</fx:Script>MXML files are XML files. Some of the characters you are about to use when writing ActionScript code are not allowed inside XML directly. The CDATA block instructs XML parsers to treat the data inside it differently, allowing these characters. Throughout this book you will be asked to add functions and variables inside the Script tag. You should always add these inside the CDATA block.
- Inside the Script block (remember that also means inside the CDATA block), add a new private function named
handleViewCartClick(). This function will accept a single argument namedeventof type MouseEvent and return nothing (have a return type ofvoid).
private function handleViewCartClick( event:MouseEvent ):void {
}As you can see, the first word in this function declaration is private. This is the function’s scope. Here you are indicating that a function is accessible only from inside this class. You are specifying that a single argument will be passed to this function and that argument will be of type MouseEvent.
Note

You will deal more with the scope of functions later in this book. However, there isn’t enough room in this book to cover both object-oriented programming and Flex, so if you are uncomfortable with this or any other object-oriented concepts, please review any number of excellent books on that topic, or read the extensive entries on Wikipedia.
- Inside the
handleViewCartClick()function, add the ActionScript code to change thecurrentStateproperty to cartView.
private function handleViewCartClick( event:MouseEvent ):void {
this.currentState="cartView";
} - Find the Button with the
id btnCartViewinside thecontrolBarContent. Currently that Button sets thecurrentStatedirectly. Instead, change this tag so it now calls thehandleViewCartClick()function and passes the event object.
<s:Button id="btnCartView" label="View Cart" right="90" y="10"
click.State1="handleViewCartClick( event )"/> - Find the Button inside the
cartGroupwith the label View Cart that currently sets thecurrentStateto cartView directly. Change this tag so it now calls thehandleViewCartClick()function and passes the event object.
<s:Button label="View Cart" click="handleViewCartClick( event )"
includeIn="State1"/> - Save the file and click Run.
As with all refactoring, the application should behave the same as it did previously with both View Cart buttons taking the application to the cartView state.
Inspecting the Event Object
In this section, you will use the debugger to examine MouseEvent properties. Learning to use the event object and its properties is one key to writing reusable code in Flex.
- Add a breakpoint on the closing parenthesis of the
handleViewCartClick()function by double-clicking in the marker bar just to the left of the code and line numbers. A small blue dot will appear in the marker bar indicating where the program execution will halt. You will be able to examine values at this point.

The debugger is immensely helpful in understanding what is happening in Flex. Use it often to get a sense of what is going on “under the hood” of the application.
Tip

Event handlers should be named consistently. For instance, in this lesson you’ve seen a
clickevent on two View Cart buttons handled by an event handler namedhandleViewCartClick(). There is no “right” way to name event handlers, but you may wish to pick a naming convention and stick with it. The most important point is make them as descriptive as possible. - In the Flash Builder interface, click the down arrow next to the Debug button and choose FlexGrocer.
Tip
If you have multiple application files, such as FlexGrocer and Checkout, you can choose the specific one you wish to run by clicking the down arrow next to the Run or Debug buttons instead of the button itself.

- In the browser, click either of the buttons labeled View Cart. In Flash Builder, you will be prompted to use the Debug perspective. You should select it.
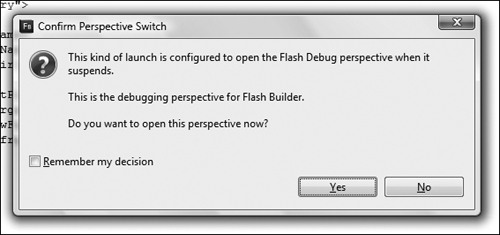
Clicking Yes will switch your Flash Builder view to the Debug perspective, which is optimized with the views needed to debug an application.
- Double-click the tab of the Variables view. This will cause the Variables view to maximize and take up the full screen.
The Variables view can provide an immense amount of information. A full-screen view will make navigating that information easier.
You will see two variables displayed,
thisandevent, as shown here: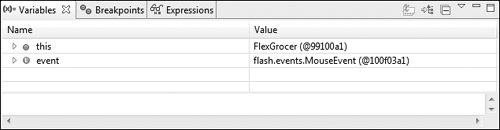
Right now, the
thisvariable represents the entire application. When you learn about creating your own components in future lessons, you will learn thatthisalways represents a context that can change. If you click the arrow in front of the variable, you will see many properties and associated values. Theeventvariable represents the event variable local to the function where the breakpoint was placed. The letter L in a circle in front ofeventindicates it is a local variable. - Click the outline of the arrow to the left of the
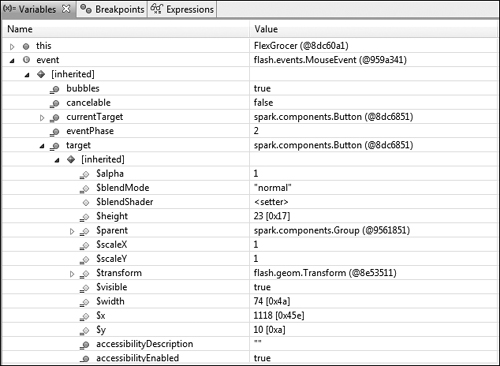
eventvariable and then the arrow to the left of the[inherited]set of properties. Locate thetargetproperty. Notice that you clicked a button to get here and that the target of this event is the Button component that broadcasts the event. Also notice thetypeproperty has the valueclick.
From the earlier discussion, neither of those property values should be a surprise. In this case, the values listed in the
[inherited]section are those available to every event because they come from the superclass. The properties listed outside that section are the specific properties available on the MouseEvent. Note that some of these properties, such asaltKeyorlocalX, wouldn’t make sense to have on every event in the system, but they are welcome properties on a MouseEvent. - Click the arrow to the left of the target, then click the arrow to the left of the
[inherited]set of properties. Locate theidproperty.
This property will depend on which View Cart button you clicked. If you clicked the button in the control bar, then the property’s value is
btnCartView, which is what you assigned in the code. If you chose the View Cart button in the shopping cart area, then you will see an assigned id such as_FlexGrocer_Button5. If you wish, repeat the steps to view the id values for the other Button. All UI objects in Flex have an id. If you don’t assign one, then Flex will. - Double-click the Variables tab again to restore it. Click the red box on either the Debug or Console view to terminate the debugging session.
Don’t forget to terminate debugging sessions. It is possible to have one debugging session running alongside another in certain browsers. You might want to do this in special cases, but not normally.
- Return to the Development perspective by clicking the chevron (>>) in the top right of your screen and then choosing Flash.
- Remove the breakpoint on the closing parenthesis of the
handleViewCartClick()function by double-clicking the blue dot in the marker bar just to the left of the code and line numbers.
Handling System Events
As mentioned earlier, there are two types of events you handle in Flex. First, there are user events, like the MouseEvent that you handled in the previous section. Second, there are system events that are dispatched by the Flex framework in response to a change in an internal condition. In this section you will see one of the most common system events related to startup and understand a bit about its use.
Understanding the creationComplete Event
The creationComplete event is one of many useful events dispatched by Flex components. This event is dispatched when a component has been instantiated and knows both its size and position in the application. The creationComplete event of a parent component is always dispatched after all its children have dispatched their creationComplete events. In other words, if you have a Group with several Buttons inside it, each of the Buttons will dispatch its creationComplete event before the Group dispatches its own creationComplete event.
Let’s examine the following code snippet:
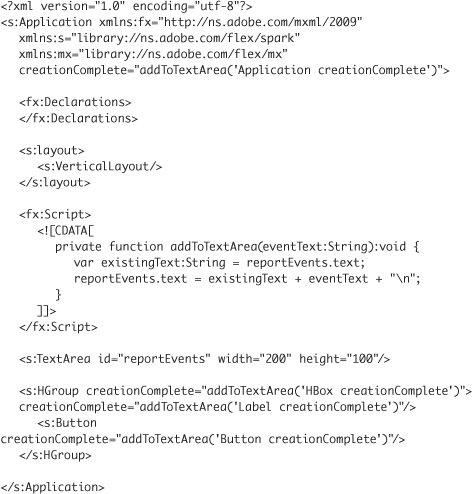
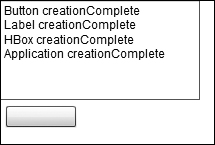
First, look at the event handler named addToTextArea. This event handler simply accepts a parameter named eventText and places it in a TextArea, followed by a return so the text doesn’t all run together. In each component, which includes Application, HGroup, Label, and Button, a creationComplete event is handled. When each component finishes its completion process, the event is dispatched and the corresponding string is sent to the event handler for display in the TextArea.
Flex begins creating components from the outside, working its way in. However, creationComplete means a component has been instantiated and knows both its size and position. In Flex, the size of a component (such as the HGroup) is often dictated by the collective size of its children. Therefore, the Label and Button must be finished (and must have dispatched their creationComplete events) before the HGroup can be considered complete and can dispatch its own event.
When all the Application’s children are created, the Application dispatches its creationComplete event.
The results displayed in the TextArea appear as shown here:
Armed with this knowledge, you can probably understand why the creationComplete event of the Application object is often used for doing work such as modifying or retrieving data.
Modifying Data on Creation Complete
Currently your FlexGrocer project uses data binding to populate a RichText control with data from an XML model. Your code looks like this:
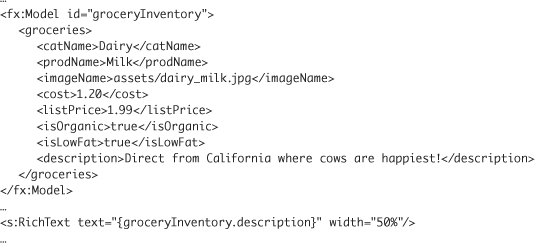
Flex knows to automatically populate the RichText control with the data retrieved from the description property of the groceryInventory object. In this section, we will use the creationComplete event to make a small modification to the description in ActionScript and see that the RichText control displays the modified data.
- Open the FlexGrocer.mxml file that you modified in the previous section.
If you didn’t complete the previous section, you can import FlexGrocer-PreCreationComplete.fxp project from the Lesson05/intermediate folder. Please refer to Appendix A for complete instructions on importing a project should you ever skip a lesson or if you ever have a code issue you cannot resolve.
- Inside the Script block, just below the existing
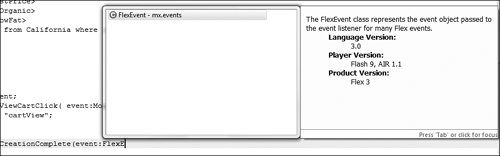
handleViewCartClick()function, add a new private function namedhandleCreationComplete(). The function will accept a single argument, namedeventof typeFlexEvent, and returnvoid.
private function handleCreationComplete(event:FlexEvent):void {
}While you are typing FlexEvent, Flash Builder will try to provide possible choices as you type. If you choose one of the items on the pop-up menu (or use the arrow keys and press Enter on the correct option), Flash Builder will complete the name for you and perform one other very important step, importing the class.
- If you choose one of the options on the pop-up menu, Flash Builder adds an import line to the top of your Script block. This line is an
importstatement that lets Flash Builder know where the class you are referencing resides. You can think ofimportstatements as more or less the ActionScript equivalent of the namespaces you used in MXML:
import mx.events.FlexEvent;
If you do not have this line in your file, you have two options: You can place your cursor right after the closing t in FlexEvent and press Ctrl+Spacebar. This will cause Flash Builder to open the code-completion pop-up again. If there is only one matching option, Flash Builder automatically selects it and adds the import for you. Alternatively, you can just type the
importstatement just inside the Script tag (remember that also means inside the CDATA block). - Inside this function, you will assign the string “Cheese from America’s Dairyland” to the
descriptionproperty of the groceryInventory object.
private function handleCreationComplete(event:FlexEvent):void {
groceryInventory.description = "Cheese from America's Dairyland";
}This statement will replace the original text of the
descriptionproperty with your new text as soon as the Application dispatches itscreationCompleteevent. - Inside the Application tag, you will instruct Flex to call the
handleCreationComplete()function when thecreationCompleteevent occurs, passing it the event object. Your code should read like this:
<s:Application xmlns:fx="http://ns.adobe.com/mxml/2009"
xmlns:s="library://ns.adobe.com/flex/spark"
xmlns:mx="library://ns.adobe.com/flex/mx"
creationComplete="handleCreationComplete(event)"> - Save and run the application.
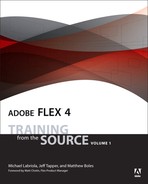
When you move your mouse over the bottle of milk, you should see the new description appear.
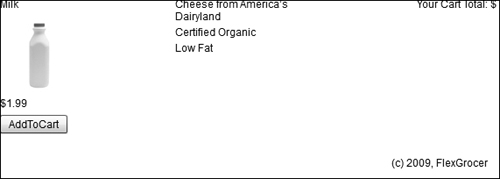
In this simple example, you have handled the creationComplete event to modify data and allowed data binding to provide the changed data to the RichText control for display.
What You Have Learned
• Gained an understanding of event handling in Flex (pages 94–97)
• Learned to pass arguments to an event handler (pages 97–98)
• Refactored the application to use an ActionScript event handler (pages 98–104)