Chapter 2: Enterprise Structure
Enterprise structure in SAP’s SD application represents the organizational structure within the business entity that is selling and distributing goods and services. To help you map this organizational structure into the SAP ERP software, SAP offers a set of building blocks. In this chapter, we will discuss these building blocks and show how to arrange them to set up the SD enterprise structure.
The SD enterprise structure in SAP ERP represents the structure of the sales and distribution entity of an organization. To map this structure into the SAP ERP software, you use various building blocks provided by SAP. You use a sales organization to replicate the selling entity into the SAP system; distribution channels to represent various channels being used by the enterprise to distribute goods to market; divisions to represent various product divisions that exist in the organization; sales areas to define the relationship among selling entity, channels of distribution, and product divisions; sales offices, sales groups, and sales districts to represent the geographical locations; and sales employee masters (from SAP HR application) to denote sales employees and their positions in the hierarchical sales reporting structure. The organizational element for setting up a plant and the plant assignments to other organizational elements such as storage location, shipping/receiving point, and loading point, helps you set up the distribution structure. This structure defines where and how the goods will be stored and how they will be shipped to the customers. Both the sales organization and the plant are assigned to the company code so that the accounting entries resulting from the sale of goods and services, as well as those resulting from the material movements in the plant, are posted to accounting. Finally, the plant is assigned to the combination of the sales organization and the distribution channel, allowing the sales organization to use the assigned plant structure when distributing goods and services to the customers and completing the typical enterprise structure setup in SAP SD application.
Enterprise structure in SAP SD does not exist in isolation. It has dependencies with enterprise structures from other modules too. Dependencies with financial accounting and materials management enterprise structure is of vital importance because it impacts the use of materials in the SD application as well as the accounting posting of the sales transactions. Therefore, before you set up your SD structure, you should work with an SAP FICO consultant to make sure that the company code, chart of accounts, fiscal year, and other enterprise structure customizations related to the financial accounting application of SAP ERP are already set up. A company code represents your organization’s legal entity, a chart of accounts represents the ledger accounts that you will use to post the sales transaction into accounting, and a fiscal year represents the financial reporting year for your company code. The bare minimum setup you need before you can start setting up the SD enterprise structure is the company code and fiscal year.
Setting up an enterprise structure is the foundation of your SAP implementation. It is therefore essential that you carefully analyze the structure of your client’s organization before you map it into the SAP ERP software. You need to understand how your selling entity is structured and how it operates by considering whether it is centralized or decentralized; what products the sales entity deals in; how the sales are made (directly or via partners); what the various methods of distribution of goods to the customers are; how many plants/distribution centers there are and what geographical locations they belong to; the structure of the sales team; the geographical locations (how many regions, territories, sales offices, and branch offices there are); and what kind of internal reports, MIS reports, and external reports (if any) are generated. It is a good practice to analyze the enterprise’s business requirements and draw a blueprint of the enterprise structure on paper before applying it to the SAP system.
TIP A good structural design will accommodate the company’s current needs and at the same time be flexible enough for the future. A good structural design will always yield better results in terms of operational control, reporting analysis, and smooth processing of the business transactions in the SAP ERP software.
Setting Up the Enterprise Structure
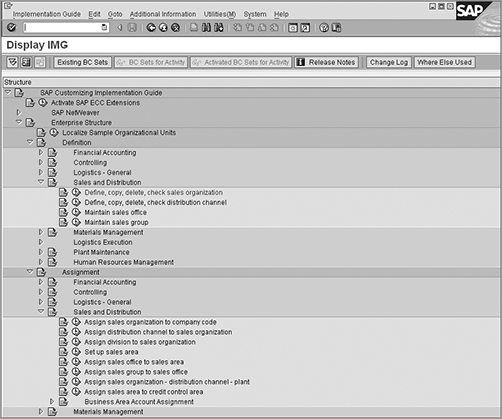
Setting up an enterprise structure entails two types of activity. You start with the definition activity and complete the setup with the assignment activity. Figure 2-1 represents the implementation guide (IMG) for SAP customizing, showing the definition and assignment activities menu path for setting up the enterprise structure in SAP ERP. Each of these activities is further divided into various application areas such as materials management (MM), logistics execution (LE), and financial accounting (FICO), to name a few. To set up an SD enterprise structure, we need to first define the SD structural elements in the definition activity for SD. We then need to assign these elements to each other to form an enterprise structure using the assignment activity. Let’s start with the creation of a sales organization.
Figure 2-1: IMG menu path to maintain enterprise structure
Setting Up the Sales Organization
The first step in setting up a sales structure in SAP is to set up a sales organization. A sales organization in SAP represents the selling entity of your client’s organization. It is the highest level in the SD enterprise structure and the one to which all the other building blocks are assigned. A sales organization has its own master data. All sales-related transactions are executed within the framework of a sales organization. When you create a customer master or a material master, you must provide the sales organization for which you are creating this master data. You must even enter a sales organization while creating the sales order document in SAP. (Refer to Figure 1-3 from Chapter 1, “Introduction to Sales and Distribution,” which shows sales organization 9090 on the order entry screen.) During processing of the sales cycle, the sales organization information gets copied over from order to delivery to billing and also helps you determine the company code while posting the sales transaction to accounting.
It is always advisable to keep the number of sales organizations to a minimum. You should only create multiple sales organizations when two or more selling entities operate on a totally different basis or when there is a legal requirement to have multiple sales organizations. For example, an organization running sales operations from multiple countries may end up having one sales organization for each country where it operates. Each of these sales organizations will then be assigned to the company codes that were set up for those countries.
Defining a Sales Organization
To create your own sales organization, use transaction code OVX5 or follow menu path IMG Enterprise Structure Definition Sales And Distribution. Click the Execute button ![]() next to Define, Copy, Delete, Check Sales Organization. Following the Menu Path, you will be presented with the Choose Activity screen, as shown in Figure 2-2, providing you with the following two methods to define your own sales organization.
next to Define, Copy, Delete, Check Sales Organization. Following the Menu Path, you will be presented with the Choose Activity screen, as shown in Figure 2-2, providing you with the following two methods to define your own sales organization.
Figure 2-2: Choose Activity screen for defining a sales organization
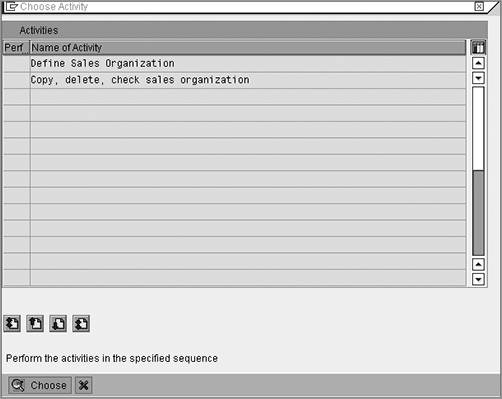
Define Sales Organization Make this selection when you want to set up a new sales organization without copying it from any existing ones. You will have to manually enter all the required information to define your own sales organization.
Copy, Delete, Check Sales Organization Select this when you want to set up your sales organization by copying it from an existing sales organization. With this copy option, you can copy the complete sales organization structure from the source sales organization to the target sales organization. This is really useful in scenarios where the source sales organization structure closely resembles the target sales organization structure. You can also use this option to check and delete an existing sales organization structure. We will cover this method in detail when we set up our Mexican sales organization (9091) for Galaxy Musical Instruments.
We’ll define our first sales organization, “Galaxy Musical Instruments US (9090),” using Define Sales Organization option.
Select Define Sales Organization, and click the Choose button at the bottom of the screen in Figure 2-2. You now should see the sales organization configuration screen, as shown in Figure 2-3.
Figure 2-3: Overview screen for defining a sales organization
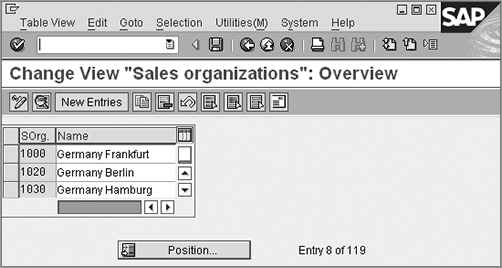
Here again, you are provided with the option to either create your own sales organization by using the New Entries button ![]() or by using the Copy button
or by using the Copy button ![]() . Using the New Entries button provides you with a blank form where you fill in all the relevant details such as the name, address, and so on, for your sales organization. Using the Copy button will open a prefilled form with the name, address, and other information copied from the source sales organization. Depending upon your needs, you can completely or partially replace the information provided via the copy option and save your entry to create your sales organization. Let’s use the Copy button in Figure 2-3 to create our first sales organization.
. Using the New Entries button provides you with a blank form where you fill in all the relevant details such as the name, address, and so on, for your sales organization. Using the Copy button will open a prefilled form with the name, address, and other information copied from the source sales organization. Depending upon your needs, you can completely or partially replace the information provided via the copy option and save your entry to create your sales organization. Let’s use the Copy button in Figure 2-3 to create our first sales organization.
Now select the source, sales organization 1000, and click the Copy button ![]() . You will be presented with a screen like that shown in Figure 2-4 but with the values from sales organization 1000. Replace the data on the screen with what you want to maintain for your sales organization. We changed the values in Figure 2-4 to represent the Galaxy Musical Instruments USA sales organization (9090).
. You will be presented with a screen like that shown in Figure 2-4 but with the values from sales organization 1000. Replace the data on the screen with what you want to maintain for your sales organization. We changed the values in Figure 2-4 to represent the Galaxy Musical Instruments USA sales organization (9090).
NOTE Please note that the functionalities associated with the copy options in Figures 2-2 and 2-3 are very different. The copy option in Figure 2-2 will copy the complete sales organization structure along with all the assignments that were made to the source sales organization, whereas the one in Figure 2-3 will copy over only basic sales organization data such as the name, description, and address from the source to the target sales organization.
Figure 2-4: Defining the sales organization, Details screen
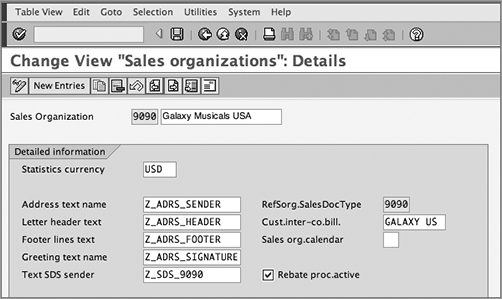
The following are the fields shown in Figure 2-4:
Sales Organization Here you provide a four-character identifier and a description for your sales organization. This field is alphanumeric, which means that you can define the identifier key with only numbers, only alphabets or with a combination of numbers and alphabets.
Statistics Currency Here you set the default statistical currency for your sales organization. When you generate sales statistics, the system uses this currency to report the statistics. Because it is a default, this currency can be overwritten during statistical reporting.
Content for form text modules Address Text Name, Letter Header Text, Footer Lines Text, Greeting Text Name, and Text SDS Sender are five fields available in sales organization customization where you assign the text modules that carry information to be printed on the various outputs such as invoices, order confirmations and so on. (See the left column of Figure 2-4.) You first create and maintain the text module using transaction code SO10 and then assign the text modules to their respective positions in the sales organization customization screen as shown in Figure 2-4. Here text module Z_ADRS_SENDER stores the sales organization address, Z_ADRS_HEADER store the logo, Z_ADRS_FOOTER stores the footer lines and Z_ADRS_SIGNATURE stores the electronic signature for sales organization 9090. Always create your own text modules with a prefix Y or Z. This way your text modules will not be overwritten by SAP when you apply some software patches or perform a release upgrade on your SAP system.
RefSorg SalesDoc Type This field sets up a reference between two sales organizations that share a common sales document type assignment. If you created your sales organization by copying from an existing sales organization, this field will automatically get populated with the source sales organization number from which you copied. Refer “Sales Document Type per Sales Area” section in Chapter, 7 “Sales,” for more details on how to use this field.
Cust. Inter-co. Bill. Here you enter the intercompany customer number for your sales organization. We will discuss intercompany billing process and customization in Chapter 9, “Billing.”
Sales Org. Calendar Here you enter the factory calendar for your sales organization. A factory calendar in SAP SD defines the working and nonworking days for your plant/factory/country setup and controls the shipping and billing activities. We’ll discuss the customization of the factory calendar in the “Setting Up a Factory Calendar” section later in this chapter.
Rebate Proc. Active Activating a rebate at the sales organization level is one of the prerequisites for rebate processing in SAP. Select this checkbox when you want to activate rebate processing for your sales organization. We’ll discuss rebate processing in detail in Chapter 9.
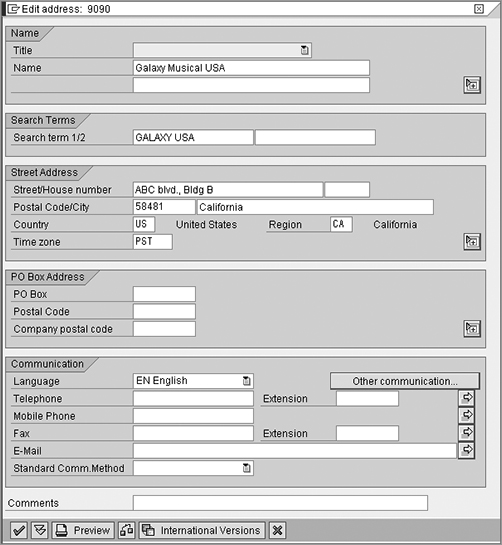
Once you are done entering the values you want for your sales organization, click the check mark button ![]() . This check mark button acts like the Enter key on your keyboard. Once clicked, SAP will automatically open the address data screen (Figure 2-5) for you to maintain the address details for your sales organization. Enter the address data, and save your entry by clicking the Save button
. This check mark button acts like the Enter key on your keyboard. Once clicked, SAP will automatically open the address data screen (Figure 2-5) for you to maintain the address details for your sales organization. Enter the address data, and save your entry by clicking the Save button ![]() . Congratulations! You have successfully defined your first sales organization.
. Congratulations! You have successfully defined your first sales organization.
TIP Notice the ![]() button on the screen now. This is the Address button. You can click this button to call up the address screen again for making any changes.
button on the screen now. This is the Address button. You can click this button to call up the address screen again for making any changes.
Figure 2-5: Address maintenance screen for a sales organization
Defining a Sales Organization Using the Copy Method
In the previous section, we showed how to define a sales organization by using the Define Sales Organization option on the Choose Activity screen (shown earlier in Figure 2-2). In this section, we will cover the Copy, Delete, Check Sales Organization option to set up the sales organization. Remember that with this copy option, not just the address data but also the assignments that exist for the source sales organization are copied over to the target sales organization. This includes a distribution channel assignment to a sales organization, a division assignment to a sales organization, plants to sales organizations, and even sales document types to the sales organization. In other words, this copy option copies over the entire sales organization structure from the source sales organization to the target sales organization. Once you have defined the sales organization using this option, you will need to select the first option on the Choose Activity screen—Define Sales Organization—to make changes to the address and other details for your sales organization definition. You can also use the Copy, Delete, Check Sales Organization option to delete or check an existing sales organization structure.
Let’s use this method to create our second sales organization, Galaxy Musical Instruments Mexico (9091). Follow the same steps as you did before to reach the screen shown earlier in Figure 2-2. Then choose the Copy, Delete, Check Sales Organization option. You should see a screen like the one in Figure 2-6.
Figure 2-6: Organizational Object Sales Organization, initial screen
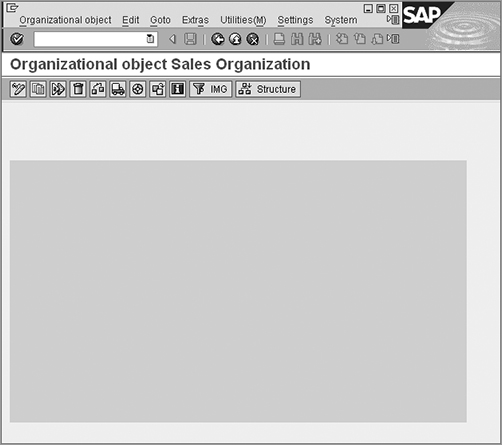
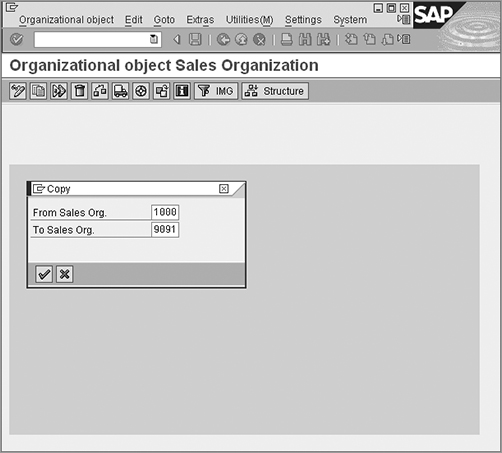
The screen is blank, but there are a few buttons on the menu bar. Click the Copy button in the menu bar. You will now see a dialog box prompting you to provide the source and destination values for the sales organization (Figure 2-7). Enter the values and click the tick button on the dialog box to perform the copy.
Now, click the back arrow button ![]() on the screen to go back to the Choose Activity screen (shown earlier in Figure 2-2).
on the screen to go back to the Choose Activity screen (shown earlier in Figure 2-2).
Now select the activity Define Sales Organization, which will open the screen shown earlier in Figure 2-3. Double-click the entry for sales organization 9091 to reach the Change Sales Organization screen (similar to what shown earlier in Figure 2-4), and make required changes to the fields, including Name, Description, Currency, Address Data, and so on. Voilá, you have successfully created your second sales organization.
Figure 2-7: Organizational Object Sales Organization, copy options
Assigning a Sales Organization to a Company Code
Once a sales organization has been defined, the next step in its setup is to assign the sales organization to a company code. Figure 2-8 shows the customization screen for assigning a sales organization to a company code. To reach this screen, you can use transaction code OVX3N or follow the menu path IMG Enterprise Structure Assignments Sales And Distribution Assign Sales Organization To Company Code. While posting the billing transaction into accounting, the SAP ERP system uses this assignment to determine the company code to which the accounting posting for sales needs to be booked.
NOTE Always remember that a sales organization has a one-to-one relationship with a company code. You can assign more than one sales organization to a company code but cannot have a sales organization point to more than one company code.
Figure 2-8: Assignment Sales Organization – Company Code screen, default assignment

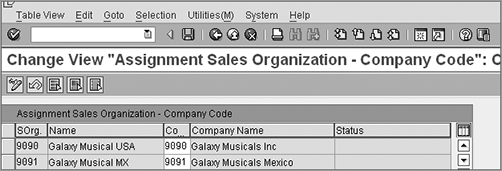
In Figure 2-8, notice that sales organization 9090 is not assigned to a company code, whereas 9091 is already assigned to company code 1000 by default. The reason for that is simple. We copied 9091 from 1000 using the Copy, Delete, Check Sales Organization option, whereas 9090 was created manually using the Define Sales Organization option. During the copy from 1000 to 9091, the system not only copied the address data but also applied all the assignments that were true for 1000 to 9091, thus bringing in the company code 1000 assignment to sales organization 9091. Figure 2-9 shows the Galaxy assignments, after we maintained the company code assignment for sales organization 9090 and corrected the company code assignment for sales organization 9091.
Figure 2-9: Assignment Sales Organization – Company Code screen, final assignment
NOTE Since the Copy, Delete, Check Sales Organization option copies over the entire structure, always use it when the source structure is very close in setup to what you want in the target structure. If the source and target are different and you use this copy option, you will be spending more time deleting the unwanted assignments that came with the copy. This is similar to what we’ll be doing because we copied 9091 from 1000, which was not close to what we wanted to configure for Galaxy Musical Instruments Mexico. As we progress, we will find more assignments that originally belonged to 1000 but are copied to 9091 as well. We’ll keep replacing them with what we need for 9091.
CASE STUDY—Galaxy Musical Instruments Configuration Analysis: Sales Organization
The sales operations for Galaxy Musical Instruments span the United States. The corporation also has a subsidiary in Mexico with its own sales entity to handle sales operations in Mexico. The U.S. and Mexican sales entities have different company codes. Galaxy decided to use numeric codes to represent the sales organizations and created two sales organizations: 9090 for Galaxy Musical Instruments USA and 9091 for Galaxy Musical Instruments Mexico. Each of these sales organizations is assigned to its respective USA (9090) or Mexican (9091) company code.
TIP In SAP, there is no specific rule with respect to the naming convention for the organization structure components. You are free to use numeric, alphabetic, or alphanumeric values. Just try to keep it logical so that it is easy to identify the component by the value. For example, Galaxy Musical Instruments decided to use numeric values to define its sales organization. In Galaxy’s naming convention, the first two characters represent the geographical region. Here 90 refers to the American region and covers all countries in the American region. The last two characters are a sequential number.
Configuring a Distribution Channel
A distribution channel represents the way you distribute your goods into the market. It may be wholesale, retail, or OEM, for example. In other words, a distribution channel is a grouping of various distribution methods that a company uses to distribute goods to its customers.
Configuring a distribution channel is a two-step activity. The first step is to create the distribution channel, and the second step is to assign the distribution channel to a sales organization. By assigning distribution channels to a sales organization, you set up a small structure that controls the methods of distribution that a sales organization can use to supply goods and services to its customers. Distribution channels are available across the sales organizations. This means you can assign the same distribution channel to multiple sales organizations.
Defining a Distribution Channel
You can define a distribution channel by using transaction code OVXI or by following menu path IMG Enterprise Structure Definition Sales And Distribution Define, Copy, Delete, Check Distribution Channel (shown earlier in Figure 2-1). Click ![]() next to the Define, Copy, Delete, Check Distribution channel, and you will again see a Choose Activity screen providing you with the option to define your own distribution channel manually (Define Distribution Channel) or to copy it from an existing source distribution channel (Copy, Delete, Check Distribution Channel). Select the Define Distribution Channel option from the activity screen to get to the customization screen.
next to the Define, Copy, Delete, Check Distribution channel, and you will again see a Choose Activity screen providing you with the option to define your own distribution channel manually (Define Distribution Channel) or to copy it from an existing source distribution channel (Copy, Delete, Check Distribution Channel). Select the Define Distribution Channel option from the activity screen to get to the customization screen.
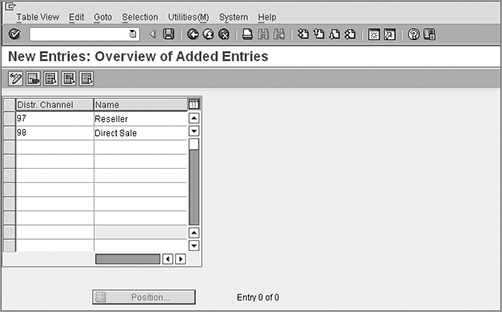
Once you are on the customization screen, click the New Entries button to open the New Entries screen, as shown in Figure 2-10.
Figure 2-10: New Entries screen for defining a distribution channel
You’ll see the following fields on the New Entries screen:
Distr. Channel Here you enter a two-character identifier key for your distribution channel.
Name Here you enter a meaningful description for your distribution channel. The description can be a maximum of 20 characters long.
Define your own distribution channel by entering the previous two entries. Figure 2-10 shows the two distribution channels that we have set up for Galaxy Musical Instruments.
Menu Path Conventions
You will encounter the Choose Activity screen for almost all the components that you will configure under the enterprise structure. From now on, instead of writing about the Choose Activity screen every time and then asking you to choose an option, we will denote the step within the menu path. For example, we’ll use IMG Enterprise Structure Definition Sales And Distribution Define, Copy, Delete, Check Distribution Channel Define Distribution Channel. The rest of the book will also follow this standard.
You also saw the use of copy option while setting up the sales organization. When used with other components, the functionality works the same way. When you use it for defining a sales organization, it allows you to copy, check, and delete the sales organization; when used with a distribution channel, it copies, checks, and deletes the distribution channel. Therefore, instead of going over this copy function every time, we will discuss customizing other components of the enterprise structure using the Define option.
Assigning a Distribution Channel to a Sales Organization
Now that we’ve defined the distribution channel, we can assign it to the sales organization.
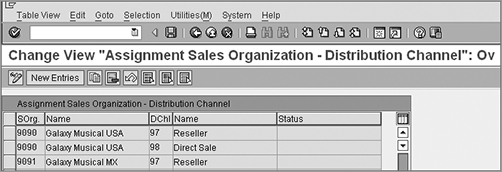
You can assign a distribution channel to a sales organization via transaction code OVXKN or the menu path IMG Enterprise Structure Assignments Sales And Distribution Assign Distribution Channel To Sales Organization. Once you reach the assignment screen, click the New Entries button, and enter the assignments for your distribution channel and sales organization. Galaxy Musical Instruments distribution channel assignments are shown in Figure 2-11 and are discussed in the “Galaxy Musical Instruments Configuration Analysis: Distribution Channel” sidebar.
Figure 2-11: Assigning distribution channel to sales organization
CASE STUDY—Galaxy Musical Instruments Configuration Analysis: Distribution Channel
Galaxy Musical Instruments primarily distributes its goods through its retail partners in the United States and Mexico. In addition, U.S. customers can place orders with Galaxy using its website. To map this structure into SAP SD, we configured two distribution channels, namely, 97 for resellers and 98 for direct sales. These distribution channels were then assigned to respective sales organizations 9090 and 9091, allowing the United States to sell via both channels, while allowing Mexico to sell only through the reseller channel.
Preexisting Channel Assignments
Just like in sales organization to company code assignment section, we noticed company code 1000 was pre-assigned to sales organization 9091; you will notice some distribution channels already assigned to sales organization 9091, which were copied over from 1000 to 9091. Let’s keep deleting any unwanted assignments and keep only the ones that we need, just like we did for our Mexico enterprise structure setup. For this scenario, we only want sales organization 9091 (Mexico) to be assigned to distribution channel 97 (Reseller) and therefore we deleted all other pre-existing distribution channel assignments for Galaxy that came via copy from 1000.
A division in SAP refers to the product division that exists in your organization. It is a way to group similar products or product lines in SAP. When you create a material master record in SAP, you create it for a particular division. A division is also one of the rules used by SAP to determine the sales area, which we will discuss later in this chapter.
Configuring a division is also a two-step activity. The first step is to create the division, and the second step is to assign the division to a sales organization. By assigning a division to a sales organization, you set up a rule in SAP that controls which product divisions a sales organization can and cannot sell from. For example, if you assign the Media & Apparel product division only to the U.S. sales organization, then SAP SD will not allow you to sell the media and apparel products using the Mexican sales organization. Like distribution channels, divisions are also available across the sales organizations. This means that you can assign the same division to multiple sales organizations.
Let’s now configure our division, starting with the definition step.
NOTE Division is a cross-application component within Logistics. It is also an integration point between the MM, PP, and SD applications. In SD we use divisions to create a sales area, but determining which product divisions are required to be set up is generally done by MM and PP consultants. You should make sure to work closely with your MM and PP counterparts before setting up a division in SAP SD.
Defining a Division
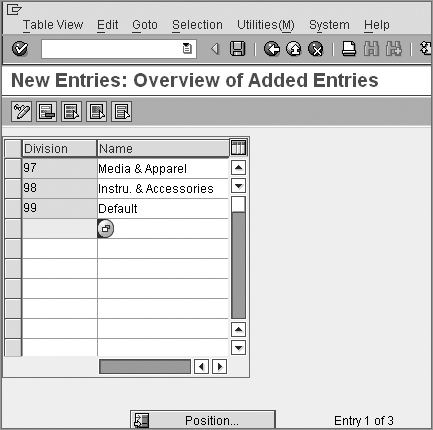
You can reach the required customization screen by using transaction code OVXB or by following menu path IMG Enterprise Structure Definition Logistics General Define, Copy, Check, Delete Division. Once you are at the customization screen, click New Entries to open the New Entries screen, as shown in Figure 2-12, which shows the division setup for Galaxy Musical Instruments.
Figure 2-12: New Entries screen for defining divisions
The fields on the displayed New Entries screen are Division and Name. Define your own division by filling in these two fields.
Division Here you enter a two-digit numeric or alphanumeric identifier key for your product division.
Name Here you enter a meaningful description for your product division. The description can be a maximum of 20 characters long.
Notice that in Figure 2-12 we created a default division: (99) for Galaxy Musical Instruments. The purpose of a default division is to allow cross-divisional sales. Without a default division, you can create a sales order only for Media & Apparel or for Instruments & Accessories. But what if a single customer order contains goods from both product divisions? You don’t want to create separate orders in SAP just because your SAP software is configured to accept orders on an either/or basis. Default division 99 provides you with the ability to create a single order for goods from different divisions while maintaining the flexibility to report sales at individual divisions. This process is called cross-divisional sales in SAP ERP.
CASE STUDY—Galaxy Musical Instruments Configuration Analysis: Divisions
Galaxy Musical Instruments is a distributor of musical products in the United States and Mexico. It sells musical instruments, accessories, audio, video, books, and various apparel. To map this structure into SAP ERP, Galaxy’s MM team came up with two product divisions: division 97, Instruments & Accessories, comprising all the musical instruments and related accessories, and division 98, Media & Apparel, comprising all video, audio, books, and wearable merchandise. In addition, we also created division 99 to allow cross-divisional sales within Galaxy Musical Instruments.
Assigning a Division to a Sales Organization
Now that we’ve defined the divisions, we can assign them to their respective sales organizations. You can assign a division to a sales organization via transaction code OVXAN or menu path IMG Enterprise Structure Assignments Sales And Distribution Assign Division To Sales Organization. Once you reach the assignment screen, click the New Entries button, and enter the assignments between sales organizations and divisions. Figure 2-13 shows an example of an assignment for Galaxy Musical Instruments.
Figure 2-13: The New Entries screen showing divisions assigned to sales organizations
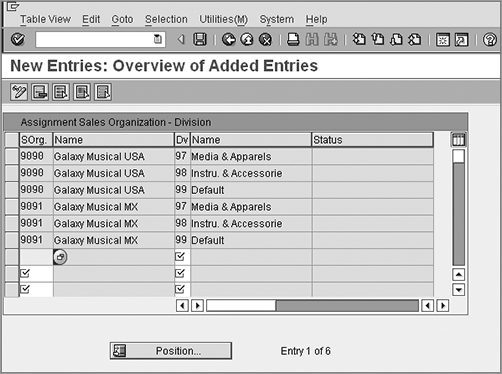
TIP Before exiting the screen shown in Figure 2-13, make sure that you delete the unnecessary division assignments that were copied over from 1000.
So far, we have configured the sales organization, distribution channel, and division elements for Galaxy Musical Instruments. Now we will enter these values in a particular order to create a sales area.
A sales area is the bare minimum structure required to process a sales transaction in the SD module. It combines the sales organization, distribution channel, and division that we have created so far. You cannot create a sales document or enter a customer master record in SD without a sales area. So far, we have created two sales organizations (9090 and 9091), two distribution channels (97 and 98), and three divisions (97, 98, and 99). Now it’s time to use our sales organization, distribution channels, and divisions to set up a sales area.
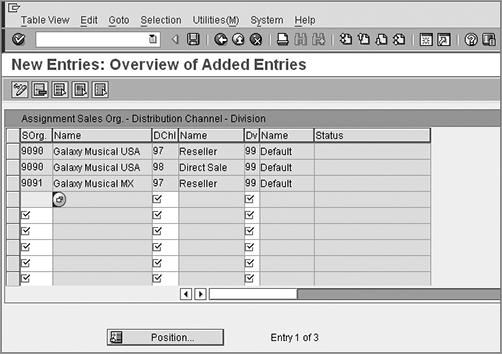
You can reach the required customization screen via transaction code OVXGN or menu path IMG Enterprise Structure Assignment Sales And Distribution Set Up Sales Area. Once you are at the customization screen, click the New Entries button to enter the required sales area entries. Figure 2-14 shows the sales areas setup for Galaxy Musical Instruments.
Figure 2-14: The New Entries screen for setting up the sales areas
CASE STUDY—Galaxy Musical Instruments Configuration Analysis: Sales Area
With the data elements in hand (two sales organizations, two distribution channels, and three divisions), we could define up to 12 sales areas. Because Galaxy Musical Instruments sells in Mexico via a reseller channel and in the United States via both reseller and direct sale channels and also because the Galaxy’s customer can place orders for cross-divisional products via a single order, we configured only three cross-divisional sales areas for Galaxy Musical Instruments, as shown in Figure 2-14.
Defining a Common Distribution Channel and Common Division
The next step in setting up the enterprise structure in SD is to define the common distribution channel and common division. In situations where your sales organization contains more than one distribution channel and more than one division, this customization setting is really helpful in reducing the master data maintenance efforts and avoiding master data duplication within a sales organization. Using a common distribution channel customization, you can define the master data for one distribution channel, and all other distribution channels that belong to that sales organization can use the same master data. You don’t have to create the master data separately for all the distribution channels. Table 2-1 shows this customization assignment via the example of sales organization ABCD with distribution channels 01 and 02 sharing common master data. Row 1 in Table 2-1 shows that distribution channel 01 uses its own master data, and row 2 shows that distribution channel 02 uses the condition record and customer/material master data defined for distribution channel 01.
Table 2-1: Example of Common Distribution Channel Setup

Common division customization works the same way for divisions that share common master data.
You can use transaction code VOR1 (Figure 2-15, top) or follow menu path IMG Sales And Distribution Master Data Define Common Distribution Channel to define a common distribution channel, and you can use transaction code VOR2 (Figure 2-15, bottom) or menu path IMG Sales And Distribution Master Data Define Common Division to define a common division setup.
Figure 2-15: Defining common distribution channels and common divisions

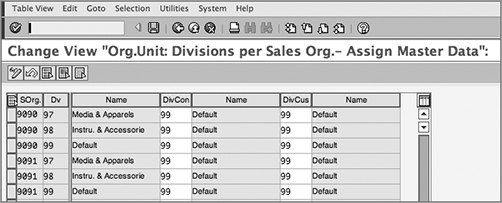
Always remember to define this setting irrespective of whether your business requirement setup needs a common distribution channel and common division. You won’t be able to create master data using the sales area you just defined if this customization setting is missing. If you don’t have a business requirement demanding a common distribution channel and common division setup, maintain the entry in VOR1 and VOR2 by keeping the source and target the same, as we did for Galaxy’s setup (shown in Figure 2-15).
In SAP, you can maintain various sales-related geographical locations of your organization as sales offices. You can set up a sales office in SAP to represent a branch office or even a sales territory.
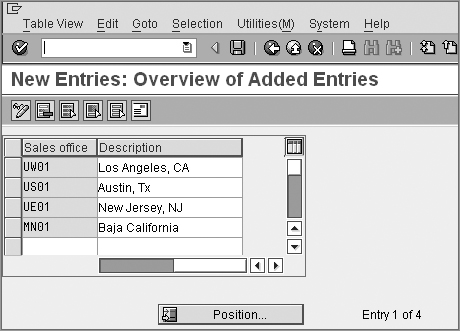
You can reach the required customization screen for defining a sales office by using transaction code OVX1 or by following menu path IMG Enterprise Structure Definition Sales And Distribution Maintain Sales Office. Once you are at the customization screen, click the New Entries button to open the New Entries screen, as shown in Figure 2-16.
Figure 2-16: New Entries screen for defining sales offices
The fields on the New Entries screen are as follows:
Sales Office Here you enter a four-character numeric or alphanumeric identifier key for your sales office.
Description Here you enter a meaningful description for your sales office. The description can be a maximum of 20 characters long.
Address button Here you enter the communication address for your sales office. To enter an address for a sales office, select the required sales office, and click the Address button ![]() on the sales office customization screen.
on the sales office customization screen.
Define your own sales office by entering the previous three entries. Figure 2-16 shows various sales offices set up for Galaxy Musical Instruments.
Figure 2-17 shows the Edit Address screen that you will use to maintain the office address for the sales office.
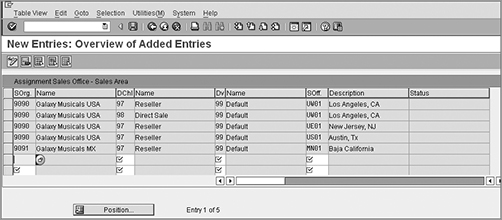
Once you have defined a sales office, the next step is to assign the sales office to a sales area. You can reach the customization screen to assign a sales office to a sales area by using transaction code OVXMN or by following menu path IMG Enterprise Structure Assignment Sales And Distribution Assign Sales Office to Sales Area. Once you reach the assignment screen, click the New Entries button, and enter the assignments between your sales offices and sales area. Figure 2-18 shows an example of assignments for Galaxy Musical Instruments.
Figure 2-17: Edit Address screen for entering sales office data
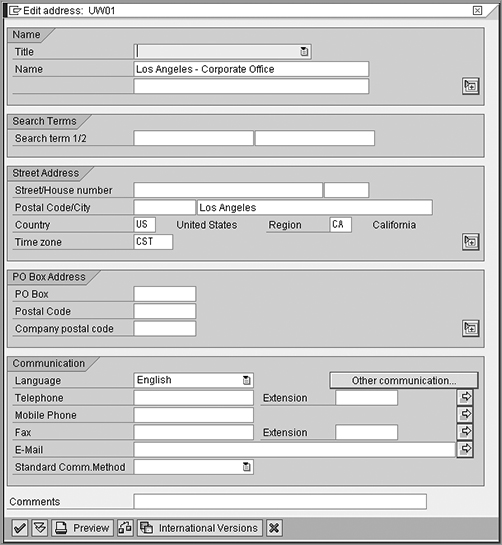
Figure 2-18: Assignment of sales office to sales area
CASE STUDY—Galaxy Musical Instruments Configuration Analysis: Sales Office
Galaxy Musical Instruments uses the following naming convention to name its sales offices in SAP: the first character stands for the country (United States), the second character stands for the region (E for the eastern region, and so on), and the third and fourth characters comprise a sequential number. Therefore, its two branch sales offices in the United States are named as US01 for Austin (TX) and UE01 for New Jersey (NJ), and the corporate head office is named UW01 for Los Angeles (CA). In Mexico, Galaxy has only one office, MN01 for Baja California (northern region). Internet sales are handled centrally from the head office in Los Angeles, whereas the sales through reseller mode are performed from all the branch offices and also from the head office. Galaxy decided to maintain this relationship in SAP using the sales office to sales area assignment procedure (shown in Figure 2-18).
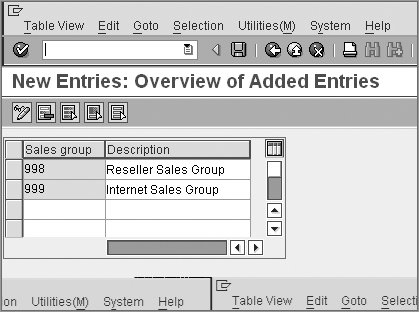
A sales group represents the grouping of your sales staff. This grouping is generally made on the basis of areas of responsibility. For example, you may have one group of sales staff that only solicits government contracts and another group that deals with everything else. You can set up a sales group in the SAP system either by using the transaction code OVX4 or by following the menu path IMG Enterprise Structure Definition Sales And Distribution Maintain Sales Group. Once you are at the customization screen, click the New Entries button to open the New Entries screen, as shown in Figure 2-19.
Figure 2-19: New Entries screen for sales group
Directions for completing the fields on the New Entries screen are as follows:
Sales Group Enter a three-character numeric or alphanumeric identifier key in this field for your sales group.
Description Enter a meaningful description for your sales group. The description can be a maximum of 20 characters long.
Enter the required data into the screen shown in Figure 2-19 to define your own sales group. To illustrate this concept, Figure 2-19 shows the setup of various sales groups for Galaxy Musical Instruments.
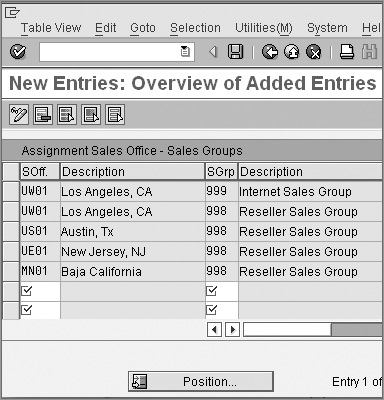
Once you have defined a sales group, the next step is to assign the sales group to the sales offices from which it can operate. You can reach the required customization screen to assign a sales group to its respective sales office by using the transaction code OVXJN or by following the menu path IMG Enterprise Structure Assignment Sales And Distribution Assign Sales Group To Sales Office. Once you reach the assignment screen, click the New Entries button, and enter the assignments between your sales offices and sales group. Figure 2-20 shows a sample assignment for Galaxy Musical Instruments.
Figure 2-20: Assigning sales group to sales office
CASE STUDY—Galaxy Musical Instruments Configuration Analysis: Sales Group
The sales group in Galaxy Musical Instruments is divided into two groups: an Internet sales group responsible for handling only sales from Galaxy’s website and a reseller sale group for sales via reseller channels. To map this structure into SAP, we created two sales groups: 999 for Internet sales and 998 for resellers.
In SAP, a plant is an organizational entity central to the logistics operation. A plant can be a production facility, a material stock location, or even a repair facility. From the point of view of SAP SD, a plant can be defined as a material stock location from where you can source the delivery of goods to your customers.
You can reach the required customization screen to define a plant by using the transaction code OX10 or by following the menu path IMG Enterprise Structure Definition Logistics General Define, Copy, Delete, Check Plant Define Plant. Once you are at the customization screen, click the New Entries button to call up the New Entries screen, as shown in Figure 2-21.
Figure 2-21: New Entries screen used to define plant
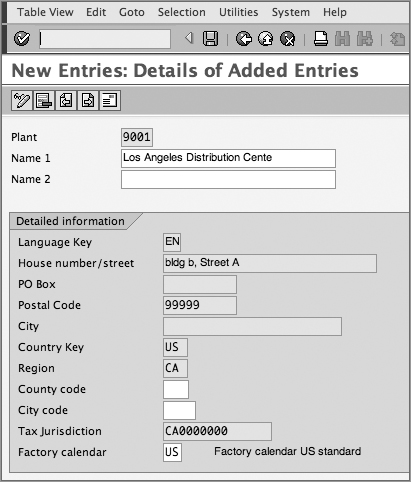
The fields on the New Entries screen are as follows:
Plant Here you enter a four-character identifier key for your plant.
Name 1/Name 2 Here you provide an identifying name or description for your plant.
Detailed Information The various fields under this grouping are used to capture the address details for the plant. This includes information such as the house number/street, region, country, city, postal code, and PO box. As you can see, all these fields are greyed out. You need to click the Address button to maintain this address data.
Tax Jurisdiction This field is used to capture the tax jurisdiction code for the plant for the purpose of tax calculations. We will cover tax related settings in detail in Chapter 5, “Pricing and Tax Determination.”
Factory Calendar The value in this field represents the operational factory calendar for the plant. A factory calendar sets the working/nonworking days for a plant.
Enter the required data into the screen shown in Figure 2-21 to define your own plant. This figure shows the setup for plant 9001 in Los Angeles for Galaxy Musical Instruments.
Once you have defined a plant, the next step is to assign it to its respective company code. This is very important because all the material movements are carried out in the framework of a plant. Each material movement that results in a financial transaction requires posting to accounting. This setting provides the link between the plant and the company code for such a posting.
WARNING A plant has a one-to-one relationship with a company code. You cannot assign the same plant to multiple company codes, although one company code can have multiple plants assigned.
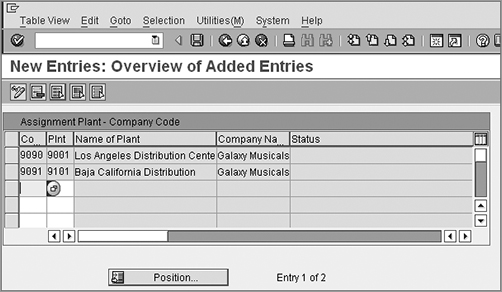
You can reach the customization screen to assign a plant to its respective company code by using the transaction code OX18 or by following the menu path IMG Enterprise Structure Assignment Logistics General Assign Plant To Company Code. Once you reach the assignment screen, click the New Entries button, and enter the assignments between your plant and the company code. Figure 2-22 shows an example assignment for Galaxy Musical Instruments.
Assigning the Sales Organization and Distribution Channels to Plants
Once the plant is defined, the next step is to assign the combination of the sales organization and distribution channel to the list of allowed plants from where the sales organization can sell the goods. If you miss this setting, you will not be able to create an order in SAP. When you create an order in the SAP system, SAP looks into this customization setting to find out whether there is any plant assigned to the combination of sales organization and distribution channel used in the sales order. If no entry is found, SAP generates an error message stating that it could not find an entry for the plant.
Figure 2-22: Assigning a plant to a company code
CASE STUDY—Galaxy Musical Instruments Configuration Analysis: Plant
Your sourcing and distribution strategy helps you decide the number of plants you need to set up in SAP. Galaxy manages all its distribution activities from its main plant and warehouse in Los Angeles. Galaxy has another plant in Mexico to handle local delivery within Mexico.
Galaxy Musical Instruments follows a strict naming convention to name the plants in SAP. The first two characters in the plant number represent the country where the plant is, and the last two sequential characters represent the number allocated to the plant. Therefore, the two plants for Galaxy Musical are named 9001 for Los Angeles (where 90 stands for the United States and 01 stands for the Los Angeles plant) and 9101 for Baja California (where 91 stands for Mexico and 01 stands for the Baja California plant). These plants were then assigned to their respective U.S. and Mexican company codes.
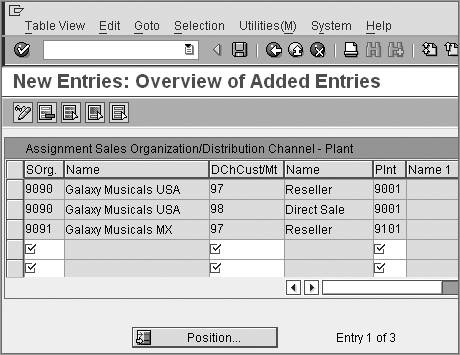
The transaction code here is OVX6N, and the menu path is IMG Enterprise Structure Assignment Sales And Distribution Assign Sales Organization and Distribution Channel To Plant. Once you reach the customization screen, click the New Entries button, and enter the assignments between the required sales organization, distribution channel, and plant. Figure 2-23 shows an example assignment for Galaxy Musical Instruments.
Figure 2-23: Assigning a sales organization and distribution channel to a plant
CASE STUDY—Galaxy Musical Instruments Configuration Analysis: Setting Up Allowable Plants
Galaxy Musical Instruments supplies goods to customers in Mexico locally from its 9101 plant in Baja California and to its U.S. customers via its 9001 plant in Los Angeles. For Galaxy to be able to sell from 9101 and 9001 using SAP, it needs to assign these plants to their respective sales organization and distribution channels. Figure 2-23 represents the setup for the allowable plants maintained in Galaxy Musical Instruments for the United States and Mexico.
A storage location in SAP represents the location in the plant where the goods are stored. The stock is maintained at this level. When the goods are received, the stock at the storage location goes up in the quantity received, and when the goods are sold, the stock at storage location is reduced according to the quantity delivered. You define the storage location using transaction code OX09 or using menu path IMG Enterprise Structure Definition Materials Management Maintain Storage Location. A storage location is always set up with respect to a plant, and therefore while customizing the storage location, the first screen you see is one like that shown in Figure 2-24. Here, enter the plant for which you want to set up the storage location, and click ![]() to reach the detailed customization screen shown in Figure 2-25.
to reach the detailed customization screen shown in Figure 2-25.
Figure 2-24: Initial customization screen to define storage location
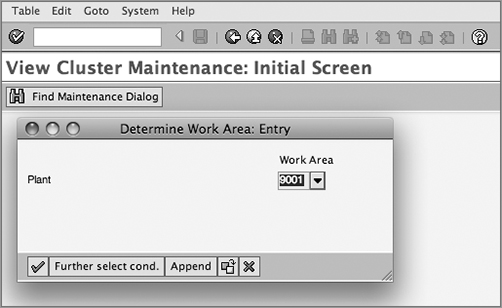
Figure 2-25: Defining a storage location, overview screen
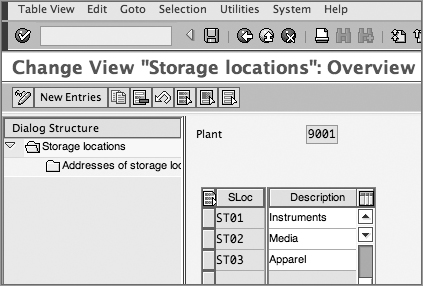
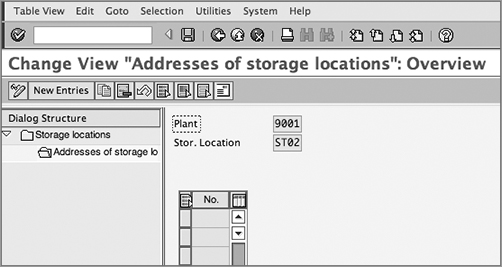
Click ![]() and define your storage location using an up to four-character unique identification key along with a meaningful description. Maintaining address data for your storage location is optional and is generally required only if your plant is very large and the storage location has its own address within the plant. To maintain address data for a storage location, select the required storage location and double-click the option for addresses of the storage location in the dialog structure on the left. You will see another screen like that in Figure 2-26. Click
and define your storage location using an up to four-character unique identification key along with a meaningful description. Maintaining address data for your storage location is optional and is generally required only if your plant is very large and the storage location has its own address within the plant. To maintain address data for a storage location, select the required storage location and double-click the option for addresses of the storage location in the dialog structure on the left. You will see another screen like that in Figure 2-26. Click ![]() to open the New Entries screen, and use
to open the New Entries screen, and use ![]() to maintain the address data. Once you are done setting up your storage location, click
to maintain the address data. Once you are done setting up your storage location, click ![]() to save your entry.
to save your entry.
Figure 2-26: Defining a storage location, address maintenance screen
A shipping point represents the organizational entity where the deliveries are processed. Each plant needs to have at least one shipping point from where the deliveries pertaining to that plant can be processed. You cannot create and process a delivery in SAP without a shipping point.
You define shipping points in SAP by using transaction code OVXD or by following menu path IMG Enterprise Structure Definition Logistics Execution Define, Copy, Delete, Check Shipping Point Define Shipping Point. Figure 2-27 shows the customization screen used to set up a shipping point in SAP. An explanation of the fields shown in Figure 2-27 follows.
Shipping Point Here you provide a four-character identification and a description for your shipping point.
Location The two fields in this section are Country and Departure Zone. These two fields represent the departure country and departure zone location for your shipping point. Country helps in determining taxes during pricing and determining country-specific standards, such as postal code length, for example. Departure Zone influences the delivery scheduling and also helps in route determination for deliveries being processed at the shipping point. To maintain the value in these two fields, you need to call up the address maintenance screen for the shipping point using the Address button ![]() on the menu. Maintain the address data for the shipping point, and enter the country and departure region information on the address screen. When you close the address screen after the successful maintenance of the address data, the values for Country and Departure Zone will automatically populate the customization screen, as shown in Figure 2-27.
on the menu. Maintain the address data for the shipping point, and enter the country and departure region information on the address screen. When you close the address screen after the successful maintenance of the address data, the values for Country and Departure Zone will automatically populate the customization screen, as shown in Figure 2-27.
Figure 2-27: Customization screen for defining a shipping point
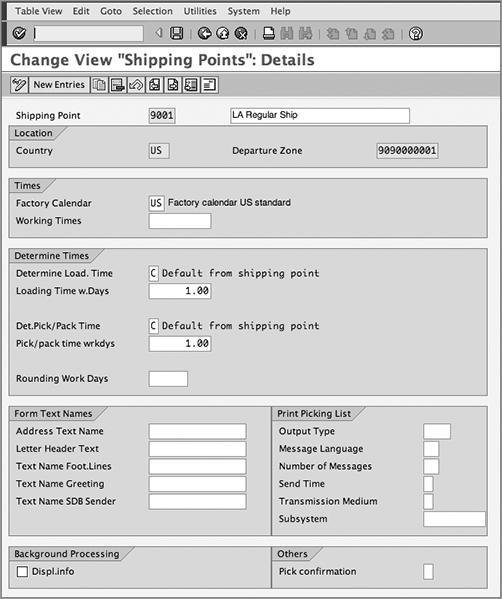
Times Using the Factory Calendar and Working Times fields in this section of the screen, you can set up the working days and working hours for your shipping point.
Determine Times The fields available in this section of the screen influence the delivery scheduling for the shipping point. The fields are explained here:
Determine Load. Time This field helps determine the time taken for loading the goods. You can choose A for route-dependent and B for route-independent loading time determination. Choose C, and SAP will pick the loading time you defined for the Loading Time w.Days field. You can leave the value in this field blank if you do not want the loading time to be determined. (We cover route determination in detail in Chapter 8, “Shipping.”)
Loading Time w.Days Here you enter the loading time that you want to consider in delivery scheduling for your shipping point.
Determine Pick/Pack Time This field helps determine the time taken for picking/packing the goods. You can choose A for route-dependent and B for route-independent pick/pack time determination. Choose C, and SAP will pick the time you defined in the Pick/Pack Time Wrkdys field. You can leave the value in this field blank if you do not want the loading time to be determined. (We cover route determination in detail in Chapter 8.)
Pick/Pack Time Wrkdys Here you enter the picking/packing time that you want to consider in delivery scheduling for your shipping point.
Rounding Work Days Here you enter the safety margin for the estimated time required for processing the delivery.
Form Text Names Address Text Name, Letter Header Text, Text Name Foot.Lines, Text Name Greeting, and Text Name SDB Sender are the fields available in this section of the screen. This is where you can enter text that appears frequently on various shipping outputs. You maintain this text using transaction code SO10.
Print Picking List The fields in this section control the output processing for picking lists. Here you define the output type, the output language (Message Language field), the number of times you want to generate output (Number Of Messages field), the timing for sending the output (Send Time field), and the medium in which you want to send the output such as print or fax (Transmission Medium field). We explain output processing in detail in Chapter 4, “Partner, Text, and Output Determination.”
Background Processing Selecting the Displ.info field check box will help you display information messages in addition to error messages in the delivery due list processing log.
Others The Pick Confirmation field in this section controls the picking confirmation’s applicability for a shipping point. Select A here if you want make confirmation compulsory for all the items processed via this shipping point. This is applicable only where you don’t use MM–WM transfer orders to perform picking.
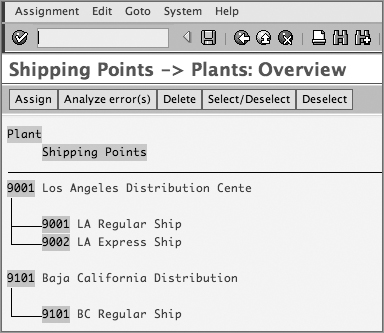
Once defined, the shipping points are assigned to plants. You can assign one shipping point to multiple plants, or one plant can have multiple shipping points. The transaction code is OVXC, and the menu path is IMG Enterprise Structure Assignment Logistics Execution Assign Shipping Point To Plant. Figure 2-28 shows the plant-shipping point assignment for Galaxy Musical Instruments.
Figure 2-28: Customization screen for shipping point assignment to plant
CASE STUDY—Galaxy Musical Instruments Configuration Analysis: Shipping Points
Galaxy Musical Instruments created three shipping points: LA Regular Ship is 9001, LA Express Ship is 9002, and BC Regular Ship is 9101. Shipping points 9001 and 9002 were assigned to U.S. plant 9001, and shipping point 9101 was assigned to Mexico plant 9101. All regular shipments in the United States are processed at shipping point 9001, and all customer deliveries requiring express shipments are handled by shipping point 9002. For Mexico, all shipments are processed using shipping point 9101, which is called BC Regular Ship.
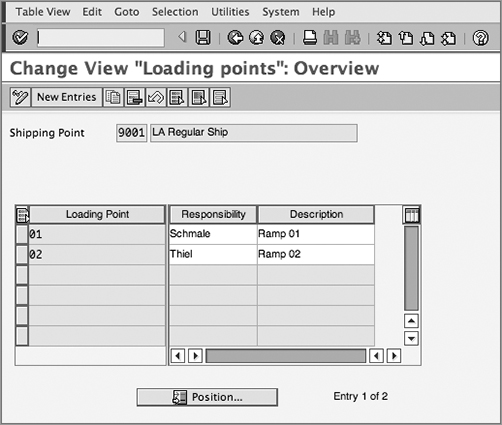
In SAP, you can divide a shipping point into multiple loading points. Setting up a loading point is optional. You can define a loading point by using transaction code OVX7 or by following menu path IMG Enterprise Structure Definition Logistics Execution Maintain Loading Point. Because a loading point is a subdivision of a shipping point, the first screen you will encounter will be a dialog box asking you to enter a shipping point. Here, enter the shipping point for which you want to set up the loading points, and click ![]() to reach the detailed customization screen in Figure 2-29. To define your own loading point, provide a two-character identifier and a meaningful description. Figure 2-29 shows the two loading points that we created for shipping point 9001.
to reach the detailed customization screen in Figure 2-29. To define your own loading point, provide a two-character identifier and a meaningful description. Figure 2-29 shows the two loading points that we created for shipping point 9001.
Figure 2-29: Defining loading points
Setting Up a Transportation Planning Point
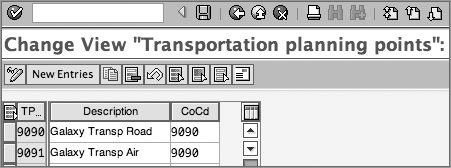
A transportation planning point is the organizational unit that manages transportation-related activities. The shipment documents are assigned to specific transportation planning points. You can define a transportation planning point using transaction code OVXT or following menu path IMG Enterprise Structure Definition Logistics Execution Maintain Transportation Planning Point.
To define your own transportation planning point, create a new entry as shown in Figure 2-30. Specify a four-character long alphanumeric name, as well as a description. Assign the entry to a company code. You can also maintain the address of this organizational entity.
Figure 2-30: Transportation planning point
Customization Rules
Before we define a factory calendar, there are a few technical points that we need to address while customizing:
- Always use Y or Z as prefix for the customization settings that you make in SAP. The enterprise structure that we configured earlier was an exception to this rule. The letters Y and Z are reserved in the SAP system for customer-specific customizations. When you make changes directly to SAP-provided customization objects without using a Y or Z, you run the risk of your changes getting overwritten by the next SAP system upgrade. All the customization settings that we will discuss in the remainder of this book will follow this rule.
- Customization changes in SAP are of two kinds: client dependent and client independent. A client-dependent setting is specific to the SAP instance you are customizing. A client-independent setting is independent of the current instance you are working. A client-independent setting affects all the instances of SAP that are installed on one system. Always take extra precautions when you configure a client-independent setting, because it will have a global impact across SAP clients.
In SAP, a factory calendar helps you define the number of working days for your organization. The transaction code is SCAL, and the menu path is IMG SAP NetWeaver General Settings Maintain Calendar. Figure 2-31 shows the initial screen for calendar maintenance. As you can see, you can use this customization screen to define factory calendars and holiday calendars in SAP. Calendars are part of the global settings in SAP and are used by many areas in the logistics and human resource applications of SAP. Setting up a calendar in SAP is a client-independent setting, and the changes to calendars are not automatically captured in a transport request. You have to manually capture these changes into a transport request for moving them between various instances of your SAP system—development, quality, and production, for example.
Figure 2-31: Main menu screen for defining SAP factory calendar
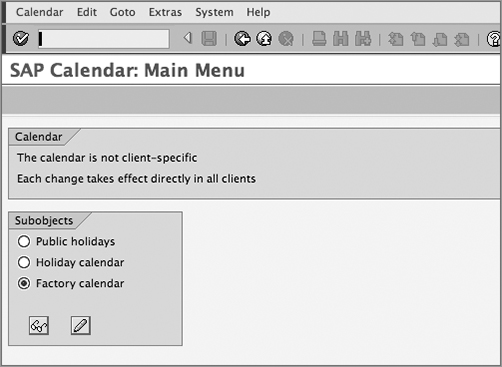
To define a factory calendar, select the factory calendar option on the customization screen shown in Figure 2-31, and click the pencil icon. Now you will see the overview screen for factory calendar customization, showing various factory calendars that exist in your SAP system (see Figure 2-32).
Figure 2-32: Overview screen for defining a factory calendar
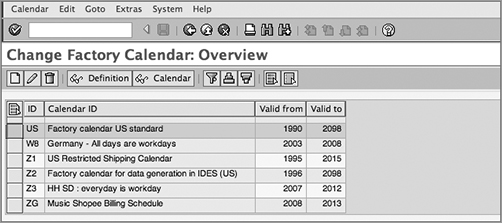
You can click the pencil icon on the menu to change an existing calendar, the recycle icon (to the right of pencil icon) to delete an existing calendar, and the create icon on the left of the pencil icon to create a new factory calendar. Let’s click the create icon to create a new factory calendar called ZZ for Galaxy Musical Instruments USA. You will be presented with a calendar customization detail screen, as shown in Figure 2-33.
Figure 2-33: Customization screen for maintaining a factory calendar
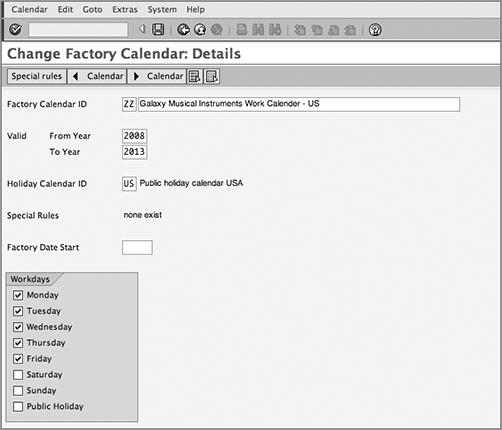
The screen is self-explanatory. Create the new factory calendar by providing a two-character identification key starting with a Y or Z prefix and by providing a meaningful description. Figure 2-33 tells you that the factory calendar ZZ is valid from year 2008 to 2013 with five working days per week (Monday to Friday) and a holiday calendar assigned as US.
For Galaxy, we created factory calendars ZZ for the United States and ZX for Mexico with both calendars having five working days per week.
Once you are done with all the customization related to enterprise structure setup, you should perform a consistency check in the SAP system to check whether the customization settings are correct in all respects. You can perform the consistency check using transaction code OVX8N or following menu path IMG Enterprise Structure Consistency Check Check Enterprise Structure For Sales And Distribution. Figure 2-34 shows various checks that are performed by SAP when you run the consistency check for SD. For example, you can check whether the address is correctly entered in all the sales organizations, whether the distribution channel is correctly assigned to the sales organization, and whether the sales area is correctly set up.
Figure 2-34: Check Report for Customizing – Organization – SD screen for sales organization
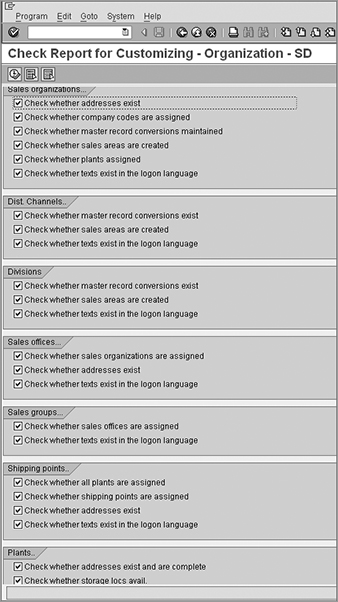
Always make sure to perform this consistency check once you are done with your customization settings for enterprise structure in SAP SD. If the consistency check report shows errors, go back to the respective customization screens and make corrections. You won’t be able to use your structure if there are errors in customizing.
In this chapter, we showed you how to set up an enterprise structure in SAP SD. We explained the various elements of an enterprise structure, their use, and their arrangement in the structure. There is one more important component of the enterprise structure still to discuss. This is called credit control, and we will cover it in detail in Chapter 11, “Credit Management.”
In Chapter 3, we will talk about master data in SAP SD.
