Chapter 3: Master Data in SD
Master data is any information that plays a key role in the core operation of a business. It may include data about clients and customers, employees, suppliers, products, and so on. Master data is typically shared by multiple users and groups. Hence, it is important to consult with the entire organization when you set it up. When you enter transaction data, the master data is copied over. This saves a lot of time and effort in data entry and ensures the consistency of information.
Master data comes in several types. The customer master and material master are the most important types and are the focus of our discussion in this chapter. In fact, all the subsequent chapters in this book will refer to topics in master data. Other master data types, such as the price master, output master, text master, customer–material information, and material determination, will be covered in the context of their respective chapters.
The customer master is a data record that contains all the information pertaining to a client, a customer, or any other business partner who plays a role in the business. As noted, a master data record is shared and updated across the organization. The customer master data is used and updated by the sales department (which maintains the customer groups, preferences, classification, and so on) and the finance/accounting department (which is more concerned with things such as bank details, credit classification, and account numbers). The common data—such as the customer’s name and address—is used centrally. Based on this requirement, SAP structures customer master data into three parts:
- General data, which is common to the entire organization
- Sales data, which is specific to a sales area
- Company code data, which is specific to the company code
This breakdown enables you to segregate authorizations and structure the customer master data.
Common Terms in Customer Master Data
Before proceeding with how to set up the customer master, you need to understand what partner functions and account groups are.
Partner Functions
In each sales transaction, different groups or individuals can have different roles and responsibilities. For example, at the customer location, the party who places the order can be different from the receiving party. In addition, an invoice may need to go to a different address than that of the payer. Therefore, you have to map all these different roles in the system, which are called partner functions.
When you create customer master data, you also specify the roles that the customer will play. SAP then copies this information to all the sales documents for this customer. Thus, you can ensure that the delivery is shipped to the door of the ship-to party and that the correct payer is scheduled to make the payments.
The following partner functions are the most frequently used:
- Sold-to party (AG)
- Ship-to party (AU)
- Bill-to party (RE)
- Payer (RG)
We will discuss partner functions in more detail in Partner determination section of Chapter 4, “Partner, Text, and Output Determination.”
Account Groups
Each partner function is assigned to an account group. Account groups are primarily used to control the screens and fields required to maintain data for each customer, based on the customer’s roles. As you will see in the subsequent sections, you can control several important settings based on the account group.
Creating Customer Master Data
The menu path to access customer master data is SAP Menu Logistics Sales and Distribution Master Data Business Partner Customer.
Under Business Partner (see Figure 3-1), the nodes let you create or change other business partners such as sales partners and forwarding agents.
You can use three sets of transaction codes to create and update customer master records:
XD01 XD01 gives you the authorization to maintain all views of the customer master data. Hence, it’s a master transaction code, which only a few individuals in the organization should have permission to use.
VD01 VD01 confines the user to maintaining the sales area data and general information, preventing access to the company code data.
FD01 FD01 is the converse of VD01. It permits the user to maintain the general information and company code data, preventing access to sales data.
In this chapter, you will work with XD01 only.
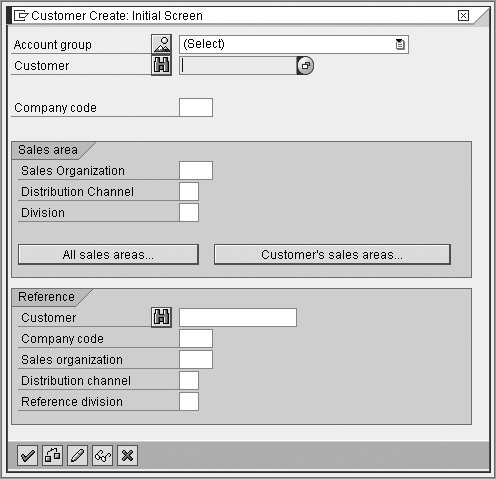
When you enter the transaction code, the screen shown in Figure 3-2 is displayed. Specify the sales area and company code for the data being set up.
To help expedite setting up the data, you can always copy data from an existing customer record. In the Reference tab of the screen shown in Figure 3-2, you can enter any existing customer number and specify the sales area. Data fields will be copied over from the reference customer. Then you can change them as required.
Figure 3-1: Menu for Business Partner
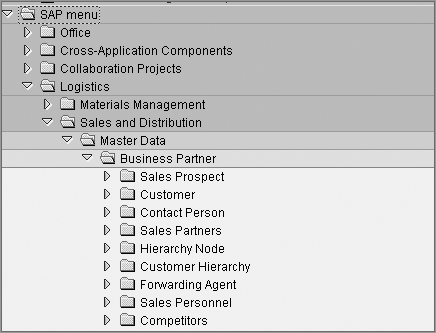
Figure 3-2: Customer Create: Initial Screen
The customer master data is divided into three areas:
- The General Data section has common information such as the Address tab, which contains name and contact information details, control data (such as industry, transportation zone, and tax information), payment transaction (bank details and payment card details), marketing (Nielsen ID and other classification), and other tabs based on relevance to the business.
- The Sales Area Data section has tabs called Sales (containing information on sales groups, pricing classifications, and so on), Shipping (which controls items such as delivery priority, shipping conditions, and so on), Billing (for tax classifications, Incoterms, and so on), and Partner Functions.
- The Company Code Data section has tabs called Account Management (reconciliation account details) Payment Transactions, Correspondence, and Insurance. From the General Data and Sales Area Data sections, you can also branch out to Extras Additional Data to reach other fields.
Many of these data fields are copied over from the customer master to transaction documents (sales orders, delivery documents, and invoices) and control several functions.
One-Time Customers
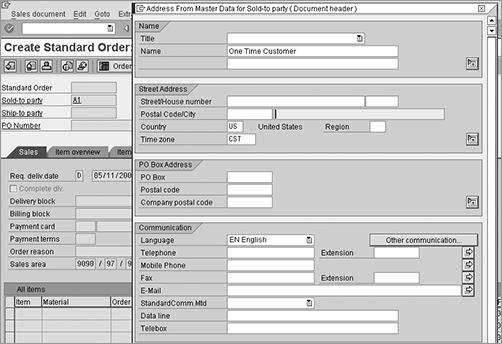
Some customers require your service once in a lifetime. Therefore, it is not required to set up these types of customers. In such cases, you can set up a one-time customer master record. In this type of customer master, you do not capture any data specific to a single customer. This makes the customer master record reusable. Specifically, the same customer number has different names and address information in different sales documents, and whenever you use a one-time customer number in a sales order, the system prompts you to enter the actual name and address of the customer placing this specific order (Figure 3-3). Since this data is stored only in the current sales document, you can reuse the customer number. One of the common business processes where a one-time customer is used is in a regular cash sale. Because the customer pays immediately for the product or service, there is no need to track and maintain a record for future use.
Figure 3-3: Using a one-time customer in a sales order
Maintaining Customer Master Records
The following transactions help you maintain existing customer master records in the system:
Change Customer Master (VD02, XD02, FD02) These are the transactions to change or update customer master screens. As discussed earlier, each of these codes controls access to some or all of the data tabs.
Display Customer Master (VD03, XD03, FD03) These transactions allow the user to display the master data without making any changes to it.
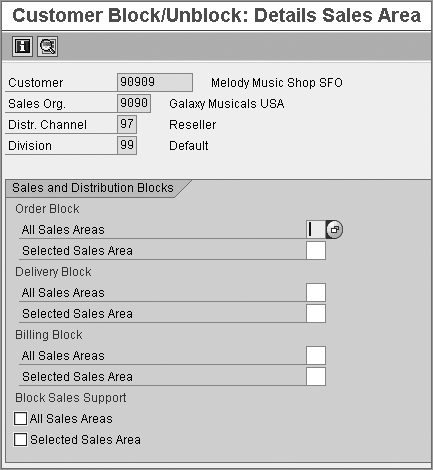
Block A Customer (VD05) This transaction is used to block a customer from transacting business with your organization. As seen in Figure 3-4, you have options to block sales orders, delivery, and billing documents in some or all the sales areas.
Figure 3-4: Customer Block/Unblock: Details Sales Area screen
Flag For Deletion (VD06) You can flag a customer master record for deletion using this transaction. Again, you have the option to delete the data specific to a sales area or across the organization. The system also gives you an option to retain the general data of the customer and delete business-relevant data such as Sales Area. This way, you can retain the basic customer record for future reference.
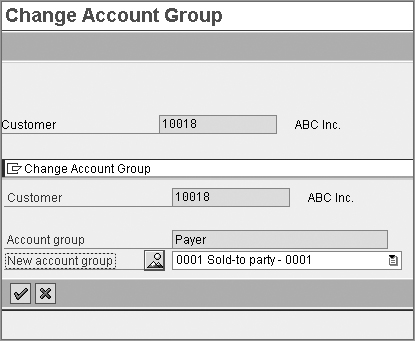
Change Account Group (XD07) If you need to upgrade a customer to play a larger role or multiple roles, you can change its account group. In this transaction, specify the customer to be changed and the new account group. You get a checklist of any additional screens and fields that must be entered before you can promote the customer. You can then maintain the data and change the account group. In Figure 3-5, a payer is being promoted to a sold-to party.
You can use this transaction only to promote a customer from a lower-level to a higher-level account group. The converse is not possible. For example, you can promote a payer to a sold-to party, which would require additional fields to be maintained. However, you cannot change a sold-to party to a lower level such as a payer, since you cannot mask or undo fields that are already maintained.
Figure 3-5: Change Account Group screen
Customizing Customer Master Data
We’ve discussed how to create and maintain customer master data, so now we’ll cover the various customization settings that you need to control.
Defining Account Groups
SAP comes with a set of standard account groups that should meet most business requirements. However, if you want to segregate different groups of customers with different number ranges or screen layouts, you can create additional account groups. For each account group, you can control the setup of various screens, fields, and attributes. If you need to set up a custom account group, use the following path: IMG Financial Accounting Account Receivable and Account Payable Customer Accounts Master Data Preparation For Creating Customer Master Data Define Account Groups With Screen Layouts.
Change LoG in the Customer Master
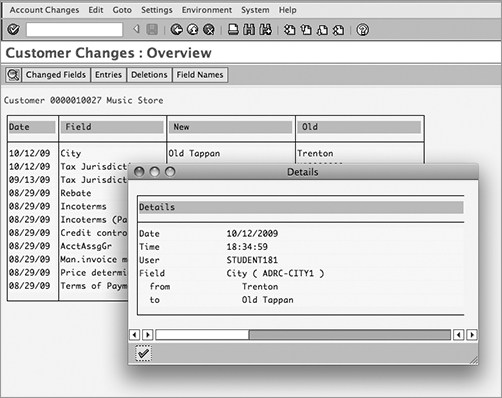
Each customer master record is shared across the organization. Any changes made to it have to be tracked and recorded. Hence, the customer master has a change log that records each change made along with the date, the time, and the user who made it. To access the change log from the customer master record, use the path Environment Account Changes All Fields. This lists all the fields that have been changed along with the old and new values, a time stamp, and the user ID. Thus, you have total traceability for the changes. For example, you can see a change log for a customer address here. The change log clearly indicates the date, the time, and the user who changed the city of the customer from Trenton to Old Tappan.
TIP In most enterprises, account groups are maintained by the FI team. Thus, you should consult with your FI and MM teams before you make any changes.
In the customization menu, follow this path to get to the customer master setup menu (Figure 3-6): IMG Logistics – General Business Partner Customers Control.
Figure 3-6: Customer master customization menu
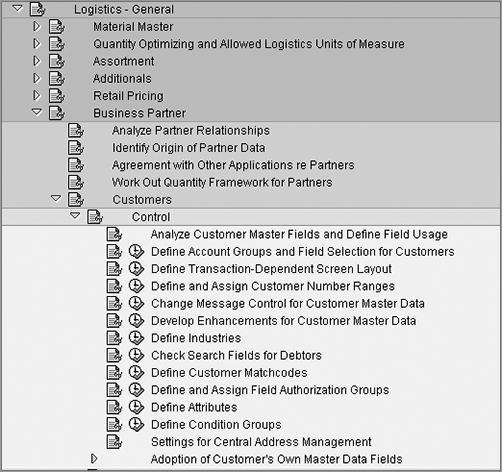
We’ll now discuss some of the key settings you can access from the Control node.
Defining Account Groups and Field Selection for Customers (OVT0)
For each account group, you can customize the screens, mark fields as mandatory or optional, and even hide them. The purpose of this step is to keep only those fields that are relevant to your business.
To do this, start by specifying the account group that you want to customize, and then click the Details icon. In Figure 3-7, we have selected the account group 0001 (Sold-To Party).
The Details screen will show you the attributes of the account group, such as the number range and partner determination procedure. To customize the field selection, first choose from General Data, Company Code Data, or Sales Data. Double-click any of these to go to the Maintain Field Status Group: Overview screen (Figure 3-8).
Figure 3-7: Change View “Customer Account Groups”: Details screen
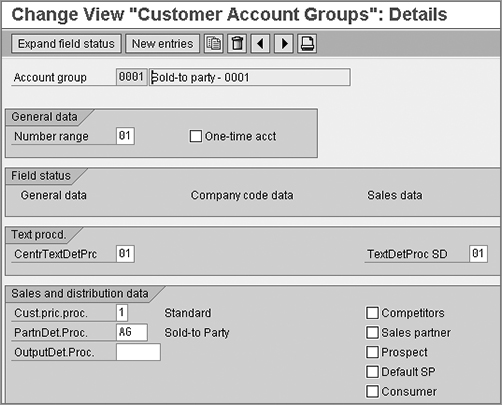
Figure 3-8: Maintain Field Status Group: Overview screen
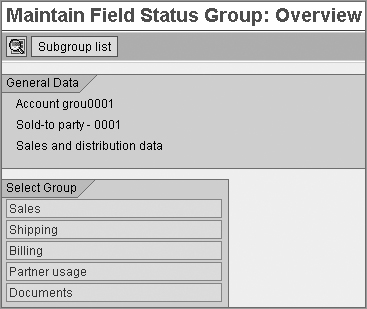
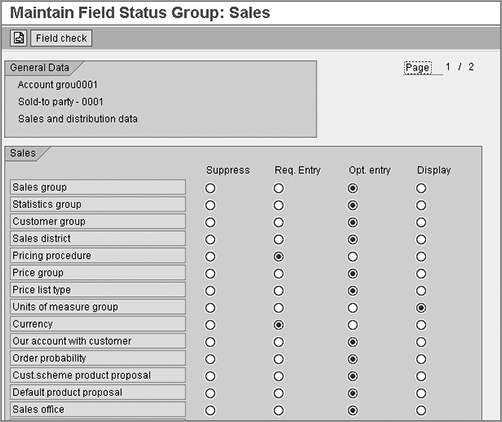
The fields are grouped together logically under tab names such as Address, Communications, and Marketing. Select the tab you want to configure, and click Choose (Figure 3-9).
The fields grouped under the chosen tab are now displayed. Radio buttons present four options for marking each field: Suppress (hidden), Req. Entry (required entry), Opt. Entry (optional entry), and Display (nonchangeable).
Figure 3-9: Maintain Field Status Group: Sales view
Defining a Transaction-Dependent Screen Layout (OB20)
In this option, you can control the fields and screens as discussed in the earlier section but based on each transaction code. This is not generally recommended and should be used selectively, only if you have typical requirements. For example if you need to mark a field as active in create mode (XD01) and as display only in change mode (XD02), you can use this option.
Defining and Assigning Number Ranges
Each account group is assigned a number range. Every new customer who you create will get a unique number from the specified number range. This helps in segregating and numbering similar partner functions serially. In the case of account group 0001, we have assigned number range 01 (Figure 3-10) and have defined the number range interval as between 10001 and 99999 (Figure 3-11).
Figure 3-10: Assigning a number range to the account group

Figure 3-11: Defining a number range interval
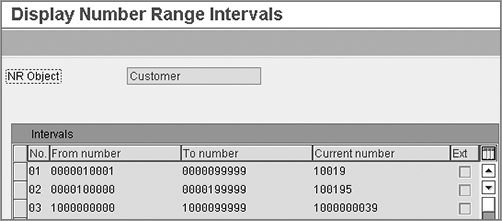
Note the Ext. check box at the far right of Figure 3-11. This is where you can mark a number range as external. If you selected this box, the system would prompt you to choose a number for the customer being created. This is particularly useful if you have an external interface from which customer master data is being copied into SAP and you are required to keep the same number as was used in the parent system. In our case, we have opted for an internal number range.
After you have customized the screens and assigned a number range, you can proceed to configure the various key fields in the customer master data.
TIP Before you configure the fields in the customer master data, it is advisable to check the reporting requirements of your organization. Based on the reporting criteria, you can set up the grouping fields and hence derive reports easily.
Defining Industries
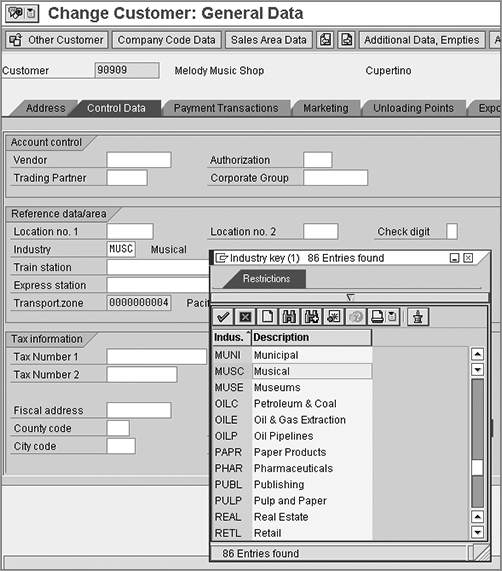
An industry is a group of customers with the same basic business activity. You can specify industries of your customers, such as trade, banking, service, manufacturing, healthcare, public service, media, and so on. The Industry appears in the general data of the customer master record (as seen in Figure 3-12) and can be an effective grouping term.
In the case of Galaxy Musical Instruments, we have specified MUSC (Musical) as one of the industries for customers. We can derive a report or control a pricing discount based on this grouping.
Figure 3-12: Specifying an industry in the customer master data
Defining Attributes
SAP provides 10 freely definable attribute fields. You can use these fields to capture various attributes or preferences of your customer. They are two-character fields. To add values applicable to your organization, click the attribute in the list, and enter new values.
CASE STUDY—GALAXY MUSICAL INSTRUMENTS: CUSTOM MASTER
In the case of Galaxy Musical Instruments, we will go with the standard SAP account groups, as shown in this table:
| Account Group | Name |
| 0001 | Sold-To Party |
| 0002 | Ship-To Party |
| 0003 | Payer |
| 0004 | Bill-To |
| CPDA | One-Time Customer |
| 0012 | Hierarchy Nodes |
The regular customers (such as retailers of the company’s products) are mapped as sold-to parties (0001). The direct customers, who order over phone or online, are mapped as one-time customers (CPDA). We have set up a single account for them. We have also assigned internal number ranges. (Account group 0012 will be used in the “Customer Hierarchy” section of this chapter.)
We have then customized the data screens to mask the fields that are not relevant to us. For example, in the Sales view, we need only the fields Pricing Procedure and Currency to be mandatory. All other fields are marked as optional (as shown in Figure 3-9).
NOTE The attribute fields come with predefined names like Attribute 1, Attribute 2, and so on. You can change the names to make them more meaningful to your organization. Contact an ABAP expert to make changes to the data dictionary.
Customizing Fields in the Sales Area Data
We have now covered the settings in the Logistics – General menu for customer master data. Next, the action moves to the Sales and Distribution node in IMG so you can configure fields in the Sales Area data. The path is IMG Sales And Distribution Master Data Business Partners Customers. The following are some of the key settings from the list of nodes appearing here (see Figure 3-13).
Figure 3-13: Customizing menus for master data in the Sales And Distribution node
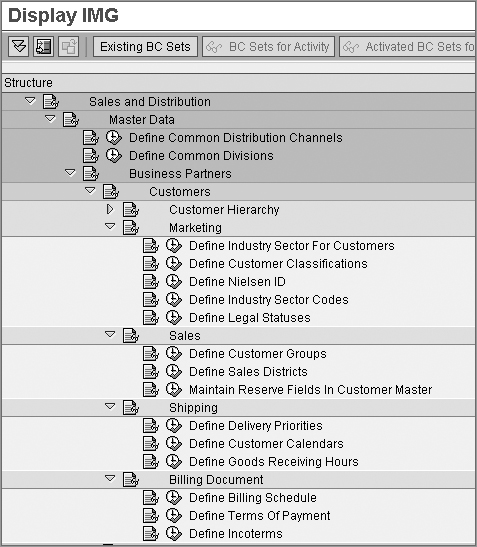
Marketing An enterprise’s sales and marketing team often classifies customers into various groups. External classifications such as the Nielsen ID for the customer can be defined here. These fields will appear in the Marketing view in the customer master.
Sales In this section, you can define sales districts that cater to various geographical areas. You can also create different customer groups. This helps users track regional sales and derive reports.
Shipping Among other functions, this tab lets you define delivery priorities. The value you input here will define the urgency of the order. Regular or important customers can be assigned a higher priority by default. This field gets copied into sales orders, where it can be changed manually, if needed. Delivery priority plays a critical role in getting stock committed to sales orders. You will study it in detail in Chapter 6, “Availability Check, Transfer of Requirements, and Backorders.”
Billing Document In this section, you can define Payment terms and Incoterms, as required. These are usually set up in consultation with the FI team.
You may need to map the client’s organizational hierarchy in SAP. In the case of large customers, there could be various regional offices that order from you independently. Hence, each one of them could be a separate customer number in the system, yet there could be requirement to map them into a group. Often prices or rebates are determined at the level of the parent node of the hierarchy and apply to the entire family. This requirement is fulfilled by the customer hierarchy functionality.
The customer hierarchy is a grouping of customers in a flexible organizational structure. At each level you can specify the higher-level customer and thus build a multilevel structure. Any specific data (such as the price record, rebate agreements, and so on) is maintained at a higher-level node and then flows down to all the dependent nodes in the tree. A validity period is attached to the hierarchy so that if there is any change to the structure, it can be made effective from a specific date.
Partner determination (see Chapter 4) also plays a key role in reflecting the complete hierarchy in sales documents. Once a customer is entered in a sales document, SAP can trace all the higher-level nodes in its hierarchy up to the apex node.
Creating a Customer Hierarchy
Before you set up a hierarchy, always create an organizational chart where you plan the hierarchy and gather the following information:
- What are the customer numbers that need to be linked?
- What is the hierarchical relationship between these customers?
- Do I need to set up any additional nodes in the hierarchy? (Nodes may be required to set up intermediate grouping levels to complete the picture.)
- What are the account groups of all these customers?
- Which sales areas are these customers assigned to?
- Which sales document type would require this hierarchy?
- Which price and rebate conditions would depend on the hierarchy?
Prerequisite Steps
The following are the master data steps you will need to take before you can create a hierarchy:
Step 1: Create Customer Master Records You should create customer master records for each of the customers you plan to link together in the hierarchy.
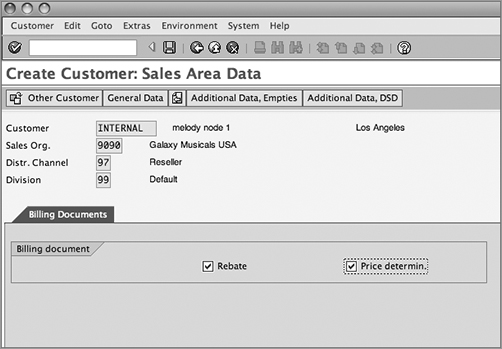
Step 2: Create Hierarchy Nodes To complete the logical setup of a customer hierarchy, you sometimes need to define hierarchy nodes. These are not actual customers but logical grouping levels. A hierarchy node is set up as a customer with account group 0012. You can use VD01 or XD01 and specify the account group there. Alternatively, there is a special code, V-12, to set up hierarchy nodes. The path is SAP Menu Logistics Sales and Distribution Master Data Business Partners Hierarchy Node.
The procedure is the same as creating a customer master. In the sales billing view, there is a provision to activate relevance for price determination and rebates (Figure 3-14).
Figure 3-14: Creating a hierarchy node
Creating the Customer Hierarchy
Once you have completed all the prerequisites, you can proceed to set up the customer hierarchy. Use this menu path: SAP Menu Logistics Sales And Distribution Master Data Business Partners Customer Hierarchy Edit (VDH1N).
You can also launch this transaction from within a customer master (VD02 or XD02) via Environment Customer Hierarchy.
Here are the steps:
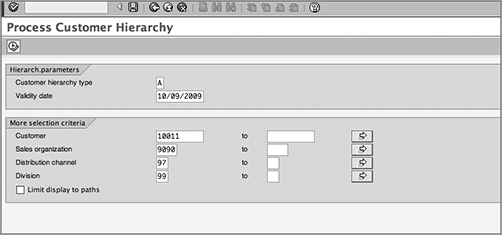
Step 1: Specify Hierarchy Type On the Process Customer Hierarchy screen, you set up a hierarchy. The hierarchy type controls the purpose of the hierarchy (for example, pricing or reporting). It also controls which account groups are permitted and which sales areas can use the hierarchy. Also, enter a validity period and the customer details on this screen (Figure 3-15).
Figure 3-15: Process Customer Hierarchy screen
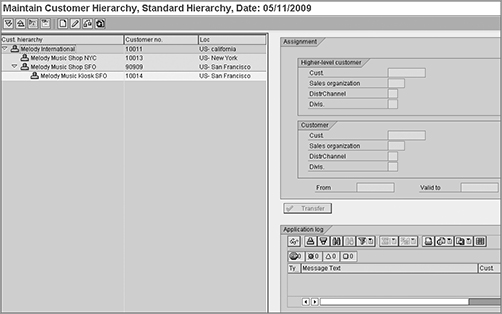
Step 2: Set Up Hierarchy Links Now set up the hierarchy, one link at a time. On the Assignment tab on the right of Figure 3-16, specify the two customers to be linked, and click Transfer. The updated hierarchy now appears on the left window. The Application Log tab, at the bottom right, signals whether the transfer was successful. If there is an error, you will find the details in the log.
Figure 3-16: Maintain Customer Hierarchy screen
Customizing a Customer Hierarchy
To customize the settings in the customer hierarchy, use the following menu path in the customization menu: IMG Sales and Distribution Master Data Business Partners Customers Customer Hierarchy.
We’ll discuss each step in this menu:
Step 1: Define Hierarchy Types (OVH1) The Hierarchy type controls the purpose of the hierarchy. All the major settings for customer hierarchy are carried out at this level. In the setting shown in Figure 3-17, the SAP Standard Hierarchy type A is assigned to partner function 1A. This is the apex of the hierarchy.
Figure 3-17: Linking a hierarchy type to a partner function

Step 2: Set Partner Determination For Hierarchy Categories Partner determination is important to copy the hierarchy data to sales documents. By customizing partner determination, the system will search for all the partners in the hierarchy of the customer in the order. They will appear as partners 1A, 1B, and so on, up to 1Z (26 levels). Use as many levels as required by your business.
Partner Determination can be set up for customer master, sales documents, delivery, shipment and billing documents. You can select one of these, from the menu. On the next screen, select the document type, and click Partner Functions In Procedure. As you can see in Figure 3-18, 1A to 1D (four levels) have been specified. They are marked as nonchangeable, and the source is specified as B (denoting a customer hierarchy).
Figure 3-18: Linking the hierarchy type to a partner function

Step 3: Assign Account Groups (OVH2) To control the assignment of customers in a hierarchy, you can set rules for account groups. For each account group, you specify which other groups are allowed to be at a higher level in the hierarchy. In Figure 3-19, for the hierarchy type A, the account group Sold-To Party (0001) can have another Sold-To Party group (0001), a Payer group (0003), or a Node group (0012) at a higher level. If you have defined any custom account groups, make sure this assignment is correct before you create your customer hierarchy.
Figure 3-19: Assigning account groups to a hierarchy type

Step 4: Assign Sales Areas (OVH3) Having set controls between account groups, you now check which sales areas are allowed at a higher level than others (Figure 3-20). If you need to link customers that belong to different sales areas, you can set up controls on which sales area is allowed to be at a higher level than the other. If a user tries to link together customers that belong to sales areas that are not permitted together in this setting, the system will issue an error message stating that the sales area assignment is not permitted.
Figure 3-20: Assigning sales areas to a hierarchy type

Step 5: Assign Hierarchy Type For Pricing By Sales Document Type (OVH4) For each sales document type, you assign a hierarchy type using a screen similar to that in Figure 3-21. This is the critical link in transferring a customer hierarchy to a sales document and in determining pricing based on the hierarchy.
Figure 3-21: Assigning a hierarchy type to sales documents for pricing

CASE STUDY—Galaxy Musical Instruments: Customer Hierarchy
One of our main customers is Melody International. Their regional offices and retail outlets have placed orders in the past, and each is registered in the database as a different customer. As part of a new agreement, we are offering a discount to all Melody group companies. We also have to track our sales across this strategic account. We use a customer hierarchy to structure the group companies.
The top of the hierarchy is a nodal company (10011). We will control the prices for the group at this level. The regional stores (90909 and 10013) form the second layer of the hierarchy. Any kiosks (10014) constitute the third layer. (Refer to Figure 3-16 for details.)
If a sales order is placed by the kiosk customer (such as 10014), the entire hierarchy will be traced up to the apex of the structure. The pricing agreement at the parent level will be determined and applied to the order.
The material master contains all the information about the product or service being sold. This information is shared across the organization and maintained by different departments. Hence, it is structured in views according to the various functions such as Purchasing view, MRP view, Accounting view, and Sales view. SD-related data is structured in three views—Sales: Sales Org 1, Sales: Sales Org 2, and Sales: General/Plant. These three views will be the focus of the following discussion.
Common Terms in Material Master Data
In your organization, you manage different types of materials such as raw materials, semifinished goods, and finished goods. Materials with a similar set of attributes are grouped under the same material type. The material type, therefore, is the key to controlling screen sequence, data fields, and data. SAP has a set of predefined material types that meet most business requirements. Check whether the following terms match the materials and products you manage in your organization:
- FERT: Finished products
- HALB: Semifinished products
- ROH: Raw materials
- DIEN: Services
- KMAT: Configurable materials
- HAWA: Trading goods
From the sales and distribution angle, we will be most concerned with products and services sold to the customer. Hence, FERT, DIEN, and HAWA will be of greater interest to us than other material types.
Creating Material Master Data
You can create a material master record using transaction code MM01. The path is SAP Menu Logistics Sales and Distribution Master Data Products Material Other Material Create.
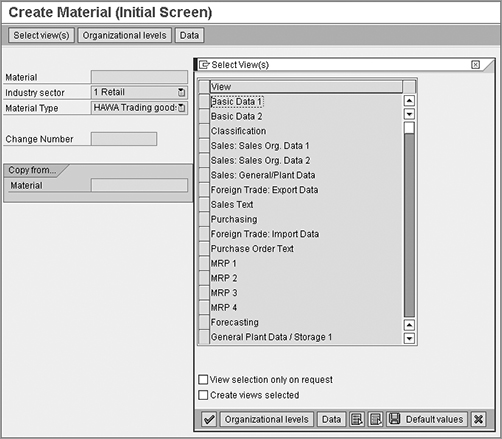
The screen shown in Figure 3-22 is where you specify the material type that you plan to set up. Use the Industry Sector field to specify the type of industry (Chemical, Pharmaceutical, Retail, and so on) to which the material belongs.
There is a provision to create a material by copying it with reference to an existing record. Use the Copy From field to specify the reference material and the organizational levels from which the data can be copied over.
The Select View(s) button allows you to choose which data screens you want to create. You can always create a material for a certain view first (such as Basic Data) and later extend it for other views. This is the typical scenario in most organizations, where different departments maintain their own piece of information and then hand it over to the next group. Based on your selection, you will then have to specify the organizational levels (plants, sales organizations, and so on) for which the data will be created.
The following are some views that you will come across in the material master. We will only discuss the major ones here.
Figure 3-22: Create Material screen: selecting views
Basic Data
This view contains product data common to the entire organization. Hence, you do not have to specify any specific organizational level to create this view. The material description, units of measure, and attributes such as weight, volume, and status appear in this view.
TIP Fields in the Basic Data view should be maintained in conjunction with other departments in the organization.
There are three sales views in the material master: Sales Org. 1, Sales Org. 2, and General/Plant Data.
Sales: Sales Org 1 View
This data is specific to a sales organization and distribution channel. The following are some of the key fields:
Units Of Measure Here you specify one or more units of measure used for stocking, selling, delivering, or procuring the material. You can maintain three different units of measure for a material:
Base Unit Of Measure This represents the unit of measure in which the stocks of the material are maintained. This is the base unit of measure. All other units will be converted to the base.
Alternative Unit Of Measure If you have more than one unit of measure, you maintain the alternatives and their conversion to the base unit in the Additional Data section of the material master. For example, some music CDs are stored as individual pieces (EA) but could also be sold or procured in packs of 10 (PAC). In this example, EA is the base unit of measure; PAC is the alternative unit of measure. The conversion is 10 EA = 1 PAC.
Sales Unit Of Measure The unit of measure in which the material is sold is the sales unit. If you need to specify a different unit for sales, enter it here.
Quantity Stipulations You can specify any stipulations regarding material quantity in sales.
Minimum Order Quantity This refers to the lowest quantity that a customer must order for this material. The marketing or pricing strategy of your organization may set a limit on the order quantity.
Minimum Delivery Quantity This refers to the minimum quantity that must be delivered to the customer. This is often governed by transportation and logistical constraints.
Delivery Unit This is the unit in which the material is delivered. If you specify the Delivery Unit setting as five pieces, then you can deliver in multiples of five only (5, 10, 15, and so on).
Sales Status To signify the status of the material in the sales life cycle, you use the Sales Status setting. Certain products may be new and not yet released in the market. Others may have reached the end of their life cycle, become obsolete, or be discontinued. You can update the status in the material master in order to control or stop the sales of such items. In the material master, you can set the Sales Status setting specific to a distribution chain (using the field DChain - Spec. Status) or across the entire organization (using the field X-Distr. Chain Status). These fields are used in conjunction with the validity date to specify when the status will take effect.
Tax Data This allows you to specify the tax classification for the material in each country. (We will cover the details and impact of this in Chapter 5, “Pricing and Tax Determination.”)
Delivering Plant This is where you specify the default plant chosen to deliver this material.
Sales: Sales Org 2 View
This view primarily contains various grouping terms:
General Item Category Group This is a critical field that determines the item category. It controls the behavior and flow of the material across the sales documents.
Material Pricing Group This field is used in pricing a product. It is used to group together materials that have the same price or pricing condition.
Material Group There are five grouping terms provided to classify and group the material in various categories.
Product Attributes You can capture the specific attributes of the product and control the sales transaction such that the order can be processed only if the attributes are acceptable to the customer.
Sales: General/Plant Data View
This view contains some general data and some fields that are plant specific.
Plant Specific Information This includes fields such as availability checking group and loading group.
Availability Checking Group The availability group controls how stocks are checked and committed to sales orders. Hence, it is a critical field. It plays a key role and will be covered in detail in Chapter 6, “Availability Check, Transfer of Requirements, and Backorders.”
Loading Group This field plays a role in logistics by determining the shipping point. It will be covered in detail in Chapter 8, “Shipping and Transportation.”
General Information Other general data fields include packaging material information, transportation groups, and weight.
Sales Text View
On the Sales Text tab, you can maintain a description or notes about the material in different languages. Through controls in text determination, the text is copied to sales documents.
Material Requirement Planning Views
Data in these views are specific to a plant and storage location. This data contains MRP-related information such as the MRP type, controller, and plant-specific material status. Information relevant to material requirements planning (MRP) is spread over four views in the material master. They are named MRP1 to MRP4. Settings here affect material availability check and inventory control.
Purchasing View
The data in this view is provided by the purchasing department. It includes information such as purchasing groups, handling and procurement of the material, tolerances, and order units.
Accounting and Costing View
This view contains data about valuation class, standard price, past price and costing data, and so on.
Other views
Other views that are beyond the scope of this chapter include the following:
- Warehouse Management
- Storage
- Work Scheduling
- Quality Management
Maintaining Material Master Records
As discussed earlier, you can create the material master using transaction MM01. The following transactions help you maintain existing material master records:
Change Material Master (MM02) To make changes to any field in the material master, you proceed with this transaction code. You specify the material number and select the view(s) that are to be edited. You can then navigate to the required screen, make the changes, and save the record.
Display Material Master (MM03) This transaction provides display rights to the user.
Flag For Deletion (MM16) If any material master is to be discontinued, you can flag it for deletion using this transaction code.
Change Material Type (MMAM) If the material type is to be changed at a later date, you can do so using this transaction code.
Change Log in the Material Master
Changes made to a material master are recorded in SAP. To check the changes done from within a material master record, select Environment Display Changes. You can get a log of old and new values along with a time stamp and user details.
Customizing Material Master Data
You can use several settings to configure the material master. However, the focus of this discussion is primarily on certain settings that are critical to SD.
Unit of Measure
You can customize all the required units of measure centrally from the General Settings menu. SAP lists all major ISO codes for measurement. If you need to add a custom unit of measure, follow this path: IMG SAP Netweaver General Settings Check Units Of Measurements (transaction CUNI). Here you can specify the following:
Dimensions Specify the dimension for the unit of measure and the SI unit of measure.
ISO Code This is a standard list of ISO codes. It is important in data exchange with other systems via EDI.
Unit Of Measure Here you can set up a custom unit of measure, link it to an ISO code, and specify other details such as decimal places and rounding rules.
Other settings for key fields appear in the menu when you follow the menu path Logistics – General Material Master Basic Settings Setting For Key Fields.
Defining a Material Group
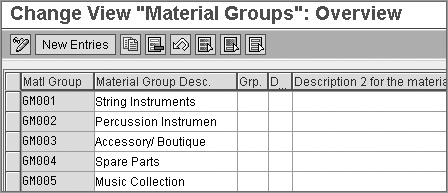
In Figure 3-23, you’ll find a list of existing material groups. To create a new group, click New Entry, and then enter a unique alphanumeric name and a brief description. For Galaxy Musical Instruments, we have grouped a wide range of products under material groups GM001 to GM005. As the business diversifies, we can add other material groups to this list. We can then design reports to get sales for each group.
Figure 3-23: Defining a material group
In the Setting For Key Fields node, there is a special submenu critical to sales and distribution. The path to it is Logistics – General Material Master ➢ Setting For Key Fields Data Relevant To Sales and Distribution. Two of the important settings here are Define Sales Statuses and Define Material Groups.
Defining the Sales Status
To set up a custom status, click New Entries (or Copy As to copy from a reference). Define a two-character status code with a description. In the same menu, you can specify whether the material is to be blocked in various sales documents, as well as the response of the system when this material is used.
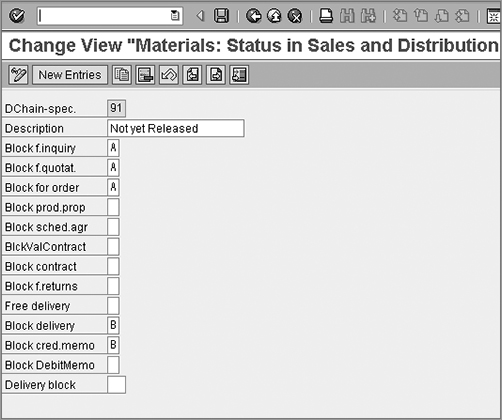
When certain new products are launched, Galaxy Musical Instruments accepts bookings before the product release date. In this phase, the new products are flagged with a sales status of Not Yet Released.
As shown in Figure 3-24, we have defined a custom status of 91 (Not Yet Released). We have also specified that if we receive an inquiry, quotation, or sales order, the system will respond with a warning message. Any delivery will be blocked.
Figure 3-24: Defining the status of a material
Defining the (Sales) Material Groups
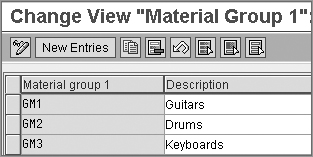
SAP offers five grouping fields in this menu (Material Group1 to Material Group5). Select the material group for which you want to add custom values. Specify a three-character term and description. Effective use of these grouping terms facilitates data categorization and reporting. In the case of Galaxy Musical Instruments, Material Group1 has been used for the various musical instrument types such as guitars, drums, and keyboards (Figure 3-25).
Figure 3-25: Defining Material Group1
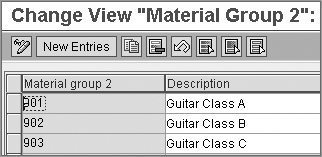
In Material Group2, you can specify further attributes. Guitars, for example, are grouped based on their properties (Figure 3-26).
Figure 3-26: Defining Material Group2
You can use some or all of the grouping terms provided, based on your requirements. The material group fields appear in the material master, Sales: Sales Org. 2 view.
NOTE Mass Change: When you have a large number of master data records, it is difficult to make mass changes manually. In Chapter 14, “Advanced Techniques,” we will study the MASS tool, which helps in mass maintenance of master data records.
In the material master, you can enter the hierarchical classification of the product. This is very useful in pricing and statistical analysis. The hierarchy is broken down into different levels. Each level signifies a certain characteristic of the product.
Maintaining a Product Hierarchy
The Product Hierarchy field appears in the material master view Sales: Sales Org 2. To maintain the value, use transaction code MM01 (Create Mode) or MM02 (Change Mode).
Based on the structure of your product line, you can create your own product hierarchy. The standard SAP system offers a three-tiered product hierarchy. Level 1 and level 2 are five digits each. Level 3 is eight digits long (and is called the 5/5/8 schema). Thus, the total length of hierarchy adds up to 18 digits.
Customizing a Product Hierarchy
To configure the product hierarchy, the path is as follows: IMG Logistics – General Material Master Settings For Key Fields Data Relevant For Sales and Distribution Define Product Hierarchies Maintenance: Product Hierarchy (V/76).
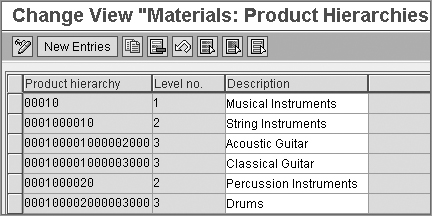
If the SAP standard schema (5/5/8) meets the requirements of your organization, you can maintain the hierarchy levels in this transaction. You can add new entries to set up the various levels in your product hierarchy. When you enter a hierarchy code, the level number is determined automatically by the system based on the number of characters you have entered. For example, if you enter a five-character entry, the system determines the level number as 1. Similarly, a 10-character entry would be level 2. Level 3 would have 18-character records.
Let us discuss this further with the example of Galaxy Musical Instruments, which has adopted the standard 5/5/8 schema shown in Figure 3-27 for its musical instrument inventory.
Figure 3-27: Standard 5/5/8 schema
Case Study—Galaxy Musical Instruments: Product Hierarchy
The following is the product hierarchy for Galaxy Musical Instruments:
Level 1 (five digits long) shows the type of product, such as Musical Instruments.
Level 2 (five digits long) classifies products into types of instruments, such as String Instruments, Percussion Instruments, and so on.
Level 3 (eight digits long) tells us about the product, such as whether a guitar is electric or acoustic.
After setting up the structure, we maintain the exact product hierarchy in each of the material master records. Once the products are classified, we can then derive a report for the sales of all string instruments (0001000010). For pricing, we can run a special offer on all drums (000100002000003000) with a discount of 10%.
You can deviate from standard SAP and define your own hierarchy levels in the system by changing the data structure. This is a technical change and will require help from an ABAP resource. Product hierarchy structure (PRODHS) in SAP has to be changed to suit your own schema. You can define up to nine levels. Then you can create a template to represent the new structure. The detailed technical configuration is not in the scope of this book.
In this chapter, we introduced the concept of master data. We explained the processes of creating and maintaining master data records, focusing on how to customize and control the various fields and screens that appear in customer master data and material master data. Finally, we introduced you to the concepts of customer and product hierarchies.
In the next chapter, we’ll cover more about partner, text, and output determination techniques.
