Chapter 12: Material Determination, Listing, Exclusion, and Proposal
This chapter covers various material related functionalities that are available in standard SAP. These include material substitution, item proposals, automatic product selection, material listing and exclusion, and customer–material information records. Each of these functionalities has its own use and importance in the overall sales cycle. In this chapter, we’ll cover these functionalities in detail, including how to use and customize them. We’ll start with material determination.
Material determination (also called material substitution) is a technique provided by SAP to allow you to substitute one material for another during the processing of a sales cycle. The technique is really useful for providing solutions for a variety of day-to-day business requirements that demand material substitutions. Here are a few real-world examples:
- Replacing an obsolete/discontinued material with a new one so as to avoid entering an order that erroneously commits the enterprise to sell a discontinued material to the customer
- Automatically substituting the agreed-upon alternative material in an order when the original ordered material is out of stock
- Supplying specially packaged versions of the original material during holiday seasons such as Christmas or Thanksgiving
- Executing a sales promotion in which you want to enclose flyers or promotional materials along with the materials ordered by the customers
You can use material determination to automatically substitute one material for another or to propose a list of alternative materials for the user to select among. Further, the substitute material either can replace the original material on the main order line or can be added as a subitem to the original material in the order. With material determination, not only can you substitute the materials, but you can also check the stock availability for the original or substitute material and control whether the shortage is to be transferred to the MRP for the original or for the substitute materials.
Material determination and automatic product selection make a great combination. With this combination, you can replace the materials and can also check whether the customer has agreed to the replacement. You achieve this using the product attributes fields available in the customer and material master records. In the following sections, we’ll cover material determination in detail, including automatic product selection. But before we move ahead, we’ll talk about how to maintain material determination records.
Maintaining Material Determination Records
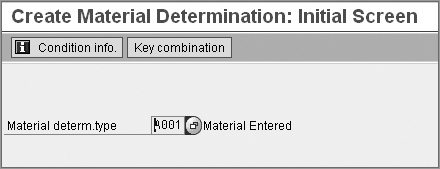
You maintain the material determination record by using transaction code VB11 or by following the SAP Easy Access menu path Logistics Sales And Distribution Master Data Products Material Determination Create. Figure 12-1 shows the material determination overview screen. To maintain the material determination record, choose the key combination for which you would like to maintain the material substitution. In our example, it is A001, which stands for the material substitution based on the material number.
Figure 12-1: Overview screen for maintaining a material determination record
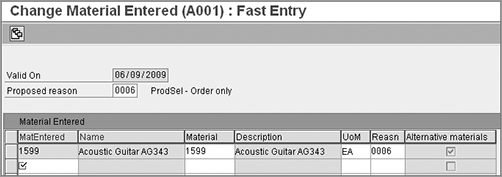
Now press the Enter key on the keyboard to go to the detailed maintenance screen (Figure 12-2). Here, you maintain the original material on the left in the MatEntered column and enter its substitute on the right in the Material column. Enter a reason for the substitution in the Reason column, and enter a validity date for your material substitution record. A substitution reason controls the overall substitution process, including whether the substitution will be automatic or manual and whether it will include an ATP check. We will cover in detail the reasons for substitution, along with the customization setup for material determination, later in this chapter. The material determination functionality also allows you to maintain more than one substitute in your material record. If you see the check box in the Alternative Materials column selected for your substitution entry, this means that more than one substitute material has been maintained for the entered material, as is the case here.
Figure 12-2: Fast Entry screen for maintaining a material determination record
This is really helpful in situations such as material substitution for stock shortages, because you can maintain all the alternative materials in the required prioritized sequence in the VB11 record. The SAP system then replaces the original material on the order with the next available material alternative in stock.
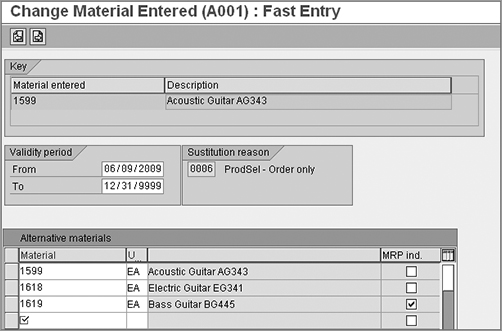
To enable this functionality, double-click the required substitution entry line while you are on the screen shown in Figure 12-2. You will be provided with the screen shown in Figure 12-3. Here you can maintain all the alternative materials in the sequence in which you want them to be determined in the sales order. Since substitution reason 0006 is configured to perform an ATP check, when the stock is insufficient for material 1599, SAP will first allocate all the available stock from 1599 to the order and will then allocate the available stock from alternative materials 1618 and 1619, respectively.
Figure 12-3: Maintaining multiple alternatives
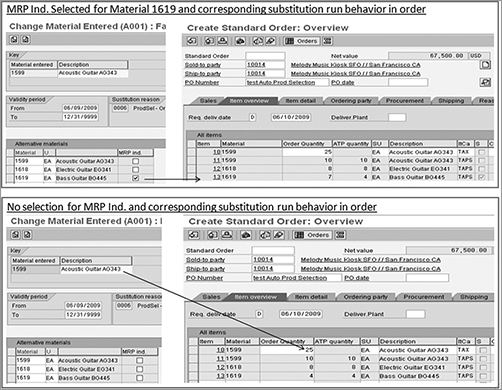
The checkbox shown in MRP Ind. column on this Fast Entry screen plays a vital role in controlling the transfer of material shortage to SAP’s planning application. As you can see in the top portion of Figure 12-4, when the MRP Ind. box was selected for material 1619, the shortfall for three quantities after the successful substitution run was reported for material 1619, but when the MRP Ind. check was removed (Figure 12-4, bottom portion), the shortage of three quantities was instead reported for material 1599.
Figure 12-4: Example showing use of MRP indicator
This setup can also be useful for clearance situations when you would like to sell off all the available inventory of a material you are planning to discontinue in the near future and start replacing it thereafter with a new material. By creating the setup shown in Figure 12-3, you tell SAP that if an order comes for material X, it should first deplete the available stock for material X and then start substituting alternative material X1. During this process, if any shortfall is encountered, transfer it to planning for the alternate material X1.
Now we have covered the benefits of material determination in SD and how to maintain the condition record for material substitution, let’s move forward and take a look at the customization settings required to set up the material determination in the SAP system.
Deciding the Scope of Customization
Before you start customizing the material determination, it is necessary that you know the scope of substitution, and you also should be able to evaluate the complete end-to-end substitution process. Answering the following questions will help you determine the scope of customization:
What is the purpose of the Material Determination? Do you need material determination to offer an additional subitem to the main item, such as discount coupons, promotional flyers and so on, or do you need material determination to perform material substitution for the main item in the sales document, such as a new material substituted for a discontinued material?
How is the substitute product going to be determined? This question points to the determination rule. Will you need to substitute products according to the material entered into the order, the material group, or any other material attribute? This helps you decide the fields you need to include into your condition tables.
Is it possible to use an existing setup, or do you need to create a new one? Standard SAP provides substitution condition type A001, item category TAPS, TAX along with schedule line category CX, and PP to handle the material determination in orders. Before you set up your new customization entry, always make sure to check whether this existing setup, as available out of the box in standard SAP, is appropriate for your business requirements. Refer to Chapter 7, “Sales,” for more details on how to set up item categories and schedule line categories.
For what scenarios can a substitute be offered, how many and in what priority can substitutes be offered, and for which material is the shortage to be reported? Recall the discussions related to Figure 12-3 and check if you need that kind of setup.
Is there any seasonal or time factor involved in substitution? For example, material X might be substituted for by its specially packaged holiday version (material Y) during the Christmas season, whereas for the rest of the year, the substitute might be alternate material Z.
Do you need to configure the product attributes? In cases where your customers are picky about the substitute material, you may want to configure the product attributes so as to consider customer consent before substituting the material on the order document.
What material number will you print on documents such as order confirmations, deliveries, invoices, and so on? Will it be the number of the original product, the substituted product, or both?
How is the pricing performed during product substitution? Will the prices be based on the original material or on the substituted material?
Case Study: Galaxy Musical Instruments Configuration Analysis: Material Determination, Scope Finalization
Galaxy Musical Instruments required the ability to substitute a material for the purposes of promotions, responding to stock shortages, and as a standard replacement for discontinued or to be discontinued materials. This determination needed to occur automatically based on the material number entered into the customer order. Galaxy further required that the pricing for the original material would prevail even after the substitution, but both the substitute and original materials were to be shown on the output documents. After analyzing these requirements against the available out-of-box setup for the material determination, we concluded that material determination A001 serves Galaxy’s purpose, and therefore we did not need to create a new setup. A001 maintenance, when used along with substitution reasons, allows substitution in the case of shortages, promotions, and so on, based on the material number entered into the order, without disturbing the original material pricing.
Customizing the Material Determination
Customization for a material determination is based on the condition technique. You start with setting up the determination using the condition technique followed by defining the substitution rules. You then also perform item categories and schedule line categories setup, provided if standard item categories TAPS and TAX along with schedule line category CX and PP are not sufficient to cater to your business requirement. Since we’ve discussed the condition technique in detail in earlier chapters of this book and applied it a number of times while configuring various basic functions such as pricing determination, partner determination, text determination, and output determination, we will just summarize the material determination customization and focus on substitution rules customization.
Follow the steps in the next sections to customize the material determination setup.
Step 1: Set Up a Condition Table for Material Determination
To create your own material determination key combination/condition table, follow menu path IMG Sales And Distribution Basic Functions Material Determination Maintain Prerequisites For Material Determination. The menu path will take you to a Choose Activity screen listing the steps for setting up material determination using the condition technique. Select the activity for Create Condition Tables from this screen to setup your own condition table. Alternatively, you can use transaction code OV16 to call the customization screen. You can use numbers greater than 500 in your condition table, or you can leave the condition table number field blank, in which case SAP automatically assigns the next available number from the customer namespace (501 and above) to your condition table. Select the required fields as per your business requirement from the field catalog, and generate and save the table.
Step 2: Set Up the Access Sequence
To create your own access sequence, use transaction code OV11, or choose the activity for Maintain Access Sequences from the Choose Activity screen.
1. Create your own access sequence by providing a four-character identification key along with a meaningful description.
2. Assign the condition tables you created earlier to your access sequence in the sequence of the most specific to the least specific or generic condition.
3. Maintain any requirements that you want to assign to your access sequence.
4. Generate your access sequence using the Utilities button available on the access sequence overview screen.
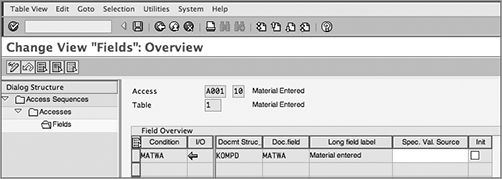
Figures 12-5, 12-6, and 12-7 show this customization setup for access sequence A001 that is available in the standard SAP system for the material determination. Both access sequences A001 and A002 are available in standard SAP system for the material determination.
Adding Fields to the Field Catalog
If some fields that you want for your condition table do not exist in the field catalog, you can add them using the following steps:
1. Add the new fields to the KOMKDZ (header) and KOMPDZ (item) structures.
2. Add these new fields to the field catalog via transaction OV26 or using the activity for Maintain Field Catalog from the Choose Activity screen.
3. Use USEREXIT_MOVE_FIELD_TO_KOMKD (header fields) and USEREXIT_ MOVE_FIELD_TO_KOMPD (item fields) from “include MV45AFZZ” to provide values to new fields during sales order processing. Remember that for step 1 and step 3, you will need an ABAP resource.
Figure 12-5: Defining access sequences
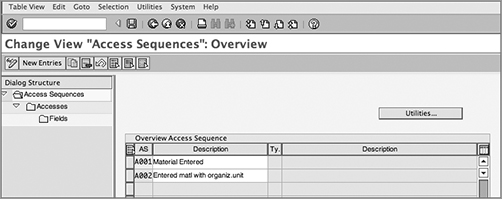
Figure 12-6: Assigning condition tables to access sequence
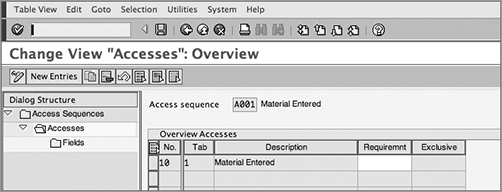
Figure 12-7: Assigning data source for condition table fields
Step 3: Set Up Material Determination Types
Use transaction code OV12 to create your own material determination condition types or choose the activity for Define Condition Types from the Choose Activity screen. Here’s how to create your own material determination type:
1. Provide a four-character identification key along with a meaningful description for your material determination condition type.
2. Assign the access sequence you created in the “Step 2: Set Up the Access Sequence” section to your condition type. You can even set up validity rules for your condition type that can control the condition record validity.
Figure 12-8 shows the customization setup for condition type A001 that is provided in the standard SAP system for the material determination.
Figure 12-8: Defining condition types

Step 4: Maintain the Material Determination Procedure
To define your own determination procedure, use transaction code OV13 or choose the activity for Maintain Determination Procedures from the Choose Activity screen.
1. Provide a six-character identification key along with a meaningful description for your determination procedure.
2. Assign the condition type you created to your procedure.
Figure 12-9 shows this customization setup for procedure A000001 that is available in the standard SAP system for the material determination.
Figure 12-9: Defining a determination procedure

Step 5: Assign the Material Determination Procedure to Sales Document Types
Now assign the material determination procedure you have created to all the sales document types that will make use of material determination technique for material substitution.
This is shown in Figure 12-10. To reach this customization screen, you can use transaction code OV14 or follow menu path IMG Sales And Distribution Basic Functions Material Determination Assign Procedures To Sales Document Types.
Figure 12-10: Assigning a material determination procedure to sales document types

Step 6: Create the Substitution Reasons
Substitution rules control the material substitution process. You can define a substitution reason via transaction code OVRQ or menu path IMG Sales And Distribution Basic Functions Material Determination Define Substitution Reasons.
To create your own substitution reason, enter a four-character identification key along with a meaningful description, followed by making the required selections in the controlling fields, as shown in Figure 12-11.
Figure 12-11: Creating substitution reasons

The following are the fields shown in this figure:
Substitution Reason The column SbstReason contains the four-character identification key for the substitution reason.
Description The column Description contains a meaningful description for this substitution reason, with the maximum field length being 20.
Entry check box This check box controls the printing of the material number on the output form during output processing. When selected, SAP prints original material and its description on the output such as invoices, order confirmations, and so on.
Warning check box This check box provides a warning to the user before substituting a material. This warning works only for manual substitutions, not for automatic ones.
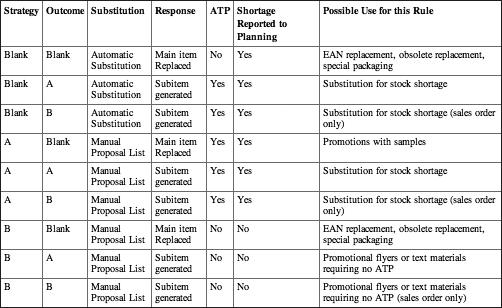
Strategy This field defines the substitution strategy. If you leave the value in this field blank, substitution is automatic. When the value is A, substitute products are displayed to the user for making a selection. At this time, an ATP check is also performed by the SAP system. Selection value B is similar to A but with no ATP check.
Outcome This field controls whether the substitute material should replace the original material entry in the sales order or should be created as a subitem of the original entry. When the value in this field is blank, the items are replaced. When the value is A, the substitution products are displayed as subitems. Value B acts like A but applies only when creating items in sales orders. To help you understand the importance of the Strategy and Outcome fields, Table 12-1 shows the nine possible combinations for values in these fields that can be used to set up a substitution reason and also explains what impact these nine combinations will have on the order document and the situations where you can use them.
Table 12-1: Possible Substitution Combinations and Result
Substitution Category This field is used only for service orders. When you select A in this field, the serviceable equipment on the service order gets replaced with the service product, thus allowing pricing to happen at the service product level and not at the serviceable equipment level.
Automatic product selection is one step beyond the plain material determination technique in SAP ERP. Here you not only substitute material A with material B but also check whether the customer agrees with such substitution. The setup consists of three simple steps:
Step 1: Define the product attribute The standard SAP system comes with 10 product attribute fields, namely, PRAT1 through 9 and PRATA. These fields correspond to product attributes 1 through 10. The first step is to give a meaningful label to these fields that can help you identify the nature of the product attribute. For example, you may rename product attribute 1 as “gift-wrapped,” product attribute 2 as “discount coupons,” product attribute 3 as “promotional material,” and so on. Since renaming is a technical change, you will need an ABAP consultant to help you with the renaming.
Step 2: Assign the product attribute to the material Next you assign the product attribute to the material. This assignment is set up in the Sales Org. Data 2 view of the material master record for the material. Here you select all the product attributes that apply to the material. For example, you may select product attribute 1, “gift-wrapped,” to indicate that the material always comes as gift-wrapped and product attribute 3, “promotional material,” to indicate that marketing promotional material also ships along with this material.
Step 3: Assign the product attribute to the customer Finally, you assign the product attributes to the customer. This assignment is set up on the Sales tab of the Sales Data view of the customer master record. You click the product attribute button on the Sales tab to call up the product attributes screen and then select the attributes that the customer is not willing to accept. For example, if the customer is not willing to accept any material that is gift-wrapped and contains marketing material, select attribute 1, “gift-wrapped,” and attribute 3, “promotional material.” If the customer accepts the materials that are gift-wrapped with no promotional material, choose attribute 3 only.
Material Listing and Exclusion
Material listing/exclusion is functionality in SAP SD that controls what materials a customer can buy. When you maintain a material listing for a customer, the customer can only buy those goods contained in the material listing assigned to the customer. Conversely, material exclusions allow you to set up a list of materials that a customer cannot buy. Figure 12-12 shows two examples.
Figure 12-12: Examples for material listing/exclusion
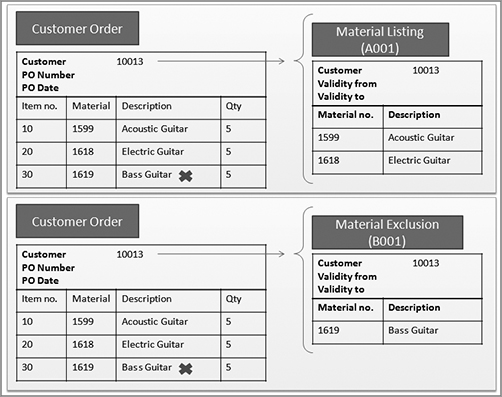
The first example shows how a material listing record maintained for a customer restricts a customer order to be processed only for listed materials, whereas the second example shows how material exclusion helps you exclude a particular material in customer order processing. The end results from both the approaches are same.
You can maintain a material listing at a sold-to level and also at a payer level. In the event the sold-to and payer are different and the material listing is maintained at both levels, the sold-to material listing takes precedence over the payer material listing. If the listing is only maintained at either the sold-to level or the payer level, SAP picks that level. If there is no listing maintained at either level, the customer is allowed to purchase any material without any restrictions.
If your business scenario demands a new configuration setup for material listing/exclusion, you can configure that by setting up the condition technique for material listing/exclusion.
CASE STUDY—Galaxy Musicals Instruments Customization Scope: Material Listing/Exclusion
Galaxy Musical Instruments has a requirement to restrict the sale of a few musical instruments to customers who buy directly from its website. For retail customers buying via the retail channel, the restriction is enforced by individual retailers on their customers. To enforce this restriction in SAP ERP, Galaxy decided to use material exclusions for such customers. The initial design study was performed, and we decided to use standard condition type B001 as-is to maintain material exclusions.
Customizing the Material Listing/Exclusion
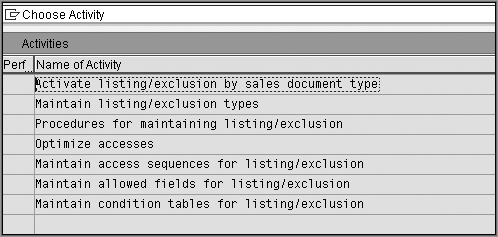
Material listing/exclusion also uses the condition technique. You start the customization with condition table setup, followed by the access sequence, condition types, and the determination procedure. In this section, without going into details of the condition technique setup, we will discuss the key customization elements related to material listing and exclusion setup. To get to the customization screen for material listing/exclusion, follow the menu path IMG Sales And Distribution Basic Functions Listing/Exclusion. You will be presented with a Choose Activity dialog box showing various customization activities for material listing/exclusion, as shown in Figure 12-13.
Figure 12-13: Initial configuration screen for material listing/exclusion
Step 1: Set Up the Condition Table
As always with the condition technique, the first step is to maintain a condition table. From the Choose Activity dialog box, choose Maintain Condition Tables For Listing/Exclusion. Alternatively, you can use transaction code OV05. As usual, you can either choose a three-digit number from the customer namespace along with a meaningful description to define your own condition table or use condition tables provided by standard SAP.
Adding Fields to the Field Catalog
If some fields that you want for your condition table do not exist in the field catalog, you can add them using the following steps:
1. Depending on whether you need a header or an item field, append the KOMKG (header) or KOMPG (item) communication structure and add the new field to the respective customer includes, KOMKGZ and KOMPGZ. When you add fields to KOMKGZ and KOMPGZ, the fields automatically get included in the main communication structure, KOMGG.
2. Add these new fields to the field catalog using the activity Maintain Allowed Fields For Listing/Exclusion in the Choose Activity dialog box.
3. Use USEREXIT_MOVE_FIELD_TO_KOMKG (header fields) and USEREXIT_ MOVE_FIELD_TO_KOMPG (item fields) from “include MV45AFZA” to populate values for the new fields during sales order processing.
Step 2: Set Up the Access Sequence
Once done with the condition table creation/selection, the next step is to define the access sequence. In the Choose Activity dialog box shown in Figure 12-13, choose Maintain Access Sequences For Listing/Exclusion. Alternatively, you can use transaction code OV01. Figures 12-14 and 12-15 show the customization setup for access sequence A001 and B001 available in standard SAP for material listing/exclusion.
Figure 12-14: Overview screen for defining the access sequence
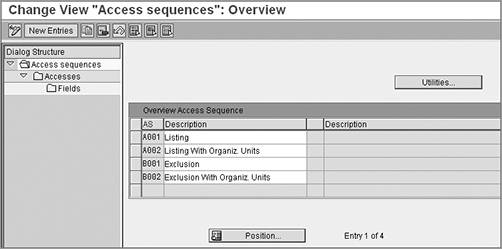
Figure 12-15: Assigning condition tables to the access sequence
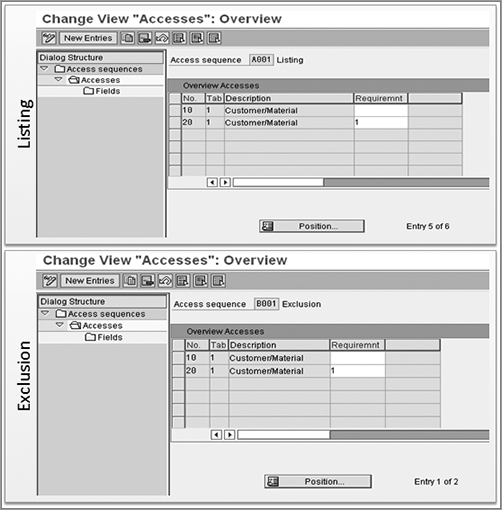
You can use this standard setup if it suffices for your business needs or else create your own access sequence using a four-character identification key along with a meaningful description. (Always use Y or Z for your own creations.) Set up the condition tables that you defined in previous steps from most specific to least specific, and assign requirements wherever you think necessary. Here, requirement 1 is provided in standard SAP to handle the scenario where you have a different sold-to and payer and both have material listings. The first access (10) is for the scenario where the sold-to and payer are the same. Access 20 is for where the sold-to and payer are different. When you are finished, don’t forget to click the Utilities button to generate the access sequence.
Step 3: Set Up the Condition Types
Once done with the access sequence maintenance, the next step is to set up the condition types. In the Choose Activity dialog box shown in Figure 12-13, choose Maintain Listing/Exclusion Types to maintain the condition types for listing and exclusion. Alternatively, you can use transaction code OV02. As usual, you can either use standard SAP condition types if they suffice for your business needs or define your own condition types for material listing and exclusion using a four-character identification key along with a meaningful description. (Here again, always use Y or Z for your own creations.) Once the condition types are defined, assign the access sequences created in the previous steps to their respective condition types.
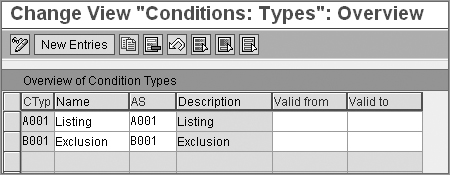
Figure 12-16 shows the customization setup that is available in the standard SAP system for condition types A001 and B001. As you can see, listing condition type A001 is assigned to access sequence A001, and exclusion condition type B001 is assigned to access sequence B001. You can also provide a default validity to your listing/exclusion records by selecting from the available values for the Valid From and Valid To fields. For example, you can set up your conditions to be valid from the first day of the year to the end of current year, from the first day of the month to the end of the current month, or even from today’s date until December 31, 9999.
Figure 12-16: Maintaining listing/exclusion types
Step 4: Set Up the Determination Procedure
Once done with the listing/exclusion type setup, the next step is to set up the determination procedure. In the Choose Activity dialog box shown in Figure 12-13, choose Procedures For Maintaining Listing/Exclusion to maintain the determination procedure for listing and exclusion. Alternatively, you can use transaction code OV03. Figures 12-17 and 12-18 show the customization screens for the listing/exclusion determination procedure setup. In standard SAP, procedure A00001 is provided for listing, and B00001 is provided for exclusion.
Figure 12-17: Maintaining the listing/exclusion procedure
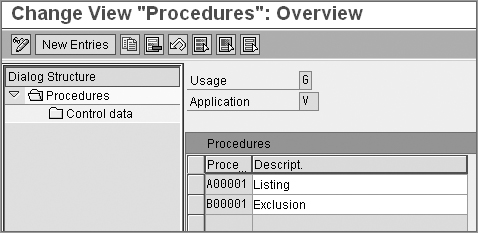
Figure 12-18: Assigning the listing/exclusion type to the procedure
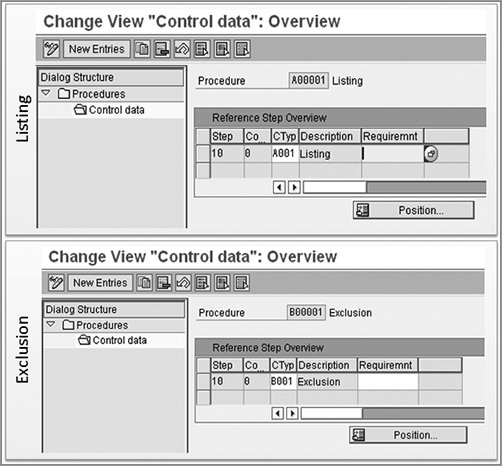
To create your own material listing/exclusion determination procedure, provide a six-character unique identification key starting with Y or Z along with a description. Assign the condition types you created in previous steps to your procedure, and save your entry.
Step 5: Assign the Procedure to a Sales Document Type
Now you are at the last step for listing/exclusion customization, which is assigning the listing/exclusion procedure to the sales document type. From the Choose Activity dialog box shown in Figure 12-13, choose Activate Listing/Exclusion By Sales Document Type to maintain the assignment. Alternatively, you can use transaction code OV04. Figure 12-19 shows the customization screen for assignment.
Figure 12-19: Activating the listing/exclusion by sales document type
Unlike in access sequences for other determination procedures, we don’t have an exclusion indicator in the access sequence for material listing/exclusion to handle situations where there are multiple condition records. Here, the Pro (procedure) field in Figure 12-19 controls the system reaction when there is more than one listing. We’ll cover the impact of various available values in the Pro field with the help of an example.
Say you maintain two separate material listings: at the customer level and at the customer group level. The customization setup contains a material listing access sequence with two accesses: step 10 for the customer and step 20 for the customer group. When you enter an order for a material that is maintained in both the material listings, the access that will apply to your sales order will depend upon what customization you have maintained for the Pro field:
- If the Pro field contains value A, then SAP will use the last listing in the access sequence (here, 20 for the customer group).
- If the Pro field contains value B, then SAP will make sure that at least one listing must apply.
- If the Pro field contains value C, then SAP will apply all listings. (Here, both 10 for customer and 20 for customer group will be applied.)
- If the Pro field value is blank, then SAP will use the first listing in the access sequence (here, 10 for the customer).
Table 12-2 summarizes what we have discussed so far about material listing/exclusion customization.
Table 12-2: Material Listing and Exclusion Setup Available in Standard SAP
| Determination Procedure | Condition Types/Access Sequences | Condition Table |
| A00001: Material Listing | A001/A001 |
501: Customer Hierarchy/Article
001: Customer/Material |
| B00001: Material Exclusion | B001/B001 | 001: Customer/Material |
Handling the Material Listing/Exclusion in Deliveries
When a delivery is created with reference to an order, material listing/exclusion is carried out in the delivery with reference to the underlying sales document. If material listing/exclusion is active for the underlying sales document, you will be able to perform the listing/exclusion for newly added items to the delivery. However, you cannot perform the material listing/exclusion in the delivery document for the items copied over from the sales order to the delivery.
Stand-alone delivery documents (delivery type LO) are not created with reference to a sales order. Therefore, material listing/exclusion functionality in these documents is handled through the Default Order Type field in the delivery type customization (0VLK). In standard SAP, sales order type DL is assigned to delivery type LO. So, if material listing/exclusion is activated for sales document type DL, you will be able to use material listings/exclusions in stand-alone delivery documents too. Similarly, the assignment of a default billing type to an LO delivery type is also controlled by sales order type DL.
Maintaining the Material Listing Master Records
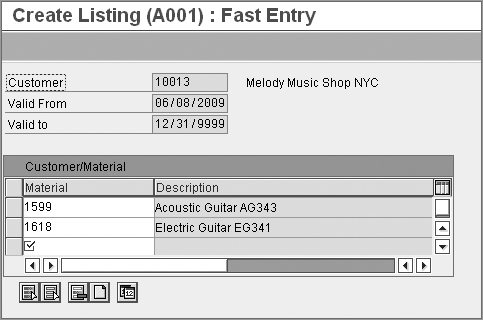
You can maintain material listing/exclusion condition records for a customer by using transaction code VB01 or by following menu path Logistics Sales And Distribution Master Data Products Listing/Exclusion Create. When you are at the overview screen, choose condition types A001 for material listing and B001 for material exclusion if you are using the standard SAP setup. If you are not using the standard SAP condition types, use the one you customized for use with material listing/exclusion. Now click the key combination button to call up the key combination record, as shown in Figure 12-20. Choose the key combination for which you want to maintain condition record, and click the ![]() button to call up the detail maintenance screen, as shown in Figure 12-21. To finish, maintain your condition records, and save your entry.
button to call up the detail maintenance screen, as shown in Figure 12-21. To finish, maintain your condition records, and save your entry.
Figure 12-20: Creating a material listing, initial screen
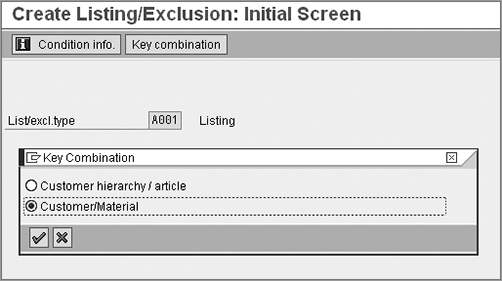
Figure 12-21: Creating a material listing, details screen
Once condition records for listing/exclusion are maintained for a customer, SAP uses the condition technique to search the suitable record and apply the restrictions as per that record to customer sales and delivery document processing.
Customer–Material Info Records
Parties to a sales transaction (the buyer and the seller) sometimes use different material numbers and descriptions for the same material. A seller may call the material XYZ, whereas the buyer calls it ABC in his books. In SAP, you bridge this gap using a customer–material info record. The purpose of a customer–material info record is to maintain the customer-specific number and description of the seller’s material in the seller’s books so as to avoid any confusion that may arise because of different naming conventions used by the buyer and seller for the same material. Once the record is maintained, you can make an order entry using any of the two material identifiers, that is, the seller’s or the buyer’s. You can even print the customer-specific material number on the various outputs such as order confirmations and invoices.
Creating the Customer–Material Info Record
You create a customer–material info record using transaction code VD51 or via menu Logistics Sales And Distribution Master Data Agreements Customer Material Information. Figure 12-22 shows the initial screen for setting up a customer–material info record.
Figure 12-22: Customer–material info record, initial screen
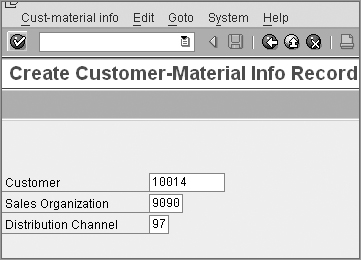
To maintain your record, provide the customer, sales organization, and distribution channel information on this screen, and click ![]() . You will see an overview screen like that shown in Figure 12-23.
. You will see an overview screen like that shown in Figure 12-23.
Figure 12-23: Customer–material info record, overview screen
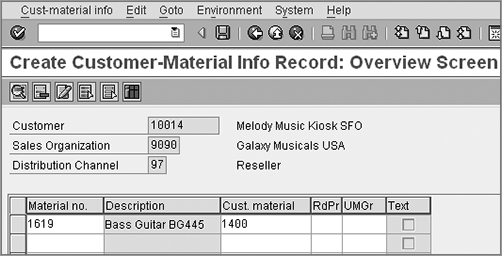
On this screen, enter your material number in the field Material No., and enter the corresponding customer-specific material number in the field Cust. Material to maintain the cross-reference. On this screen you can also maintain the value for the rounding profile (RdPr) and for the unit of measure group (UMGr) to be used with the rounding profile. (A rounding profile allows you to round the order proposal quantity to deliverable units.)
NOTE You can maintain text for the customer–material info record by following the menu path Goto Text. Text for a customer–material info record is customizable. You can perform your own text determination setup for a customer–material info record using transaction code VOTXN. For more details on how to use VOTXN, please refer to the discussion of text determination in Chapter 4, “Partner, Text, and Output Determination.”
Apart from facilitating a cross-reference between the two materials, a customer–material info record allows you to maintain default proposals for delivery tolerance and shipping-related data specific to the customer–material info record. As usual, these defaults can be overwritten manually in the sales order. Always remember that the defaults you maintain in customer–material info records (VD51) are applicable only to the particular customer and material combination, whereas the defaults maintained in the customer master record (XD01) are applicable to all the materials ordered by that customer. In scenarios where you have maintained both these defaults, the ones maintained in the customer–material info record takes precedence over any defaults maintained in the customer master record during the order entry.
For example, imagine that you maintain a default delivery plant 9002 in the customer master record and 9001 in the customer–material info for material X and customer Y. Now, when you create a sales order for material X, SAP will pick the default delivery plant as 9001 (using the customer–material info record). For any other material, SAP will pick the default plant as 9002 from the customer master record.
Determination of the Delivering Plant in the Sales Order
The system searches for the delivering plant for a material in the sales order in the following sequence:
1. It picks the delivering plant from the customer–material info record.
2. If it finds no plant in the customer–material info record in step 1, the system looks for the delivering plant in the shipping view of the customer master and picks it.
3. Finally, if the system fails to find the delivering plant in either of the previous steps, it picks the delivering plant from the sales organization view of the material master.
To maintain the defaults, double-click the cross-referenced entry you maintained on the overview screen (in Figure 12-23, it is the row with material 1619) to reach the item screen shown in Figure 12-24.
Figure 12-24: Creating a customer–material info record, item screen (for setting defaults)
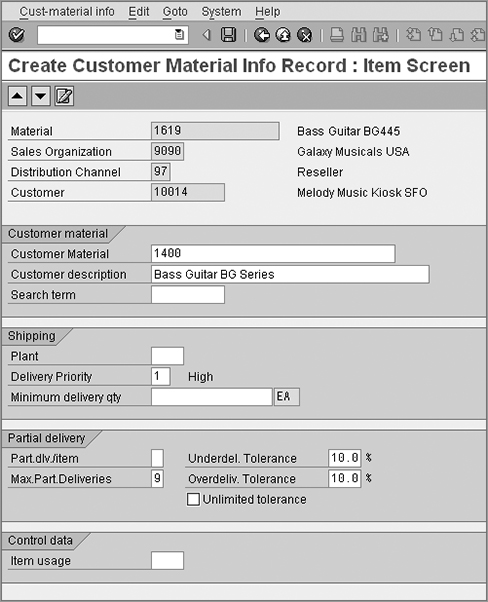
As you can see, this screen allows you to maintain a variety of additional data for your customer–material info record and make the data searchable. Here are the main properties of the four tabs on this screen:
Customer Material This is where you can set up the customer description for the material. The Search Term field helps you in searching this material in various order-processing screens and work lists.
Shipping This is where you can set a default shipping plant and delivery priority for this customer–material info record. You can also maintain defaults for a minimum delivery quantity that a customer should purchase for this material.
Partial Delivery This is where you can set whether the customer allows partial deliveries for this material and if yes, then how many partial deliveries can be made. You can also set the range for the delivery tolerance agreed upon with the customer.
Control Data There is only one item, Item Usage, on the Control Data tab. This is where you define the item usage for this material, which in turn will help in determining the item category for this material in sales and delivery documents. We discuss item categories in detail in Chapter 7.
Now, maintain the required data on this screen, and save your newly created customer–material information record.
Creating Orders Using the Customer Material Number
The order entry screen in the SAP system contains fields to accept and display customer and material-specific information, that is, a customer-specific material number and a customer-specific description. Once you have maintained the cross-reference between the identifier you used and the one that is used by the customer for the same material using the customer–material info record, you can perform the order entry for that customer using the customer material identifier.
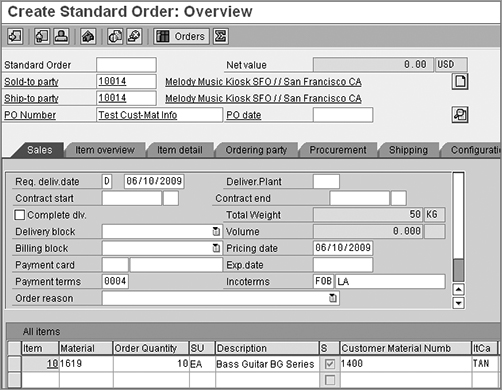
To do order entry using a customer’s identifier, call up the create order screen (Figure 12-25), and fill in the required information such as the customer, order quantity, and purchase order number. Now enter the customer material number identifier in the Customer Material Numb field. You will see that SAP will automatically populate the Material and Description fields with the values from the customer–material info record. In our example, when we entered 1400 in the customer material number field, SAP automatically populated the Material and Description fields with the values 1619 and Bass Guitar BG Series, respectively.
Figure 12-25: Customer–material info record in action
Dependencies Between Material Functionalities
The sequence of events for various material-related functionalities can be defined as follows:
1. Customer–material info records
2. Material determination
3. Material exclusion
4. Material listing
In standard SAP logic, the customer–material info record is applied first to the sales order. This is followed by the material determination. At the end, restrictions as per material listing/exclusion record are applied. Let’s imagine a situation where you have maintained material determination for material 1619 to replace it with material 1599 and have also maintained a customer–material info record for 1619 as 1400. Now, when you create a sales order and enter material number 1400 in the order, the SAP system will first apply the customer–material info record to get to the seller’s material number, that is, 1619. Next it will apply the material determination record on 1619, thus giving an end result of an order entry maintained for material 1599. If you also have maintained the material exclusion record that restricts the sale of material 1599 to this customer, this record kicks in next and sends a message telling the user that material 1599 is restricted for sale to the customer. The SAP system always applies material exclusion prior to the material listing.
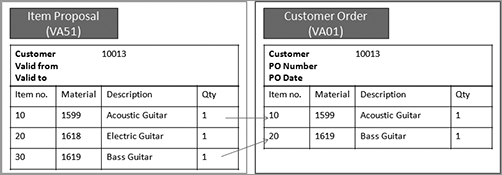
Item Proposal (Figure 12-26) is a tool that helps you to perform the order entry process more efficiently by allowing you to copy over the items into your order from a customer-specific or generic item proposal list. In this process, you first maintain as a proposal document a list of frequently ordered materials, along with the quantities in which the material is ordered or can be ordered by the customer. Next, when you need to create an order for such materials, you just call the item proposal screen from within the sales order creation screen and copy over the required materials with or without quantities to the customer order. This definitely saves a lot of the valuable time and effort that goes into searching for the material when you create the order.
Figure 12-26: Process example, item proposal
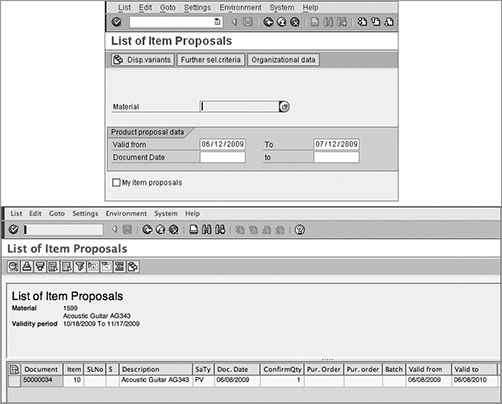
SAP provides a set of four transaction codes to maintain an item proposal in the ERP software. You can use transaction code VA51 to create, VA52 to change, and VA53 to display an item proposal. Transaction code VA55 allows you to generate the list of existing item proposal records with the selection based on material number, validity dates, or records created by you. You can further filter your report output by using the Organizational Data and Created By options available on the selection screen in the VA55 report. Figure 12-27 shows the selection screen and report outputs for the VA55 report.
Figure 12-27: List Of Item Proposals by material, selection screen, and report output
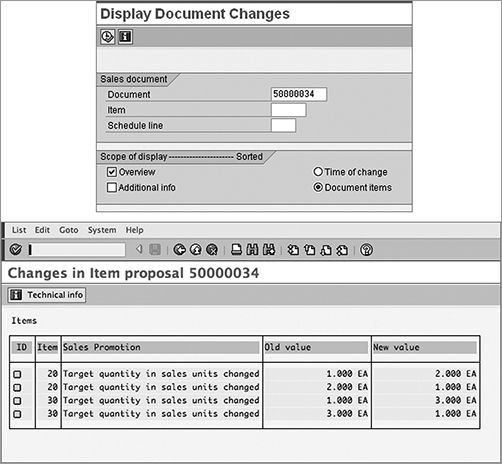
You can check the change history for an item proposal using menu path Environment Changes while you are in a change or display transaction (VA52 or VA53). Figure 12-28 shows the overview screen for the item proposal change log and the log of all the changes that were made in the item proposal document.
Figure 12-28: Item proposal change log, selection screen, and item proposal change log
Creating an Item Proposal Record
You create an item proposal record by using transaction code VA51 or by following menu path Logistics Sales And Distribution Master Data Products Item Proposal Create. Figure 12-29 shows the initial overview screen for setting up an item proposal record.
Once you are at this screen, provide the values for the document type and sales area fields, and click ![]() to reach to the detail maintenance screen shown in Figure 12-30.
to reach to the detail maintenance screen shown in Figure 12-30.
Figure 12-29: Customer item proposal, overview screen

Figure 12-30: Customer–material info record, detail screen
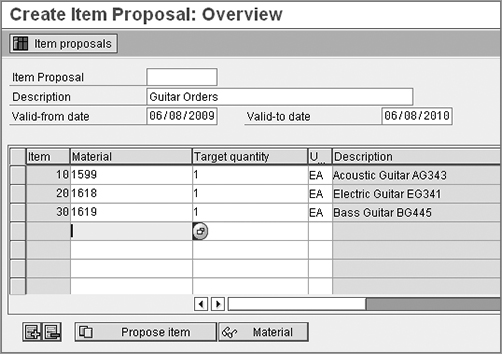
On this screen, provide a meaningful description and validity dates for your proposal record, and maintain all the materials along with the default quantity that you want to set up in a single proposal document. Unlike other sales documents, an item proposal maintenance screen does not contain a Copy With Reference button to allow item proposal creation by copying from an existing item proposal. But, you can still propose items from an existing item proposal using the Propose Item button ![]() .
.
Now use the menu path Edit Incompletion Log to check the completeness of your item proposal record, and save your entry.
Seeing Item Proposals in Action
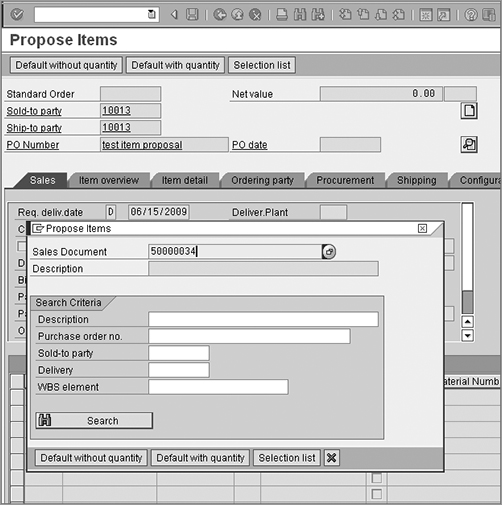
While you are at the order entry screen, you can propose items into a sales order by using the Propose Item button ![]() , using the hotkey Ctrl+F11, or following the menu path Edit Additional Functions Propose Items. After you do one of these things, you will be presented with a Propose Items dialog box, as shown in Figure 12-31. If you know the item proposal number, you can enter it in the Sales Document field. Otherwise, you can search for your item proposal by triggering an F4 search on the Sales Document field. As you can see in Figure 12-31, this dialog box provides you with various options to copy the material. You can copy the material with or without quantity information and can choose materials to be copied using the Selection List button. When you make the desired selection, SAP copies over the materials to the customer order, as per the selection chosen.
, using the hotkey Ctrl+F11, or following the menu path Edit Additional Functions Propose Items. After you do one of these things, you will be presented with a Propose Items dialog box, as shown in Figure 12-31. If you know the item proposal number, you can enter it in the Sales Document field. Otherwise, you can search for your item proposal by triggering an F4 search on the Sales Document field. As you can see in Figure 12-31, this dialog box provides you with various options to copy the material. You can copy the material with or without quantity information and can choose materials to be copied using the Selection List button. When you make the desired selection, SAP copies over the materials to the customer order, as per the selection chosen.
Figure 12-31: Item proposal in a sales document
Seeing Customer-Specific Item Proposals in Action
Unlike other sales document types, you don’t need a partner determination setup for an item proposal. You can set up the link between a partner and an item proposal by maintaining the item proposal record number in the customer master record. An item proposal assigned in this way is also known as a customer-specific item proposal. The assignment works as shown in Figure 12-32.
Figure 12-32: Item proposal maintenance in customer master
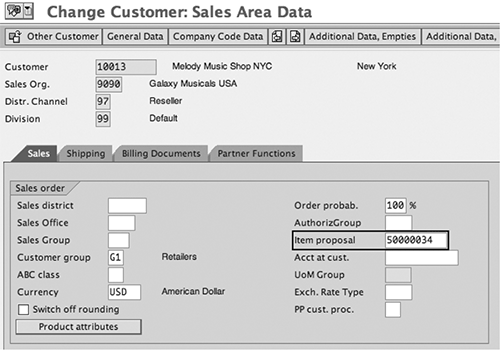
This is really useful in situations where your customer places recurring orders for particular products. You can simply create an item proposal and assign it to a customer master record, and SAP will automatically propose and copy over the materials from this assigned item proposal into the new customer orders, saving you the time and effort required when searching the material every time you create orders for such customer.
NOTE Always remember that an item proposal is just a frequently used material listing that helps in the order entry process. No basic functions from SAP SD application are triggered or determined from within or for an item proposal document. When you create an order using Item Proposal, first the items are copied to the order document, and then all the other functions such as availability check, BOM explosions, material determinations, and material listing/exclusions are triggered in their logical sequence.
Customizing an Item Proposal
Unlike the other sales document customizations that we studied in Chapter 7, you don’t need to configure the item category, schedule line category, or copy controls for an item proposal. Therefore, customizing an item proposal consists of only two steps:
Step 1: Customize the document type for item proposals To do this, use transaction code VOV8 or follow menu path IMG Sales And Distribution Sales Sales Documents Sales Document Header Define Sales Document Types.
Step 2: Define number ranges to be used with item proposals To do this, use transaction code VN01 or follow menu path IMG Sales And Distribution Sales Sales Documents Sales Document Header Define Number Ranges For Sales Documents.
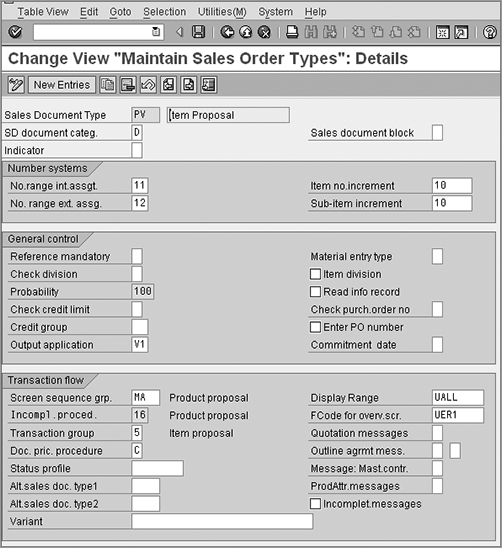
Since we have already covered sales document customization at length in Chapter 7, we will skip that topic here. However, for your convenience, we are providing a configuration screenshot (Figure 12-33) demonstrating the setup for item proposal document type PV. PV is the item proposal document type available out of the box in the standard SAP system. If you want to create your own item proposal type while customizing, make sure to create it as a copy from PV and prefix it with a Y or Z to differentiate it from standard SAP document types. Once it’s copied, make the necessary changes in your newly created document type as per your business requirements.
NOTE When configuring item proposals, you only need to configure an incompletion procedure at the sales document header level. In the standard SAP ERP setup, incompletion procedure 16 is available for item proposals. It is always advisable to analyze the settings for existing setup provided by SAP in incompletion procedure 16 before you create your own customized version. For more details on how to perform customization on an incompletion procedure, please refer to the discussion of incompletion procedures in Chapter 7.
Figure 12-33: Item proposal customization screen
In this chapter, we covered the various material/product-related functionalities that are available in SAP SD. We also talked about their use and customization setup and discussed their relationship to each other and to sales and delivery document processing. In Chapter 13, “Serial Numbers and Batch Management,” we will cover two other important material functionalities that can help you track individual units of materials.
