Chapter 13: Serial Numbers and Batch Management
The serial number and batch management functions have their presence in almost all parts of the logistics chain in SAP. Although the former provides the ability to trace and track materials at an individual unit level, the latter provides the same at the batch level. In this chapter, we will cover the setup and use of the serial numbers and batch management functionality that is provided in the SAP ERP system.
A serial number is a unique number allocated to an individual piece of a product that helps organizations identify, record, and track that individual piece throughout its life cycle. Starting from when the item was produced, you can record and track many types of information for an individual serialized unit using serial number management, including the following:
- Whether it is under blocked or unrestricted inventory status
- Which plant it is available in
- Whether it is at your warehouse or at a customer’s location
- When and to whom it was sold
- What its warranty coverage is
- Whether it came back for repairs and how many times it has undergone repairs
- Whether it came back into the warehouse as a return
- Whether it was it resold after being refurbished
- Whether the item was installed at a customer site or it was kept dismantled
In the SAP system, serial number management is part of logistics and is available across applications. You can use it in a production application to assign serial numbers during production and refurbished orders processing. In a quality management application, it allows serial number assignment during quality inspection processing. Using serial numbers in an inventory management application allows you to capture serial numbers during various inventory transactions resulting from goods receipts, goods issues, stock transfers, stock transport orders, and physical inventory processing, and thus it provides inventory control at an individual unit level. When used in a plant maintenance and customer service application, a serial number not only provides you with control over the products sold but also lets you identify, record, and track your own assets, including their maintenance records. In a sales and services application, you can assign serial numbers to the individual units that are delivered to the customers via a delivery document. You can also capture serial numbers in the return delivery document.
A serialized product provides better controls during after-sales support. Not only can you easily track and validate warranty coverage on a serialized unit, but a serialized unit also helps detect fraud in RMA processing and can help determine whether the unit reported in RMA is actually a counterfeit or stolen unit. When a serialized unit is registered, it creates a direct relationship between the consumer and the manufacturer/service provider, thus providing a platform to organizations for strengthening the relationship with their customers and improving brand presence. Product recalls are easier when the material is serialized and registered.
In the SAP system, the serial numbers can be generated internally by the system or can be provided externally by the user. The field length is a maximum of 18 characters. The field can store numeric as well as alphanumeric serial numbers.
Controlling Serial Number Management
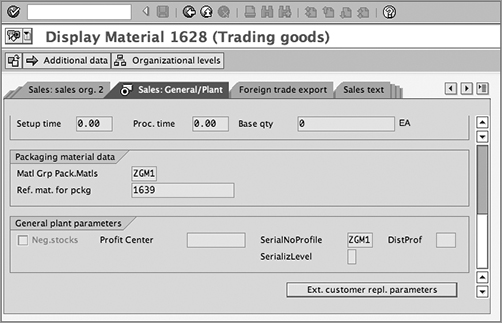
In SAP ERP, the serialization of products is controlled by the serial number profile assigned to the product’s material master record in the Sales: General/Plant Data view, as shown in Figure 13-1.
Figure 13-1: Assigning a serial number profile to the material master record
You can assign a serial number at various stages of a business process. You can assign serial numbers when the goods are produced/procured, when the goods are delivered to the customer, during the handling unit management (HUM), and so on. However, whether the serialization can happen in a particular business transaction like production, delivery, HUM, and so on, depends solely on the serial number profile settings. The serial profile, along with the serialization procedures assigned to it, controls the creation of serial master records and the assignment of serialized units while carrying out business transactions, such as delivery processing.
A serialization procedure controls whether the serial number can be assigned in a particular business transaction. You can switch on/off the use of the serial number in a particular business transaction using serialization procedures. For example, if you don’t want to use a serial number in order, don’t assign the SDAU procedure to the serial number profile.
Standard SAP comes equipped with 10 serialization procedures, as explained in detail in Table 13-1.
Table 13-1: Serialization Procedures
| Serialization Procedure | Description and Use |
| HUSL | Allow serial numbers maintenance during handling unit management. |
| MMSL | Allow serial numbers maintenance during inventory management, i.e., goods receipt, goods issue, stock transfers, stock transport orders, and physical inventory. |
| PPAU | Allow serial numbers maintenance during production and refurbished orders processing. |
| PPRL | Allow serial numbers maintenance when production and refurbished orders are released. |
| QMSL | Allow serial numbers assignment during the quality inspection on the serialized material in the quality management application of the SAP ERP system. |
| SDAU | Allow serial numbers assignment in sales documents such as sales orders, inquiries, and quotations. |
| SDLS | Allow serial numbers assignment during delivery processing. |
| SDCC | Allow serial numbers assignment when performing a completeness check for deliveries. |
| SDRE | Allow serial numbers assignment during return delivery processing. Common uses are sales returns from the customer, returns for repairs, material recalls, replacements, and so on. |
| SDCR | Allow serial numbers assignment when performing a completeness check in return deliveries. |
NOTE In the SAP system, you are not allowed to create your own serialization procedures.
Customizing Serial Number Management
Customizing serial number management in the SAP system involves setting up a serial profile and assigning the required serial number procedures to the serial profile. You then assign the serial profile to the material master record of the material that you want to manage using serial number management.
Deciding the Scope of Customization
Before we start discussing customization, we’ll answer a few questions that can help you decide the basic scope of customization that you need:
- What specific areas of business do you want to implement serial number management for? Is it only for selling the serialized unit, or does it have a bigger scope? For example, if you want to be able to sell the serialized units, then you should also be maintaining the serialized stock; similarly, if you want to provide post-sales service for the serialized product, you should be able to take the serialized returns and validate them against the serialized sales too. The answer to this question will help you decide the serialization procedures that you need to assign to your serial profile in customizing.
- What materials need serialization? Do you want all finished goods and parts to be serialized or only specific ones? The answer to this question will help you decide how many serial profiles you need and what materials they should be assigned to.
- How are the serial numbers to be assigned to a serialized unit? If you use an external system to control the assignment of serial numbers to the units, you would most likely require external number range setup in the SAP system.
- Do you need special user statuses to track the whereabouts of the serialized unit? For example, after the unit is shipped to the customer (system status ECUS), is it installed, pending for installation, or dismantled? Here, installed, pending for installation, and dismantled are the user-defined statuses, and ECUS (unit at the customer’s place) is a system-provided status.
- What partners need to be captured? For instance, do you want to capture only the sold-to party partner in the serial number master record, or do the business requirements also call for capturing the retail partner who sold the serialized unit to the end customer or the authorized service partner who will service the serialized unit for that region?
To illustrate these concepts, let’s look at the customization scope analysis for Galaxy Musical Instruments.
CASE STUDY—Galaxy Musical Instruments: Scope Analysis
Galaxy decided to manufacture its own brand of acoustic guitar. So that it can track the guitar throughout the logistics cycle, the company decided to implement serial numbers and batch management for this new product. So, Galaxy created the finished goods material master record for the new product (model EX43) with material number 1628, which is serialized and relevant for batch management.
A non-SAP system controls the serial number assignment for Galaxy during the production process, and therefore the serial numbers in SAP are maintained as external numbers. The scope of serial number management implementation for Galaxy involves the ability to allocate serial numbers to the units when the stock is received in the plant, the ability to capture serial number information on the sales and delivery document, and the ability to capture serial numbers when the goods are returned by the customer.
Maintaining a Serial Profile
The transaction code is OIS2, and the menu path is IMG Sales And Distribution Basic Functions Serial Numbers Determine Serial Number Profiles.
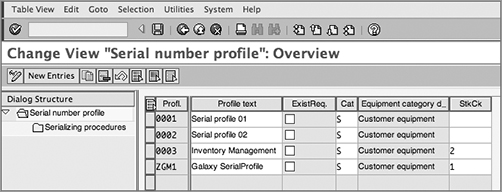
Figure 13-2 represents the customization screen showing serial number profile ZGM1 configured for Galaxy Musical Instruments. Profiles 0001 to 0003 on the screen are standard profiles that come out of box with the SAP system.
As always, define your own serial profile with the prefix Z, taking the copy from the existing profile that matches your business requirement closely. You can give an identification key (four characters or less) along with a description for your serial profile generation.
Figure 13-2: Serial number profile customization screen
Let’s take a look at the fields and check boxes on this screen:
Profl./Profile Text The profile is displayed in the field Profl., and the description is displayed in the next field, Profile Text.
ExistReq. The check box for ExistReq., when selected, ensures that the serial number master record for the individual unit should exist before it can be used in the delivery or in any other business transaction. With this setting, it won’t be possible for the business transaction to automatically create the serial number master record. You will have to create serial number master record manually using maintenance transactions (IQ*) before you can use the serial number in delivery or any other transaction.
Category The Category field controls the link between the serial number profile and the equipment category.
StkCk This field controls whether the system should perform a stock check when the serial number is assigned and controls whether to throw a warning or error if a stock discrepancy is found. Choose 1 to perform a stock check with a warning for stock discrepancies, choose 2 to perform a stock check with an error for stock differences, and leave the field blank to not perform the stock check at all.
Assigning the Serialization Procedures
In this step, you assign various serialization procedures to your serial profile. Figure 13-3 shows various serialization procedures assigned to serial profile ZGM1.
Figure 13-3: Assigning serialization procedures to a serial number profile
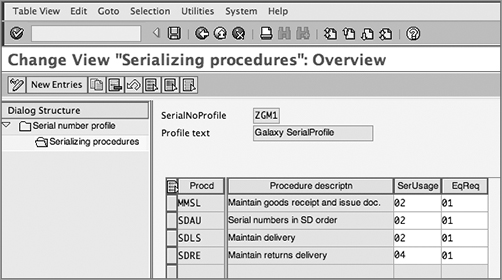
Select all the required serialization procedures that are applicable as per your business requirement. Depending upon whether you want a serial number to be optional, mandatory, or automatic, you can make the required selection in the SerUsage field. The EqReq field allows you to maintain a serial master record with or without equipment. When you choose 01 in this field, the creation of equipment master record for each serial number master record is optional, and when you choose 02, the equipment record creation is mandatory.
Maintaining Serial Numbers Master Record
In the SAP system, a unique combination of material number and serial number constitutes a serial number master record. You maintain a master record for each serialized unit in the SAP system. You can set up the serial number master record by using transaction code IQ01 or by following the SAP Easy Access Menu Path: Logistics Sales and Distribution Master Data Products Serial Numbers. You can also use transaction IQ02 for changing serial number master record, IQ03 for displaying serial number master record, IQ04 for creating serial numbers via list entry, IQ08 for making mass changes, and IQ09 for displaying work lists for serial numbers. Figure 13-4 represents the serial number master maintenance screen.
Here the material number and serial number together define the unique key for the serial number master record.
You can maintain stock-related information for the serialized unit under the Stock Information section. You can then use this information to track the serialized unit in the stock. The stock information can be autopopulated by the SAP system if the serial numbers are generated while loading the stock into the SAP system. In that case, you will find fields for the stock type, plant, storage location, and batch already filled in with the relevant data. You can also maintain the stock batch and master batch–level information for a serialized unit. In fact, you can even maintain the serialized unit warranty information and back-to-back warranty information of the vendor using the fields available on the Warranty tab.
Figure 13-4: Serial number master maintenance screen
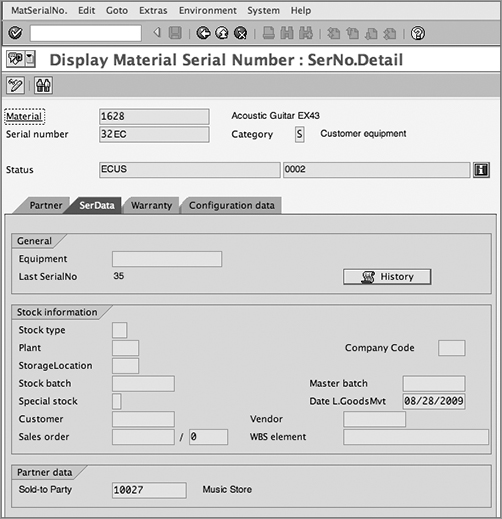
For each serial number master record, you can maintain the current status of the serial number. When you create the record for the first time, it is under either AVLB status or ESTO status. When the goods are sold, the status changes to ECUS, representing that the goods are at the customer’s location now. At the same time, SAP captures the customer details and the details of any other required partners that you want to maintain for the serialized unit. These details are shown on the Partner Data tab and in the Sold-To Party field on the SerData tab, as shown in Figure 13-4. You can also maintain further qualifier statuses called user statuses, if they are set up in customizing.
You can maintain and change the serial number status manually using the menu path Edit Special Serial No. Functions Manual Transaction. You can also change the serial number assignment to the material or change the material number assignment to the serial number by using the menu path Edit Special Serial No. Functions Change Serial No. and the menu path Edit Special Serial No. Functions Change Material No., respectively.
Using the Extras Serial Number History menu path, you can get the complete history for the serialized unit including when it was procured, when it was sold, when it was returned, when the inventory was transferred, when it was repaired, and so on, along with the document numbers, provided the serial number profile allows the serial numbers assignment in these business transactions and provided the serial number was captured while carrying out the business transaction.
NOTE Always remember that a serial number cannot be deleted from the system once created. You can only mark it for deletion and can later archive it.
Assigning Serial Numbers to Deliveries
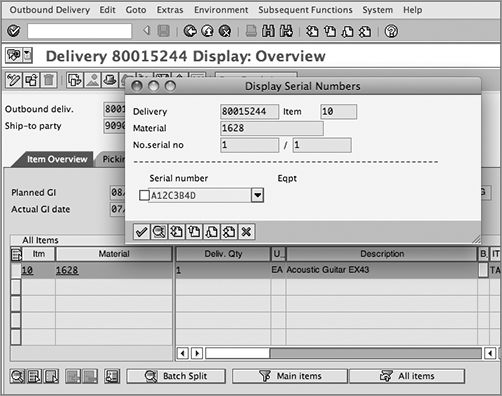
Once the master record for the serialized unit is ready, you can select the serialized unit during delivery processing and other allowed business transactions. You can also create a new serial number master record at this time by clicking the Create Serial Number button to generate and assign a new serial number to the delivered unit, provided it is allowed in customizing. Figure 13-5 shows an example of the assignment of serial numbers during outbound delivery processing. To reach this serial number assignment screen, you have to select the line item in delivery that requires the serial number assignment and then follow the menu path Extras Serial Numbers. If you set up the Serial Usage field as obligatory while customizing the serial number profile, the SAP system will automatically bring up the serial number screen for maintenance because without it the document will be incomplete.
Figure 13-5: Assigning serial numbers during delivery processing
Batch management refers to managing, tracking, and processing products produced/procured in batches. A batch can be defined as a partial quantity or subset of a material quantity procured/produced that differs from other subsets of the same material based on certain distinguishing characteristics or properties. For instance, during a first process run, say 1,200 gallons of milk are processed and packed into 1-gallon milk bottles (sellable units) with an expected shelf life of 10 days. During the second process run, 1,500 gallons of milk are processed and packed into milk bottles with an expected shelf life of 12 days. Thus, the material stock record for milk has two distinctive batches (based on when it was produced and the shelf life/expiry date) with 1,200 and 1,500 stock quantities, respectively.
Batches are used by a lot of industries. For some industries, such as industries manufacturing food, pharmaceuticals, and medical devices, batch management is a legal requirement governed by the regulatory Good Manufacturing Practice (GMP) Act. For other industries, batch management is more of an internal business requirement to track products at the batch level.
Batch management functionality in the SAP system deals with managing and processing of batches across the logistics component. You can create batches when the goods are produced, assembled, or procured. Each batch is identifiable based on the unique batch number, which can be externally assigned by the user or can be internally assigned by system. Each batch number corresponds to a batch master record that contains all the specifications and attributes of a batch. You can use these attributes as a selection parameter to perform automatic batch determination during the processing of a sales cycle.
You can perform quality inspection on the batch stock and can put the batch under restricted or unrestricted use. During outbound delivery processing to the customer and transport orders in warehousing, you can run batch determination to select the relevant batches. You can also use the SAP batch management for defect tracking and product recall management. Using Batch Info Cockpit report, you can even perform quite an exhaustive analysis on the batches.
Understanding Batch Levels
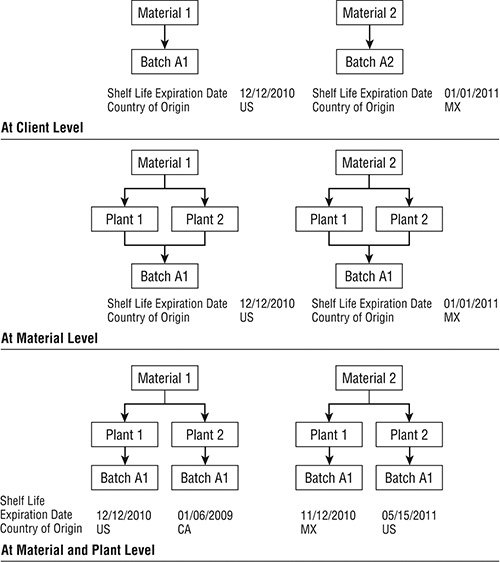
In the SAP system, you can define batches at three levels: the client level, the material level, and the material/plant level:
Client level Batch maintenance at the client level makes a batch unique throughout the client. This means that the batch number, once assigned to a material, cannot be reassigned to another material within the same client. Here, the batch master record is maintained for a combination of the material number and the batch number, and the batch class type used is 023.
Material level Batch maintenance at the material level makes a batch unique for a material: you can assign the same batch number to more than one material within a client, with batch specifications varying from one material to another but with the same specifications across all plants for the same material. When batch maintenance is at this level, all material movement between plants for one material will involve only one batch. Here, the batch master record is maintained for a combination of the material number and the batch number, and the batch class type used is 023.
Material/plant level Batch maintenance at the material/plant level makes the batch assignment very flexible and therefore is widely used. It is also the default setting for batch-level maintenance available in the standard SAP system. Here, the batch number is unique for a combination of a material and a plant. You have the flexibility to assign the batch number again and again for a different material with different specifications at each plant level. You can even transfer stocks from one plant to another plant between batches with the same number and different specifications. In such cases, the SAP system automatically assumes the specifications of the destination batch. Here the batch master record is maintained for a combination of material number, plant, and batch number, and the batch class type used is 022.
Figure 13-6 represents the three levels we just discussed.
Figure 13-6: Batch levels
In SAP, if you started using batch management at a particular batch level and you need to switch to another batch level, you can easily switch as long as you are switching to a higher level in the batch-level hierarchy; in other words, you can switch from a material/plant level to a material level, from a material/plant level to a client level, and from a material level to a client level. Switching to a subordinate level is, however, allowed only between the client level to a material level; that is, you cannot switch from a material level to a material/plant level or from a client level to a material/plant level, but you can switch from a client level to a material level.
Maintaining Batch Master Records
Working with batches involves setting up the batch masters, loading stock to batches, and determining the relevant batch during sales and distribution processing. A batch master record holds batch-specific information for a material. You can either create the batch master records manually prior to loading stock using the maintenance transactions provided by the SAP system or leave it up to the inventory load transaction to automatically create the batch master record while loading stock. You can only create a batch record for a material if the batch management is activated with the required batch level and the material is batch relevant. While activating batch management is part of the customization setting, marking material as batch relevant is a master data setting that you can set by selecting the Batch Management check box available in the Sales: General/Plant view of the material master record for the material. Remember that you cannot remove the batch relevancy indicator from a material that already contains the batch stock for the current or previous period. In such scenarios, you need to first clear the batch stock and then proceed with removing the batch relevancy indicator from the material master.
You can create a batch master record by using the transaction code MSC1N or by following the Easy Access menu path SAP Menu Logistics Central Functions Batch Management Batch.
The Batch Master Record Creation Screen
A batch is created for a material, and therefore the structure of a batch object consists of a material number, a batch number, and a plant. Whenever you create a batch master record, you enter a material number and a batch number combination as a unique key. Plant entry is optional and is required to be maintained if you have activated the batch at the material/plant level.
Figure 13-7 represents the batch master record creation screen and the Basic Data 1 tab. The screen is divided into two parts. The upper part of the screen shows the unique composite key that represents the batch master record. Here, in Figure 13-7, the batch master record is unique for each unique combination of material number and batch number (batch management at the material level). You can see a Plant entry on the screen because we maintained the optional Plant field while setting up the batch master record—just to give you a visual picture of all three fields from the batch structure.
Figure 13-7: Basic Data 1 screen for creating a batch master record
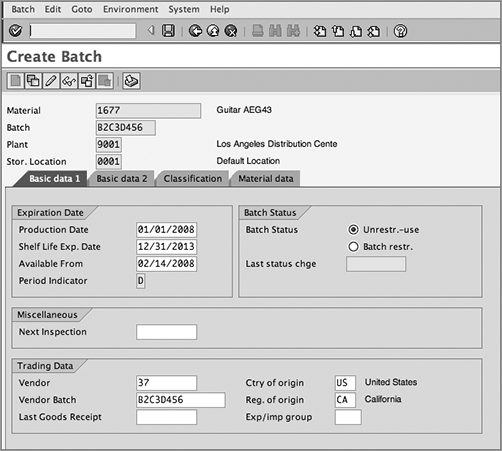
The lower part of the screen consists of various fields and tabs where you store the attributes of the batch record. Let’s look at these fields in more detail:
Expiration Date This is where you can maintain the date when the batch was produced (Production Date), when the shelf life of the batch will expire (Shelf Life Expiration Date), and when the batch will be freely available for sale (Available From). If the batch is for refurbished units, you can also use the Production Date field to represent the final date that is the last stage in the refurbishing process and marks the product good for resale. This may be the refurbished date, testing date, or last inspection date.
Miscellaneous This is where you maintain the date on which the next inspection of the shelf stock from the batch will be due.
Batch Status The Batch Status field allows you to maintain the status of the batch master record. You can set the status to restricted use or unrestricted use. You can also create your own user-defined statuses using the classification system to further classify the batches as damaged, blocked, require refurbishing, inspection pending, and so on. When a batch status changes from restricted to unrestricted, or vice versa, the SAP system automatically posts an internal transfer-posting document to transfer the underlying stock from restricted to unrestricted or from unrestricted to restricted stock. This material document is posted for all the storage locations where stock for this batch exists. Even for inventory movement for a batch-managed stock, the SAP system decides whether to post to restricted or unrestricted stock based on whether the batch status is restricted or unrestricted.
TIP You can use batch status as one of the search parameters to include/exclude a particular batch while carrying out the batch determination in a sales transaction.
Trading Data A batch material can be produced internally or procured from a vendor. The Trading Data part of the maintenance screen allows you to capture the vendor details when a batch was externally procured. This helps you track the source of the batch along with important information about the source, such as the vendor number, vendor batch, last goods receipt date, country of origin for the batch, region of origin, and export/import group.
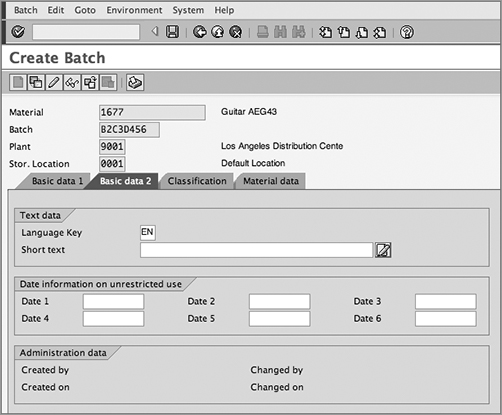
The Basic Data 2 tab on the maintenance screen (Figure 13-8) allows you to capture any text or date information related to the unrestricted use of the batch. This screen also captures the administrative details about who created or changed the batch master record.
Figure 13-8: Basic Data 2 screen for creating a batch master record
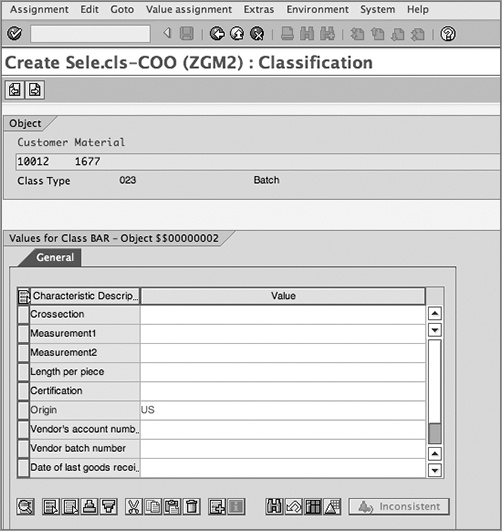
You can use batch management with and without classification. Using the Classification tab in batch management (Figure 13-9) allows you to maintain additional characteristics in the batch master records that can be used later as the search criteria for determining the relevant batch while processing deliveries and other batch-relevant business transactions. For example, if your customer only wants goods that are produced in the United States, you can maintain the country of origin (COO) as US on the Classification tab of the batch master record. You then maintain the customer requirement for COO as US in the batch determination condition records. During automatic batch determination, SAP treats the COO information maintained in the batch determination condition record as the selection parameter, and searches the relevant batch with COO set to US for delivering goods to the customer.
Figure 13-9: Classification screen for creating a batch master record transaction
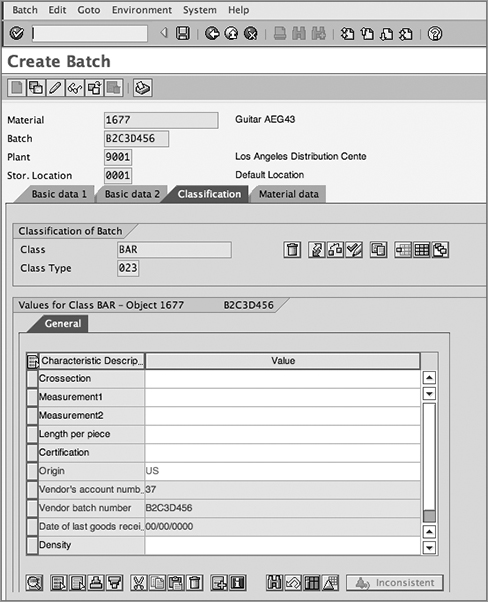
TIP While creating a batch master using MSC1N, if you don’t have the complete data to maintain the classifications, you can put the classification under incomplete status using the ![]() button and can later maintain the classification data using transaction code MSC2N (Batch Master Record Change).
button and can later maintain the classification data using transaction code MSC2N (Batch Master Record Change).
In the following section, we will discuss the customization settings for batch management and automatic batch determination in SAP SD. We will then discuss the batch determination condition master record maintenance and will show batch determination in action using a sales order example.
Preliminary Setup and Activation
Setting up batch definition is a prerequisite for using batch management in the SAP system. By setting up batch definition, we mean setting up the batch level and activating batch management in the SAP system. You can customize the batch definition by using transaction code OMCT or by following menu path IMG Logistics General Batch Management Specify Batch Level And Activate Status Management.
Figure 13-10 represents the Batch Definition overview screen. The three settings of greatest interest on this screen are Batch Level, Batch Status Management, and Initial Status Of A New Batch. The setting for Plants With Batch Status Management is optional. Use it if you want to activate the batch status management at the plant level. You can also reach the customization screens for these three customization options using direct transactions—OMCE for setting up batch levels, OMCS for managing batch status, and OMAB for setting up the initial status for a new batch.
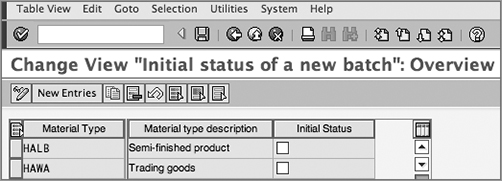
Selecting the relevant option in Figure 13-11 allows you to activate batch management at the required level. Activating batch status management as per Figure 13-12 allows you to maintain the batch status as restricted or unrestricted in the batch master record. The settings in Figure 13-13 allow you to set the default initial status for a new batch. The status is customized based on the material type. If the Initial Status check box is selected, the batch’s initial status is defaulted to restricted, and when it is not selected, the batch’s initial status is defaulted to unrestricted.
Figure 13-10: Batch definition overview screen
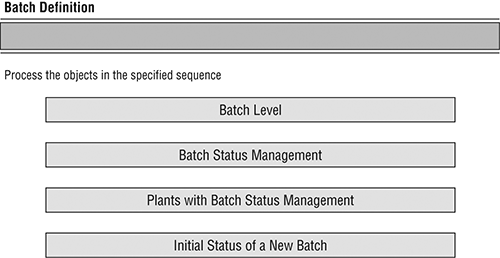
Figure 13-11: Defining the batch level
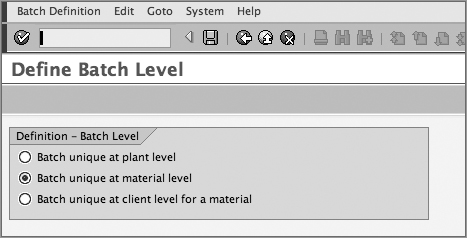
Figure 13-12: Defining the batch status management
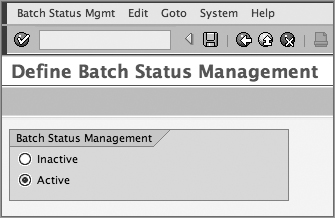
Figure 13-13: Setting up the initial status for a new batch
Batch Number Ranges
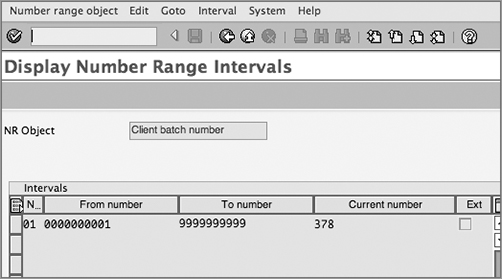
You can have batch numbers generated internally by the SAP system or have the user provide them externally. In the standard SAP system, number range 01 with starting number 0000000001 and ending number 9999999999 is provided to internally assign the batch numbers. The number range object is BATCH_CLT.
The customization of the internal number range involves two steps. In the first step, you need to activate the internal batch number range assignment using transaction code OMCZ, and in the second step you need to set up the actual internal numbers range using transaction code OMAD. Figure 13-14 and Figure 13-15 show the customization screen for these two steps. You can also use user exits EXIT_SAPLV01Z_001 and EXIT_SAPLV01Z_002 to assign your own batch number range parameters.
For an external number range, the SAP system does not provide any visible number range in the object BATCH_CLT, but internal number range 02 is reserved for external number assignments. You could use user exit EXIT_SAPLV01Z_003 to define your own number range parameters for external number assignment for batches.
Figure 13-14: Activating the internal number range
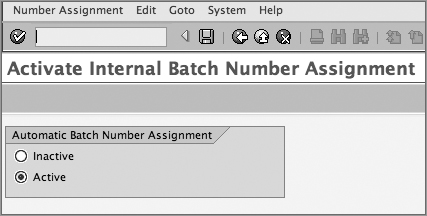
Figure 13-15: Setting up the internal number range
Batch Determination
Like other basic functions in the SAP SD application, batch determination uses the condition technique, and the steps for determination are very similar. Let’s take a quick look at these steps:
1. Setting up a condition table
2. Setting up an access sequence
3. Defining strategy types
4. Creating a batch determination procedure
5. Setting up a batch determination rule
6. Activating automatic batch determination in SD
Setting Up a Condition Table
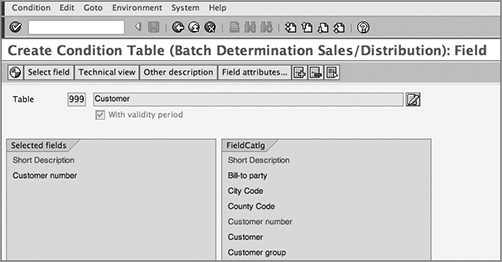
Here you define the condition table that will store the condition records for your batch determination. You can choose from the ones that are available in the standard SAP system, or you can create your own in the customer namespace (that is, 500 and greater). The transaction code is V/C7, and the menu path is IMG Logistics – General Batch Management Batch Determination And Batch Check Condition Tables Define Sales And Distribution Condition Tables. Figure 13-16 shows the customization screen for defining the batch condition table.
Figure 13-16: Setting up the batch condition table
Adding New Fields to the Field Catalog
Adding new fields to the field catalog involves three steps: adding the fields to the header and item structures, adding the fields to the field catalog, and populating the fields. Let’s look at these steps in order:
Step 1: Add new fields to the header and item structures. Add new fields to header structure KOMKH using include KOMKDZ and to item structure KOMPH using include KOMPDZ. Once added to these structures, the fields will automatically get added to the KOMGH structure.
Step 2: Add the fields to the field catalog. Once the new fields are added to the structure, use transaction V/C6 to add them to the field catalog. Remember that you will not be able to see the fields on the selection screen for V/C6 unless they are added to the structures as per the first step. Now you can use these newly added fields in your condition table.
Step 3: Populate the fields during order/delivery processing. Once fields are added to the structure and field catalog and used in the condition table, the next step is to populate the values into these newly added fields. If you added fields to the header structure KOMKH, use USEREXIT_MOVE_FIELD_TO_KOMKH from include MV45AFZB for populating the values into the newly added fields. For populating the values into the newly added fields to item structure KOMPH, use USEREXIT_MOVE_FIELD_TO_KOMPH.
Setting Up an Access Sequence
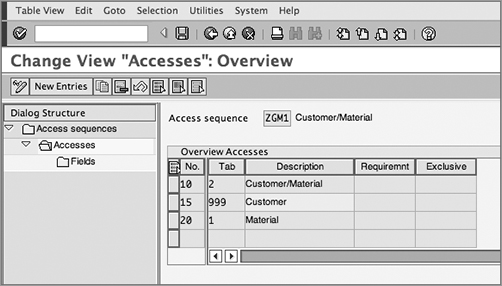
Here you arrange the condition tables in the sequence in which you want them to be accessed by the SAP system when batch determination is carried out. Again, you can use the ones available in the standard SAP system or define your own. To define your own, use a four-character identification key starting with the prefix Z and add a meaningful description. Do not forget to generate your access sequence once you’re done. The transaction code is V/C2, and the menu path is IMG Logistics General Batch Management Batch Determination And Batch Check Access Sequences Define Sales And Distribution Access Sequences. Figure 13-17 represents the customization screen for defining the batch access sequence.
Figure 13-17: Defining the batch access sequence
NOTE Unlike other condition techniques based on access sequences, access sequence for batch determination does not have an Exclusive check box, and you can’t define requirements at the access sequence level.
Defining Strategy Types
The next step is to define a strategy type and assign the access sequence to the relevant strategy types. Strategy types are the condition types that control the search criteria. The transaction code is V/C1, and the menu path is IMG Logistics – General Batch Management Batch Determination And Batch Check Strategy Types Define Sales And Distribution Strategy Types. Figure 13-18 represents the customization screen for strategy types.
CASE STUDY—Galaxy Customization Analysis: Batch Condition Tables and Access Sequences
At Galaxy Musical Instruments, a variety of rules exist that determine the batch selection during sales and distribution processing. One of the important rules for determining batch selection in Galaxy is the country of origin. Some of Galaxy’s customers only want goods that are made in United States. Sometimes, this country-of-origin requirement from customers is specific to materials, and sometimes it is a generic requirement applied to all materials sold to that customer. For all other customers, Galaxy wants to send the batch materials that were produced/procured first to be delivered first. To achieve this search logic, Galaxy chose standard condition tables 002 (Customer/Material) for maintaining customer/material-specific batch determination rules, chose 001 (Material) for defining material-specific rules, and created the new table 999 (Customer), as shown in Figure 13-16, for defining customer-specific rules. These three tables were then put into access sequence ZGM1 with access to condition records, as shown in Figure 13-17.
Figure 13-18: Defining the strategy type
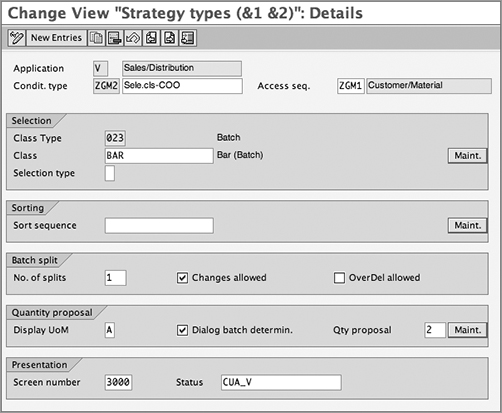
The important fields on this customization screen are as follows:
Condition Type The Condition Type field on the screen represents the four-character strategy type identification key, ZGM2.
Access Sequence Access sequence ZGM1 represents the access sequence assigned to strategy type ZGM2.
Class Type The class type is always 023—the batch class provided in the standard SAP system for use with batch management, except for the material/plant level batch maintenance scenario, where the class type is 022.
Class Using Class, you can define a default classification to your strategy type. Remember that you can search for batches using batch determination only if the batches are classified.
Selection Type The Selection Type field defines how the selection for a batch needs to happen. When left blank, the system immediately displays the batches that meet the selection criteria when the batch search is executed in a document.
Sort Sequence The Sort Sequence field allows you to define your own sort display for batches.
Batch Split The Batch Split field controls the number of batch splits that are allowed during batch determination.
CASE STUDY—Galaxy Customization Analysis: Batch Strategy Types
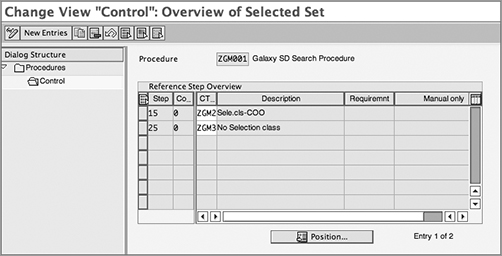
At Galaxy Musical Instruments, a variety of rules can determine a batch search. There are searches based on the country of origin and searches based on some other classes. To cover these, Galaxy created two strategy types: ZGM2 with default class BAR (for the country-of-origin information) and ZGM3 without any default class. This way, ZGM3 can have any class when the batch search condition record is finally maintained.
Creating a Batch Determination Procedure
Next you assign the strategy types to a determination procedure that will help determine the required batch during a sales transaction. The transaction code is V/C3, and the menu path is IMG Logistics – General Batch Management Batch Determination And Batch Check Batch Search Procedure Definition Define Sales And Distribution Search Procedure. Add your strategy type into the procedure as shown in Figure 13-19.
Figure 13-19: Creating the batch determination procedure
Setting Up a Batch Determination Rule
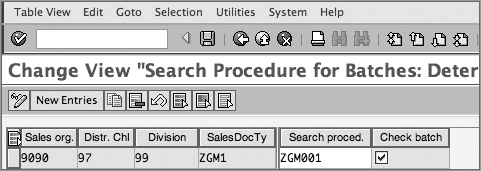
Finally, you define the determination rule. The transaction code is V/C5, and the menu path is IMG Logistics – General Batch Management Batch Determination And Batch Check Batch Search Procedure Allocation And Check Activation Allocate SD Search Procedure/Activate Check.
Here, a combination of sales area and document type helps you determine the relevant determination procedure for a sales transaction, as shown in Figure 13-20. This can be represented in equation form as follows:
Sales area + Document type = Determination procedure
Figure 13-20: Setting up a batch determination rule
Activating Automatic Batch Determination in SD
If you want the SAP system to automatically determine the relevant batches during sales order and delivery processing, you can specify that here by selecting the automatic determination check box for each sales and delivery item category for which you would like the automatic batch determination. The transaction code is V/CA for sales and V/CL for delivery. The menu path is IMG Logistics – General Batch Management Batch Determination And Batch Check Activate Automatic Batch Determination In SD.
Maintaining Condition Master Records for Batches
Table 13-2 represents the transaction codes available in the standard SAP system for maintaining condition records for batch determination. To maintain a record, use the relevant transaction to call up the maintenance screen and maintain the record for the strategy type (condition type) you defined in customizing.
Table 13-2: Transaction Codes for Maintaining Batch Determination Condition Records
| Transaction Code | Menu Path | Description |
| VCH1 | SAP Easy Access Menu Path Central Functions Batch Management Batch Determination Batch Search Strategy For Sales And Distribution Create | Creates batch condition record |
| VCH2 | SAP Easy Access Menu Path Central Functions Batch Management Batch Determination Batch Search Strategy For Sales And Distribution Change | Changes batch condition record |
| VCH3 | SAP Easy Access Menu Path Central Functions Batch Management Batch Determination Batch Search Strategy For Sales And Distribution Display | Displays batch condition record |
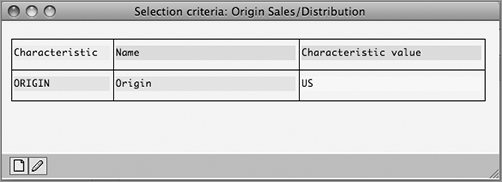
For batch determination strategy type ZGM2, Figure 13-21 represents the condition record maintenance screen, and Figure 13-22 represents the selection criteria for the batch determination. Here, entering the country of origin as US in the selection criteria tells SAP to look only for batches where the country of origin is set to US when it’s assigning stock to the delivery document for customer 10012 and material 1677.
Figure 13-21: Creating the batch condition record

Figure 13-22: Creating the batch condition record, selection criteria screen
Batch Determination in Action
Figure 13-23 shows an example of batch determination in action using customer 10012 and material 1677. As you can see, the system automatically determined batch B1C2D345 using batch determination. Let’s take a look at how the SAP system arrived at this batch number.
Figure 13-23: Example showing batch determination in a sales order
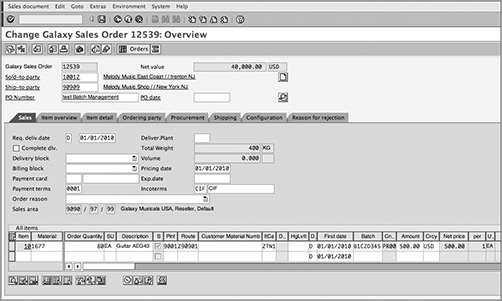
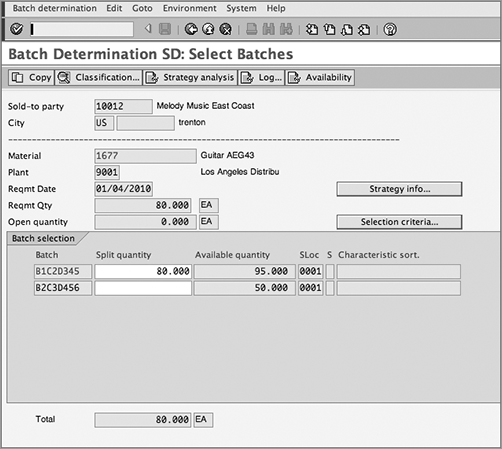
Select line item 10, and click the ![]() button; you will be taken to the batch determination analysis screen, as shown in Figure 13-24.
button; you will be taken to the batch determination analysis screen, as shown in Figure 13-24.
Figure 13-24: Batch determination analysis screen
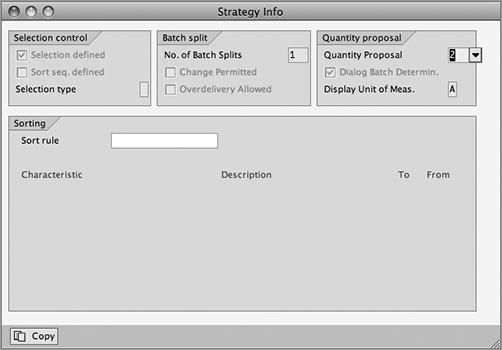
Clicking the Strategy Info button takes you to the screen in Figure 13-25 that shows all the strategy information that was used by SAP during batch determination.
Figure 13-25: Strategy information
Clicking the Selection Criteria button takes you to the screen in Figure 13-26 that tells you what selection criteria SAP used to determine the batches.
Figure 13-26: Selection criteria
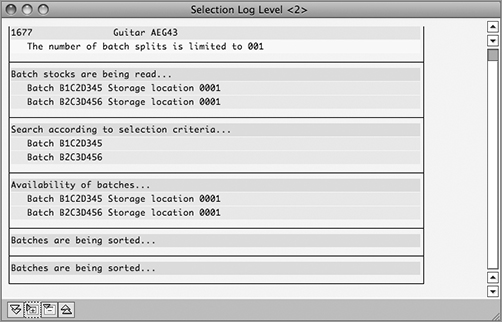
Clicking the Log button takes you to the log screen shown in Figure 13-27 that tells you how SAP determined the batch. As you can see, the two available batches for material 1677 were selected. On these two batches, SAP applied the selection criteria of the country of origin as US and found that both the batches had a country of origin set to the United States. It then checked the availability of batches in storage location 0001 and found that the batches were available.
Figure 13-27: Batch determination log analysis
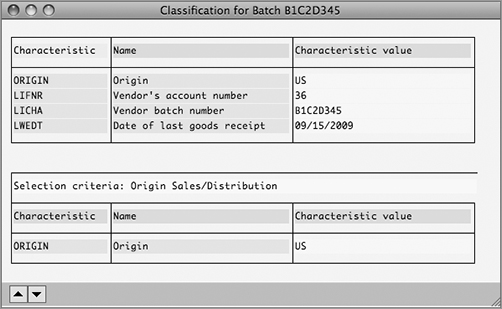
Clicking the Strategy Analysis button takes you to the batch condition record determination analysis screen (Figure 13-28), and clicking the Classification button will show the classification details of the selected batch that you maintained while setting up the batch master record (Figure 13-29).
Figure 13-28: Strategy analysis
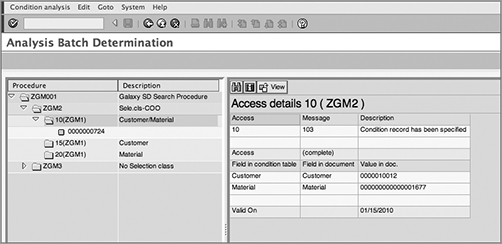
Figure 13-29: Batch classification
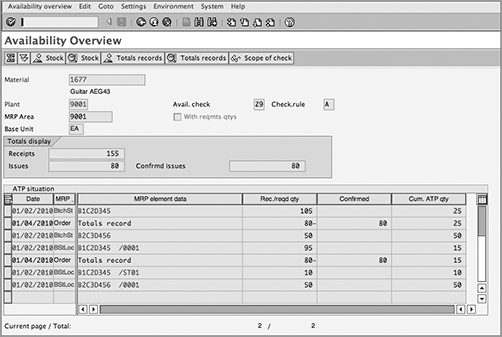
If you want to see the availability check overview for the selected batch stock, you can do so by clicking the Availability button. Figure 13-30 shows the availability check overview screen for material 1677.
Figure 13-30: Stock availability at the batch level
Serial numbers and batch management are important components of SAP’s logistics central function because they provide great levels of tracking and traceability to organizations. In this chapter, we discussed the setup and use of serial numbers and batch management in the SAP system. In the next chapter, we will cover various advanced topics in the SAP SD application and briefly touch upon enhancement packages.
