Using Apple Mail with iPhoto
Burning CDs and DVDs for sharing
The power of MobileMe
Interfacing an iPhone and iPhoto
Sharing socially: Facebook and Flickr
Utilizing photo feeds
Exporting to other applications
These days, the fastest way to share your photographic works of art is electronically. And because working with iPhoto means that you already have your photos in the digital realm, sharing them with your friends and relatives is easy. Burning them onto CDs and DVDs is quick and easy, too.
Depending upon the resolution of your shared photo, the recipient can decide whether to print it. That way, you don't have to worry about shipping hard-copy photos or risking them getting bent or folded (even if you mark them Do Not Bend!)
In this chapter, I show you how iPhoto and Apple Mail work together. Don't want to spend time e-mailing photos to each person in your address book? No problem — put them on the Web and just send an invitation to view. This can be done using social networking applications like Facebook and Flickr and Apple's MobileMe service, all of which I show you in this chapter.
Many good e-mail clients are available for Mac besides the Apple client, Mail. Eudora, AOL, and Entourage all allow you to send photos. Rather than trying to cover them all, though, I concentrate on using iPhoto with Mail. You may find software available elsewhere that adds other e-mail clients. Also, later in this chapter I show you how to export the photos to a hard drive. From there you can attach them to any e-mail client.
Attaching photos to an e-mail is the easiest, quickest, and least-expensive way to share your photos. Being easy, though, doesn't mean there aren't things to think about to make sure the process works. Take these three things into consideration when e-mailing photos:
Photo file type and size: Remember that you aren't submitting a photo for viewing in an art gallery. To keep the file size down while still maintaining a decent resolution, go with either JPEG or PNG format.
Tip
When you attach a photo to an email, iPhoto automatically converts it to a JPEG. If you export photos outside of iPhoto, you have more choices of format. PNG is a good alternative.
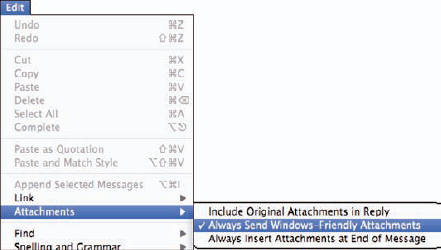
Whether the recipient is using Windows or Mac OS: I find it best to make no assumptions about the recipients machine, so I send attachments that either operating system can read. Make this setting in Mail from the Edit

Whether you want all photo attachments to appear at the end of the e-mail message: This is something else you can set in Mail from Edit
Because this is a book about iPhoto, I'll stick to showing you how to include your photos in Apple's Mail application using iPhoto. Chapter 2 covers the General Preference pane where you can choose one of the other e-mail clients listed, if you prefer.
Here's how to send an e-mail directly from iPhoto. The nice part is you don't have to have Mail or any of the other three email applications open before starting these steps. If you haven't done this already, in Mail, choose Edit
With iPhoto open, follow these steps to e-mail a photo directly from iPhoto:
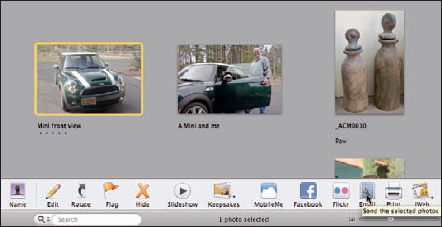
In iPhoto's main window, highlight the photo(s) you wish to e-mail and then click the Email button on the iPhoto toolbar. (See Figure 11-2.)
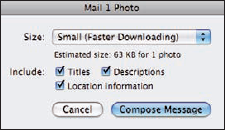
In the dialog that appears (see Figure 11-3), make the following selections:
Size: You can choose a Small, Medium, or Large photo or choose to send the actual size as it appears in iPhoto. If you make it too large, your Internet service provider (ISP) — or your recipient's ISP — might not accept the e-mail. If the photo is only going to be viewed on the computer and not printed, the small or medium sizes are usually the best. For printing, consider large or actual size to provide the necessary resolution. The photo is converted to a JPEG file for you.
Include: In previous chapters, I tell you how you can assign titles, descriptions, and location information to your photos. Here, select or deselect the check boxes to indicate your preference on which of this information is sent along with the photo.
Click the Compose Message button.
The photo(s) appear in a new e-mail in Apple Mail, as shown in Figure 11-4.
Fill out the e-mail headers (the To and Subject fields) and optional message; then click Send.
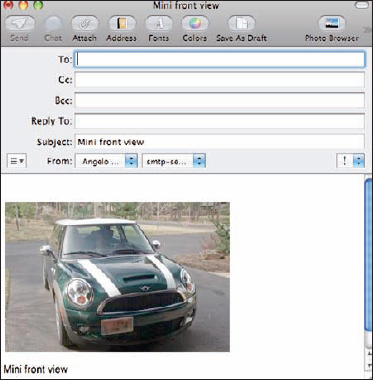
Your photo(s) is sent on its way.
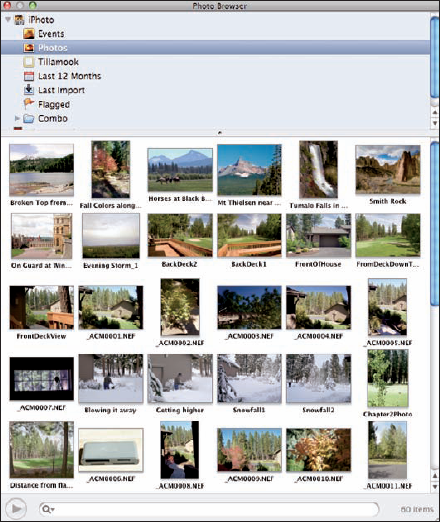
Here's a way to send photos from the iPhoto Library without actually opening iPhoto: You can use the Photo Browser in Apple Mail. This is a very convenient way to send photos from iPhoto.
Open Mail and then choose Window
Photo Browser.The Photo Browser window opens, displaying the contents of your iPhoto Library. See Figure 11-5.
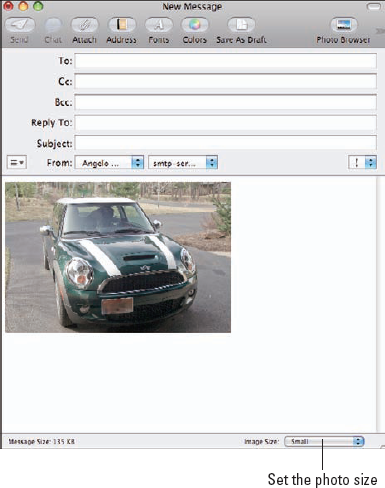
In Mail, open a new message by choosing File
New Message or by pressing+N.
Select the photo(s) you wish to send and drag it from the Photo Browser window into the Mail message window.
At the bottom of the Mail window, set the photo size you wish, fill out the headers, add an optional message, and click Send.
See Figure 11-6.
Although not as fast, creating a CD or DVD with your photos is definitely a more secure way of sharing or even backing up your memories.
Warning
If you use the method that follows to share your photos, the person you're sharing them with must also have iPhoto and should be using the same version of iPhoto as you do.
Tip
However, to share photos with Windows users, export the photo(s) from iPhoto to your computer, insert a blank CD or DVD, drag the exported photos onto the disc icon, choose File
To burn a CD or DVD from iPhoto (remember, this disc can only be read in iPhoto) do this:
Open iPhoto and select the individual photos or Albums you want to burn to disc.
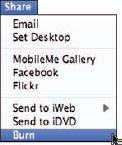
On the iPhoto toolbar, choose Share
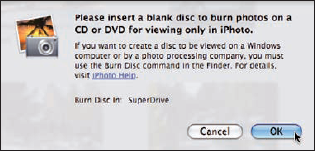
Burn, as shown in Figure 11-7.A dialog appears (as shown in Figure 11-8), asking you to insert a blank disc. XX If you have other CD/DVD applications such as Toast that you use for burning CD's/DVD's, you may use them instead of the Finder.
Insert a blank CD or DVD and then click OK.
When your Mac recognizes the disc, information about the CD or DVD appears above the iPhoto toolbar.
In the Name field, change the name of the CD or DVD. Then click the Burn button to initiate the action. (See Figure 11-9.)
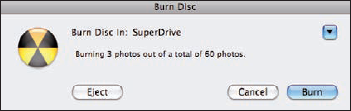
Before the burn begins, the Burn Disc dialog appears (as shown in Figure 11-10) confirming the number of photos to be burned. The dialog also gives you the choice to cancel the burn, eject the disc, or proceed with the burn.
If everything is correct, click the Burn button.
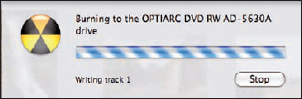
A burn progress dialog appears (as shown in Figure 11-1), allowing you to see the progress of the disc burn.
Warning
You can stop the burn by clicking the Stop button, but the disc might not be readable after stopping. This process may take some time.
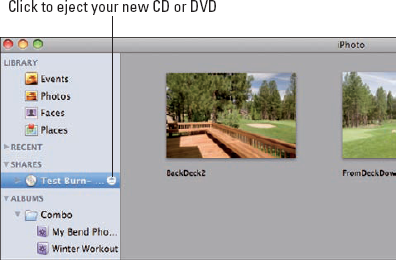
When the burn process finishes, the new disc appears in the Source list, under Shares, with the title you gave it.
To eject the disc, click the up arrow beside the disc name in the Source list.
Figure 11-12 shows the recognized disc in my example.

Perhaps the best way to allow the most people to see your photos is to put them on the Web. If you're fortunate enough to have a MobileMe account, you know it's a great way to keep everything in sync, from e-mail and contacts to calendars.
And with the capability to host your photo Albums in your Gallery, they're accessible anywhere in the world to anyone you authorize — or everyone, if you choose. You can even choose to allow others to download your photos or upload some of their own (maybe some shots from a party or an event that you didn't capture).
Here's how to publish your photos or Albums in a MobileMe Gallery from iPhoto:
Open iPhoto and select the item to publish: an Event, an Album, or some photos from your Library.
From the iPhoto menu, choose Share
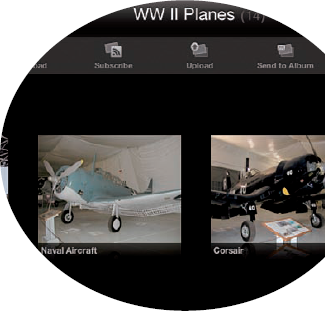
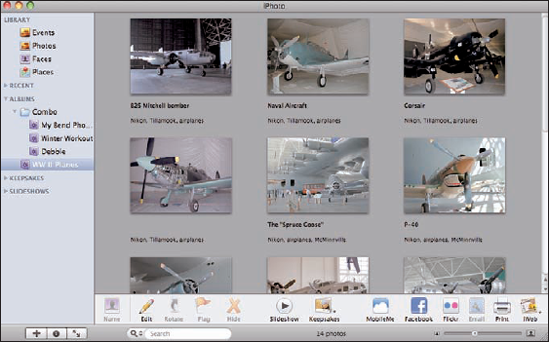
MobileMe Gallery or click the MobileMe button on the iPhoto toolbar.For this example, I chose an Album of World War II airplane photos, as shown in Figure 11-13. Any location information set for the photos is also present in the Gallery.
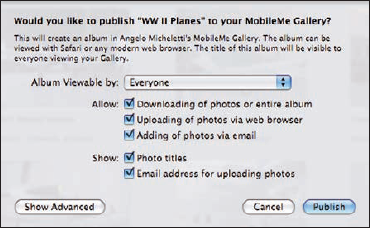
Choose the options you desire from the resulting dialog in iPhoto.
Figure 11-14 shows this dialog, where you have the following options:
Make the Album viewable by everyone or by only you; or, set names and passwords for individuals to whom you grant viewing rights. Making the Album viewable by everyone makes it public — anyone who has the Web site address can view it.
Allow downloading of photos or an entire Album.
Allow uploading of photos via a Web browser. Select this if you want to allow others to add to the Album. If you do, anyone who can view the Web site can upload any photo they wish.
Allow adding of photos by e-mail. By selecting this, you can create an e-mail address to which you can send photos from your iPhone, some other mobile device, or a computer.
Show photo titles. This will show the titles from iPhoto for each photo in the Album.
Show e-mail address for uploading photos. If you allow adding photos by e-mail, you can also make the e-mail address for doing this visible to all viewers of your Gallery. If you wish to reserve this right for yourself, don't select this option.
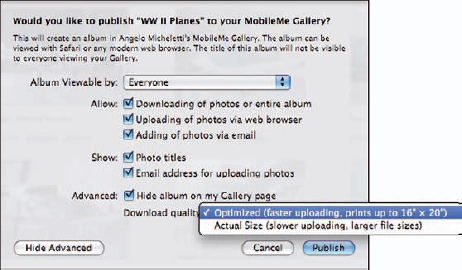
Click the Show Advanced button to get more options.
As shown in Figure 11-15, you can choose to Hide Album on My Gallery Page, which means the Album is viewable at its own Web site address but isn't accessible from your Gallery homepage.
Set the size and quality of any downloaded photos.
This setting affects how long it takes to upload to your Gallery, but it also sets the size of photos when anyone downloads them.
Click the Publish button.
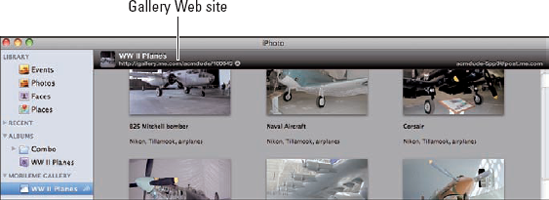
When the publish operation is finished, the window in iPhoto contains the Gallery Web site address — and, in my example, the e-mail address for uploading photos. Figure 11-16 shows the iPhoto main window after the publish.
Tip
Click the Gallery Web site address (at the top of the main window in iPhoto) to go to your MobileMe Gallery and see the result of the Publish operation, in your browser, as shown in Figure 11-17.
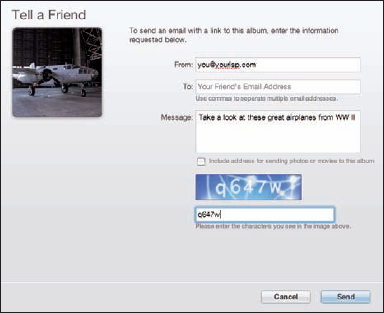
Click the Tell a Friend icon (on the top-right side of the Gallery page) to send an e-mail to friends and family announcing your Album and giving them the Web address.
Figure 11-18 shows an example.
Great stuff, right? All you need to give folks is the MobileMe Web site address, and they can see your photos. And you can update Albums as often as you like, doing it all within iPhoto. But that's not all; keep reading.

If you installed Apple's iWeb application (another component, along with iPhoto, of the iLife suite of applications), you can create either a photo Web page or a blog and allow friends and relatives to access your photos that way. In the last section of this chapter, you see how you can still make photo Web pages even if you don't have iWeb.
For now, see how easy it is to get your photos onto the Web.
Open iPhoto and select the item to publish: an Event, an Album, or some photos from your Library.
From the iPhoto menu, choose Share
Send to iWebPhoto Page.
Tip
You can also click the arrow on the iWeb button on the toolbar and select Photo Page from the drop-down menu.
This exports your photos to a page that's designed to display images.
Alternatively, you can choose Send to iWeb
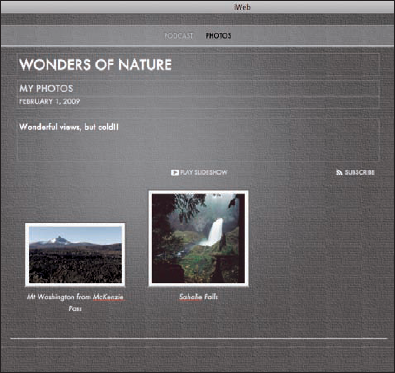
If your copy of iWeb wasn't already open, iPhoto automatically opens it. There are many choices you can make within iWeb to create the photo page or blog of your desires. To get detailed information about using iWeb, check out Macs All-in-One Desk Reference For Dummies, by Wallace Wang (Wiley Publishing). For now, Figure 11-19 shows an example of what a photo page might look like in iWeb.
Now all you have to do is let everyone know the Web address for your photo page or blog.
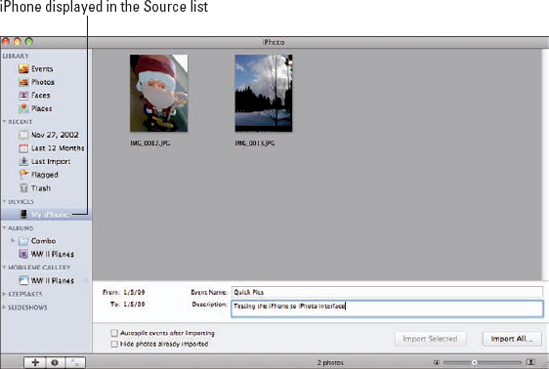
For those of you (like myself) who are fortunate enough to have an iPhone, you can import your iPhone camera photos directly into iPhoto. If you have iPhoto open, as soon as you connect your iPhone to your Mac, iPhoto recognizes it and shows it under Devices in the Source list and puts iPhoto into Import mode. Figure 11-20 shows an example of this. As you can see, my iPhone is named just that: My iPhone.
Tip
What if you don't have iPhoto open and you want to make sure it doesn't automatically open when you connect your iPhone? There is a way. An application on your Mac, called Image Capture, controls this. Find Image Capture on your hard drive and double-click it to launch it. Choose File
To download the iPhone camera's photos into iPhoto, here's all you have to do:
Fill in an Event Name and Description in the iPhoto window. (Refer to Figure 11-20.)
(Optional) Select the two check boxes.
See Chapter 3 for an explanation of these options.
Select which photos you want to download and then click the Import Selected button; or download them all by clicking Import All.
When the dialog appears, choose to either Delete Originals from the iPhone or retain them.
That's it! Your personal photos are now securely in the iPhoto Library, ready for you to use all your iPhoto skills.
If you took advantage of MobileMe to upload your photos into your Gallery, and if you allowed e-mail updating of your Gallery photos (see the "Exhibiting in a Web Gallery" section earlier in this chapter for details), you can create an e-mail with photos attached, on your iPhone, and see them appear, almost magically, in your Gallery.
Facebook and Flickr are two of the most popular social networking Web sites today. They're a great way to share photos of yourself and friends with a world-wide audience. A real bonus is that you don't need to get any plug-ins to make the interfaces between iPhoto and Facebook or iPhoto and Flickr work because they're built in. And if you choose to view them (you do this by choosing iPhoto View

Here's how to publish photos in Facebook:
Open iPhoto and select the photos, Events, or Albums you want to publish; then click the Facebook button on the toolbar.
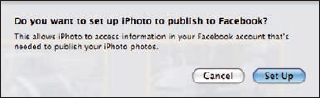
The dialog shown in Figure 11-22 appears and asks if you want to enable this copy of iPhoto to publish to Facebook; click Set Up.
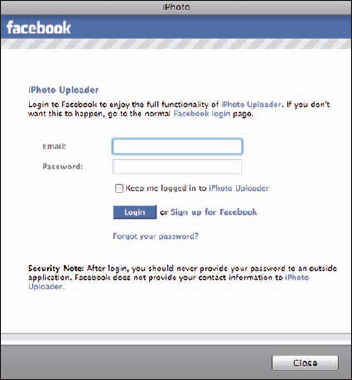
Either log in or sign up for Facebook. (See Figure 11-23).
After you're logged in for the first time, a dialog appears, requesting you to allow iPhoto Uploader to operate.
Click the Allow button, and then close the dialog.
The next dialog asks if you want to publish to Facebook and who should be allowed to view your photos.
Choose Everyone, Friends of Friends, or Only Friends. Then click the Publish button. (See Figure 11-24.)
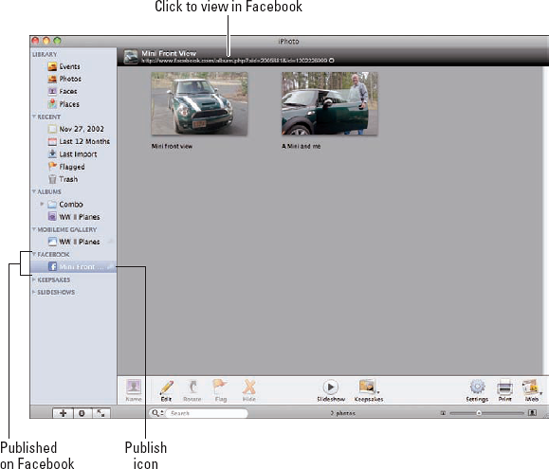
Your photos appear in the Source list as a published Album under Facebook. Figure 11-25 shows this.
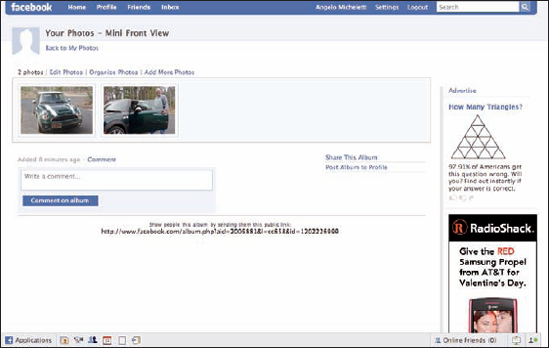
Select the Album to see your photos within iPhoto; click the Web site address at the top of the window to see how they appear in Facebook. (See Figure 11-26.)
(Optional) You can now add photos or Events to the Album by dragging them from your Events or Photos to the Facebook Album in the Source list. You can also remove photos from the Album by dragging them to the iPhoto Trash.
Note
Any time you make a change to the Facebook Album, click the Publish icon to sync with Facebook. The icon is next to the Facebook Album name and looks like a radio beam. (Refer to Figure 11-25.)
You can also make changes in Facebook. The next time you sync the Facebook Album in iPhoto, any additions appear as Web-sized versions in your Facebook Album.
To stop publishing your Album in Facebook, select the Album and press Delete.
Note
When you delete the Album, it no longer appears on Facebook or in iPhoto, but the photos are still be in your iPhoto Library.

Publishing your photos with Flickr works in a similar way to publishing in Facebook. Follow these instructions:
Open iPhoto and select the photos or Events you want to publish; then click the Flickr button on the toolbar.
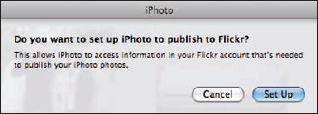
The dialog shown in Figure 11-27 appears and asks if you want to enable this copy of iPhoto to publish to Flickr; click Set Up.
Either log in or sign up for Flickr.
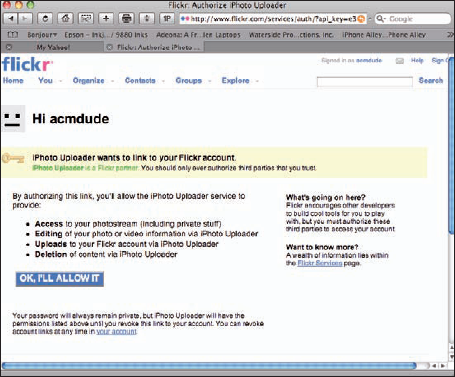
After you've logged in for the first time, a dialog appears (see Figure 11-28), requesting you to allow iPhoto Uploader to operate.
Click the OK, I'll Allow It button and then close the window.
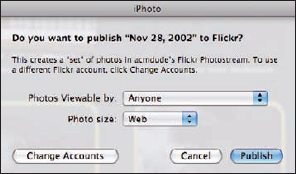
A dialog appears in iPhoto, confirming whether you want to publish the photos or Events you selected.
Choose to make them viewable by Anyone, Only You, Family, or Family and Friends. Then select the Photo Size.
See Figure 11-29.
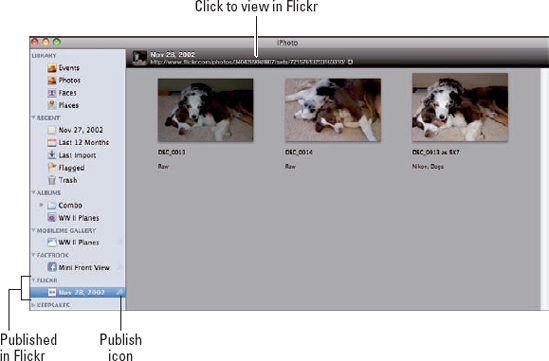
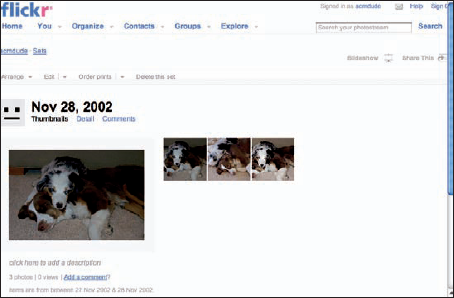
Your photos appear in the Source list as a published Album under Flickr. (See Figure 11-30.)
You can select the Album and see your photos within iPhoto; or click the Web site address at the top of the window to see how they appear in Flickr. (See Figure 11-31.)
(Optional) You can now add photos or Events to the Album by dragging them from your Events or Photos to the Flickr Album in the Source list. You can also remove photos from the Album by dragging them to the iPhoto Trash.
Note
Like in Facebook, any time you make a change to the Flickr Album, click the Publish icon to sync with Flickr. The icon is next to the Flickr Album name and looks like a radio beam. (Refer to Figure 11-30.)
You can also make changes in Flickr. The next time you sync the Flickr album in iPhoto, any additions appear as Web-sized versions in your Flickr Album.
To stop publishing your Album in Flickr, select the Album and press Delete.
The Album no longer appears on Flickr or in iPhoto, but the photos are still in your iPhoto Library.
Pretty straightforward stuff but with a lot of power for sharing. And best of all, it's free.
Although this section is about showing and sharing your photos, you're on the receiving end. In this case, it isn't your photos being shared; rather, it's a friend or relative sharing his through a photo feed.
Whether your friends use MobileMe, Facebook, Flickr, or other similar Web services to post their photos, iPhoto makes it convenient for you to enjoy them — and all within the confines of the iPhoto application. No matter where they post their photos, as long as they provide you with the host URL address (that thing that starts with "http://"), here's how to subscribe to a photo feed.
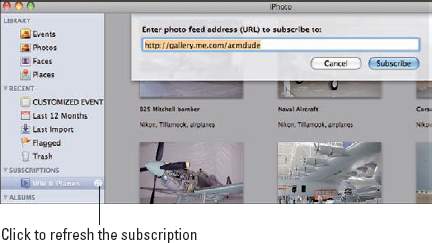
In iPhoto, choose File
Subscribe to Photo Feed.In the dialog box that opens (see Figure 11-32), paste or type the URL that was given to you.
Click the Subscribe button.
iPhoto handles the communication with the site, and you see the Subscriptions heading appear in the Source List as well as the name of the photo file under it.
Click the name of the photo file.
The photos appear in the main iPhoto window.
(Optional) To refresh the subscription, click the circular icon at the right of the name. (Refer to Figure 11-32.)
That's all there is to it.
Even with all this capability, sometimes you just want to create something else using your photos. The good news is that in iPhoto, you can.
Using the iPhoto's standard export capabilities allows you to do things like these:
Export your photos to your hard drive so that you can burn them to a CD or DVD and use them outside of iPhoto. From your hard drive, for instance, you can attach the photos to any e-mail client you use, not just the ones I mentioned earlier.
Create a QuickTime movie of selected photos.
Create an MPEG-4 slideshow, complete with music, for a range of devices.
Save a group of photos as a simple Web page that you can then upload to a server for display in a Web browser.
You can also use third-party software (available on the Web; also see Chapter 14) written especially for the Export dialog to expand the choices you have.
The following sections take a look at the standard choices for exporting from iPhoto.
Earlier in this chapter, I mention that if you want your photos available to use outside of iPhoto, you must export them and use the Finder or other application such as Toast to burn a CD or DVD. Here's how to do the export:
Open iPhoto and select an Event, Album, or group of photos in iPhoto to export.
From the iPhoto menu, choose File
Export.The Export Photos dialog appears.
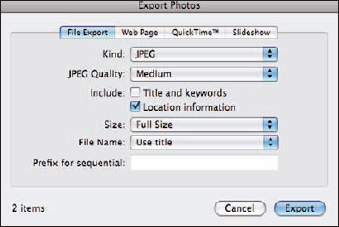
Click the File Export button at the top of the Export Photos dialog.
See Figure 11-33 for the location of this button.
In the File Export portion of the Export Photos dialog, you can choose the format of the exported photos.
Your choices, in the Kind field, include JPEG, TIFF, PNG, the Original format, or the current photo format.
The dialog also provides these options:
JPEG Quality: If you're exporting JPEGs, you can choose the quality.
Include: Select the Title and Keywords check box to include the title and keywords you've assigned to the photos in the export. Select the Location Information check box if you've assigned location information to the photos and want that information to travel with them.
File Name: You can choose what to use as the filename.
If you choose Sequential, enter the prefix for the sequence in the Prefix for Sequential field. For example, say you use Airplanes. Then iPhoto assigns sequential filenames, like this: Airplanes1, Airplanes2, Airplanes3, and so on.
Click the Export button.
When you see a list of locations where the exported photos will be stored, make a choice and then click OK.
Saving a group of photos as a Web page that you can then upload to a server is easy to do in iPhoto. If you don't want to use iWeb, this provides a very quick and simple way to provide your photos for viewing in a Web browser. Here's how:
Open iPhoto and select the photos you want to appear on your Web page.
Choose File
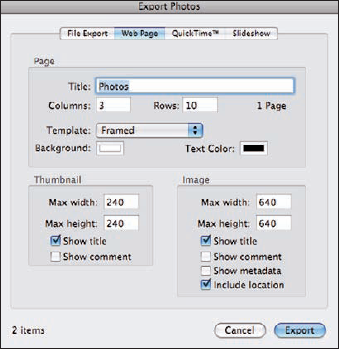
Export from the iPhoto menu.Click the Web Page button at the top of the Export Photos dialog. (See Figure 11-34 for the location of this button.)
When the Web Page portion of the Export Photos dialog opens, you can choose the title, columns and rows, the template to use, the size of the thumbnails and images, and whether to include location information.
After you make your choices, click Export.
A dialog appears, allowing you to choose where to store the Web page.
Click OK.
To preview your page in a browser before uploading it to a server, go to the location you chose in Step 5 and double-click the
index.htmlpage.
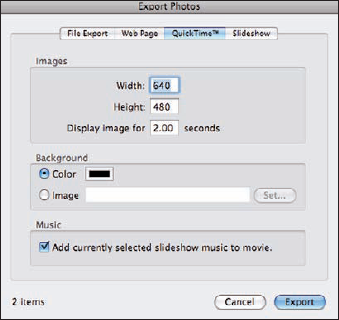
Another standard way to present your photos is by creating a QuickTime movie file. This is a slideshow movie that you can playusing the QuickTime Player or any application that supports QuickTime. Here's how easy it is:
Open iPhoto and select the photos you want to appear in your QuickTime movie.
Choose File
Export from the iPhoto menu.Click the QuickTime button at the top of the Export Photos dialog. (See Figure 11-35.)
Change the options to suit your purposes:
Images: Set the maximum dimensions for your movie and the display interval for each photo.
Background: Select the Color radio button and then click the preview swatch to pick your color. To select an image, select the Image radio button and then click the Set button.
Music: Choose whether to include the same background music selected in the Slideshow Settings window (described in Chapter 13).
Click the Export button.
In the dialog that appears, asking where to store the movie, choose a location, and then click OK.
To view your movie, use QuickTime Player or any application that supports QuickTime.
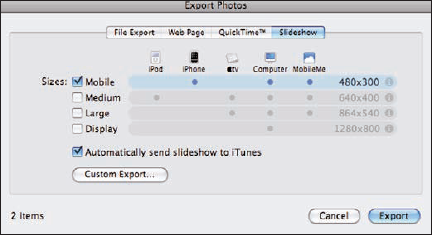
The final, standard way of exporting your photos involves exporting your slideshow project as an MPEG-4 movie that you can view on your iPod with a color display, an iPhone, Apple TV, or your computer display. To do this follow these steps:
Open iPhoto and select a slideshow from your Source list.
Choose File
Export from the iPhoto menu.Click the Slideshow button at the top of the Export Photos dialog. (See Figure 11-36.)
Choose a size that corresponds with the intended device.
Notice, in Figure 11-36, the blue dots in the columns for each size that's appropriate for each device. I chose Mobile in my example.
Choose whether to automatically send the slideshow to iTunes.
(Optional) You can specify a number of custom settings (such as video and sound settings) by clicking the Custom Export button.
After you make your choices, click the Export button.
A dialog appears, asking where to store your file. The default is a folder named iPhoto Slideshows.
Choose the location and then click OK.
For syncing your devices, see each manufacturer's instructions.