
In This Chapter
Simply defined, importing photos is the process of downloading your photos from your camera (or other storage device) to your computer. Lately, the photographic software industry has begun calling the process of importing photos into the computer ingesting. For me, that conjures up scenes from old science fiction thrillers where monsters satisfied their needs at the expense of the local inhabitants. I assure you that isn't an accurate description of what happens at import time, and I'm going to continue to use the term import in this book.
Those of you who already have your photos imported to your computer are likely wondering what all the fuss is about. Case closed, right? No, this idea of importing is more than just physically bringing the photographic file onto your hard drive. It's about safety, backup, and nondestructive editing.
Take a look at this chapter and the import process, and you'll see what I mean.
You can use any of several ways to import your digital photos from your camera to your computer. They all work, but some are preferable — depending on the source of the photos and how you like to work with them — and I want you to understand why. The possibilities are as follows:
Face it: You've taken a great deal of time and care to capture events that are important to you, and the last thing you want is to negate that effort and lose your photos. It's important to remember that at this point in time, the only places where these photos exist are in your mind and in your camera. Unfortunately, iPhoto can't do a mind-meld, but with proper care, it can ensure the safety of what's in your camera.
I'll start with what I consider the best choice.
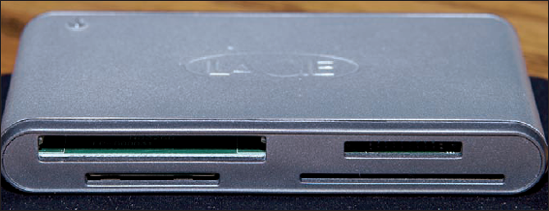
Like many professional photographers, I'm not in favor of doing a direct, camera-to-computer import. I recommend removing the flash or SD memory card from your camera and inserting it into a card reader, which is connected to your computer using the computer's Universal Serial Bus (USB) port. This lessens the possibility of damage to your camera, and it's certainly as fast as a direct connection. Nearly every digital camera comes with a removable card of some kind. If the camera also has internal memory, I recommend that you set the camera to use its removable memory card for photo storage. The particular card reader shown in Figure 3-1 can handle several different types of cards. Make sure the card reader you choose can read the type of card your camera uses.
Importing from a memory card is just as simple as importing from a camera. To use a card reader to import photos, follow these steps:
Remove the flash or SD card from your camera, using your camera manufacturer's instructions.
Most likely, those instructions include turning off the camera power and opening a small door in the camera body to remove the card.
Plug the card reader into a USB port on your computer.
Insert your flash or SD card into the card reader.
Start iPhoto, if it isn't already running.
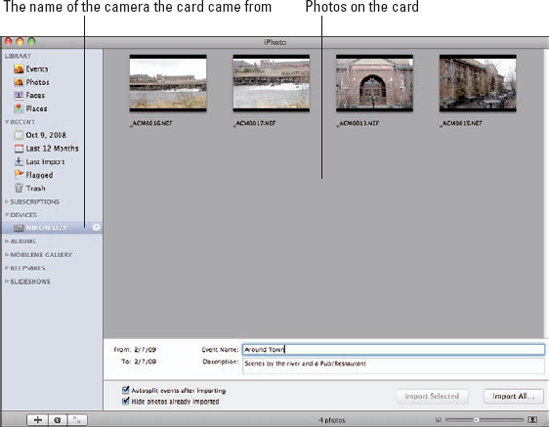
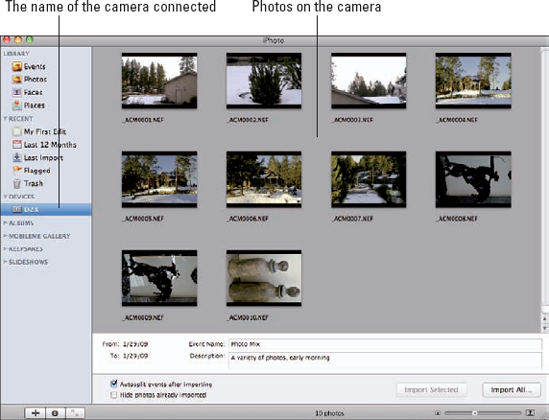
A window similar to the one in Figure 3-2 opens and displays the name of the camera that the card came from in the Source list (under Devices) on the left side of the window and the photos on the card in the iPhoto main window.
Tip
To automatically start iPhoto before importing (which means that it starts when you connect a device to the computer), see the section "Automatically Starting iPhoto Before Importing" later in this chapter.
Fill in the Event Name and Description.
This is your chance to give the Event a name that signifies the theme of the photos and set a longer description of the Event.
Determine the actions for the check boxes.
Autosplit Events After Importing: Select this check box if you want iPhoto to divide your photos into separate Events based on the date and time you took them.
Hide Photos Already Imported: Select this option if you already imported some of the photos on the camera. The duplicate photos won't appear in the iPhoto window, so they won't be imported again.
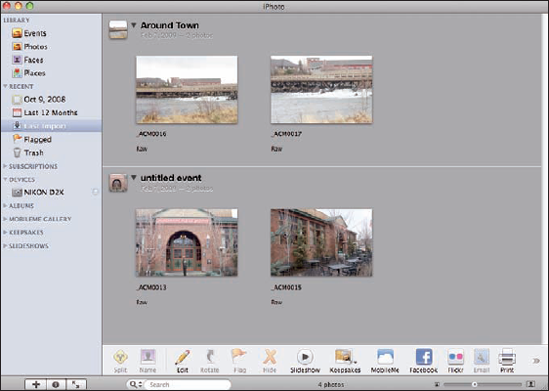
In the example import in Figure 3-3, some photos were taken more than two hours apart. Because the Autosplit Events After Importing option was selected and because I has set the limit in Event Preferences (see Chapter 2 for more on Event Preferences) as Two-Hour Gaps, two Events are produced even though all the photos were taken on the same day.
Click the appropriate Import button.
If you wish to import only some of the photos, select them and then click the Import Selected button. Otherwise, click the Import All button. When the import is complete, iPhoto asks whether you want to delete the photos in the camera. I find it best and safest to do this action separately, using the controls in the camera (see the camera owner's manual for instructions), so click No in the dialog.
(Optional) If you used the Autosplit Events After Importing option to create multiple Events, click the additional untitled event titles and change them to what you want.
Because the import window has a place for only one Event name, you must change additional Events after the import.
Remove the card from the card reader by clicking the Eject button next to the camera name under Devices in the Source list.
Warning
Always use the Eject button to do this. If you just pull the card out of the card reader, you risk problems, including lost data.
Disconnect the card reader from your computer.
If you don't have a memory card reader or prefer a more direct method, you can easily import your photos into iPhoto. Here's what you do:
Connect the small end of the USB cable to your camera.
The USB connection on a camera is usually under some kind of rubber flap to keep out dirt. Because each camera is different, you need to use the camera's owner's manual to determine where this connection is. One end of the USB cable is much smaller than the other, and the smaller end is the one that connects to the camera.
Connect the larger end of the USB cable to your computer.
Tip
Connect the USB cable directly into a USB port on the computer. You can connect to a USB hub if necessary although this doesn't always work.
Turn the camera on, if it isn't on already.
Start iPhoto, if it isn't already running.
If everything is connected properly, you see your camera appear in the Source list under Devices on the left side of the iPhoto window, as shown in Figure 3-4. You will also see all the photographs contained within the camera in the iPhoto main pane.
Tip
To automatically start iPhoto before importing (which means that it starts when you connect a device to the computer), see the next section, "Automatically Starting iPhoto Before Importing."
Fill in the Event Name and Description.
Give the Event a name that signifies the theme of the photos and set a longer description of the Event.
Determine the actions for the check boxes.
Autosplit Events After Importing: Select this option if you want iPhoto to divide your photos into separate Events based on the date you took them.
Hide Photos Already Imported: Select this check box if any of the photos on the camera have already been imported. As a result, they won't be imported again.
Click the appropriate Import button.
If you wish to import only photos that you selected, click Import Selected; otherwise, click Import All. When the import is complete, iPhoto asks whether you want to delete the photos in the camera. Again, I find it best and safest to do this action separately, using the controls in the camera. So click No in the dialog.
(Optional) If you used the Autosplit Events After Importing option to create multiple Events, click the additional untitled Event titles and change them to what you want.
Because the import window has a place for only one Event name, you must change additional Events after the import.
When you imported all photos, it's safe to Control-click (or right-click) your camera icon in the Source list and choose Unmount. Or, you can drag your camera icon into the iPhoto Trash.
Warning
Only when this is done is it safe to turn off your camera and then physically disconnect it from your computer.
Disconnect the camera from the computer.
Importing photos from external media is almost as easy as importing from your camera or memory card. This is a big advantage for many reasons. You might have photos that you took sometime in the past, and they're already saved to your computer. You might have a 35mm or medium-format camera that uses film, which you had processed, digitized, and saved on a disc. Or the photos might have come to you attached to an e-mail, either with the Apple Mail client or even Web mail. Whatever the scenario might be, now you want to organize your old, existing photos in iPhoto. The import process goes like this:
If the photos aren't already on a hard drive or disc, put them there.
Warning
I don't recommend dragging photos into iPhoto — there's too much chance for error. Instead, highlight the photos and save them to the appropriate location.
Open iPhoto and choose File

iPhoto imports file formats such as JPEG, TIFF, and RAW. You can read more about file formats in Chapter 7.
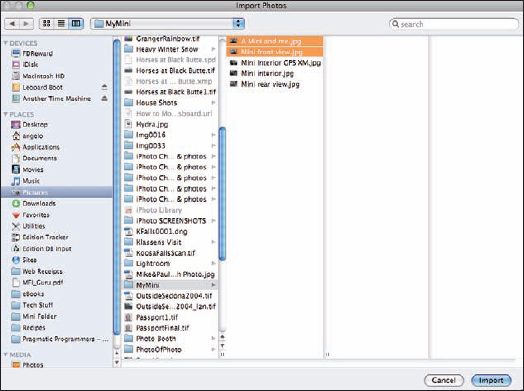
Navigate to the place where the photos are stored (shown in Figure 3-5) and select the photo file(s)/folder(s) you want to import.
Click the Import button.
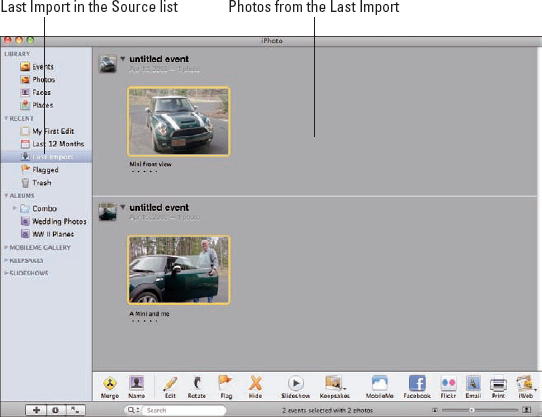
The photo file(s)/folder(s) is imported. The last Event imported appears in iPhoto under Last Import in the Source list, as shown in Figure 3-6. (Your import(s) also appear in the Events window.) The Last Import pane shows the last photo(s) that were imported.
(Optional) In this case, I didn't give an Event name at Import time. However, you can always change an Event name by clicking the Event Name area (in this case, it reads untitiled event) and typing a new name.
Tip
Events are created for your photos depending on the settings you make in Events Preferences (discussed in Chapter 2). If the Imported Items from Finder check box isn't selected, Events are created based on the folders the photos are imported from, regardless of the date on which you took them (the capture date). That means that all photos in any folder are in one Event, with the folder name as the Event name. If the Imported Items from Finder check box is selected, all photos with the same capture date, regardless of the folder they're in, are placed in the same Event, and the Event name is the name of the first folder in the batch to be imported. If the photos are not in a folder, untitled event will be used.
If you're the kind of person who gets aggravated each time you connect your camera or card reader, only to realize you haven't started iPhoto yet, the solution is very simple. If this doesn't apply to you (come on — @@'fess up; you know it does), feel free to skip this section, secure in the knowledge that you're far above the rest of us.
To set iPhoto to open automatically before importing photos from your digital camera, follow these steps:
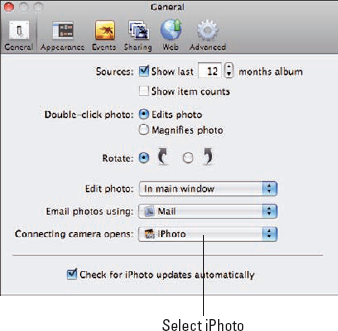
Open iPhoto and choose iPhoto
Preferences.Click the General button on the toolbar.
This opens the General Preferences pane.
Near the bottom of the General Preferences pane, you see a Connecting Camera Opens option. Set it for iPhoto, as shown in Figure 3-7.
This ensures that whether you connect a camera or the card reader, iPhoto will open.
Close the dialog.
Keywords are labels that you can add to your photos to provide additional information about the subject — and, more importantly, make searches more efficient. I discuss iPhoto's searching capabilities in detail in Chapter 6, but at this point, during the import process, I encourage you to add your keywords. If your imported photos already have keywords, you might want to edit them to ensure more accurate retrievals.
You can use these two ways to view keywords in iPhoto:
Move your mouse over the photo.
From the iPhoto menu, choose Window
Show Keywords.
When you find the photo's keywords (or find that they don't have any yet), you can edit (or add) them. Take a look at both of these methods in more detail. First, try moving your mouse over the selected photo. To do so, follow these steps:
Select Photos in the Source list, find the photo of interest, and simply move the mouse over it.
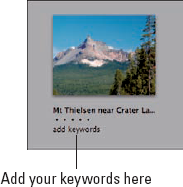
If you move your mouse over a photo that has no keywords, you see add keywords beneath the photo, as shown in Figure 3-8. If you see keywords, proceed to Step 3.
To add keywords to a photo that doesn't have any, click add keywords and type in your keywords, separating each with a comma.
That's all there is to adding keywords.
To edit existing keywords, click any one of the keywords. Double-click the one to be edited to highlight it; then type your changes. Then press Return if you're finished editing, or double-click another keyword and edit it.
Another way to add or edit keywords is to use this second method:
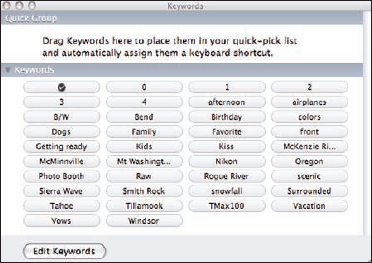
Choose Window
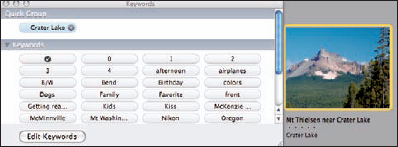
Show Keywords.The Keywords dialog shown in Figure 3-9 appears, showing all current keywords and providing a means for editing them and creating new ones. To create a new one, continue with the steps that follow.
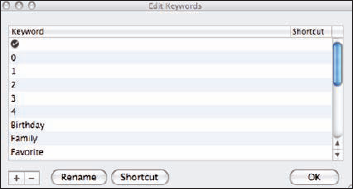
Click the Edit Keywords button.
You see the Edit Keywords dialog, as shown in Figure 3-10.
Click the + button in the dialog to create an Untitled keyword entry space. Type the new keyword and click OK.
The keyword automatically gets a shortcut assigned (usually the first letter of the keyword, or the second letter if the first is already taken, and so on) and is placed in the Quick Group at the top of the dialog.
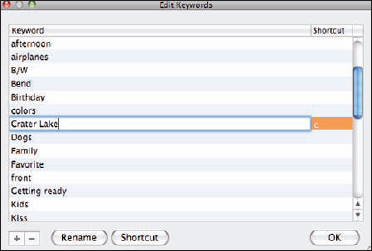
In Figure 3-11, I added Crater Lake for the keyword.
Select the appropriate photo in the iPhoto main window, and then click the Crater Lake keyword button you just created.
The keyword appears beneath the photo.
Figure 3-12 shows the Crater Lake keyword applied to the photo.
To edit a current keyword, click Edit Keywords, highlight the keyword to be edited, click the Rename button, and make your changes. If you want to change the shortcut, click the Shortcut button and make your change. When you're finished, click OK.
Tip
Another way to add or delete keywords from a photo is to select the photo, open the Show Keywords dialog, and click a current keyword to delete it or click a new keyword to add it. There's even some animation that goes along with these actions.
Note
I recommend adding and/or editing keywords right after you import your photos. Of course, you can add and edit keywords at any time.
During the capture of your photos, your camera, if it's suitably equipped, can attach GPS data to your photos. (Check your camera's manual to find out whether your camera has this feature.)
If your camera isn't so equipped, all is not lost — as long as you can remember where you were! I recommend adding this location data right after you import your photos. Of course, you can add and edit location information at any time.
Warning
Any location information added by your camera or by you becomes part of the metadata for the photo. That means that it can be viewed by anyone having access to that photo. If you don't wish to share this information, don't enter it manually. Also, check your camera manual to see how to turn off the GPS capability.
To add locations to your photos manually, follow these steps:
Select the photo, photos, or Event to which you want to add a location.
When you move the mouse pointer over a photo or Event, a small, white Information button appears in the lower-right corner.
Click the Information button.
The photo or Event flips to the back so that you can enter information. If you select multiple photos or an entire Event, entering location information for one photo enters it for all.
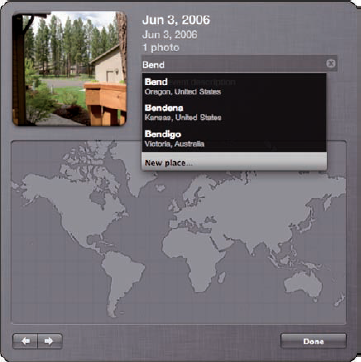
Click Enter Event Location, and then type the name of the place where you took the photo.
This is why I said you have to remember where you were.
As you type, a list of matching locations appears, as shown in Figure 3-13. If necessary, scroll to find the correct name and select it.
Tip
If you're not connected to the Internet, you won't be able to complete the next steps in this section, which require that you are. As soon as you do connect, finish these steps by using Places Maps and the My Places dialog.
If you don't see a location match in the list, follow these steps:
Click New Place.
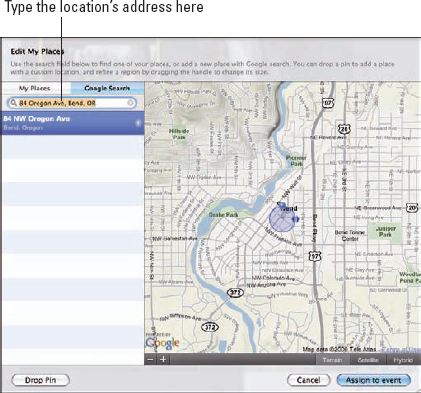
The Edit My Places dialog appears, as shown in Figure 3-14.
Type as much address information as possible and then press Return. One or more matches appears. Select the one you want, and a blue pin marks the spot on the map.
Move the pin manually to fine-tune the location. Drag the arrow on the circle to increase or decrease the circle size.
Add this new location to My Places by clicking the + button next to the address in the list.
Tip
Adding a location to My Places makes it available to be chosen in other photos taken at the same place.
When you're satisfied, click the Assign to Photo button. (This is called the Assign to Event button if you're adding the location to an entire Event.) Proceed to Step 4.
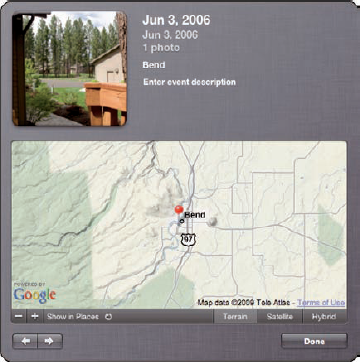
iPhoto enters the name and produces a map with a pin in it depicting that location, as shown in Figure 3-15.
You can click the plus or minus buttons to zoom in or out. Use the Terrain, Satellite, or Hybrid buttons to change the display. When you're finished, click Done.
Select the photo, and then choose Photos
As you see in Figure 3-16, the actual GPS coordinates for the location name you picked have been filled in.

You can even add and name a personal location that might not have an address. Suppose you have a photo that you took at your friend's cabin near Crater Lake. Here's how you can set that location.
Select the photo (or Event, if all the photos were taken at the same place) and click the small Information button.
Click New Place.
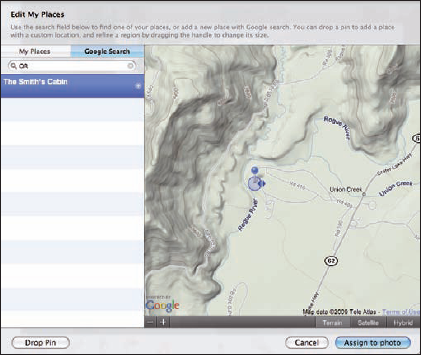
Click the Google Search button.
You can drag the map up, down, left, and right, and use the + and – buttons to zoom in and out in order to get the approximate place you're looking for.
Click the Drop Pin button, and then drag the head of the pin to position it where you want it, as shown in Figure 3-17.
The new location is added to the list on the left and appears as New Place; click it, type the name for this location, and then press Return.
Click the Assign to Photo button. (This is the Assign to Event button if you're adding the location to an entire Event.) Click the plus sign next to the name.
This adds the location to My Places.
Ratings are a very subjective way of classifying your photos. It's kind of like a Hollywood critic judging a movie — only in this case, you're the critic. As you can see in Chapter 6, making a rating can help find those photos you want to have a closer look at, or those where you want to do more intense editing. Ratings can be changed at any time. To set them, do the following:
Select a photo or photos for which you want to set ratings.
If you select more than one photo, when you set a rating, it will be applied to all the selected photos.
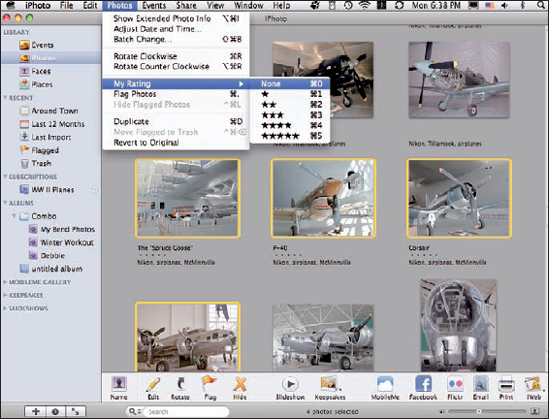
Either right-click or Control-click any of the photos. In the menu that appears, choose My Rating and then choose None or 1 to 5 stars.
Tip
Alternatively, you could also choose Photos
You can also simply click one or more of the dots that appear beneath the photo thumbnails to set the rating.
Note
If you click a star already set for a photo, it will be canceled, and the rating will be one less. This is the easiest way to add or delete stars for individual photos.
When you look at all the Events in your Library, you see that only one photograph is displayed per Event (see Figure 3-19) even though the Event contains several photos. This photo is called the key photo, and it's meant to give an indication of the type of content within that Event folder.
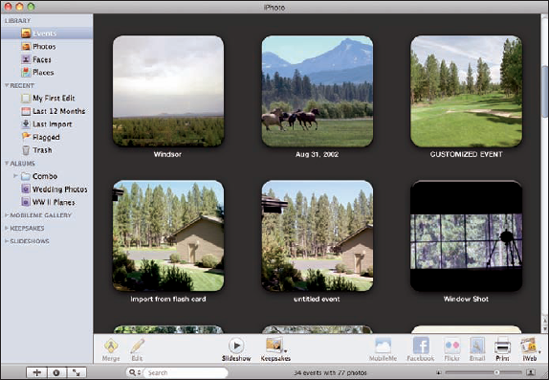
By default, the first photo imported into an Event becomes the key photo, but you might prefer another photo. To change the photo used as the key photo, follow these simple steps:
Click Events in the Source list and then move your mouse across the Event slowly.
You see all the photos in the Event displayed one after the other.
When the photo you're interested in appears, simply right-click (or Control-click) your mouse and choose Make Key Photo. Or, even more simply, just press the spacebar.
The photo you selected now becomes the key photo.
Another way to do this is as follows:
Double-click the Event to open it in another window and show all the photos.
This allows you to more easily choose the likely candidate for key photo.
When you determine which one you want, highlight it and choose Events
Make Key Photo.Any time you change your mind, you can make this selection again and choose another photo.
Sometimes, no matter how careful you are, things happen that cause problems during the import process. They might occur because of inadvertent errors you made or because the software or hardware simply can't do what you want it to do. iPhoto can handle up to 250,000 photographs in its Library. Sounds like you shouldn't have any worries, but you don't have unlimited hard drive space or computer memory, so the theoretical limit might be much lower for you — and that can be a problem. Depending on the situation, here are some things to try:
Make more storage space available. One obvious solution is to buy more hard disk space. Before doing that, though, you can try an easier and less-costly solution. You can back up your Library or part of your Library to a CD or DVD and then delete those less-often used photos from the Library, gaining back that space. When necessary, use the procedures in this chapter to import those photos back to the Library from the CD or DVD you backed them up on.
Check your camera to ensure that it's on and properly set to transfer photos. If the camera is connected properly but doesn't appear in the Source list, perhaps some camera-specific settings are incorrect for file transfer. Also check to ensure the USB cable is seated in the connector properly. If you have another USB cable, try substituting that one, and plug the cable into another USB port on your computer.
Quit other programs to speed up the process. Depending on your operating environment, you might find the import operation to be running slowly. If you have other programs open, try quitting them to see whether that helps.
If you have multiple USB ports on your computer, use one that doesn't have other devices connected to it if possible. This will eliminate any contention among devices for time on the port. Also, use a USB 2.0 port, if available, rather than a slower USB 1.1 (commonly found on your keyboard).
There's another operation you can perform regarding the Library that can serve two purposes. You can physically move the iPhoto Library to another hard drive that has more room; that way, you don't have to worry about backing up to a disc and then deleting less-frequently used photos. You can also use this to create multiple iPhoto Libraries so that you can separate photos that cover different time frames. For instance, one Library can have all photos you imported with dates prior to 1999, and another one covers 2000 to the present.
Whatever your reasons, here's how to move the iPhoto Library:
Close iPhoto if it's open.
Open the folder where the iPhoto Library is stored and drag it to a new location.
The default location for the Library is in the Pictures folder on your hard drive.
Hold down the Option key and open iPhoto.
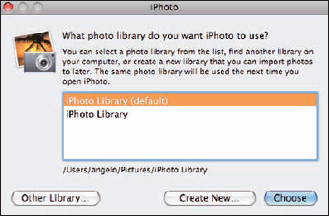
You see the dialog in Figure 3-20, asking you to create or choose a Library from the list iPhoto found.
Click a Library name in the list or click the Other Library button.
Find the location where you moved the Library in Step 2, select it, and click Open.
Creating a new iPhoto Library is a similar process.
Close iPhoto if it's open.
Open the folder where the current Library is stored and either rename it or move it to another location.
Tip
Because iPhoto can work with only one Library at a time, you must break the link to the current Library before you can create a new one.
Press and hold the Option key and open iPhoto.
The dialog in Figure 3-20 again appears.
Click the Create New button.
Type a name of your choice for the new Library and choose a location to store it.
Click Save.
An empty iPhoto Library is created at the location you chose and with the name you typed.
Note
At this point, all future imports will place the photos into this moved/new Library.
Warning
Never move or rename the current iPhoto Library when iPhoto is open. This would likely cause corruption of the file and, potentially, permanent damage to the Library contents.
That's it. With the techniques in this chapter, importing from any medium the Macintosh accepts is easy, and the photos that mean so much to you and your family are secure.