
Choosing the correct paper for printing
Trying out different themes, backgrounds, and borders
Printing multiple photos on one sheet of paper
Using the Adjust tool to make changes prior to printing
Using default and customized printer settings
Using iPhoto's printing service instead of a personal printer
Photographers, whether professional or amateur, really seem to enjoy capturing important events as photos. Then, when you edit your shots to bring out as much quality as possible, you certainly want a print that reflects all your hard work. After all, a lot of the fun of photography is taking the finished photos and making prints that you can hang on the wall, proudly displaying the results.
As you might guess, the print process is what I cover in this chapter, along with ways to create elegant photo books, calendars, and cards. Generating a hard copy can be the most stimulating and rewarding part of the whole creative process of photography.
I have to get this disclaimer out of the way: With the large number of printer styles, prices, and manufacturers available, I can't discuss the ins and outs of every type. Yes, printers are critical hardware, but they have so many variations. Let me just say that with all the considerations that go into making a printer-purchase decision, don't forget this overriding thought: Get the best you can afford. You won't regret it. In the long run, the cost of consumables (paper and ink) is far greater than the hardware cost. If you can, stick with brands that you have experience with and know their reputation. For me that's Epson, HP, and Canon. Printing is where you show off your creativity, so don't short-change yourself.
There is no one, absolute, and correct process to follow in choosing and printing your photos. Make sure you first consult your printer's manual so you get all the details on how to get the best results with that particular model. But here are some useful ideas to keep in mind while you set out to do your printing, regardless of which type or brand of printer you're using.
If you have a large number of photos to print, first print a contact sheet. Think of this as a sheet of thumbnail (small) images. Making a contact sheet allows you to see what the photos look like on the paper you're using. Too, you can mark up each photo with things like crop marks, photo adjustment notes — and, in fact, decide whether to even print a particular photo.
Try different papers, both glossy and matte. It's amazing what a difference the paper can make in the final print. You can do this economically by printing a few contact sheets with different papers.
After printing, let the print dry for a couple of hours, at least. Prints tend to darken slightly when they dry, and what looked good at first might require more adjustment for the final print.
Note
Here's another thought to keep in mind: In iPhoto, you can select one or more photos — or an entire Event — and print using just one execution from the Print dialog. Note, though, that when you batch print, the settings in the Print dialog apply to each of the selected photos, unless you select a photo, hold down the Option key, and then make an individual change of the background, borders, and layout for that photo.
As you learn the capabilities of iPhoto, sharpen your editing skills, and understand your printer's capabilities, your printing process will become second nature.
Start by making theme and background choices.
Select the Event or photos that you want to print, and then either click the Print button on the toolbar or choose File
Print from the iPhoto menu.
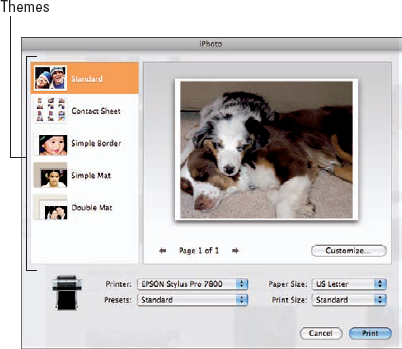
Figure 12-1 shows the Print pane that opens. Notice that your default printer is selected, but every other printer that Mac OS X recognizes as available to your computer or network is listed when you open the Printer pop-up menu. Of course, you may choose from this list another printer to use. Also, in this window, you can select the paper size and print size you want.
Select the theme listed on the left that will work for you.
Here's some information to help you select a theme:
Standard: Prints the photo with a white edge around it.
Contact Sheet: Prints all the selected photos in thumbnail size on one page.
Simple Border: Prints the photo with a box around the edge.
Simple Mat: Prints the photo with what looks like a traditional photo mat around it.
Double Mat: Prints the photo to look like you put a double-mat around it.
The preview picture changes to show you what your photo looks like with that theme.
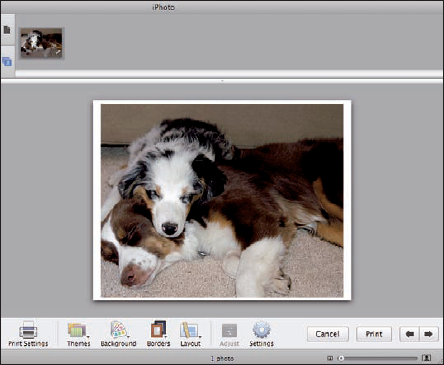
(Optional) To tweak your print, click the Customize button.
Figure 12-2 shows you the Customize pane, from which you can make changes with the Themes, Backgrounds, Borders, and Layout buttons. You can also access the Adjust tool here to make changes to the photo without going to Edit mode. Click the Print Settings button to return to the default Print window.
At the top of the window showin in Figure 12-2 is a viewing strip with two buttons at the left. The top button will show you all the pages to be printed. The bottom button shows all the photos to be printed.
Tip
For any of the first three themes (refer to Figure 12-1), the choices in the other toolbar buttons are minimal, so I'll concentrate on choices that exist for the Double Mat theme.
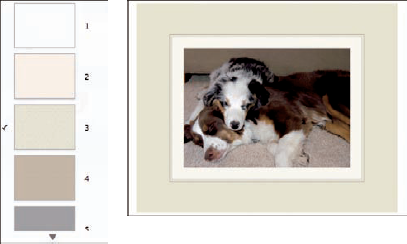
Click the Background button on the toolbar and select one of the 26 choices.
For this running example, I chose number 3. See the results in Figure 12-3.
Resuming the print process
Once you have started to print, a Printing icon appears i the Source List. If you're interrupted before you finish printing, iPhoto helps you out. Clicking this icon makes it very convenient to do other work in iPhoto. Or you can even quit iPhoto, start iPhoto again, and then simply click the Printing icon to return to where you were in the printing sequence.
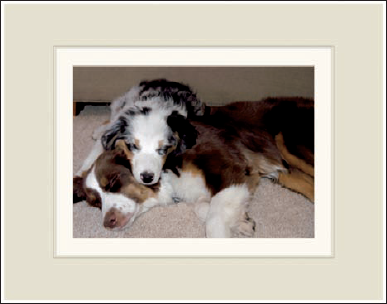
When you selected a Theme you set the basic look (in this example, Double Mat), the next task is to pick a specific border and layout. If you haven't already picked a theme and background, do so. (See the previous section.) then follow these steps:
Click the Borders button on the toolbar to open the Borders menu, then choose one of the seven types.
I chose number 6. Figure 12-4 shows what the example looks like so far.
Click the Layout button on the toolbar to open the Layout menu, and then select one of the 24 choices.
I chose entry one, and then the second one in the submenu, and I created a line of text for the photo. Figure 12-5 shows the results.
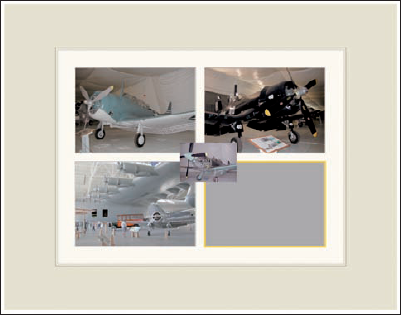
The Layout menu is very comprehensive and even allows you to work with multiple photos and arrange them on a single sheet of printer paper. This can save you some cash because you can get more than one print from one sheet of photo printing paper. Or you just might want to combine photos in different panes on the single sheet of paper for artistic reasons.

But what if you decide you don't like the order the photos appear in? Luckily, this kind of thing is easy to correct and doesn't require you to start over. Follow these steps if you change your mind:
Place the mouse over the photo you wish to move.
Click and drag the photo to the area desired.
The photo you drag and the one you drag it over change places. This makes it much easier to try out different arrangements before proceeding with the printing. Figure 12-6 shows this change being made.
Note
Here are some other handy things to bear in mind:
At any time, you can go back and try different combinations of backgrounds, borders, and layouts until you're satisfied.
If you choose one of the layouts that has text, use the Settings button on the toolbar to change the formatting of the text.
When you're printing just one photo, clicking the Settings button also allows you to make Multiples of the Same Photo per Page when you choose a layout that allows this.
This helps you make enough copies for friends and relatives and still save photo paper.
Photos in the viewer that you've used in a multiphoto layout sport a white check mark.
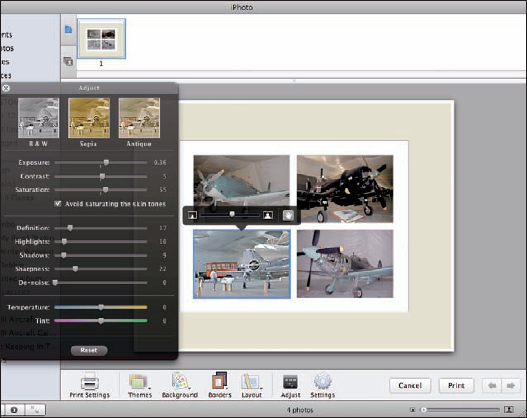
After you settle on all the aesthetic changes to the look of the to-be-printed sheet, you have the chance to make final corrections to the photos.
Thanks to the inclusion of the Adjust tool in the Customize pane, you don't have to return to Edit mode to make these corrections. To make photo corrections in the Customize pane (see the previous sections to get there), follow these steps:
Select the photo(s).
If you're working with only one photo: Select it by clicking it with the mouse; then click the Adjust button on the toolbar.
If you have multiple photos (refer to Figure 12-6): Select the photo to work on and then click the Adjust button. If you want to make the exact same adjustments to all the photos, you can select them all (hold down the Shift key and click on each photo) and then click the Adjust button. Moving any slider or size control now affects all the photos.
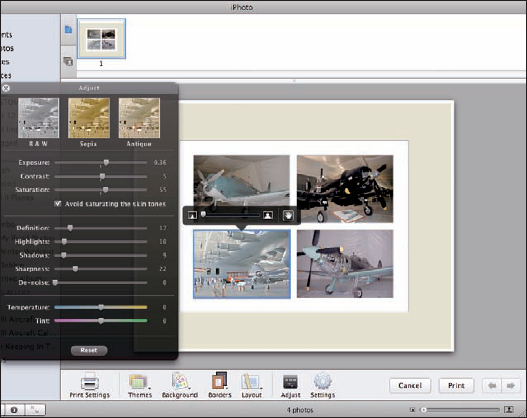
Figure 12-7 shows one photo selected and the Adjust tool window open.
(Optional) Increase or decrease the photo size.
Check out the slider control just above the photo in question. Use this slider to increase or decrease the size of the photo within the confines of the layout. And by clicking and dragging, you can move the photo around. Figure 12-8 shows the result of increasing the size and moving the photo.
When you're satisfied with the result of your changes, click the Print button to proceed with the printing process.
At this point in the chapter, you've made some decisions regarding how you want your photo to look in the final print. Don't forget, however, that you can always change these decisions any time before you actually click Print.
Tip
Unlike other operations in iPhoto, printing changes that you make in the Customize pane — including resizing, as described in the preceding section — apply only to the print operation. These changes don't appear in your Library, Albums, books, cards, calendars, or slideshows.
The printer settings that you choose ensure that what you want to see in a print is the result that you get from your printer's hardware and software.
As I mention earlier, each printer is different, and I can't go into detail on each one. Make sure you read your printers manual for guidelines on using it. In this section, however, I give you a general idea of the choices you'll see during the print process, and I tell you what each means. Remember, though, that, the dialogs shown here will likely be slightly different, depending on your particular brand and model of printer.
Up to this point in the chapter, you've finished at least the first pass at setting up your photo for printing — and you might have had your printer crank out a few test prints. Here's what comes next: You make the final choices in the printing process, choices regarding things like print quality, paper size, and color settings. I use an example photo to take you through the steps.
Click the Print button, located on the bottom-right side of the iPhoto main window.
This sends the project to your selected printer and starts entering printer-specific information.
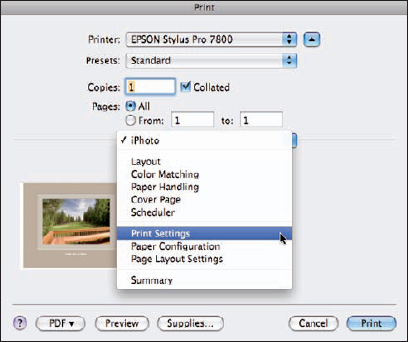
You see a Print dialog showing the name of the printer, a thumbnail of the photo to be printed, and a pop-up menu in the middle that shows the default iPhoto setting.
Click the pop-up menu and choose Print Settings. (See Figure 12-9.)
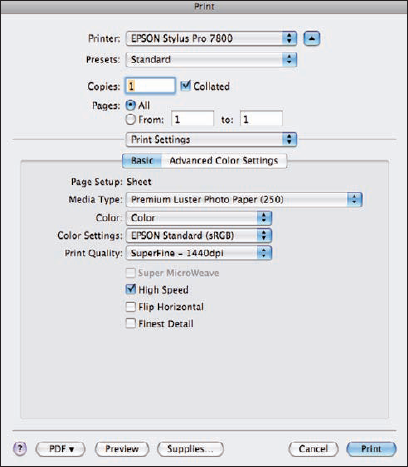
In the Print dialog that opens (see Figure 12-10), you can change things like the media type, whether you want color or black and white, the color space to use, and some print-quality settings that will vary, depending on the type of printer you have. Figure 12-10 shows the choices for my example and my printer.
Now you choose paper type and make color setting choices.
First, examine the default values and see whether they meet your needs. Back in Figure 12-10, you can see the basic default values for my example print and my particular printer. If you like these values, just go ahead and click the Print button.
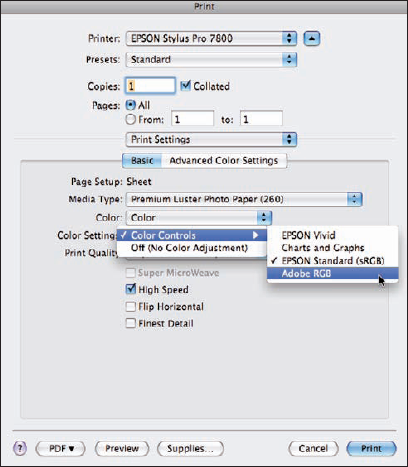
In my running example, though, I want to change the Media Type because the paper I'm using is different than the default, and I want the Color Settings set to use the larger color space called Adobe RGB. This should allow for more accurate colors in the print. See Figure 12-11.
Now look at the Print Quality setting. (Refer to Figure 12-10.) Although I chose not to do so in my example, you can also change the Print Quality to get the resolution you desire, understanding that choosing a higher resolution takes longer to print, uses more ink and may not make a noticeable difference.
The Big Moment. Just click the Print button to complete your print project.
Sounds easy enough, but you don't really know if you'll like the print until you see it.
Note
When you view a photo on your computer screen, you're viewing it with transmitted light. Looking at a print means that you're viewing reflected light from paper, which can produce quite a different look. If necessary, go back and use the Adjust tool to make corrections or change the type of paper you're using. It can make a lot of difference.
If you don't have a printer that you feel is up to the task of printing your photos, another option is available directly from iPhoto: the Kodak Print Service. You still make all the photo-editing changes, such as cropping, straightening, removing red-eye, and using the Adjust tool to get the photo looking how you want. But you don't have to mess with multiple printer settings to figure out how to get your specific printer model to produce the look you want.
To use the Kodak Print Service, do the following:
In iPhoto, select the photos or Events you want to print.
From the menu bar, choose File
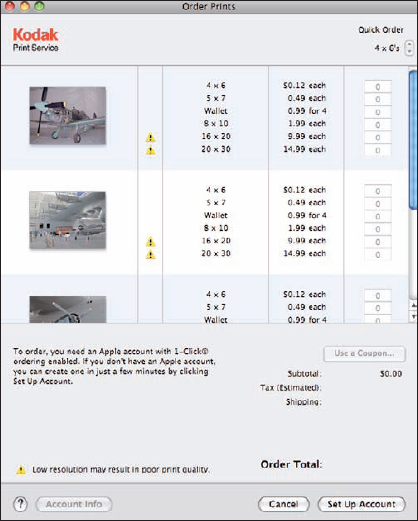
Order Prints.The Order Prints dialog appears, as shown in Figure 12-12. The dialog shows thumbnails of all the selected photos.
For each photo, select the print size and number of copies.
If you're ordering only 4" × 6" prints, use the Quick Order arrows at the top-right side of the dialog to specify the number of sets you want.
Warning
For any sizes where the resolution of the photo is such that poor print quality will likely result, a yellow alert triangle appears. Select a smaller print size.
If you don't already have an account, you must click the Set Up Account button before you can make any other selections.
A series of dialogs take you through all the required financial information. You can even choose the shipment method.
After reviewing your order choices, click the Buy Now button to place your order.
To check the status of your order, go to Apple Photo Services Support at
www.apple.com/support/photoservices.
Now just sit back and wait for your prints to arrive.