
Crafting and customizing a photo book
Adding travel maps to a photo book
Creating a photo calendar
Designing your own cards
Creating high-quality slideshows
Printing and distributing your work
Traditionally, when you want to share your photos, you make some prints to show people when you see them, or you e-mail those photos to friends and family because that's quick and easy to do. But what if you really want to make a statement with your photos and enhance the entire presentation so that they don't just get lost in the shuffle or erased along with the e-mail that brought them?
In this chapter, I show you four other ways to share your photos via iPhoto: photo books, calendars, cards, and slideshows. Some of them will require a little cash to bring them to fruition, but for the right occasion and for the right photos, the results can be priceless.
Have a look.

You have quite a few choices at your disposal when creating a photo book. From the overall look and feel, to whether the photo pages are printed double- or single-sided, you get to decide on a design that works for you.
In particular, you can decide on the following characteristics — and change them at will:
Book type and theme
Page background and layout — per book or on a page-by-page basis
This includes placing a map showing the photo's location on the layout.
Picture placement on each page, manually or automatically
Because this process is integrated into iPhoto, your book creation experience is quick and easy.
The two really great things about picking the book type and theme are that both are easy to do, and you can change your choices right up to the last minute. Here's how it works.
Select one or more Albums or Events, or a group of photos, for your book.
Click either the + (Add) icon on the small toolbar and then choose Book; or you can click the Book icon on the toolbar or (if the width of the iPhoto window is below a certain size, click on the Keepsakes icon in the toolbar and then choose Book).
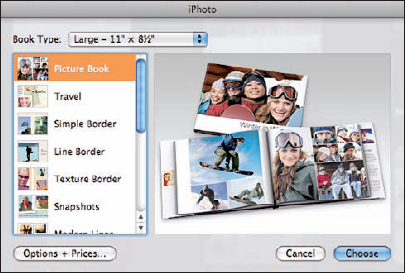
Figure 13-1 shows the dialog that appears, from which you can choose the book type and size as well as the book theme. The preview on the right side of the dialog shows you what your choices look like.
Tip
Check out the various options and prices before you start by clicking the Options + Prices button. You do have to be online, first, though.
After you make your choices, click the Choose button.
Notice that some themes allow text to be entered along with the photos.
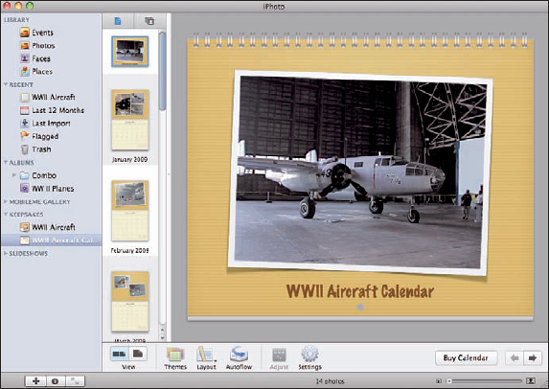
Figure 13-2 shows the result of choosing a type and theme. A new heading, Keepsakes, appears in the Source list, and the book appears under that heading. You can edit the book title at any time. By default, the title is the name of the Event being used as content plus the word Book or Untitled Book in the event you just chose a group of photos.
Across the top of the Book window, shown in Figure 13-2, is the photo browser, which looks like a film strip. In the photo browser, you see the photos that will appear in the book, in the order in which they'll appear. The first photo on the left side of the photo browser will appear on the cover. Just click and drag the photos to change the order at any time. As each photo is used, a check mark appears in its lower-right corner. In the middle pane of the Book window, you see the cover of your book and any text allowed. This text can be edited at any time. On the toolbar is a row of buttons, where you can (from left to right) perform the following actions:
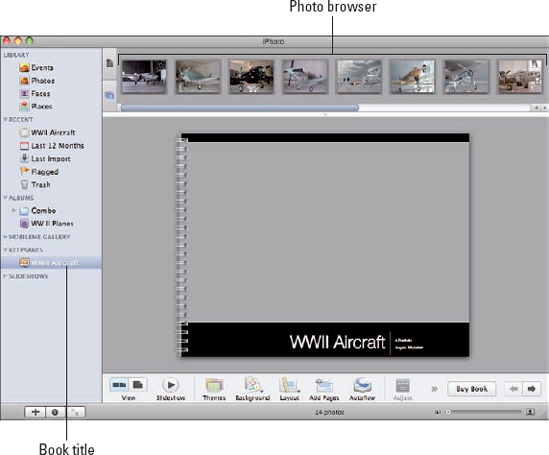
Play selected photos as a slideshow.
Change the theme.
Add pages to the book.
Autoflow all your photos into the book automatically.
Use an Adjust palette that is a combination of the Effects and Adjust palettes in the iPhoto Editor.
Crop and move each photo on each page.
Modify the formatting for the text on each page.
Change the display size of the page using the slider on the bottom-right side of the window.
Wow, that's a lot of finessing! Keep reading to see how to use each button.
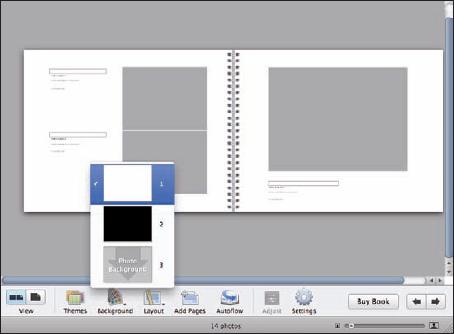
The choices provided by the Background and Layout buttons change, depending on the Theme you chose. To change the background, follow these steps:
Use the right- and left-facing arrow buttons (on the far-right side of the toolbar) to move to the page you want to change.
Click the Background button to see what choices you have and then choose one, such as white, black, or a photo.
For this example, Figure 13-3 shows the choices for the current page.
Continue using the right- and left-arrow buttons to change other pages as necessary.
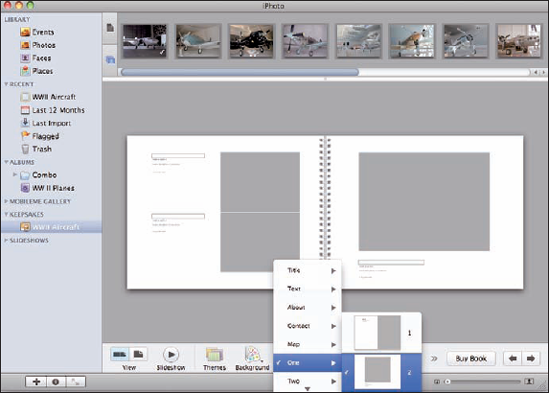
The Layout button works in much the same way but with more choices, depending on the Theme you're editing.
If necessary, use the right- and left-arrow buttons to move to the page you wish to edit.
Click the Layout button to see your choices, and then make one.
In Figure 13-4, you can see the choices for the page I made. Your layout choices also include the name of the particular page type, such as an About page or a Contact page. You're free to choose any of them.
Continue using the right- and left-arrow buttons to change other pages as necessary.
Of course, background and layout are only part of what goes into making a great photo book. The main ingredient is your photos — and, equally important, the order in which they're placed on the pages.
To order and place photos manually
Go to the page where you wish to place your photo(s).
In the top part of the iPhoto Book window (refer to Figure 13-2) is the photo browser, showing all the photos you designated for this book. Click and drag the photo you want to the photo location on the opened page.
iPhoto sizes the photo properly for the size of the location.
Continue with each page until you place all your photos.
To let iPhoto arrange the photos for you
Make sure to arrange your photos in the photo browser in the order you desire.
Note
You can reorder (just click and drag) your photos in the photo browser at the top of the iPhoto Book window. This is especially important if you have a photo on the front cover because the first photo in line is the one that iPhoto will use on the cover.
Click the Autoflow button on the toolbar.
Look at each page in your book to make sure that you still like the order of the photos.
If not, you can click and drag photos on facing pages to different locations on those pages.
(Optional) iPhoto books are a minimum of 10 pages for single-sided pages and 20 pages for double-sided pages. If you have too many pages for the number of photos, click on the Page View button (which is the top one at the left of the photo browser) then click the extra pages, one by one, in the photo browser at the top of the window and press the Delete key.
Time for some last-minute editing. Figure 13-5 shows one of the facing pages. When you click the Adjust button on the toolbar, the Adjust tool window opens. Right-click or Control-click the photo to bring up a menu that allows you to mirror the image (the photo looks like the reflection in a mirror) and also go directly to the iPhoto Editor (select Edit Photo) to use all its tools. (See Chapter 7 for more details.)

When you finish in the Editor, you return to the page you left in the book. You also see a black box at the top of the photo that allows you to resize the photo as you wish and move it in the frame.
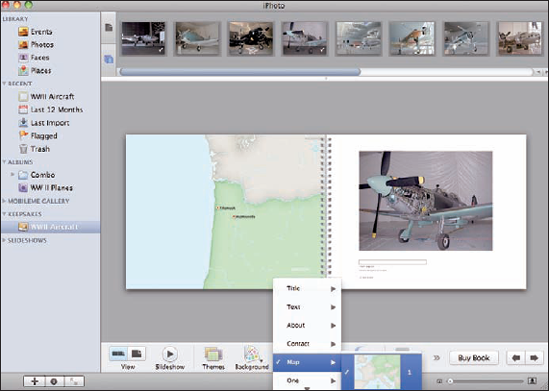
If you have location information for your photos, you can place a travel map on a book page. (See Chapter 3 for more about adding location information to photos.) Click the book page; then click the Layout button on the toolbar and choose Map. Figure 13-6 shows the menu choice and the result. You can click and drag the map to orient it to your choice.
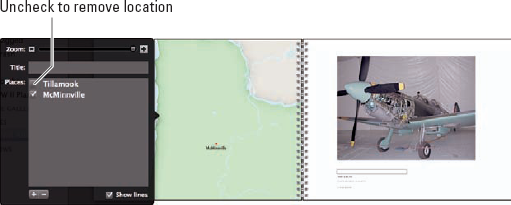
In my running example, there are two locations shown because I took some of the photos at a different site. You can always change how many locations are shown. Click anywhere on the map, and a small dialog appears, letting you change the map size and remove any of the locations you don't want. See Figure 13-7.
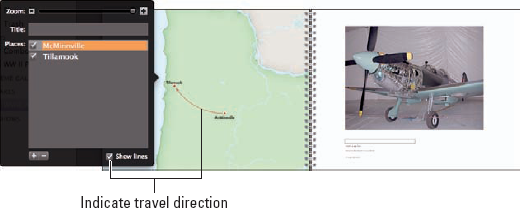
If you have more than one location, you can impose lines indicating the direction of travel on the map. Click the map; in the dialog that appears, select the Show Lines check box. If the directional arrow goes in the wrong direction, simply drag the location names in the dialog into the proper order, and the arrow changes accordingly. Figure 13-8 shows this. To dismiss the dialog, click away from the map.
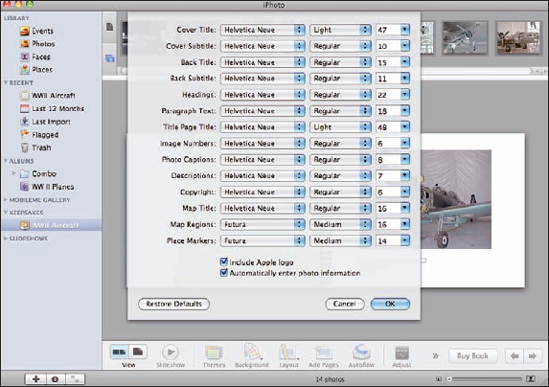
As I mention earlier, some layouts allow you to add text to accompany a photo. This is handy when you want to add a caption, titles, headings, and much more. Here's how:
Click the Settings button on the toolbar to change the various text formats in the book. This dialog is shown in Figure 13-9.
Not much point in creating a photo book if you can't hold it in your hands and share it, now, is there? Purchasing a book is very simple. Just take a minute to preview it for one last perusal, and then buy online!
Tip
I do want to mention, though, that you need an Apple ID and a valid credit card to purchase a photo book.
When you're finished creating and editing pages, preview your photo book by right-clicking in the gray area around your book and choosing Preview Book.
A PDF file is generated, which opens for your inspection. When you're finished with the preview, just quit the application you're using to view it.
Alternatively, you can click the Slideshow button on the toolbar and watch a slideshow presentation of your book.
Click the Buy Book button to begin the ordering process.
Nice job!
Something that can display your photos, make a nice gift, and be useful at the same time is a photo calendar. And iPhoto offers an easy and convenient way to make one. Use preset themes and layouts, modify each calendar page to make it just the way you want it, and then let iPhoto place the photos for you — or add them yourself manually. Here's how.
Start by choosing your photos.
Select the Albums, Events, or photos you want to use in your calendar.
Click the Calendar button in the toolbar or (if the width of the iPhoto window is below a certain size) click on the Keepsakes icon in the toolbar and then choose Calendar.
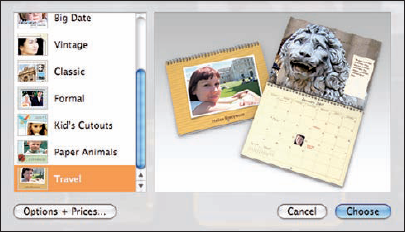
From the dialog that appears, select the theme you want and then click the Choose button.
Figure 13-10 shows some of the selections, which range from Formal to Kid's Cutouts.
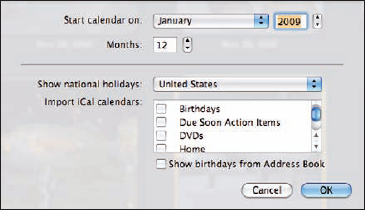
In the next dialog that appears (see Figure 13-11), you can select the
Start month and year for the calendar.
Number of months (up to 24).
Whether you want the national holidays of a particular country to appear.
Where to get other information (such as iCal events and birthdays) you want placed in the calendar.
When you're finished with these choices, click OK.
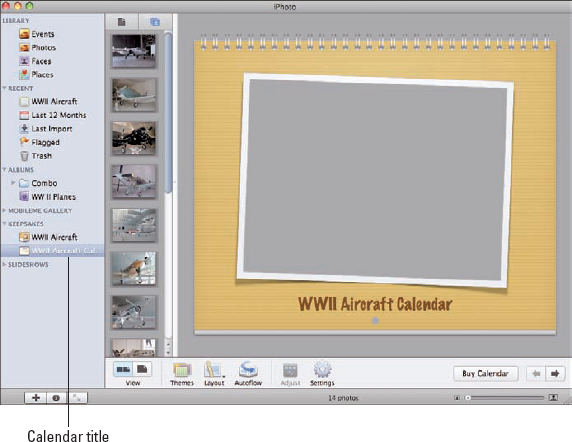
Your calendar will appear under Keepsakes in the Source list with either the name of the Event used for content plus the word Calendar or the name Untitled Calendar if you used a group of photos for content. Click twice on the name of the calendar to highlight it, then type the name you wish and press Return.
In the photo browser running vertically, you can see all the photos you selected for the calendar. Figure 13-12 shows this for my example.
Use the right- and left-arrow buttons on the far-right side of the toolbar to scan through the various months to see where and how many photos will be placed in each month. You can modify the individual page layouts as follows.
After you choose your photos and decide on a theme, you can tinker with the design layout by doing the following.
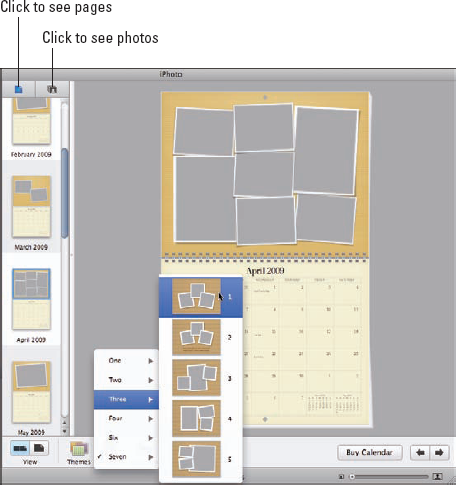
At the top of the photo browser, click the single-page icon (the one on the left) to see the pages of the calendar in the photo browser.
Pick the month you want to modify, click it in the photo browser, and then click the Layout button on the toolbar to choose a new one.
Figure 13-13 shows the choices. Currently, there is room for seven photos, but I think that's too many. I changed it to three.
When you're finished with the layout changes, click the photos icon at the top of the photo browser (it's the one on the right) to again see all your photos.
Now set the photos for each of the months in your calendar. There are two ways to do this. Here's how to do it manually:
Use the right- and left-arrow buttons on the toolbar to get to the month you wish to modify.
Drag the photo or photos of choice from the photo browser and drop them on the photo placeholders on each month to be edited.
For months with multiple photos, click and drag photos to rearrange them at will.
Tip
Each photo that you're using has a white check mark in the lower-right corner.
You can also let iPhoto set the photos for you. Just click and drag the thumbnails in the photo browser to get them in the order you prefer. iPhoto uses them from top to bottom in order. (The top photo is the cover photo.)
To let iPhoto place the photos for you, click the Autoflow button on the toolbar. After that, you can still manually click and drag the photos where you wish within the month they appear. Figure 13-14 shows the result of this.
Because iPhoto allows you to mark things like birthdays and anniversaries on your calendar, you might also want to place a photo on those special occasions. It's easy to do.
If the photo you want to use isn't already in the photo browser simply click Photos in the Source list, find the photo you want, and drag it onto your calendar listed under Keepsakes.
Your photo now appears at the end of the photo browser.
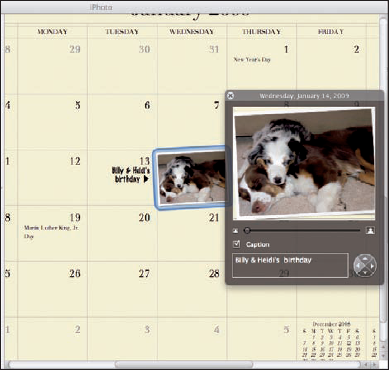
Go to the month in which the special occasion occurs. Drag and drop the photo from the photo browser onto the day in the calendar.
Double-click that day to bring up the editing dialog for the photo. (See Figure 13-15.)
You can adjust the size of the photo with the slider.
(Optional) To create a caption
Select the Caption check box.
Type the caption in the text box.
Use the four-point symbol to specify whether the caption will appear at the left, right, top, or bottom of the day's square.
Click the Close button at the top left of the editing dialog to close it.
That's all there is to it.
After you make all the changes and additions, preview your calendar and then buy it.
Note
You need an AppleID and a valid credit card to purchase a calendar.
Right-click or control-click anywhere in the gray area surrounding your calendar in the iPhoto window.
In the pop-up menu that appears, you have two choices: Save Calendar as PDF and Preview Calendar. Choose Preview Calendar.
Your calendar opens in Preview for your inspection. When you're finished, simply close the application you used for viewing.
Click the Buy Calendar button to begin your purchase.
You're connected to Apple to enter all the details.
Imagine how happy everyone who receives your very personalized calendar for the coming year will be when they receive it!
It seems these days that almost every day on the calendar has an occasion set aside for it. I know, that's stretching things a bit, but we all have special days that we celebrate each year. What better way to do so than by sending a card, using your own photos. iPhoto makes it easy to do.
Start by choosing the occasion. After all, you don't want to send a 50th wedding anniversary card sporting a photo of your three-year-old dressed like a witch at Halloween? (Well, maybe for a Happy Divorce card.)
Select the Event or photos you wish to use for your greeting card or postcard.
Click the Card button in the toolbar or (if the width of the iPhoto window is below a certain size) click on the Keepsakes icon in the toolbar and then choose Card.
A card project appears under Keepsakes in the Source list.
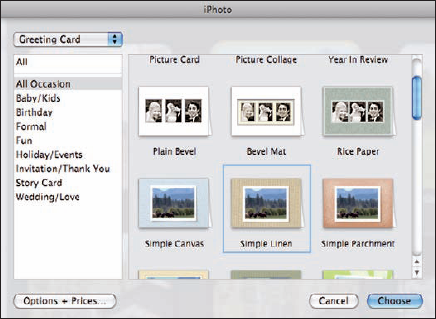
A dialog appears, allowing you to choose either a greeting card or a postcard, the theme for the card, and a listing of types of cards; make your selections and click the Choose button.
Your card will appear under Keepsakes in the Source list with the name Untitled Card. Click twice on the name of the card to highlight it, then type the name you wish and press Return.
There isn't much difference between the greeting cards and postcards from an editing standpoint, so I just use a greeting card example. Figure 13-16 shows the dialog.
Tip
Some themes allow only one photo.
Time to edit the card.
With the card you chose in the center pane, use these buttons on the toolbar:
Background: Choose from a number of colored backgrounds.
Design: Choose from several ways of displaying the photo scene (with a border, with a mat, with a title, and so on) and whether to have text.
You can also choose to change the card's orientation; set it to horizontal or vertical.
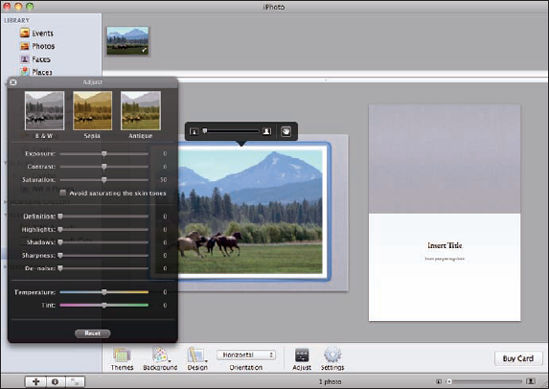
Click the photo and then click the Adjust button on the toolbar to modify your photo. Figure 13-17 shows the usual sliders in the Adjust tool window and a slider for changing the photo size above the photo.
What card would be complete without some text? Happy Birthday! Happy Groundhog's Day! Happy Tax-Free Day!
Click the Settings button on the toolbar to bring up a formatting dialog.
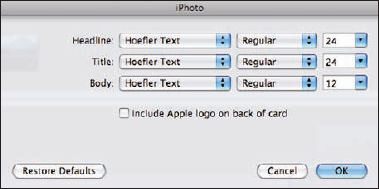
Depending on the card design, the dialog shows the types of text fields that you can modify, as shown in Figure 13-18.
Make your selections.
You can choose the font and size for the headline, title, and body text. You can even have the Apple logo printed on the back of the card, if you wish.
Click OK.
After you made all your changes, take a preview look at your card and then buy it. If you have some card stock that you want to use for printing your card you can certainly do that. Use the PDF file described below and the techniques in Chapter 12 for printing at home.
Note
As with photo books and calendars, you need an AppleID and a valid credit card to purchase a card.
Right-click or Control-click anywhere in the gray area surrounding your card in the iPhoto window.
In the pop-up menu that appears, you see two choices: Save Card as PDF and Preview Card. Choose Preview Card. If you're going to print this yourself, you would Save Card as PDF.
Your card opens for your inspection. When you're finished, simply close the application used for viewing.
Click the Buy Card button to begin your purchase.
You're connected to Apple to enter all the details.
Imagine how happy everyone who receives your very personalized card for a particular occasion will be!
Ever watched a program on TV that used photographs to tell a story and wondered whether you could do that with your own story? Of course, you can — with iPhoto, which makes it pretty easy to do. You can even add effects, transitions, and your favorite music just like the pros. When you're finished, you can run the slideshow on your computer or export it to your hard drive or iDVD to share with others or post it to your MobileMe Gallery or a Web page. Here's how.
Select the Albums, Events, or photos you want to make into a slideshow.
Click the Slideshow button on the toolbar or click the + (Add) button on the small toolbar.
Click Slideshow and add a title.
Figure 13-19 shows the slideshow window you'll see. The slideshow window will open in the iPhoto main window.
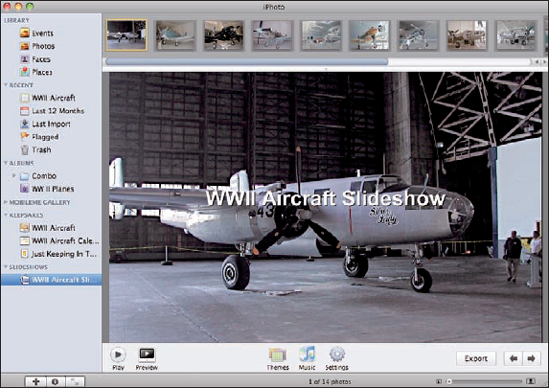
You can change the name of your slideshow at any time by highlighting the current name and typing a new one. The Preview button on the toolbar allows you to sample your slideshow with the current settings so you can quickly try them out. Here's how to select settings for your slideshow.
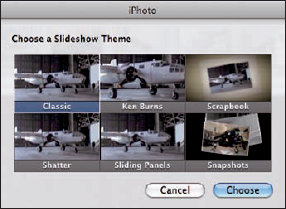
Click the Themes button, located in the middle of the toolbar. Figure 13-20 shows the dialog that appears.
Click a theme to assign it to your slideshow and then click the Choose button.
Click the Preview button on the toolbar to see how you like the theme (and the music attached to the theme by default).
Honestly, I think the hardest part of creating a slideshow is choosing which theme you want to use. They're all fantastic.
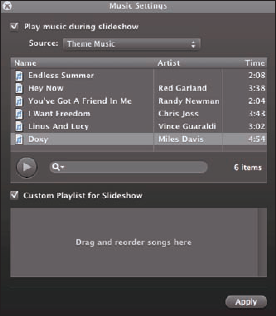
Time for tunes. Click the Music button, also located in the middle of the toolbar.
When the Music Settings dialog shown in Figure 13-21 appears, you can choose your own music on your computer, choose one of the six tracks under Theme Music, or create your own playlist. When you're satisfied, click the Apply button.
Click the Settings button on the toolbar.
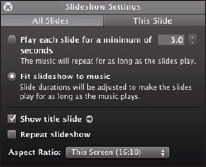
The Slideshow Settings dialog shown in Figure 13-22 appears.
Change settings for each slide or for all slides.
This Slide: Click this to set a Black & White, Sepia, or Antique tone for the slide.
Tip
You must do this for each slide that you want to change.
All Slides: Click this to set the minimum play length for each slide.
In the example, it's set for 5 seconds.
If you select the Fit Slideshow to Music radio button, the duration of slides is adjusted so that the slideshow and the music end together, automatically.
Still in the Slideshow Settings dialog, select the check boxes for your choices.
Show Title Slide: Select this check box if you want a title slide. Click on the small arrow in the circle next to this selection. This will bring up the Title Slide. Click on the text twice and change as you wish. When you're finished, click away from the text field and you're done.
Repeat Slideshow: Select this check box to make the slideshow repeat upon completion.
Set the aspect ratio from the pop-up menu, depending on where you plan to display the slideshow.
For example, you can set the slideshow to work with the current display or HDTV (16:9), TV (4:3), or iPhone (3:2) displays.
When you're finshed, click the Close button (the X in the upper-left corner).
So, your slideshow masterpiece is finished. You can run the slideshow on your computer or TV screen. If you want to send it to others, you can export it by clicking the Export button at the right side of the toolbar. (Refer to Figure 13-19.) That will take you through the process I describe in Chapter 11.