In This Chapter
Taking a look at the power of the Editor
Full-screen editing
Trying edits until they're right — Redo, Undo, and Revert to Original
Editing multiple photos the easy way
The iPhoto Editor is a combination of one-click, quick-fix tools and advanced editing capabilities for everything from exposure and saturation to noise reduction and color balance. No matter what level of editing you need to perform, the iPhoto Editor provides the tools.
If you've already been through Chapter 2, you completed a simple iPhoto project and were introduced to some of the editing tools available. In this chapter, I show you in more depth how to use all the editing tools.
Sometimes, because of the subject or the lighting, you have to quickly take a photo. You just might not have time to get the composition precisely how you want it. iPhoto can help you compensate for that, too, allowing compositional changes after the fact.
That's enough talk — time to get busy understanding how to make your photos better.

Taking the perfect photograph is a lofty goal and nearly impossible. Light never falls evenly on all parts of a photo, or you make a simple error in camera settings in the heat of the picture-taking moment, or your composition isn't quite right.
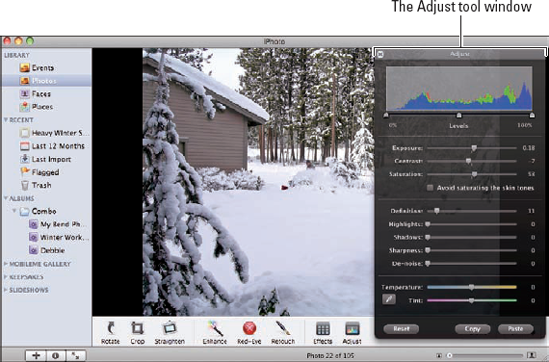
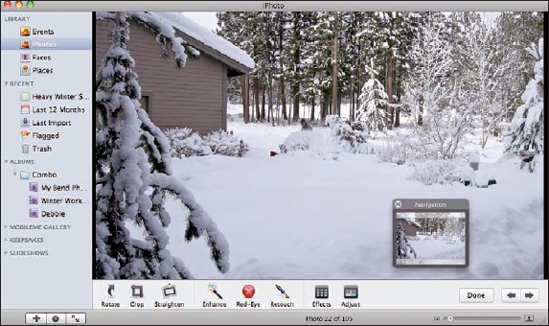
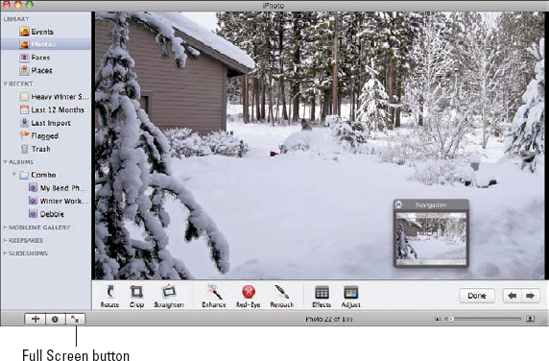
Luckily, almost all these errors can be corrected, at least to some extent. Figure 7-1 shows the main window in Edit mode, and this is where the magic happens.
Take note of the little Navigation window, which appears any time you zoom in within the photo. Sometimes you zoom in so much to make a correction that you lose track of where you are in the photo — and that's what the Navigation window is for. You can put the mouse inside it and click and drag to move the photo around. Or, you can put it away by clicking the Close button in its upper-left corner. If you don't zoom, you don't see the Navigation window.
About this time, you might be muttering something like, "So many tools, so little time." Well, don't worry. Stay right here for my tips on how I approach editing every photo. I'm sure these tips will help you, too.
Here's an overview of my approach to editing. I start with what I call the "tidying-up phase":
I select the photo to edit and then click the Edit button in the toolbar at the bottom of the iPhoto main window.
If necessary, I use the Rotate button to rotate the photo.
Tip
Pressing and holding the Option key when clicking the Rotate button will change the direction of the rotation.
There's no sense working on parts of a photo that I don't want, so I use the Crop button and crop the photo, if required, before doing anything else.
Finally, I straighten the photo, if necessary, using the Straighten button.
Although this upfront part of the photo-editing process might not seem very exciting or artistic, tidying up is important and will save you time later. You'll see what I mean when you read Chapter 8.
After tidying up, I decide how much editing I will do with the specific photo. The next group of tools — Enhance, Red-Eye, and Retouch (see Chapter 8 for more details) — can often be used when higher-level editing is not required. I call these tools E.R.R. (and to err is not only human, it is often enough for your photo).
How do you know whether using these tools will be enough to fix your photo? Well, you can certainly try them and use the Undo feature if they don't work out. It's really a matter of judgment based on experience and whether you like the look of what has been changed. If I decide to use these tools, here's how I use them:
I normally start with the Red-Eye tool if there are any people in the photo with this problem.
Next I use the Retouch tool to remove any blemishes or dust spots that were on the lens — and thus in the photo. These two tools (Red-Eye and Retouch) are necessary whether you're planning to use the Enhance tool (see the next bullet) or not. Even if you're going to do advanced editing, you want to use these two tools first.
Last, but certainly not least, I click the Enhance button. This tool brightens the picture and makes contrast changes to lighten the mood of the photo. There are no adjustments you can make, and one click is all you need.
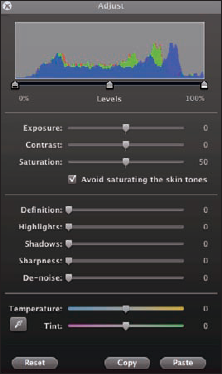
But say you have a few photos that are your prizes — the ones you want to look as good as possible — and you don't mind spending more time and care getting them to look the way you want. You've done your tidying up, and used Red-Eye, Retouch, and Enhance. Now, click the Adjust button, and the world of advanced photo editing opens. Figure 7-2 shows the Adjust tool window. Check out the ten sliders here that you can use to modify exposure, contrast, saturation, and a host of other parameters. Chapter 10 is devoted to using the Adjust tool.
When you finish using the Adjust tool, you might want to revisit the earlier-mentioned tools to correct any errors just discovered. Otherwise, you're ready to print or display.
Note
This is my overall workflow with iPhoto. I recommend trying editing this way first to see how it works for you. Afterward, don't hesitate to modify it to suit yourself — but do that based on your experience.
This approach covers a lot of work, but what if you decide at some point you don't want any of these changes? Good question, and it deserves an answer right now.
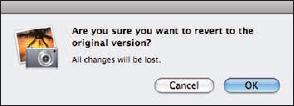
iPhoto uses a technique called nondestructive editing to ensure that your original photo's look and feel is never lost. Instead of changing your photo directly, iPhoto keeps track of your modifications (keeping a list of things to do) and applies them to your original photo each time you open it for viewing, further editing, or printing. Operating in this way has several advantages:
You can use the Undo and Redo features multiple times in any editing session without fear of corrupting the original photo.
At any time after editing, you can choose Photos
Revert to Original and go back to square one. Figure 7-3 shows the warning dialog after this choice is made.
Warning
After you go back, all edits are lost.
If you're editing a photo in RAW format (explained in detail in Chapter 9), the command path is Photos
Unlike some photo-editing software, it makes no difference in what order you make your edits.
Whenever you make an edit (or series of edits), you can compare the result against the original photo by simply pressing the Shift key. This really helps when you've made several changes and aren't sure whether you've made things better or not. (Believe me, this question pops up more often than I care to admit.) Just keep pressing and releasing the Shift key to compare the changed photo and its original until you make the call.
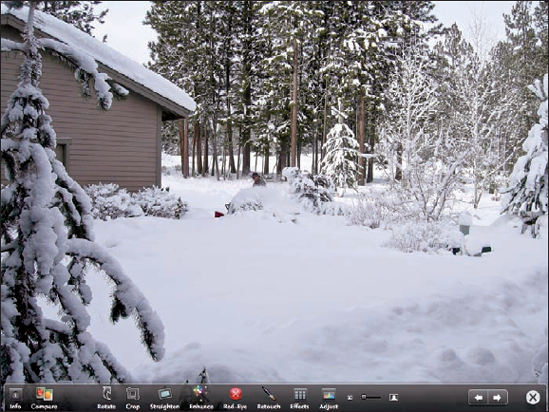
Whenever you're editing a photograph, always try to have it displayed as large as possible on your computer screen. (This is especially true when sharpening a photo.) If you don't do this, you might make editing changes that aren't apparent at the time but will be detrimental when printing at a larger size. Full Screen mode also allows you to better compare two similar images to see which you prefer to edit.
To edit in Full Screen mode, follow these steps:
Select the photo you wish to edit.
Click the Full Screen button (see Figure 7-4) or choose View
Full Screen.Edit your photo using the tools on the toolbar at the bottom of the iPhoto window, as shown in Figure 7-5.
If the toolbar isn't showing (you did ask for full-screen viewing of your photo, after all), simply move your mouse to the bottom of the screen to make it appear. Chapters 8-10 cover editing in detail.
Tip
Notice the two choices that appear on the far left of the toolbar. Clicking the Info button gives you information about the photo. Clicking the Compare button allows you to compare the current image with the next one in order in the Event it's located in: If they're similar photos, you can choose which one to edit.
When in Full-Screen mode, if you move the mouse to the top of the screen, you will see a film strip (of sorts) that shows thumbnails of all the photos in the current Event.
To exit from Full Screen mode, click the X button on the far-right of the toolbar or press the Escape (Esc) key on your keyboard.
When viewing your photo in Edit mode, you can zoom in or out on a photo. I always recommend that when you're cropping, retouching, working on red eye, and sharpening, zoom in and enlarge the area in question before performing the edits. Here's how you zoom in and out:
Select the photo you want to edit and then click the Edit button.
Do one of the following:
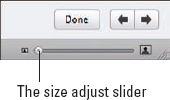
Use the size adjust slider to zoom in and out. Drag the size slider in the lower-right corner (see Figure 7-6) and use the scroll bars to bring the correct part of the photo into view. You can also click the icons at either end of the slider to go to the extremes immediately.
Use the keyboard to zoom in and out. Using your keyboard, press Option+1 to zoom to 100% or press Option+2 to go to 200%. You can also place your mouse pointer over the portion of the photo where you want to center the zoom and then press the 1 key for 100% or the 2 key for 200%. Press Option+0 (the zero key) to zoom out.
The thing about composition is that it's critical to getting a really good photograph. However, most people don't consciously think about it — or, if they do, they forget about it in the heat of the photograph-taking moment.
Poor composition is often caused by including too much in the photo, preventing the viewer from focusing on the main feature and causing distractions. Another cause is having something bright and distracting in the photo that pulls your eyes away from the main subject. Cure these two problems, and the improvement to your photos is huge.
Luckily, you have the technology to fix some composition errors after the fact. Two of the best iPhoto tools to correct these kinds of problems are the Cropping tool and the Adjust tool.
Because this is a book about iPhoto, I don't have room for a lengthy discussion of the theory and practice of compositional techniques. However, I will mention three techniques that can dramatically improve the results of your picture-taking and lessen the need for extensive editing.
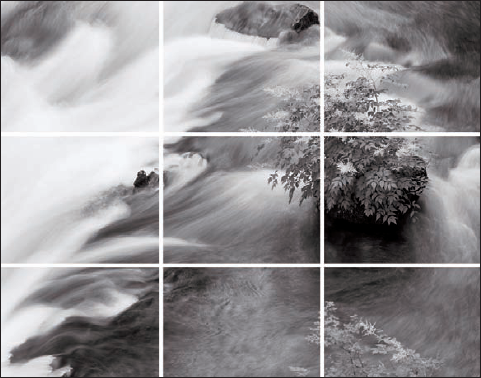
The Rule of Thirds is easy tocomprehend and to use. Simply imagine that the scene you are going to photograph is divided into thirds, both vertically and horizontally. The rule, simply stated, is that you typically want to place the focus or main subject of the photo at or near one of the intersections of the vertical and horizontal lines (called power points). The horizon would be placed on or near one of the horizontal lines. Placing the main subject directly in the middle is boring and to be avoided if at all possible. Figure 7-7 shows whatI mean. Here, the bush in the middle of the river is very near a power point and gives a pleasing composition. Just remember that this is not an exact science. It's still art, so use your judgment.
Tip
Using the Crop tool can be very helpful here if the composition isn't quite right.
Distracting elements in a photo can be a disaster. Strive to have the eyes of the viewer flow naturally to the main subject. If that doesn't happen, maybe you have bright objects that pull the viewer's eyes away, or perhaps a tree limb that inadvertently got in the photo.
Note
Strive to arrange the elements of your photograph to lead the viewer's eye into the photo and to the main subject. Remove distracting elements from the photo by using the Crop tool (to crop them out) or the Adjust tool (to lessen the effect).
Close one eye when first looking at the scene you want to photograph. Humans — because we're binocular — inherently have depth perception. Often, it's that depth perception that makes a scene something we want to capture in a photo. But a camera only has one eye, its lens. Depth can be lost in the photo unless we use some elements (for example, trees, rocks, or a hill in the near foreground) to give the illusion of depth. If you close one eye, you'll see the scene as the camera will see it — and you'll also know whether you have to do something to save the shot. If your camera has an LCD screen, you can check it to see what the camera will see albeit on a small scale.
Warning
This is something that no tool can really fix. Make doing this a habit before you shoot.
If the subject of composition really fascinates you, check out Digital Photography For Dummies, 6th Edition, by Julie Adair King and Serge Timacheff (Wiley). The time taken to get comfortable with this aspect of photography is well worth the effort.
One of the major advantages of digital photography is that pixels are free! No more buying film, having film so old that photos are ruined, or running out just when things are going well. Camera memory cards are relatively inexpensive; plus, you can erase photos that are obviously poor while you're shooting, thus saving room for more good photos.
My point is that digital photography encourages us to take lots and lots of photos. Suppose, though, that in your haste to capture a particular moment, you make some consistent errors in your camera settings. Perhaps you take 25 shots and realize afterward that they're all underexposed, just by enough to be bothersome. That's a lot of editing to do.
Wouldn't it be great if you could fix the problem one time and then just let it trickle down to all the other photos having a similar problem? You can, thanks to iPhoto coming to the rescue.
In Chapter 10, I give you an in-depth discussion of the Adjust tool, but for now, allow me to just plant the thought that this tool is the key to easily editing multiple photos.
Here's how:
Select a photo affected by the recurrent problem and then click the Edit button to open Edit mode.
Select the Adjust tool; in the Adjust tool window that opens, use the sliders to make your changes.
Note the Copy and Paste buttons in the bottom-right corner of the Adjust tool window (see Figure 7-8). This is the good stuff.
When you're satisfied with the edits, simply click the Copy button.
This copies all the changes you made ready for you to Paste. This works just like how Copy and Paste do in other Mac applications.
Still in Edit mode, click the right-arrow button on the far-right of the toolbar to bring the next photo into view.
If the Adjust pane is in the way, just click the top bar of the pane and drag it to somewhere more convenient on the screen.
Click the Paste button, and the same changes from Step 3 will be applied to this photo.
Tip
The Copy and Paste buttons work only with the changes made in the Adjust tool window, and not with any of the other tools.
Continue to click the right-arrow button. As each photo comes into Edit mode, click the Paste button to apply the edit.
This technique does require some manual effort, but if the edits are extensive, this is still quite a timesaver.