
In this chapter, I explore the creation of OS X application bundles from Java applications. JAR files do not have icons associated with them and are treated as documents by OS X until you bundle them as application bundles. OS X application bundles contain everything applications need to run. This includes libraries, images, icons, and property files.
Part of creating a desirable application on OS X is icon creation. Icons on OS X are works of art. As such, I explain the roles of vector drawing programs and raster art creation in implementing beautiful application icons.
Finally, I explain the installation options available for your Java applications on OS X. Installations vary from simple drag-and-drops, to creating more complex installers with programs like izPack. I explain the Apple's recommended installation method (using DMGs) in detail.
A demo application with icon art is available from this book's Web site for use in producing the packages, installations, and icons described in this chapter. The application is Checkbook Demo. It includes two JAR libraries, command-line interface integration, an image for an icon label, an embedded database, several source files, and a basic application icon. I intend Checkbook Demo to demonstrate deployment of a feature-rich application, not to work as functional checkbook software.
Apple's user base loves refinement. Since the first Mac rolled of an assembly line, Apple has focused on improving the user experience. OS X currently spearheads the drive to impress users. In addition to being a rock-solid twenty-first century operating system, OS X is the most luxurious of operating systems.
Double-clickable JAR files are functional, but they fail to impress OS X users. JAR files do not have an OS X feel to them. To impress your OS X savvy users, you need to package your Java applications with them in mind.
Before I explain bundling of Java applications as OS X applications, I need to explain some terms. The terms package and bundle are used almost interchangeably. In an elementary math class some years ago, you probably learned that all squares are rectangles, but not all rectangles are squares. A similar relationship exists between bundles and packages. Packages are always bundles, but bundles are not always packages.
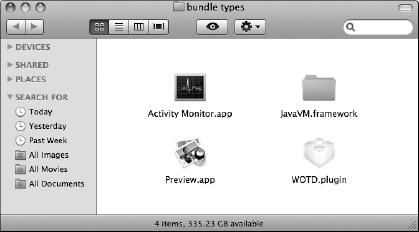
Bundles are folders with suffixes, like .app or .framework, as shown in Figure 5.1. Some bundles, such as applications (*.app), behave to OS X users as though they are only one file. Bundles that behave as though they are only one file are called packages. Some bundles are browsable just like regular folders. Examples of bundles that behave similar to regular folders are frameworks (*.framework). These are bundles, but not packages.
Types of bundles include libraries, plug-ins, and document bundles. This chapter explains Java application packaging and distribution. In the next section, I give a quick tour of a basic application bundle before examining the JAR Bundler application.
All the applications in your /Applications folder are bundles. For your first look at the interiors of application bundles, we should avoid inadvertently damaging an application you care about. Also, you probably don't know which of those applications are Java based, Objective-C based, or developed with another language.
Pulling apart Java-based application packages is a good way to start learning about creating your own application packages. Obviously, you are better off potentially destroying application bundles that you don't care about. Avoid destroying application bundles containing applications you actually paid for.
Prior to Snow Leopard, Xcode had a handy Java application template project that built Java application packages. Xcode version 3.2 does not have a simple built-in Java application project, but that is only a minor hurdle. In chapter 3, I explain multiple ways to create Java based Xcode projects. Also, later in this chapter, I explain JAR bundle creation.
This chapter isn't about making Java based Xcode projects, so I provide a pre-constructed Java project on the book's Web site. The Xcode project on the Web site is called BasicAppBundle. BasicAppBundle is a Java based application project created from the Xcode 3.1 Java Application template. BasicAppBundle works fine in Xcode 3.2, though. Use the BasicAppBundle project to an unlimited number of Java application bundles to experiment with.
Note
Chapter 3 explains Java application creation with Xcode.
After downloading the BasicAppBundle project from the book's Web site, build the application. Building the application creates an application package in the dist directory. The dist directory is at the root level of the BasicAppBundle project. The dist directory contains a Java application bundle named BasicAppBundle.app. You may or may not see the .app extension, depending on whether you have set up your system to see extensions by default.
Tip
To view file extensions by default, navigate to the Finder preferences. Select Advanced preferences and toggle the "Show all files extensions" checkbox.
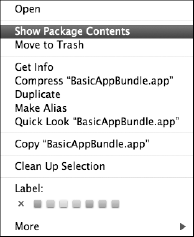
Double-clicking a normal folder opens the folder for browsing. Double-clicking the BasicAppBundle.app runs the Java program contained in the BasicAppBundle package. To see the contents of the BasicAppBundle.app, control-click the BasicAppBundle.app package and select Show Package Contents, as shown in Figure 5.2, from the resulting context menu.
Inside the BasicAppBundle, you find four files: Info.plist, BasicAppBundle, BasicAppBundle.icns, and BasicAppBundle.jar, as shown in Figure 5.3. Java application bundles don't get simpler than this example.
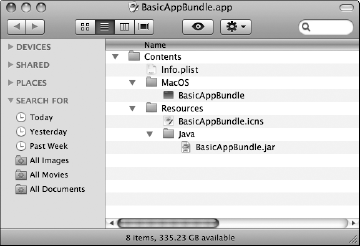
Every application bundle must have an executable targeting your OS. Looking at the contents of the BasicAppBundle.app, BasicAppBundle.jar sticks out as our executable, but that is not the case. The actual executable is located here:
Contents/MacOS/BasicAppBundle
The BasicAppBundle file is called by OS X when you double-click the BasicAppBundle.app package. In turn, the BasicAppBundle executable starts the BasicAppBundle.jar. The JAR file is considered a Java resource and is located here:
Contents/Resources/Java/BasicAppBundle.jar
Note
Application bundles are capable of hosting executables for multiple operating systems in a single application bundle. For instance, some bundles have an executable in a folder located at Contents/MacOSClassic as well as an executable in Contents/MacOS. In theory, an application bundle could host Windows, Linux, and OS X applications in the same bundle.
The BasicAppBundle.app package contains an *.icns file. Icon files in OS X are created from multiple images designed to look good at varying sizes. OS X takes care of the details of blending the images together, creating a continuous range of sizes from 512 pixels to 16 pixels.
Contents/Resources/BasicAppBundle.icns
I explain icon creation and assembly later in this chapter.
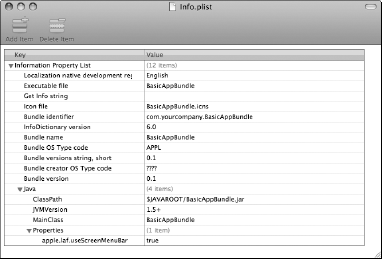
Every application bundle has an Info.plist. It is located at Contents/Info.plist. Info.plist is the information property list file. Open the information property list file by double-clicking it. The Info.plist opens in the Property List Editor application, as shown in Figure 5.4.
Tip
The Property List Editor is installed with the Xcode development tools. It is located at /Developer/Applications/Utilities/Property List Editor.app.
Information property list files are XML files. Writing an Info.plist by hand is possible, but extremely unpleasant and error prone. The Property List Editor makes handling Info.plists manageable.
Most of the Keys in the Info.plist created for the BasicAppBundle.app package are reader-friendly, even containing spaces in their names. The human readable key name is another trick of Info.plist. To see the actual names of the keys, select View
Possibly the most common issue faced when debugging Java applications that you received pre-bundled has to do with the version of Java the application uses. Browse the keys in Info.plist until you find the key named JVMVersion. If your Java application fails to work because it is using the wrong version of Java, you need to modify the JVMVersion value.
Tip
JVMVersion in Info.plist can specify an exact Java version, the newest version of a specific release, or a minimum release to use. Specify an exact release with a value that is just numbers and dots, such as 1.5.1. Specify the newest release of a specific version with an asterisk. A value of 1.4* uses the latest version of 1.4 (1.4.2 on my system). A value of 1.4+ uses the newest Java release available. On my system that is 1.6.0.
Icons on OS X are beautiful works of art. The first step in creating an icon for your application is to create various sized renderings of the art for your icon with either a raster art program like Photoshop or a vector drawing program such as Illustrator. After you finish your artwork, you assemble an icon using the Icon Composer application.
Until you fail to create your first stunning icon, you do not appreciate the time eye-catching icons take to design and implement. An image that looks great with endless detail at 512 pixels often looks like a blob of color at 32 or even 128 pixels. Designing an icon that looks good at 512 pixels and good at 16 pixels takes an enormous effort. On top of that, the icon must look good when dynamically sized to other odd sizes such as 149 pixels.
Just when you are pleased with a nice square icon that looks good at every imaginable size, your boss comes back and says, "Let's think outside the box." It is time to look at custom image masks that make your icon appear round, shaped like your company logo, or some really odd shape that only upper management truly appreciates.
Such is the life of an icon designer.
As a Java programmer working on OS X applications, you need to know the basics of icon creation. If you work for a large company, your company should find a graphic artist to create the final icons. You, as the programmer, need to understand enough mechanics of icon creation to explain to your graphic artist what she needs to provide for you to construct the icon.
Also, until you have final icon components from the artist, you need to create a temporary icon. From my experience, some folks have a tough time imagining how the application works if you merely say, "Pretend there is an icon that I double-clicked." In the following sections, I explain Apple's guidelines for icon creation, basic features of Photoshop, and basic features of Illustrator. Additionally, I give steps for creation of a quick-and-dirty icon as a placeholder until you have final art.
Apple provides extensive Human Interface Guidelines for the creation of application icons. In this section, I give a brief overview of the guidelines for creating icons that comply with Apple's Human Interface Guidelines.
Note
In Chapter 6, I explore more details of Apple's Human Interface Guidelines.
Note
Apple's Human Interface Guidelines for icons are located here:
http://developer.apple.com/documentation/UserExperience/
Conceptual/AppleHIGuidelines/XHIGIcons/XHIGIcons.html#//
apple_ref/doc/uid/20000967-TP6.
Beginning with OS X 10.5, Apple again pushed the envelope by demanding that icons look good at 512x512 pixels. A 16x16 hack job by an engineer is not going to cut it in the highly visual world of OS X. An icon that looks good at 512x512 requires an artist's hand.
As a programmer, be aware of the icon requirements for your project. When it comes time to do a little knowledge transfer with the icon designer, you need to let the designer know what art is needed and what is required for your family of icons to conform to Apple's guidelines.
Icons scale from 512x512 pixels to 16x16 pixels for OS X application icons. One icon is typically created from five icons of various sizes. The actual square icons that need supplying during icon creation are 512, 256, 138, 32, and 16. Creating a set of icons that act and appear as one icon requires a base image that works at 16x16 and then more detail for the larger icons.
Most good icons do not appear not square, even though they are. Some transparency makes icons stand out and lose their blocky feel. Transparency works for outlining the icon or adding shadows to the icon. Use a bit mask in your icons design avoiding boxy-looking icons.
Applications and files saved from the application should have icons with a specific perspective. Their icons should appear as though they sit or lay on a desk in front of you. Utility applications should appear to lay flat on the computer screen in front of you. The slight difference helps users determine what type of file or application they see, even when they are unfamiliar with the specific application.
Application icons communicate their function at a glance. Some applications are so abstract that an explanation through pictures is not possible, but most applications should display a picture that relates to the primary function of the product. For instance, chess programs often display a chess piece, and word processors display pen and paper or a typewriter. In some cases, an application-related logo is enough.
If your application is more of a utility with limited scope of use, then the colors of the icon should tend towards grays and feel less vibrant than other icons. Utility icons should look reserved, as if to say, "We mean business."
Tip
Get a good feel for the difference in utility application icons and normal application icons by comparing the icons of application in your /Applications/Utilities folder to the icons in your /Applications folder. Look especially close at Apple's pre-installed software for good examples.
Many complex applications come with supportive tools. For instance, many games come with level design tools. Supportive applications should have icons that integrate the icon of the main application that they support. Having related icons provides users with a visual clue that the applications are also related.
If your application saves files, the saved files should have icons related to the saving application. Typically, the base for a saved file's icon is a piece of paper with the top-right corner folded over. An image related to the saving application's icon should appear prominently on the paper to allow for quick identification of which application created the document. Also, the file type should be printed at the bottom of the paper icon.
Note
Java classes and JARs are treated as documents by OS X. Check the icon associated with both. Hiding the document status of JARs is the reason for bundling them as Java application packages.
Application plug-ins also have icons. In the case of application plug-ins, the icon should look like a cube building block with two sides and the top displayed. The left side should contain the application icon for the application that the plug-in is for. The right side of the block should contain the plug-in specific icon. The top surface should be connectors found on a building block.
Tip
The application, the files the application creates, and utility programs that support the primary application are all related. These related files and applications should share an icon theme that makes it obvious they are related.
Photoshop is an extremely powerful program. It has a huge number of features. Entire books and university classes exist teaching details of Photoshop's use. The few pages I include in this book about Photoshop do not give more than a glimpse of the power of Photoshop in the hands of a graphic artist.
You are likely a Java programmer. You are not expected to know the details of Photoshop's use or to perform the duties of a graphic artist. However, you need to know some basics about Photoshop so you can hold meaningful conversations with the actual artist explaining what is needed. Understanding a few basics of Photoshop facilitates knowledge transfer when it is time to get an artist to create icon images and other project art.
Also, having a temporary icon as a placeholder in your project or build scripts makes automation of builds easier. In this section, I explain important features of Photoshop and basic icon art creation with Photoshop. I explain assembly of the application icon later in this chapter.
Photoshop is a raster art program. Raster art programs create pictures with pixels. Photoshop has many advanced features that belong to the realm of vector art programs, but Photoshop is easiest to understand from the perspective of raster art programs.
Note
Vector art programs tend to scale images sizes better than raster art programs, which is why Adobe includes many features, such as type, as vector-based tools.
Create a new Photoshop document by selecting File

Select a meaningful name for your document. For instance, icon_512x512 for the largest icon art. Do not append a file type in the New document dialog box. Select the file type of your icon art when you save the Photoshop document.
When creating icon art, set the Preset drop-down to Custom. Set the width and height units of your document to pixels, and then set the width and height to 512, 256, 128, 32, or 16, depending on the image or mask that you are creating.
The color mode drop-down gives the options: Bitmap, Grayscale, RGB Color, CMYK Color, and Lab Color. Select RGB Color 8 bit with Background Contents of Transparent for the creation of your icon images. Bitmap and Grayscale are useful, too, if you are creating custom masks for your icon instead of just using the icon art's default transparency.
Warning
Do not use CMYK Color for creation of icon images. CMYK Color is targeted to printing and gives a more restrictive color palette than RGB Color. It is tempting to select CMYK over RGB, because it has more colors describing each pixel, but in this case, more is less.
Notice the floating toolbar, shown in Figure 5.6. Most of your image manipulation starts with this toolbar. At first glance, the floating toolbar contains 20 tools. However, every tool that has a triangle in the lower-right corner is actually part of a tool group. Select a tool, and then click and hold to see the tool's entire tool group, as shown in Figure 5.7.
If you check all the toolbar tool groups, you find a total of 59 separate tools. Most of those tools also have multiple properties that you can adjust. You have lots of options for tool use in Photoshop.
Don't let all those tools scare you. I explain the more useful tools in this section.
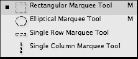
Three of Photoshop's tool groups target selection. The Shape Selection tool group, shown in Figure 5.8, selects circles, ovals, rectangles, and single columns or rows of pixels.
Tip
Add to the current selection by holding the Shift key while using a selection tool. Subtract from a current selection by holding the Option key while using a selection tool.
In Adobe Photoshop CS4, the Quick Selection tool and Magic Wand tool, shown in Figure 5.9, comprise another of the selection tool groups. The Quick Selection tool behaves like a combination of paintbrush and a selection tool. The Quick Selection tool is great for selecting swaths of related regions.
The Magic Wand tool selects a single color within a specified tolerance with a single-click. If you toggle contiguous off, then it selects a given color across the entire image instead of limiting the selection to touching pixels that match.
The most powerful group of selection tools is the lassos tool group, shown in Figure 5.7. There are three lassos: the Lasso tool, the Polygonal Lasso tool, and the Magnetic Lasso tool. All the lasso tools aid in outlining a selection until you close the selection. They are called lassos for that reason.
Use the base Lasso tool by holding down the mouse button and moving the mouse around freehand to select your outline. Releasing the mouse button stops the outline trace and closes the outline.
The Magnetic Lasso gravitates the outline you trace to any close edge. Releasing the mouse button does not close the outline. Instead, releasing the mouse adds a fixed point to the outline you trace. Click and hold the mouse to continue tracing. Double-click the mouse or continue the outline to the opening point of the outline to complete the outline and create your selection.
Create a selection with the Polygonal Lasso tool by single-clicking to create a selection outline. The selections are straight lines, which at first seem limiting. The Polygonal Lasso tool is the most precise of the three lassos. It becomes the most useful selection tool when you zoom in on an image to the point where you see individual pixels. If you need to create highly detailed selections quickly, the Polygonal Lasso tool is your best option. As with the other lassos, double-click at any time or single-click your initial point to close the loop and create your selection.
After you select part of an image, you can move it with the Move tool, shown in Figure 5.10. To drag an image selection with the Move tool, click and hold within the selected area and drag the selection to a new location. If you click and drag outside of the selection area, the entire image moves instead of just the selected area.
Behavior of the arrow keys differs depending on the tool type you select. If you use a section tool, the arrows move the selection marquee without moving the selected portion of the image. However, if you have selected the Move tool, the arrows move the selected portion of the image with the selection marquee.
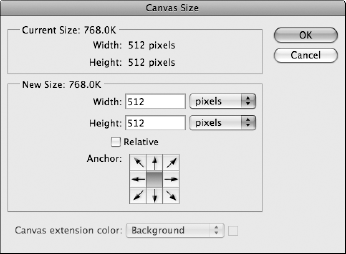
Crop your image using either the Crop tool, as shown in Figure 5.11, or the Canvas Size dialog box. The Crop tool is best for situations where the result does not need precise measurements. The Canvas Size dialog box works best when you know the exact width and height of the new image.
The Crop tool works like the Rectangular Marquee tool described previously. Select a corner of your desired image, and drag to the opposing corner of your desired image. The resulting selection crops to the new image size when you hit the Return key. If you want to adjust the crop area, select handles on the crop area boundary and drag the crop area boundaries to their new location.
Tip
To deselect a crop area, press the Esc key.
Open the Canvas Size dialog box, shown in Figure 5.12, from the Image
The Canvas Size dialog box's anchors determine where the cropping takes place. Each of the arrows points to the side of the image that the crop is measured from. By default, the center anchor of the Canvas Size dialog box is selected.
Tip
The Canvas Size dialog box allows you to increase the size of the image, as well as crop it. You also can crop the width while increasing the height or crop the height while increasing the width.
A closely related dialog box is the Image Size dialog box, shown in Figure 5.13. Open the Image Size dialog box by selecting Image
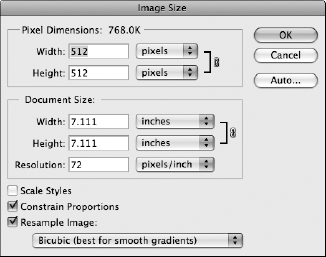
Select either pixels or percent for your width and height units in the Pixel Dimensions panel. While the Constrain Proportions check box is selected, the image scales without stretching. If you want to change the width or height independent of the other, just uncheck the Constrain Proportions check box.
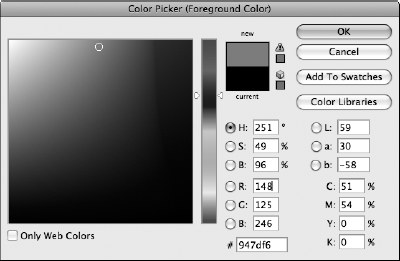
Photoshop always stores two active colors: a foreground color and a background color, as shown in Figure 5.14. Click either of the colors to bring up the Color Picker dialog, box as shown in Figure 5.15, which specifies whether it is for choosing the foreground color or the background color with a label in the dialog box's title bar.
To swap your foreground and background colors, click the double-headed arrow next to the color display on the toolbar. To reset your foreground and background colors to black and white, click the little black-and-white version of the colors on the toolbar.
Another option for selecting colors, other than the Color Picker, is the Eyedropper tool, shown in Figure 5.16. Use the Eyedropper tool to select a color that already exists in your image. The selection becomes the foreground color. However, swapping the foreground and background colors, as described earlier, works for setting your chosen color to the background color.
Brushes and pencils, as shown in Figure 5.17, are the quickest tools for freehand changes. These tools are especially popular with users of graphics tablets such as Wacom tablets. The most notable difference between a pencil tool and a brush tool is that the pencil has no gradient associated with its stroke, whereas a brush tends to have fuzzy edges.
Tip
Brush tools work best for touching up photos where lots of colors bleed together. Pencil tools work best at touching up text and other solid colors.
A common task assigned to application developers is quick fixes to images with stray pixels of the wrong color. Suppose, for instance, that Mr. Baus Mann intercepts you at the door at 6:30 PM on a Friday night and asks you to remove a speck of dust that has found its way into a "vital" image. (Of course, it can't wait for Monday.)
Here's how you make a quick touch up:
Open the image in Photoshop.
Use the Eyedropper tool to select the color needed for the touchup.
Zoom in on the speck of dust or other nasty aberration.
Usually you want to zoom in to the point that you can make out individual pixels. This allows you to avoid changing pixels that have not offended anyone. Zooming in and out is accomplished with the key combinations

Select the Pencil tool, and set the pencil size to 1 pixel.
Fix the offending pixels.
Another common task is combining images. Adding images to an existing image is almost just a cut and paste away. Usually an image also needs some resizing. Follow these steps to import images into Photoshop documents at your desired size and place them at your desired location:
Open the image you want to add to your existing Photoshop image with Photoshop.
You now have two images open.
Resize the image you want to add to the desired size and resolution. Use the Crop tool, Canvas Size dialog box, and Image Size dialog box to get the image ready for placement.
Copy the image for placement.
Paste the copied image into the working Photoshop image.
The image appears on a new layer above the existing image. (I explain layers shortly.)
Select the Move tool, and move the pasted image to your desired location.
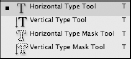
Yet another common task is adding words to your image. To add text to a Photoshop document, select either the Horizontal Type tool or the Vertical Type tool, as shown in Figure 5.18. Next, click the image to place the cursor. From that point, adding the text is similar to adding text in Word or TextEdit.
Tip
The active foreground color is the color of the text you type. Change the foreground color while typing to create multicolored text.
When adding text or pasting images to your Photoshop document, the new text or image drops onto a new layer, as shown in Figure 5.19. Layers separate Photoshop document features so they change when edited without affecting other additions to the image.
Think of layers in terms of overhead projectors. As you overlay transparencies on an overhead projector, the entire image displayed is a combination of all the transparencies on the projector. Layers work the same way.
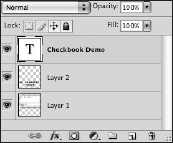
Select an individual layer to make it the active layer. Only the selected layer accepts changes. Combine all layers into one layer by flattening the image with the Layer
Assembling a temporary icon for your Java projects is a nice touch while you wait for a real graphic artist to create final icon artwork. Follow these steps to create basic 512x512 icon art, as shown in Figure 5.20:
Open your development application.
Possibly, the application runs only from inside Xcode or Eclipse at this point, but that is okay.
Using Grab, take a screen capture of a meaningful window in your application.
Screen captures are definitely frowned on for icon art, but this is for a temporary development icon.
Save the screen capture, and reopen it in Photoshop.
Resize the captured image to fit in a 512x512 image. Actually, make the image small enough to place some text under it in a 512x512 image.
Create a new 512x512 RGB Photoshop document.
I use Photoshop CS4 in this example. In other versions of Photoshop, menus and features may have slightly different names, but the process should be similar.
Paste your screen capture into the new document.
Move the document to the top portion of the document with the Move tool.
Use the Horizontal Type tool to place the name of the application under the screen capture.
Export your new image using File
Save for Web & Devices... menu item.
The GIF or PNG file format works well if you want to retain transparency when the image is used for creation of the temporary icon.

Tip
When using GIF files, icons in OS X are either transparent or not. The masks for icons are black and white only when made from GIFs. Icons made from PNGs have an opacity associated with them. The masks made from PNGs are scaled rather than black-and-white bit masks.
The next section describes using Illustrator. If you want to assemble an icon, just skip to that section. The Illustrator section covers similar material to this section with an Illustrator emphasis.
Like Photoshop, Illustrator is an extremely powerful program. It also has a huge number of features. Entire books and classes exist teaching details of Illustrator use. The few pages I include in this book about Illustrator do not give more than a glimpse of its power in the hands of an artist.
You are a Java programmer. You are not expected to know the details of Illustrator use or to perform the duties of the project graphic artist. However, you need to know some basics about Illustrator so you can hold meaningful conversations with the actual artist, explaining what is needed. Understanding a few basics of Illustrator facilitates knowledge transfer when it is time for an artist to create icon images and other project art.
Also, having a temporary icon as a placeholder in your project or build scripts makes automation of builds easier. In this section, I explain important features of Illustrator and basic icon art creation with Illustrator. I explain assembling the application Icon in the next section.
Illustrator is a vector art program. Vector art programs are good for creation of images that scale in size. Vector art programs, such as Illustrator, describe their art in terms of Bezier curves. No matter how large or small the images get, they stay exactly the same. That is the biggest draw of vector art programs.
Tip
Vector art programs such as Illustrator tend to scale images very well. However, the tremendous scaling involved in OS X icon art requires the project's graphic artist to create multiple pieces of art that work on different scales. If done properly, you may not even notice that the artist is providing multiple pieces of art instead of one piece of resized art.
On the down side, Icon Composer requires raster art such as PNGs or GIFs when constructing icons. Illustrator typically saves files in AI or EPS formats. These formats do not work directly with Icon Composer. Fortunately, Illustrator documents export very nicely to PNG file format.
When creating a new document in Adobe Illustrator, you have the options of Print, Web, Mobil and Devices, Video and Film, Basic CMYK, and Basic RGB document types, as shown in Figure 5.21. Don't let all these options scare you. They are basically all the same type of document. The real difference is in the height, width, unit of measure, and whether you are using RGB or CMYK.
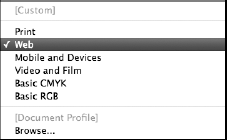
Choose Web for your New Document Profile, as shown in Figure 5.22. Choosing Web sets your color mode to RGB and your units to Pixels. You can just as easily choose Basic RGB. However, you then must change the unit to Pixels. Not a big deal, really.
Choose one artboard. One artboard is all you need. Think of artboards as pages of your document. For example, if you design a flyer with a front and back page in Illustrator, you set your artboards to two instead of one.
Note
A big difference between Photoshop and Illustrator is that the workspace in illustrator can contain many artboards, but Photoshop documents only contain one image. (I am ignoring channels and layers for simplicity.) Illustrator has a large scratch area around each artboard where items are placed if you do not want them on the artboard. This is very handy when assembling Illustrator artboards.
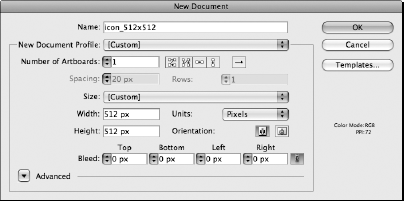
Set your Width and Height to 512 px when creating icons. Not too surprisingly, that means 512 pixels. If you are making one of the other icon images, adjust the pixel width and height accordingly.
Bleed should be left at zero. Bleed is used for print.
Let me explain bleeds. You have probably seen postcards or flyers where the picture goes all the way to the edge of the paper or card. In large press runs, if ink is printed all the way to the edge of the paper, it bleeds onto rollers. When the ink gets where it isn't supposed to be, it messes up the print job, smearing and duplicating onto parts of the paper it shouldn't be on. So, when printing to the edge of paper, what really happens is that a paper is chosen that is larger than the final size of the printed piece. The paper is then cut down to appear that the printing goes all the way to the edge of the paper. The print that was cut off is called the bleed.
We don't need bleed for icons.
After you have a new document created, you notice a toolbar as in Photoshop. This toolbar is more geared toward vector art than raster art, though.
The foundation of vector tools such as Illustrator is the Pen tool. Use the Pen tool to draw Bezier curves. The initial click with a pen sets a first anchor point. Each additional click sets another anchor point.
Illustrator defaults to straight lines between anchor points. To create a curve between anchors, click and drag out handles from your new anchor point. The position of the handles in relation to the anchors determines the curve touching that anchor.
Tip
Dealing with handles and anchors to generate curves takes some practice. If you remember any calculus, here's a head start. Think of your curves between anchors as functions. Visualize inflection points, minima, and maxima on that function. Place your anchors at those points. Also, your handles must always be tangent to your anchor points.
At the bottom of the toolbar are the Fill and Stroke icons. Fill and stroke have to do with closed polygons. For instance, if you create a square, the stroke is the outline's color. The fill is the interior of the square.
Note
Photoshop has background and foreground colors on the toolbar. Illustrator has a fill color and a stroke color. Fill and stroke are both foreground colors. The background color in Illustrator is always transparent.
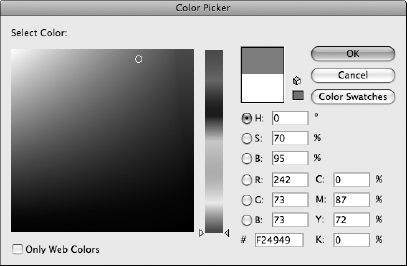
If you double-click the Fill or Stroke on the toolbar, you open the Color Picker, shown in Figure 5.23. For icons, you should use the RGB settings or enter the RGB hex number directly.
To the upper right of the Fill and Stroke icons is a double-headed arrow pointing at the Fill and Stroke. Clicking this icon swaps the Fill and Stroke colors of the currently selected shape.
To the bottom right of the Fill and Stroke icons is the Default Fill and Stroke icon. It looks like a smaller version of the Fill and Stroke icon. The default colors are black and white.
Importing images in Illustrator is called "placing" images. Select File
After the image is placed on the artboard, make sure you have the Selection tool chosen. The Selection tool is the black arrow. Use the Selection tool to resize the placed image. To resize the placed image while constraining proportions, do the following:
Select the image.
Selecting the image makes the corner anchors available for dragging.
Hold down the Shift key.
Drag the corner anchor until the placed image is the desired size.
As you drag the anchor, the current width and height of the image are displayed to make sizing simpler.
After the image is the desired width and height, use the Selection tool to move the image to your desired location. Notice that Illustrator gives you visual hints when the image is centered on the artboard.
Tip
The default measure shown generally in Illustrator is in points. Points are a common unit used in traditional printing. Change the default measure to pixels by selecting the menu command Illustrator
Handling text in Illustrator is easy. Select the Type tool for placing text. Click on or off the artboard to place your cursor. Finally, use the Selection tool to move the text to your desired location. Editing text in Illustrator is similar to using programs like TextEdit and Word. Look at the bar just under the menu bar for fonts, sizes, alignments, and other text settings, as shown in Figure 5.25.
While you wait for a graphic artist to make art for your project icon, create some basic art for temporary placement. Follow these steps for creating basic 512x512 icon art using Illustrator:
Open your development application.
Possibly, the application runs only from inside Xcode or Eclipse at this point, but that is okay.
Using Grab, take a screen capture of a meaningful window in your application.
Screen captures are definitely frowned on for icon art. That is okay for a temporary development icon.
Save the screen capture.
Open Illustrator.
Create a new document with a 512x512 artboard, and set the units to pixels and the color mode to RGB.
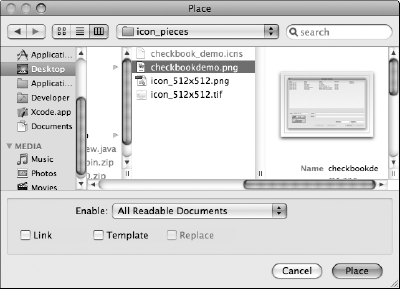
Place your screen capture in your Illustrator document. Open the Place dialog box by selecting the File
Place menu item.Resize the placed screen capture to fit in on the 512x512 artboard. Actually, make the image small enough to place some text under in a 512x512 image.
Move the document to the top portion of the artboard with the Selection tool.
Use the Type tool to place the name of the application under the screen capture on the artboard.
Export the image as a PNG using File
Export... menu item.The background is transparent by default when exporting Illustrator documents to PNGs.
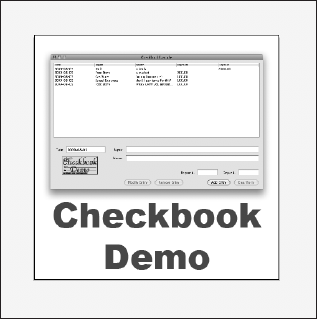
You now have an icon image, as shown in Figure 5.26. Creating an icon is explained in the next section.
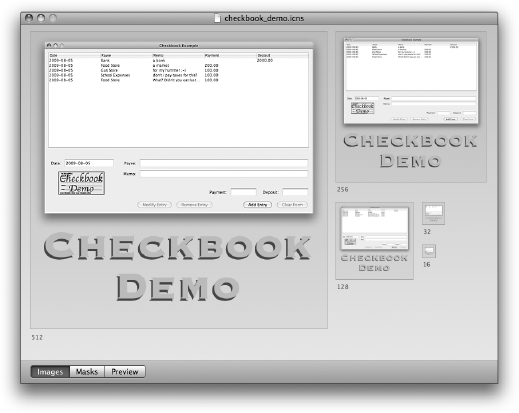
Creating the artwork for icons requires lots of talent. Assembling the finished icon does not. Even mask generation is automated. Create icons on OS X with Icon Composer, as shown in Figure 5.27. Icon Composer is in the directory /Developer/Applications/Utilities/.
Images and masks are added to an icon by dragging them to panels inside the Icon Composer. The available sizes are 512, 256, 128, 32, and 16. Usually, masks are pulled directly from the image transparency. Occasionally, you may want to customize the masks.
Warning
Be careful that any custom masks you create do not indicate opacity in areas where your image is not opaque.
After creating the icon, use the Preview tab at the bottom of Icon Composer to test the icon at a variety of sizes and on a variety of backgrounds. Be sure to test for these problems:
Manually resize the icon from largest to smallest size on a neutral background. Look for jittery transitions between icon sizes. The transform should be so smooth that a normal user does not realize the icon is created from multiple images.
View the icon on several backgrounds. The image should not blend into the background. If the image gets lost in the background, consider adding silhouettes to the icon that make it stand out on similar backgrounds.
Resize the icon from largest to smallest. Details should vanish from the icons, not just become smaller. A general rule is that if a detail becomes too small to be meaningful or understood, the detail should no longer be visible in the icon.
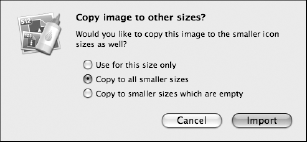
If you already have a 512x512 image, such as a GIF or PNG, to use for your icon, follow these steps to create the icon:
Open Icon Composer from the directory /Developer/Applications/Utilities/.
Drag the image onto the 512 panel.
This brings up a Copy dialog box, as shown in Figure 5.28.
Select Copy to all smaller sizes.
Click Import.
The image is automatically resized to fit all smaller sizes. Also, any transparency in the image is applied to the icon masks.
Use Icon Composer's Preview tab at the bottom of the screen to check your handiwork.
Save your new icon as an *.icns file.
Tip
Let Icon Composer generate masks automatically from your images. You rarely need to create custom masks.
Jar Bundler turns plain old JAR files into friendly OS X feeling application packages with minimal fuss. Jar Bundler is located in /Developer/Applications/Utilities/Jar Bundler.app. Jar Bundler is installed with your Xcode tools from your system install disk.
Jar Bundler does just that. It creates bundles out of JAR files. The first step in creating a bundle with Jar Bundler is creating a runable JAR file from your project. Add any resource files that make sense to your application JAR. You do not need to make your application JAR double-clickable. Leave libraries as separate JAR files, and add the libraries to your package using Jar Bundler.
Tip
If you want to automate the bundle creation of your application with a tool such as Ant, use Jar Bundler once to create a fully functional OS X application. Then strip it down and reassemble it using your build tool.
Alternatively, create your application with Jar Bundler, and then have your build tool directly modify your working package with new builds.
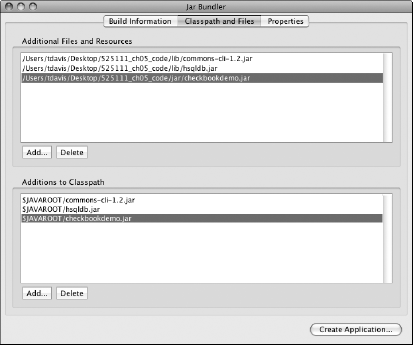
Jar Bundler has three tabbed views: the Build Information tab, the Classpath and Files tab, and the Properties tab. The Build Information pane handles main-class, application arguments, and Java version settings. With the Classpath and Files pane, you configure the main application JAR and associated library JARs used for the application. Using the Properties pane, set the JVM options, OS X properties, and Java properties that your application uses.
In the Build Information pane, set the main class for the application, arguments to pass the main class, the preferred JVM version, and a custom icon. To set the main class, simply type the fully qualified class name of the main class—in other words, the package name followed by the class name. Here's an example: com.genedavis.CheckbookDemo.
Arguments to main are command-line arguments that your application uses. These are different from the arguments passed to your Java VM. These are the args passed to
public static void main(String[] args) {}Note
Advanced Java applications often include Apache's Command Line Interface (CLI) library. CLI takes care of parsing command-line arguments in POSIX, GNU, Java, short and long styles. The Web site for the CLI API is http://commons.apache.org/cli/index.html.
The CLI API is available under an Apache style license.
Choosing a custom icon is pretty straightforward. I covered icon creation with Icon Composer earlier in this chapter. If you change your application icon and recreate the application bundle, the icon change does not always take right away. In cases where the icon does not change quickly, I recommend copying an image file into the application's Contents/Resource/ folder and then deleting the image file. That usually refreshes the bundle's icon so the application icon shows up properly in the Finder.
Tip
View the directory structure of an OS X application by Control-clicking (or right-clicking) the application and choosing Show Package Contents from the context menu.
The Build Information pane is shown in Figure 5.29. The JVM version setting in the Build Information pane's Options panel is easy enough, as long as you keep in mind the meanings of * and +. The asterisk means use the newest version of this JVM release. For instance, the setting of 1.5* refers to the newest Java 5 release and ignores Java 1.6 versions. The plus means use the newest JVM, but minimally this VM. So 1.5+ indicates that Java 6 should run your application, if it is the newest JVM on the computer, but never use Java 4.

After you create a JAR from your application and see that the associated libraries are also in the JAR, then you are ready for the Classpath and Files tab of the Jar Builder, shown in Figure 5.30. Add your JARs to the Additional Files and Resources panel using the Add... button. The $JAVAROOT path for the JAR files is added automatically to the Additions to Classpath panel.
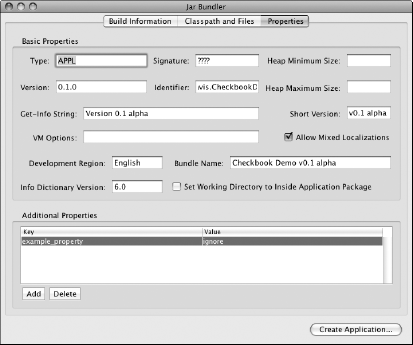
The Properties tab, shown in Figure 5.31, contains the JVM arguments, OS X properties, and Java properties needed by your application. Don't let the number of fields and properties on this pane deter you. Moving the mouse over any of the pane elements gives you context-sensitive help. Also, the default properties on this pane are often enough to get your development apps working.
Table 5.1 describes the properties available on the Properties tab of the Jar Builder.
Table 5.1. Jar Builder Properties Tab
Now that you understand Jar Bundler and how to make icons, it is time for you to create an application bundle. For this section, I have created the Checkbook Demo application to give you an idea of how a real application is configured with Jar Bundler. The pieces of the Checkbook Demo and the final application bundle are both on the book's Web site.
Note
The Ch05.zip file on the Web site contains the source files, classes, JARs, and the icon and images you need to complete the bundle in this section. Ch05.zip also contains an example of the bundled application.
The Checkbook Demo has the following features:
Command-line arguments targeting the application
Libraries contained in external JAR files
A custom icon
A target JVM
Images loaded at runtime
About and preferences JFrames associated with the proper applications MenuItems
A Bundle Name property differing from that of the Bundle's name
An embedded HSQLDB database targeting a
~/<user name>/Documents/directory
Note
HSQLDB is available from http://hsqldb.org/ under a BSD style license.
Now let's create the Checkbook Demo application bundle. The steps for creating the application icon are detailed earlier in the chapter. Modify the steps to suit your own development project:
Open Jar Bundler.
Jar Bundler is located in
/Developer/Applications/Utilities/Jar Bundler.app. You should be in the Build Information tab by default.Set the Main Class to com.genedavis.CheckbookDemo.
The Main Class is the same as the
main-classproperty specified to make a JAR double-clickable.Set the Arguments to Main to -f demo_checkbook.
These arguments are passed to the application's
main()method for parsing.Remember that the plus sign means "highest version of Java, but minimally this version."
Choose an icon.
Icon creation is detailed earlier in this chapter. You should find an actual artist to create the icon's art, but you can easily create temporary art for a placeholder icon.
Select the Classpath and Files tab.
Add the common-cli-1.2.jar, the hsqldb.jar, and the checkbookdemo.jar to the Additional Files and Resources.
These files are provided on the book's Web site. The Additions to Classpath is populated automatically as you add the JAR files to Additional Files and Resources.
Select the Properties tab.
Set the Version to 0.1.0.
Set the Identifier to com.genedavis.CheckbookDemo.
Set Get-Info String to Version 0.1 alpha.
Set Short Version to v0.1 alpha.
Set Bundle Name to Checkbook Demo v0.1 alpha.
Click the Create Application button.
Select a location on your hard drive to save the application bundle.
You now have a fully functional OS X friendly application bundle. You cannot save the Jar Bundler configuration. However, you can easily update the directories of an application bundle with an Ant build.
Note
I discuss details of Ant builds in Chapter 4.
Presumably, you now have a working OS X application bundle. The simplest approach to distributing your application is to zip it, stick it on a Web site or FTP site, and make the link available to your users. Remember that OS X applications are actually folder trees with many resources. Placing the application bundle in a zip file keeps all the application's resources together during distribution.
To zip the application bundle, from the Finder Control-click (or right-click) the bundle and select Compress <your app name>. Another option is to create the ZIP from the Terminal. Start by using cd to change to the bundle's directory, and type zip -r my_app.zip * to place the application in a zip file called my_app.zip. (If using *, make sure the application is alone in the directory, because everything in the directory is added to your zip file.)
If you are looking for a fancier distribution, then read on. This chapter covers several common approaches to distributing and installing OS X applications.
Tip
Get your application some publicity by submitting information about it to www.apple.com/downloads/macosx/submit/. The listing will appear on Apple's OS X download page.
OS X installations fall into two broad categories: simple drag-and-drop installations and installer-based installations.
If your application does not require an installer, keep it simple with a drag-and-drop installation. If you have a basic application in a bundle that is completely self-contained, then there is little need for a custom installer. However, even with simple application bundles, it is convenient for the Applications folder alias to appear immediately next to the bundle your user wants to install.
More complex installations may require startup items added to the computer, user templates for application documents, multiple application bundles with tools supporting the main application, user editable property files, installation of command-line tools, and even system-wide OS changes such as to properties.
Simple installations of the drag-and-drop variety often use DMGs. DMGs are disk images. Double-clicking a DMG results in a virtual disk mounting on your desktop. Your application bundle is in the newly mounted disk (maybe with a Read Me file) and is dragged by the end user to the /Applications folder.
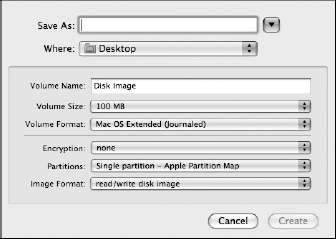
Apple recommends compressed disk images as the preferred application distribution method. Create disk images with the Disk Utility application. Follow these steps to create a new disk image with Disk Utility:
Double-click Disk Utility, which is located in /Applications/Utilities/.
Create a new disk image by clicking the New Image icon at the top of Disk Utility, which opens a configuration dialog box, as shown in Figure 5.32, for your new disk image.
Name your *.dmg in the Save As text box.
Name your mounted volume by placing the mounted volumes name in the Volume Name text field.
Usually, the volume name and filename are similar, if not the same.
Customize any of the dropdown configurations that fit your project.
The other configuration options are pretty much self-explanatory. However, make sure the Volume Size is large enough to hold your application. If you require your end user to enter a password to decrypt your image, then add encryption.
Click the Create button.
You now have an empty mounted disk image on your Desktop.
Note
Apple has an excellent resource document on application distribution at this site: http://developer.apple.com/documentation/Porting/Conceptual/PortingUnix/distributing/distibuting.html.
Tip
Don't worry about making a disk image that is bigger than your application needs. The DMG file compresses, taking only the disk space actually needed for your installation.
Set up your new disk image with a drag-and-drop installation. The goal is to have your application bundle and an alias to the /Applications directory on the new disk image. The background of the disk image root folder should contain an explanation to the end user that he needs to drag the application to the /Applications alias.
Follow these steps to set up the disk image:
Drag a copy of your application bundle to the new disk image.
Make an alias of the /Applications folder.
Drag the alias to the new disk image.
Rename the Applications alias folder to Applications.
Add your background image to the disk image.
Usually, resources the user is not meant to see are placed off-screen so they become visible only through scrolling.
Control-click (or right-click) the background of the disk image folder.
Select Show View Options from the context menu.
Set the background image of the disk image to a drag-and-drop graphic.
This is the image you added to the disk in Step 5.
Tip
Programmers often create a background image for the installation DMG that contains a large arrow pointing from the application to the Applications folder alias. The arrow usually is accompanied by a terse statement, such as "Drag <app name> to Applications folder."
The final task in creating your distribution DMG is converting it to a read-only volume. Follow these steps:
From Disk Utility, select the mounted DMG.
Select Convert... from the Images menu.
Set the Image Format to read-only.
Save your image.
That's all there is to creating fancy drag-and-drop installations. In the next sections, I explain general information about PackageMaker installations and izPack installations.
Though drag-and-drop is the preferred installation method, it is not the only option on OS X. Apple also provides PKG files. PKG stands for Package. Several types of bundles on OS X are called packages (with a lowercase p), but only PKG folders are called Packages (with an uppercase P). In this book, I call Package bundles PKGs exclusively to avoid confusion with the broader term package.
PKG folders bundle all the resources necessary to install an application. The only thing PKG folders don't contain to install an application is the actual installation application. Instead, when you double-click a *.pkg, OS X starts the Installer.app. Installer understands PKGs and uses the contents to guide your end users through the installation process.
Oddly enough, the Installer application does not create PKGs. That task falls to PackageMaker, shown in Figure 5.33. PackageMaker is found in /Developer/Applciations/Utilities/.
Warning
Be careful when creating PKGs. An improperly created PKG can at the very least lead to an unusable application, but at the worst it can cripple the end user's computer. Nothing shuts down a software company quicker than "bricking" a few customers' computers.
Note
A wonderful PackageMaker tutorial by Stéphane Sudre is located at http://s.sudre.free.fr/Stuff/PackageMaker_Howto.html
Note
The PackageMaker User Guide is found at the Apple Web site at http://developer.apple.com/DOCUMENTATION/DeveloperTools/Conceptual/PackageMakerUserGuide/Introduction/Introduction.html
Upon opening PackageMaker, you see a dialog box requesting your organization and minimum target OS version. As a Java developer, your organization is your root package name, something like com.yourcompanydomain.
PackageMaker is a feature-rich installation creation tool. PackageMaker provides customization of every step of your installation process. When you have finished configuring your installation, click the Build icon at the top of the main PackageMaker window to create your final PKG bundle.
Many Java applications are customized and distributed to platforms besides OS X. If your project is one of these, then izPack is a good choice for your project. izPack is a pure Java cross-platform installer that works well with OS X. It also supports i18n (internationalization) with 10 languages currently supported.
Note
izPack is available under an Apache style license from izpack.org.
izPack emphasizes scripted builds, especially with Ant or shell scripting. Create builds in izPack as XML description files. After the XML installation description is completed, compile your build with izPack's compile command. Because izPack supports both shell scripting and Ant, integration with Xcode and other popular Java IDEs is possible.
Note
Chapter 4 discusses shell scripting, Ant, and XML, which are all useful when creating izPack installations.
As I mentioned earlier, izPack installations are compiled from XML installation description files. Special XML tags in the description file indicate the location of resources associated with the installation. Resources include license agreements, images, and data files.
Two installation types are supported by izPack. The traditional approach is the single file approach. izPack creates a single JAR file as an installer. The JAR file contains all the resources needed to complete the installation. In many cases, this works fine.
The other izPack installation solution distributes the installation between a local JAR installation program and the Internet. The resources in this option exist on the Web. izPack pulls the resources from the Web as needed. Depending on the user's customizations of his installation, this solution results in optimized downloads that waste less bandwidth.
Now you may think to yourself, "A JAR-based installer isn't very Mac-friendly." (If you actually thought that, give yourself a gold star!) Not to worry. Not only can you use Jar Bundler (described earlier in this chapter) to convert izPack installation JARs into user-friendly applications, but izPack comes with a tool specifically made to do the same thing. The name of the utility is izpack2app, which copies your installation JAR into a preexisting application bundle. So whether you use izpack2app or Jar Bundler makes no difference.
This chapter is about application bundle creation and installations. Bundles are not always packages, but packages are always bundles. Packages, such as application bundles, appear to the user as though they are single files. Application bundles are folders that contain all the resources an application needs to run.
Apple's Human Interface Guidelines for application icon creation are very specific about acceptable styles of application icons. I explain the guidelines and the use of Icon Composer for the assembly of OS X icons. Both Photoshop and Illustrator are common tools of choice when creating icon artwork. You can create a temporary icon for use with nightly builds until you have final artwork from your company's graphic artist.
You assemble Java applications into full-fledged OS X application bundles with Jar Bundler. After bundling, four types of common installations are used to deliver those applications to end users. They are ZIP'ed bundles, drag-and-drop DMGs, PKG installation bundles, and the cross platform installer izPack.