
Advanced programmers take the Terminal seriously. Working from the command line is not suited to every programmer's taste. I know several excellent programmers who avoid the command line whenever they can. However, dismissing the Terminal environment entirely removes an important tool from your repertoire.
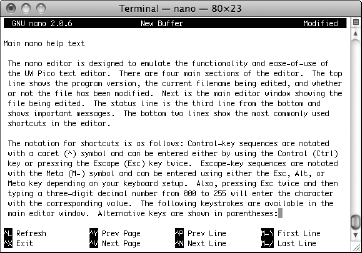
Games, editors, utilities, and just about every type of application imaginable are available for the Terminal. Many programmers and system administrators refuse to code outside of the command-line editor's emacs and vi. For quick edits from the Terminal, nano, shown in Figure 11.1, makes a great tool. The point is that Terminal applications' use and development are popular on OS X and in the Unix world.
If you spend much time working in the Terminal, you quickly find Terminal applications performing tricks you never dreamed of trying with System.out.println(). Advanced Terminal applications regularly hide passwords as they are entered, change the foreground and background colors of text, manipulate the positions of cursors, and clear the Terminal of unwanted text. Truly impressive Terminal applications even provide menu systems and pop-up dialog boxes within the Terminal window.
Usually, introductory Java books and classes skip past complex Terminal application programming, sticking mostly with basic System.out.println() calls. When using ANSI escape sequences, System.out.print() and System.out.println() become powerful tools. Even the basic System.out.print() method can produce colored and stylized Terminal output.
When you are ready to create dialog boxes and menus, a little JNI makes them available through the ncurses library. The most advanced user interfaces for the Terminal are created using ncurses.
Note
Many programmers refer to Terminal applications as "console" applications. On OS X, the Console is an application used to capture logged errors and other output. If you find yourself in a crowd of non-OS X Unix geeks, realize that their "console" is usually synonymous with your "Terminal" and you'll fit in just fine.
Before continuing, keep in mind that the Terminal is not meant as a rich GUI development environment. If you put too many bells and whistles into your Terminal applications, shell geeks will be turned off to your application. Terminal applications should be clear and clean. Do not treat your terminal applications as remedial GUI applications. Design your terminal applications as no-nonsense interfaces.
ANSI Escape Sequences are the basis of good command-line utility interfaces. ANSI Escape Sequences provide commands for moving the position of the cursor on the Terminal, as well as changing the foreground and background colors of text. ANSI Escape Sequences even provide a code for the dreaded blinking text.
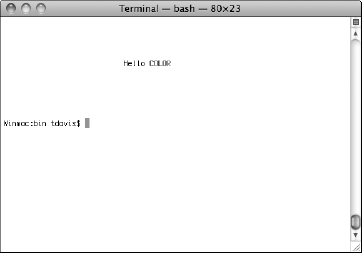
Figure 11.2 shows a simple System.out.println() printing to a custom Terminal location and in multiple colors. I bet no one told you System.out.println() could do that!
Note
All the source code for the examples in this chapter is available on the book's Web site.
The application is called AnsiDemo, and it gives a hint at what you can accomplish with a simple System.out.println(). Don't worry too much about the details at this point. I explain how escape sequences work in detail later in the chapter.
This is the source from AnsiDemo.java:
public class AnsiDemo {
   public static void main(String[] args)
   {
      char esc = 27;
      String clearScreen = esc + "[2J";
      String position1 = esc + "[5;29H";
      String position2 = esc + "[10;1H";
      String color1 = esc + "[30;0m";
      String color2 = esc + "[31;1m";
      String color3 = esc + "[32;1m";
      String color4 = esc + "[34;1m";
      String color5 = esc + "[35;1m";
      String color6 = esc + "[36;1m";
      String reset = esc + " [0m";

      System.out.println(
            clearScreen +
            position1 +
            color1 +
            "Hello " +
            color2 +
            "C" +
            color3 +
            "O" +
            color4 +
            "L" +
            color5 +
"O" +
color6 +
"R" +
reset +
position2);
}
}No special libraries are needed for displaying the colors above. Also, no special libraries are needed for repositioning text or clearing the screen. The Terminal is configured to understand the set of ANSI Escape Sequences that I use in this application.
Before moving on to diehard ANSI Escape Sequence usage, review the Terminal preferences. Behaviors set in the Terminal Preferences window can make or break the usefulness of many command-line utilities.
Command-line environments use different configurations. Typically, when programming specifically for OS X, you get a standard default Terminal configuration. Having one standard Terminal makes writing native OS X Terminal applications much easier than programming for unknown command lines offered by other vendors. If you program Terminal applications for DOS or Linux, the set of ANSI Escape Sequences varies. In fact, the entire ncurses library was written to transparently handle the differences between terminals on different operating systems.
I return to a discussion of ncurses later in this chapter.
Occasionally, you may use a Terminal application remotely that does not map exactly to the behavior of your local machine. The Terminal provides a rich set of preferences for supporting customizations to the Terminal. You can customize the look and feel, behavior, and even the encodings supported by the Terminal on your Mac.
Open the Terminal's Preference window by selecting Terminal
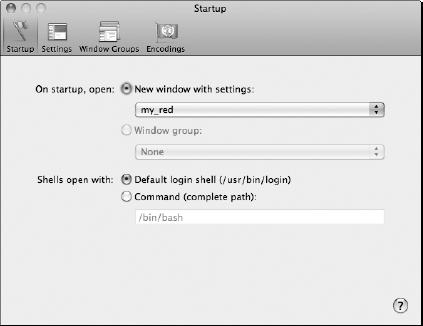
Choose the Settings tab, shown in Figure 11.4. The Settings tab displays the preset color schemes for the Terminal. You'll find some very attractive color schemes here. However, if you choose to create your own, just click the add button (+) at the bottom of the window.
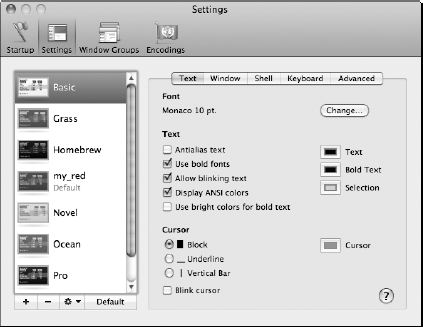
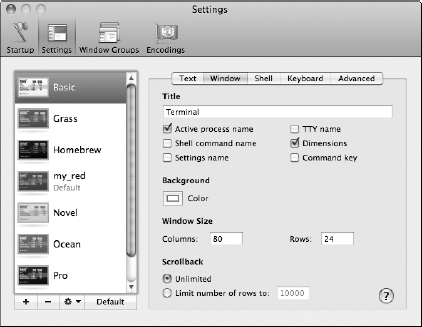
Select the Text tab if it is not already selected, as shown in Figure 11.4. The Text tab of the Settings window contains font preferences, text coloring preferences, and cursor preferences. You can even change the color of your cursor.
Choose the window tab of Settings, as shown in Figure 11.5. This panel configures the default window size, places useful information in the Terminal title bar, and configures the scrollback. Having unlimited scrollback is useful when debugging scripts and long builds.
Warning
The standard Column count expected by command-line tools is 80. Changing the default size of the Terminal window may make some older command-line utilities display improperly.
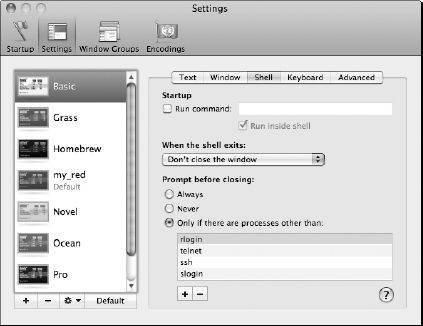
Choose the Shell tab of the Settings preferences, as shown in Figure 11.6. This window allows you to set the closing prompts. Even more interesting is the option of running a command on Terminal startup.
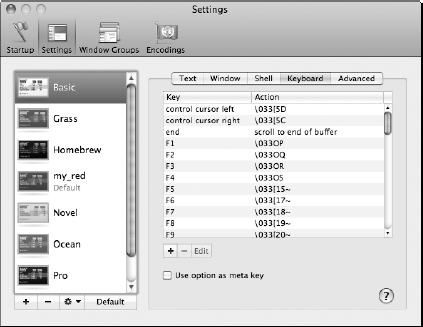
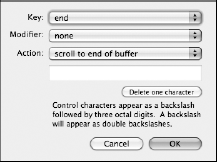
Choose the Keyboard tab of the Settings tab, as shown in Figure 11.7. This panel allows you to modify the default actions of common keyboard keys. For instance, if you use a Terminal application at work that maps F1 differently, modify the action of that key here by double-clicking the row. The dialog box for modifying individual keys is shown in Figure 11.8.
Perhaps the most useful feature on this page is the check box that sets the Option key to work as your meta key. Several Terminal applications, such as emacs, require the use of a meta key combination, which is similar to a Command- or Control-key combo. Normally on OS X you need to use the Escape key as your meta key. The Escape key is far from the normal reach of your pinky, so using the Escape key as a meta key is very distracting. It disrupts your workflow when using command-line utilities.
The fix is simply to click the "Use option as meta key" check box in the Terminal Preferences' keyboard preferences.
Choose the Advanced tab in the Settings preferences, as shown in Figure 11.9. The Advanced tab is at the heart of making the Terminal behave correctly with remote command-line applications. The Emulation section contains a drop-down list allowing you to select how your terminal is declared. You have these choices:
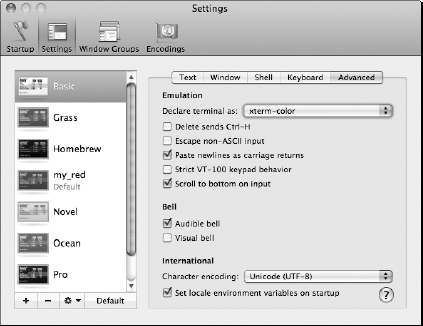
This set of preferences also allows you to set the keypad behavior and the beep (also officially called the "bell") behavior. Also, changing the international character encoding is available with many quick choices including these:
Unicode (UTF-8)
Western (Mac OS Roman)
Western (ISO Latin 1)
Western (ISO Latin 9)
Western (Windows Latin 1)
Western (ASCII)
Western (NextStep)
Japanese (Mac OS)
Japanese (ISO 2022-JP)
Japanese (EUC)
Japanese (Shift JIS)
Korean (EUC)
Cyrillic (ISO 8859-5)
Russian (DOS)
Cyrillic (Windows)
Cyrillic (KOI8-R)
Simplified Chinese (GB 2312)
Central European (ISO Latin 2)
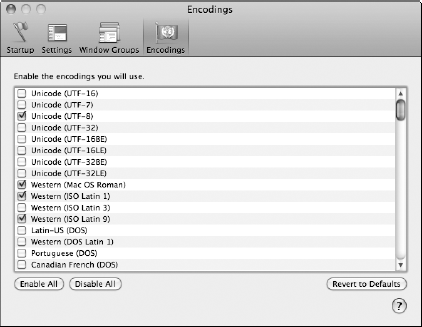
By clicking the Customize Encodings List at the bottom of the drop-down, you open the Encodings tab of the preferences, as shown in Figure 11.10.
Tip
If you are working in a session of emacs, vi, or nano, either locally or remotely, and the Delete key is not working properly, try toggling the "Delete sends Ctrl-H" check box in the Advanced tab of the Settings area of Terminal Preferences. Sometimes this simple click saves you lots of hassle.
Now that you have reviewed the Terminal preferences affecting console applications and ANSI escape sequences, you are ready for a better explanation of the sequences.
ANSI escape sequences affect color and position of text in terminals. The escape sequence typically takes the form ESC+[ followed by one or more numbers and ended by a letter. For example, the following code produces a green color:
ESC[32m
Placing the escape character in a string is a bit problematic. Java does not have an escape sequence to represent the escape character. Luckily, escape is easily represented as a char. The char value of escape is decimal value 27. Instead of adding the escape character directly into a String, you can set a char to the value of the escape value and then add the char to the String.
Note
Escape in hex is 0x1b. In octal, the escape character is 033.
Using the escape sequence for green text that I mentioned earlier (ESC[32m), here is the code for creating the escape sequence as a Java String:
char ESC = 27
String CSI = ESC + "[";
String green = CSI + "32m";
Notice that I named the variable containing ESC+"[" CSI. CSI is the formal name for the beginning of the escape sequence. CSI stands for Control Sequence Introducer. It is called a Control Sequence Introducer because the character combination of ESC+[ flags the character set as a control sequence.
Note
Sometimes ASCII code 155 is used as a CSI instead of the ESC+[ characters used in this chapter. Code 155 is not as widely supported, so I avoid its use.
When setting a color for text in the Terminal, the setting is usually needed only for a word or phrase. After the word or phrase prints, you want the color to change back to the original default the user prefers seeing. This code is used for resetting the color of text printing:
ESC[39m
In Java code, this escape sequence reverts to default printing:
char ESC = 27
String CSI = ESC + "[";
String resetColor = CSI + "39m";
Call the reset on colors before changing to a new color. In pseudo code, setting colored text with System.out.print() might look something like this:
set ansi color
print text
reset ansi color
set another ansi color
print text
reset ansi color
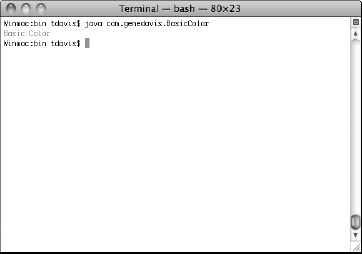
In case any of the escape sequence description is confusing, I include a sample program called BasicColor. BasicColor prints the phrase "Basic Color" in green and then resets the text color to the default user color, as shown in Figure 11.11.
The following source is the code for BasicColor.java:
package com.genedavis;
/**
 * Run this class from the Terminal in OS X
 * to see "Hello Color!" in green
 *
 * @author T. Gene Davis
 */
public class BasicColor {
   public static void main(String[] args)
   {
      // ASCII ESC+"[" is known as a
      // Control Sequence Introducer (CSI)

      final char ESC = 27; // in unicode ... u001B
      final String CSI = ESC + "[";

      // Changes the Terminal color to green
      String green = CSI + "32m";

      // Resets the Terminal color to default
      String reset = CSI + "39m";

      // 1. set foreground color to green
      // 2. print Hello Color!
      // 3. reset the foreground color
      System.out.println(
            green +
"Basic Color" +
reset);
}
}
Warning
Don't forget to reset the text colors to the user's default color scheme. Forgetting to reset the Terminal colors will annoy your users.
The base colors for ANSI-compliant terminals are limited to black, red, green, yellow, blue, magenta, cyan, and white. The values for the colors are 30-37. These colors have normal and bright versions, doubling the total colors available.
Explicitly choose the color brightness of a color by appending ;0m or ;1m instead of just m to the color escape sequence. The ;0m extension explicitly sets colors to their normal version. The ;1m extension explicitly sets colors to their bright version.
For instance, this code sets the Terminal color to normal red:
ESC+[31;0m
This sequence of code sets the Terminal color to bright red:
ESC+[31;1m
In Java, the two versions of red look like this:
char ESC = 27;
String CSI = ESC + "[";
String normalRedColor = CSI + "31;0m";
System.out.print( normalRedColor );
and
char ESC = 27;
String CSI = ESC + "[";
String brightRedColor = CSI + "31;1m";
System.out.print( brightRedColor );
When using bright colors, resetting the color with CSI+"39m" does not completely reset the color of text to its original color. Instead, you get a bright version of the user's color. To work around this, use the code CSI+"39;0m", which resets the user's text color and sets the color to the normal brightness.
Tip
ANSI escape sequences define bright, normal, and faint versions of colors. OS X's Terminal does not support faint versions of color escape sequences. Most operating systems do not support the faint-colored escapes.
Tip
Another way to reset the text color is the ANSI escape sequence ESC+[0m. The ESC+[0m sequence resets all modified attributes, not just color.
Text colors come in two varieties: foreground and background. Foreground colors change the color of the text itself. Background colors change the color surrounding the text. This is similar to the behavior of foreground and background colors in the AWT, except that background colors are localized to the text drawn with them. In AWT code, background colors usually affect an entire panel instead of a localized region.
Normal intensity background colors are specified with ESC+[40m thru ESC+[47m. Bright background colors are specified with ESC+[100m thru ESC+[107m.
For example, the following code sets the background to bright green:
char ESC = 27;
String CSI = ESC + "[";
String brightGreenBackgroundColor = CSI + "102m";
System.out.print( brightGreenBackgroundColor );
In this section, I present tables showing Java code for the ANSI escape sequences I have discussed to this point. Remembering the codes for all the foreground and background colors is a bit intimidating until you have the pattern memorized. I provide tables listing the colors and related sequences to make your life easier.
Table 11.1 contains the Java code necessary to use the normal ANSI color escape sequences. Earlier in the chapter, I provided a code snippet similar to this:
char ESC = 27;
String CSI = ESC + "[";
String yourColor = CSI + "31;0m";
System.out.print( yourColor );
The variable yourColor contains the control sequence for setting the Terminal text color. Replace CSI+"31;0m" from this example with the following sequences, setting the yourColor variable to your preferred sequence.
Table 11.1. Normal Foreground ANSI Colors for Terminal Text
Sequence | Description |
|---|---|
CSI+"30;0m" | Normal black foreground |
CSI+"31;0m" | Normal red foreground |
CSI+"32;0m" | Normal green foreground |
CSI+"33;0m" | Normal yellow foreground |
CSI+"34;0m" | Normal blue foreground |
CSI+"35;0m" | Normal magenta foreground |
CSI+"36;0m" | Normal cyan foreground |
CSI+"37;0m" | Normal white foreground |
Table 11.2 details the Java code necessary to set your escape sequences to bright colors. Again, replace the code for setting yourColor with the sequence from the table to produce the desired text attributes.
Table 11.2. Bright Foreground ANSI Colors for Terminal Text
Sequence | Description |
|---|---|
CSI+"30;1m" | Bright black foreground |
CSI+"31;1m" | Bright red foreground |
CSI+"32;1m" | Bright green foreground |
CSI+"33;1m" | Bright yellow foreground |
CSI+"34;1m" | Bright blue foreground |
CSI+"35;1m" | Bright magenta foreground |
CSI+"36;1m" | Bright cyan foreground |
CSI+"37;1m" | Bright white foreground |
Table 11.3 details the Java code necessary to set your escape sequences for background colors. Replace the code for setting yourColor from earlier in this section with the sequence from the table to produce the desired escape sequence.
Table 11.3. Normal Background ANSI Colors for Terminal Text
Sequence | Description |
|---|---|
CSI+"40m" | Normal black background |
CSI+"41m" | Normal red background |
CSI+"42m" | Normal green background |
CSI+"43m" | Normal yellow background |
CSI+"44m" | Normal blue background |
CSI+"45m" | Normal magenta background |
CSI+"46m" | Normal cyan background |
CSI+"47m" | Normal white background |
Table 11.4 details the Java code necessary to set your escape sequences for bright background colors. Replace the code for setting yourColor from earlier in this section with the sequence from the table to produce the desired escape sequence.
Table 11.5 details Java code necessary to set additional escape sequences for text manipulation. Again, replace the code for setting yourColor from earlier in this section with the sequence from the table to produce the desired escape sequence. Also, because these are not actually colors, you might want to change the variable name. Use the sequence CSI+"0m" to universally reset all modified attributes.
Table 11.5. Additional ANSI settings for Terminal Text
Sequence | Description |
|---|---|
CSI+"0m" | Resets all attributes to user's default |
CSI+"39m" | Resets foreground without resetting brightness |
CSI+"39;0m" | Resets foreground and sets brightness to normal |
CSI+"1m" | Sets font intensity to bright (bold text) |
CSI+"4m" | Underlines text |
CSI+"5m" | Blinks |
CSI+"7m" | Turns negative on (visually pleasing highlight) |
CSI+"8m" | Turns conceal on |
CSI+"22m" | Sets font intensity to normal |
CSI+"25m" | Blinks off (Make it stop!) |
CSI+"27m" | Turns negative off |
CSI+"28m" | Turns conceal off |
Entering passwords is a common task. Users do not appreciate having passwords visibly echoed. Many work, school, and public environments allow people to see what is typed on a screen, so most programs hide typed passwords.
Terminal applications are no different. Terminal applications prevent onlookers from reading passwords off the screen as users type them. One method for obscuring passwords is to set the foreground and background colors to the same value. This way, when the user types her password, bystanders cannot read the value off the screen.
As it turns out, the Terminal already supports a shortcut for concealing the display of text, including passwords. In Table 11.5, I introduced the "conceal on" (ESC+[8m) and "conceal off" (ESC+[28m) escape sequences. Conceal on sets the current Terminal background color to the same color as the current foreground color, thus rendering the text unreadable by onlookers.
I provide a short application called Conceal demonstrating the use of conceal on and conceal off. The following code is the source for the file Conceal.java.
package com.genedavis;
/**
* Conceal hides text from view. Cutting and pasting
* the text into TextEdit reveals the hidden text.
*
* @author T. Gene Davis
*/
public class Conceal {
public static void main(String[] args) {
// ASCII ESC+"[" is known as a
// Control Sequence Introducer (CSI)
final char ESC = 27; // in unicode ... u001B
final String CSI = ESC + "[";
// Hides printed text
String conceal = CSI + "8m";
// reveals printed text
String reveal = CSI + "28m";
// 1. set conceal
// 2. print Hidden text
// 3. set reveal
System.out.println(
"-->" + conceal +
"Hidden text" +
reveal + "<--");
}
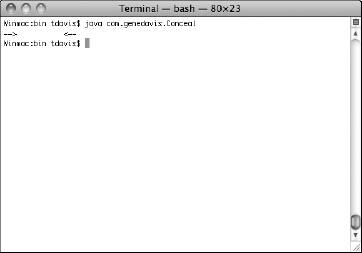
}Figure 11.12 shows the output of Conceal.java. Visually, the Conceal class prints the following:
--> <--
If you cut and paste the entire line into a text editor such as TextEdit, you quickly see that the hidden text is still printed. The System.out.println() text is still echoed to the Terminal, but it is invisible to onlookers.
Printing invisible text has purpose. When a terminal ANSI escape sequence for conceal is entered, it not only affects printing, but it also affects anything typed by a user. This includes passwords.
Here is another Java example using the conceal escape sequence. This class is named PasswordEntry and actually conceals the text typed by the user. The text is presumably a password that needs obscuring:
package com.genedavis;
import java.util.Scanner;
public class PasswordEntry {
   public static void main(String[] args) {
      // ASCII ESC+"[" is known as a
      // Control Sequence Introducer (CSI)

      final char ESC = 27; // in unicode ... u001B
      final String CSI = ESC + "[";

      // Hides printed text
      String conceal = CSI + "8m";

      // reveals printed text
      String reveal = CSI + "28m";

      // prepare to read the password
      Scanner scan = new Scanner( System.in );
      String password;
// request the password and conceal the system in
System.out.print(
"Enter your password: " +
conceal );
password = scan.nextLine();
// reveal Terminal type again and share
// the password with the world
System.out.println(
reveal +
"Your password is ... " +
password );
}
}In the PasswordEntry program, I set CSI with ESC+[. I create Strings representing conceal on and conceal off with CSI. Next, I print a request for a password, after which I print the conceal escape sequence. While the Terminal is concealing text, I capture the typed password. When the password is entered, I print the code for turning conceal off in the Terminal. All this results in a Terminal looking something like Figure 11.13.
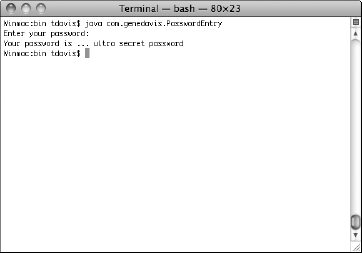
Figure 11.13. Results of running PasswordEntry in Terminal, when your entered password is "ultra secret password"
Warning
Don't forget to turn conceal off with code ESC+[28m or ESC+[0m. Failing to do so will irritate your users, as they will not be able to see anything they type or anything your program prints.
Another common approach to entering passwords in Terminal applications is using the Console class. The Console class contains two methods specifically for collecting passwords from users:
public char[] readPassword()
public char[] readPassword(String fmt, Object... args)
Both methods turn off echoing, so they are more secure than using the conceal escape sequences. The Console class was introduced in Java 1.6.
ANSI escape sequences do much more than make colored text and hide passwords. Properly used, entire Terminal User Interfaces can be designed using ANSI escape sequences. You still need to learn the art of clearing the Terminal, hiding the cursor, and moving the insertion point around the view area. After you have these tasks down, I explain the creation of Terminal User Interfaces from scratch. Near the end of the chapter, I discuss creation of UIs using Charva and ncurses.
Soon I explain moving the insertion point to any visible portion of the Terminal window. If text is there already, you want the text erased before printing new strings. Depending on your task, you may want to clear entire rows of text, partial rows of text, entire screens, or partial screens. Table 11.6 shows the complete selection of clear codes for the Terminal on OS X.
The pattern for using these codes is similar to the pattern I discussed earlier in the book:
Create an ESC char.
The ASCII code is 27. Simply assigning the decimal number
27to acharturns out to be a clean and simple way to create thischar.Combine the ESC char with
[to create the CSI.CSIs are Control Sequence Introducers. ESC+[ is the most common ANSI escape sequence initiator.
Create the sequence, and store it in a String for printing.
Variable names tend to make more sense than escape sequences when reading through code.
This code snippet creates the escape sequence for clearing the Terminal window. After creating the escape sequence, it prints the sequence and clears the Terminal:
char ESC = 27;
String CSI = ESC + "[";
String clearTerminal = CSI + "2J";
System.out.print( clearTerminal );
Until this point, all the escape sequences ended in m. Most escape sequences do not end in m, so don't forget to check what letter the sequence you use actually should end with.
Warning
Remember to use System.out.print() rather than System.out.println() when printing ANSI escape sequences, or you end up with extra unwanted new lines in your display.
Warning
Clearing the Terminal does not remove the text in the Terminal. Instead, it normally scrolls the text off the screen. Never assume that clearing the screen removes sensitive information. Closing the Terminal is the only way to ensure that sensitive information is removed.
Table 11.6. Line and Screen Clearing Sequences
Sequence | Description |
|---|---|
CSI+"0J" | Clears from current cursor position to the end of the Terminal view |
CSI+"1J" | Clears from current cursor position to the beginning of the Terminal view |
CSI+"2J" | Clears the entire Terminal view |
CSI+"0K" | Clears from current cursor position to the end of the same line |
CSI+"1K" | Clears the current line of text before the cursor from the Terminal view |
CSI+"2K" | Clears the entire line of text from the Terminal |
When clearing the screen for a Terminal UI, you create the illusion that your user has in fact left the command line even though he is still in the Terminal. Nothing destroys the illusion of having a Terminal UI quicker than a cursor blinking away on the screen.
Luckily, ANSI escape sequences allow you to hide and show cursors at will. The codes for hiding and showing cursors are ESC+[?25l and ESC+[?25h, respectively. The code snippet for hiding the cursor looks like this:
char ESC = 27;
String CSI = ESC + "[";
String clearTerminal = CSI + "25l";
System.out.print( clearTerminal );
This is the code snippet for showing a previously hidden cursor:
char ESC = 27;
String CSI = ESC + "[";
String clearTerminal = CSI + "25h";
System.out.print( clearTerminal );
Warning
Remember to show your cursor when exiting your application, if you hid it in the application. Otherwise, your user no longer has a cursor at the command line.
Warning
The sequence for hiding a cursor ends in a lower case L, not a 1 or uppercase I. Confusing these characters is easy depending on the font in which you read them.
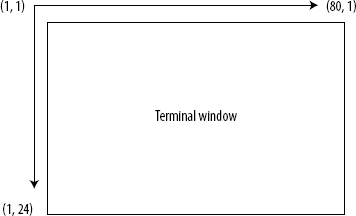
The last ANSI escape sequence you need before embarking on your journey into the world of Terminal UIs is the code for moving the cursor. You can use several codes for moving the cursor, but you likely need only two. The following sequence sets the position of the cursor in the Terminal window:
ESC+[<row>;<column>H
The abbreviated form places the cursor at the top-left corner of the screen:
ESC+[H
Warning
The x and y coordinates in the cursor moving sequence are reversed from where you expect. Row (y) comes first, not second.
The rows and columns in the Terminal are 1 based, instead of 0 based. The default size of the Terminal is 80 columns by 24 rows, as shown in Figure 11.14. I explain how to verify the row and column count later in this chapter. Currently, Java does not contain any built-in methods for verifying the row count or column count in a terminal window.
The code for setting the cursor position to row 5 and column 30 looks like this:
char ESC = 27;
int x = 30;
int y = 5;
String CSI = ESC + "[";
String moveCursor = CSI + y + ";" + x + "H";
System.out.print( moveCursor );
The following code places the cursor at the top-left corner of the Terminal window.
char ESC = 27;
String CSI = ESC + "[";
String moveCursor = CSI + "H";
System.out.print( moveCursor );
At the heart of interacting with Terminal applications is the need to capture keystrokes in real time. Some Terminal applications accept mouse events, but most users of Terminal applications prefer to keep their hands on the keyboard. Using a mouse slows them down. Therefore, mouse-driven Terminal UIs are not acceptable.
As I mentioned in Chapter 9, Java has no built-in method for retrieving characters from the Terminal, before the Enter key is pressed. It turns out Java also has no build-in methods for checking the current view size in the Terminal. In order to make an interactive Terminal application, you must know the viewable size of the Terminal and the latest key press.
Capturing the latest Terminal key press, the viewable columns, and the viewable rows is fairly straightforward with C. In this section, I provide a Terminal User Interface utility written with JNI for capturing these three pieces of data.
Note
The lack of a console/terminal character reader in Java has been in various bug fix requests for more than 13 years. The current bug request is bug number 6351276. The current version of the bug report is:
http://bugs.sun.com/bugdatabase
/view_bug.do?bug_id=6351276
Note
I detail JNI usage on OS X in Chapter 9
The Java portion of the Terminal UI utility is named TuiUtil.java. This is the source for the Java class TuiUtil:
package com.genedavis;
/**
 * Native methods for Terminal UI.
 *
 * @author T. Gene Davis
 */
public class TuiUtil {
   // executed during class load
   static
   {
      // used to load from a system library path
      System.loadLibrary("TUI");
   }

   // native method call
   public native char getch();

   // native method call (tput cols)
   public native int getTerminalColumns();

   // native method call (tput lines)
   public native int getTerminalRows();
}
The TuiUtil class starts with a static block. The static block loads a dynamic library called TUI. The actual filename is libTUI.jnilib.
The TuiUtil class contains three native methods: getch(), getTerminalColumns(), and getTerminalRows(). I use an Ant script for generating the native C header file. You may prefer to generate the C header with a direct call to javah.
The following code is the source for the JNI header file associated with the TuiUtil class. In the project Ant project, the JNI header file is named native_TuiUtil_jni.h:
/* DO NOT EDIT THIS FILE - it is machine generated */
#include <jni.h>
/* Header for class com_genedavis_TuiUtil */
#ifndef _Included_com_genedavis_TuiUtil
#define _Included_com_genedavis_TuiUtil
#ifdef __cplusplus
extern "C" {
#endif
/*
 * Class:     com_genedavis_TuiUtil
 * Method:    getch
 * Signature: ()C
 */
JNIEXPORT jchar JNICALL Java_com_genedavis_TuiUtil_getch
  (JNIEnv *, jobject);
/*
 * Class:     com_genedavis_TuiUtil
 * Method:    getTerminalColumns
 * Signature: ()I
 */
JNIEXPORT jint JNICALL Java_com_genedavis_TuiUtil_
   getTerminalColumns
  (JNIEnv *, jobject);
/*
 * Class:     com_genedavis_TuiUtil
 * Method:    getTerminalRows
 * Signature: ()I
 */
JNIEXPORT jint JNICALL Java_com_genedavis_TuiUtil_getTerminalRows
  (JNIEnv *, jobject);
#ifdef __cplusplus
}
#endif
#endif
The three native method definitions define their return values as jchars and jints. For simplicity, I do no implicit conversion from the underlying C code to the JNI types. I just use jchar and jint.
The native implementation of the TuiUtil class is found in a C file called TuiUtilImpl.c. Here's the source for the native implementation of the TuiUtil class:
#include <stdio.h>
#include <sys/ioctl.h>
#include <termios.h>
#include <unistd.h>
#include "native_TuiUtil_jni.h"
// This Terminal Utility works
// on Mac OS X and likely works on
// other *NIX operating systems
// after recompiling.
// getch()
JNIEXPORT jchar JNICALL
Java_com_genedavis_TuiUtil_getch
(JNIEnv * my_jenv, jobject my_jobj)
{
   jchar ch;
   struct termios old_term, new_term;
   //storing the old settings
   tcgetattr ( STDIN_FILENO, &old_term );
   // making a copy of the old settings
   // to modify
   new_term = old_term;
   // modifying the copy of the terminal settings
   // so there is no echoing and no buffering,
   // just flipping bits here
   new_term.c_lflag &= ~( ICANON | ECHO );
   // setting the modified terminal settings
   // to be active
   tcsetattr ( STDIN_FILENO, TCSANOW, &new_term );
   // getting the character
   ch = getchar();
   // resetting the terminal settings to the old settings
   tcsetattr ( STDIN_FILENO, TCSANOW, &old_term );

   return ch;
}

// getTerminalColumns()
JNIEXPORT jint JNICALL
Java_com_genedavis_TuiUtil_getTerminalColumns
(JNIEnv * my_jenv, jobject my_jobj)
{
   //defining a terminal size struct
   struct ttysize terminal_size;

   //populating the struct
   ioctl(0, TIOCGSIZE, &terminal_size);

   //returning the viewable columns
   return terminal_size.ts_cols;
}

// getTerminalRows()
JNIEXPORT jint JNICALL
Java_com_genedavis_TuiUtil_getTerminalRows
(JNIEnv * my_jenv, jobject my_jobj)
{
//defining a terminal size struct
struct ttysize terminal_size;
//populating the struct
ioctl(0, TIOCGSIZE, &terminal_size);
//returning the viewable lines
return terminal_size.ts_lines;
}The TuiUtilImpl.c file implements the three native methods defined in the TuiUtil class. The implementations are simple, so they need no supporting methods. All three implementations are fairly generic Unix solutions, so they should work on other Unix-based operating systems besides Mac OS X.
I implement the getch() method as the Java_com_genedavis_TuiUtil_getch() function. It defines a jchar and two termios structs. The termios structs store a configuration for the Terminal. In this case, one struct stores a Terminal configuration for echoing keystrokes and blocking input to the program until the Return key is pressed. These setting are stored in the old_term struct while the modifications for the utility are created in a clone called new_term. The customized settings are activated in the Terminal using the tcsetattr() function. The getchar() function takes care of retrieving the return value for the function, and then I reset the Terminal settings with the old_term struct and a call to the tcsetattr() function.
If you want to include the getch() method in your own code, I recommend moving the code for setting the Terminal echo and blocking to a setup function and a cleanup function, and simply perform the getchar() call during your event loop. Either way, for the purpose of explaining the process of getting characters from the Terminal as they are typed, this code works.
Finding the viewable columns and rows of the Terminal is actually easier than getting the latest keystroke. The getTerminalColumns() implementation and the getTerminalRows() implementation simply populate a ttysize struct with the row and column counts by passing the struct to the ioctl() function. The column count is stored in the ts_cols member. The row count is stored in the ts_lines member of the ttysize struct.
Note
Another solution for finding the viewable rows and columns in the Terminal is passing environment variables on startup of your command-line utility that represent the row and column counts. The downside of this approach is that if the Terminal view is resized after the Java application starts, the application cannot know of the change.
This JNI approach relates the current status of rows and columns even if the Terminal window changes size after the applications starts.
On the book's Web site, I have a project that contains the TuiUtil and a simple Terminal application implementation. Included in that project are a simple dialog box class and a simple menu class. These classes are not production quality. My intention is to give you an idea of what JNI methods and ANSI escape sequences need to go into creating even a small Terminal User Interface.
The following source is for the TuiMessageDialog class. The TuiMessageDialog implements a basic Terminal-based message dialog box. The dialog box functions similar to JOptionPane's showMessageDialog() method, only with much less polish. Later in this chapter, I present an example of a more refined ncurses approach that uses the Charva API.
package com.genedavis;
/**
 * Simple message dialog box for Terminal apps.
 *
 * @author T. Gene Davis
 */
public class TuiMessageDialog {

   // setting up the CSI
   private static char ESC = 27;
   private static String CSI = ESC + "[";

   // preset escape sequences
   private static String blackFore = CSI + "30m";

   private static String redBack = CSI + "101m";
   private static String greenBack = CSI + "102m";
   private static String blueBack = CSI + "104m";

   private final static String reset = CSI + "0m";

   /**
    * Handles coloring, centering, and printing of
    * message dialog box.
    *
    * @param message Message for dialog to display
    * @param bkColor
    */
   private static void showMessage(
      String message,
      String bkColor)
   {
      // finding the proper location of the dialog box
      int cols = TuiWindow.tuiUtil.getTerminalColumns();
int rows = TuiWindow.tuiUtil.getTerminalRows();
int x = (cols - message.length()) / 2 - 1;
int y = rows / 2 - 2;
// setting the background color of the dialog box
System.out.print(
bkColor +
blackFore );
// setting the position of the dialog box
// and printing the dialog box line by line
System.out.print( CSI + y + ";" + x + "H" );
for (int i=0; i< (message.length()+2) ; i++)
System.out.print(" ");
System.out.print( CSI + (y+1) + ";" + x + "H" );
System.out.print(
" " +
message +
" ");
System.out.print( CSI + (y+2) + ";" + x + "H" );
for (int i=0; i< (message.length()+2) ; i++)
System.out.print(" ");
System.out.print( CSI + (y+3) + ";" + x + "H" );
for (int i=0; i< (message.length()-4) ; i++)
System.out.print(" ");
System.out.print("[OK] ");
// resetting the colors to user's preferences
System.out.print(reset);
// waiting for user acknowledgement of the
// dialog box before continuing
TuiWindow.tuiUtil.getch();
}
/**
* Displays a message in a red dialog box.
*
* @param message message to print in the dialog box
*/
public static void showRedMessage(String message)
{
showMessage(message, redBack);}
/**
* Displays a message in a green dialog box.
*
* @param message message to print in the dialog box
*/
public static void showGreenMessage(String message)
{
showMessage(message, greenBack);
}
/**
* Displays a message in a blue dialog box.
*
* @param message message to print in the dialog box
*/
public static void showBlueMessage(String message)
{
showMessage(message, blueBack);
}
}The TuiMessageDialog class contains three public static methods for displaying message dialog boxes in green, blue, and red. The methods could just as easily indicate information, caution, and alert. Each message method passes custom drawing information (in this case, merely color) to the private showMessage() method. The private showMessage() method does all the real work of drawing the dialog box.
The showMessage() method uses the TuiUtil class, previously explained, to find the dimensions of the Terminal's viewable area. The message box is then placed in the center of the Terminal. The dialog box is modal and waits until the TuiUtil's getch() method finds a key typed before continuing with execution. The TuiMessageDialog class does not undraw itself, but rather allows the TuiWindow (discussed later) to repaint the Terminal view.
Again, the TuiMessageDialog is not for production code. It does not even handle messages that need wrapping. It is simply a demonstration that, using the techniques I discuss earlier in this chapter, you can create a usable dialog box system for your Terminal-based applications.
Using a combination of the ANSI escape sequences and the TuiUtil class that I explain earlier in the chapter, you also can create menu bars and menus for your Terminal-based applications. In the following code, I create a basic menu bar for the Terminal. The following code is for the TuiMenu class. It is simply a menu bar with hard-coded menu items embedded, but it shows what you can accomplish with techniques I showed earlier in this chapter. It is easy to imagine a fully navigable menu system using similar techniques. However, an example that complex would not fit into a single chapter of a book.
package com.genedavis;
/**
 * Simple menu bar for Terminal apps.
 *
 * @author T. Gene Davis
 */
public class TuiMenu {

   // setting up the CSI
   char ESC = 27;
   String CSI = ESC + "[";
   // preset escape sequences
   String initPosition = CSI + "H";
   String whiteFore = CSI + "37m";
   String grayBack = CSI + "100m";
   String reset = CSI + "0m";
   String underline = CSI + "4m";
   String noUnderline = CSI + "24m";
   /**
    * Paints the menu bar
    */
   public void paint()
   {
      int cols = TuiWindow.tuiUtil.getTerminalColumns();

      System.out.print( initPosition );
      System.out.print(
            whiteFore +
            grayBack );

      for (int i=1; i<= cols; i++)
         System.out.print(" ");

      System.out.print( initPosition );
      System.out.print(
            " " +
            underline +
            "G" +
            noUnderline +
            "reen");

      System.out.print("  " +
            underline +
                    "B" +
            noUnderline +
                    "lue");
System.out.print(" " +
underline +
"R" +
noUnderline +
"ed");
System.out.print(" " +
underline +
"Q" +
noUnderline +
"uit");
System.out.print( reset );
}
}The TuiMenu simply provides four menu items. Three menu items activate the three versions of the TuiMessageDialog. The fourth menu item exits the application. The mnemonic codes are underlined in the menu items using the ESC+[4m sequence and underlining is stopped using the ESC+[24m sequence.
The menu bar is drawn by placing the cursor at the top-left corner of the screen, using the ESC+[H cursor moving sequence, and then printing it with a bright black background. Bright black looks gray, in case you wondered what exactly "bright" black looks like. The proper width of the menu bar is determined with a call to the TuiUtil to find the current viewable width of the Terminal window.
Note
If nothing else, the demonstration of creating a Terminal-based dialog box and a Terminal-based menu should impress you with the importance of methods for getting single character input from command-line-based applications and also obtaining the viewable dimensions of the window running the command-line application.
Currently, Java's Console application supports neither of these basic features. I hope methods for obtaining this information works its way into the Java specification in the near future.
For completeness, I include the TuiWindow class. The main() method is in the TuiWindow class. The TuiWindow class combines the TuiUtil, the TuiMenu, and the TuiMessageDialog in one application. The TuiWindow is not meant as a template for creating a Java-based Terminal application. The TuiWindow, shown in Figure 11.15, serves as a demo of how to combine the techniques from this chapter when creating a Terminal application.

The following source is the TuiWindow class:
package com.genedavis;
/**
 * This is a basic windowed terminal application.
 *
 * @author T. Gene Davis
 */
public class TuiWindow {
   public static TuiUtil tuiUtil = new TuiUtil();

   // setting up the CSI
   char ESC = 27;
   String CSI = ESC + "[";

   // preset escape sequences
   String hideCursor = CSI + "?25l";
   String showCursor = CSI + "?25h";
   String reset = CSI + "0m";
   String clear = CSI+"2J";

   TuiMenu menubar;
   /**
    * Create window and start application loop
    */
   public static void main(String[] args) {
      TuiWindow tw = new TuiWindow();
      tw.appLoop();
   }
/**
* Initialize window, and display welcome
* message in a TuiMessageDialog
*/
public TuiWindow()
{
menubar = new TuiMenu();
hideCursor();
paint();
TuiMessageDialog.showGreenMessage(
"Terminal Display Demo");
paint();
}
/**
* Application loop responsible for clearing
* the terminal, painting the terminal, and
* handling events for the keyboard.
*/
private void appLoop()
{
char myChar = ' ';
while (myChar != 'q' && myChar != 'Q')
{
clearTerm();
paint();
// use native call
myChar = tuiUtil.getch();
handleEvent(myChar);
}
clearTerm();
resetColors();
showCursor();
}
/**
* Handle keys typed
*/
private void handleEvent(char myChar) {if (myChar == 'r' && myChar != 'R')
{
TuiMessageDialog.showRedMessage(
"Red Chosen");
}
else if (myChar == 'g' && myChar != 'G')
{
TuiMessageDialog.showGreenMessage(
"Green Chosen");
}
else if (myChar == 'b' && myChar != 'B')
{
TuiMessageDialog.showBlueMessage(
"Blue Chosen");
}
}
/**
* Reset the graphics to user's preferences.
*/
private void resetColors()
{
//Clear the entire visible display
System.out.println( reset );
}
/**
* Clear the entire visible display
*/
private void clearTerm()
{
System.out.println( clear );
}
/**
* Paint the Terminal window
*/
private void paint()
{
clearTerm();
menubar.paint();
}
/**
* Hide Terminal's cursor
*/
public void hideCursor()
{
System.out.println( hideCursor );}
/**
* Show Terminal's cursor
*/
public void showCursor()
{
System.out.println( showCursor );
}
}The TuiWindow creates an instance of the TuiUtil and stores it in a static variable for use in the application. The TuiWindow also takes care of the application loop and cleans up after the application loop receives a request to quit.
Note
If you use the terminal_ui project from the book's Web site, the project comes with a shell script named run to run the built project. The shell script contains only one command:
java -Djava.library.path=c_bin -cp java_bin/ com.
   genedavis.TuiWindow
You can run the project from the command line in a Terminal window using this command.
Graphical User Interfaces (GUIs) provide users with pretty pictures and pleasing graphic navigation. Terminal User Interfaces (which are never called TUIs, but they should be) provide the equivalent user experience for Terminal-based interfaces. Dialog boxes, windows, panels, and menus are all available from inside Terminal UIs, just as they are in available in GUIs. Terminal UIs exist mostly in server, embedded, and headless application environments where administrators care for their applications by way of Terminal interfaces.
In this section, I introduce ncurses wrapped with Charva. Charva is a Java-based Terminal User Interface API. The ncurses library is C based, so you must wrap it with a JNI library in order to use it in Java. The remainder of this chapter covers an overview of ncurses, building Charva for wrapping ncurses, testing Charva, and creating a Terminal UI using standard Java development tools.
The ANSI escape sequences detailed earlier in this chapter are supported on most operating systems, but usually with slight variations. Even on OS X, there is no guarantee that a new release of Terminal will not break an application that depends on those specific codes.
For some applications and utilities, variations in ANSI escape sequences do not matter. You may be the only one who uses the tool, or your team may be the only ones who use the tool. Not all useful programs are intended for mass distribution.
In other cases, you want your application to work on as many versions of OS X as possible. (Oh, and maybe to work on those other operating systems, too.) For these cases, the Unix world came up with a solution many years ago. It is a library called ncurses.
Ncurses is a C library for creating complex Terminal-based User Interfaces. The ncurses library handles keyboard input, mouse events, cursor placement, colorizing text, and screen updating. Using ncurses, you can manage text-based windows, menus, and panels in a platform-agnostic manner.
The ncurses libraries ship with OS X, so they are readily available. However, using them in Java applications presents problems. Ncurses behaves differently than AWT and Swing. Also, wrapping the libraries in JNI is far too difficult a task for most entry-level programmers.
With JNI and the ncurses library, you can create a custom API for handling Terminal User Interfaces. However, if your goal is merely creating a Terminal application, then several free libraries can do the wrapping for you. Charva is an excellent choice for creating Terminal-based applications.
Note
Another popular Terminal User Interface API is the Java Curses Library. Java Curses Library is a SourceForge project. The Java Curses Library, like Charva, is available under the LGPL license. See the project site here:
http://sourceforge.net/projects/javacurses/
Charva creates User Interfaces in the same way that AWT and Swing create UIs. Charva clones the AWT and Swing APIs where possible. Sometimes, you can take a working Swing or AWT application, change the package names of the components to charva.awt and charvax.swing from java.awt and javax.swing, and find yourself with a working Terminal application. The result is a Terminal-based interface instead of a graphical interface.
Charva is licensed under the GNU Lesser General Public License. The GNU Lesser General Public License is a business-friendly version of the GNU Public License. It allows linking against Charva without restricting licensing of code that uses Charva. APIs that extend rather than just link against Charva have some additional restrictions. For complete details, have your corporate lawyer examine the license that comes with Charva.
Charva is distributed in a standard *.zip file. Building Charva for OS X is fairly painless, because it comes with an Ant project to handle all the nasty details. Once built, make sure the JARs and native library are available to your Java project and that you are all set to make your own Terminal applications using Charva.
Note
The home page for Charva is located here:
http://www.pitman.co.za/projects/charva/index.html.
Note
I discuss using and modifying Ant scripts in Chapter 4.
To download and build Charva on OS X, follow these steps:
Download Charva.
Charva source code is hosted on the SourceForge site here:
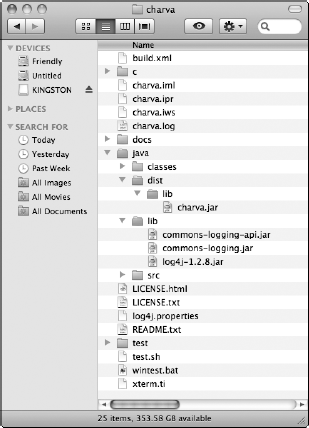
http://sourceforge.net/projects/charvaUncompress Charva either by double-clicking the Charva download in Finder or using the unzip tool from Terminal.
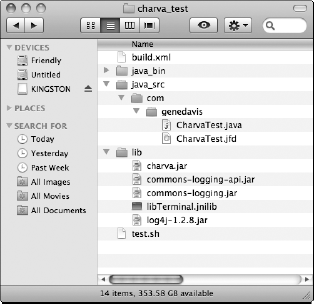
A Finder window showing the extracted contents of the Charva download is shown in Figure 11.16.
Open Terminal, and cd to the uncompressed Charva folder.
The Charva documentation refers to this folder as
$CHARVA_HOME.Set the environment variable for JAVA_HOME in your current Terminal window.
Find the correct location of
JAVA_HOMEby issuing the/usr/libexec/java_homecommand in your Terminal window. Set theJAVA_HOMEenvironment variable for the current Terminal window using the commandexport JAVA_HOME=<home>where<home>is the location given by the command/usr/libexec/java_home.From the Charva folder, issue the command ant compile.
Because Charva uses JNI to access
ncurses, it must use native files built specifically for OS X. All this work is automated with Ant.From the Charva folder, issue the command ant javah.
The
javahtask prepares the project for building against the native libraries.Issue the command ant compile-test from the Charva folder.
This task creates the Charva test. I explain the test shortly.
Create the JNI library with the command ant makeDLL . Enter mac_osx when the build script requests your operating system.
After you successfully complete these steps, the Charva library is nearly ready to use. The build process created an OS X-specific dynamic library called libTerminal.jnilib. For testing and development, place this library in /Library/Java/Extensions so Java can find and load it when using Charva.
Note
I discuss finding JAVA_HOME and other important Java directories correctly on OS X in Chapter 2.
Warning
When testing Charva linked application installations, remove the libTerminal.jnilib dynamic library from the /Library/Java/Extensions directory. Your application may find this library instead of the copy in your installation giving you a false positive on your user installation tests.
Verify that the Charva library built properly by running the test application from the Charva folder.
Make the test.sh script executable by entering the following command from the Charva directory:
chmod 755 ./test.sh
Run the test. Execute ./test.sh from the Charva directory.
Experiment with the test.
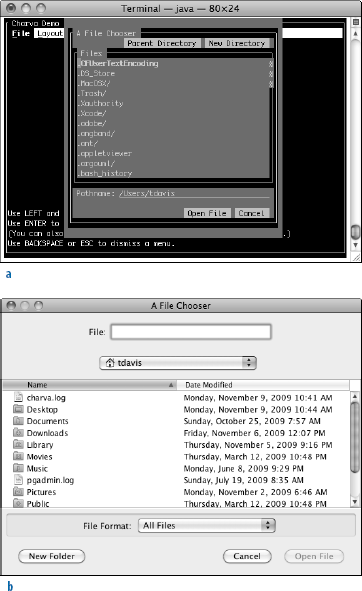
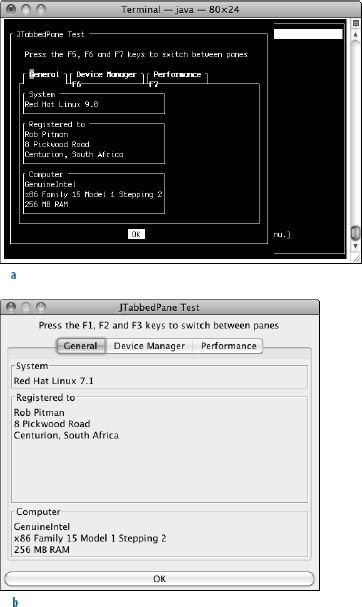
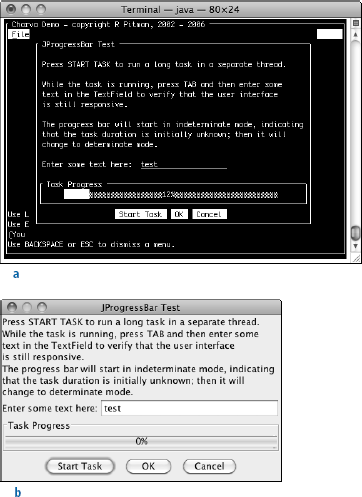
In the Charva test, there are examples of menus, the JFileChooser as shown in Figure 11.17a, assorted layouts, the JTabbedPane as shown in Figure 11.18a, buttons, and a JProgressBar as shown in Figure 11.19a. All of these are implemented for pure Terminal-based applications.
The test application comes with a traditional Java Swing version for comparison purposes. Run the Java Swing version of the Charva test using the command ./test swing, from the Charva directory. Figures 11.17b, 11.18b, and 11.19b are the Swing GUI versions of Figures 11.17a, 11.18a, and 11.19a.
Charva allows you to create an advanced Terminal-based User Interface with minimal effort. I provide an example on the book's Web site in a folder called charva_test. For the example, I create a UI using JFormDesigner. JFromDesigner is a Java UI creator. You easily can use another UI design tool.
After creating the UI for your application, follow these steps:
Open the generated source code in your favorite IDE.
Modify AWT and Swing package import s to begin with charva and charvax instead of java and javax.
Comment out Swing and AWT method calls that do not apply to Terminal-based applications.
I usually end up removing methods
setDefaultCloseOperation()that do not apply to Terminal-based applications.Compile and run from the Terminal.
I do not know of any IDEs that properly run Terminal-based applications, so you must run the applications directly from the command line instead of clicking the "Run" button in your IDE. Compiling from an Ant script also is easier than configuring the build from an IDE.
The charva_test project included on the Web site, shown in Figure 11.20, contains the necessary Ant build script and shell script to create and run a Charva-based Terminal application.
The following source is the Ant script (build.xml) I created to build charva_test. You easily can modify it to build your Charva-based projects:
<?xml version="1.0" encoding="UTF-8"?>
<project name="charva_test" default="java-build" basedir=".">
   <property name="java.source" value="java_src" />
   <property name="java.bin" value="java_bin" />
<target
      name="clean"
      description="Removes previous build">

      <echo>Cleaning Java and Native bin folders...</echo>

      <delete dir="${java.bin}" />
      <delete dir="${native.bin}" />

   </target>

   <target
      name="java-build"
   depends="clean"
      description="Builds the Java source">

      <echo>Building Java...</echo>

      <mkdir dir="${java.bin}"/>
      <javac
         srcdir="${java.source}"
         destdir="${java.bin}"
         classpath="lib/charva.jar" />
   </target>
</project>
The build script contains two targets, clean and java-build. The java-build target is the default target. The java-build target calls clean, creates the necessary java_bin directory, and finally calls javac to build the Terminal application.
Java-based Terminal utilities and other Java-based Terminal applications usually start from a shell script. The shell script simply wraps the Java application. It provides necessary system setup for the application before launching it. The shell script also provides any necessary cleanup for the application when it exits.
The following is the source for the charva_test project's shell script. The script is contained in a file called test.sh:
#!/bin/bash
/usr/bin/java
-Djava.library.path=lib
-cp ".:java_bin/:lib/charva.jar:lib/commons-logging.jar:lib/
   log4j-1.2.8.jar"
com.genedavis.CharvaTest 2> $HOME/charva.log
# returning the screen to a usable state
stty sane
The script defines itself as a bash script. It starts the Java application. All exceptions are redirected to $HOME/charva.log (charva.log in your home directory). When the Java application exits, stty sane is called to make sure the application's Terminal preferences are removed. However, if you break from the application with Control+C, then stty sane is never called.
Earlier, I explained how to place your dynamic library, libTerminal.jnilib, in the Java extensions folder for global access. This script does not require that placement. Instead, place your libTerminal.jnilib in the project lib director, and the application finds it just fine.
Tip
Open a second Terminal window and execute tail -f charva.log to watch for exceptions in your Charva-based application.
Tip
When creating a shell script to wrap a Java application, use *.sh during development. The extension makes it more obvious that the file is shell script.
When moving the script into a production environment, remove the .sh extension, so its name blends in better with other command-line tools like emacs, grep, ant, and so on. In this case, the test.sh script becomes simply test.
Tip
Charva applications require exception logging in order to run. The default location for logging must reside in the script for starting the Terminal application.
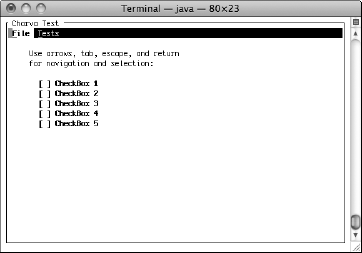
The CharvaTest class contains the UI setup and also the main method for this example. When run, as shown in Figure 11.21, the application displays a menu bar, a label, and several check boxes in the Terminal window. Navigate the application using mnemonics, tabs, arrows, escape, and return.
The raw source generated by JFormDesigner follows. The following code contains the modification I made in order to get the application to run in Terminal with the Charva API. The modifications were minor.
package com.genedavis;
import charva.awt.*;
import charva.awt.event.*;
import charvax.swing.*;
/**
 * @author T. Gene Davis
 */
public class CharvaTest extends JFrame {

   public static void main(String[] args)
   {
      CharvaTest ct = new CharvaTest();
      ct.setVisible(true);
   }

   public CharvaTest() {
      initComponents();
   }
   private void quitMIActionPerformed(ActionEvent e) {
      System.exit(0);
   }
   private void simpleMessageMIActionPerformed(ActionEvent e) {
      JOptionPane.showMessageDialog(null, "Just a message dialog.");
   }
   private void initComponents() {
      // JFormDesigner - Component initialization - DO NOT MODIFY
      //GEN-BEGIN:initComponents
      menuBar1 = new JMenuBar();
      fileMenu = new JMenu();
      quitMI = new JMenuItem();
      testsMenu = new JMenu();
      simpleMessageMI = new JMenuItem();
      panel1 = new JPanel();
      panel2 = new JPanel();
      label3 = new JLabel();
      checkBox1 = new JCheckBox();
      checkBox2 = new JCheckBox();
      checkBox3 = new JCheckBox();
      checkBox4 = new JCheckBox();
      checkBox5 = new JCheckBox();
      textarea1 = new JTextArea();
      label2 = new JLabel();
      //======== this ========
      setTitle("Charva Test");
// intentionally commented out ...
// setDefaultCloseOperation(WindowConstants.DO_NOTHING_ON_CLOSE);
setEnabled(false);
Container contentPane = getContentPane();
contentPane.setLayout(new BoxLayout(contentPane, BoxLayout.Y_AXIS));
//======== menuBar1 ========
{
//======== fileMenu ========
{
fileMenu.setText("File");
fileMenu.setMnemonic('F'),
//---- quitMI ----
quitMI.setText("Quit");
quitMI.setMnemonic('Q'),
quitMI.addActionListener(new ActionListener() {
public void actionPerformed(ActionEvent e) {
quitMIActionPerformed(e);
}
});
fileMenu.add(quitMI);
}
menuBar1.add(fileMenu);
//======== testsMenu ========
{
testsMenu.setText("Tests");
testsMenu.setMnemonic('T'),
//---- simpleMessageMI ----
simpleMessageMI.setText("Simple Message");
simpleMessageMI.setMnemonic('S'),
simpleMessageMI.addActionListener(
new ActionListener() {
public void actionPerformed(ActionEvent e) {
simpleMessageMIActionPerformed(e);
}
});
testsMenu.add(simpleMessageMI);
}
menuBar1.add(testsMenu);
}
setJMenuBar(menuBar1);
//======== panel1 ========
{
panel1.setLayout(new BorderLayout());
//======== panel2 ========
{
panel2.setLayout(new BoxLayout(panel2, BoxLayout.Y_AXIS));
//---- label3 ----
label3.setText(" ");
panel2.add(label3);
//---- checkBox1 ----checkBox1.setText("CheckBox 1");
panel2.add(checkBox1);
//---- checkBox2 ----
checkBox2.setText("CheckBox 2");
panel2.add(checkBox2);
//---- checkBox3 ----
checkBox3.setText("CheckBox 3");
panel2.add(checkBox3);
//---- checkBox4 ----
checkBox4.setText("CheckBox 4");
panel2.add(checkBox4);
//---- checkBox5 ----
checkBox5.setText("CheckBox 5");
panel2.add(checkBox5);
}
panel1.add(panel2, BorderLayout.CENTER);
//---- textarea1 ----
textarea1.setText(
"
Use arrows, tab, escape, and return
"+
"for navigation and selection:");
textarea1.setEditable(false);
textarea1.setRows(3);
textarea1.setEnabled(false);
panel1.add(textarea1, BorderLayout.NORTH);
//---- label2 ----
label2.setText(" ");
panel1.add(label2, BorderLayout.WEST);
}
contentPane.add(panel1);
setSize(80, 23);
// JFormDesigner - End of component initialization
//GEN-END:initComponents
}
// JFormDesigner - Variables declaration - DO NOT MODIFY
//GEN-BEGIN:variables
private JMenuBar menuBar1;
private JMenu fileMenu;
private JMenuItem quitMI;
private JMenu testsMenu;
private JMenuItem simpleMessageMI;
private JPanel panel1;
private JPanel panel2;
private JLabel label3;
private JCheckBox checkBox1;
private JCheckBox checkBox2;
private JCheckBox checkBox3;
private JCheckBox checkBox4;
private JCheckBox checkBox5;private JTextArea textarea1; private JLabel label2; // JFormDesigner - End of variables declaration //GEN-END:variables }
As I mentioned earlier, the CharvaTest class is generated using a GUI design tool called JFormDesigner. The import statements originally read as follows:
import java.awt.*;
import java.awt.event.*;
import javax.swing.*;
To make them work with Charva, I simply changed the imports to read as follows:
import charva.awt.*;
import charva.awt.event.*;
import charvax.swing.*;
As part of the conversion to Charva, I commented out one line of code:
setDefaultCloseOperation(WindowConstants.DO_NOTHING_ON_CLOSE);
If you think about it, Terminal applications do not have close buttons on their title bars, so removing this line of code makes complete sense.
The last change I make to convert this GUI to a Terminal UI is to change the size of the JFrame to a columns-and-rows-based size rather than the pixel-measured size generated by JFormDesigner. The new line of code reads as follows and matches the default size of the Terminal window when opened.
setSize(80, 23);
Obviously, more complex layouts require more modifications to work with Charva, but as this demonstration shows, Charva does most of the work for you when creating a Terminal User Interface.
Advanced Terminal applications, also called Console applications, have ASCII-based User Interfaces. These interfaces use ANSI escape sequences for coloring text, clearing screens, and changing the cursor position within the visible Terminal window.
ANSI escape sequences provide lots of variety to text applications, including password hiding. However, basic keystroke capture is missing from Java applications run as command-line utilities. Also, Java does not contain methods for tracking the viewable display of Terminal-based Java applications. Instead, you must make calls to native C-based libraries when these features are needed. I provide the necessary JNI in this chapter for tracking Terminal view dimensions and keystroke capture.
Using the JNI code I provided in this chapter, I created a basic Terminal User Interface. This sample program serves to show the importance of knowing row and column counts in Terminal-based applications and also the importance of individual char capture when running a Terminal interface. Sun provides neither functionality in Java, but I hope they will in the future, because developers continue to express interest in these features.
Charva, Java Curses Library, and other third-party APIs fill the need for Terminal-based User Interface APIs. Most Terminal-based UI APIs link to the ncurses library. Ncurses is the native library that handles ANSI escape sequence differences between operating systems.
In this chapter, explain installation and use of Charva. Charva is built as a drop-in replacement for Swing and AWT in Terminal-based environments. Substitute charva.awt and charvax.swing package names for java.awt and javax.swing packages to get regular Java Swing and AWT UIs to run from Terminal. Minor modifications are sometimes required, but not many. Most Java GUI development utilities create Charva-based UIs with little extra work from you, the developer.