In the last few chapters, you have learned several ways to automate your analytical processes to achieve higher productivity, controlled analysis, and reproducibility. In this chapter, automation takes on different meaning. Automation here will define the means of manipulating or controlling one application with another. Why would you even want to control one application with another? Think about all the times you have crunched data in Access only to bring the results into Excel for presentation and distribution. Think about all the times you have sent Excel data to Access only to open Access and run a set of queries or output a report.
The reality is that each of these applications has its strengths, which you routinely leverage through manual processes. So why not automate these processes? The goal of this chapter is to give you a solid understanding of how to use automation to control Excel from Access and vice versa.
Each program in the Microsoft Office Suite comes with its own Object Library. As you know, the Object Library is a kind of encyclopedia of all the objects, methods, and properties available in each Office application. Excel has its own Object Library, just as Access has its own Object Library, just as all the other Office applications have their own Object Library. In order for Excel to be able to speak to another Office program such as Access, you have to bind it to that program.
Binding is the process of exposing the Object Library for a server application to a client application. There are two types of binding: early binding and late binding.
Note
In the context of this discussion, a client application is the application that is doing the controlling, while the server application is the application being controlled.
With early binding, you explicitly point a client application to the server application's Object Library in order to expose its object model during design-time, or while programming. Then you use the exposed objects in your code to call a new instance of the application as such:
Dim XL As Excel.Application
    Set XL = New Excel.Application
Early binding has several advantages:
Because the objects are exposed at design-time, the client application can compile your code before execution. This allows your code to run considerably faster than with late binding.
Since the Object Library is exposed during design time, you have full access to the server application's object model in the Object Browser.
You have the benefit of using IntelliSense. IntelliSense is the functionality you experience when you type a keyword and a dot (.) or an equal sign (=) and you see a popup list of the methods and properties available to you.
You automatically have access to the server application's built-in constants.
Late binding is different in that you don't point a client application to a specific Object Library. Instead, you purposely keep things ambiguous, only using the CreateObject function to bind to the needed library at run-time, or during program execution.
Dim XL As Object
    Set XL = CreateObject("Excel.Application")
Late binding has one main advantage: Late binding allows your automation procedures to be version-independent. That is, your automation procedure will not fail due to compatibility issues between multiple versions of a component. For example, suppose you decide to use early binding and set a reference to the Excel Object Library on your system. The version of the available library on your system will be equal to your version of Excel. The problem is that if your users have an earlier version of Excel on their machine, your automation procedure will fail. You do not have this problem with late binding.
Processes where Access data is moved to Excel lend themselves quite nicely to automation. This is primarily due to the nature of these two programs. Access typically serves as the data layer in most analytical processes, while Excel serves as the presentation. Because of this dynamic, you may find that you often send Access data to Excel to build charts, pivot tables, or some other presentation mechanism displaying the data. Excel Automation can literally take you out of the report building process, creating and saving Excel reports without any human interaction.
For your first Excel automation trick, you will build a procedure in Access that automatically opens a new Excel workbook and adds a worksheet:
Open the ZalexCorp Restaurant Equipment and Supply.accdb sample database on
www.wrox.com.Start a new module by clicking the Create tab in the ribbon and selecting Module. If you are using Access 2007, you need to select Macro

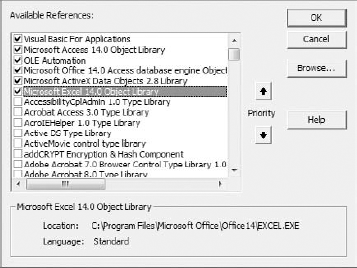
Before you do anything, you must set a reference to the Excel Object Library. To do this, go up to the application menu and select Tools

Scroll down until you find the entry "Microsoft Excel XX Object Library," where the XX is your version of Excel. Place a check in the checkbox next to the entry, as shown here in Figure 16-1, and then click the OK button.
Note
If you don't set a reference to the Excel Object Library, Access gives you a compile error, producing you this message:
Compile error: User-defined type not defined.
The good news is that once you set a reference to the Excel Object Library in a particular database, it is set for good in that database.
Now that you have referenced the Excel Object Library, you can start writing code. Enter the following code in your newly created module.
Function MyFirstAutomationCode()

'Step1: Declare the variables you will work with.
    Dim xl As Excel.Application
    Dim xlwkbk As Excel.Workbook
    Dim xlsheet As Excel.Worksheet

'Step 2: Start Excel, then add a workbook and a worksheet.
    Set xl = New Excel.Application
    Set xlwkbk = xl.Workbooks.Add
Set xlsheet = xlwkbk.Worksheets.Add
'Step 3: Make Excel visible
xl.Visible = True
'Step 4: Memory Clean up.
Set xl = Nothing
Set xlwkbk = Nothing
Set xlsheet = Nothing
End FunctionThe following outlines what the steps in the code do:
Declaring the necessary variables: In step 1, declare three variables:
xlis an object variable that exposes the ExcelApplicationobjectxlwkbkis an object variable that exposes the ExcelWorkbookobjectxlsheetis an object variable that exposes the ExcelWorksheetobject
Starting a new instance of Excel with a new Workbook and Worksheet: In step 2, first create a new instance of Excel and assign that instance to your
xlobject variable. From here, thexlobject variable is your tie into the Excel application, exposing all objects, properties and variables that you would normally have if you were working directly in Excel.Next, you open a new workbook by using the
Workbooks.Addmethod of thexlobject variable. Note that you are assigning the new workbook to yourxlwkbkvariable. At this point, yourxlwkbkvariable actually represents a real workbook, exposing all objects, properties and variables that you would normally have if you were working with a workbook directly in Excel.Finally, you add a new worksheet by using the
Worksheets.Addmethod of thexlwkbkobject variable. Note that you are assigning the new worksheet to yourxlsheetvariable. At this point, yourxlsheetvariable actually represents a real worksheet, exposing all objects, properties and variables that you would normally have if you were working with a worksheet directly in Excel.Making Excel visible: By default, an instance of Excel created via automation is not visible. Although not necessary, it's generally a good practice to make the instance of Excel visible for a couple of reasons. First, should anything go wrong during the procedure, debugging becomes easier if you can see the Excel spreadsheet. Secondly, you can easily close the instance of Excel in debug mode by closing out the Excel window. If the instance is not visible, you have to kill it by going into the Windows Task Manager and ending the process there.
Cleaning up memory by closing the open objects: In step 4, it is generally good practice to release the objects assigned to your variables. This reduces the chance of any problems caused by rogue objects that may remain open in memory. As you can see in the code, you simply set the variable to
Nothing.
Congratulations! You have just created your first automation procedure.
Now that you have successfully created your first automation procedure, it's time to try something more meaningful; sending Access data to Excel, the first step in creating an Excel report from your Access analysis.
The process of sending your Access data to Excel can generally be broken down into three main actions:
First, you identify the dataset you want to send to Excel and assign it to a
Recordsetobject.Next, you open Excel and copy the Recordset to a spreadsheet using Excel's
CopyFromRecordsetmethod.Finally, since the
CopyFromRecordsetmethod does not transfer column headings, you must add your dataset's column headings and add them to the spreadsheet.
Let's go through the following example procedure, where you send the PvTblFeed table to a tab called "Pivot Table Feed."
Function SendRecordset()

'Step1: Declare the objects and variables you will work with
   Dim MyRecordset As ADODB.Recordset
   Dim xl As Excel.Application
   Dim xlwkbk As Excel.Workbook
   Dim xlsheet As Excel.Worksheet
   Dim i As Integer

'Step 2: Start Excel, then add a workbook and a worksheet
   Set xl = New Excel.Application
   Set xlwkbk = xl.Workbooks.Add
   Set xlsheet = xlwkbk.Worksheets.Add
   xlsheet.Name = "Pivot Table Feed"

'Step3: Make the instance of Excel visible
   xl.Visible = True
'Step 4: Assign a dataset to the recordset object
Set MyRecordset = New ADODB.Recordset
   MyRecordset.Open "PvTblFeed", CurrentProject.Connection

'Step 5: Copy the records to the active Excel sheet
   With xlsheet
   xl.Range("A2").CopyFromRecordset MyRecordset
   End With

'Step 6: Add column heading names to the spreadsheet
   For i = 1 To MyRecordset.Fields.Count
   xl.ActiveSheet.Cells(1, i).Value = MyRecordset.Fields(i - 1).Name
   Next i

'Step 7: Memory Clean up
   Set MyRecordset = Nothing
   Set xl = Nothing
   Set xlwkbk = Nothing
   Set xlsheet = Nothing

End Function
The following outlines what the steps in the code do:
Declaring the necessary objects and variables: In Step 1, you first declare five variables:
MyRecordsetis aRecordsetobject that holds the results of the data pull.xlis an object variable that exposes the ExcelApplicationobject.xlwkbkis an object variable that exposes the ExcelWorkbooksobject.xlsheetis an object variable that exposes the ExcelWorksheetobject.iin an integer variable that is used to add column headings.
Starting a new instance of Excel with new Workbook and Worksheet: Step 2 creates a new instance of Excel, opens a new workbook and adds a new worksheet. Note that you give the new worksheet a name, "Pivot Table Feed."
Making Excel visible: Step 3 makes the instance of Excel visible.
Assigning data to your
Recordset: Step 4 specifies that your Recordset is read-only and is filled with data from the PvTblFeed table found in the ZalexCorp Restaurant Equipment and Supply.accdb Access database.Copying the Recordset into Excel: By the time you reach step 5, the
MyRecordsetobject is filled with data from the PvTblFeed table. In Step 5, you use Excel'sCopyFromRecordsetmethod to get it out and into your spreadsheet. In this example, you are copying the data onto your newly created sheet starting at cell A2.Adding column headers: As you know the
CopyFromRecordsetmethod does not return column headers or field names. There are several ways to fill in the column headers for a dataset. In Chapter 8, you used an array to fill in the column headers. This example demonstrates how you can enumerate through each field in the Recordset to automatically get the name of each header and enter it into Excel.Cleaning up the open objects: This step releases the objects assigned to your variables, reducing the chance of any problems caused by rogue objects that may remain open in memory.
You will sometimes come across a scenario where you have to send two or more datasets to Excel into different tabs. This is as easy as repeating parts of the automation procedure for a different Recordset. The following code sends the PvTblFeed table to a tab called "Pivot Table Feed" and then sends the MainSummary table to another tab in the same the workbook.
Function SendMoreThanOneRecordset()

'Step1: Declare the objects and variables you will work with
   Dim MyRecordset As ADODB.Recordset
   Dim xl As Excel.Application
   Dim xlwkbk As Excel.Workbook
   Dim xlsheet As Excel.Worksheet
   Dim i As Integer

'Step 2: Start Excel, then add a workbook and a worksheet
   Set xl = New Excel.Application
   Set xlwkbk = xl.Workbooks.Add
   Set xlsheet = xlwkbk.Worksheets.Add
   xlsheet.Name = "Pivot Table Feed"

'Step3: Make the instance of Excel visible
   xl.Visible = True

'Step 4: Assign a dataset to the recordset object
   Set MyRecordset = New ADODB.Recordset
   MyRecordset.Open "PvTblFeed", CurrentProject.Connection

'Step 5: Copy the records to the active Excel sheet
   With xlsheet
xl.Range("A2").CopyFromRecordset MyRecordset
   End With

'Step 6: Add column heading names to the spreadsheet
   For i = 1 To MyRecordset.Fields.Count
   xl.ActiveSheet.Cells(1, i).Value = MyRecordset.Fields(i - 1).Name
   Next i

'Step 7: Close active recordset: Repeat steps 4-6 for new a recordset
   MyRecordset.Close
   MyRecordset.Open "ForecastSummary", CurrentProject.Connection

   Set xlsheet = xlwkbk.Worksheets.Add
   xlsheet.Name = "Forecast Summary"

   With xlsheet
   xl.Range("A2").CopyFromRecordset MyRecordset
   End With

   For i = 1 To MyRecordset.Fields.Count
   xl.ActiveSheet.Cells(1, i).Value = MyRecordset.Fields(i - 1).Name
   Next i

'Step 8: Memory Clean up
   Set MyRecordset = Nothing
   Set xl = Nothing
   Set xlwkbk = Nothing
   Set xlsheet = Nothing

End FunctionExcel automation goes beyond getting your data to Excel. With Excel automation, you can have Access dynamically add formatting, set print options, add an AutoFilter, create pivot tables, build charts, and the list goes on.
However, the rub here is there are countless actions you can take after your Access data reaches Excel. Where do you begin to learn how to create a pivot table using VBA, create and format a chart with VBA, or even add an AutoFilter? While it's true there are many resources that can help you learn VBA, the reality is that this kind of a learning process takes trial and error as well as time to build experience working with the Excel object model. Even if programming Excel pivot tables and charts were within the scope of this book, there are enough nuances to Excel programming that any instruction that could fit into one chapter would fall short.
So what is an aspiring analyst to do? After all, the reason you are reading this book is that you need to implement automation now. The answer is to simply let Excel program for you!
In Excel, macros are used as a way to record actions that can be played back when needed. When you start recording a macro, Excel automatically generates one or more lines of code for every action you take. After you stop recording, you can open the macro to review, edit, or even copy the generated code. The idea here is after you send Access data to Excel, you can perform some actions on your data while recording a macro, and then copy the macro generated-code into the Access module where you have the automation procedure. The next time you run the automation procedure, the recorded macro actions will run right from Access.
To illustrate this concept, take some time to walk through the following demonstration.
In the sample database, execute the
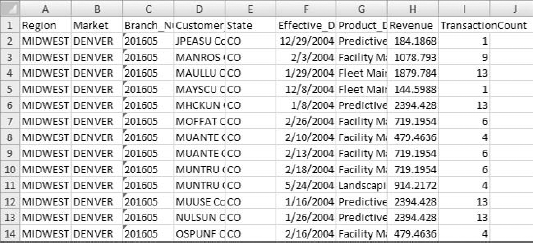
SendRecordsetfunction in the Module titled "Excel_Automation_2." Once the function finishes running, you should have an Excel spreadsheet that looks similar to the one shown in Figure 16-2.In Excel, start a new macro, name it "MyMacro" and click the OK button. At this point, your macro will start recording your actions.
Make the following formatting changes:
Click cell A1.
Go up to the Data tab and click the Filter icon.
Select cells A1 through I1 and change the font style to bold.
Select columns A through I, then click the Home tab and select Format

Click cell A1
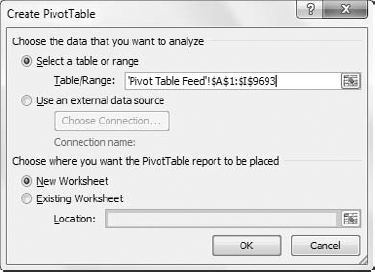
Select the Insert tab and click the pivot table icon. This activates the Create PivotTable dialog box shown in Figure 16-3. Click the OK button to create the pivot table. A new pivot table and a PivotTable Field List appears.
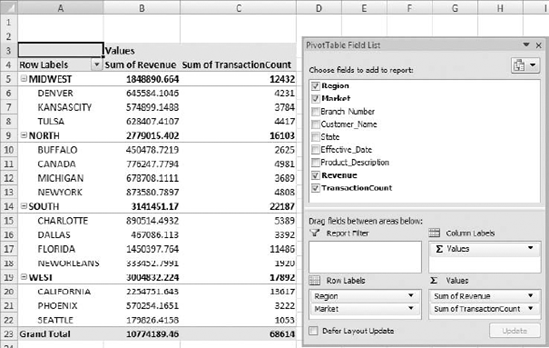
In the PivotTable Field List, select the check boxes next to the following fields:
Region, Market, Revenue, andTransactionCount. Figure 16-4 illustrates the selections.
Click cell A1.
Stop the macro recording.
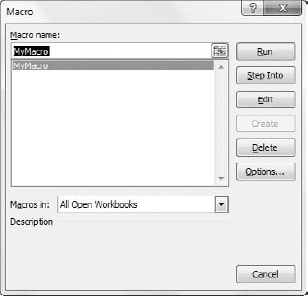
Now that you have finished recording the necessary actions, you can copy the macro-generated code out of Excel and into Access. In order to do this, click the Developer tab and select Macros. This opens up the Macro dialog box shown in Figure 16-5. Select MyMacro, then select Edit.
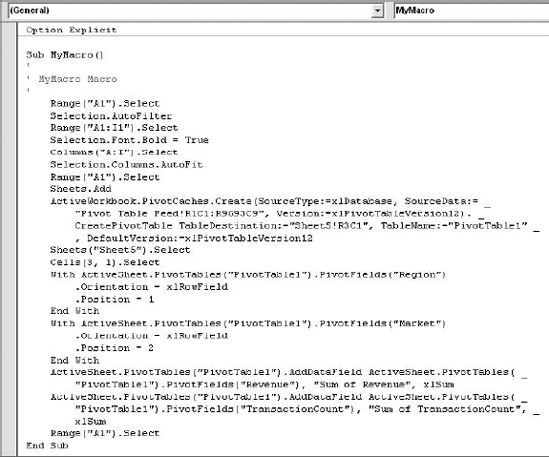
The code in your macro should look similar to the code shown in Figure 16-6. At this point, all you have to do is select and copy all the code within the
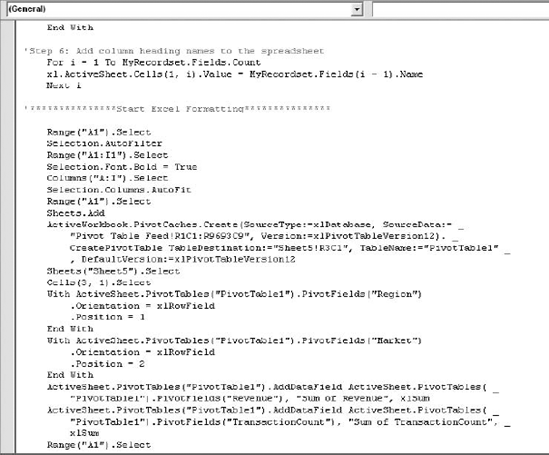
Subprocedure (don't include the comments orEnd Sub).Open the "Excel_Automation_2" module in Access and paste the code after the step where you enumerate through the column headings (Step 6) as shown in Figure 16-7.
Tip
Be sure to paste your macro-generated code in a place within your procedure that makes sense. For example, you don't want the procedure to encounter this code before the data has been sent to Excel. Generally, Excel generated code can logically be added directly after the section of code that applies column headings.
Also, notice that in Figure 16-7, there is a clear marker that indicates where the Excel generated code starts. It's good practice to clearly define the point where you are working with Excel generated code. This ensures that you can easily find the section of code in the event you need to replace it, or remove it all together.
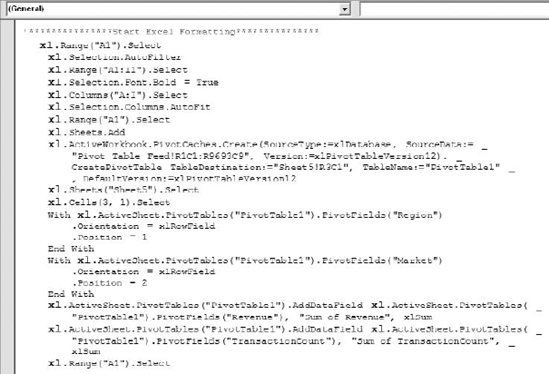
You're almost done. Now add the appropriate application variable name to each foreign object that is a direct property of that application object. In other words, since the objects and properties in the macro-generated code come from the Excel Object Library, you need to let Access know by prefacing each of these with the name you assigned to the Excel application. For example:
Range("A1").Selectwould be edited toxl.Range("A1").Selectbecausexlis the variable name you assigned to the Excel application object andRangeis used as a direct property of the Excel application. In this example, you prefix each one of the following objects withxl.:Range, Selection, Columns, Cells, Sheets, ActiveWorkbook, andActiveSheet. Figure 16-8 demonstrates what your code should look like once you have made this change.Note that you only have to add the application variable name to object and properties that are not being used by an object or property of a higher object. To drive this point home, take these two lines of code for example:
xl.Columns("A:I").Select
  xl.Selection.Columns.AutoFit
Notice that when
Columnsis used as a property of theSelectionobject it is not prefaced with the variable namexl.Warning
Be warned that skipping Step 9 causes you to get these seemingly unpredictable run-time errors:
Run-time error '1004': Method 'Range' of object '_Global' failed
Run-time error '91': Object variable or With block variable not set
Save your module and test it.
You have just built your first fully automated Excel report! Keep in mind that this is a simple example. The possibilities are as expansive as Excel itself. For example, you could create a chart, create a pivot table, or apply subtotals. Using this method, you can literally create a report purely in VBA and then run it whenever you want.
In the previous section, you learned that there are Excel objects and properties that you needed to point back to the Excel Application object by prefacing them with the name you assigned to the Excel application. For example: Range("A1").Select would be edited to xl.Range("A1").Select because xl is the name you assigned to the Excel Application object.
The problem is that this can be quite an ordeal if you have recorded a macro that generated a substantial block of code. It would take a long time to search through the macro-generated code and preface each appropriate object or property. However, there are Excel objects and properties used repeatedly in your macro-generated code. These are Range, ActiveSheet, ActiveWorkbook, ActiveCell, Application, and Selection. The good news is that you can leverage this fact by filtering these objects and properties into the four most commonly used keywords.
The four most common keywords are:
RangeSelectionActiveApplication
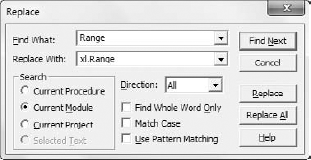
This is where the Find and Replace functionality can come in handy. With Find and Replace, you can find these keywords and preface them all in one fell swoop. To do this, follow these steps:
Select all the macro-generated code in the Visual Basic Editor.
Then you select Edit

As you can see, all you have to do is enter each keyword into the Find What drop-down list, and enter the prefaced keyword in the Replace With drop-down list. Keep in mind that depending on your macro-generated code, some of these keywords may not produce any hits, which is OK.
Warning
Notice in Figure 16-9 that there is a search option called Selected Text. This means that any of the Find and Replace functionalities that you apply are limited to the selected text. It is extremely important that you select the macro-generated code and ensure that the Selected Text option is active before you start any Find and Replace procedures. Otherwise, you could inadvertently change code in other parts of your module.
Bear in mind that these keywords only make up the bulk of the objects and properties that may need to be prefaced in your macro-generated code. There are others that you'll need to preface by hand, the most common of which are:
ColumnsCellsRowsSheets
Why can't you preface these using Find and Replace? It's a question of object hierarchy. Often times, these are used as properties of higher objects, which means you would not need to preface them because the higher object is prefaced. Here's an example:
xl.Columns("A:I").Select
  xl.Selection.Columns.AutoFit
Notice that when Columns is used as a property of the Selection object it is not prefaced. Prefacing the Columns, Cells, and Rows properties manually ensures that you don't unintentionally cause an error.
Admittedly, bringing your Excel macro-generated code into Access and manipulating the code to run in an Access module can be a daunting prospect for some. Fortunately, there is an easier alternative. The alternative is to keep the macro-generated code in Excel and simply fire the macro from Access. That is to say, Access will do nothing more than just call the macro and run it. The following code demonstrates how to fire a macro from Access.
Function RunExcelMacro()

'Step1: Declare the objects you will work with.
   Dim xl As Excel.Application
   Dim xlwkbk As Excel.Workbook

'Step 2: Start Excel, then open the target workbook.
   Set xl = New Excel.Application
   Set xlwkbk = xl.Workbooks.Open("C:Book1.xlsm")

'Step 3: Make Excel visible
   xl.Visible = True

'Step 4: Run the target macro
   xl.Run "Macro1"

'Step 5: Close and save the workbook, then close Excel
   xlwkbk.Close (True)
   xl.Quit
'Step 6: Memory Clean up. Set xl = Nothing Set xlwkbk = Nothing End Function
The following outlines what the steps in the code do:
Declaring the necessary objects: In Step 1, you first declare two variables:
xlis an object variable that exposes the ExcelApplicationobject.xlwkbkis an object variable that exposes the ExcelWorkbookobject.
Starting a new instance of Excel with a new Workbook and Worksheet: In Step 2, you create a new instance of Excel and open the target workbook—the workbook that contains the macro you need to run.
Making Excel visible: Step 3 makes the instance of Excel visible.
Running the target macro: Step 4 runs the target macro.
Closing and saving the target Workbook: This step closes and saves the target workbook. The
Trueargument inxlwkbk.Close(True)indicates that you want the workbook saved after the macro has run. If you do not want to save the target workbook, change this argument toFalse. Also in Step 5, you quit the Excel application, effectively closing the instance of Excel.Cleaning up open objects: This steps releases the objects assigned to your variables, reducing the chance of any problems caused by rogue objects that may remain open in memory.
There is no arguing that Excel's Macro Recorder can prove to be an invaluable tool when building an automation procedure. The macro-generated code it provides cannot only get you up and running quickly but also can help you learn some of Excel's programming fundamentals. The one drawback to using macro-generated code, however, is that the code itself is rather inefficient. This is because the macro recorder not only records the functional actions that give your macro its utility, but it also records mouse moves, mouse clicks, mistakes, redundant actions, etc. This leaves you with lots of useless code that has nothing to do with macro's original purpose. Although the impact of this superfluous code is typically negligible, larger automation procedures can take speed and performance hits due to these inefficiencies. In that light, it's generally a good practice to take some time to clean up and optimize your macro-generated code.
If you want to enter a formula in a cell within Excel, you have to select that cell first and then enter the formula. Indeed, this is true with most actions; you have to select the cell first and then perform the action. As you are recording a macro, you are moving around and clicking each cell on which you need to perform an action. Meanwhile the macro recorder is generating code for all that navigation you are doing. However, the fact is that in VBA, you rarely have to explicitly select a cell before performing an action on it. Therefore, all that code is superfluous and is not needed. Consider the following macro-generated code:
Range("A1:I1").Select
      Selection.Font.Bold = True
In this example, the macro is selecting a range of cells first and then changing the font style to bold. It's not necessary to select the range first. This code can be changed to read:
Range("A1:I1").Font.Bold = TrueAnother version of this type of behavior is the shown in the following code:
Range("A20").Activate
        ActiveCell.FormulaR1C1 = "=4+4"
In this example, a cell is activated and then a formula is entered into the cell. Again, it is not necessary to select the cell before entering the formula. This code can be changed to read:
Range("A20").FormulaR1C1 = "=4+4"Navigation code typically makes up a majority of the superfluous entries in your macro-generated code. These are easy to spot and change. Remember these general rules:
If one line contains the word
Selectand the following line containsSelection, you can adjust the code.If one line contains the word
Activateand the following line containsActiveCell, you can adjust the code.
Certain actions you take in Excel while recording a macro generate a pre-defined collection of default settings. To demonstrate what this means, open Excel and start recording a macro. Click on any cell and simply change the Font to 12-pitch font. Stop the recording. The code that is generated will look similar to this:
Range("A2").Select
      With Selection.Font
          .Name = "Calibri"
          .Size = 12
          .Strikethrough = False
          .Superscript = False
          .Subscript = False
          .OutlineFont = False
          .Shadow = False
          .Underline = xlUnderlineStyleNone
          .ThemeColor = xlThemeColorLight1
          .TintAndShade = 0
          .ThemeFont = xlThemeFontNone
      End With
Remember that all you did was change the font of one cell, but here you have a litany of properties that reiterate default settings. These default settings are unnecessary and can be removed. This macro can and should be adjusted to read:
Range("A2").Font.Size = 12Tip
You can easily spot the lines of code that represent default setting because they are usually encapsulated within a With statement.
While you are recording a macro, you will inevitably make missteps and, as a result, redo actions once or twice. As you can imagine, the macro recorder will steadily record these actions, not knowing they are mistakes. To illustrate this, look at the following code:
Range("D5").Select
      Selection.NumberFormat = "$#,##0.00"
      Selection.NumberFormat = "$#,##0"
      Range("D4").Select
      Range("D5").Select
      Range("A2").Select
      With Selection.Font
          .Name = "Calibri"
          .Size = 12
          .Strikethrough = False
          .Superscript = False
          .Subscript = False
.OutlineFont = False
.Shadow = False
.Underline = xlUnderlineStyleNone
.ThemeColor = xlThemeColorLight1
.TintAndShade = 0
.ThemeFont = xlThemeFontNone
End With
Range("A2").Select
With Selection.Font
.Name = "Calibri"
.Size = 10
.Strikethrough = False
.Superscript = False
.Subscript = False
.OutlineFont = False
.Shadow = False
.Underline = xlUnderlineStyleNone
.ThemeColor = xlThemeColorLight1
.TintAndShade = 0
.ThemeFont = xlThemeFontNone
End With
Range("D5").SelectBelieve it or not, there is only one real action being performed here: Change the number format of cell D5. So why are there so many lines of code? If you look closely, you will see that number formatting has been applied twice, first with two decimal places and then with no decimal places. In addition, the font in Cell A2 was changed to 12-pitch font, then changed back to 10-pitch font. If you remove these missteps, you get a more efficient set of code.
Range("D5").NumberFormat = "$#,##0"Tip
When you hit the Undo command while recording a macro, the macro recorder actually erases the lines of code that represent the actions that you are undoing. In that light, make sure you utilize the Undo command before going back to correct your missteps. This ensures you don't record mistakes along with good actions.
You will notice that while you are running an Excel macro, your screen flickers and changes as each action is performed. This is because Excel's default behavior is to carry out a screen update with every new action. Unfortunately, screen updating has a negative impact on macros. Because the macro has to wait for the screen to update after every action, macro execution is slowed down. Depending on your system memory, this can have a huge impact on performance.
To resolve this issue, you can temporarily disable screen updating by inserting the following code before your macro-generated code:
xl.ScreenUpdating = False
To turn screen updating back on, insert the following code after your macro-generated code.
xl.ScreenUpdating = True
Note
In the code example above, xl is the variable name assigned to the Excel Application object. This can be different depending on the variable name you give to the Excel Application object.
It typically doesn't occur to most Excel users to automate Access using Excel. Indeed, it's difficult for most to think of situations where this would even be necessary. Although there are admittedly few mind-blowing reasons to automate Access from Excel, you may find some of the automation tricks found in this section strangely appealing. Who knows? You may even implement a few of them.
You should be familiar with the fact that if you want to work with another object's Object Library, you must set references. In order to work with Access, you must set a reference to the Microsoft Access Object Library as illustrated in Figure 16-10. In addition to the Access Object Library, you will note that there is also a reference set to the Microsoft DAO Object Library. The DAO (Data Access Objects) library allows you to easily create and manipulate the database objects within Access.
Note
It's generally best to select the latest version of the Microsoft DAO library available. You will notice that in Figure 16-10, latest version of the Microsoft DAO Object Library is 3.6. Don't be too concerned if you only have earlier versions available; the examples in this chapter will run fine with those earlier version.
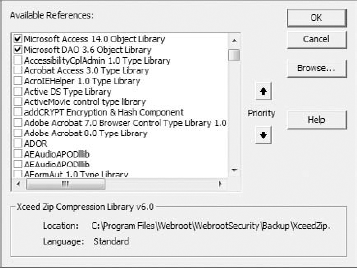
Figure 16.10. When automating Access, you should set a reference to both the Access Object Library and the DAO Object Library.
At this point, open the Excel workbook called Chapter16_SampleFiles.xls installed with the sample files for this book. There you will find the code for the examples in this section. Take some time to review and test out each example.
Here's a nifty technique for those of you who often copy and paste the results of your Access queries to Excel. In this technique, you use DAO to run an Access query in the background and output the results into Excel via a Recordset object.
Sub RunAccessQuery()

'Step 1: Declare your variables
   Dim MyDatabase As DAO.Database
   Dim MyQueryDef As DAO.QueryDef
   Dim MyRecordset As DAO.Recordset
   Dim i As Integer

'Step 2: Identify the database and query
   Set MyDatabase = DBEngine.OpenDatabase _
   ("C:OffTheGridalexCorp Restaurant Equipment and Supply.accdb")
   Set MyQueryDef = MyDatabase.QueryDefs("Revenue by Period")

'Step 3: Open the query
   Set MyRecordset = MyQueryDef.OpenRecordset

'Step 4: Clear previous contents
   Sheets("Main").Select
   ActiveSheet.Range("A6:K10000").ClearContents
'Step 5: Copy the recordset to Excel
ActiveSheet.Range("A7").CopyFromRecordset MyRecordset
'Step 6: Add column heading names to the spreadsheet
For i = 1 To MyRecordset.Fields.Count
AzctiveSheet.Cells(6, i).Value = MyRecordset.Fields(i - 1).Name
Next i
End SubThe following outlines what the steps in the code do:
Declaring the necessary variables: In Step 1, you first declare four variables:
Setting the target database and target query: Step 2 specifies the database that holds your target query as well as which query will be run. Assigning the query to a
QueryDefobject allows you to essentially open the query in memory.Opening the query into a Recordset: In this step, you literally run the query in memory and output the results into a Recordset. Once the results are in a Recordset, you can use it just as you would any other Recordset.
Clearing contents in the spreadsheet: This step clears the "Main" worksheet before copying the Recordset. This ensures that all data from the previous pull has been removed before bringing in fresh data.
Copying the Recordset into Excel: In Step 5, you use Excel's
CopyFromRecordsetmethod to get the returned dataset into your spreadsheet. In this example, you are copying the data in theMyRecordsetobject onto the sheet called "Main" starting at cell A7.Adding column headers: In Step 6, you enumerate through each field in the Recordset to automatically get the name of each header and enter it into Excel.
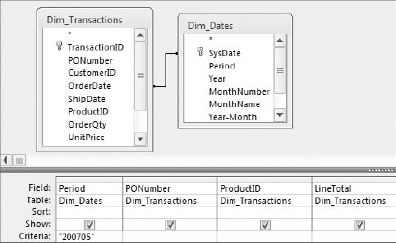
An Access parameter query is interactive, prompting you for criteria before the query is run. A parameter query is useful when you need to ask a query different questions using different criteria each time it is run. To get a firm understanding of how a parameter query can help you, build query in Figure 16-11. With this query, you want to see the all purchase orders logged during the 200705 system period.
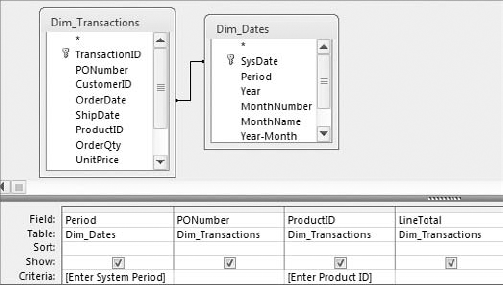
Although this query gives you what you need, the problem is that the criterion for system period is hard-coded as 200705. That means if you want to analyze revenue for a different period, you essentially have to rebuild the query. Using a parameter query allows you to create a conditional analysis; that is, an analysis based on variables you specify each time you run the query. To create a parameter query, simply replace the hard-coded criteria with text that you have enclosed in square brackets ([ ]), as shown in Figure 16-12.
![To create a parameter query, replace the hard-coded criteria with text enclosed in square brackets [ ].](http://imgdetail.ebookreading.net/business/42/9780470567012/9780470567012__the-excel-analysts__9780470567012__figs__1612.png)
Figure 16.12. To create a parameter query, replace the hard-coded criteria with text enclosed in square brackets [ ].
Running a parameter query forces the Enter Parameter Value dialog box to open and ask for a variable. Note that the text you typed inside the brackets of your parameter appears in the dialog box. At this point, you would simply enter your parameter, as shown in Figure 16-13.
By the way, you are not in any way limited in the number of parameters you can use in your query. When you run this query, you are prompted for both a system period and a product ID, allowing you to dynamically filter on two data points without ever having to rewrite your query.
The idea behind running an Access parameter query with Excel is simple. Have the user input the parameters on your spreadsheet, then use automation to run the parameter query in memory and output the results to Excel.
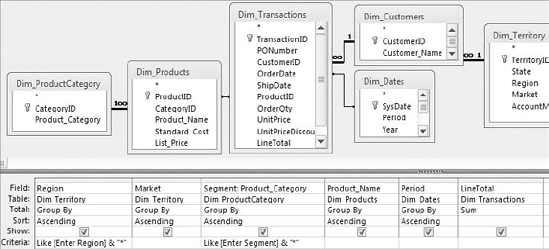
In the sample database, you will find a query called MyParameterQuery. A quick look at this query in Design view (Figure 16-15) reveals that this query checks for two parameters: region and business segment.
Tip
You will notice that the parameters in Figure 16-15 have been combined with the asterisk wildcard character (*). This useful technique forces all records to be returned if the parameter is left blank. Without the wildcard characters, blank parameters would cause the query to return no records. This trick essentially gives you the option of entering the parameters to filter the records or ignore the parameter to return all records.
Using the wildcard with a parameter also allows users to enter in a partial parameter and still get results. Suppose, for example, that the criterion in your parameter query is:
Like [Enter Lastname] & "*"
Entering A as the parameter would return all last names that start with the letter A.
Or suppose the criterion in your parameter query is:
Like "*" & [Enter Lastname] & "*"
Entering A would return all last names that contain the letter A.
Figure 16-16 illustrates that the "Chapter16_SampleFiles.xlsm" workbook has two cells designated as input fields: one for region and one for business segment.
Take a moment to review the code that brings it all together. This technique allows you to build some interesting reporting solutions with relatively little effort.
Sub RunAccessQuery()

'Step 1: Declare your variables
   Dim MyDatabase As DAO.Database
   Dim MyQueryDef As DAO.QueryDef
   Dim MyRecordset As DAO.Recordset
   Dim i As Integer

'Step 2: Identify the database and query
   Set MyDatabase = DBEngine.OpenDatabase _
   ("C:OffTheGridalexCorp Restaurant Equipment and Supply.accdb")
   Set MyQueryDef = MyDatabase.QueryDefs("MyParameterQuery")

'Step 3: Define the Parameters
   With MyQueryDef
        .Parameters("[Enter Segment]") = Range("D3").Value
        .Parameters("[Enter Region]") = Range("D4").Value
   End With

'Step 4: Open the query
   Set MyRecordset = MyQueryDef.OpenRecordset

'Step 5: Clear previous contents
   Sheets("Main").Select
   ActiveSheet.Range("A6:K10000").ClearContents

'Step 6: Copy the recordset to Excel
   ActiveSheet.Range("A7").CopyFromRecordset MyRecordset

'Step 7: Add column heading names to the spreadsheet
   For i = 1 To MyRecordset.Fields.Count
   ActiveSheet.Cells(6, i).Value = MyRecordset.Fields(i - 1).Name
   Next i

End Sub
The following outlines what the steps in the code do:
Declaring the necessary variables: For step 1, declare four variables:
Setting the target database and target query: In Step 2, you specify the database that holds your target query as well as which query will be run.
Define parameters: In Step 3, you expose the query parameters in order to assign values to each one. As you can see, the name of each parameter matches the parameter name as entered in Query Design view (Figure 16-15). The values assigned to each parameter come from the corresponding input boxes on the Excel spreadsheet (Figure 16-16).
Opening the query into a Recordset: Step 4 runs the query in memory and outputs the results into a Recordset.
Clearing contents in the Spreadsheet: Step 5 clears the "Main" worksheet before copying the Recordset, ensuring that all data from the previous pull has been removed before bringing in fresh data.
Copying the Recordset into Excel: In Step 6, you use Excel's
CopyFromRecordsetmethod to get the returned dataset into your spreadsheet.Adding column headers: In Step 7, you enumerate through each field in the Recordset to automatically get the name of each header and enter it into Excel.
You can run Access macros from Excel, using automation to fire the macro without opening Access. This technique is not only useful for running those epic macros that involve a multi-step series of 20 queries but can also come in handy for everyday tasks like outputting Access data to an Excel file. For example, the following code fires an Access macro that exports a table to an Excel file, and then opens the file with Excel.
Note
Keep in mind that Access 2007 and 2010 have security features that may prevent your macros from running. Feel free to review Chapter 6 to learn how to manage macro security.
Sub OpenAccessMacro()

'Step 1: Declare your variables
   Dim AC As Access.Application

'Step 2: Start Access and open the target database
   Set AC = New Access.Application
   AC.OpenCurrentDatabase ("C:OffTheGridalexCorp Restaurant
Equipment and Supply.accdb")
'Step 3: Run the target macro, then close Access
With AC
.DoCmd.RunMacro "MyMacro"
.Quit
End With
Workbooks.Open "C:OffTheGridMyExcel_Output.xlsx"
End SubAs you learned in Chapter 11, Access reports allow you to build professional looking reports that have a clean PDF-style look and feel. This example demonstrates how you can open your Access reports right from Excel. The appealing thing about this technique is that you don't see Access at all; the report goes straight to a Word rich-text file!
Note
It takes a few seconds for Access to output the target report to rich text format. The larger the report, the longer the conversion takes. With very large reports, you may see the hourglass for a few minutes. Ultimately, you can weigh the options and determine your patience threshold.
Sub OpenAccessReport()

'Step 1: Declare your variables
   Dim AC As Access.Application

'Step 2: Start Access and open the target database
   Set AC = New Access.Application
   AC.OpenCurrentDatabase ("C:OffTheGridalexCorp Restaurant
 Equipment and Supply.accdb")

'Step 3: Open the target report as a Word rich text file
   With AC
        .DoCmd.OpenReport "Revenue Report", acViewPreview
        .DoCmd.RunCommand acCmdOutputToRTF
        .Quit
   End With

End SubThere may be times when you or your clients need to switch focus to an Access form. This example demonstrates how you can open an Access form from Excel.
Sub OpenAccessForm()

'Step 1: Declare your variables
   Dim AC As Access.Application

'Step 2: Start Access and open the target database
   Set AC = New Access.Application
   AC.OpenCurrentDatabase ("C:OffTheGridalexCorp Restaurant
Equipment and Supply.accdb")

'Step 3: Open the target form and make Access visible
   With AC
        .DoCmd.OpenForm "MainForm", acNormal
        .Visible = True
   End With

End Sub
Note
You will notice that the last few examples you walked through make use of Access' DoCmd object. This object exposes methods that are essentially macro actions. That is to say, if you go to Access and start a new macro, the available actions you will see listed there are the same ones exposed via DoCmd methods. What's the point? The point is that you can perform virtually any action that a macro allows you to perform, simply by using the DoCmd object. This means that you can build a virtual Access macro strictly with VBA.
During your integrated processes, you may routinely increase or decrease the number of records and tables in your database. As time goes on, your Access database grows in file size. This is because Access does not release file space. All the space needed for the data you move in and out of your database are held by your Access file, regardless if the data is still there or not. In that light, it's critical that you run Compact and Repair on your Access database regularly. Among other things, running Compact and Repair defragments your database, releasing any unused space and ensuring that your database does not grow to an unmanageable size.
Note
To manually compact and repair your database in Access 2007, click the Office icon and select Manage
To manually compact and repair your database in Access 2010, go to the application ribbon and select File
Office automation enables you to Compact and Repair your databases right from code. The example outlined in the following code demonstrates how to run Compact and Repair on an Access database directly from Excel.
Sub CompactRepairFromExcel()

'Step 1: Declare your variables
   Dim OriginalFile As String
   Dim BackupFile As String
   Dim TempFile As String

'Step 2: Identify the target database assign file paths
   OriginalFile = "C:OffTheGridMyDatabase.accdb"
   BackupFile = "C: OffTheGridMyDatabaseBackup.accdb"
   TempFile = "C: OffTheGridMyDatabaseTemporary.accdb"

'Step 3: Make a backup copy of database
   FileCopy OriginalFile, BackupFile

'Step 4: Perform the compact and repair
   DBEngine.CompactDatabase OriginalFile, TempFile

'Step 5: Delete the old database
   Kill OriginalFile

'Step 6: Rename the temporary database to the old database name
   Name TempFile As OriginalFile

End Sub
The following outlines what the steps in the code do:
Declaring the necessary variables: In Step 1, you first declare three string variables that will hold file names.
Assigning file names: In Step 2, you are assigning each of the string variables a file name.
The
OriginalFilestring variable is assigned the file path and name of the target database. This variable will represent your database during the procedure.The
BackupFilestring variable is assigned the file path and name of a backup file you will create during this procedure.The
TempFilestring variable is assigned the file path and name of a temporary file you will create during this procedure.
Making a backup copy of the target database: In Step 3, you use the
FileCopyfunction to make a backup of theOriginalFile(the target database). Although this step is not necessary for the Compact and Repair procedure, it's generally a good practice to make a backup of your database before running this level of VBA on it.Executing the Compact and Repair: To understand what is going on from this point on, you must understand how Access actually performs Compact and Repair. When you Compact and Repair a database manually, it seems as though Access simply compresses your original database; this is not the case. Access actually creates a second file and essentially copies your original database minus the empty file space. Access then deletes the old file. You need to take the same action with your code.
In that light, Step 4 executes the Compact and Repair, specifying the original database and specifying the file path of the temporary database.
Deleting the old file: At this point, you have two copies of your database: the original database, and a second database, which is a copy of your original without the empty file space. Step 5 deletes the original database, leaving you with the copy.
Renaming the temporary file: In Step 6, you simply rename the temporary file, giving it the name of your original database. This leaves you with a database that is compacted and optimized.
Both Excel and Access applications have strengths, which you routinely leverage through manual processes. For example, you may routinely crunch data in Access only to bring the results into Excel for presentation. Or, you may send Excel data to Access only to open Access and run a set of queries or output a report. The objective of automation is to take all manual intervention out of these processes by controlling one application with another.
Access data processing lends itself quite nicely to automation. The typical automation scenario is one where you send Access data to Excel, then use Excel automation to build charts, pivot tables, or some other presentation mechanism displaying the data. From Excel, you can use Access automation to fire an Access macro, run Access queries or even open Access reports.
Automation can literally take you out of the processes you have set up, allowing them to run without any human interaction.
