
WHAT'S IN THIS CHAPTER?
Adding a custom dashlet to Alfresco Share
Defining new pages for Alfresco Share sites
Adding new types of sites to Alfresco Share
This chapter guides you through the process of extending Alfresco Share to implement a custom dashlet and a custom page. It walks you through the configuration of each of these into an Alfresco Share project site. It also looks at how you can define new site presets and make them available to your users.
This chapter builds on the foundation reading from Chapter 14. The Alfresco Share customizations that you are going to build will interact with the Knowledge Base repository work from the previous chapter. If you have not worked through the previous chapter, please take time to do so.
This chapter is structured to provide the following sections:
Overview—A high-level explanation of the concepts and application extension points that you will use in the example. You don't have to type in any of the code in this section—it is simply provided to help guide along the conversation.
Installing the Code—A step-by-step guide to the approach you will need to take in order to install all of the sample code on your own Alfresco installation.
Putting It into Action—A walkthrough of your new extensions. Try them out and see what they do!
At the end of this chapter you will find the source code for the samples. This is only provided for reference. To install, you should download the source files from the book's page at www.wrox.com and follow the instructions provided in the section titled "Installing the Code."
In the previous chapter, you worked on the repository-side pieces required to provide a Knowledge Base content model and services. You provided a RESTful interface in the form of a Web script so that external applications could retrieve information from your Knowledge Base.
In this chapter, you'll look at one such external application in the form of Alfresco Share. You will explore Alfresco Share and look at how you can extend it to introduce Knowledge Base functionality into collaborative projects. You will build the following:
A Knowledge Base dashlet
A Knowledge Base page
A Knowledge Base site type (a preset)
This section provides an overview of Alfresco Share and covers what each of these things is. You'll go through them one at a time. There will be some code snippets at times to make the reading a little easier. However, you don't have to type in any code in this section. Just read and enjoy!
Alfresco Share allows users to discover, join, and participate in collaborative sites for content projects. An Alfresco Share site consists of content, users, and tasks around a project or team objective. Sites provide a dynamic place where people can collaborate with the help of productivity tools built around their project.
Sites are preconfigured with applications properly scoped to the project being worked on. They often include things such as a team blog, a project wiki, a team calendar, a document library, discussion boards, and membership management. These applications can be enabled or disabled as the site manager sees fit.
Alfresco Share provides a friendly user interface that makes it very easy for users to discover existing sites or to create new sites. In fact, behind the scenes, sites are actually site spaces in the Alfresco repository. You looked at spaces in the previous chapter. Every interaction with Alfresco Share is actually against a space or a content item in the Alfresco repository.
The repository site spaces are located under the following path:
/Company Home/Sites
For example, if you create a site called My First Site and give it the URL name of first, you will find that you have a space under the Sites folder with the following path:
/Company Home/Sites/first
Each site you create consists of a top-level space with subspaces dedicated for the purposes of the applications configured for the site. The applications use these subfolders to save application-specific content.
In most cases, an application uses a single subspace. In addition, in most cases, an application also uses a single site page for all of its functionality. A site can have many pages; they will appear in a tabbed page navigation component along the top of the application (see Figure 15-1).
As you can see, the site dashboard is only one of many pages available to the site. It is one of two mandatory pages. The other mandatory page is Members. The rest of the pages are entirely optional.
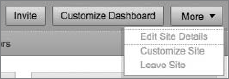
You can configure which pages should be included in the site by clicking the More menu located on the right-hand side of the application and selecting Customize Site (see Figure 15-2).
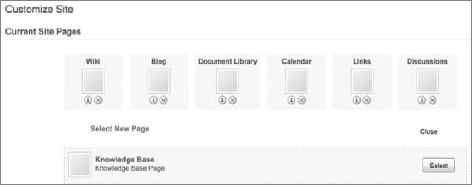
After you click Customize Site, you will be taken to a window where you can select from available application pages (see Figure 15-3). You can add pages to your site or remove existing pages from your site.
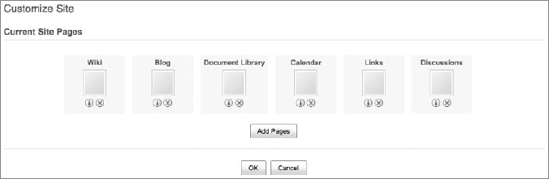
Shown in Figure 15-3 are the default site pages provided with Alfresco Share for the Collaboration Site type. If you create a site using the Create Site dialog, Collaboration Site is the default type of site available to you.
Alfresco Share lets you define new site pages as well as new types of sites. By defining new site pages, you empower site managers to include new and interesting applications in their projects. By defining entirely new types of sites, you enable users to spin up project spaces that have prewired site configurations, pages, and business logic.
When users arrive to a site, they are initially greeted by the site dashboard. The site dashboard provides a place where managers can place one or more dashlets. A dashlet offers a quick view into the content or activities of the site. The Site Activities dashlet, for example, provides a quick glance into the activities of the site and allows for simple sorting right there on the Site Dashboard page. You can use the out-of-the-box dashlets or you can add your own custom dashlets.
Later in this chapter, you will add a custom Knowledge Base dashlet. The Knowledge Base dashlet is a read-only view into the Knowledge Base that provides a quick glance into the population of the Knowledge Base. It shows how many articles are available in the repository for each of the available status values: draft, pending approval, current, and archived.
A dashlet consists of a Spring Web script. For it to appear as an option on the Alfresco Share site dashboard configuration screen, it must have its family element set to site-dashlet in its Web script descriptor:
<webscript>
   <shortname>Knowledge Base</shortname>
   <description>A summary of all knowledge base articles</description>
   <family>site-dashlet</family>
   <url>/components/dashlets/knowledgebase</url>
</webscript>
A simple and typical approach to building a dashlet is to include a scriptable controller and a view template file. Bind these to the GET method and HTML format by naming them as shown here:
JavaScript controller—knowledgebase.get.js
FreeMarker template—knowledgebase.get.html.ftl
The invocation of the Web script is shown in Figure 15-4.
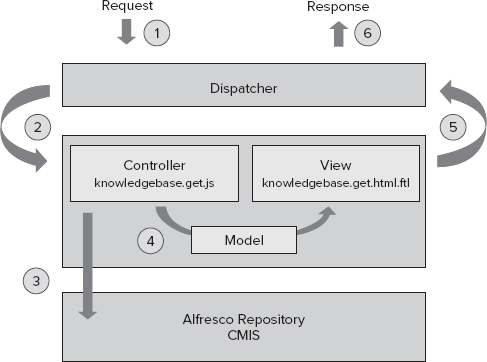
Here is what happens:
The request for the dashlet arrives to the Web script dispatcher.
The dispatcher calls the JavaScript controller (if available).
The controller opens up a connection to the Alfresco repository and uses either a RESTful interface or the CMIS interface to retrieve XML or JSON as pure data.
The controller populates the model with the data needed to render.
The dispatcher calls the view to render HTML markup.
The dispatcher hands the markup back to the requester.
In this case, the requester is the Alfresco Share page renderer itself. The dashlet renders into the site dashboard page at the exact location where the site manager has instructed it to appear.
The design provided thus far for your dashlet is sufficient for simple dashlets with minimal browser dependencies. Good HTML design practices suggest that your dashlet can render HTML-compliant markup and allow the overall Alfresco Share framework to assert the proper CSS used to decorate your dashlet.
However, if your dashlet wants to use CSS includes or browser-side JavaScript, your dashlet will need to inform the Web framework to inject specific dependencies into the HTML <head> tag.
Spring Surf lets your Web scripts declare these kinds of dependencies. All you need to do is add a template with the name knowledgebase.get.head.ftl. The special .head naming convention indicates to Surf that this template should be executed ahead of the Web script's view template. Its output will be stitched into the XHTML compliant <head> tag.
This HEAD generation template has full access to the model generated by the scriptable controller. Thus, the <head> tag for your Web script can be dynamic and based on the model established by the controller.
You can improve on your design once more by ensuring that all markup generated by your dashlet supports internationalization. Internationalization (often abbreviated I18N) means that your dashlet is mindful of the current user's language and locale settings. For example, the dashlet should render in Spanish for Spanish speakers and in French for French speakers.
Your dashlet produces a response from two different sources:
The content of one or more Knowledge Base articles. This is the pure data received in the JSON response from the Alfresco repository.
Additional content and markup generated by the dashlet itself.
You are in good shape with respect to the former. The Alfresco repository provides all the facilities necessary to have your content model leverage multiple languages. Alfresco provides multilingual support for all of its content objects. In fact, you can manage all of this right inside of Alfresco Explorer.
The Knowledge Base article you defined in your content model is already I18N enabled. The repository Web script (kb-search) introduced in the previous chapter will hand back a pure data version of this article. This Web script can handle any locale-specific selection for you.
Therefore, you should turn your attention to the content and markup generated by the dashlet itself. This consists of two kinds of things: HTML markup and human-readable text. In general, HTML markup is not a concern. The intention behind HTML is that it should work the same across different countries and different browsers. The same is not true for human-readable text. This can be vastly different. For example, Chinese has little in common with Dutch – at least as it appears on the screen (inspired linguists may disagree).
The solution is to use a message bundle to store keys or identifiers that your dashlet will look up in order to determine the human-readable text to use when generating a response for a given locale. The Web script runtime will automatically locate the bundle and make it available to your dashlet.
You simply name this file knowledgebase.get.properties and define within it any key/value pairs that you like. It might look like this:
header.knowledgebase=Knowledge Base
label.all=Total number of articles
label.drafts=Drafts
label.pendingApprovals=Pending for approval
label.current=Current
label.archived=Archived
error.call=An error occured when getting the knowledge base summary
This is the default bundle that will be used if the locale cannot be determined or if there is no matching bundle for the current locale. You can add locale-specific bundles as well. For example, you might add a file named knowledgebase.get.properties.es_BO to support Spanish in Bolivia or knowledgebase.get.properties.fr_BE to support French in Belgium. You can access these values in your Web script using code like this:
${msg("header.knowledgebase")}This will pull the value of header.knowledgebase from the bundle appropriate to the current locale. In Bolivian Spanish, it might print out "Base de Conocimiento." In Belgian French, it might print out "Base de Connaissance." And by default, it would just print out "Knowledge Base."
Note
It is important to keep in mind that the dialects of French, Spanish, Chinese, English, and other languages can vary widely from country to country (or sometimes even within a country). For example, Spanish in Bolivia can be quite different than Spanish in Spain. You should try to support the range of dialects for all the locales you seek to serve. By following this pattern, you can build dashlets that work across many different locales without duplicating code. This also helps design for the future by giving you an easy way to support additional locales should the need arise.
Alfresco Share comes with several site pages available out of the box. When Alfresco Share starts up, it looks to its own configuration file to determine which site pages have been set up and how to identify them.
The following configuration is an example of what is defined for Alfresco Share in a default installation:
<config evaluator="string-compare" condition="SitePages">
   <pages>
      <page id="calendar">calendar</page>
      <page id="wiki-page">wiki-page?title=Main_Page</page>
      <page id="documentlibrary">documentlibrary</page>
      <page id="discussions-topiclist">discussions-topiclist</page>
      <page id="blog-postlist">blog-postlist</page>
      <page id="links">links</page>
      <page id="tasks">tasks</page>
   </pages>
</config>
Each <page> element has an id that defines the ID of the page in Spring Surf. The value of the <page> element provides information that will be used by the Spring Surf components on the page to look up the content of the page.
You can define your own custom site page by simply developing a Spring Surf page and then adding it to the Alfresco Share configuration previously shown. The inner workings of Spring Surf are covered in Chapter 12.
Building a new site page for Alfresco Share is easier than building a page from scratch because you can reuse much of the application user interface that was already provided for you. For example, the template for your Knowledge Base page is shown in Figure 15-5.
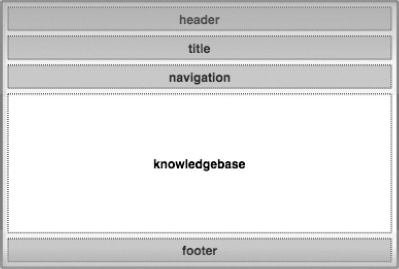
In Figure 15-5, the template consists of five regions: header, title, navigation, knowledgebase, and footer. Four of these regions already have components defined that you can reuse. Alfresco Share provides them for you out of the box. They are the very same ones that every other page uses.
Thus, you can inherit a consistent look and feel with the rest of the application quickly by simply reusing the header, the title section, the navigation controls, and the footer. That leaves the knowledgebase region in the middle. You'd like to put something there.
To add something to the knowledgebase region of the page, you need to build a Surf component and bind it to the region. Then it will render in that spot. You do this by writing a Web script. Web scripts consist of a few simple files on disk that implement things like scriptable controllers and template views. Alfresco Share picks them up without the need for a server restart or recompilation.
Most of the effort involved in building a site page is actually that of building Web scripts. A simple site page will have a single Web script. More complex pages (for example, the Document Library page) may have many Web scripts on a single page participating together.
Every Web script has a Web script descriptor file that follows a prescribed naming convention. For your Knowledge Base component, you might call this file knowledgebase.get.desc.xml. The Web script descriptor informs the Web script dispatcher of some basic properties about the Web script. It describes the URL to which the Web script will be bound.
<webscript>
   <shortname>knowledgebase</shortname>
   <description>Knowledge Base Component</description>
   <url>/components/knowledgebase</url>
</webscript>
In Figure 15-4, you see that the dispatcher allows you to define a scriptable controller that will handle the request and begin populating the model using server-side JavaScript. You'll use this for your Knowledge Base component and you might call the file knowledgebase.get.js. This controller will do all of the data operations; it will call out to Alfresco using CMIS and retrieve Knowledge Base articles and populate the model with results.
The dispatcher then lets you define a template view that uses the values in your model to generate markup for the body of the Web script using FreeMarker and you might call the file knowledgebase.get.html.ftl. This will generate the HTML markup that constitutes what the end user sees rendered into the knowledgebase region of the page.
A Web script essentially only needs a descriptor file, a scriptable controller, and a template view. However, you can go a little further and employ some best practices by defining a few extra elements.
First, your Web script that fits nicely inside the page may need to define browser-side dependencies for JavaScript or CSS. These dependencies are generally part of the HTML <head> tag. You can add an additional template file responsible for injecting these dependencies into the proper place in the total page markup that renders back to the browser.
This file might be called knowledgebase.get.head.ftl. This would get picked up by the Surf engine and recognized as defining things that you would like to go into the HTML <head> tag. You could set it to contain the following:
<#include "../component.head.inc">

<!-- Knowledge Base-->
<@link rel="stylesheet" type="text/css"
 href="${page.url.context}-extension/components/knowledgebase/knowledgebase.css" />
<@script type="text/javascript"
 src="${page.url.context}-extension/components/knowledgebase/knowledgebase.js">
</@script>

<!-- Tag Library -->
<@link rel="stylesheet" type="text/css"
 href="${page.url.context}/modules/taglibrary/taglibrary.css" />
<@script type="text/javascript"
 src="${page.url.context}/modules/taglibrary/taglibrary.js">
</@script>
Once that file is in place, Surf will include your HTML HEAD markup in the FreeMarker ${head} variable, which is injected into the <head> tag of the overall HTML received by the browser.
This HEAD generation template has full access to the model generated by the scriptable controller. Thus, the <head> tag for your Web script can be dynamic and based on the model established by the controller.
It is good practice to design your site's page components so that they are enabled to work for multiple locales. As with custom dashlets, you can use message bundles to enable internationalization of your Web script. You might add another file named knowledgebase.get.properties.
This properties file defines the key/value pairs that should be consulted when the Web script needs to render in the default locale. It should contain key/value pairs similar to those shown here:
title.current=Current articles
title.drafts=Draft articles
title.pendingApprovals=Articles pending for approval
title.archived=Archived articles
You could provide additional message bundles for different locales. For example, if you wanted to support Dutch in the Netherlands, you could add the extension nl-NL to the file.
It is also good practice to design your Web script to use a configuration file so you can modify runtime information without needing to change the source code itself. Web script configuration files sit right alongside your scriptable controllers and view templates. Their contents are available to your Web script when it executes.
A Web script configuration file consists of XML from which your Web script can draw properties and values. You will use one of these with the Web script for your custom page component. By convention, it would be called knowledgebase.get.config.xml and look like this:
<knowledgebase>
   <serviceFormat>json</serviceFormat>
   <!--<serviceFormat>cmis</serviceFormat>-->
</knowledgebase>
This configuration file provides information to the Web script's scriptable controller about how to access the Alfresco repository service. It can talk to the Alfresco repository using either json or cmis. If you configure it to use JSON, the Web script will call over to the custom kb-search Web script that you wrote in the previous chapter. On the other hand, if you configure it to use CMIS (Content Management Interoperability Services), the Web script will call over using the CMIS open-standard APIs!
By default, things are set up to use your custom Web script (the JSON option). However, if you are on a CMIS 1.0–compatible version of Alfresco, you can simply elect to use the CMIS APIs. If you do that, you don't even need the kb-search repository Web script! Aren't you glad you waited until this chapter to learn that?
Once you have built your page, all you have to do is declare it as available to Alfresco Share through the Alfresco Share configuration file. You can use a configuration similar to what is shown here:
<config evaluator="string-compare" condition="SitePages">
   <pages>
      <page id="calendar">calendar</page>
      <page id="wiki-page">wiki-page?title=Main_Page</page>
      <page id="documentlibrary">documentlibrary</page>
      <page id="discussions-topiclist">discussions-topiclist</page>
      <page id="blog-postlist">blog-postlist</page>
      <page id="links">links</page>
      <page id="tasks">tasks</page>
      <page id="knowledgebase">knowledgebase</page>
   </pages>
</config>
The new line is highlighted in bold. That's all there is to it.
Alfresco Share provides a Create Site dialog that you can use to quickly configure and create a new site. It's easy to access – you just click Create Site in the Sites dashlet on your user dashboard.
This wizard provides a form where you set up the new site's properties. It also provides a drop-down list where you can select the kind of site you would like to create. It makes available all the types of sites that are registered through configuration. If you're daring and want to see what this looks like, you can glance ahead to Figure 15-7.
By default, there is only one type of site available in this menu. It is called a Collaboration Site (see Figure 15-6). When you create a site of this type, Alfresco Share automatically creates your site space and preconfigures your site with pages and site-dashboard components.
You can configure the default options for the Collaboration Site through Alfresco Share's configuration files. You can also introduce new types of sites. You do this by modifying a configuration file called presets.xml. This file defines site presets.
A site preset is a type of site. This file defines one or more site presets that describe preconfigured sets of pages, dashlets, components, and templates. These elements are bundled together with an ID. You just add your own custom site presets into this file.
As an example, you can create an additional site preset that defines a Knowledge Base site. This site is for Knowledge Base – article contributors and consumers. Therefore, you can tweak things so that the default pages and default dashlets on the site dashboard are more meaningful to that audience.
You modify the presets.xml file to include your custom site preset definition as shown here:
<pages>
   <page id="site/${siteid}/dashboard">
      <title>Knowledge Base Site Dashboard</title>
      <title-id>page.kbSiteDashboard.title</title-id>
      <description>Knowledge Base site's dashboard page</description>
      <description-id>page.kbSiteDashboard.description</description-id>
      <template-instance>dashboard-3-columns</template-instance>
      <authentication>user</authentication>
      <properties>
         <sitePages>[{"pageId":"knowledgebase"}, {"pageId":"documentlibrary"},
                     {"pageId":"links"}, {"pageId":"discussions-topiclist"}]
         </sitePages>
      </properties>
   </page>
</pages>
This defines a site preset with four site pages: your custom Knowledge Base page, the Document Library page, the Links page, and the Discussions page. You specify that your Knowledge Base site dashboard requires authentication and that it should default to a three-column layout.
The next step is to adjust the Create Site dialog's drop-down control so that your new type of site appears as an option. The Create Site dialog populates that drop-down control by making a callback to a Web script on the Alfresco Share server.
This Web script can be adjusted so that your Knowledge Base site is available as one of the options. You'll do this later on, so don't worry about how it looks yet. Rather, take a look at how the adjusted scriptable controller appears:
var sitePresets = [
 {id: "site-dashboard", name: msg.get("title.collaborationSite")},
 {id: "kb-site-dashboard", name: msg.get("title.kbSite")}
];
model.sitePresets = sitePresets;
You simply add the line shown in bold. Notice that this now hands back kb-site-dashboard as an option. It also uses your resource bundles for I18N support in the Create Site dialog.
A preset allows you to define a fixed set of pages that should be available to the site upon creation. However, it also lets you preconfigure the site dashboard that will be created for the site.
A preset can include descriptions of components that should be bound into the dashboard. These descriptions specify the URL of the dashlet's Web script as well as the column and row into which to place the dashlet.
The configuration appears something like this:
<preset id="kb-site-dashboard">
   <components>
      ...
      <!-- dashboard components -->
      <component>
         <scope>page</scope>
         <region-id>component-1-1</region-id>
         <source-id>site/${siteid}/dashboard</source-id>
         <url>/components/dashlets/site-welcome</url>
      </component>
      <component>
         <scope>page</scope>
         <region-id>component-2-1</region-id>
         <source-id>site/${siteid}/dashboard</source-id>
         <url>/components/dashlets/activityfeed</url>
      </component>
      ...
   </components>
</preset>
This is just a snippet. You may have many more components defined. Notice that each component can specify the row and the column where it is to appear on the dashboard. Your preset can therefore completely set up the default layout of the site dashboard as well as all of the default dashlet bindings. The end of the chapter shows a full view of how the additional Alfresco Share preset XML appears.
As before, you want to follow best practices in building your site so that you can quickly provision it for many different countries and languages. In this case, you need to provide a message bundle for the Alfresco Share configuration. To do so, you need to wire in your own message bundle to Alfresco Share.
You can define a Spring bean that overrides Alfresco Share's default message bundle values so it includes your custom bundle.
<?xml version='1.0' encoding='UTF-8'?>
<!DOCTYPE beans PUBLIC '-//SPRING//DTD BEAN//EN'
   'http://www.springframework.org/dtd/spring-beans.dtd'>

<beans>

   <bean id="webscripts.resources"
         class="org.alfresco.i18n.ResourceBundleBootstrapComponent">
<property name="resourceBundles">
<list>
<value>alfresco.messages.webscripts</value>
<value>alfresco.messages.slingshot</value>
<value>alfresco.web-extension.messages.kbsite</value>
</list>
</property>
</bean>
</beans>This Spring bean adds in support for an additional message bundle called kbsite.properties located under web-extension/messages. This is shown in bold in the previous code. In this message bundle, you might define the following key/value pairs:
page.kbSiteDashboard.title=Knowledge Base Site Dashboard page.kbSiteDashboard.description=Knowledge Base site's dashboard page title.kbSite=Knowledge Base Site
Notice that these are the same keys that the preset configuration and drop-down list Web script were looking for. That's all there is to it. You can now fully internationalize your new site preset. You can provide bundles so that the Create Site dialog works for languages such as Spanish or Mandarin Chinese.
This section provides step-by-step instructions for installing this chapter's code into your Alfresco installation. It assumes that you have downloaded the sample source code from www.wrox.com. This is available as a ZIP compressed file.
Inside of the ZIP file, you will find the following folder structure:
/chapter15
/extension
/scripts
install_chapter_15.bat
readme.txtIf you have performed a default installation on Windows under the C:Alfresco directory, you can run the install_chapter_15.bat file to quickly install all of this chapter's sample code in one step! If you elect to do so, you can skip ahead to the section titled "Putting It into Action."
Otherwise, follow the manual installation instructions provided here. The sample files are assumed to have been extracted into a location referred to as <sampleLocation>. Bear in mind that the path references in this section use a Windows file convention. If you are using a non-Windows box (such as a Linux distribution), you will need to adjust the file paths accordingly.
Please read through the readme.txt file for last-minute updates and tips on installing the sample code.
The code provided in this chapter builds on what was developed in the previous chapter. It assumes that you have completed and installed the sample code from Chapter 14. Please make sure you have completed the sample code installation from Chapter 14 before continuing.
Before doing anything else, you should stop the Alfresco server. You can do this either from a command line or through the Windows Start menu (if you used the Windows Installer).
From the command line, type the following:
cd<installLocation>alf_stop.bat
This shuts down Alfresco and returns you to the command prompt.
Next you'll add the custom Knowledge Base dashlet to Alfresco Share. This makes the dashlet available for you to plug into a site dashboard.
From the following directory:
<sampleLocation>chapter15web-extensionsite-webscriptsorgalfrescocomponentsdashlets
copy the following files:
knowledgebase.get.desc.xml
knowledgebase.get.head.ftl
knowledgebase.get.html.ftl
knowledgebase.get.js
knowledgebase.get.properties
knowledgebase.get.config.xml
to:
<installLocation> omcatsharedclassesalfrescoweb-extensionsite-webscriptsorgalfrescocomponentsdashlets
These instructions walk you through the process of installing the custom site page. This involves adding the Web script for your custom page as well as the Surf objects for the page, template instance, and components.
To begin, you'll introduce the Web script that provides most of the functionality for your new site page. This Web script is included in the site page as part of the Surf page rendering process.
From the following directory:
<sampleLocation>chapter15web-extensionsite-webscriptsorgalfrescocomponentsknowledgebase
copy the following files:
knowledgebase.get.desc.xml
knowledgebase.get.head.ftl
knowledgebase.get.html.ftl
knowledgebase.get.js
knowledgebase.get.properties
knowledgebase.get.config.xml
to:
<installLocation> omcatsharedclassesalfrescoweb-extensionsite-webscriptsorgalfrescocomponentsknowledgebase
This puts the Web script descriptor, scriptable controller, template view, and html <head> renderer into place. It also sets up the configuration file and the message bundle to provide I18N support.
You can now define the Surf page that will plug into your site. The page has the ID knowledgebase and is defined in a single file.
From the following directory:
<sampleLocation>chapter15web-extensionsite-datapages
copy the following file:
knowledgebase.xml
to:
<installLocation> omcatsharedclassesalfrescoweb-extensionsite-datapages
Add the Surf template instance now. The template instance provides additional configuration that the FreeMarker file may use while rendering.
From the following directory:
<sampleLocation>chapter15web-extensionsite-data emplate-instances
copy the following file:
knowledgebase.xml
to:
<installLocation> omcatsharedclassesalfrescoweb-extensionsite-data emplate-instances
Now you'll add the FreeMarker template file. This file converts the page model into markup for the browser to consume.
From the following directory:
<sampleLocation>chapter15web-extension emplatesorgalfresco
copy the following file:
knowledgebase.ftl
to:
<installLocation> omcatsharedclassesalfrescoweb-extension emplatesorgalfresco
For your new site page to work, the only remaining thing to do is bind the Web scripts into the template regions.
There are five regions in total. One is in the global scope and the other four are in the template scope. The globally scoped region will be resolved for you by Spring Surf. You just need to define the other four.
Of the other four, you can reuse existing Alfresco Share Web scripts for three of them. Your new Web script is then bound in as the new element. You bind it to the knowledgebase region.
From the following directory:
<sampleLocation>chapter15web-extensionsite-datacomponents
copy the following files:
template.navigation.knowledgebase.xml
template.title.knowledgebase.xml
template.toolbar.knowledgebase.xml
template.knowledgebase.knowledgebase.xml
to:
<installLocation> omcatsharedclassesalfrescoweb-extensionsite-datacomponents
Now that the site page is defined, all you have to do is configure it to be available as a selectable option. Site managers should be able to see the site page as one of several available pages they may elect to include on their site dashboard.
From the following directory:
<sampleLocation>chapter15web-extension
copy the following file:
share-config-custom.xml
to:
<installLocation> omcatsharedclassesalfrescoweb-extension
The knowledgebase.lib.js file contains helper methods for performing Knowledge Base searches using JSON as well as using CMIS. This file is used by the custom dashlet as well as the custom page component Web scripts.
From the following location:
<sampleLocation>chapter15web-extensionsite-webscriptsorgalfrescocomponentsknowledgebase
copy the following file:
knowledgebase.lib.js
to:
<installLocation> omcatsharedclassesalfrescoweb-extensionsite-webscriptsorgalfrescocomponentsknowledgebase
These instructions walk you through the process of setting up the new site preset. This involves adding the preset, making it available from the Create Site Dialog, and adding message bundles for I18N support.
The first thing you need to do is to add the additional preset definition to the presets.xml file. The sample code provided with this book has already done this for you. The code to insert is provided toward the end of the chapter.
From the following location:
<sampleLocation>chapter15web-extensionsite-datapresets
copy the following file:
presets.xml
to:
<installLocation> omcatsharedclassesalfrescoweb-extensionsite-datapresets
You override the scriptable controller for the create-site Web script by simply copying in a new JavaScript file that gets picked up instead of the out-of-the-box one.
From the following location:
<sampleLocation>chapter15web-extensionsite-webscriptsorgalfrescomodules
copy the following file:
create-site.get.js
to:
<installLocation> omcatsharedclassesalfrescoweb-extensionsite-webscriptsorgalfrescomodules
Your custom message bundle defines text values for the default locale. If you want to provide additional bundles for other locales, you just need to assign the correct suffix extensions.
From the following location:
<sampleLocation>chapter15web-extensionmessages
copy the following file:
kbsite.properties
to:
<installLocation> omcatsharedclassesalfrescoweb-extensionmessages
To include your own custom message bundle along with the Alfresco Share message bundles so that you can fully support I18N with your new site preset, you need to override the Spring bean responsible for doing so.
From the following location:
<sampleLocation>chapter15web-extension
copy the following file:
custom-slingshot-application-context.xml
to:
<installLocation> omcatsharedclassesalfrescoweb-extension
Both the custom dashlet and the custom page component have browser-side dependencies. These files need to be resolvable by the browser. One option is to modify the share.war file, but a better option is to simply place them in an alternate Web application.
In this case, you've elected to place them into the ROOT Web application under Tomcat. This section will walk you through how to set this up.
The web.xml file is a required file for the ROOT Web application. If it already exists in your Tomcat server, you can skip to the next step. If it doesn't exist, you may have to create the following directory structures yourself.
From the following location:
<sampleLocation>chapter15ROOTWEB-INF
copy the following file:
web.xml
to:
<installLocation> omcatwebappsROOTWEB-INF
The custom dashlet has a single CSS file dependency.
From the following location:
<sampleLocation>chapter15ROOTshare-extensioncomponentsdashlets
copy the following file:
knowledgebase.css
to:
<installLocation> omcatwebappsROOTshare-extensioncomponentsdashlets
The custom page component has CSS and JS dependencies.
From the following location:
<sampleLocation>chapter15ROOTshare-extensioncomponentsknowledgebase
copy the following files:
knowledgebase.css
knowledgebase.js
to:
<installLocation> omcatwebappsROOTshare-extensioncomponentsknowledgebase
If you have followed the instructions, you should be ready to put things into action.
You can start up the Alfresco server either from a command prompt or through the Windows Start menu (if you used the Windows Installer).
From the command line, type the following:
cd<installLocation>alf_start.bat
This starts up Alfresco and returns you to the command prompt.
You'll begin by creating a simple Collaboration Site in Alfresco Share and configuring it to use your new site page.
Open a browser and go to Alfresco Share. You can access Alfresco Share using the following URL:
http://localhost:8080/shareLog in to Alfresco Share. You can log in using the administrator account. The administrator has a user name of
adminand a password ofadmin.Once you log in, you will see the user dashboard.
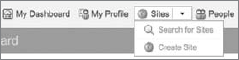
To create a new site, click on the arrow next to Sites at the top of the page, and then click Create Site in the drop-down list (see Figure 15-7).
This brings up the Create Site dialog.
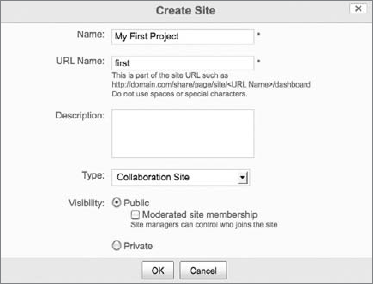
In the Create Site dialog, do the following (see Figure 15-8):
In the Name field, give your site a name, such as My First Project.
In the URL Name field, type first.
You can leave the Description field blank.
In the Type list, select Collaboration Site.
Click OK to create the site.
Since you were the one to create the site, you are automatically designated as the site manager. This means that you can customize and tweak the site as you see fit. You can set up the site dashboard and invite new participants to the site. You can specify their roles and rights.
Now that you are feeling high and mighty as the site manager, you'll set about making the custom Knowledge Base dashlet available to your users. You will add the dashlet to the site dashboard so that all users who arrive to your site will have a quick view into what is happening in the Knowledge Base.
Along the top of the page, you should see a blue site bar that indicates the name of your site on the left side and provides a few interesting buttons along the right side. This is depicted in Figure 15-9.
Click Customize Dashboard to begin tweaking the site dashboard that your users will see. This will take you to a page where you can see a list of all of the dashlets configured for the site dashboard.
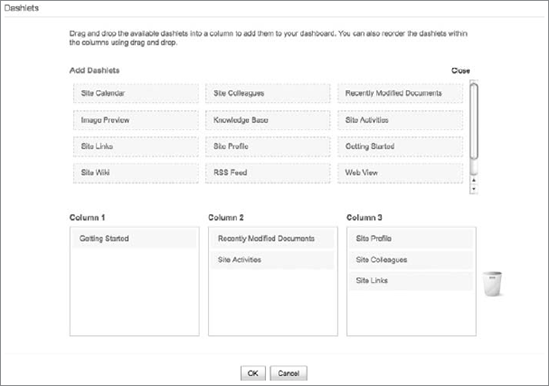
Scroll down to the section on dashlets and click Add Dashlets to see a list of available dashlets, including the Knowledge Base dashlet (see Figure 15-10).
Click the Knowledge Base dashlet to select it, and then drag and drop it into one of the three columns on the bottom part of the window.
You can place the dashlet wherever you like.
Once you have placed the dashlet into the site dashboard configuration, click OK to save your changes.
You are returned to the site dashboard displaying your Knowledge Base dashlet. It will appear on the page in the location that you specified. It will display as shown in Figure 15-11.
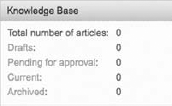
You may wonder why your Knowledge Base doesn't have any content in it. Why don't you see the Knowledge Base articles from the previous chapter? That's because those articles were created in a space under Company Home. The dashlet is clever and is looking for Knowledge Base articles that are specifically located in this Alfresco Share site. You haven't created any yet.
As the much-esteemed site manager, you can configure additional pages for your site. You can also remove pages that you don't want or need. Follow these steps to add to your site the custom page that you created.
In the blue site bar along the top of the page, click the More menu, and then click Customize Site in the drop-down list.
This takes you to a page where you will see a listing of all of the pages that currently make up your site.
Click Add Pages to bring up a selection of site pages that are available and are not currently being used by your site. You should see your Knowledge Base page listed among the available options (as shown in Figure 15-12).
Click Select for the Knowledge Base page.
Click OK on the bottom of the page.
You are taken back to the site dashboard, where you should see the Knowledge Base page in the navigation region of the application (see Figure 15-13).
Click the Knowledge Base page in the navigation menu. This will render your custom Knowledge Base page! See Figure 15-14 for an example of what it looks like.
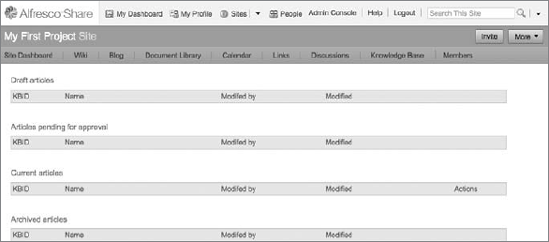
Congratulations! You have created a brand new site page and it has been added to your site. It reuses much of the Alfresco Share user interface and looks consistent with the rest of the application. In the middle of the page is your custom Web script.
Now try out your new site preset. You will create a new Knowledge Base Share site.
At the top of the page, click the arrow next to Sites, then click Create Site in the drop-down list.
This brings up the Create Site Dialog. You saw this dialog before. You used it to create a Collaboration site. This time around, you're going to create a Knowledge Base site.
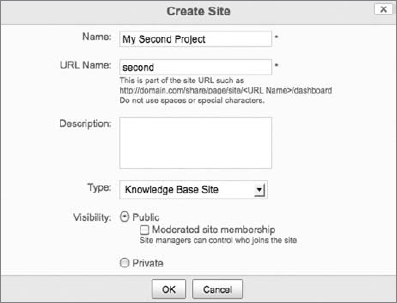
In the Create Site dialog, do the following (as shown in Figure 15-15):
In the Name field, type My Second Project.
In the URL Name field, type second.
Leave the Description field blank.
In the Type list, select Knowledge Base Site.
Click OK to create the site.
You are taken to the site dashboard (see Figure 15-16). However, this time the site dashboard should look a little different. You should only see four dashlets on the site dashboard and a limited number of pages.
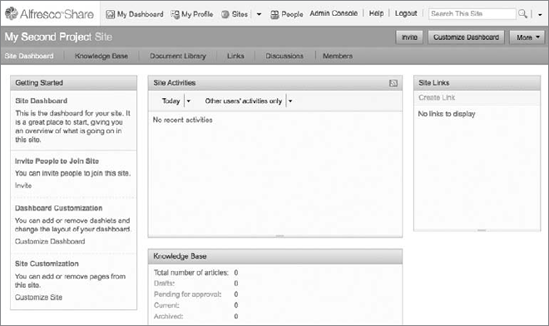
Recall that when you defined the additional preset within presets.xml, you constrained the number of dashlets to four. These were the Getting Started dashlet, the Site Activities dashlet, the Knowledge Base dashlet, and the Site Links dashlet.
You also limited the number of pages to four. These were the Knowledge Base page, the Document Library page, the Links page, and the Discussions page. The Site Dashboard and Members pages are mandatory.
You're just about done. There is just one thing left to do. Click on the Document Library tab in the menu bar. The only reason you need to do this is to ensure that the document library services initialize for your site. This helps to make sure your site space contains a subfolder named documentLibrary. You'll need that in the next chapter!
Feel free to click around and try out your Alfresco Share extensions. In the next chapter, you'll begin creating content and using these extensions. You'll also add a few more tweaks and goodies to your Alfresco Share site.
This section provides sample code used in this chapter. This code is also available from www.wrox.com. This is available as a ZIP compressed file. The paths to source files mentioned in this section are relative to the root of the ZIP file.
This section describes the files required to implement the custom Knowledge Base dashlet for Alfresco Share.
The following files should be placed into this directory:
<installLocation> omcatsharedclassesalfrescoweb-extensionsite-webscriptsorgalfrescocomponentsdashlets
Defines the Knowledge Base dashlet's Web script implementation
<webscript> <shortname>Knowledge Base</shortname> <description>A summary of all Knowledge Base articles</description> <family>site-dashlet</family> <url>/components/dashlets/knowledgebase</url> </webscript>
Code snippet web-extensionsite-webscriptsorgalfrescocomponentsdashletsknowledgebase.get.desc.xml
Defines the Knowledge Base dashlet's Web script HEAD markup
<#include "../component.head.inc">
<@link rel="stylesheet" type="text/css"
href="${page.url.context}-extension/components/dashlets/knowledgebase.css"
/>Code snippet web-extensionsite-webscriptsorgalfrescocomponentsdashletsknowledgebase.get.head.ftl
Defines the Knowledge Base dashlet's Web script controller
<import resource="classpath:alfresco/web-extension/site-webscripts/org/alfresco/
components/knowledgebase/knowledgebase.lib.js">
/**
* Gathers information on all knowledgebase articles within the site.
*
* @method main
*/
function main()
{
var knowledgeBaseConfig = new XML(config.script);
var site = page.url.templateArgs.site;
var serviceFormat = knowledgeBaseConfig.serviceFormat ?
knowledgeBaseConfig.serviceFormat : "json";
var maxResults = args.maxResults ? parseInt(args.maxResults) : 50;
var articles;
// Search for all knowledge base articles in the site
// The service either returns an Array of results (can be empty)
// or an integer status code
if (serviceFormat == "json")
{
articles = jsonSeachKnowledgeBaseArticles(site, maxResults);
}
else if (serviceFormat == "cmis")
{
articles = cmisSeachKnowledgeBaseArticles(site, maxResults);
}
if (articles instanceof Array)
{
// Group articles and prepare model
var articleGroups = groupArticlesByStatus(articles);
model.all = articles.length;
model.drafts = articleGroups["Draft"] ? articleGroups["Draft"].length : 0;
model.pendingApprovals = articleGroups["Pending Approval"] ?articleGroups["Pending Approval"].length : 0;
model.current = articleGroups["Current"] ? articleGroups["Current"].length:0;
model.archived = articleGroups["Archived"] ?
articleGroups["Archived"].length : 0;
}
else
{
// An error code was returned
model.error = articles;
}
}
main();Code snippet web-extensionsite-webscriptsorgalfrescocomponentsdashletsknowledgebase.get.js
Defines the Knowledge Base dashlet's Web script view
<div class="dashlet knowledgebase">
<div class="title">${msg("header.knowledgebase")}</div>
<div class="body">
<div class="msg">
<#if (error?exists)>
<div>${msg("error.call")}</div>
<#else>
<table>
<tr>
<td>${msg("label.all")}:</td>
<td>${all}</td>
</tr>
<tr>
<td><a href="${url.context}/page/site/${page.url.
templateArgs.site!""}/documentlibrary?filter=
tag&filterData=draft#" class="theme-color-1">
${msg("label.drafts")}</a>:</td>
<td>${drafts}</td>
</tr>
<tr>
<td><a href="${url.context}/page/site/${page.url.
templateArgs.site!""}/documentlibrary?filter=
tag&filterData=pending#" class="theme-color-1">
${msg("label.pendingApprovals")}</a>:</td>
<td>${pendingApprovals}</td>
</tr>
<tr>
<td><a href="${url.context}/page/site/${page.url.
templateArgs.site!""}/documentlibrary?filter=
tag&filterData=current#" class="theme-color-1">
${msg("label.current")}</a>:</td><td>${current}</td>
</td>
<tr>
<td><a href="${url.context}/page/site/${page.url.
templateArgs.site!""}/documentlibrary?filter=
tag&filterData=archived#" class="theme-color-1">
${msg("label.archived")}</a>:</td>
<td>${archived}</td>
</td>
</table>
</#if>
</div>
</div>
</div>Code snippet web-extensionsite-webscriptsorgalfrescocomponentsdashletsknowledgebase.get.html.ftl
Defines the Knowledge Base dashlet's default properties bundle
header.knowledgebase=Knowledge Base label.all=Total number of articles label.drafts=Drafts label.pendingApprovals=Pending for approval label.current=Current label.archived=Archived error.call=An error occured when getting the knowledge base summary
Code snippet web-extensionsite-webscriptsorgalfrescocomponentsdashletsknowledgebase.get.properties
Defines the Knowledge Base dashlet's configuration
<knowledgebase> <serviceFormat>json</serviceFormat> <!--<serviceFormat>cmis</serviceFormat>--> </knowledgebase>
Code snippet web-extensionsite-webscriptsorgalfrescocomponentsdashletsknowledgebase.get.config.xml
This section describes the files required to implement the custom Knowledge Base page for Alfresco Share.
The following file should be placed into this directory:
<installLocation> omcatsharedclassesalfrescoweb-extensionsite-datapages
Defines the Knowledge Base page
<?xml version='1.0' encoding='UTF-8'?> <page> <id>knowledgebase</id> <page-type>knowledgebase</page-type> <title>Knowledge Base</title> <title-id>page.knowledgebase.title</title-id> <description>Knowledge Base Page</description> <description-id>page.knowledgebase.description</description-id> <template-instance>knowledgebase</template-instance> <authentication>user</authentication> </page>
Code snippet web-extensionsite-datapagesknowledgebase.xml
The following file should be placed into this directory:
<installLocation> omcatsharedclassesalfrescoweb-extensionsite-data emplate-instances
Defines the Knowledge Base template instance
<?xml version='1.0' encoding='UTF-8'?> <template-instance> <template-type>org/alfresco/knowledgebase</template-type> </template-instance>
Code snippet web-extensionsite-data emplate-instancesknowledgebase.xml
The following files should be placed into this directory:
<installLocation> omcatsharedclassesalfrescoweb-extensionsite-datacomponents
Binds the custom Knowledge Base Web script to the Knowledge Base region
<?xml version='1.0' encoding='UTF-8'?>
<component>
<scope>template</scope>
<region-id>knowledgebase</region-id>
<source-id>knowledgebase</source-id>
<url>/components/knowledgebase</url>
<properties>
<maxResults>25</maxResults>
</properties>
</component>web-extensionsite-datacomponents emplate.knowledgebase.knowledgebase.xml
Binds the stock navigation Web script to the navigation region
<?xml version='1.0' encoding='UTF-8'?> <component> <scope>template</scope> <region-id>navigation</region-id> <source-id>knowledgebase</source-id> <url>/components/navigation/collaboration-navigation</url> </component>
Code snippet web-extensionsite-datacomponents emplate.navigation.knowledgebase.xml
Binds the stock title Web script to the title region
<?xml version='1.0' encoding='UTF-8'?> <component> <scope>template</scope> <region-id>title</region-id> <source-id>knowledgebase</source-id> <url>/components/title/collaboration-title</url> </component>
Code snippet web-extensionsite-datacomponents emplate.title.knowledgebase.xml
Binds the stock toolbar Web script to the toolbar region
<?xml version='1.0' encoding='UTF-8'?> <component> <scope>template</scope> <region-id>toolbar</region-id> <source-id>knowledgebase</source-id> <url>/components/knowledgebase/collaboration-toolbar</url> </component>
Code snippet web-extensionsite-datacomponents emplate.toolbar.knowledgebase.xml
Template files should be placed into this directory:
<installLocation> omcatsharedclassesalfrescoweb-extension emplatesorgalfresco
Defines the Knowledge Base page template
<#include "include/alfresco-template.ftl" /> <@templateHeader/> <@templateBody>
<div id="hd">
<@region id="header" scope="global" protected=true />
<@region id="title" scope="template" protected=true />
<@region id="navigation" scope="template" protected=true />
</div>
<div id="bd">
<div>
<div id="yui-main">
<div id="divknowledgebaseList">
<@region id="knowledgebase" scope="template" />
</div>
</div>
</div>
</div>
</@>
<@templateFooter>
<div id="ft">
<@region id="footer" scope="global" protected=true />
</div>
</@>Code snippet web-extension emplatesorgalfrescoknowledgebase.ftl
Web script files should be placed into this directory:
<installLocation> omcatsharedclassesalfrescoweb-extensionsite-webscripts
The Knowledge Base Web script descriptor
<webscript> <shortname>knowledgebase</shortname> <description>Knowledge Base Component</description> <url>/components/knowledgebase</url> </webscript>
Code snippet web-extensionsite-webscriptsorgalfrescocomponentsknowledgebaseknowledgebase.get.desc.xml
The Knowledge Base Web script configuration
<knowledgebase> <serviceFormat>json</serviceFormat> <!--<serviceFormat>cmis</serviceFormat>--> </knowledgebase>
Code snippet web-extensionsite-webscriptsorgalfrescocomponentsknowledgebaseknowledgebase.get.config.xml
The Knowledge Base Web script HEAD markup generator
<#include "../component.head.inc">
<!-- Knowledge Base-->
<@link rel="stylesheet" type="text/css"
href="${page.url.context}-extension/components/knowledgebase/
knowledgebase.css" />
<@script type="text/javascript"
src="${page.url.context}-extension/components/knowledgebase/knowledgebase.js">
</@script>
<!-- Tag Library -->
<@link rel="stylesheet" type="text/css"
href="${page.url.context}/modules/taglibrary/taglibrary.css" />
<@script type="text/javascript"
src="${page.url.context}/modules/taglibrary/taglibrary.js"></@script>Code snippet web-extensionsite-webscriptsorgalfrescocomponentsknowledgebaseknowledgebase.get.head.ftl
Defines the Knowledge Base Web script view
<#macro dateFormat date>${date?string("EEE d MMM yyyy HH:mm:ss")}</#macro>
<#macro printArticles articles type buttons>
<div class="title">${msg("title." + type)}</div>
<table>
<thead class="theme-bg-color-3">
<tr>
<th class="kbid">${msg("header.kbid")}</th>
<th class="name">${msg("header.name")}</th>
<th class="modified-by">${msg("header.modifiedBy")}</th>
<th class="modified-date">${msg("header.modifiedDate")}</th>
<th class="actions"><#if buttons?size > 0>
${msg("header.actions")}</#if> </th>
</tr>
</thead>
<tbody id="${el}-${type}-tbody">
<#if articles?is_number>
<tr>
<td colspan="5">${msg("article.error")}</td>
</tr>
<#else>
<#list articles as article>
<tr>
<td class="kbid">${article.nodeDBID!""}</td>
<td class="name"><a href="${url.context}/page/site/${page.url.templateArgs.site!""}/document-
details?nodeRef=${article.nodeRef}">
${article.name!msg("label.articleNameNotFound")}</a></td>
<td class="modified-by"><a href="${url.context}
/page/user/${article.modifiedByUser}/profile">
${article.modifiedBy!""}</a></td>
<td class="modified-date">${article.modifiedOn!""}</td>
<td class="actions"><#list buttons as button>
<button class="archive" value="${article.nodeRef}">
${msg("button." + button)}</button></#list></td>
</tr>
</#list>
</#if>
</tbody>
</table>
</#macro>
<#assign el=args.htmlid>
<script type="text/javascript">//<![CDATA[
new Alfresco.kb.KnowledgeBase("${el}").setOptions(
{
siteId: "${page.url.templateArgs.site!""}"
}).setMessages(
${messages}
);
//]]></script>
<div id="${el}-body" class="knowledgebase">
<#-- Print all article types -->
<@printArticles articles=drafts type="drafts" buttons=[] />
<@printArticles articles=pendingApprovals type="pendingApprovals" buttons=[] />
<@printArticles articles=current type="current" buttons=
["archive"] />
<@printArticles articles=archived type="archived" buttons=[] />
</div>Code snippet web-extensionsite-webscriptsorgalfrescocomponentsknowledgebaseknowledgebase.get.html.ftl
Defines the Knowledge Base Web script controller
<import resource="classpath:alfresco/web-extension/site-webscripts/org/alfresco/
components/knowledgebase/knowledgebase.lib.js">
/**
* Loads Knowledge Base articles from the server and groups them by status
*
* @method main
*/
function main()
{// Set input input paramaters
var knowledgeBaseConfig = new XML(config.script);
var site = page.url.templateArgs.site;
var serviceFormat = knowledgeBaseConfig.serviceFormat ?
knowledgeBaseConfig.serviceFormat : "json";
var maxResults = args.maxResults ? parseInt(args.maxResults) : 50;
var articles;
// Load articles from server with configured service format
if (serviceFormat == "json")
{
articles = jsonSeachKnowledgeBaseArticles(site, maxResults);
}
else if (serviceFormat == "cmis")
{
articles = cmisSeachKnowledgeBaseArticles(site, maxResults);
}
if (articles instanceof Array)
{
// Group articles by status and prepare model
var articleGroups = groupArticlesByStatus(articles);
model.drafts = articleGroups["Draft"] ? articleGroups["Draft"] : [];
model.pendingApprovals = articleGroups["Pending Approval"] ?
articleGroups["Pending Approval"] : [];
model.current = articleGroups["Current"] ? articleGroups["Current"] : [];
model.archived = articleGroups["Archived"] ? articleGroups["Archived"] : []
}
else
{
// An error code was returned
model.error = articles;
}
}
// Start webscript
main();Code snippet web-extensionsite-webscriptsorgalfrescocomponentsknowledgebaseknowledgebase.get.js
Defines the Knowledge Base Web script
title.current=Current articles title.drafts=Draft articles title.pendingApprovals=Articles pending for approval title.archived=Archived articles header.kbid=KBID header.name=Name header.modifiedBy=Modifed by
header.modifiedDate=Modified header.actions=Actions button.archive=Archive label.articleNameNotFound=Name not found! label.searchError=Could not get knowledgebase articles from the server message.archiveError=Could not archive article
Code snippet web-extensionsite-webscriptsorgalfrescocomponentsknowledgebaseknowledgebase.get.properties
This section describes the files required to implement the custom Knowledge Base page for Alfresco Share.
The following file fragment should be included into the existing presets.xml file in this directory. You will need to copy this file out of the share.war file or locate it in the sample files ZIP distribution.
<installLocation> omcatsharedclassesalfrescoweb-extensionsite-datapresets
Additional configuration for the presets.xml file
<preset id="kb-site-dashboard">
<components>
<!-- title -->
<component>
<scope>page</scope>
<region-id>title</region-id>
<source-id>site/${siteid}/dashboard</source-id>
<url>/components/title/collaboration-title</url>
</component>
<!-- navigation -->
<component>
<scope>page</scope>
<region-id>navigation</region-id>
<source-id>site/${siteid}/dashboard</source-id>
<url>/components/navigation/collaboration-navigation</url>
</component>
<!-- dashboard components -->
<component>
<scope>page</scope>
<region-id>component-1-1</region-id>
<source-id>site/${siteid}/dashboard</source-id>
<url>/components/dashlets/site-welcome</url>
</component>
<component>
<scope>page</scope><region-id>component-2-1</region-id>
<source-id>site/${siteid}/dashboard</source-id>
<url>/components/dashlets/activityfeed</url>
</component>
<component>
<scope>page</scope>
<region-id>component-2-2</region-id>
<source-id>site/${siteid}/dashboard</source-id>
<url>/components/dashlets/knowledgebase</url>
</component>
<component>
<scope>page</scope>
<region-id>component-3-1</region-id>
<source-id>site/${siteid}/dashboard</source-id>
<url>/components/dashlets/site-links</url>
</component>
</components>
<pages>
<page id="site/${siteid}/dashboard">
<title>Knowledge Base Site Dashboard</title>
<title-id>page.kbSiteDashboard.title</title-id>
<description>Knowledge Base site's dashboard page</description>
<description-id>page.kbSiteDashboard.description</description-id>
<template-instance>dashboard-3-columns</template-instance>
<authentication>user</authentication>
<properties>
<sitePages>
[{"pageId":"knowledgebase"}, {"pageId":"documentlibrary"},
{"pageId":"links"},{"pageId":"discussions-topiclist"}]
</sitePages>
</properties>
</page>
</pages>
</preset>Code snippet web-extensionsite-datapresetspresets.xml (additional fragment)
The following file should be placed into this directory:
<installLocation> omcatsharedclassesalfrescoweb-extensionsite-webscriptsorgalfrescomodules
Override for the Create Site Web script controller
var sitePresets = [
{id: "site-dashboard", name: msg.get("title.collaborationSite")},
{id: "kb-site-dashboard", name: msg.get("title.kbSite")}
];
model.sitePresets = sitePresets;Code snippet web-extensionsite-webscriptsorgalfrescomodulescreate-site.get.js
The following file is a common server-side JavaScript library that is used by both the custom dashlet and the custom page. It should be placed in the following location:
<installLocation> omcatsharedclassesalfrescoweb-extensionsite-webscriptsorgalfrescocomponentsknowledgebase
Defines common JavaScript functions for the Knowledge Base
/**
* CMIS Version
*
* Performs a CMIS searh
*
* @method cmisSeachKnowledgeBaseArticles
* @param site {string} The site to search in
* @param pageSize {int} The maximum number of articles to return
*/
function cmisSeachKnowledgeBaseArticles(site, pageSize)
{
// Get the nodeRef for the sites documentLibrary
var connector = remote.connect("alfresco"),
result = connector.get("/slingshot/doclib/container/" +
stringUtils.urlEncodeComponent(site) + "/documentLibrary"),
data = eval('(' + result + ')'),
container = data.container;
docLibNodeRef = container ? container.nodeRef : null;
// Do search limited to the site's document library
var query = "<?xml version="1.0" encoding="UTF-8" standalone="yes" ?>" +
"<query xmlns:cmis="http://www.cmis.org/2008/05">" +
" <statement>" +
" select d.*, s.* " +
" from cmis:document as d " +
" join kb:status as s on s.cmis:objectid = d.cmis:objectid " +
" where in_tree('" + docLibNodeRef + "')" +
" and d.cmis:objecttypeid <> 'D:cm:thumbnail'" +
" </statement>" +
" <pageSize>" + pageSize + "</pageSize>" +
"</query>";
result = connector.post("/cmis/queries", query, "application/cmisquery+xml");
var feed = atom.toFeed(result.response),
entries = feed.entries,
entriesLength = entries.size(),
entryEl = null,
objEl,
propertiesEl,
propertiesList,
propertyEl,
articles = [],
article;// Convert to object format similar to the json response
for (var ei = 0; ei < entriesLength; ei++)
{
entryEl = entries.get(ei);
article = {
properties: {}
};
objEl = getElementByTagName(entryEl.getExtensions(), "object");
propertiesEl = getElementByTagName(objEl.getElements(), "properties");
propertiesList = propertiesEl.getElements();
for (var pi = 0, pl = propertiesList.size(); pi < pl; pi++)
{
propertyEl = propertiesList.get(pi);
if (propertyEl.getAttributeValue("propertyDefinitionId") == "s.kb:status")
{
article.properties["kb_status"] = propertyEl.firstChild.text;
}
else if (propertyEl.getAttributeValue("propertyDefinitionId") ==
"d.cmis:name")
{
article.name = propertyEl.firstChild.text;
}
else if (propertyEl.getAttributeValue("propertyDefinitionId") ==
"d.cmis:lastModifiedBy")
{
article.modifiedByUser = propertyEl.firstChild.text;
article.modifiedBy = article.modifiedByUser;
}
else if (propertyEl.getAttributeValue("propertyDefinitionId") ==
"d.cmis:lastModificationDate")
{
article.modifiedOn = propertyEl.firstChild.text;
}
else if (propertyEl.getAttributeValue("propertyDefinitionId") ==
"d.cmis:objectId")
{
article.nodeRef = propertyEl.firstChild.text;
}
}
articles.push(article);
}
return articles;
}
/**
* Helper method that returns elements (org.apache.abdera.model.Element)
* in the list (java.util.List) having an element tag name matching elTagName
*
* @method getElementByTagName
* @param list {string} (mandatory) The list to look for elements in
* @param elTagName {string} (optional) The tagName to look for* @return {array|object} An element in the list matching elTagName
* @private
*/
function getElementByTagName(list, elTagName)
{
var el;
for (var i = 0, l = list.size(); i < l; i++)
{
el = list.get(i);
if (el.QName.localPart == elTagName)
{
return el;
}
}
return null;
}
/**
* JSON version.
*
* Returns person display name string as returned to the user.
* Caches the person full name to avoid repeatedly querying the repository.
*
* @method jsonSeachKnowledgeBaseArticles
* @param siteId {string} (mandatory) The site id
* @param maxResults {int} (optional) The maximum number of results to return
* @return {array|int} The found knowledgebase articles or integer status
code on error
*/
function jsonSeachKnowledgeBaseArticles(siteId, maxResults)
{
// Prepare the webscript url
var url = "/slingshot/knowledgebase/search/site/" +
stringUtils.urlEncode(siteId) +
(maxResults ? ("?maxResults=" + maxResults) : "")
// Call server webscript
var connector = remote.connect("alfresco");
result = connector.get(url);
if (result.status == 200)
{
// Return knowledgebase articles
return eval('(' + result + ')').items;
}
else
{
// Return error code to indicate error
return result.status;
}
}/**
* Takes the articles and groups them by status.
*
* @method groupArticlesByStatus
* @return {object} An object using statuses as keys and arrays of articles
as values
*/
function groupArticlesByStatus(articles)
{
var articleGroups = {},
status,
article;
for (var i = 0, l = articles.length; i < l; i++)
{
article = articles[i];
status = article.properties ? article.properties["kb_status"] : null;
if (status)
{
if (articleGroups[status] === undefined)
{
articleGroups[status] = [];
}
articleGroups[status].push(article);
}
}
return articleGroups;
}Code snippet web-extensionsite-webscriptsorgalfrescocomponentsknowledgebaseknowledgebase.lib.js
The following configuration files should be placed into this directory:
<installLocation> omcatsharedclassesalfrescoweb-extension
Custom Alfresco Share configuration file
<alfresco-config>
<!-- Add a custom page type -->
<config evaluator="string-compare" condition="SitePages" replace="true">
<pages>
<page id="calendar">calendar</page>
<page id="wiki-page">wiki-page?title=Main_Page</page>
<page id="documentlibrary">documentlibrary</page>
<page id="discussions-topiclist">discussions-topiclist</page>
<page id="blog-postlist">blog-postlist</page>
<page id="links">links</page><page id="tasks">tasks</page>
<page id="knowledgebase">knowledgebase</page>
</pages>
</config>
</alfresco-config>Code snippet web-extensionshare-config-custom.xml
Defines custom Spring beans or Spring bean overrides for Alfresco Share
<?xml version='1.0' encoding='UTF-8'?>
<!DOCTYPE beans PUBLIC '-//SPRING//DTD BEAN//EN' 'http://www.springframework.org/
dtd/spring-beans.dtd'>
<beans>
<bean id="webscripts.resources"
class="org.alfresco.i18n.ResourceBundleBootstrapComponent">
<property name="resourceBundles">
         <list>
            <value>alfresco.messages.webscripts</value>
            <value>alfresco.messages.slingshot</value>
            <value>alfresco.web-extension.messages.kbsite</value>
         </list>
      </property>
   </bean>

</beans>Code snippet web-extensioncustom-slingshot-application-context.xml
The following message bundle should be placed here:
<installLocation> omcatsharedclassesalfrescoweb-extensionmessages
Defines custom message bundle elements for Alfresco Share
page.kbSiteDashboard.title=Knowledge Base Site Dashboard
page.kbSiteDashboard.description=Knowledge Base site's dashboard page

# Customise site
page.knowledgebase.title=Knowledge Base
page.knowledgebase.description=Displays the Knowledge Base content

# Create site preset
title.kbSite=Knowledge Base Site
Code snippet web-extensionmessageskbsite.properties
The following files are used by the custom dashlet and custom page implementations provided in these samples. They are not part of the core Alfresco Share Web application. Rather than modify the Alfresco Share Web application itself, they are copied into a separate ROOT Web application in Tomcat.
The following file should be copied into your Tomcat ROOT Web application directory at the following location:
<installLocation> omcatwebappsROOTshare-extensioncomponentsdashlets
CSS for the Knowledge Base custom page
.knowledgebase.dashlet .body .msg
{
   padding: 0.5em;
}

.knowledgebase.dashlet .body table td
{
   padding: 0.15em 0.5em 0.15em 0.25em;
}
Code snippet ROOTshare-extensioncomponentsdashletsknowledgebase.css
The following files should be copied into your Tomcat ROOT Web application directory at the following location:
<installLocation> omcatwebappsROOTshare-extensioncomponentsknowledgebase
CSS for the Knowledge Base custom page
.knowledgebase
{
   padding: 1em;
}

.knowledgebase .title
{
   line-height: 2.5em;
   color: #008000;
   font-size: 108%;
}

.knowledgebase table
{
   margin-bottom: 2em;
   width: 70em;
border: 1px solid #C0C0C0;
}
.knowledgebase caption
{
padding: 0.5em;
font-size: 1.23%;
}
.knowledgebase tbody
{
border-top: 1px solid #C0C0C0;
}
.knowledgebase th,
.knowledgebase td
{
padding: 0.25em;
}
.knowledgebase table th.kbid
{
width: 10%;
}
.knowledgebase table .name
{
width: 30%;
}
.knowledgebase table .modified-by
{
width: 20%;
}
.knowledgebase table .modified-date
{
width: 20%;
}
.knowledgebase table .actions
{
width: 15%;
text-align: center;
}
.knowledgebase table .actions .yui-button button
{
line-height: 1;
min-height: 1em;
padding: 0 3px;
}Code snippet ROOTshare-extensioncomponentsknowledgebaseknowledgebase.css
Browser-side JavaScript for the Knowledge Base custom page
/**
 * Alfresco Knowledge Base namespace.
 *
 * @namespace Alfresco
 * @class Alfresco.kb
 */
Alfresco.kb = Alfresco.kb || {};

/**
 * Knowledge Base component.
 *
 * Lists all knowledge base articles and gives the possibility to archive the
 * current ones.
 *
 * @namespace Alfresco
 * @class Alfresco.kb.KnowledgeBase
 */
(function()
{
   /**
    * YUI Library aliases
    */
   var Dom = YAHOO.util.Dom,
       Event = YAHOO.util.Event;

   /**
    * Dashboard KnowledgeBase constructor.
    *
    * @param {String} htmlId The HTML id of the parent element
    * @return {Alfresco.KnowledgeBase} The new component instance
    * @constructor
    */
   Alfresco.kb.KnowledgeBase = function KB_constructor(htmlId)
   {
      Alfresco.kb.KnowledgeBase.superclass.constructor.call(this,
         "Alfresco.kb.KnowledgeBase", htmlId, ["button"]);
      return this;
   };

   YAHOO.extend(Alfresco.kb.KnowledgeBase, Alfresco.component.Base,
   {
      /**
       * Object container for initialization options
       *
       * @property options
       * @type object
       */
      options:
      {
         /**
          * Current siteId.
          *
* @property siteId
* @type string
*/
siteId: "",
/**
* ContainerId representing root container
*
* @property containerId
* @type string
* @default "documentLibrary"
*/
containerId: "documentLibrary"
},
/**
* Fired by YUI when parent element is available for scripting
*
* @method onReady
*/
onReady: function KB_onReady()
{
var el = Dom.get(this.id)
var archiveButtons = Dom.getElementsByClassName("archive",
"button", el);
for (var i = 0, l = archiveButtons.length; i < l; i++)
{
Alfresco.util.createYUIButton(this, null, this.onArchiveButtonClick,
{}, archiveButtons[i]);
}
},
/**
* Fired when the user clicks the Cancel button.
* Takes the user back to the details edit page without saving anything.
*
* @method onArchiveButtonClick
* @param p_oEvent {object} a "click" event
*/
onArchiveButtonClick: function KB_onArchiveButtonClick(p_oEvent, p_oButton)
{
// Disable buttons to avoid double submits
var buttonSpanEl = p_oButton.get("element");
p_oButton.set("disabled", true);
// Prepare archive webscript url
var url = YAHOO.lang.substitute(Alfresco.constants.PROXY_URI_RELATIVE +
"/slingshot/doclib/action/archive/site/{siteId}/{containerId}",
{
siteId: this.options.siteId,
containerId: this.options.containerId
});// Request article to be archived
Alfresco.util.Ajax.jsonPost(
{
url: url,
dataObj:
{
nodeRefs: [ p_oButton.get("value") ]
},
successCallback:
{
fn: function(response)
{
// Remove button from row and move row to archive table
var trEl = buttonSpanEl.parentNode.parentNode;
buttonSpanEl.parentNode.removeChild(buttonSpanEl);
Dom.get(this.id + "-archived-tbody").appendChild(trEl);
},
scope: this
},
failureMessage: this.msg("message.archiveError")
});
}
});
})();Code snippet ROOTshare-extensioncomponentsknowledgebaseknowledgebase.js