
Investigating the Photoshop and Dreamweaver workflow
Dreamweaver Technique: Keeping Photoshop Smart Objects in Sync
Exploring the Fireworks/Dreamweaver connection
Using Fireworks from within Dreamweaver
Dreamweaver Technique: Optimizing Graphics
Working with image placeholders
Dreamweaver Technique: Combining Images in Fireworks
Sending a graphic to Fireworks
Embedding Fireworks code
Driving the Fireworks graphics engine
Managing files with Bridge
Adobe has a wide array of market-leading tools under its roof, and two are of special interest to Web designers: Adobe Photoshop in graphics and Dreamweaver in Web authoring. Web designers, especially those new to the field, often pair Photoshop and Dreamweaver in their workflow. This most recent release of both products, as part of the Creative Suite bundle, further tightens their integration. Now, you can modify a source file in Photoshop for an image placed into a Dreamweaver page — and then update it in Dreamweaver with a single click. In this chapter, you learn the various ways that you can effortlessly tie Photoshop and Dreamweaver together.
In the real world, Web sites — particularly the images — are constantly being tweaked and modified. This fact of Web life explains why Fireworks, Adobe's premier Web graphics tool, is so popular. One of Fireworks' main claims to fame is that everything is editable all the time. If that were all that Fireworks did, the program would already have earned a place on every Web designer's shelf just for its sheer expediency. Fireworks has many other extraordinary graphic capabilities, however, and Dreamweaver can tap that power directly.
Adobe's Dreamweaver and Fireworks products are tightly integrated. You can optimize your images — reduce the file size, crop the graphic, make colors transparent — within Dreamweaver, using the Fireworks engine (and without opening Fireworks). Moreover, you can edit an image in any fashion in Fireworks and, with one click of the Done button, automatically export the graphic with its updated settings. Perhaps most important of all, Dreamweaver can control Fireworks — creating graphics on-the-fly — and then insert the results in Dreamweaver.
A key Fireworks feature is the capability to output HTML and JavaScript for easy creation of rollovers, sliced images, and image maps with behaviors. You can even opt to create pop-up menus with standards-compliant CSS. With Fireworks, you can specify Dreamweaver-style code so that all your Web pages are consistent. After Fireworks generates the HTML, Dreamweaver's Insert Fireworks HTML object makes code insertion effortless. Dreamweaver recognizes images — whether whole or sliced — as coming from Fireworks, and displays a special Property inspector.
The Adobe integration doesn't stop there. Adobe Bridge is a highly evolved visual browser and panel, which is now accessible directly from within Dreamweaver. In the final section of this chapter, you learn how to take advantage of Bridge's advanced image cataloging. Web pages and Web graphics are closely tied to each other. With the tight integration between Dreamweaver and the other Adobe products — Photoshop, Fireworks, and Bridge — the Web designer's world is moving toward a single design environment.
This chapter covers a lot of territory in various Adobe graphics programs, but one of the key operations is opening a Photoshop PSD file in Dreamweaver. Here's how it's done:
Place your cursor where you'd like your image to appear.
From the Common category of the Insert panel, choose Images: Image.

In the Select Images dialog box, navigate to your Photoshop source files and choose the one you want; click OK (Choose).
When the Image Preview dialog box appears, choose the JPEG, GIF, or PNG from the Format list and optimize the graphic for best image at the smallest size; click OK when you're done.
Every Photoshop file added to your Dreamweaver page is inserted as a Smart Object — which you learn more about (and lots more) in the chapter that follows.
Adobe Photoshop, the graphics program powerhouse, was primarily developed to work with print. Although it has long included the capability to export Web-compatible formats such as JPEG, GIF, and PNG, the path from Photoshop to Dreamweaver has been an arduous one. Moreover, the reverse direction — necessary for fine-tuning graphics — was just as time-consuming. For years, Web designers everywhere put up with repetitive, tedious steps just to use two of their favorite programs together.
Happily, the workflow between the two industry leaders has been smoothed. Now, Dreamweaver not only recognizes the Photoshop native file format (PSD), and offers an in-product conversion to a Web-compatible format, it also inserts those graphics as Smart Objects. A Smart Object image keeps track of the original source and lets you know whether the two — Photoshop source and Web image — are in sync. If they're not, you can update the Web image quickly and easily.
Moreover, designers can copy any selection in Photoshop and paste it into Dreamweaver — and get the same immediate conversion option as if they opened a PSD file.
Like all native formats from major graphics programs, Photoshop's PSD format is proprietary and not suitable for viewing on the Web. Each file contains a great deal of non-graphical information, such as layer structure, color palettes, and typography details. Consequently, PSD files are typically many times larger than their Web counterparts — for example, one PSD file of a single image against a background is 578KB, whereas the same file in JPEG format, with light compression, is only 23KB. Clearly, for a Photoshop file to be used online, it has to undergo a significant conversion — a conversion Dreamweaver is quite able to handle.
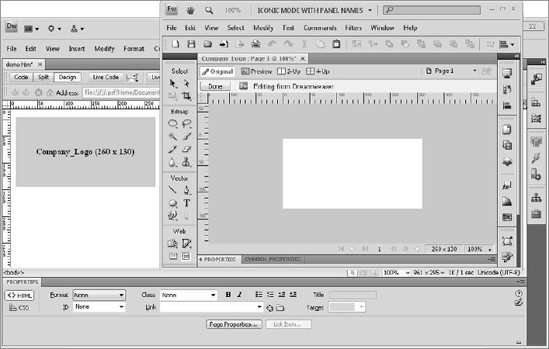
When you insert a PSD file into Dreamweaver, the Image Preview dialog box appears, as shown in Figure 24-1. Designers choose the desired Web format and can further optimize the image to achieve the maximum quality with the minimum file size through a series of format-specific controls. For example, if you choose JPEG format, a slider control that affects the Quality (or compression) setting is available. Similarly, GIF format offers the ability to limit the number of colors.
All in all, the Image Preview is quite powerful and can even be used for comparative optimization with two or four preview panes. The dialog box consists of three tabbed panels:
Options: Enables you to try various export options and preview them. You can switch file formats from GIF to JPEG (or animated GIF or PNG), as well as alter the palette, color depth, loss (quality), and dithering. Transparency for GIF and PNG images is set in the Options panel. The Image Preview dialog also provides access to an Optimize To Size Wizard that enables you to target a particular file size for your graphic; click the clamp icon in the lower right of the Options tab to start the wizard.
File: Defines an image's dimensions. Images can be rescaled by a selected percentage or pixel size. Moreover, you can crop your image either numerically (by defining the export area) or visually (with the cropping tool).
Animation: Provides frame-by-frame control for animated GIFs. Each frame's delay (how long it is onscreen) can be defined independently, and the entire animation can be set to either play once or loop a user-determined number of times. The Animation tab becomes active only if the Format is set to Animated GIF.
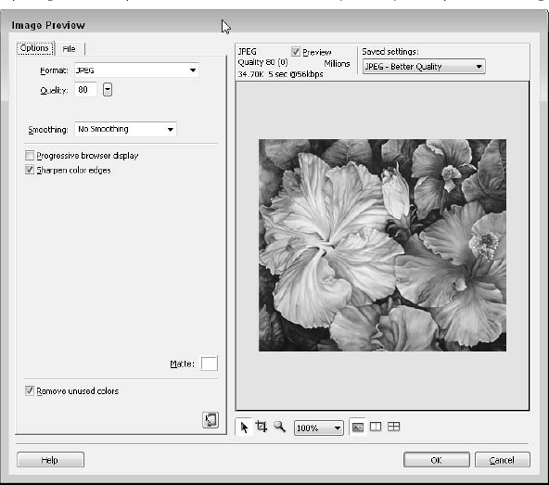
Figure 24-1. Opening a Photoshop file in Dreamweaver automatically allows you to optimize the image for the Web.
To insert an image in Photoshop format into Dreamweaver, follow these steps:
Place your cursor where you'd like the image to appear.
Click the Image button from the Common category of the Insert panel or choose Insert Image. Alternatively, you can drag the Image button from the Insert panel to the desired location.
When the Select Image Source dialog box opens, navigate to and select a Photoshop native file (with a PSD extension), and click Open. The Image Preview dialog box opens, with the chosen image displayed.
In the Options tab, choose the desired Web format from the Format list.
Dreamweaver can convert a PSD file to GIF, Animated GIF, JPEG, and PNG formats.
Choose your settings for the selected format.
If you want to change the scale of the image, click the File tab and make your adjustments.
When you're done, click OK. The Save Web Image dialog box is displayed.
In the Save Web Image dialog box, navigate to the location within your site to store your image and, if desired, enter a new filename.
When you're ready, click Save.
After the graphic is inserted, the Property inspector identifies it as a Photoshop-derived image, displays the PSD source, and offers an Edit in Photoshop option, as shown in Figure 24-2, in addition to the standard image properties. To return to the Image Preview dialog box, click Edit Image Settings, also in the Property inspector and identified in Figure 24-2.
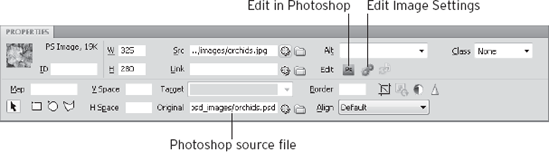
You'll also notice an overlaid symbol in the upper-left corner. This symbol indicates that this is a Photoshop Smart Object, which is covered in the upcoming section, "Updating a Photoshop Smart Object."
Many designers use their graphics program to create the layout and then use parts of the design in Dreamweaver. Although these individual elements could be saved as separate files and then inserted using the procedure outlined in the previous section, it's much faster to simply copy what you need from one program, Photoshop, and paste it into another, Dreamweaver.
The same conversion mechanism used for inserting a PSD file into Dreamweaver — the Image Preview dialog box — is used when copying and pasting an image.
To copy a selection from Photoshop to Dreamweaver, follow these steps:
In Photoshop CS5, make your selection.
To copy the selection in the currently selected layer, choose Edit

Tip
You're not limited to copies of simple selections or merged layers: you can also copy slices. In Photoshop, after you've made your slices with the Slice tool, use the Slice Select tool to choose them. Then copy the selected slice with either the menu or keyboard shortcut.
In Dreamweaver, place your cursor where you'd like the image to appear.
Choose Edit
In the Options tab, choose the desired Web format from the Format list.
Choose your settings for the selected format.
When you're done, click OK. The Save Web Image dialog box is displayed.
In the Save Web Image dialog box, navigate to the location within your site to store your image and enter a new filename.
When you're ready, click Save.
The same Property inspector is used for converted PSD files and for those images pasted from Photoshop. Again, a Smart Object symbol is displayed on top of the image in the upper-left corner. Whether the images come from a Photoshop file or the Photoshop clipboard, they are inserted as Smart Object images and, as you'll see in the next section, this means you can easily modify the source and reapply your changes.
Any image originating from Photoshop — whether imported from a PSD file or copied and pasted — can be modified in Photoshop and easily updated in Dreamweaver. Because these Dreamweaver images keep track of their Photoshop source images, they are referred to as Smart Objects. As noted earlier, a Smart Object is identified by a symbol overlaid on the upper-left corner of the image; the symbol tells the sync status at a glance. When the Photoshop image is first inserted, the Smart Object is in-sync with the source and the symbol is completely green; if the source is changed, the symbol turns half-red. Tooltips further help clarify the sync status when you roll over the symbol. Out-of-sync Smart Objects can be updated and brought into sync with the click of the Update from Original button on the Property inspector, as shown in Figure 24-3.

Once the image has been inserted into Dreamweaver, there are two files you can modify: the original source graphic and the converted Web-compatible file. The process is different for changing each of the two file types; each procedure is detailed next.
Tip
Although you will need Dreamweaver CS5 to take advantage of Smart Object technology, you can use either Photoshop CS5 or the previous version, Photoshop CS4.
To modify the source image from Photoshop via the Smart Object connection, follow these steps:
Select the image in Design view.
From the Property inspector, choose Edit. Alternatively, you can press Ctrl (Command) and double-click the image to launch the original source graphic in Photoshop.
You're also free to modify the source graphic directly in Photoshop, without initiating the process in Dreamweaver.
When the source image appears in Photoshop, make any desired changes.
Return to Dreamweaver and, with the original image selected, choose Update from Original in the Property inspector or from the context menu.
The updated image is optimized according to the previous conversion settings and inserted in the page. Smart Objects are smart enough to retain any scaling done in Dreamweaver, as well as the optimized settings.
If you resize a Smart Object image, a warning indicator is added to the sync symbol; you can resample the source for optimum rescaling by selecting the Update from Original option on the Property inspector.
Tip
What if you have multiple Smart Object images inserted into your Web pages from a single Photoshop source? If the source is updated, all the related Smart Objects will be marked as out-of-sync and you have the option to update them individually or all at once. To update multiple Smart Objects, open the Assets panel and select all the images you want to modify; all of the images will display the out-of-sync indicator in the Assets panel preview window. Then, right-click (Windows) or Ctrl-click (Mac) and choose Update from Original.
If you don't have the source image available or you'd prefer to change the Web-compatible file, you'll need to send the image to Photoshop in a slightly different way.
To modify the Web-compatible image converted from Photoshop, follow these steps:
Select the image in Design view.
Choose Modify
Tip
If you prefer to use keyboard shortcuts, you'll need to make sure that Photoshop is set up as your primary editor for JPEG, GIF, and PNG formats in the File Types/Editors category of Preferences. Once you've made that assignment, you can press the Alt (Option) key while double-clicking an image to open the file in Photoshop.
When the source image appears in Photoshop, make any desired changes.
Select the modified image.
Choose Edit
In Dreamweaver, with the original image selected, choose Edit
Naturally, any changes made to the Web-ready image will not be reflected in the original PSD file.
Keeping Photoshop Smart Objects in Sync
Dreamweaver and Photoshop's Smart Object connection makes it possible to quickly update a web-based image in Dreamweaver if the source of that image has been modified in Photoshop.
Note: This Dreamweaver Technique requires Photoshop CS5 or Photoshop CS4, as well as Dreamweaver CS5.
From the Techniques site, expand the 24_Photoshop_Fireworks folder and open the
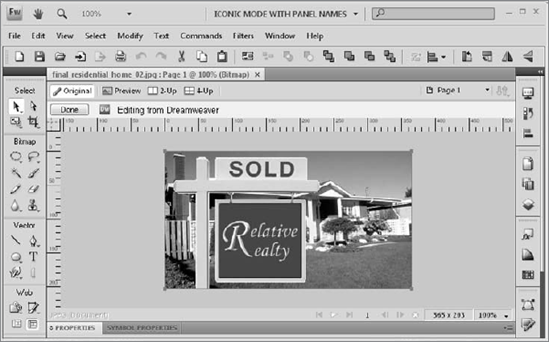
photoshop_startfile.Select the top image on the page,
residential_home_01ps.jpg.Note the Smart Object symbol in the upper-left corner of the image. The green symbol indicates that the image is in-sync with the Photoshop source.
From the Property inspector, click the Edit icon.
Photoshop launches and displays the selected image.
Now select a second image to blend with the first by choosing from the Photoshop menu File
In the Import dialog box, navigate to the TechniquesImages folder and choose
sold_sign.png.Place the bounding box in the center of the image, and double-click to confirm the placement.
The imported file is in standard PSD format with a transparent background, so it can blend into the other image seamlessly.
Choose File
Switch back to Dreamweaver and note that the Smart Objects symbol is half-red and half-green.
Select the image and, from the Property inspector, click Update from Original.

Smart Objects greatly smooth the workflow between Photoshop and Fireworks.
Adobe Fireworks combines the best of both vector and bitmap technologies and is one of the first graphics programs to use PNG as its native format. Exceptional export capabilities are available in Fireworks with which images can be optimized for file size, color, and scale. Moreover, Fireworks is terrific at generating GIF animations, rollovers, image maps, and sliced images.
Note
Dreamweaver has a few graphics tricks of its own now. Even without Fireworks, you can crop, resample, and brighten images — and more. For a discussion of Dreamweaver's built-in graphics capabilities, see Chapter 8.
With Dreamweaver and Fireworks, you have two ways to alter inserted graphics: the Optimize Image command and the Edit button in the Image Property inspector.
Note
The full integration described in this chapter requires that a current version of Fireworks be installed after Dreamweaver or as part of the Adobe Creative Suite. Certain features, such as the Optimize Image command, work with Fireworks 2 and later; any other features requiring direct communication between the two programs work with Fireworks MX 2004 and up.
Although you can design the most beautiful, compelling image possible in your graphics program, if it's intended for the Internet, it must be viewed in a Web page. Not only must the graphic work in the context of the entire page, but you also have to take the file size of the Web graphic into account. All these factors mean that most, if not all, images require some degree of modification after they're included in a Web page. Dreamweaver's Optimize Image command facilitates this modification by opening the Export module of Fireworks right from within Dreamweaver — which has the same functionality as the Image Preview dialog box previously covered in this chapter — as shown in Figure 24-4.
Figure 24-4. You can optimize images from within Dreamweaver using the Fireworks interface, with or without Fireworks installed.
Note
If you crop or rescale an inserted image in Fireworks, you must update its height and width in Dreamweaver. The easiest way to accomplish this is to click the Reset Size button in the Image Property inspector.
Fireworks saves its source files in an expanded PNG format to maintain full editability of the images. Graphics for the Web must be exported from Fireworks in GIF, JPEG, or standard PNG format. Dreamweaver's Optimize Image command can modify either the source file or the exported file. In most situations, better results are achieved by using the source file, especially when optimizing includes rescaling or resampling. Some situations, however, require that you leave the source file as-is and modify only the exported files. Suppose, for example, that one source file is used to generate several different export files, each with different backgrounds (or canvases, as they are called in Fireworks). In that case, you are better off modifying the specific exported file, rather than the general source image.
Tip
You can also open the Image Preview dialog box with the currently selected image by choosing Edit Image Settings from the Property inspector.
Dreamweaver enables you to choose which type of image you want to modify. When you first execute the Optimize Image or the Edit Image command, a Find Source dialog box appears (see Figure 24-5). If you want to locate and use the source file, click Use A PNG; to use the exported image that is inserted in Dreamweaver, click Use This File. If you opt for the source file — and the image was created in Fireworks — Dreamweaver reads the Design Note associated with the image to find the location of the source file and open it. If the image was created with an earlier version of Fireworks or the image has been moved, Dreamweaver asks you to locate the file with a standard Open File dialog box. By setting the Fireworks Source Files option, you can always open the same type of file: source or exported. Should you change your mind about how you like to work, open Fireworks and select Edit
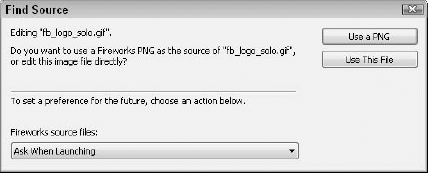
Figure 24-5. Set the Find Source dialog box in Fireworks to use the source graphics image (PNG) or the exported image (GIF, JPEG, or PNG), or to prompt for each optimization.
Note
There's one case in which Fireworks does not follow your Launch and Edit preferences: If the image chosen is a sliced image, Fireworks always optimizes the exported file rather than the source, regardless of your settings.
Tip
Because of server capacity limitations, most Web designers upload the exported GIF/JPEG image files (the files that actually appear in the Web page) to their servers, but they do not upload the source PNG image files from which these GIFs/JPEGs are derived. If you use this approach, you can take advantage of Dreamweaver's Cloaking feature to cloak your PNG files, thus automatically preventing them from being uploaded, as discussed in Chapter 4.
To use the Optimize Image command, follow these steps:
Select the image you'd like to modify in Dreamweaver.
Note
The current page must have been saved at least once before the Optimize Image command can be run. The current state of the page doesn't have to be previously saved, but a valid file must exist for the command to work properly. If you haven't saved the file, Dreamweaver alerts you to this fact when you call the command.
Choose Commands
Tip
You can also invoke the Optimize Image command from the Property inspector. With the image selected, click Optimize — it's the second button from the left in the Edit area and looks like a C-clamp.
Make whatever modifications are needed from the Options, File, or Animation tabs of the Optimize Images dialog box.
When you're finished, click OK to accept your changes or click Cancel to return to Dreamweaver without modifying the image.
Note
If you're working with a Fireworks source file, the changes are saved to both your source file and the exported file; otherwise, only the exported file is altered.
Optimizing Graphics
Dreamweaver and Fireworks' tight integration makes it possible to resize your graphics visually in Dreamweaver and use the Fireworks engine to optimize it to your chosen physical size as well as a reduced file size.
From the Techniques site, expand the 24_Photoshop_Fireworks folder and open the
fireworks_startfile.The top image on the page is too big and needs to be reduced both in file size and dimensions.
Select the image of the two-story house,
residential_home_01.jpg, so that the sizing handles appear.Begin dragging the size handle in the lower-right corner and then press and hold the Shift key to constrain the resizing. If you don't constrain the resizing, the width to height proportion may not be consistent with the original image.
Resize the picture until it's approximately two-thirds of its original size.
When the image size is more appropriate to the page, select Edit Image Settings from the Property inspector. The Image Preview dialog box opens with the selected image already resized to your specifications.
In the Options tab of the Image Preview dialog box, select the 2 Preview Windows option near the bottom of the dialog. You'll use the two preview windows to find the best balance between the visual quality of the image and file size.
Drag the Quality slider down around 60 until you find suitable image quality and file size. At 55%, the file size drops from the original size of 29KB to less than 9KB — a significant reduction, without a noticeable image quality change.

When you're ready, click OK. The image is optimized and you're returned to Dreamweaver.
If the Property inspector displays the width and height dimensions in bold, click the adjacent Reset Image To Original Size icon.
Save your page.
The Optimize Image command is great for adjusting the dimensions or file size of an image; in the next Dreamweaver Technique, you see how to send images for more elaborate editing to Fireworks from Dreamweaver.
Optimizing an image is great when all you need to do is tweak the file size or rescale the image. Other images require more detailed modification — such as when a client requests that the wording or order of a series of navigational buttons be changed. Dreamweaver enables you to specify Fireworks as your graphics editor. If you've done so, you can take advantage of Fireworks' capability to keep every element of your graphic always editable. Believe me, this is a major advantage.
In Dreamweaver, external editors can be set for any file format; you can even assign more than one editor to a file type. When installing the Adobe Creative Suite, Fireworks is preset as the primary external editor for GIF, JPEG, and PNG files. If you install Fireworks outside the Suite's setup, Dreamweaver Preferences handles the external editor assignment. To assign Fireworks to an existing file type, follow these steps:
Choose Edit
Select the File Types/Editors category.
Select the file type (GIF, JPEG, or PNG) from the Extensions list (see Figure 24-6).
Click the Add (+) button above the Editors list. The Select External Editor dialog box opens.
Locate the editor application and click Open when you're ready.
Click the Make Primary button while the editor you want is highlighted in the Editors list.
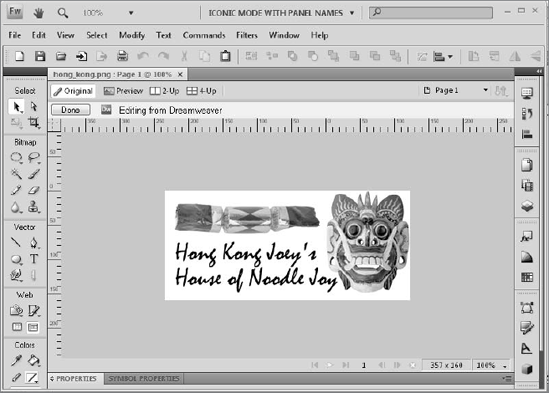
Now, whenever you want to edit a graphic, select the image and click the Edit in Fireworks button in the Property inspector. You can also right-click (Control+click) the image and select Edit With Fireworks to start editing it. Fireworks starts up, if it's not already open. As with the Optimize Image command, if the inserted image is a GIF or a JPEG and not a PNG, Fireworks asks if you'd like to work with a separate source file, if that option in Fireworks Preferences is set. If you choose to do so, Fireworks automatically loads the source file.
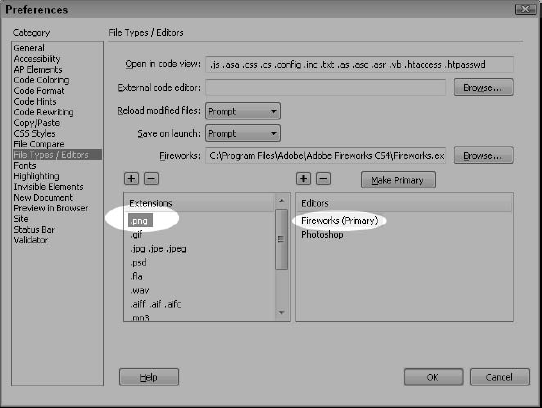
Figure 24-6. Define Fireworks as your external editor for GIF, JPEG, and PNG files to enable the back-and-forth interaction between Dreamweaver and Fireworks.
When the image opens in Fireworks, the document window indicates that the image is being edited from Dreamweaver in Fireworks, as shown in Figure 24-7. A Done button is also available in the Document window for completing the operation after you've made the alterations to your file in Fireworks. Alternatively, you can choose File
As discussed in Chapter 8, when designing a page, you can defer the task of inserting final artwork by using image placeholders instead of actual images; then, at the appropriate time, you can replace these image placeholders with the actual images. Working this way can facilitate smooth, trouble-free interaction between your Web site design and graphics departments.
To use Fireworks to replace your Dreamweaver image placeholders, follow these steps:
In Dreamweaver, open the page that contains the image placeholder you want to replace.
Select the image placeholder and click the Create button in the Property inspector. Or simply Ctrl+double-click (Command+double-click) the image placeholder.
Fireworks launches and creates a new, blank PNG file whose canvas size is set to the width/height of the placeholder image, as shown in Figure 24-8.
In Fireworks, create the desired image.
When you are finished, click Done.
Fireworks first prompts you to save the image as a PNG (source) file. It then prompts you to export the file in a suitable Web format: GIF or JPEG. Dreamweaver automatically replaces the selected image placeholder with this exported image.
After you've used this procedure to replace a Dreamweaver image placeholder, you can easily edit the image in Fireworks by using the techniques described in the previous section of this chapter (the Edit button in the Property inspector and the Edit With Fireworks command).
Combining Images in Fireworks
In this Dreamweaver Technique, you use Dreamweaver's Edit capability to combine an image on the page with another.
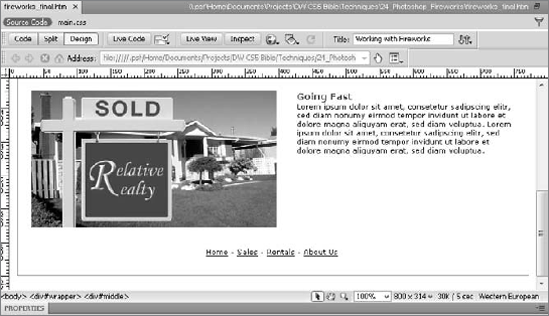
Open the
fireworks_start.htmfile previously worked on.Select the bottom image on the page,
residential_home_02.jpg.From the Property inspector, click the Edit icon.
Fireworks launches and displays the selected image in a special editing window.
Now select a second image to blend with the first by opening the Fireworks menu and choosing File
In the Import dialog box, navigate to the Techniquesimages folder and choose
sold_sign.png.Place the angle cursor near the top left of the image, and click once to place the imported graphic.
The imported file is in standard PNG format with transparency enabled, so it can blend into the other image seamlessly.
Reposition the imported image to your liking; when you're satisfied, click Done.
Fireworks closes and Dreamweaver is brought to the forefront; when your revised image appears, save your page.
Combining images is just one of the ways you can use Dreamweaver and Fireworks together.
The rollover is a fairly common but effective Web technique to indicate interactivity. Named after the user action of rolling the mouse pointer over the graphic, this technique uses from two to four different images per button. With Fireworks, you can both create the graphics and output the necessary HTML and JavaScript code from the same program. Moreover, Fireworks adds some sophisticated twists to the standard on/off rollovers to enable you to easily enhance your Web page.
Note
Although graphic rollovers are still in use throughout the Web, if you want to apply the effect to navigation bar elements, CSS is a better, Web standards–compliant route to take. You can learn more about CSS in general — and CSS-based navigation in particular — in Chapter 6.
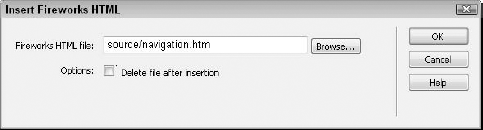
Rollovers created in Fireworks can be inserted into Dreamweaver using several methods. First, you can use Fireworks to build the images, and then you just export them and attach the behaviors in Dreamweaver. This technique works well for graphics going into AP elements or images with other attached behaviors. The second method of integrating Fireworks-created rollovers involves transferring the actual code generated by Fireworks into Dreamweaver — a procedure that can be handled with one command: Insert Fireworks HTML — Insert
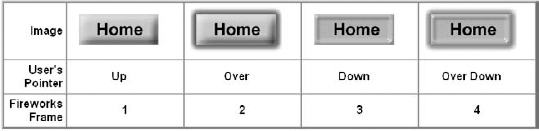
With its full-spectrum editability, Fireworks excels at building consistent rollover graphics simply. The possible states of an image in a rollover — up, over, down, and over while down — are handled in Fireworks as separate states, formerly called frames. As in an animated GIF, each state has the same dimensions, but the content is slightly altered to indicate the separate user actions. For example, Figure 24-9 shows the different states of a rollover button, side-by-side.
Note
Many Web designers use just the initial two states — up and over — in their rollover buttons. The third state, down, takes place when the user clicks the button, and it is useful if you want to indicate that moment to the user. The down state also indicates which button has been clicked (which is down) when a new page appears, but the same navigation bar is used, notably with states. The fourth state (over while down) is called when the user's pointer rolls over the previously selected button.
You can attach the rollover behaviors to your images in several ways in Dreamweaver. The following technique uses Dreamweaver's Rollover object. To create a rollover by attaching Dreamweaver behaviors to Fireworks-created graphics, follow these steps:
Create your graphics in Fireworks, using a different state for each rollover state.
Warning
You cannot use Fireworks' Edit
In Fireworks, choose File
If you want, type a new name in the File Name text box. In this operation, the File Name text is used as a base name by Fireworks to identify multiple images exported from a single file. When exporting states, the default settings append
_fn, wherenis the number of the state. State numbers 1–9 are listed with a leading zero (for example,MainButton_f01).In the Save As Type list box, select States To Files.
If desired, select the Trim Images option. When Trim Images is on, Fireworks automatically crops the exported images to fit the objects on each state. This procedure makes for smaller, more flexible image files.
Warning
I recommend that, in most situations, you opt to trim your images when exporting states as files. But here's an exception to watch out for: If a button in one state has a drop shadow, its trimmed size will be slightly larger than the non-drop–shadow buttons. Swapping it forces it to fit the smaller button's image space, which causes a jagged, amateurish swap display.
Click the Save button to store your states as separate files.
From the Common category of the Insert panel, choose the Rollover Image object.
In the Insert Rollover Image dialog box, click the Original Image Browse button to locate the image stored with the first state designation:
_f01.If you want, give your image a unique name different from the one automatically assigned in the Image Name text box.
Click the Rollover Image Browse button to locate the image stored with the second state designation:
_f02.If you'd like to use the down (
_f03) and over while down (_f04) images, attach additional Swap Image behaviors to the image files. For help, see Chapter 11.

Many Web designers build their entire navigation bar — complete with rollovers — in Fireworks. Rather than create and export one button at a time, all the navigation buttons are created as one graphic, and slices or hotspots are used to make the different objects or areas interact differently. You learn more about slices and hotspots later in this chapter.
In some ways, Fireworks is a hybrid program, capable of simultaneously outputting terrific graphics and sophisticated code. You can even select the type of code you want generated in Fireworks: Dreamweaver HTML, Dreamweaver XHTML, Dreamweaver Library, or code compatible with other programs such as GoLive and FrontPage. You can also find a more general Generic code option. All these options can be chosen during the Export procedure.
Warning
Fireworks CS5 has the capability to convert graphics to CSS-based layouts, complete with sliced images, background graphics, and external style sheets. For graphics thus converted using their CSS and Images export, you don't need to do anything special in Dreamweaver — just open the page like any other Web page. Unlike other Fireworks exported code, there are no round-trip capabilities with this export option, however.
For rollovers, Fireworks generally outputs to two different sections of the HTML document, the <head> and the <body>; only the FrontPage style keeps all the code together. The <head> section contains the JavaScript code for activating the rollovers and preloading the images; <body> contains the HTML references to the images themselves, their links, and the event triggers used (onClick or onMouseOver).
The general procedure is to first create your graphics in Fireworks and then export them, simultaneously generating a page of code. Now, the just-generated Fireworks HTML page can be incorporated in Dreamweaver. Dreamweaver includes two slick methods for including your Fireworks-output code and images. The Insert Fireworks HTML object places the code — and the linked images — right at your current cursor position. You also have the option to export your Fireworks HTML directly to the clipboard and paste it, verbatim, into Dreamweaver.
Warning
If you paste the Fireworks rollover code manually into a Dreamweaver HTML document, take care to merge the existing <head> and <body> code with the Fireworks rollover code. And remember: An HTML document can have only one <head> and one <body> tag!
Just as an image requires a link to create a rollover in Dreamweaver, a Fireworks image needs to be designated as either a slice or a hotspot. The Fireworks program describes slices and hotspots as being part of the graphic's Web layer. The Web layer can be hidden or locked, but not deleted. Figure 24-11 shows the same button with both a slice and a hotspot attached.
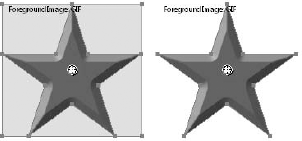
Figure 24-11. The Fireworks image on the left uses a slice object, whereas the image on the right uses a polygon hotspot.
Slices are rectangular areas that permit different parts of the same graphic to be saved as separate formats — the entire graphic is formatted as an HTML table. Each slice can also be given its own URL and have one or more behaviors attached to it.
A Fireworks hotspot is an area defined for an image map. Hotspots can be rectangular, elliptical, or polygonal — just like those created by Dreamweaver with the Image Map tools. Because Fireworks is an object-oriented graphics program, any selected image (or part of an image) can be automatically converted to a hotspot. Like slices, hotspots can have both URLs and behaviors assigned to them.
Note
In addition to the technique outlined in the text that follows, you can also use Fireworks' Button Editor (available by choosing Insert
To include Fireworks-generated code in your Dreamweaver document, follow these steps in Fireworks:
Create your graphics in Fireworks, placing the image for each interactive rollover state — up, over, down (optional), and over while down (optional) — in its own state.
With the object in its first state selected, create the hotspot(s) or slice(s).
To do so automatically, choose Edit
Where appropriate, use Fireworks' Property inspector to assign URLs to hotspots or slices.
Click the target symbol displayed in the center of the hotspot or slice to display a menu of available behaviors.
Alternatively, you can open Fireworks' Behavior inspector and click the Add Behavior (+) button.
If you are working on a slice, select the Simple Rollover or Swap Image behavior. If you are working on a hotspot, choose the Swap Image behavior (Simple Rollover is not available for hotspots).
Tip
The Simple Rollover behavior is used to create single- or multiple-button rollovers in which one image is replaced by another image in the same location; only two states are used for a Simple Rollover. Use the Swap Image behavior to create more complex rollovers, such as those in which the rollover triggers an image change in another location. A third alternative, the Nav Bar, should be used in situations where the navigation system is to be placed in a stateset. The Nav Bar behavior can display all four states (up, over, down, and over while down).
Export the object by choosing File
Enter a name in the File Name text box and make sure that the HTML and Images option is displayed in the Save As Type drop-down list.
If you intend to use the graphics in several places on your site, choose Dreamweaver Library (
.lbi) from the Save As Type drop-down list.To change the type of HTML/XHTML code generated, click the Options button and make a selection from the Style drop-down list.
Dreamweaver HTML code is the default style; other options include GoLive, FrontPage, and Generic HTML and XHTML.
Select the location in which to store your HTML code by navigating to the appropriate folder. Note that Dreamweaver Library code must be saved in a site's Library folder.
If you prefer to not save your HTML, select Copy To Clipboard from the HTML drop-down list.
To save your graphics in a separate folder, select the Put Images In Subfolder option.
Tip
Fireworks defaults to placing the graphics in a subfolder called Images, even if one does not exist. To specify a different folder, click the Browse button.
When you're finished, click Save.
When Fireworks completes the exporting, you have one HTML file (unless you've chosen the Copy To Clipboard option) and multiple image files — one for each slice and state. Now you're ready to integrate these images and code into your Dreamweaver page. Which method you use depends on the HTML style you selected when the graphics were exported from Fireworks:
Both the Library and Clipboard methods are one-step, self-explanatory techniques — and using the Insert Fireworks HTML object is only a bit more complex. To insert the Fireworks code and images into your Dreamweaver page using the Insert Fireworks HTML object, follow these steps:
Make sure that you've exported your graphics and HTML from Fireworks with the Dreamweaver HTML style selected.
Select the Fireworks HTML object from the Images menu of the Insert panel's Common category or choose Insert
If you want to delete the Fireworks-generated HTML file after the code is inserted, select the Delete File After Insertion option. This can help keep your site folder tidy.
Enter the path to the Fireworks HTML file or click the Browse button to locate the file.
When you're finished, click OK. Dreamweaver inserts the Fireworks HTML and graphics at the current cursor location.
Note
If you're a hands-on Web designer, you can also use the Code inspector to copy and paste the JavaScript and HTML code. If you do, you can find helpful comments in the Fireworks-generated HTML file such as "Begin copying here" and "Stop copying here."
All the methods for inserting Fireworks HTML work with images that have either hotspots or sliced objects (or both), whether or not behaviors are attached.
Placing sliced images on your Web page couldn't be simpler, thanks to the Insert Fireworks HTML command. However, like standard non-sliced graphics, sliced images often need to be modified. One technique that many designers use is to create a framing graphic that contains HTML text; in Fireworks, a sliced area designated as a text slice can hold any HTML content. Text often has to be modified. If it is in a framing graphic, the image may need to be changed so that the table cells remain the same size as in the original design. This prevents the separate slices from becoming apparent.
In Dreamweaver, sliced images from Fireworks are recognized as a Fireworks table and can be modified through a dedicated Property inspector, as shown in Figure 24-13. The Fireworks Table Property inspector displays the PNG source file and an Edit button for sending the entire table back to Fireworks for alterations. As with non-sliced graphics, click Done on the document title bar in Fireworks when your modifications are complete to update the source and exported files. The newly exported images are then reloaded into Dreamweaver.

Figure 24-13. Modify sliced graphics by first selecting the surrounding table and then clicking the Edit button in the Fireworks Table Property inspector.
Warning
Although Fireworks attempts to honor any changes you make to the HTML table in Dreamweaver, certain changes may cause Fireworks to modify your Dreamweaver table code. If, for example, you add or remove cells to or from the table in Dreamweaver and then go to edit the table in Fireworks, Fireworks displays an alert that it will replace the table in Dreamweaver. To avoid having your original table modified inappropriately by Fireworks, simply click Done right away when you get such an alert (before making any changes). Doing so keeps the original table as-is in Dreamweaver. At this point, make a backup of the entire current page; then go ahead and try out your Fireworks table edit.
Dreamweaver and Fireworks integration extends deeper than just the simplified insertion of code and graphics. Dreamweaver can communicate directly with Fireworks, driving it to execute commands and return custom-generated graphics. This facility enables Web designers to build their Web page images based on the existing content.
As with Dreamweaver, almost every operation is under command control in Fireworks. This is most apparent when you are using either program's History panel. If your action appears as a repeatable item in the History panel, a corresponding JavaScript function controls it. Fireworks' wealth of JavaScript functions also exposes its control to Dreamweaver — and the first condition for interoperability is handled. To create a strong link between programs, Dreamweaver engineers expanded on the Fireworks API used in the Optimize Image command, where Dreamweaver actually launches a streamlined, headless version of Fireworks. This operation is controlled by a C-level extension called FWLaunch. Here's a step-by-step description of how Dreamweaver is typically used to communicate with Fireworks:
The user selects a command in Dreamweaver.
Dreamweaver opens a dialog box.
After the user has filled in the dialog box and clicked OK, the command begins to execute.
All user-supplied parameters are read and used to create a JavaScript scriptlet or function, which serves as instructions for Fireworks.
If used, the scriptlet is stored on the disk.
Fireworks is launched with a command to run the Dreamweaver-created scriptlet or function.
Fireworks processes the scriptlet or function while Dreamweaver tracks its progress via a cookie on the user's machine.
After Fireworks has finished, a positive result is returned.
The Fireworks API includes several error codes for use if problems, such as a full disk, are encountered.
While tracking the Fireworks progress, Dreamweaver sees the positive result and integrates the graphics by rewriting the DOM of the current page.
The dialog box is closed, and the current page is refreshed to correctly present the finished product.
To successfully control Fireworks, you need a complete understanding of the Fireworks DOM and its extension capabilities. Adobe provides documentation for extending Fireworks from its support site: www.adobe.com/support/fireworks.
Tip
The History panel in Fireworks is useful — especially the Copy Command To Clipboard function. To see the underlying JavaScript used to create an object in Fireworks, first make the object. Next, highlight the History panel steps and click the Copy To Clipboard button. Paste the clipboard contents in a text editor to see the exact steps Fireworks used; you can then begin to generalize the statements with variables and other functions.
On the Dreamweaver side, the FWLaunch C Library has six useful methods, detailed in Table 24-1.
Table 24-1. FWLaunch Methods
Method | Returns | Use |
|---|---|---|
| N/A | Brings the Dreamweaver window in front of any other application running |
| N/A | Brings the Fireworks window in front of any other application running |
| Result from running the scriptlet in Fireworks. If the operation fails, it returns an error code: 1: The argument proves invalid 2: File I/O error 3: Improper version of Dreamweaver 4: Improper version of Fireworks 5: User canceled operation | Executes the supplied JavaScript |
| Boolean | Determines if Fireworks may be launched |
| Result from running the scriptlet in Fireworks. If the operation fails, it returns an error code: 1: The argument proves invalid 2: File I/O error 3: Improper version of Dreamweaver 4: Improper version of Fireworks 5: User canceled operation | Performs an Optimize Image operation, opening the Fireworks Image Preview dialog box |
| Boolean | Determines if the user has a specific version of Fireworks |
Few software programs are named more aptly than Adobe Bridge. As a visual browser of images, Flash movies, and documents, Bridge establishes a connection to these assets from the Adobe program. Bridge is installed with every Adobe Creative Suite variation and is available to all programs within those bundles, including Dreamweaver.
Although Bridge displays files, it is far more than an Adobe-built replacement for Windows Explorer on the PC or the Finder on the Mac. With Bridge, you can apply keywords, labels, and ratings to any image or file. Furthermore, Bridge offers powerful sorting capabilities that can filter the displayed thumbnails by date, file type, and keyword. These two key features easily work together. You could, for example, set up a keyword using a client's name and apply that keyword to a set of assets. Then, to locate all the JPEG images associated with the client's keyword with a rating of 3–5 stars, it would take just a few clicks of the mouse.
Dreamweaver offers two methods of launching Bridge. From the menus, choose File
Once you've located your assets, it's easy to bring them into Dreamweaver. Perhaps the simplest method is to just drag them from Bridge and drop them into Dreamweaver. Bridge has a Compact mode that reduces its window to a quarter size and places it in the bottom left of the screen, always on top (see Figure 24-15). From Bridge, you can also choose the File

Figure 24-14. Launch Bridge right from within Dreamweaver by using the menu, toolbar, or keyboard shortcut.

Figure 24-15. Working in Bridge's Compact mode allows you to browse your assets and drag them directly into Dreamweaver.
To bring a file shown in Bridge into Dreamweaver, follow these steps:
Choose File
When Bridge opens, locate the desired asset.
Drag the asset from Bridge to Dreamweaver or, alternatively, choose File
If the asset is located outside of the current site root, a dialog appears to ask if you'd like to copy the file to the site; click Yes and choose a location for the file in the Copy File As dialog box.
The asset is placed in the Dreamweaver document.
Because of the ease in which graphic thumbnails are presented, Bridge is most likely to be used in conjunction with graphic assets, but you can access other types of files as well. PDF files, HTML pages, Flash movies, Microsoft Office documents, MP3 files, and more are all displayed in Bridge. All of these file types, with the exception of Flash movies and Microsoft Office documents, are added to the page as a text link. Any SWF file inserts the required code for playing in the Web page. If you have Microsoft Office installed, you'll be given an opportunity to insert the document content or the document name as a link.
Creating Web pages is almost never done with a single application: In addition to a Web layout program, you need a program capable of outputting Web graphics — and both Photoshop and Fireworks provide world-class graphics generators and optimizers. Adobe has integrated several functions with Dreamweaver and its other programs to streamline production and simplify modification. The following are some of the key features:
Photoshop images can be incorporated into Dreamweaver by opening the PSD file, by copying and pasting it, or by dragging a file into Dreamweaver. In any event, Dreamweaver converts it to a Web-ready format of the designer's choosing as a Smart Object. An onscreen symbol indicates whether or not the Smart Object is in sync with its Photoshop source. If not, the Dreamweaver image can be updated with a single click.
You can update images placed in Dreamweaver with Photoshop or Fireworks in two ways: Optimize or Edit. With the Optimize Image command, just the Image Preview portion of Fireworks opens; with the Edit command, the full versions of Photoshop or Fireworks are run.
Graphics and HTML exported from Fireworks can be incorporated into a Dreamweaver page in numerous ways: as a Library item, as an HTML file (complete with behavior code), or as an item pasted from the clipboard.
Dreamweaver includes a special C-level extension called FWLaunch, which provides the primary link to Fireworks.
Adobe's asset manager, Bridge, can be launched and accessed from within Dreamweaver. Files located in Bridge can be dragged directly into Dreamweaver.
In the next chapter, you learn how to incorporate Flash and Shockwave movies into your Dreamweaver Web pages.