
Automating Web development with commands
Including custom XML tags
Examining new Property inspectors
Modifying keyboard shortcuts
Expanding Dreamweaver's core functionality
Translating server-side content
The Web is a dynamic environment, with new technologies continually emerging. Until recently, HTML standards were changing every year or so; even now, products are routinely introduced that use the Web as a jumping-off place for new methods and tools. Keeping pace with the constantly shifting work environment of the Web has been beyond the capabilities of any suite of Web authoring tools, much less a single one — until Dreamweaver debuted, of course.
The initial version of Dreamweaver had a high degree of extensibility built right in, with its customizable HTML objects and JavaScript behaviors. Adobe continues to enhance this flexibility with each release. With the implementation of the W3C Document Object Model and a tremendous number of new API functions, objects, and behaviors, Dreamweaver features have been beefed up so that they are much more powerful than ever. In addition, Dreamweaver presents a host of ways to extend its power. Here are just some of the options:
Menus: The entire Dreamweaver menu system is completely customizable. You can add context menu items, rearrange the main menu, and even add completely new menus, all by modifying a single XML file.
Keyboard shortcuts: Adobe makes it easy to use the same keyboard shortcuts across its product line — even extending such ease to other products — with the Keyboard Shortcut Editor. In addition to adopting the most comfortable set of key combinations, shortcuts for individual commands can be personalized.
Commands: Commands are JavaScript and HTML code that manipulate the Web page during the design phase, much as behaviors are triggered at runtime.
Custom tags: The rapid rise of XML makes custom-tag support essential in a professional Web authoring tool. Dreamweaver gives you the power to create any custom tag and control how it displays in the Document window.
Property inspectors: Custom Property inspectors go hand in hand with custom tags, enabling the straightforward entry of attributes and values in a manner consistent with the Dreamweaver user interface.
Custom panels: Dreamweaver enables you to create custom panels that supplement its variety of built-in panels.
Translators: Translators enable server-side and other content to be viewed in the Document window at design time, as well as in the browser at runtime.
C-level extensions: Some special uses require a root-level addition to Dreamweaver's capabilities. Adobe's engineers have "popped the hood" on Dreamweaver and made it possible for a C or C++ language library to interface with it through C-level extensions.
Custom toolbars and objects: The Insert panel and all other toolbars are now fully extensible, enabling quick and easy access to your most frequently used Dreamweaver objects and commands.
Tag libraries: Dreamweaver enables you to create, edit, and delete tag libraries.
Although a few of these extension features require programming skills beyond those of the typical Web designer, most are well within the reach of an HTML- and JavaScript-savvy coder. Moreover, the Keyboard Shortcut editor employs a graphical user interface, making it accessible to all. As with behaviors and objects, the source code for all but the C-level extensions is readily available and serves as an excellent training ground. This chapter, combined with these standard scripts, provides all the tools you need to begin carving out your own personalized version of Dreamweaver.
By their very nature, objects and behaviors are single-purpose engines. A custom object inserts a single block of HTML into the <body> of a Web page, whereas custom behaviors add JavaScript functions to the <head> and attributes of one tag. Commands, on the other hand, are multifaceted, multipurpose, go-anywhere, and do-anything mechanisms. Commands can do everything objects and behaviors can do — and more. In fact, commands can even masquerade as objects.
For all their power, commands are one of the most accessible of the Dreamweaver extensions. This section describes the basic structure of commands, as well as how to use the standard commands that ship with Dreamweaver. You can also find information about how to create your own commands and control their integration into Dreamweaver.
When I first encountered commands, I thought, "Great! Dreamweaver now has a macro language." I envisioned instantly automating simple Web design tasks. Before long, I realized that commands are even more powerful — and a bit trickier — than a macro recorder. Dreamweaver's adoption of the W3C Document Object Model (DOM) is one of the factors that make commands feasible. The DOM in Dreamweaver exposes, or makes available, every part of the HTML page — every tag, every attribute, every bit of content — which can then be read, modified, deleted, or added to. Moreover, Dreamweaver commands can open, read, and modify other files on local systems.
A command can have a parameter form or not, depending on how the command is written. Generally, commands are listed in the Commands menu, but by altering the menus.xml file (as discussed in the "Adjusting the menus.xml file" section later in this chapter), you can cause any command to appear as part of any other menu — or to not appear at all. Because one command can call another, such hidden commands are more easily modified.
My original vision of a macro recorder came true with the commands Start Recording and Play Recorded Command. Now, any onscreen action can be instantly logged and replayed — and through the History panel, even converted into a permanent, repeatable command.
So how, specifically, are commands being used? The following list describes some of the commands that have been built by Web designers outside Adobe:
Tag Stripper: Removes all instances of any tag from a Web page. By Massimo Foti.
Breadcrumbs: Automatically adds navigation elements on a page. By Paul Davis.
Borderless Frames: Sets all frames in a frameset to no borders. By Massimo Foti.
Add Old Browser Message: Inserts a message that can be seen only by browsers that do not support the W3C DOM. By Rachel Andrews.
Replicator: Duplicates any selected element any number of times. By this book's author, Joseph Lowery.
As is obvious from this list, commands come close to being limited only by the author's imagination.
For further evidence of just how useful commands can be, the following sections look at a few of Dreamweaver's standard commands.
All the code created by Dreamweaver is structured according to the current Tag Library settings. The Tag Library identifies which codes are indented and which are on their own lines, as well as numerous other specifications regarding HTML writing. Occasionally, a Web designer must work with Web pages created earlier, by other designers using other programs, or even by hand. The Apply Source Formatting and Apply Source Formatting to Selection commands can rewrite the original code — of an entire Web page or a selected part of the page, respectively — so that it is structured according to the current Tag Library settings. The more accustomed your eye is to following Dreamweaver-style HTML, the more you value this command.
Note
You learn more about the Tag Library feature later in this chapter.
The Apply Source Formatting and Apply Source Formatting to Selection commands are examples of Dreamweaver commands that don't display dialog boxes to gather the user's selected parameters — because there are no parameters to set. To invoke the commands, choose Commands
Dreamweaver tends to produce compact, uncluttered HTML/XHTML code, which is not always the case with other HTML/XHTML editors and hand-coded efforts. One of the most common problems is redundant <font> tags, which can result when you select some text, change the font, change the font size, and finally, change the font color. The resulting code is likely to resemble the following:
<font face="Arial"><font size="4"><font color="green">
  Bonanza!</font></font></font>
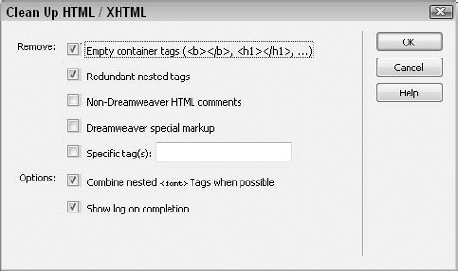
The Clean Up HTML and Clean Up XHTML commands are custom made to consolidate redundant tags and to remove some of the code clutter that can accumulate during a page's design. In all, you have seven different cleaning operations from which to choose. Note that the Clean Up HTML and Clean Up XHTML commands are applicable only to the current page and cannot be applied sitewide.
XHTML syntax is much less forgiving than HTML; your XHTML code must be nearly perfect to work correctly. The Clean Up XHTML command fixes XHTML code syntax errors, lowercases all tag attributes, and adds (or reports) missing required tag attributes.
To use the Clean Up HTML or Clean Up XHTML commands, follow these steps:
Load the desired HTML or XHTML document into your Dreamweaver workspace.
Choose Commands

Choose from these options in the dialog box:
Remove: Empty Container Tags: Deletes empty tag pairs with no code between them (such as
<b></b>).Remove: Redundant Nested Tags: Eliminates superfluous tags that repeat the same code as the tags surrounding them, as shown in the following example:
<font color="white">And the <font color="white">truth</font>
   is plain to see.</font>
Remove: Non-Dreamweaver HTML Comments: Deletes any HTML comments that were not created by Dreamweaver to mark a Library or template item.
Remove: Dreamweaver Special Markup: Clears all Dreamweaver-specific comments, such as:
<!-- #BeginEditable "openingPara"-->
Remove: Specific Tag(s): Erases any specific tag and all its attributes. Select this option and then type the tag name or names in the text box.
Note
Enter tag names without angle brackets; separate multiple tags with a comma. For example:
font, blink.Combine Nested
<font>Tags When Possible: Consolidates<font>tags.Show Log On Completion: Lets you view a report of the changes applied to your document.
Click OK when you're finished.
Dreamweaver performs the actions requested on the current document. If you select the Show Log option, an alert displays the changes made, if any.
I'm a big fan of any kind of work-related automation, and I consider myself a power user of word-processing macros, so you can imagine my delight when a similar capability was added to Dreamweaver. You save a tremendous amount of work with the capability to record onscreen actions and then replay them instantly — with the option of saving them as a command or simply pasting them into another document. Nearly every onscreen action can be replicated.
How could you use such a macro-like capability in Dreamweaver? Suppose you have a series of ten images on a page, and you want to give each image a vertical space of 10, a horizontal space of 8, and a 2-pixel border. You could perform each of these actions one at a time, entering in the same border value and selecting the center alignment button, but it would get rather tedious after the third or fourth image. With Dreamweaver, you can easily automate the procedure by following these steps:
Select the first image.
Choose Commands
Enter the new values in the Property inspector.
Choose Commands
Select another image.
Choose Commands
Repeat Steps 5 and 6 for every image you want to change.
Most of the commands and onscreen moves can be replicated in this manner, but not all. The major exception is the use of the mouse. Dreamweaver cannot repeat mouse moves and selections. You cannot, for example, begin to create a drop-cap by recording the drag selection of the first letter in each paragraph. You can, however, use the arrow keys and any keyboard-related combination.
For example, suppose that you have this standard list of names in your document:
Danilo Celic
Massimo Foti
Joseph Lowery
Al Sparber
Danielle Ugoletti
Eduordo Zubler
You want to change these names to a Lastname, Firstname format. To make this change with command recording, follow these steps:
Position your cursor at the beginning of the first name.
Choose Commands
Press Ctrl+Shift+right arrow (Command+Shift+right arrow) to select the first word. Dreamweaver highlights the first word and the following space.
Press Ctrl+X (Command+X) to cut the selected word.
Press End to move to the end of the line.
Type a comma and a space.
Press Ctrl+V (Command+V) to paste the previously cut word.
Press the backspace key to remove the trailing space.
The first line is complete, but to position the cursor to perform the recorded command again, press the right arrow to move to the start of the next line. (Because the cursor was positioned at the end of the last line, the right-arrow key moves it to the front of the following line.)
Choose Commands
Choose Commands
If you try to include a mouse move or selection when recording a command or playing back a recorded command, Dreamweaver issues a warning and asks if you'd like to stop recording. If you choose to continue, Dreamweaver ignores the attempted mouse move and resets the pointer in its previous position.
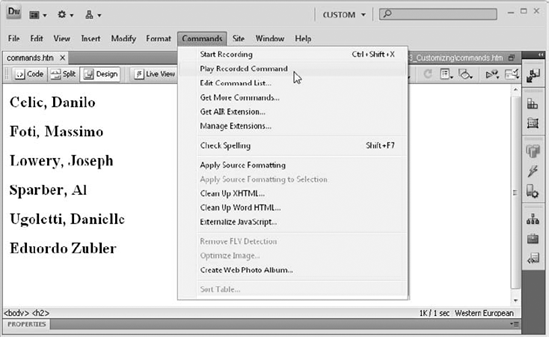
Figure 33-2. After the steps for changing the order of the first line are recorded, re-ordering the other lines is a one-step process with Dreamweaver's command recorder.
Tip
If you try to record your navigations around a table, Dreamweaver does not record the Tab or Shift+Tab keys. However, you can still record your table moves by using Home and End in combination with the arrow keys; note that this works in Standard mode only, not in Layout mode. To move from cell to cell, from left to right, press End and then the right arrow. To move right to left, press Home and then the left arrow. You can also move up and down columns by pressing Home or End and then either the up or the down arrow.
Recorded actions are maintained in memory, and when you issue the Start Recording command again, the previously recorded steps are replaced. You can, however, use the History panel to convert recorded steps into a command that you can use repeatedly in any document or site.
To convert recorded steps into a command, follow these steps:
Record a series of actions as described in the preceding set of steps.
Play the recorded actions at least once by choosing Commands
On the History panel the collective recorded actions are displayed as a single step, Run Command. Select the Run Command item listed last.
Click the Save Selected Steps As A Command button at the bottom of the History panel.
In the Save as Command dialog box, enter an appropriate name for your command and click OK.
New commands saved in this manner are dynamically added to the Commands menu.
Commands, like most behaviors, are a combination of JavaScript functions and HTML forms; the HTML provides the user interface for any parameters that must be set, and JavaScript carries out the particular command. Although you can combine both languages in a single HTML file, many programmers, including those from Adobe, keep the JavaScript in a separate .js file that is incorporated in the HTML file with a <script> tag, as shown in the following example:
<script language="javascript" src="Clean Up HTML.js">
This separation enables easy modification of the user interface and the underlying code, and the sharing of the JavaScript functions.
Commands are very open-ended. In fact, only two Dreamweaver functions are specific to commands — canAcceptCommand() and commandButtons() — and neither function is required. Two other command-oriented functions, receiveArguments() and windowDimensions(), are also used elsewhere; but again, neither is required.
The canAcceptCommand() function controls when the command is active in the menus and when it is dimmed. If canAcceptCommand() is not defined, the command is always available. This function returns true or false; if false is returned, the command is dimmed in the menus.
You can see canAcceptCommand() in action in both the Sort Table and Format Table commands. For either of these commands to be effective, a table must be indicated. Rather than require that a table be selected, the canAcceptCommand() function calls a subroutine, findTable(), which returns true if the user's cursor is positioned inside a table:
function canAcceptCommand(){
  if (dw.getDocumentDOM() == null)
    return false;
  else if (dw.getDocumentDOM().getShowLayoutView())
    return false;
else if (findTable())
return true;
else
return false;
}
function findTable(){
var tableObj="";
var selObj = dw.getDocumentDOM().getSelectedNode();
while (tableObj=="" && selObj.parentNode){
if (selObj.nodeType == Node.ELEMENT_NODE && selObj.tagName=="TABLE")
tableObj=selObj;
else
selObj = selObj.parentNode;
}
return tableObj;
}Adobe recommends that the canAcceptCommand() function not be defined unless at least one case exists in which the command should not be available. Otherwise, the function is asked to run for no purpose, which degrades performance.
The commandButtons() function defines the buttons that appear on the parameter form to the right. This expanded functionality is extremely useful when developing commands. Some commands require that an operation be enabled to run repeatedly and not just the one time an OK button is selected. As noted earlier, you don't have to declare the function at all, in which case the form expands to fill the dialog box entirely. If you do not use this standard Dreamweaver method for creating your command buttons, in most cases, you need to define them yourself.
Each button declared has a function associated with it, which is executed when the user selects that particular button. All the buttons for a command are listed in an array, returned by commandButtons(). The following example declares three buttons: OK, Cancel, and Help:
function commandButtons() {
    return new Array("OK","goCommand()","Cancel",
                     "window.close()","Help","displayHelp()")
}
Notice that two of the buttons, OK and Help, call user-defined functions; but the Cancel button simply calls a built-in JavaScript function to close the window. Although no limitations exist on the number of buttons a parameter form can hold, you should always strive to keep your parameter forms as simple and uncluttered as possible.
The receiveArguments() function is used in conjunction with runCommand(). Whenever runCommand() calls a specific command — from a behavior, object, or other command — it can pass arguments. If receiveArguments() is set up, that is the function executed, and the arguments are read into receiveArguments(). This function enables the same command to be called from different sources and have different effects, depending on the arguments passed. The receiveArguments() function is used extensively in menu commands and is explained more fully later in this chapter in the section "Building menu commands."
You can use the windowDimensions() function in behaviors and objects, with commands to set a specific size for the associated dialog box. If windowDimensions() is not defined, the size of the dialog box is set automatically. Adobe recommends that windowDimensions() not be used unless your parameter form exceeds 640 × 480.
The remainder of the user interface for a command — the parameter form — is constructed in the same manner with the same tools that are used for objects and behaviors. A command parameter form or dialog box uses an HTML <form> in the <body> of the file. If no <form> is declared, the command executes without displaying a dialog box. All the form elements used in objects — text boxes, radio buttons, checkboxes, and lists — are available in commands.
When programming a command, I often get stuck on one small point. "If only I knew how to _________, I'd be home free," is my usual refrain. The following routines and explanations will help you "fill in the blank" as you begin to construct your own custom commands.
Although many commands work with the entire HTML document, some require just a portion of text or an object that has been selected by the user. Although it seems a simple task, some quirks in the API make getting a selection a little tricky.
The usual method for determining — and acting on — what the user has selected requires the getSelection() function. getSelection() returns 2-byte offsets that mark the beginning and end of the user's selection. The difficulty appears when you try to extract the character data that corresponds to those byte offsets. The offsetsToNode() function, which is used to make this translation, expands the offsets to the nearest tag — the innerHTML, in other words. For example, the following function attempts to get the user's selection and report it in an alert:
function testCase() {
  var theDom = dreamweaver.getDocumentDOM("document");
  var offsets = dreamweaver.getSelection();
  var theNode =
      dreamweaver.offsetsToNode(offsets[0],offsets[1]);
  var nodeText = theNode.data;
  alert(nodeText);
}
If a user selects the word gray in the line "The old gray mare just ain't what she used to be," the function returns the entire line. To get just what is selected, you need to use the nodeToOffsets() function in combination with offsetsToNode() and the JavaScript substring() function.
The sample code in Listing 33-1 demonstrates the proper substring technique; it is taken from the Change Case command which I wrote.
Example 33-1. Getting selected text
function lowerCase(){
  var theDom = dreamweaver.getDocumentDOM("document");
  var offsets = dreamweaver.getSelection();
  var theNode =
      dreamweaver.offsetsToNode(offsets[0],offsets[1]);
  if (theNode.nodeType == Node.TEXT_NODE) {
    var nodeOffsets = dreamweaver.nodeToOffsets(theNode);
    offsets[0] = offsets[0] - nodeOffsets[0];
    offsets[1] = offsets[1] - nodeOffsets[0];
    var nodeText = theNode.data;
    theNode.data = nodeText.substring(0,offsets[0]) +
      nodeText.substring(offsets[0],offsets[1]).toLowerCase()
      + nodeText.substring(offsets[1], nodeText.length);
    window.close();
  }
  else { //it's not a TEXT_NODE
    var nodeOffsets = dreamweaver.nodeToOffsets(theNode);
    offsets[0] = offsets[0] - nodeOffsets[0];
    offsets[1] = offsets[1] - nodeOffsets[0];
    var nodeText = theNode.innerHTML;
    theNode.innerHTML = nodeText.toLowerCase();
    window.close();
  }
}
Notice two branches in the example lowerCase() function — either the selected string is text (a TEXT_NODE), or it's not. If the node is something other than a TEXT_NODE, the data property is not available, and you must use innerHTML instead. This situation occurs when a user selects an entire paragraph. In fact, all the user has to select is the last character before the closing tag — such as a period at the end of a paragraph — and the node type switches to ELEMENT_NODE.
By comparison, you have far fewer hoops to jump through to reference a selected object: You only have to get its outerHTML property, as shown in Listing 33-2.
Listing 33-2 also includes a small error routine that checks whether the user's selection is text (selObj.nodeType == Node.TEXT_NODE) and, if so, uses helpMe2() (a custom function that must be defined elsewhere in the script) to put up an advisory and then closes the window to enable the user to reselect.
Example 33-2. Getting a selected object
function replicate() {
  var theDom = dreamweaver.getDocumentDOM("document");
  var offsets = dreamweaver.getSelection();
  var selObj =
      dreamweaver.offsetsToNode(offsets[0],offsets[1]);
  if (selObj.nodeType == Node.TEXT_NODE) {
    helpMe2();
    window.close();
    return;
  }
  var theCode = selObj.outerHTML;
}Commands offer a tremendous range of power and can perform actions not available to behaviors or objects. To take advantage of this power with a point-and-click interface, it's best to disguise the command as an object. As an object, the command appears in both the Insert panel and the Insert menu.
A Dreamweaver object usually consists of two files: an HTML file for the code and a GIF image for the button, all in the Dreamweaver CS5ConfigurationObjectsCategory folder. (The value of Category is the name of the folder that corresponds to the Insert panel category in which the object resides.) When using a command as an object, however, you can have as many as five files split between the Dreamweaver CS5ConfigurationObjectsCategory and Dreamweaver CS5ConfigurationCommands folders. The standard Rollover object is a good example: three associated rollover files are in the Dreamweaver CS5ConfigurationObjectsCommon folder, and two are in the Commands folder. (The Dreamweaver CS5ConfigurationObjectsCommon subfolder alerts you to the fact that the Rollover object resides in the Common category of the Insert panel.) Here is how these rollover files are used:
Dreamweaver CS5ConfigurationObjectsCommonRollover.gif: The image for the Rollover button that appears in the Common category of the Insert panel.
Dreamweaver CS5ConfigurationObjectsCommonRollover.htm: A shell file (called by the Rollover button) that reads ObjectsCommonRollover.js.
Dreamweaver CS5ConfigurationObjectsCommonRollover.js: Contains the
objectTag()function, which references the CommandsRollover.htm file.Dreamweaver CS5ConfigurationCommandsRollover.htm: Builds the user interface for the object and reads all external JavaScript files, including CommandsRollover.js.
Dreamweaver CS5ConfigurationCommandsRollover.js: Contains the actual code for the function that performs the required operations, which returns its value to the ObjectsCommonRollover.htm file by way of the ObjectsCommonRollover.js file.
The key to understanding how to use a command as an object is the code linking the two types of extensions. In the Dreamweaver CS5ConfigurationObjectsCommonRollover.js file is the objectTag(), which is used to write an object into an existing Web page with its return value. In this case, the function first gets the Document Object Model of the relevant command file (Dreamweaver CS5ConfigurationCommandsRollover.htm); this procedure enables the current function to reference any variable set in the other file. Then the popupCommand is executed, which runs Dreamweaver CS5ConfigurationCommandsRollover.htm — which, in turn, launches the dialog box and gets the user parameters. Finally, a result from that command is set to the return value of objectTag() and written into the HTML page. Here's the objectTag() function in its entirety from Dreamweaver CS5ConfigurationObjectsCommonRollover.js:
function objectTag() {
  var rolloverTag = callCommand("Rollover.htm");
  if (rolloverTag) { //if inserting call, update behavior funcs as needed
  updateBehaviorFns("MM_findObj","MM_swapImgRestore",                                    "MM_preloadImages","MM_swapImage");
  }
  else {
    rolloverTag = '';
  }
  return(rolloverTag);
}
Some custom commands disguised as objects make the DOM connection in the command file rather than in the object file. All iCat objects (written to integrate a shopping cart into Dreamweaver), for example, establish the link in the primary functions of their command JavaScript files, in the following manner:
var dom = dreamweaver.getDocumentDOM("../Objects/iCat/Add To Cart.htm");
dom.parentWindow.icatTagStr = icatTagStr;
Then, the corresponding objectTag() function simply returns the icatTagStr variable.
It's relatively straightforward to insert text wherever the cursor has been set in the document — you just set a text string equal to the [innerHTML | data] property of the DOM at that point. But how do you insert code in the <head> section of a Web page, where you don't generally find the cursor? Certain code, such as <script> tags that hold extensive JavaScript functions, must be inserted in the <head>. By design, behaviors return code specifically intended for the <script> tag — except you can't easily use a behavior to include a line such as the following:
<script language="Javascript" src="extend.js"></script>
You can insert such a line with commands, however. This technique, developed by Dreamweaver extensions author Massimo Foti, shows the way.
Unfortunately, no equivalent to the body property exists in the Dreamweaver DOM for the <head> section. The way around this minor limitation is to first locate the sole <head> tag in the document. You can accomplish this task in two lines of JavaScript code:
theDom = dreamweaver.getDocumentDOM("document");
theHeadNode = theDom.getElementsByTagName("HEAD");
Now the script variable needs to be set. Whenever Dreamweaver encounters a closing </script> tag in a JavaScript function, the tag is flagged because it seems to be missing a mate. To avoid this problem, split the tag into two concatenated strings, as follows:
theScript = '<script language="Javascript" src="extend.js"><' + '/script>';
Finally, find the first item in the <head> section and append the script to its innerHTML property:
theHeadNode.item(0).innerHTML = theHeadNode.item(0).innerHTML + theScript;
The full function looks like the following:
function insertScript() {
  var theDom, theHeadNode, theScript;
  theDom = dreamweaver.getDocumentDOM("document");
  theHeadNode = theDom.getElementsByTagName("HEAD");
  theScript = '<script language="Javascript" src="extend.js">< ' + 'script>';
}
Warning
You can find numerous examples of Massimo Foti's commands and other extensions linked on the book's Web site. Just look under Additional Extensions for his name.
As you've seen, the runCommand() function plays a key role in scripting commands. It's worth emphasizing that this same function is used when you want one command to invoke another command. The proper syntax is:
var doNew = dw.runCommand("commandFileName");where commandFileName is the name of an HTML file in the Dreamweaver CS5ConfigurationCommands folder. No value is returned with runCommand(); the function executes whatever command is called, passing any optional arguments. The function takes the following format:
dreamweaver.runCommand("myCommand.htm","argument01","argument02");The called command's dialog box is presented and must be completed or canceled before the originating command can continue.
Tip
Many commands — especially those disguised as objects — are not intended to be directly accessed by the user. However, Dreamweaver lists any valid command found in the Commands folder on the menu — unless you add a comment as the first line of your HTML file in the following format:
<!-- MENU-LOCATION=NONE-->
This code line inhibits the command name from being automatically displayed in the Commands menu list.
Commands aren't limited to working on the current document — you can use a command to read, modify, and even create new files. Any new file created using createDocument() or createXHTMLDocument() is an HTML or XHTML page based on the Default.html or Default.xhtml file found in the Dreamweaver CS5ConfigurationDocumentTypesNewDocuments folder.
Occasionally, however, a command must make a new non-HTML/XHTML document, such as an XML or SMIL file or other file type that doesn't use the <html>...</html> structure. To accomplish this task, you first create an HTML file and then replace its entire contents with your own data — or nothing at all. The following custom function, developed by Andrew Wooldridge, makes and saves a new, blank text file:
function doNew() {
  var newDOM = dreamweaver.createDocument();
  var theDoc = newDOM.documentElement;
  theDoc.outerHTML = ".";
  theDoc.innerHTML = " ";
  dreamweaver.saveDocument(newDOM, '../../empty.txt'),
}
Remember that all of the Dreamweaver document functions — such as saveDocument() — use addresses relative to the file calling them. For example, if the doNew() function is included in a command and, therefore, stored in the Commands folder, the empty.txt document is saved two folders above the Commands folder in the Dreamweaver root directory because the full path to it is Dreamweaver CS5ConfigurationCommands.
Dreamweaver offers numerous ways to perform almost every task: through the Property inspector, context menus, and keyboard shortcuts, and even by entering code directly. However, in the search for ever-faster, more efficient ways of working, you may often find it desirable to take control of the menus and other command methods and make them work the way you and your team prefer them to work. If, for example, you insert a great number of AP elements and always define your links via the Property inspector, you are probably better off redefining Ctrl+L (Command+L) to Insert AP element, rather than its default, Make Link.
Dreamweaver places all menus and keyboard shortcuts under your control. Not only can you add new items, but you can also rename menu items, change their keyboard shortcuts, determine when a menu item is active or dimmed — and even add entirely new menu strips. Moreover, all this functionality is available with the context menus as well.
One file — menus.xml, found in the Dreamweaver CS5ConfigurationMenus folder — is responsible for menu and keyboard shortcut setup. Although you have to edit the XML file by hand to reconfigure the menus, Dreamweaver includes a Keyboard Shortcut editor for modifying the keystroke commands. Details are in the "Using the Keyboard Shortcut editor" section later in the chapter.
Menu customization brings a whole new level of functionality to Dreamweaver. It's entirely possible for a company to create custom subsets of a program for certain departments. For example, each of several departments in a large firm might be responsible for its own section of the Web site. A customized version of Dreamweaver could include a predefined site and disable the Define Site commands in the Site menu. It could also offer a specialized menu for calling up Help screens, tied to the standard F1 keyboard shortcut for Help.
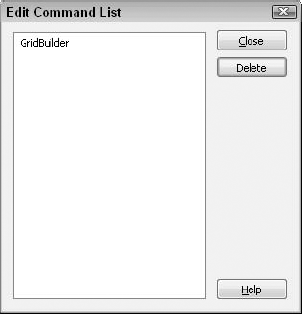
In addition to the fully open architecture of the menus.xml file, command menu items created by the History panel can be managed right in the Document window. Before you delve into the relatively complex structure of menus.xml, take a look at the Edit Command List feature.
Whenever you save a series of History panel steps as a command, that command is instantly added to the bottom of the Commands menu list. Dreamweaver enables you to manage these custom added items — renaming them or deleting them — through the Edit Command List feature.
To manage History panel recorded commands, follow these steps:
Whenever I'm learning a new program, one of the tasks I set for myself is to memorize the half-dozen or so essential keyboard shortcuts of the software. Keyboard shortcuts are terrific for boosting productivity — so terrific, in fact, that almost every program uses them. Although this is a good thing from a single-program user's perspective, in reality no Web designer uses just one program, and having to remember the keyboard shortcuts for every program can be an absolute nightmare.
To put the brakes on keyboard shortcut overload, Adobe has implemented a standard Keyboard Shortcut editor for its key Web products — Flash, Fireworks, and Dreamweaver. Where possible, common features share the same shortcut across the product line. For example, opening the Behaviors panel is accomplished with the same keyboard shortcut in Dreamweaver and Fireworks: Shift+F3. Dreamweaver also includes a set of shortcuts matching those from HomeSite and BBEdit to smooth your transition from those text-based editors. Best of all, you can customize any existing set of shortcuts to match the way you truly work best.
To access the Keyboard Shortcut editor, shown in Figure 33-4, choose Edit
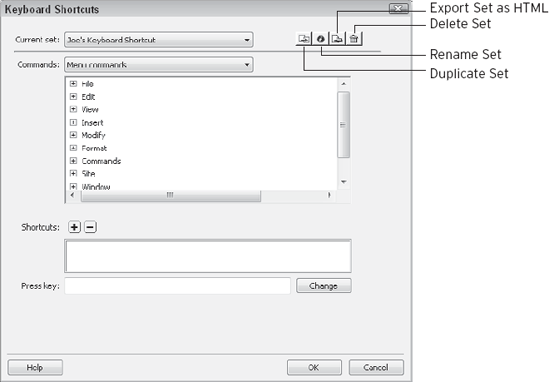
Figure 33-4. Use the Keyboard Shortcut editor to establish the easiest-to-remember mnemonics for your keyboard shortcuts.
The standard Keyboard Shortcut editor includes four standard sets of shortcuts:
BBEdit: Keyboard shortcut set matching those found in BBEdit.
Dreamweaver MX2004: This set uses the standard shortcuts found in Dreamweaver MX 2004. These additional shortcuts are not necessarily the same as those in the Adobe Standard set because keystrokes may be added or modified for new features in the latest version.
HomeSite: Keyboard shortcut set matching those found in HomeSite.
Dreamweaver Standard: The default set of shortcuts incorporating common keyboard combinations in Dreamweaver, Fireworks, and Flash.
To change from one set to another, open the Keyboard Shortcut editor and choose the desired set from the Current Set drop-down list. The changes take effect immediately upon closing the dialog box; you don't have to relaunch Dreamweaver.
The standard sets are locked and cannot be altered — you can only customize a copy of one of the standard sets. Dreamweaver provides all the controls to accomplish this on top of the Keyboard Shortcut editor. The four buttons are as follows:
Duplicate Set: Copies the current set (standard or custom) and appends the word copy. The duplicate set can be fully customized.
Rename Set: Renames the current shortcut set.
Export Set as HTML: Saves a list of the current set of keyboard shortcuts in an HTML format that can be viewed or printed in a browser.
Delete Set: Removes a keyboard shortcut set. When Delete Set is chosen, a list of all custom sets is displayed, and any set except the active one may be removed. To remove a sole custom set, select any of the standard shortcut sets prior to choosing Delete Set.
Each command has up to two shortcuts assigned to it. This facility makes it possible to retain the originally assigned keyboard shortcut and to add a more personal one.
To create a custom keyboard shortcut set, follow these steps:
Choose Edit
Note
From the Department of Pointless Nonsense, Irony Division: the Keyboard Shortcuts feature is one of the few commands without a keyboard shortcut.
From the Current Set drop-down list, select a standard keyboard shortcut set upon which to base your custom set.
Click the Duplicate Set button, type in an appropriate name for your custom shortcut set, and click OK. When the duplication is finished, select your new shortcut set from the Current Set list.
Choose the type of commands you want to modify from the Commands drop-down list. Dreamweaver has five different command types in Windows — Menu commands, Site panel, Code editing, Document editing, and Site window — and three under the Macintosh system — Menu commands, Code editing, and Document editing.
Select the specific command whose keyboard shortcut you want to modify. If you've chosen Menu or Site panel from the Commands list (Windows only), click the plus (+) sign next to the menu heading containing the command. The listing expands to show the first level of menu items. If the command you want to alter is contained within a submenu, click the plus (+) sign next to the submenu. Click the minus (−) sign to collapse an expanded listing.
With the desired command selected, click the Add (+) button in the Shortcuts section. The cursor moves into the Press Key field.
Press the keyboard combination you want to assign to the command. If Dreamweaver detects a conflict with an existing keyboard shortcut, an alert is displayed beneath the Press Key field telling you the command to which that shortcut is currently assigned.
Select Change to confirm your choice.
If the shortcut you selected is already in use, you can reassign it to your new choice. When you click Change under these circumstances, Dreamweaver brings up an alert dialog box warning you that the shortcut is currently assigned. It also tells you which command is using it, and asks if you want to reassign it to the command you are editing. To reassign the keystroke, click OK. To choose a new keyboard shortcut, click Cancel.
If a command already has two shortcuts assigned to it, you select the one you want to change.
Click OK when you're finished to save your keyboard shortcut set.
Tip
The personalized keyboard shortcut files are stored in the Dreamweaver CS5ConfigurationMenusCustom Sets folder as XML files. To make a keyboard shortcut set available on another system, copy the appropriate XML file to the corresponding folder in the user's Dreamweaver CS5ConfigurationMenusCustom Sets folder. For more details on the location of the user's folders, see the "Multiuser System Customization" sidebar earlier in this chapter.
When Dreamweaver is launched, the program reads the menus.xml file and builds the menu system. You can even customize menus.xml and reload the file from within Dreamweaver to instantly update your menu and shortcuts. The key, of course, is editing the XML file.
Warning
The syntax for menus.xml is quite complex. Dreamweaver ignores any syntactically incorrect entries and disables their corresponding menu items. So, take great care when you edit menus.xml to use proper syntax, and make sure you create a backup of the file before you begin editing.
The typical procedure for changing an existing menu item or shortcut is to open the file in a text editor (after backing up the original) and make the necessary changes. When adding menus or menu items, follow the file's syntax exactly, as described in the following sections.
Although Dreamweaver now provides a user interface for editing the keyboard shortcuts, sometimes power users must go to the source for major modifications — and the source for shortcuts is menus.xml. The menus.xml file is divided into two main sections: <shortcutlist> and <menubar>. The <shortcutlist> divisions are, as you might suspect, a list of keyboard shortcuts. The <menubar> areas are concerned with the various menu bars — in the main Document window, in the Site panel (Windows only), and in the numerous context menus. <shortcutlist> and <menubar> share several characteristics. They both follow the same basic structure:
<shortcutlist id="shortcutListID" [platform="win|mac"]> <shortcutattributeName="value"attributeName="value" ... /> <shortcutattributeName="value"attributeName="value" ... />other shortcut items...</shortcutlist> <menubar name="menubarname" id="menubarID" [platform="win|mac"]> <menu name="menuname" id="menuID"> <menuitemattributeName="value"attributeName="value" ... /> <menuitemattributeName="value"attributeName="value" ... />other menuitem items...</menu>other menu items...</menubar>
Shortcuts for menu items are primarily defined within the <menubar> code; the <shortcutlist> is mainly concerned with those shortcuts that do not have a menu item associated with them, such as moving from one word to another. By default, Dreamweaver defines six <shortcutlist> sections: DWMainWindow for the Document window menu, DWMainSite for the Site panel menu (Windows only), DWHTMLContext for the Code inspector/Code view context menu, DWServerBehaviorContext for the Server Behaviors panel context menu, DWDataBindingContext for the Bindings panel context menu, and DWServerComponentContext for the Components panel context menu.
Note
The key difference between the <shortcutlist> and the <menubar> sections is that although you can define new menu items or change existing ones in the <menubar> portion of the code, you can only alter existing shortcuts — you cannot add new shortcuts.
Each <shortcutlist> tag has one required attribute, the ID. The ID refers to a specific window or panel and must be unique within the <shortcutlist> section. The same ID is repeated in the <menubar> section to refer to the same window or panel. For example, the Document window ID is DWMainWindow, whereas the one for the context menu of the Server Behaviors panel is DWServerBehaviorContext. The <shortcutlist> tag takes one optional attribute, platform, which must be set to either win or mac, for Windows and Macintosh systems, respectively. (Note that in syntax statements, optional attributes are enclosed in brackets.) If no platform attribute is listed, the <shortcutlist> described applies to both platforms. Here, for example, is the beginning of the <shortcutlist> definition for the Files panel, which only appears in the Windows version of the software:
<shortcutlist id="DWMainSite" platform="win">
A separate <shortcut> tag exists for every keystroke defined in the <shortcutlist>. The <shortcut> tag defines the key used, the tag's ID, the command or file to be executed when the keyboard shortcut is pressed, and the applicable platform, if any. Shortcuts can be defined for single special keys or key combinations using modifiers. The special keys are as follows:
F1 through F12
PgDn, PgUp, Home, End
Ins, Del, BkSp, Space
Esc and Tab
Modifiers can be used in combination with standard keys, with special keys, or by themselves. A combination keyboard shortcut is indicated with a plus sign between keys. Available modifiers include those described in Table 33-1.
Table 33-1. Dreamweaver Shortcut Modifier Keys
Key | Example | Use |
|---|---|---|
Alt or Opt | Alt+V; Option+V | Indicates the Alt (Windows) or Option (Macintosh) key modifier |
Cmd | Command+S | Indicates the Command (Macintosh) key modifier |
Ctrl | Ctrl+U | Indicates the Ctrl (Windows) key modifier |
Shift | Shift+F1 | Indicates the Shift key on both platforms |
You can also combine multiple modifiers, as in Command+Shift+Z.
The format of the <shortcut> tag is identical to that of the <menuitem> tag, as described in the following section.
Each <menubar> section of the menus.xml file describes a different menu strip, either on a window or on the context menu associated with a panel. Nested within the <menubar> tag is a series of <menu> tags, each detailing a drop-down menu. The individual menu items are defined in the <menuitem> tags contained within each set of <menu>...</menu> tags. Here, for example, is the context menu for the HTML Styles panel (I've abbreviated the complete <menuitem> tag for clarity):
<menubar name="" id="DWHtmlStyleContext">
  <menu name="HTML Style Popup" id="DWContext_HTMLStyle">
    <menuitem name="Edit..." />
    <menuitem name="Duplicate..." />
    <menuitem name="Delete" />
    <menuitem name="Apply" />
    <separator />
    <menuitem name="New..." />
  </menu>
</menubar>
The <menubar> and <menu> tags are alike in that they both require a name — which is what appears in the menu system — and an ID. The ID must be unique within the <menubar> structure to avoid conflicts. If a conflict is found (that is, if one item has the same ID as another), the first item in the XML file is recognized, and the second item is ignored.
Note
You can put a dividing line between your menu items by including a <separator id="idname"/> tag between any two <menuitem> tags. (idname is any legal, unique XML name string.)
Numerous other attributes exist for the <menuitem> tag. The required attributes are name, id, and either file or command, as marked with an asterisk in Table 33-2.
Table 33-2. Menuitem Tag Attributes
Attribute | Possible Value | Description |
|---|---|---|
| Any menu name | The name of the menu item as it appears on the menu. An underscore character causes the following letter to be underlined for Windows' shortcuts — for example, |
| Any unique name | The identifying term for the menu item. |
| Any special key or keyboard key plus modifier(s) | The keyboard shortcut used to execute the command. |
|
| The operating system valid for the current menu item. If the platform parameter is omitted, the menu item is applicable for both systems. |
| JavaScript function | If present, governs whether a menu item is active (the function returns |
| JavaScript function | Executed when the menu item is selected. This inline JavaScript function capability is used for simple functions. |
| Path to a JavaScript file | The JavaScript file is executed when the menu item is selected; the path is relative to the Configuration folder. |
| JavaScript function | Displays a checkmark next to the menu item if the function returns |
| N/A | Specifies that the menu item is set dynamically by the |
Tip
The menus.xml file is quite extensive. You can find the main menu for Dreamweaver — the one you most likely want to modify — by searching for the second instance of its ID, DWMainWindow. The first instance is used by the corresponding <shortcutlist> tag.
You can create submenus by nesting one set of <menu> tags within another. The following example is a simplified look at the File
<menu name="_File" id="DWMenu_File">other menu items...<menu name="_Import" id="DWMenu_File_Import"> <menuitem name="_XML into Template..." /> <menuitem name="_Word HTML..." /> <menuitem name="_Tabular Data..." /> </menu>other menu items...</menu>
Note how the <menu> tag defining the Import submenu is nested within the <menu> tag that defines the File menu.
When examining the menus.xml file, notice that many menu items have JavaScript functions written right into the <menuitem> tag, such as this one for File
<menuitem name="New _Window" key="Cmd+N" enabled="true"
          command="dw.newDocument()" id="DWMenu_MainSite_File_New" />
When the user selects File
A menu command, like most of the other Dreamweaver extensions, is a combination of HTML and JavaScript. If the menu command is extensive and cannot be referenced as one or two functions directly in the menus.xml file, it is contained in an HTML file, stored in the Dreamweaver CS5ConfigurationMenus folder. Menu commands can even use a dialog box, such as standard commands for accepting user input.
Tip
You can find many examples of menu commands, written by the Dreamweaver engineers, in the Dreamweaver CS5ConfigurationMenusMm folder.
Menu commands have access to all the Dreamweaver API functions and a few of their own. None of the seven menu command API functions, listed in Table 33-3, is required, and three are automatically called when the menu command is executed.
Table 33-3. Command Menu API Functions
Function | Returns | Description |
|---|---|---|
| Boolean (true or false) | Determines whether the menu item is active or dimmed |
| An array of labels and functions, separated by commas | Sets the name and effect of buttons on the dialog box |
| An array of menu item names and unique IDs, separated by a semicolon | Sets the current listing for a menu |
Boolean | Adds a checkmark next to the item if | |
| Nothing | Handles any arguments passed by the |
| A text string | Sets the name of the menu item according to the given function; not to be used in conjunction with |
| Width, Height (in pixels) | Determines the dimensions of the Parameters dialog box, such as |
With the advent of XML — in which no standard tags exist — the capability to handle custom tags is essential in a Web authoring tool. Dreamweaver incorporates this capability through its third-party tag feature. After you've defined a third-party tag, Dreamweaver displays it in the Document window by highlighting its content, inserting a user-defined icon, or doing neither depending on the Preferences selected and the attributes assigned. Third-party tags are easily selected through the Tag Selector below the Document window; therefore, they are easy to cut, copy and paste, or otherwise manipulate. Perhaps most important, after a third-party tag is defined, you can apply a custom Property inspector that enables tag attributes to be entered in a standardized user interface.
Third-party tags can be defined directly within Dreamweaver. Just as object files use HTML to structure HTML code for easy insertion, Dreamweaver uses XML to make an XML definition for the custom tag. A custom tag declaration consists solely of one tag, <tagspec>, with up to seven attributes. The following list describes all of the tag's legal attributes:
tag_name: Defines the name of the tag as used in the markup. Any valid name — no spaces or special characters are allowed — is possible. A tag with the attributetag_name="invoice"is entered in the document as<invoice>.tag_type: Determines whether the tag has a closing tag (nonempty) and is thus capable of enclosing content or if the tag describes the content itself (empty). For example, the<invoice>tag could have atag_type="nonempty"because all the content is between<invoice>and</invoice>.render_contents: Sets whether the content of a non-empty type tag is displayed. Therender_contentsattribute value is eithertrueorfalse; iffalse, the tag's icon is displayed instead of the contents.content_model: Establishes valid placement and content for the tag in the document. The possible options are as follows:block_model: Tags defined withcontent_model="block_model"appear only in the<body>section of a document and contain block-level HTML tags, such as<p>,<div>,<blockquote>, and<pre>.head_model: Defines a tag that appears in the<head>section and can contain text, for example:content_model="head_model".marker_model: You can place tags with the attributecontent_model="marker_model"anywhere in the document with no restrictions on content. Themarker_modelvalue is most often used for inline tags that are placed within a paragraph or division.script_model: Like themarker_modeltag,script_modeltags can be placed in either the<head>or<body>section. All content within ascript_modeltag is ignored by Dreamweaver. This feature enables server-specific scripts to be included without alteration.
start_string: The initial delimiter for a custom string-delimited tag;start_stringandend_stringmust both be defined if one is declared. Lasso tags, for example, use astart_stringof a left bracket ([).end_string: The closing delimiter for a custom string-delimited tag. Theend_stringfor a Lasso tag is the right bracket (]).detect_in_attribute: A Boolean value that determines whether Dreamweaver should ignore string-delimited tags used as attributes in other tags. The default isfalse, but for most string-delimited functions, thedetect_in_attributevalue should be set totrue.parse_attributes: A Boolean value that determines whether Dreamweaver should inspect and parse the attributes within string-delimited tags. By default, Dreamweaver parses all attributes; setparse_attributetofalseto force Dreamweaver to ignore the attributes.icon: Empty tags or non-empty custom tags withrender_contentdisabled require a GIF file to act as an icon in the Document window. The icon attribute should be set to any valid URL, relative or absolute (as inicon="images/invoice.gif").icon_width: Sets the width, in pixels, of the icon used to represent the tag. The value can be any positive integer.icon_height: Sets the height, in pixels, of the icon used to represent the tag. The value can be any positive integer.is_visual: Sets whether the tag is rendered in the Design view; either atrueorfalsevalue is acceptable.
Here's the complete code for a sample custom tag, the Template Expressions tag (which, although created by Adobe, is technically a third-party tag):
<tagspec tag_name="dwtemplate" start_string="@@(" end_string=")@@"
  detect_in_attribute="true" icon="TemplateExpr.gif" icon_width="18"
  icon_height="18"></tagspec>
Figure 33-5 shows an example of the Template Expressions custom tags; the page is set up so that the items on the menu can be altered with template expressions.
Tip
If the content is to be rendered for a custom tag, you can easily view it in the Document window by enabling the Third-Party Tags Highlighting option in the Highlighting panel of the Preferences dialog box. Make sure that View
After a custom tag is defined, the definition is saved in an XML file in the ThirdPartyTags folder, in Dreamweaver's Configuration folder. If you are establishing a number of custom tags, you can place all the definitions in the same file. Adobe refers to this as the Tag DB or Database.
Property inspectors are used throughout Dreamweaver to display the current attributes of many different types of tags: text, images, AP elements, plugins, and so on. Not only do Property inspectors make it easy to see the particulars for an object; they make it a snap to modify those parameters. With the inclusion of custom tags in Dreamweaver, the capability to add custom Property inspectors is a natural parallel. Moreover, you can create custom Property inspectors for existing tags, and the custom Property inspectors are displayed in place of the built-in Property inspectors.
Like objects, commands, and behaviors, custom Property inspectors are composed of HTML and JavaScript; the Property inspector HTML file itself is stored in the Dreamweaver CS5ConfigurationInspectors folder. However, the layout of the Property inspector is far more restrictive than that of the other Dreamweaver extensions. The dialog box for an object, command, or behavior can be any size or shape desired — any custom Property inspector must fit the standard Property inspector dimensions and design. Because of the precise positioning necessary to insert parameter form items such as text boxes and drop-down menu lists, AP elements are used extensively to create the layout.
Like many of the other standard extension files, most of the Property inspector files that ship with Dreamweaver are composed of an HTML file that calls a separate JavaScript file. It is entirely possible, however, to combine HTML and JavaScript into a single file. No matter how it's structured, a custom Property inspector HTML file requires the following four key elements:
An initial DTD (Document Type Definition) line for custom Property inspectors:
<!DOCTYPE HTML SYSTEM "-//Adobe//DWExtension ;
layout-engine 6.0//pi">
An HTML comment line immediately preceding the opening
<html>tag that identifies which tag the Property inspector is for; here's the HTML comment line for aMETAtag Property inspector:<!-- tag:META,priority:5,selection:within,vline,hline--> <html>
The function
canInspectSelection(), which determines whether the Property inspector should be displayed according to the current selection.A second function,
inspectSelection(), which updates the tag's HTML when new values are entered in the Property inspector.
If any of these elements is missing or incorrectly declared, Dreamweaver ignores the file and does not display the Property inspector.
Note
In addition to the mandatory functions and definitions, custom Property inspectors are capable of using any of the other Dreamweaver JavaScript functions, with the exception of the getBehaviorTag() and getBehaviorElement functions. If you include the displayHelp() function, a small question mark in a circle appears in the upper-right corner of your custom Property inspector, which, when selected by the user, executes whatever routines your Help function has declared.
Two main items define a custom Property inspector:
The custom Property inspector DTD, which must be the first line in the file
An HTML comment line, which must immediately precede the opening
<html>tag
More than one Property inspector can be defined for a particular tag, making it possible for separate inspectors to be used if different attributes are specified. Therefore, each Property inspector is assigned a priority that determines the one to be displayed. Property inspectors are further defined by whether the current selection is within the tag indicated or if it contains the entire tag; this feature enables two different Property inspectors to be defined, as with the <table> tag. Finally, optional graphic elements are definable: a horizontal line to delineate the upper and lower portions of the Property inspector, and a vertical line to separate the object's name from the other parts of the Property inspector.
Here is the custom Property inspector DTD:
<!DOCTYPE HTML SYSTEM "-//Adobe//DWExtension
  layout-engine 6.0//pi">
The HTML comment line uses the following syntax:
<!-- tag:ID,priority:1-10,
  selection:exact|within,hline,vline,serverModel-->
(The last three values of the selection attribute — hline, vline, and serverModel — are all optional.) For example, the Property inspector for the <link> tag (a <head> element) is defined as follows:
<!-- tag:LINK,priority:5,selection:within,vline,hline-->
The individual sections of the definition are as follows:
tag— The name of the tag for which the Property inspector is intended. Although it's not mandatory, the tag name is customarily uppercased. The tag ID can also be one of three keywords:*COMMENT*, when a comment class tag is indicated;*LOCKED*, when a locked region is to be inspected; or*ASP*, for all ASP elements.
priority: Thepriorityof a Property inspector is provided as a number from1to10. The highest priority,10, means that this Property inspector takes precedence over any other possible Property inspectors. The lowest priority,1, marks the Property inspector as the one to use when no other Property inspector is available.
Note
You can find an example of how priority is used in the <meta> tag and the Description and Keywords objects. The Property inspectors for Description and Keywords have a higher priority (6) than the one for the basic <meta> tag (5), which enables those inspectors to be shown initially if the proper criteria are met; if the criteria are not met, the Property inspector for the <meta> tag is displayed.
selection: Depending on the current selection, the cursor is either within a particular tag or exactly enclosing it. The selection attribute is set towithinorexact, according to the condition under which the Property inspector should be displayed.hline: Inserts a 1-pixel horizontal gray line (see Figure 33-6) dividing the upper and lower halves of the expanded Property inspector.vline: Places a 1-pixel vertical gray line (see Figure 33-6) between the tag's name field and the other properties on the upper half of the Property inspector.
To control the circumstances under which your custom Property inspector is displayed, use the canInspectSelection() function. Like canAcceptBehavior() and canAcceptCommand() for behaviors and commands, respectively, if canInspectSelection() returns true, the custom Property inspector is shown; if it returns false, the Property inspector is not shown.
As noted earlier, the canInspectSelection() function is mandatory. If no conditions exist under which the Property inspector should not be displayed, use the following code:
function canInspectSelection() {
  return true;
}
Access to several of the standard Dreamweaver <head> elements' Property inspector files is restricted by the canInspectSelection() function to specific tags. In the following example, from the <meta> Description object, the current selection is examined to see if a <meta> tag is selected, and the name attribute is set to description:
function canInspectSelection() {
  var dom = dw.getDocumentDOM();
  var metaObj = dom.getSelectedNode();
  if (!metaObj || !metaObj.getAttribute) return false;
  return (metaObj.tagName && metaObj.tagName == "META" &&
   metaObj.getTranslatedAttribute("name") &&
   metaObj.getTranslatedAttribute("name").toLowerCase()=="description");
}
The inspectSelection() function is the workhorse of the custom Property inspector code and is responsible for pulling the information from the selected tag for display in the various Property inspector fields. Depending on the code design, the inspectSelection() function can also be used to update the HTML code when the attribute values are modified in the Property inspector.
Here's an excerpt of the inspectSelection() function from the Link Property inspector file:
function inspectSelection() {
  TEXT_HREF = findObject("Href");
  ...
  if (linkObj.getAttribute("href"))
    TEXT_HREF.value = linkObj.getAttribute("href");
  else
    TEXT_HREF.value = "";
  ...
}
In this example, if an attribute (href) exists, its value is assigned to the Property inspector's appropriate text box value (TEXT_HREF.value). The remainder of the inspectSelection() function for the <link> tag consists of a series of statements such as those shown in the sample code.
Tip
You can design a Property inspector that displays a different interface depending on whether or not it is expanded, as the Keywords Property inspector does. If an inspector is not expanded, the argument(0) property is set to the value min; when it is expanded, argument(0) is equal to the value max.
Many Property inspectors update their HTML tags when a change occurs in one of the input boxes. No real standard method exists to accomplish this because there are so the many possible variations with Property inspectors. However, one of the most commonly used events is onBlur(), as in the following example, taken from the Keywords Property inspector file:
var minText = '<textarea name="Keywords" onBlur="setMetaTag()" '
  + 'style="width:350;height:32" rows="2" wrap="virtual"></textarea>'
The setMetaTag() function that is called is a local one that assigns whatever is currently in the textarea of the Property inspector to the content attribute.
All the attributes for a Property inspector must fit into a tightly designed space. Although it's helpful to look at examples found in the Inspectors folder, many of the standard Property inspectors are built in to the core functionality of the program and are not immediately accessible on the design level. The following specifications and tips should make it easier to design your own custom Property inspectors:
An expanded Property inspector is 100 pixels high: 50 pixels for the top portion and 49 pixels for the bottom portion (the dividing line between the two is 1 pixel high).
If the
hlineattribute is specified in the Property inspector definition, a 1 pixel–high line is drawn the entire width of the inspector, 51 pixels down from the top (reducing the bottom portion's height to 49 pixels).If the
vlineattribute is specified, a single-pixel line is drawn across the top half of the Property inspector, 118 pixels from the left.The image placed on the upper-left corner of the Property inspector is generally sized at 36 pixels square and placed 3 pixels from the top and 2 pixels from the left. Although you are not required to keep this size image — or its placement — following these guidelines helps make your custom Property inspectors resemble the standard Dreamweaver ones.
It's a good idea to lay out your Property inspector with the View
Keep the AP Elements panel visible. Many custom Property inspectors use multiple AP elements to position the elements exactly and the AP Elements panel makes selecting individual AP elements for adjustment a snap.
Use nested AP elements to position and group associated items in the Property inspector. Almost all the form objects for user input in Property inspectors, such as text boxes and drop-down lists, are identified by labels. Placing both the label and text boxes in their own AP elements, while grouping them under one parent AP element, provides maximum flexibility and ease of placement.
Apply CSS styles within the Property inspector to easily manage font sizes and design your Property inspector in a WYSIWYG environment.
Property inspectors are an excellent way to manage the attributes of most elements in a single, consistent user interface. The Property inspector user interface, however, is not the best solution for all situations. Recognizing this, the Adobe engineers have added another extension type for Dreamweaver: floating panels. A floating panel is a cross between a Property inspector and a command. Like Property inspectors, floating panels can stay on the screen while you work on the Web page; like commands, floating panels are not restricted to a set size and shape.
Custom floating panels have the same basic interface as standard Dreamweaver panels. Any floating panel can be resized or grouped with other floating panels, standard or custom. After it is grouped, a custom floating panel also has a tab that, when selected, brings the floating-panel interface to the front. A couple of noteworthy differences exist between built-in and custom floating panels:
Built-in floating panel tabs can display names and icons; custom floating panel tabs can display only names.
Built-in floating panels can be assigned a minimum size; custom floating panels cannot (that is, the user can shrink them down to about 100 × 100 pixels).
Floating panels, like most other extensions, are a combination of HTML and JavaScript. HTML is the main file that is called; it provides the user interface via an HTML form. JavaScript provides the functionality from the <head> of the HTML page.
Note
Like Property inspectors, floating panels have their own DTD that you must include as the first line in your custom floating panel files: <!DOCTYPE HTML SYSTEM "-//Adobe//DWExtension layout-engine5.0//floater">.
Floating panels are stored in the Dreamweaver CS5ConfigurationFloaters folder. However, unlike commands or objects, you can't just save your custom floating panel in a particular folder to make it accessible. You must call a function that displays the floating panel, either dw.setFloaterVisibility(floaterName,true) or dw.toggleFloater(floaterName). Most often, these functions are called from a <menuitem> tag in the menus.xml file, like the following custom floating panel:
<menuitem name="HelpBuilder" enabled="true"
 command="dw.toggleFloater('helpBuilder')"
 checked="dw.getFloaterVisibility('helpBuilder')" />
The checked attribute ensures that a checkmark is displayed next to the menu item if the floating panel is visible.
Warning
When naming a custom floating panel, be sure to avoid names reserved for Dreamweaver's built-in elements: assets, behaviors, codesnippet, CSS styles, dataSource, documenttype, frames, helpbook, HTML, insertbar, AP elements, library, objects, or history properties, reference, samplecontent, serverBehavior, serverFormat, serverModel, site, taglibrary, site files, site map, templates, timelines, timelines, or toolbar.
As indicated in the preceding paragraphs, floating panels have their own API functions, and several methods of the Dreamweaver object are applicable. The floating panel API functions, none of which is required, are described in Table 33-4.
Table 33-4. Floating Panel API Functions
Function | Returns | Use |
|---|---|---|
| Nothing | Specifies whether a Help button should appear beneath the OK and Cancel buttons. |
| Nothing | Executes after the current document has been edited. |
| A string containing | For Dreamweaver CS5 (Windows only); specifies where a floating panel can dock. |
| A string in the format | Sets the position of the floating panel onscreen when it is first called; if left onscreen when Dreamweaver quits, it reopens in the last location. |
| A string in the format | Indicates what other floating panels are grouped with the current floating panel when it first appears. |
| Boolean | For Dreamweaver CS5 (Windows only); specifies if other panels can dock to this panel. |
| Boolean | Determines if the floating panel is enabled when Code view is active. |
| Boolean | Specifies whether the floating panel can be resized by the user. |
| Nothing | Executes after the current selection has been altered. |
Warning
Adobe strongly cautions programmers against using documentEdited() and selectionChanged() unless these functions are absolutely necessary. Because they constantly monitor the document, both functions can have an adverse effect on performance if implemented. Adobe suggests that programmers incorporate the setTimeout() method to temporarily pause these functions so that the user can continue to interact with the program.
Within the Dreamweaver API are two pairs of methods and a single function that relate to floating panels as follows:
getHideAllFloaters(): Reads the state of the Show/Hide Floating Panel menu option to determine if all floating panels should be hidden (true) or shown (false)setHideAllFloaters(): Sets the Show/Hide Floating panel to a particular state, to Hide (true) or Show (false)getFloaterVisibility(floaterName): Reads whether the given floating panel is currently displayed and frontmost (true) or hidden (false)setFloaterVisibility(floaterName,isVisible): Brings the named floating panel forward if theisVisibleargument istruetoggleFloater(floaterName): Toggles the visibility state of the given floating panel between hiding and bringing to the front
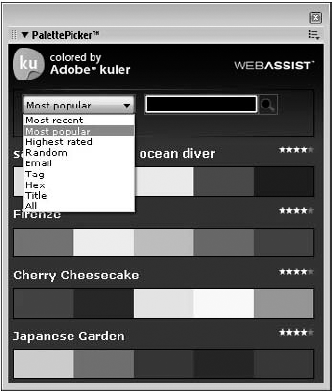
Floating panels have a great deal of potential with their flexible interface and constant onscreen presence. The example shown in Figure 33-7, PalettePicker from WebAssist, interfaces with Adobe Kuler to access color themes.
For any markup tag to be depicted in the Document window — whether it's <b> for bold or a custom third-party tag such as Tango's <@cols> — it must be translated. Dreamweaver's built-in rendering system translates all the standard HTML code, along with a few special custom tags such as those for ASP and ColdFusion. However, to display any other custom tags, or those that perform special functions such as server-side includes, the tag developer must build a custom translator.
As part of its expansion efforts, Dreamweaver supports custom translators. This enhancement enables programs that output nonstandard HTML to be displayed onscreen integrated with the regular code. One of Dreamweaver's main claims to fame is its capability to accept code without rewriting it. With Dreamweaver translators, you can visually insert, show, and edit your custom code.
Here's a brief overview of how translators work:
When Dreamweaver starts, all the properly coded translators in the Dreamweaver CS5ConfigurationTranslators folder are initialized.
If a document is loaded with nonstandard HTML, the code is checked against the installed translators.
The translators are enabled.
Note
With the exception of the SSI translator, all translators are automatically active all the time — no preference setting determines their availability.
The code is processed with the translator and temporarily converted to a format acceptable to Dreamweaver.
Dreamweaver renders the code onscreen.
If a change is made to the page, Dreamweaver retranslates the document and refreshes the screen.
When the page is saved, the temporary translation is discarded, and the original code, with any modifications, is stored.
Developers continue to break new ground with the use of translators. Some translators that have been developed so far include those for the following:
Server-side includes: Standard with Dreamweaver, the SSI translator effortlessly inserts, at design time, files that you normally don't see until delivered by the Web server. (To learn more about SSI, see Chapter 29.)
XSSI: The Extended Server-Side Include (XSSI) extension, developed by Webmonkey authors Alx Ladygo, Nadav Savio, and Taylor for Adobe, includes a translator that brings the Apache-served code right into the Document window.
Tango: Developed by Pervasive Software, the Tango translator compensates for differences between database-oriented code and standard HTML. Additionally, Tango includes a manually controlled Sample Data translator that enables the Web designer to view the page complete with an example database.
Like other Dreamweaver extensions, such as behaviors and commands, translators are HTML files with JavaScript. Translators have no user interface. Other than deciding when to invoke it, you have no parameters to set or options from which to choose. All the pertinent code is in a script located in the <head> of the translator, which, along with any necessary support routines, includes two essential JavaScript functions: getTranslatorInfo() and translateMarkup(). Any other Dreamweaver JavaScript API functions not specific to behaviors can be used in a translator as well.
Note
Because of the limitations of JavaScript, much of the heart of custom translation is handled by specially written C-level extensions. These compiled code libraries enhance Dreamweaver's capabilities so that new data types can be integrated. C-level extensions are covered in the "Extending C-Level Libraries" section later in this chapter.
The getTranslatorInfo() function simply sets up and returns an array of text strings that are read by Dreamweaver during initialization.
The structure of the array is relatively rigid. The number of array elements is specified when the Array variable is declared, and a particular text string must correspond to the proper array element. The array order is as follows:
translatorClass: The translator's unique name used in JavaScript functions. The name has to begin with a letter and can contain alphanumeric characters as well as hyphens or underscores.
title: The title listed in the menu and the Translation category. This text string can be no longer than 40 characters.
nExtensions: The number of file extensions, such as
.cfml, to follow. This declaration tells Dreamweaver how to read the next portion of the array. If this value is set to0, all files are acceptable.extension: The actual file extension without the leading period.
nRegExps: The number of regular expressions to be declared. Should this value be equal to
0, the array is closed.RegExps: The regular expression to be searched for by Dreamweaver.
runDefault: Specifies when the translator executes (
always,never, orconditionally).
The number of array elements — and thus, the detail of the function — depends entirely on the translator. Here, for example, is the code for getTranslatorInfo() from Live Picture's translator, where a file must have a particular <meta> tag to be translated:
function getTranslatorInfo(){
  returnArray = new Array( 5 );
  returnArray[0] = "FPX";     // translatorClass
  returnArray[1] = "Flashpix Image Translator";     // title
  returnArray[2] = "0";       // number of extensions
  returnArray[3] = "1";       // number of expressions
  returnArray[4] = "<meta http-equiv="refresh" content="0;url=http://";
  return returnArray;
}
By comparison, the standard SSI translator's getTranslatorInfo() function has 10 array elements, and Webmonkey's XSSI has 17.
Although the getTranslatorInfo() function initializes the translator, the translateMarkup() function actually does the work. As noted earlier, most translators rely on a custom C-level extension to handle the inner workings of the function, but translateMarkup() provides the JavaScript shell.
The translateMarkup() function takes three arguments, which must be declared, but whose actual values are provided by Dreamweaver:
docName: The file URL for the file to be translated.siteRoot: The site root of the file to be translated. Should the file be outside the current site, the value would be empty.docContent: A text string with the code for the page to be translated.
Typically, the docContent text string is parsed using either JavaScript or a C-level extension within the translateMarkup() function that returns the translated document. Dreamweaver then displays this translated document.
Here's an excerpt of the translateMarkup() function from the ColdFusion translator:
function translateMarkup(docNameStr, siteRootStr, inStr) {
  var outStr = "";
  ...
  // translate
  if (inStr.indexOf("<cf") != −1 || inStr.indexOf("<CF") != −1) {
    var TM =
      new TranslationManager(TRANSLATOR_CLASS, SERVER_MODEL_FOLDER, "");
    TM.serverModelAlwaysCheckTag = myAlwaysCheckTag;
    TM.serverModelAlwaysCheckAttribute = myAlwaysCheckAttribute;
var split = TranslationManager.splitBody(inStr);
outStr = TM.translate(split.inStr);
if (outStr != "")
outStr = split.preInStr + outStr + split.postInStr;
}
...
return outStr;
}In this example, notice that the translated document in the form of outStr is built by creating a TranslationManager object named TM and then calling this object's translate() method: TM.translate(split.inStr).
Translations are generally intended for onscreen presentation only. Although there's no rule prohibiting translated content from being written out to disk, most applications need the original content to run. To protect the original content, Dreamweaver includes a special locking tag. This XML tag pair, <MM:BeginLock>...<MM:EndLock>, stops the enclosed content (the translation) from being edited, while simultaneously storing a copy of the original content in a special format.
The <MM:BeginLock> tag has several attributes:
translatorClass: The identifying name of the translator as specified ingetTranslatorInfo().type: The type or tag name for the markup to be translated.depFiles: A comma-separated list of any files on which the locked content depends. If any of these dependent files are altered, the page is retranslated.orig: A text string with the original markup before translation. The text string is encoded to include four standard HTML characters:<becomes%3C;>becomes%3E;"becomes%22;%becomes%25;
To see how the special locking tag works, look at an example taken from the Tango Sample Data translator. Tango uses what are called meta tags, which begin with an @ sign, such as the <@TOTALROWS> tag. The Tango Sample Data translator replaces a result drawn from a database with a specified sample value. The original code is:
<@TOTALROWS samptotalrows=23>
After the code is translated, Dreamweaver refreshes the screen with the following code:
<MM:BeginLock translatorClass="TANGO_SAMPLEDATA" type ="@TOTALROWS"
     orig="%3C@TOTALROWS samptotalrows=23%3E">23<MM:EndLock>
The 23 in bold is the actual translated content that appears in Dreamweaver's Document window.
Note
You don't actually see the locking code, even if you open the Code inspector when a page is translated. To view the code, select the translated item, copy it, and then paste it in another text application, or use the Paste As HTML feature to see the results in Dreamweaver.
All programs have their limits. Most limitations are intentional and serve to focus the tool for a particular use. Some limitations are accepted because of programming budgets — for both money and time — with the hope that the boundaries can be exceeded in the next version. With Dreamweaver, one small section of those high, sharply defined walls has been replaced with a doorway: C-level extensions. With the proper programming acumen, you can customize Dreamweaver to add the capabilities you need.
As with most modern computer programs, the core of Dreamweaver is coded in C and C++, both low-level languages that execute much faster than any noncompiled language, such as JavaScript. Because C is a compiled language, you can't just drop in a function with a few lines of code and expect it to work — it has to be integrated into the program. The only possible way to add significant functionality is through another compiled component called a library. With the C-level extensions capability, Dreamweaver enables the incorporation of these libraries, known as DLLs (Dynamic Link Libraries) on Windows systems and as CFMs (Code Fragment Managers) on Macintosh systems.
One excellent example of the extended library is DWfile. This C-level extension is used by several Dreamweaver partners, including RealNetworks and iCat, to perform tasks outside the capabilities of JavaScript — namely, reading and writing external text files. By adding that one library, Dreamweaver can now work with the support files necessary to power a wide range of associated programs. DWfile is described in detail in the following section.
C-level extensions are also used in combination with Dreamweaver's translator feature. As discussed earlier in this chapter, translators handle the chore of temporarily converting nonstandard code to HTML that Dreamweaver can present onscreen — while maintaining the original code in the file. Much of this functionality isn't impossible for JavaScript; the conversion would be too slow to be effective. C-level extensions are definitely the way to go when looking for a powerful solution.
Note
A discussion of programming in C or C++, as required by C-level extensions, is beyond the scope of this book. Developers are encouraged to scour the Dreamweaver Support Center for relevant information: www.adobe.com/support/dreamweaver/.
C-level extensions, properly stored in the Dreamweaver CS5ConfigurationJSExtensions folder, are read into Dreamweaver during initialization when the program first starts. The routines contained within the custom libraries are accessed through JavaScript functions in commands, behaviors, objects, translators, and other Dreamweaver extensions.
Take a look at how Adobe's C-level extension DWfile is used. DWfile has 14 main functions:
copy(): Copies a file from one file URL (the first argument) to another (the second argument).DWfile.copy()can be used to copy any type of file, not just text files.createFolder(): Creates a folder, given a file URL.listFolder(): Lists the contents of a specified folder in an array. This function takes two arguments: the file URL of the desired folder (required) and a keyword, either"files"(which returns just filenames) or"directories"(which returns just directory names). If the keyword argument is not used, you get both files and directories.exists(): Checks to see if a specified filename exists. This function takes one argument, the filename.getAttributes(): Returns the attributes of a specified file or folder. Possible attributes areR(read-only),D(directory),H(hidden), andS(system file or folder).setAttributes(): Sets the attributes of a specified file.getCreationDate(): Returns the date when the file was initially created.getCreationDateObj(): Returns the JavaScript object that represents the date when the file was initially created.getModificationDate(): Returns the date a specified file or folder was last modified.getModificationDateObj(): Returns the JavaScript object that represents the date a specified file or folder was last modified.getSize(): Gets the size of a specified file.read(): Reads a text file into a string for examination. This function also takes one argument, the filename.write(): Outputs a string to a text file. This function has three arguments; the first two — the name of the file to be created and the string to be written — are required. The third, the mode, must be the wordappend. This argument, if used, causes the string to be added to the end of the existing text file; otherwise, the file is overwritten.remove(): Places the referenced file in the Recycling Bin (Windows) or Trash (Macintosh) without requesting confirmation.
The following JavaScript function, which could be included in any Dreamweaver extension, uses DWfile to determine whether theFile, named in a passed argument, exists. If it does, the contents are read and presented in an alert box; if theFile doesn't exist, the function creates it and outputs a brief message.
function fileWork(theFile) {
  var isFile = DWfile.exists(theFile);  // does theFile exist?
  if (isFile) {
    alert(DWfile.read(theFile));        // yes: display it in an alert box
  }
  else {                                // no: create it and display msg
    DWfile.write(theFile,"File Created by DWfile");
   }
}
Note how the C-level extension name, DWfile, is used to call the library and its internal functions. After the library has been initialized, it can be addressed as any other internal function, and its routines are simply called as methods of the function using JavaScript dot notation, such as DWfile.exists(theFile).
You must follow strict guidelines to enable Dreamweaver to recognize a C-level extension. Specifically, you must include two files in the library, and you must declare each function for correct interpretation by Dreamweaver's JavaScript interpreter.
Adobe engineers have developed a C-Level Extension API in the form of a C header, mm_jsapi.h, that contains definitions for more than 20 data types and functions. To insert mm_jsapi.h in your custom library, add the following statement:
#include "mm_jsapi.h"
Tip
You can find the latest version of mm_jsapi.h on the Dreamweaver Exchange, which you can get to by choosing Help
After you've included the JavaScript API header, you declare a specific macro, MM_STATE. This macro, contained within the mm_jsapi.h header, holds definitions necessary for the integration of the C-level extension into Dreamweaver's JavaScript API. You must define MM_STATE only once.
Each library can be composed of numerous functions available to be called from within Dreamweaver. For Dreamweaver's JavaScript interpreter to recognize the functions, each one must be declared in a special function, JS_DefineFunction(), defined in the library. All the JS_DefineFunction() functions are contained in the MM_Init() function. The syntax for JS_DefineFunction() is as follows:
JS_DefineFunction(jsName, call,nArgs)
where jsName is the JavaScript name for the function, call is a pointer to a C-level function, and nArgs is the number of arguments that the function can expect. For example, the MM_Init() function for DWfile might appear as follows:
void
MM_Init() {
  JS_DefineFunction("exist", exist, 1);
  JS_DefineFunction("read", exist, 1);
  JS_DefineFunction("write", exist, 2);
}
Because MM_Init() depends on definitions included in the C header mm_jsapi.h, it must be called after the header is included.
Tip
If you're building cross-platform C-level extensions, consider using Metrowerks' CodeWarrior integrated development environment. CodeWarrior can edit, compile, and debug C, C++, and even Java or Pascal for both Windows and Macintosh operating systems. Perhaps most important, Adobe engineers used CodeWarrior to test C-level extensions.
Previous versions of Dreamweaver required you to manually edit the sourceformat.txt file to change code formatting, including tag case, attributes, indentation, and line wrapping. Dreamweaver gives you a well-designed dialog box called the Tag Library editor to make all those changes for you. You can use that editor to customize every single tag you place in Dreamweaver, and you can even add additional tags if you're using a proprietary server or design XML files with commonly used tag sets.
All tag-related attributes and color code settings are stored in a tag database (the Tag Library), which is manipulated through the Tag Library Editor. Click the Tag Library Editor link in Preferences or choose Edit
To edit the properties for a tag library, follow these steps:
Choose Edit
In the Used In list box, choose every type of document that should use the selected tag library. Note that the tags in the selected library are available only in the document types you've chosen.
If the tags in the selected tag library require a prefix, enter this prefix in the Tag Prefix field. The Tag Prefix box enables you to add a prefix to the beginning of every tag in that particular library. For example, if you developed a tag library for XSL documents, you add
xsl:as the tag prefix to add the prefix to the beginning of every tag.When you are finished, click OK to close the Tag Library Editor dialog box.
To edit a tag in a tag library, follow these steps:
Choose Edit
Set your desired Tag Format options:
Line Breaks: Changing the line breaks option changes where Dreamweaver places line breaks in your code. Choose between four options: No Line Breaks; Before And After Tag; Before, Inside, After; and After Tag Only. This option is great for preventing line breaks after
<td>tags and before</td>tags to ensure that no unwanted whitespace shows up in your code.Contents: This setting affects how the content inside your tags is formatted. The indentation settings are based on your code format preferences. Choose between Not Formatted, Formatted But Not Indented, and Formatted And Indented.
Case: The case settings affect how the tag and its attributes are capitalized. XHTML, for example, requires that everything be lowercase. Options are Default, Lowercase, Uppercase, and Mixed Case. Choosing Mixed Case gives you a prompt to type in exactly how you want the tag to appear. Clicking Set Default enables you to set the default for all tags, which is the same as changing your tag case preferences in Edit
The Preview area below the Tag Format options enables you to see exactly how your tag will be written to the page.
Tip
I recommend setting your default case to lowercase to comply with XML/XHTML standards.
To edit an attribute for a tag, follow these steps:
Choose Edit
Set your desired attribute options:
Attribute Case: This option sets the case of your attribute. Attribute Case is completely independent of the tag. Options are Default, Lowercase, Uppercase, or Mixed Case. Choosing Mixed Case enables you to enter exactly how you want the attribute formatted. Clicking Set Default alerts you to return to the Code Format category of Preferences.
Attribute Type: There are ten different attribute types for your tag — Text, Enumerated, Color, Directory, File Name, File Path, Flag, Font, Relative Path, and Style. Setting the type affects how Dreamweaver asks for information when using Code Hints in Code view or the Quick Tag Editor. Choosing Color for an attribute causes a color palette to appear if you add the attribute in Code view. Setting the Type to Relative Path gives you a Select File dialog box.
Values: The Values field is used only for the enumerated attribute type and gives you a list of valid values for a particular attribute.
Click OK.
The following sets of steps show you how to create a new tag library, add a tag to an existing library, or add an attribute to an existing tag.
To add a new tag library, follow these steps:
Choose Edit
Click the Add (+) button and choose New Tag Library.
Enter a name for your new tag library and click OK.
Your new tag library is now shown at the bottom of the list. You're ready to start adding new tags.
To add new tags to one of your tag libraries, follow these steps:
Choose Edit
Click the Add (+) button and choose New Tags.
Choose the Tag Library to add to in the list menu.
Enter one or more tags to add. To add several tags at one time, simply enter a comma-separated list of tags into the dialog. This method enables you to add a large number of tags very quickly.
Choose whether your tag requires matching end tags. Choosing matching end tags gives you tags like
<a>text</a>. Choosing not to have matching end tags gives you tags like<br>and<img>.
To add a new attribute to an existing tag, follow these steps:
Choose Edit
Click the Add (+) button and choose New Attributes.
Choose the Tag Library that contains the tag you want to add attributes to from the first list menu.
Choose the tag you want to add attributes to from the second list menu.
Enter one or more attributes to add. If you want to add several attributes at one time, simply enter a comma-separated list of attributes into the dialog. This enables you to add a large number of attributes very quickly.
To delete a tag library, tag, or attribute, follow these steps:
Choose Edit
In the Tag Library Editor dialog box, select the tag library, tag, or attribute you want to delete.
Click the Remove (–) button. If you are asked to confirm the deletion, do so.
To make your deletions permanent, click OK. To discard your deletions, click Cancel.
Dreamweaver enables you to create a new tag library by importing tags from an existing XML Document Type Definition (DTD) file or schema. In many instances, you may want to add a new tag library. If you're working on a proprietary server or a language that's not supported by Dreamweaver, you can add all the necessary tags into a new tag library.
To create a new tag library by importing a DTD file or schema, follow these steps:
Choose Edit
In the Tag Library Editor dialog box, click the Add (+) button and choose DTDSchema
In the File Or Remote URL field, enter the file or URL of the DTD or schema file.
In the Tag Prefix field, enter the prefix to be used with the tags you're importing, to identify the tags as part of this tag library.
When you're finished, click OK to create your new tag library.
Dreamweaver's commitment to professional Web site authoring is most evident when you examine the program's customization capabilities. Virtually every Web site production house can benefit from some degree of personalization — and some clients absolutely require it. As you examine the ways in which you can make your productive life easier by extending Dreamweaver, keep the following points in mind:
Dreamweaver includes a full range of customizable features: objects, behaviors, commands, third-party tags, Property inspectors, and translators. You can even extend the program's core feature set with the C-Level Extensibility option.
You can use commands to affect any part of your HTML page and automate repetitive tasks.
In addition to accessing custom commands through the Commands menu, you can configure them as objects for inclusion in the Insert panel. You can also make a command appear in any other standard Dreamweaver menu by altering the
menus.xmlfile.To make it easy to work with XML and other non-HTML tags, Dreamweaver enables you to create custom tags complete with individual icons or highlighted content.
Attributes for third-party tags are viewable — and modifiable — by creating a custom Property inspector.
Dreamweaver's C-Level Extensibility feature enables C and C++ programmers to add new core functionality to a program.
Tags from server-side applications can be viewed in the Document window, just as they can be when browsed online, when a custom translator is used. A custom translator often requires a C-level extension.
You can use the Tag Library Editor to customize your Dreamweaver tag libraries.
In the next chapter, you learn how to create and use Dreamweaver server behaviors.