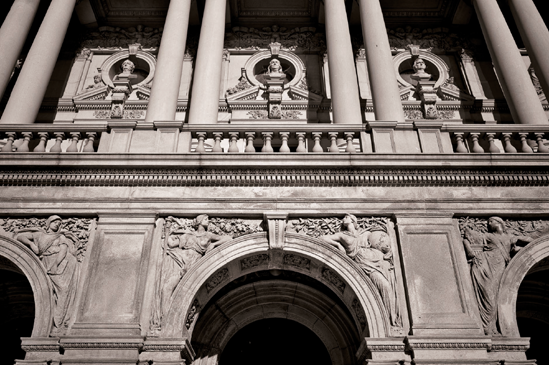
A detail of the exterior of the Thomas Jefferson Building of the Library of Congress showing the busts of Johann Wolfgang von Goethe, Benjamin Franklin, and Thomas Babington Macaulay. Taken at ISO 100, f/8, 1/250 second with a 35mm lens.
The Library of Congress is the largest library in the world, and it serves as the research arm for members of the United States Congress. After a fire destroyed the original collection in 1814, Thomas Jefferson sold his personal library to the institution, thus starting the incredible collection that the Library offers today. Also under the Library is the Copyright Office, which provides the essential infrastructure for the nation's copyright system.
The Thomas Jefferson Building is the showpiece of the Library's three buildings. Its Great Hall is considered one of the most beautiful public buildings in the United States. Within the Thomas Jefferson Building are some of the most valued documents the Library possesses: drafts of the Declaration of Independence, George Washington's copy of the Constitution, Thomas Jefferson's original library, and a Gutenberg Bible.
Photographs are allowed to be taken inside The Great Hall, but photographs of its documents and within the Reading Room are prohibited. The best pictures are therefore the exterior of the Thomas Jefferson Building as well as the interior of The Great Hall.
The main entrance of the Italian Renaissance-styled Thomas Jefferson Building is on its west side on 1st St. SE, just north of its intersection with Independence SE. This is the grand entrance of the building and the side worth beginning your photography thanks to its many intricate details and lovely appearance.
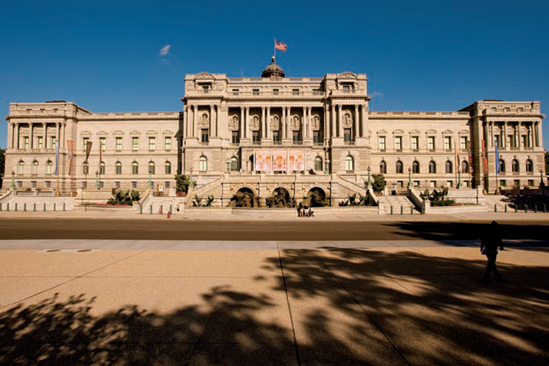
The building features 33 ethnological heads which are featured as ornaments on all the keystones of the first-story windows. They are meant to show the physical characteristics of different human races from Arab through Zulu and are based on models from the collection of the Smithsonian Institution. The 23-carat gold-plated flame of the Torch of Learning sits atop the building. The building (shown in Figure 23.1) was inspired by the Paris Opera House and was designed to eclipse the European libraries with both its size and its collections.
Nine historically significant busts are featured across the front entrance of the building, which include Emerson, Irving, Goethe, and Dante, among others. In front of the building is a fountain containing King Neptune, Roman god of the sea.
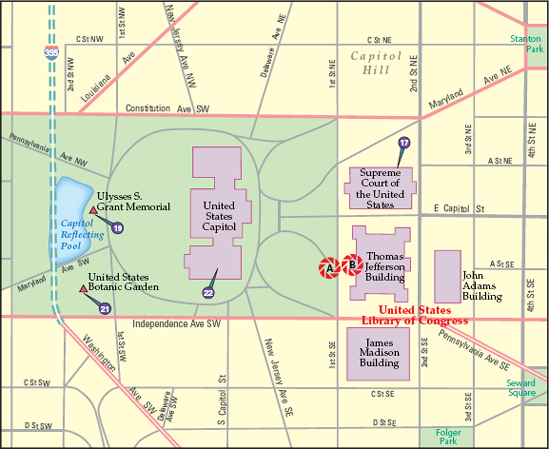
Figure 23.1. The best locations from which to photograph the Thomas Jefferson Building of the Library of Congress: (A) 1st St. SE and (B) inside the Great Hall. Nearby photo ops: (17) Supreme Court of the United States, (19) Ulysses S. Grant Memorial, (21) United States Botanic Garden, (22) United States Capitol.
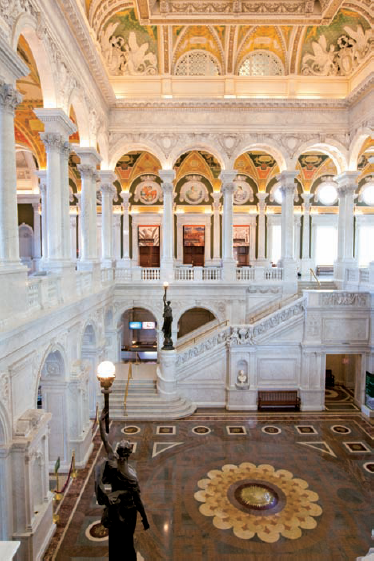
The entrance here leads into The Great Hall, an extraordinary display of both art and architecture that overall represents the achievements and knowledge of mankind. Over 40 American painters and sculptors created the artwork inside over a period of eight years. All told, it is a vibrant and majestic scene to witness and therefore an excellent photo opportunity.
The depth and breadth of the artwork here requires a fair amount of study to properly understand it, and the interactive kiosks provide a great insight into its significance.
During the day there is just enough light that if your camera is able to use higher ISO values and maintain its quality, you can carefully hand hold your camera inside. The Library does not allow the use of any artificial light sources. But most any on-camera flash system is ineffective in such a large space, not to mention the generally ugly light it would provide compared to the already present natural light.
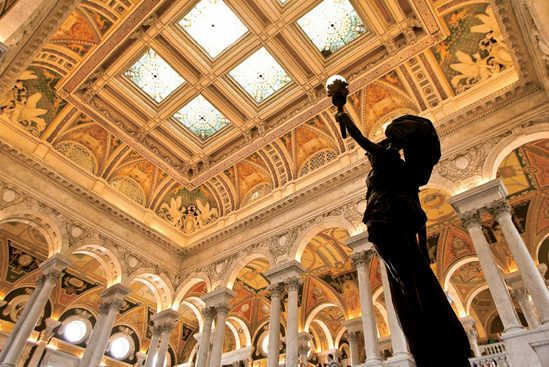
You can study the building in an intimate manner (see Figure 23.2), as detail shots within the Great Hall are plentiful (see Figure 23.3).
Visiting the Thomas Jefferson Building is an awe-inspiring trip, and you may want to take it all in before beginning to photograph it by following a guided tour.
The exterior of the Thomas Jefferson Building is rather straightforward, but the interior requires both some technique as well as modern gear to achieve the best results.
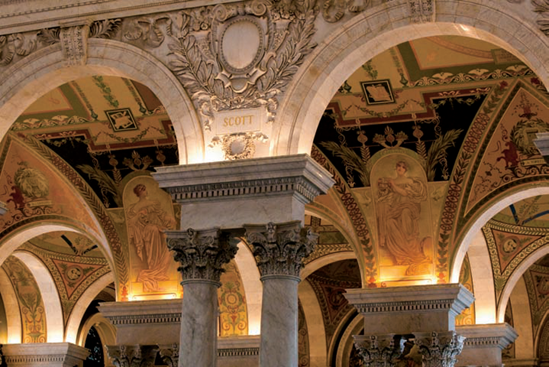
Figure 23.4. Detail of the ceiling within The Great Hall of The Library of Congress Thomas Jefferson Building (see B on the map). Taken at ISO 3200, f/4.5, 1/160 second with a 90mm lens.
For exterior images such as Figure 23.1, a wide-angle lens of 20mm may be used to capture the entire building. You can compose the shot in a traditional, horizontal manner or in a vertical way for something a little different. Of course some distortion occurs due to using the wide-angle lens and pointing your camera up to take the photo, but it still makes a nice image.
To minimize distortion, stay as far away from the building as possible to use the longest focal length lens possible, and keep your camera as level to the ground as your composition permits. There are, however, plenty of trees that can get in the way if you go much farther west than the western side of 1st St. SE, and if you compose the image with a perfectly level camera, the composition will involve a lot of the road and sidewalk in front of you. Although distortion may annoy some, it can also be used to artful effect if you choose to.
Inside, fast lenses with apertures of f/4 and below are almost essential because the light is so low. Also, a stabilized lens, which can negate movement of the camera at slow shutter speeds, is worth its price here.
For exterior images, a graduated neutral density filter can help deepen a blue sky. If you are shooting the exterior with the sun at your back, a polarizer will not be very effective, because it works best 90 degrees to the sun.
You must acquire a permit to use a tripod here. (To do so, visit the Public Affairs Office, Room LM105, in the Madison Building.) If you don't want the hassle of carrying a tripod, getting creative with stabilizing your camera can help. Use a friend's shoulder or brace yourself against part of the building to hold your camera still. Also, hold your camera at either end to keep it as still as possible: Rest the very end of the lens on your fingers and then hold the body of the camera. Doing this minimizes its movement. Another option is a lightweight, telescoping monopod — but this method still requires a lot of precision to keep the image from being blurry and may be met with mixed results.
When the sun is shining strongly against the west façade of the building, you may want to add some exposure to compensate for the brightness of the building. Whatever mode you are most comfortable with, whether it be Aperture Priority or Full Auto, will likely work out fine because of the relatively normal lighting conditions here. If the sun is shining strongly against the west façade of the building, you could experiment by adding some exposure (via exposure compensation or dialing it in using Manual mode) to adjust for the brightness of the building. Keep in mind that in order to use exposure compensation you usually have to use Program or one of the priority mode settings.
Inside requires more technique because of the low levels of light. You want to set a high ISO value, such as 2000–3200 and you then need to use a slower shutter speed. Remember the relationship between focal length and shutter speed: You always want to keep your shutter speed fast enough that any slight amount of camera shake is minimized by using a shutter speed that is fast enough to negate it. The rule is based on a simple concept: As your focal length gets longer, it becomes easier to shake the lens due to its physical length and zoom.
The traditional rule, a stalwart of the 35mm film days, is known as the one over focal length or inverse focal length rule. The rule stipulates that by using a shutter speed with your focal length as its denominator, your chances of having camera-shake induced blur is minimized. So if you are using a 50mm lens, you would simply use 50mm as the denominator of your shutter speed; your minimum shutter speed would thus be 1/50 second. If you have a stabilized lens or camera, you can go a little slower than this rule by perhaps one or two stops, because the stabilization feature reduces the apparent shaking of the camera.
Many digital cameras change the apparent focal length of a lens by anything from 30 to 100 percent due to its crop factor, so to use this rule with your specific camera you'll want to first determine your crop factor and always multiply that by your focal length. For example, if you are using a camera that has a crop factor of 1.6X, and your zoom lens is set to 30mm, you would multiply your crop factor (1.6) by the lens focal length (30mm) which equals 48mm. Thus to be safe you'd want to keep your shutter speed above 1/50 second. Many cameras, when set to automatic exposure modes, will take into account your focal length and set an appropriate shutter speed. They may also blink your shutter speed or otherwise alert you that your shutter speed is slow compared to your focal length.
If this sounds like too much math to do while you are just wanting to take photos, keep this simple guideline in mind: Avoid shutter speeds below 1/30 second with wide lenses, 1/125 second when using normal length lenses, and 1/500 second when using longer lenses (above 100mm). This is a conservative guideline, but it also takes into account all the variance in digital cameras and also other factors that can cause camera shake, such as wind, shooting from a moving vehicle (such as a tour bus), and taking a quick, impromptu shot where you don't have time to completely steady yourself.
If your camera has a short timer delay of, say, 2 seconds, you can use it while holding your camera to reduce camera shake. This gives you time to press the shutter and rest your hand on your camera body, all before the camera takes the shot.
Setting a smaller aperture value also helps indoors when there is less light (refer to figures 23.2 and 23.3), but remember you'll get less depth of field when doing so. However, a wide-angle lens's optics are much more tolerant of smaller aperture values with respect to depth of field, so if you are using a lens of 35mm or less, you can often get away with apertures of f/5.6 and below more easily than if you are using a lens of over 50mm. No matter what the lens, you get less depth of field in front of your focus point and more behind it, so it helps to focus on an object slightly more in the foreground to maintain sharp focus throughout the picture.
Having more light always helps with a photograph, and at this location that is especially true.
The exterior photographs of the Thomas Jefferson Building are great when in the afternoon and late evening, when the sun is setting and brightly illuminating the west façade of the building. Black-and-white images lit with strong sunlight have great contrast and are vibrant with detail. If the light drops too low, though, the trees on the west side if 1st St. SE will cast shadows on the building.
Inside, shooting at times that offer lots of bright light is key: The brighter it is inside, the easier it is to get good photos. Days that have heavy overcast make getting good inside shots tough.
If the weather isn't optimal for shooting overall exterior images of the building, you can try for detail shots that don't rely so much on nice weather to work. The many details of the building can be photographed in a way that one would not have any idea that it's not optimal weather outside. If it's raining, the opposite can sometimes be true: While shooting a wide scene, you may not even realize it is raining.
If it is dark outside, the interior images will be tougher to capture because there won't be very much ambient light. You'll have to use slower shutter speeds, wider apertures, and higher ISO values. One way you can get around this is to concentrate on areas that are lit well, such as corners that are full of windows where detail shots can be taken. Follow the light for the best photos if there is little light otherwise.
Great night shots can be made of the Neptune Fountain at the front of the building, and once the sun has set you don't have to worry about shadows from the trees on the building.
The Italian Renaissance-styled exterior of the Thomas Jefferson Building is great for black-and-white photos (see Figure 23.4). Start off with the more formal shots showing the arches and stairs, but also try shots of the exterior that incorporate vignettes of artwork, which cover the building's façade. Experiment with angles and compositions that use layer textures and design elements together to create an interesting view.
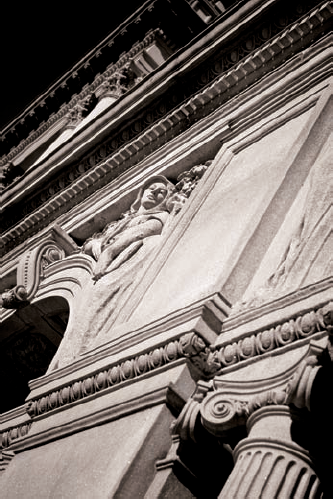
Figure 23.5. A detail shot of the exterior of the Thomas Jefferson Building of The Library of Congress (see A on the map). Taken at ISO 100, f/5, 1/800 second with a 65mm lens.
Inside, you can discover many ways to get creative. Similar to the exterior, try working with various methods of composition with the layered arches, columns, and artwork.
Inside you have more opportunities to use depth and color. Studying the interior with your camera lens lends itself to discovering the intricate artwork as well as coming up with unique images of it all.
Try to get out of the habit of standing in the usual locations or using the same angles. Try looking straight up, or tilt your camera to compose elements to fill the entire frame in a way that isn't just at 90-degree angles (see Figure 23.5).