
Understanding the calendar's different views and functions
Calculating with your iPhone
Using the clock as an alarm, a stopwatch, and a timer too
Leaving voice reminders
The iPhone is a smartphone. And, as a smart device, it can remind you of appointments, tell you the time where you live (or halfway around the world), and even help you perform arithmetic.
Over the next few pages, we look at four of the iPhone's core — if, frankly, unsexy — apps. Indeed, we'd venture to say that no one bought an iPhone because of its calendar, calculator, clock, or voice recorder. Just the same, it's awfully handy having these programs around.

The Calendar program lets you keep on top of your appointments and events (birthdays, anniversaries, and the like). You open it by tapping the Calendar icon on the Home screen. The icon is smart in its own right because it changes daily; the day of the week and date are displayed.
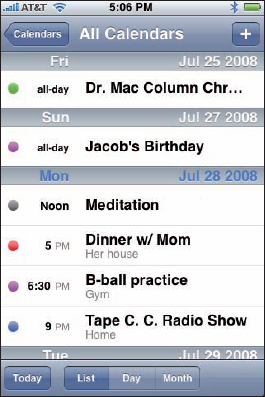
You have three main ways to peek at your calendar: List, Day, and Month views. Choosing one is as simple as tapping on the List, Day, or Month button at the bottom of the Calendar screen. From each view, you can always return to the current day by tapping the Today button.
Take a closer look in the following sections.
List view, shown in Figure 6-1, isn't complicated. As its name indicates, List view presents current and future appointments in list format. You can drag the list up or down with your finger or flick to rapidly scroll through the list. List view compensates for the lack of Week-at-a-Glance view, though Apple certainly could add such a feature eventually, as it did on the iPhone's cousin, the iPad tablet.
Tip
The iPhone can display the color-coding you assigned in iCal. Cool, huh?
If you're a Mac user who uses iCal, you can create multiple calendars and choose which ones to sync with your phone (as described in Chapter 3). What's more, you can choose to display any or all of your calendars. You can also sync calendars with Microsoft Entourage on a Mac or Microsoft Outlook 2003, 2007 or 2010 on a PC.
Warning
Be careful: To-do items created in iCal aren't synced and don't appear on your iPhone.
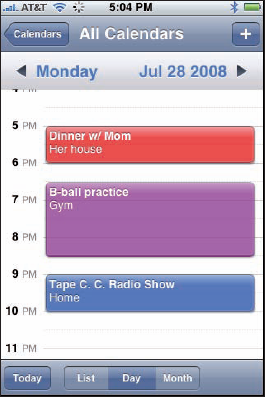
Day view, shown in Figure 6-2, reveals the appointments of a given 24-hour period (though you have to scroll up or down to see an entire day's worth of entries).
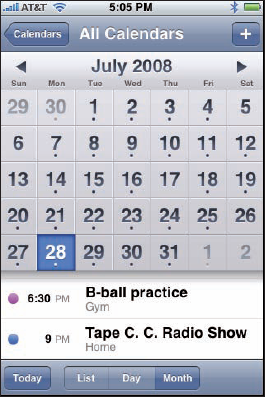
By now, you're getting the hang of these different views. When your iPhone is in Month view, you can see appointments from January to December. In this monthly calendar view, a dot appears on any day that has appointments or events scheduled. Tap that day to see the list of activities the dot represents. The list of activities is just below the month in Month view, as shown in Figure 6-3.
In Chapter 3, you discover pretty much everything there is to know about syncing your iPhone, including syncing calendar entries from your Windows machine (using the likes of Microsoft Outlook) or Mac (using iCal or Microsoft Entourage).
Of course, in plenty of situations, you enter appointments on the fly. Adding appointments directly to the iPhone is easy:
Tap the Calendar icon at the top of the screen, and then tap the List, Day, or Month button.
Tap the + button in the upper-right corner of the screen.
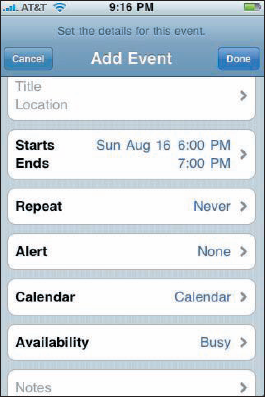
The + button appears whether you're in List, Day, or Month view. Tapping it displays the Add Event screen, shown in Figure 6-4.
Tap the Title/Location field and finger-type as much (or as little) information as you feel is necessary.
Tapping displays the virtual keyboard.
Tap Done.
If your calendar entry has a start time or end time (or both):
Tap the Starts/Ends field.
In the bottom half of the screen that appears (see Figure 6-5), choose the time the event starts and then the time it ends.
Use your finger to roll separate wheels for the date, hour, and minute (in 5-minute intervals) and to specify AM or PM. It's a little like manipulating one of those combination bicycle locks or an old-fashioned date stamp used with an inkpad.
Tap Done when you're finished.
If you are entering an all-day milestone (such as a birthday), tap the All-Day button so that On (rather than Off) is showing. Then tap Done.
Note
Because the time isn't relevant for an all-day entry, note that the bottom half of the screen now has wheels for just the month, day, and year.
If you're setting up a recurring entry, such as an anniversary, tap the Repeat window. Tap to indicate how often the event in question recurs, and then tap Done.
The options are Every Day, Every Week, Every 2 Weeks, Every Month, and Every Year.
If you want to set a reminder or alert for the entry, tap Alert. Next, tap a time, and then tap Done.
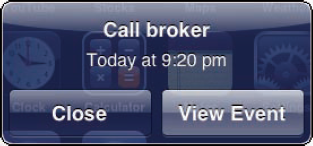
Alerts can be set to arrive on the actual date of an event, 2 days before, 1 day before, 2 hours before, 1 hour before, 30 minutes before, 15 minutes before, or 5 minutes before. When the appointment time rolls around, you hear a sound and see a message like the one shown in Figure 6-6.
Tip
If you're the kind of person who needs an extra nudge, set another reminder by tapping on the Second Alert field.
Tap Calendar to assign the entry to a particular calendar, and then tap the calendar you have in mind (Home or Work, for example). Then tap Done.
Tap Availability (if it's shown on your phone) to indicate whether you're busy, free, tentative, or out of office. Then tap Done.
If you want to enter notes about the appointment or event, tap Notes at the bottom of the Add Event screen. Type your note, and then tap Done.
A virtual keyboard pops up so that you can type those notes.
Tap Done after you finish entering everything.

Tip
Choose a default calendar by tapping Settings, tapping Mail, Contacts, Calendars, and then flicking the screen until the Calendar section appears. Tap Default Calendar and select the calendar that you want to show up regularly.
If you travel long distances for your job, you can also make events appear according to whichever time zone you selected for your calendars. In the Calendar settings, tap Time Zone Support to turn it on, and then tap Time Zone. Type the time zone location on the keyboard that appears.
When Time Zone Support is turned off, events are displayed according to the time zone of your current location.
Tip
To turn off a calendar alert, tap Settings, tap Sounds, and then making sure that the Calendar Alerts button is turned off.
If you want to modify an existing calendar entry, tap the entry, tap Edit, and then make whichever changes need to be made. To wipe out a calendar entry, tap Edit, and then tap Delete Event. You have a chance to confirm your choice by tapping either Delete Event (again) or Cancel.
Calendar entries you create on your iPhone are synchronized with the calendar you specified in the iTunes Info pane.
If you work for a company that uses Microsoft Exchange ActiveSync, calendar entries and meeting invitations from coworkers can be pushed to your device so that they show up on the screen moments after they're entered, even if they're entered on computers at work. Setting up an account to facilitate this pushing of calendar entries to your iPhone is a breeze, although you should check with your company's tech or ITdepartment to make sure that your employer allows it. Then follow these steps:
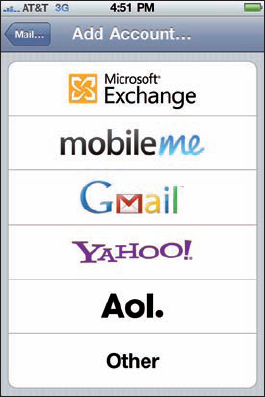
Tap Settings, then tap Mail, Contacts, Calendars, and then tap Add Account.
From the Add Account list, shown in Figure 6-7, tap Microsoft Exchange.
Fill in the e-mail address, username, password, and description fields, and then tap Next.
If required, enter your server address on the next screen that appears.
The iPhone supports something called the Microsoft Autodiscovery service, which uses your name and password to automatically determine the address of the Exchange server. The rest of the fields should be filled in with the e-mail address, username, password, and description you just entered, as shown in Figure 6-8.
Tap Next.
Tap the On switch for each information type that you want to synchronize using Microsoft Exchange.
The options are Mail, Contacts, and Calendars. You should be good to go now, although some employers may require you to add passcodes to safeguard company secrets.

Note
If you have a business-issued iPhone and it is lost or stolen — or it turns out that you're a double-agent working for a rival company — your employer's IT administrators can remotely wipe your device clean.
Warning
Only one account taking advantage of Microsoft Exchange ActiveSync can be configured to work on your iPhone.
The iPhone has one more important button, the Invitations button, located just to the right of the List, Day, and Month buttons — but you see it only under certain circumstances. For instance, you see the button when the Exchange calendar syncing feature is turned on or when you have a calendar that adheres to the CalDAV Internet standard. (By the time you read this, you may also see an invitation if you use a MobileMe calendar as part of Apple's $99/year subscription service.) The Invitations button, which shows up if you have an invitation on your calendar, is represented by an arrow pointing downward into a half-rectangle. (The button is not shown in Figures 6-1, 6-2, or 6-3.)
If you have any pending invitations, tap the Invitations button now to view them, and then tap any of the items in the list to see more details.
Suppose that a meeting invitation arrives from your boss. You can see who else is attending the shindig, check scheduling conflicts, and more. Tap Accept to let the meeting organizer know you're attending, tap Decline if you have something better to do (and aren't worried about upsetting the person who signs your paycheck), or tap Maybe if you're waiting for a better offer.
Tip
You can choose to receive an alert every time someone sends you an invitation. In the Calendar settings, tap New Invitation Alerts so that the button displays On.
If you take advantage of MobileMe, you can now keep calendar entries synchronized between your iPhone and PC or Mac. When you make a scheduling change on your iPhone, it's automatically updated on your computer, and vice versa. Choose MobileMe from the Add Account screen (refer to Figure 6-7) to get started.
You find out more about configuring MobileMe when we discuss the Fetch New Data setting in Chapter 13.
You can subscribe to calendars that adhere to the CalDAV and iCalendar (.ics) standards, which are supported by the popular Google and Yahoo! calendars, or iCal on the Mac. Although you can read entries on the iPhone from the calendars you subscribe to, you can't create entries from the phone or edit the entries that are already present.
To subscribe to one of these calendars, tap Settings and then tap Mail, Contacts, Calendars. Next, tap Add Account, and then tap Other. You then choose either Add CalDAV Account or Add Subscribed Calendar. Next, enter the server where the iPhone can find the calendar you have in mind, and if need be, a username, a password, and an optional description.
You can search calendar entries, appointments, locations for events, and so on by using Spotlight search, a topic we address in Chapter 2. You can also search for events while in the calendar List view by typing text in the Search All Calendars field at the top of the screen.
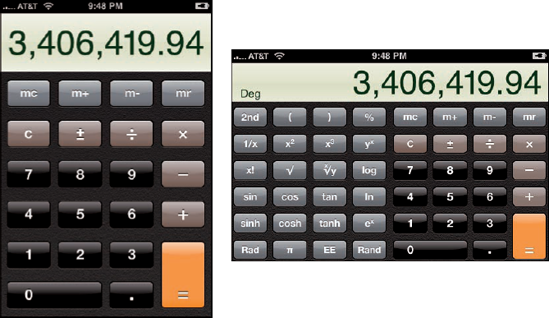
Quick — what's 3,467.8 times 982.3? Why, the answer is 3,406,419.94 (of course). We can solve the problem quickly thanks to the iPhone calculator, buried (until it's needed) under another of those Home screen icons.
Your handy iPhone calculator does just fine for adding, subtracting, multiplying, and dividing. Numbers and symbols (such as C for clear, and M+ for memory) are large and easy to see.
Are you thinking, "This isn't exactly the most advanced calculator I've ever used"? Well, you're right. The calculator can't handle a sine or a square root, much less more advanced functions.
Fortunately, the math whizzes at Apple were thinking right along with you. To see what they came up with, rotate the iPhone. As if by sleight of hand, your pocket calculator is now a full-fledged scientific calculator, capable of tackling dozens of complex functions. Take a gander at both calculators shown in Figure 6-9.
Isn't it nice to know just how much smarter a smartphone can make you feel?
We hear you: "So the iPhone has a clock. Big whoop. Doesn't every cell phone have a clock?"
Well, yes, every cell phone does have a clock. But not every phone has a world clock that lets you display the time in multiple cities on multiple continents. And, not every cell phone has an alarm, a stopwatch, and a timer to boot.
Let's take a look at the time functions on your iPhone.
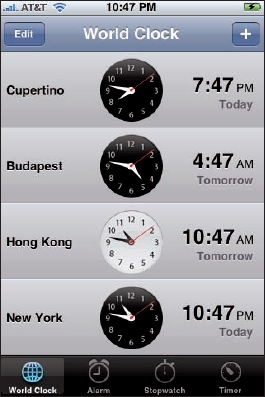
Want to know the time in Beijing or Bogota? Tapping World Clock (inside the Clock app) lets you display the time in numerous cities around the globe, as shown in Figure 6-10. When the clock face is dark, it's dark in the city you chose; if the face is white, it's light outside.
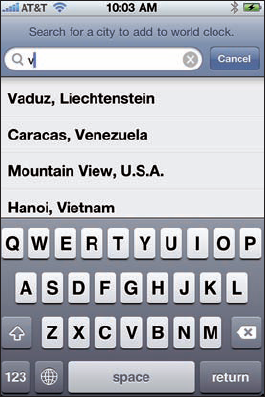
Tap the + button in the upper-right corner of the screen and use the virtual keyboard to start typing a city name. The moment you press the first letter, the iPhone displays a list of cities or countries that begin with that letter. So, as Figure 6-11 shows, typing V brings up both Vaduz, Liechtenstein, and Caracas, Venezuela, among myriad other possibilities. You can create clocks for as many cities as you like, though the times in only four cities appear on a single screen. To see times in other cities, scroll up or down.
To remove a city from the list, tap Edit and then tap the red circle with the white horizontal line in it to the left of the city you want to drop. Then tap Delete.
You can also rearrange the order of the cities displaying the time. Tap Edit, and then press your finger against the symbol with three horizontal lines to the right of the city you want to move up or down in the list. Then drag the city to its new spot.
Ever try to set the alarm in a hotel room? It's remarkable how complicated setting an alarm can be, on even the most inexpensive clock radio. Like almost everything else, the procedure is dirt-simple on the iPhone:
Tap the Alarm icon at the bottom of the screen.
Tap the + button in the upper-right corner of the screen.
Choose the time of the alarm by rotating the wheel in the bottom half of the screen.
This step is similar to the action required to set the time that an event starts or ends on your calendar.
If you want the alarm to go off on other days, tap Repeat and then tellthe iPhone the days you want the alarm to be repeated, as in Every Monday, Every Tuesday, Every Wednesday, and so on.
Tap Sound to choose the ringtone (see Chapter 4) that will wake you up. You can even use a custom ringtone you created.
Your choice is a matter of personal preference, but we can tell you that the ringtone for the appropriately named Alarm managed to wake Ed from a deep sleep.
Tap Snooze to have the alarm, accompanied by a Snooze button, appear on the screen.
Tap the Snooze button to shut down the alarm for nine minutes.
If you want to call the alarm something other than, um, Alarm, tap the Label field and use the virtual keyboard to type another descriptor.
Tap Save when the alarm settings are to your liking.
You know that an alarm has been set and activated because of the tiny status icon (surprise, surprise — it looks like a clock) that appears in the upper-right corner of the screen.
An alarm takes precedence over any tracks you're listening to on your iPod. Songs momentarily pause when an alarm goes off and resume when you turn off the alarm (or press the Snooze button).
Warning
When your ring/silent switch is set to Silent, your iPhone doesn't ring, play alert effects, or make iPodsounds. But it will play alarms from the Clock app. That's good to know when you set your phone to Silent at a movie or the opera. And, although it seems obvious, if you want to hear an alarm, you have to make sure that the iPhone volume is turned up.
Warning
Not all phone carriers support the network time option in all locations, so an alarm may not sound at the correct time in a given area.
If you're helping a loved one train for a marathon, the iPhone Stopwatch function can provide an assist. Open it by tapping Stopwatch in the Clock app.
Just tap Start to begin the count, and then tap Stop at the finish line. You can also tap a Lap button to monitor the times between laps.
Cooking a hard-boiled egg or Thanksgiving turkey? Again, the iPhone comes to the rescue. Tap Timer (in the Clock app) and then rotate the hour and minute wheels until the time you have in mind is highlighted. Tap When Timer Ends to choose the ringtone that will signify time's up.
After you set up the length of the timer, tap Start when you're ready to begin. You can watch the minutes and seconds wind down on the screen, if you have nothing better to do.
If you're doing anything else on the iPhone — admiring photos, say — you hear the ringtone and see a Timer Done message on the screen at the appropriate moment. Tap OK to silence the ringtone.
Consider all the times you'd find it useful to have a voice recorder in your pocket — perhaps when you're attending a lecture or interviewing an important source (that's a biggie for us journalist types). Or maybe you just want to leave yourself a quickie reminder about something ("Pick up milk after work"). Well, you're in luck. Apple includes a built-in digital voice recorder.
Tip
A bunch of third-party apps add voice recording to the iPhone. Ed uses Recorder from Retronyms and Dictation from Dragon, and Bob uses iTalk Recorder from Griffin.
After you have that recorder in your pocket, how do you capture audio? When you tap the Voice Memos icon on the Home screen, up pops the microphone displayed in Figure 6-12. We'd tell you to talk right into that microphone, but it's mainly for show. The two real microphones on the iPhone 4 are on the top and bottom of the device (as pictured in Chapter 1).

Tap the red record button in the lower-left part of the screen to start recording. You see the needle in the audio level meter move as the Voice Memo detects sounds, even when you pause a recording by tapping the red button a second time. A clock at the top of the screen indicates how long your recording session is lasting. It's that easy.
After you capture your thoughts or musings, how do you play them back?
You can start playback in a couple of ways, and both involve tapping the same button:
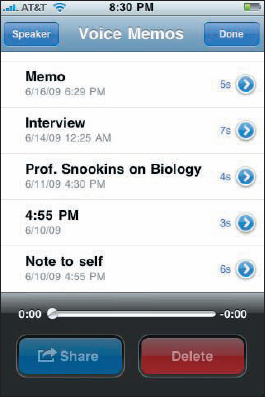
Immediately after recording the memo, tap the button to the right of the audio level meter. A list of all your recordings pops up in chronological order, as shown in Figure 6-13, with the most recent memo on top. That memo is the one you just recorded, of course, and it automatically starts to play.
If you haven't just recorded something, tapping the button to the right summons the same list of all your recordings. However, nothing plays until you tap a recording in the list and then tap the little play button that appears to the left of the date and time that the recording was made (or, alternatively, to the left of the label you assigned to the recording, as we explain in the "Adding a label to a recording" section, later in this chapter).
Tip
You can drag the playhead along the scrubber bar to move ahead to any point in the memo.
If you don't hear anything after tapping play, tap the Speaker button in the upper-left corner of the screen. Sound pumps through the built-in iPhone speaker.
Maybe the person who left the recording rambled on and on. You just want to cut to the chase, for goodness' sake. Fortunately, you can trim the audio directly on the iPhone.
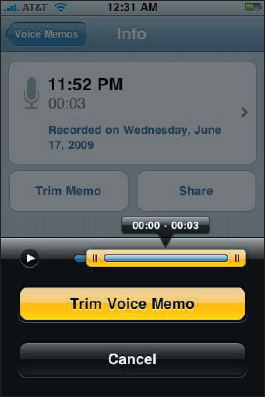
Tap the right-pointing arrow next to the memo you want to trim, and then tap Trim Memo. A narrow, blue tube representing the recording appears inside a yellow bar, as shown in Figure 6-14. Drag the edgesof this audio region to adjust the start and end points of the memo. You can preview your edit before tapping the Trim Voice Memo button by tapping the little play button.
Warning
Your edits are permanent. Make sure that you're completely satisfied with your cuts before tapping Trim Voice Memo.
When a memo is added to your list of recordings, it just shows up with the date and time of the recording. You see no other identifier. As memos accumulate, you may have a tough time remembering which recording was made for which purpose. You can label a recording with one of the labels Apple has supplied or, better, create a custom label.
Here's how:
From the list of recordings, tap the right-pointing arrow for the memo to which you want to add a label.
Tap the right-pointing arrow in the box showing the date and time and the length of the video you just recorded.
Select a label from the list that appears.
Your choices are None, Podcast, Interview, Lecture, Idea, Meeting, Memo, and Custom.
Choose Custom to type your own label (Professor Snookins on Biology, for example).
That's it. Your recording is duly identified.
You may want to share with others the good professor's wacky theories. Tap Share from either the main Voice Memos list or the information screen. You then have the option to either e-mail the memo or (if your carrier permits it) send it as part of an MMS, or multimedia picture, message.
Tip
You can also sync Voice Memos to your PC or Mac by using iTunes, as described in Chapter 3.
When you have no further use for a recording, you can remove it from the Voice Memos app by tapping it in the list and then tapping the Delete button.