
Taking off in airplane mode
Preparing networks
Seeking sensible sounds and screen brightness
Uncovering usage statistics
Brushing up on Bluetooth
Tinkering with telephone options
Finding a lost iPhone
Are you a control freak? The type of person who must have it your way? Boy, have you landed in the right chapter.
Throughout this book, you have occasion to drop in on Settings, which is kind of the makeover factory for the iPhone. For example, we show you how to open Settings (by tapping its Home screen icon) to set ringtones, change the phone's background or wallpaper, and specify Google, Yahoo!, or Bing as the search engine of choice. We also show you how to alter security settings in Safari, tailor e-mail to your liking, and get a handle on how to fetch or push new data.

Tip
The Settings area on the iPhone is roughly analogous to the Control Panel in Windows and System Preferences on a Mac.
Because we cover some settings elsewhere, we don't dwell on every setting here. But you can still discover plenty to help you make the iPhone your own.
When you first open Settings, you see the scrollable list shown in Figure 13-1. In all but airplane mode (at the top of the list), a greater-than symbol (>) appears to the right of each listing. This symbol tells you that the listing has a bunch of options. Throughout this chapter, you tap the > symbol to check out those options.
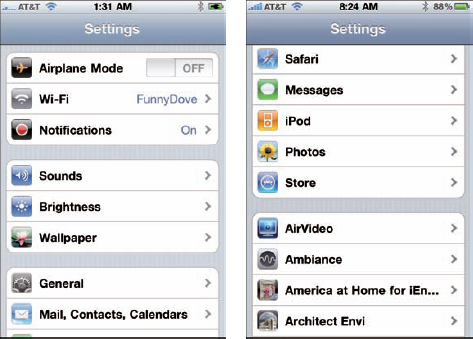
If you scroll down to the bottom of the Settings list, you may see settings that pertain to some of the specific third-party apps you've added to the iPhone, as shown in Figure 13-1, right. (See Chapter 14 for the scoop on third-party apps.)
Using a cell phone on an airplane is a no-no. But there's nothing verboten about using an iPod on a plane to listen to music, watch videos, and peek at pictures — at least, after the craft has reached cruising altitude.
So how do you take advantage of the iPhone's built-in iPod (among other capabilities) while temporarily turning off its phone, e-mail, and Internet functions? The answer is, by turning on airplane mode.
To do so, merely tap Airplane Mode on the Settings screen to display On (rather than Off).
That act disables each of the iPhone's wireless radios: Wi-Fi, EDGE, 3G (if applicable), and Bluetooth. While your iPhone is in airplane mode, you can't make or receive calls, surf the Web, watch YouTube, or do anything else that requires an Internet connection. The good news is that airplane mode keeps your battery running longer — particularly useful if your flight is taking you halfway around the world.
Tip
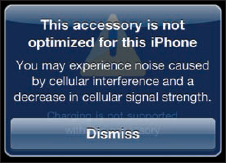
If you plug the iPhone into an iPod accessory that isn't necessarily compatible because of possible interference from the iPhone's wireless radios, you may see a message like the one shown in Figure 13-2. If you do, consider turning on airplane mode.
As we mention in Chapter 10, Wi-Fi is typically the fastest wireless network you can use to surf the Web, send e-mail, and perform other Internet tricks on the iPhone. You use the Wi-Fi setting to determine which Wi-Fi networks are available to you and which one to exploit based on its signal.
Tap Wi-Fi and all Wi-Fi networks in range are displayed, as shown in Figure 13-3. (Alternatively, you can reach this screen by tapping General, tapping Network, and then tapping Wi-Fi.)
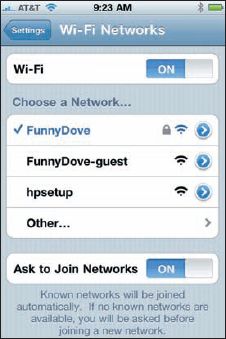
A signal-strength indicator can help you choose the network to connect to if more than one is listed; tap the appropriate Wi-Fi network when you reach a decision. If a network is password-protected, you see a lock icon.
You can also turn on or off the Ask to Join Networks setting. Networks that the iPhone is already familiar with are joined automatically, regardless of which one you choose. If the Ask feature is on, you're asked before joining a new network. If it's off, you have to select a network manually.
Tip
If you used a particular network automatically in the past but no longer want your iPhone to join it, tap the > symbol next to the network in question (within Wi-Fi settings), and then tap Forget This Network. The iPhone develops a quick case of selective amnesia.
Note
In some instances, you have to supply other technical information about a network you hope to glom on to. You encounter a bunch of nasty-sounding terms: DHCP, BootP, Static, IP address, Subnet Mask, Router, DNS, Search Domains, Client ID, HTTP proxy, and Renew Lease. (At least this last one has nothing to do with real estate or the vehicle you're driving.) Chances are that none of this info is on the tip of your tongue — but that's okay. For one thing, it's a good bet that you'll never need to know this stuff. What's more, even if you do have to fill in or adjust these settings, a network administrator or techie friend can probably help.
Sometimes, you may want to connect to a network that's closed and not shown on the Wi-Fi list. If that's the case, tap Other and use the keyboard to enter the network name. Then tap to choose the type of security setting the network is using (if any). Your choices are WEP, WPA, WPA2, WPA Enterprise, and WPA2 Enterprise. Again, it's not exactly the friendliest terminology, but we figure that someone nearby can provide assistance.
Note
If no Wi-Fi network is available, you have to rely on 3G or EDGE. If they aren't available either, you can't rocket into cyberspace until you regain access to a network.
The next bunch of settings control what the iPhone looks like and sounds like.
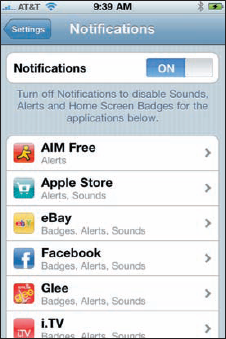
App developers can send you alerts related to the programs you've installed on your iPhone by exploiting the Apple Push Notification service. Such alerts are typically in text form but may include sounds as well. Or they may appear in a little circle affixed to the app icon as numbered badges. You can receive such alerts even when the app isn't running. If you find alerts intrusive or distracting or merely want to preserve battery life — yep, notifications can sap some juice — turn off all notifications globally by tapping Notifications on the Settings screen and then tapping the switch so that it reads Off.
You can turn off notifications for individual apps. Simply tap an app in the list below the global Notifications setting, as shown in Figure 13-4, and turn on or off the app's sounds, alerts, or badges.
Consider the Sounds settings area as the iPhone's soundstage. There, you can turn on or off audio alerts for a variety of functions: new voicemail messages, new text messages, new mail, sent mail, and calendar alerts. And you can set ringtones here.
You can also decide whether you want to hear lock sounds and keyboard clicks. In addition, you can determine whether the iPhone should vibrate when you receive a call. And, you can drag the volume slider to determine the loudness of your ringer and alerts. Note that you can instead use the physical volume buttons on the side of the iPhone to change the volume of the ringer and alerts, as long as you're not already on a call or using the iPod to listen to music or watch video.
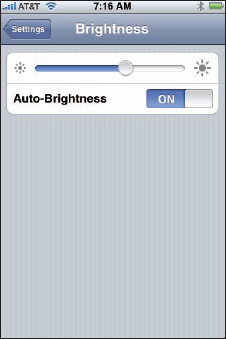
Who doesn't want a bright, vibrant screen? Alas, the brightest screens exact a trade-off: Before you dra the brightness slider shown in Figure 13-5 to the max, remember that brighter screens sap the life from your battery more quickly.
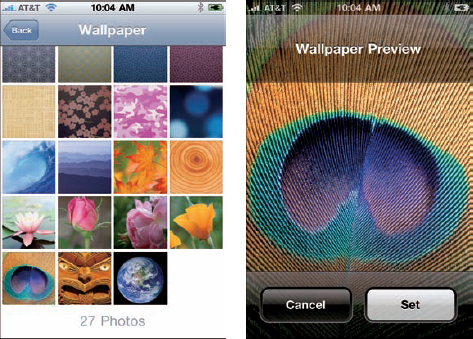
Choosing wallpaper is a neat way to dress up the iPhone according to your taste. You can sample the pretty patterns and designs that the iPhone has already chosen for you by tapping the thumbnails shown in Figure 13-6. But stunning as they are, these images may not hold a candle to the masterpieces in your own photo albums (more about those in Chapter 9). After making a selection, tap the image, and then tap Set. You can set wallpaper for the Home screen, the Lock screen, or both by tapping the appropriate button.
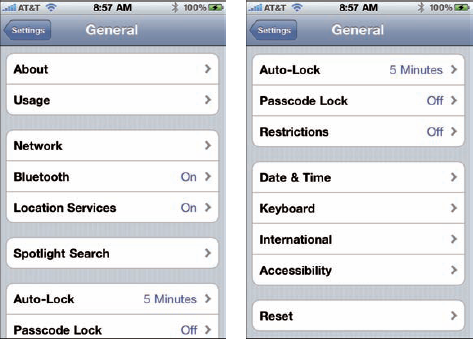
Certain miscellaneous settings are difficult to pigeonhole. Apple wisely lumped these under the General settings moniker. Figure 13-7 gives you a look at them all.
You aren't seeing double. This section is all about the setting known as About. And About is full of trivial (and not-so-trivial) information about the device. What you find here is straightforward:
Name of your network
Number of songs stored on the device
Number of videos
Number of photos
Number of apps
Storage capacity used and available: Because of the way the device is formatted, you always have a little less storage than the advertised amount of flash memory.
Software version: We were up to version 4.0 as this book was being published. But in parentheses next to the version number, you also see a number such as 8A293, which is the build number of the software version you have. The build number changes whenever the iPhone's software is updated.
Model and serial numbers
IMEI and ICCID: Say what? These abbreviations stand for the International Mobile Equipment Identity and Integrated Circuit Card Identifier (or smart card) numbers, respectively. Hey, we warned you some of this was trivial.
Modern firmware: The version of the cellular transmitter.
Legal and Regulatory: You had to know that the lawyers would get their two cents in somehow. All the fine print is here. And fine print it is. Although you can flick to scroll these lengthy legal notices, you can't pinch the screen to enlarge the text. (Not that we can imagine more than a handful of you will bother to read this legal mumbo jumbo.)
Think of the Usage setting as one of the places to go on the iPhone for statistics about how you employ the device. You find other information in the About setting (under General on the Settings screen), described in the preceding section.
You can scroll up or down the Usage list to discover the following information:
Battery Percentage: How much of your battery is charged in percentage terms. The percentage appears just to the left of the battery gauge at the upper-right corner of the iPhone. You can display the battery percentage only on the iPhone 3GS and 4 models.
The amount of time since you last fully charged your iPhone: Indicated in days and hours, for the time when the iPhone has been unlocked and in use and also when it has been in standby mode.
Call time: Shown for the current period and for the lifetime of the product.
Cellular Network Data: The amount of network data you sent and received over EDGE or 3G. You can reset these statistics by tapping the Reset Statistics button at the bottom of the screen.
A few major controls appear under the Network setting, one of which, Wi-Fi, we address earlier in this chapter and in Chapter 10. The others are Enable 3G, Cellular Data, Data Roaming, Set Up Internet Tethering, and VPN. We tackle them one by one in this section.
As you're aware by now, the major benefit of the AT&T 3G network is that it's a lot faster than EDGE (though still not as zippy as Wi-Fi). Regardless, you're not always going to be carrying the iPhone in a 3G area — and even when you are in range, you don't always need to take advantage of faster data speeds. Under these circumstances, tap the Enable 3G button so that Off is showing. Why turn off 3G? The faster network also drains your battery much faster. Tap Enable 3G to turn the network back on when you need to.
The Enable 3G option turns up on only the iPhone 3G, 3GS, and 4 models.
Turn off the Cellular Data option if you don't want to exhaust your cellular minutes. Of course, turning off this setting means you can access the Internet only through Wi-Fi.
You may unwittingly rack up lofty roaming fees when using Safari, exchanging e-mails, and engaging in other data-heavy activities while traveling abroad. Turn off data roaming to avoid those excess charges.
When tethering is turned on, you can share the iPhone's Internet connection with a PC via Bluetooth or USB. As of this writing, AT&T was charging $20 a month on top of your regular data plan for this service.
Note
We're sad to report that, as of this writing, you can't use the tethering feature on the iPhone to provide an Internet connection for its close sibling, the iPad.
Warning
A virtual private network, or VPN, is a way for you to securely access your company's network behind the firewall — using an encrypted Internet connection that acts as a secure "tunnel" for data. The iPhone software supports the protocols L2TP (Layer 2 Tunneling Protocol), PPTP (Point-to-Point Tunneling Protocol), and Cisco IPSec VPN, which apparently provides the kind of security that satisfies network administrators.
You can configure a VPN on the iPhone by tapping VPN under Network, tapping Add VPN Configuration, and then tapping one of the aforementioned protocols. Then, using configuration settings provided by your company, fill in the appropriate server information, account, password, encryption level (if appropriate), and other information. Better yet, lend your iPhone to the techies where you work and let them fill in the blanks on your behalf.
After you configure your iPhone for VPN usage, you can turn that capability on or off by tapping (yep) the VPN On or Off switch under Settings.
Of all the peculiar terms you may encounter in techdom, Bluetooth is one of our favorites. The name is derived from a tenth-century Danish king named Harald Blåtand, who, the story goes, helped unite warring factions. And, we're told, Blåtand translates to Bluetooth in English. (Bluetooth is all about collaboration between different types of devices — get it?)
Blåtand was obviously ahead of his time. Although he never dialed a cell phone, he now has an entire short-range wireless technology named in his honor. On the iPhone, you can use Bluetooth to communicate wirelessly with a compatible Bluetooth headset or hands-free car kit. These optional headsets and kits are made by Apple and many others. They've become more of a big deal as a number of states and municipalities around the United States make it illegal to hold a phone to your mouth and ear to gab while you're driving. To ensure that the iPhone works with one of these devices, it has to be wirelessly paired, or coupled, with the chosen device. With the optional iPhone Bluetooth headset that Apple sells, you can automatically pair the devices by placing the iPhone and headset in a dual dock (supplied with the headset), which you connect to your computer.
If you're using a third-party accessory, follow the instructions that came with that headset or car kit so that it becomes discoverable, or ready to be paired with your iPhone. Then turn on Bluetooth (under General on the Settings screen) so that the iPhone can find such nearby devices and the device can find the iPhone. Bluetooth works up to a range of about 30 feet.
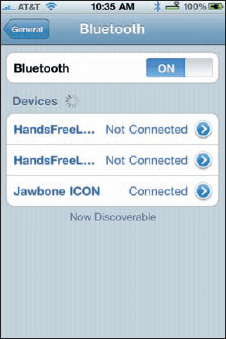
To unpair a device, tap it from the device list shown in Figure 13-8 so that the word Connected becomes Not Connected. Tap the device again to reconnect.
To divorce a Bluetooth device from the iPhone, tap the right arrow in the blue circle to the right of the Bluetooth you're unceremoniously dumping. On the next screen, tap Forget This Device. At least you won't have to pay alimony.
iOS 3 and 4 provide support for stereo Bluetooth headphones, car kits, and other accessories, so you can stream stereo audio from the iPhone to those devices. Sadly, stereo Bluetooth still doesn't work on the original iPhone.
The iPhone can tap into Bluetooth in other ways. One is through peer-to-peer connectivity, in which you can engage in multiplayer games with other nearby iPhone users. You can also do such things as exchange business cards, share pictures, and send short notes. And, you don't even have to pair the devices, as you do with a headset or car kit.
What's more, you can use an Apple Wireless Keyboard or other Bluetooth keyboard (on the 3GS or 4 models) to more easily type on the iPhone.
Warning
You still can't use Bluetooth to exchange files or sync between an iPhone and a computer. Nor can you use it to print stuff from the iPhone on a Bluetooth printer. That's because the iPhone doesn't support any Bluetooth profiles (or specifications) required to allow such wireless stunts to take place.
Location, location, location. By using Maps, through (several) apps, and by geotagging photos taken with its camera, the iPhone makes good use of knowing where you are. The iPhone 3G, 3GS, and 4 models exploit built-in GPS, but even the first-generation iPhone can find your general whereabouts (by triangulating signals from Wi-Fi base stations and cellular towers).
If that statement creeps you out a little, don't fret. To protect your right to privacy, individual apps pop up quick messages (similar to the one shown in Figure 13-9), asking whether you want them to use your current location. But you can also turn off Location Services right in Settings. Not only is your privacy shielded, but you also keep your iPhone battery juiced a little longer.
You can also allow individual apps to determine your approximate location. Any app that requested your whereabouts within the last 24 hours will display the location services icon next to its name in the Location Services screen in Settings. When an app is using your location, that icon — it resembles a tiny arrowhead — appears in the status bar at the top of the screen.

You can set the amount of time that elapses before the phone automatically locks or turns off the display. Your choices are Five Minutes Before, Four Minutes Before, and so on, all the way down to One Minute. Or, you can choose to have the iPhone never lock automatically.
Warning
If you work for a company that insists on a passcode (see the next section), the Never Auto-Lock option isn't on the list your iPhone shows you.
Don't worry if the iPhone is locked. You can still receive calls and text messages and adjust the volume.
You can select a passcode to prevent people from unlocking the iPhone. Tap Passcode Lock. Then use the virtual keypad to enter a 4-digit code. During this setup, you have to enter the code a second time before it's accepted.
You can also determine whether a passcode is required immediately, After 1 Minute, After 5 Minutes, or After 15 Minutes. Shorter times are more secure, of course. On the topic of security, the iPhone can be set to automatically erase your data if you (or someone else!) make ten failed passcode attempts. Your settings will be reset to their defaults and all your media and information might as well be dust.
You can also change the passcode or turn it off later (unless your employer dictates otherwise), but you need to know the present passcode to apply any changes. If you forget the passcode, you have to restore the iPhone software, as described in Chapter 15.
The iPhone has two kinds of passcodes. A simple passcode is a four-digit number. If you require a more stringent password — one that is much harder to guess — turn off the simple passcode and come up with something much more difficult to crack, a longer combination of letters, numbers, punctuation, and special characters.
Under Passcode Lock settings on the 3GS and 4, you have the option to turn on or off voice dialing.
Parents and bosses may love the Restrictions tools, but kids and employees usually think otherwise. You can clamp down, um, provide proper parental guidance to your children by preventing them at least some of the time from using the Safari browser, YouTube, Location Services, the camera, FaceTime, or iTunes. Or, you might not let them install new apps or make purchases in the apps you do allow. When restrictions are in place, icons for off-limit functions can no longer be seen.
For instance, you can allow Junior to watch a movie on the iPhone but prevent him from watching a flick that carries an R or NC-17 rating. You can also restrict access to certain TV shows and apps, based on age-appropriate ratings. Stop feeling guilty: You have your users' best interests at heart.
On the iPhone 3GS and iPhone 4, double-pressing the Home button summons the multitasking tray, which we introduce in Chapter 2. On the iPhone 3G, you can specify what happens when you double-press Home. (Thus, you won't see the Home button setting on newer models.) iPhone 3G owners can set it so that double-pressing the Home button displays the Home screen, Search screen, Phone Favorites, Camera app, or iPod app.
In our neck of the woods, the time is reported as 11:32 PM (or whatever time it happens to be). But in some circles, it's reported as 23:32. If you prefer the latter format on the iPhone's status bar, tap the 24-Hour Time setting (under Date & Time) to turn on the setting.
This setting is just one that you can adjust under Date & Time. You can also have the iPhone set the time automatically, using the time reported by the cellular network (and adjusted for your time zone).
If automatic time-setting is turned off, you're asked to select the time zone and then set the date and time manually. Here's how:
Tap Set Automatically so that it's off.
You see fields for setting the time zone and the date and time.
Tap the Time Zone field.
Tap out the letters of the city or country whose time zone you want to enter until the one you have in mind appears. Then tap the name of that city or country.
The Time Zone field is automatically filled in for that city.
Tap the Set Date & Time field so that the time is shown. Then roll the bicycle-lock-like controls until the proper time is displayed.
Tap the date shown so that the bicycle-lock-like controls pop up for the date. Then roll the wheels for the month, day, and year until the correct date appears.
Tap the Date & Time button to return to the main Date & Time settings screen.
Under Keyboard settings, you can turn on or off autocapitalization and turn on or off Enable Caps Lock.
Autocapitalization, which the iPhone turns on by default, means that the first letter of the first word you type after ending the preceding sentence with a period, a question mark, or an exclamation point is capitalized.
If Cap Locks is enabled, all letters are uppercased LIKE THIS if you double-tap the shift key. (The shift key is the one with the arrow pointing north.)
You can also turn on a keyboard setting that inserts a period followed by a space when you double-tap the Space key. Additionally, you can choose to use an international keyboard (as discussed in Chapter 2), which you select from the International setting — the next setting after Keyboard in the General settings area. As you might have surmised, this is also the area where you can turn on or off the keyboard's autocorrection smarts.
The iPhone is an international sensation. It's sold and used around the world by people of all nationalities. In the International section, you can set the language you type on (by using a custom virtual keyboard), the language in which the iPhone displays text, and the language in which it speaks through Voice Control. Heck, you can even select a different region format (from among numerous countries) and a different calendar type, among Gregorian, Japanese, Buddhist, and Republic of China.
The Accessibility tools (available on the 3GS and 4 only) are targeted at people with certain disabilities:
VoiceOver: A screen reader describes aloud what's on the screen. The screen reader can read e-mail messages, Web pages, and more.
Zoom: This tool is a screen magnifier for those who are visually challenged. To zoom, double-tap the screen with three fingers, and drag three fingers to move around the screen.
White on Black: This tool reverses the colors on the iPhone to provide a higher contrast for people with poor eyesight.
Mono Audio: If you suffer hearing loss in one ear, the iPhone can combine the right and left audio channels so that both can be heard in both earbuds.
Speak Auto-Text: When this setting is on, the iPhone automatically speaks autocorrections and capitalizations.
Triple-press the Home Button: As you know by now, double-pressing the Home button launches multitasking. But you can set up the iPhone so that triple-pressing the button (pressing three times really fast) turns on certain Accessibility features. By doing so, you can turn VoiceOver on or off, Zoom on or off, or White on Black on or off.
As little kids playing sports, we ended an argument by agreeing to a "do-over." Well, the Reset settings on the iPhone are one big do-over. Now that we're (presumably) grown up, we're wise enough to think long and hard about the consequences before implementing do-over settings. Regardless, you may encounter good reasons for starting over; some of these are addressed in Chapter 15.
Reset All Settings: Resets all settings, but no data or media is deleted.
Erase All Content and Settings: Resets all settings and wipes out all your data.
Reset Network Settings: Deletes the current network settings and restores them to their factory defaults.
Reset Keyboard Dictionary: Removes added words from the dictionary. As we point out early on, the iPhone keyboard is intelligent. And one reason it's so smart is that it learns from you. So when you reject words that the iPhone keyboard suggests, it figures that the words you specifically banged out ought to be added to the keyboard dictionary.
Warning
This option deletes all the words you've added to the keyboard dictionary, so it will make your keyboard stupider instead of smarter. We suggest that you think twice before you invoke this option.
Reset Home Screen Layout: Reverts all icons to the way they were at the factory.
Reset Location Warnings: Restores factory defaults.
We cover most of the remaining settings in earlier chapters devoted to e-mail, calendars, the iPod (photos and music), Safari, and e-mail. Still, we didn't get to a few other settings — 'til now.
Do you think of us as Ed and Bob or Baig and LeVitus? The answer to that question will probably determine whether you choose to sort your Contacts list alphabetically by last name or first.
Tap Mail, Contacts, Calendars; scroll down to the Contacts section; and peek at Sort Order. Then tap Last; First; or First, Last.
You can also determine whether you want to display a first name or last name first. Tap Display Order, and then choose First; Last; or Last, First.
While you're at it, check out the Default Account setting under the Contacts settings. If you create new contacts outside a specific account, the default account you select here is the account to which the new contact will be added.
In Chapter 4, we tip our hand and indicate that we save a few more phone tricks — those found in Phone settings — for this chapter.
Tap Phone now to review some of the choices we don't get to in that chapter. Be aware that you have to scroll down the screen to find Phone settings.
If you expect to spend time in an area with poor or no cell phone coverage, you may want to temporarily forward calls to a landline or other portable handset. Here are the simple steps:
To change the forwarding number, tap the circle with the X in the Phone Number field to get rid of the old number, and then enter a new one.
Remember to turn off Call Forwarding to receive calls directly on your iPhone again.
Warning
You must have cellular coverage while setting the Call Forwarding feature.
Tap the Call Waiting button to turn the feature on or off. If Call Waiting is off and you're speaking on the phone, the call is automatically dispatched to voicemail.
Don't want your name or number displayed on the phone you're calling? Make sure to tap Show My Caller ID so that it's off. If privacy isn't a concern, you can leave this setting on.
Folks who are hearing impaired sometimes rely on a teletype, or TTY, machine, to hold conversations. You can use the iPhone with standard TTY devices by plugging a cable from the TTY device into an optional $19 iPhone TTY adapter, and then plugging the adapter into the iPhone. Make sure the TTY setting on the phone is turned on.
The tiny SIM (Subscriber Identity Module) card inside your iPhone holds your phone number and other important data. Tap to turn on SIM PIN and enter a password with the keypad. Then, if someone gets hold of your SIM, he or she can't use it in another phone without the password.
Note
If you assign a PIN to your SIM, you have to enter it to turn the iPhone off and on again.
A major difference between the iPhone and all the other Apple products you might buy is that you enter into a relationship with not only Apple but also the phone company when you have an iPhone. Tap AT&T Services and then tap any of the following options for a shortcut phone call:
Check Bill Balance: The phone dials *225# and, if all goes according to plan, you receive a text message with the due date and sum owed. This type of text message isn't counted against your messaging allotment.
Call Directory Assistance: The phone dials 411.
Pay My Bill: The iPhone dials *729 and you're connected to an automated voice system. You can pay your bill with a checking account, debit card, or credit card by following the voice prompts.
Note
You're billed for phone service from AT&T, not from Apple. Of course, charges for any music or other content purchased in iTunes from your computer are paid to Apple through whichever credit card you have on file, as with any iPod.
View My Minutes: This time, *646# is called. You again receive a text reply that doesn't count against your messaging allotment.
Voice Connect: The iPhone dials *08 to connect you to automated news, weather, sports, quotes, and more. Just bark out the kind of information you're looking for, such as finance, and follow voice prompts for stock quotes and business news, for example. Or, say "Sports" and follow the voice prompts to see the latest scores of your favorite team.
Not all AT&T Services make a phone call. If you tap the AT&T MyAccount button, Safari opens an AT&T account management page on the Web.
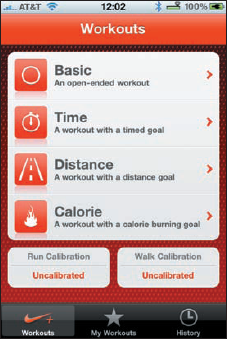
You're passionate about fitness. You're equally passionate about music. In the summer of 2006, Apple teamed with the folks at Nike on a $29 wireless sports kit that lets runners place a sensor inside a Nike sneaker that can wirelessly communicate with a receiver connected to an iPod Nano. As runners dash off, they can track time, distance, and calories burned on the Nano, receive vocal feedback, and upload results to a Nike Web site. Runners can even play a select "power song" on the iPod for that last push when they're feeling exhausted.
Apple added the Nike + app to the iPhone 3GS and 4 (but not to earlier models). When you turn on the app in Settings, your iPhone can record every step you make. You don't have to connect a separate receiver, as you do on the Nano. By using Nike + on your iPhone, you can select one of the workout routines shown in Figure 13-10.
We hope you never have to use the Find My iPhone feature — though we have to say that it's pretty darn cool. If you inadvertently leave your iPhone in a taxi or restaurant, Find My iPhone may just help you retrieve it. The feature requires a MobileMe subscription.
To turn on Find My iPhone, tap Mail, Contacts, Calendars, and then tap the me.com e-mail account you added to the iPhone. (You get a me.com e-mail account when you join MobileMe.) Refer to Chapter 11 to see how to add an e-mail account to the iPhone. Make sure the Find My iPhone setting is turned on.
Now suppose that you lost your phone — and we can only assume that you're beside yourself. Log in to your MobileMe me.com account from any browser on your computer. Click Find My iPhone.
Tip
Apple now supplies a free Find My iPhone app in the App Store. So you could use an iPhone loaded with this app to locate another iPhone (or iPad). You still need a MobileMe subscription.
Assuming that your lost phone is turned on and in the coverage area, its general whereabouts should appear on a map, as shown in Figure 13-11. In our tests, Find My iPhone found our iPhones quickly.

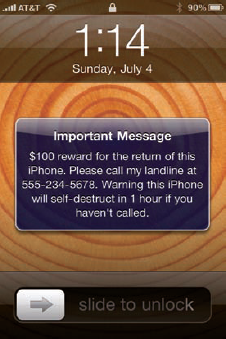
The truth is that even seeing your iPhone on a map may not help you much, especially if the phone is lost somewhere in midtown Manhattan. Take heart. At the MobileMe site, click Display a Message and then bang out a plea to the Good Samaritan whom you hope picked up your phone. The message appears on the lost iPhone's screen. Don't forget to include in the message a way for the person to reach you, such as the message displayed on the iPhone in Figure 13-12.
To get someone's attention, you can also sound an alarm that plays for two minutes, even if the phone was in silent mode. Hey, that alarm may come in handy if the phone turns up under a couch in your house.
After all this labor, if the phone is seemingly gone for good, click Remote Wipe at the MobileMe site to delete your personal data from afar and return the iPhone to its factory settings. And, if you ever get your phone back afterward, you can always restore the information with an iTunes backup on your PC or Mac.
We trust that you control freaks are satisfied with all the stuff you can manage in Settings. Still, the iPhone may not always behave as you want. For the times when things get out of control, we highly recommend Chapter 15.