
Setting up your accounts
Reading and managing e-mail messages
Searching for e-mail messages
Sending e-mail messages
Setting e-mail preferences
Chapter 5 shows you how well your iPhone sends SMS text messages. But SMS text messages aren't the iPhone's only written communication trick, not by a long shot. One of the niftiest things your iPhone can do is send and receive real, honest-to-gosh e-mail, using Mail, its modern e-mail app. It's designed not only to send and receive text e-mail messages but also to handle rich HTML e-mail messages — formatted e-mail messages complete with font and type styles and embedded graphics.
Furthermore, your iPhone can read several types of file attachments, including PDF, Microsoft Word, PowerPoint, and Excel documents, as well as stuff produced through Apple's own iWork software. Better still, all this sending and receiving of text, graphics, and documents can happen in the background so that you can surf the Web or talk to a friend while your iPhone quietly and efficiently handles your e-mail behind the scenes. And Mail is compatible with the most popular e-mail providers, including Yahoo! Mail, Gmail, AOL, and Apple's own MobileMe.

As you discover in this chapter, the iOS 4 upgrade brought two important improvements to the Mail app. For starters, you can access a unified inbox of all your e-mail accounts (assuming you have multiple accounts). Moreover, you can organize messages by thread, or conversation.
First things first. To use Mail, you need an e-mail address. If you have broadband Internet access (that is, a cable modem or DSL), you probably received one or more e-mail addresses when you signed up. If you're one of the handful of readers who doesn't already have an e-mail account, you can get one for free from Yahoo! (http://mail.yahoo.com), Google (http://mail.google.com), AOL (http://www.aol.com), or one of many other service providers.
Warning
Many (if not all) free e-mail providers add a small bit of advertising at the end of your outgoing messages. If you'd rather not be a billboard for your e-mail provider, either use the address(es) that came with your broadband Internet access ([email protected] or [email protected], for example) or pay a few dollars a month for a premium e-mail account that doesn't tack advertising (or anything else) onto your messages. You can get a me.com e-mail account as part of Apple's $99-a-year MobileMe service (which you may be able to find at a discount at Amazon or other online vendors).
Chapter 3 explains the option of automatically syncing the e-mail accounts on your computer with your iPhone. If you chose that option, your e-mail accounts should be configured on your iPhone already. You may proceed directly to the later section "Darling, You Send Me (E-Mail)."
If you haven't yet chosen that option but want to set up your account the easy way now, go to Chapter 3 and read the section on syncing mail accounts with the iPhone. Then you, too, can proceed directly to the "Darling, You Send Me (E-Mail)" section.
If you don't want to sync the e-mail accounts on your computer, you can set up an e-mail account on your iPhone manually. It's not quite as easy as clicking a box and syncing your iPhone, but it's not rocket science either.
If you have no e-mail accounts on your iPhone, the first time you launch Mail, you're walked through the following procedure. If you have one or more e-mail accounts on your iPhone already and want to add a new account manually, start by tapping Settings on the Home screen, and then tap Mail, Contacts, Calendars, and Add Account.
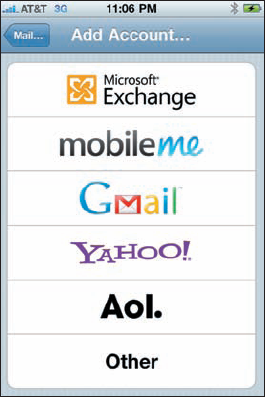
Either way, you should now be staring at the Add Account screen, shown in Figure 11-1. Proceed to one of the next two sections, depending on your e-mail account.
If your account is with Apple's own MobileMe service, Google's Gmail, Yahoo!, or AOL, tap the appropriate button on the Add Account screen now. If you're setting up company e-mail through Microsoft Exchange, skip to the "Set up corporate e-mail" section. If your account is with a provider other than the ones listed, tap the Other button and skip to the next section.
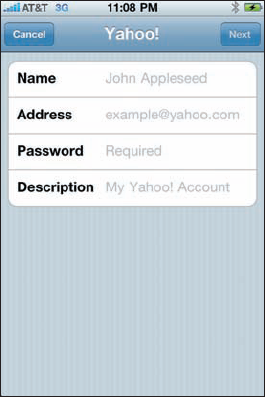
Enter your name, e-mail address, and password, as shown in Figure 11-2. The description field is usually filled in automatically with the content you have in the address field, but you can replace that text with your own description (such as Work or Personal).
Tap the Next button in the upper-right corner of the screen. Your e-mail provider will verify your credentials. If you pass muster, that's all there is to setting up your account.
If your e-mail account is with a provider other than MobileMe, Gmail, Yahoo!, AOL, or Microsoft Exchange, you have a bit more work ahead of you. You're going to need a bunch of information about your e-mail account that you may not know or have handy.
We suggest that you scan the following instructions, note the items you don't know, and go find the answers before you continue. To find the answers, look at the documentation you received when you signed up for your e-mail account or visit the account provider's Web site and search there.
Here's how you set up an account:
Under Mail, tap Add Mail Account. Fill in the name, address, password, and description in the appropriate fields, the same as if you were setting up a MobileMe, Gmail, Yahoo!, or AOL account. Tap Next.
With any luck, that's all you'll have to do, although you may have to endure a spinning cursor for awhile as the iPhone attempts to retrieve information and validate your account with your provider. Otherwise, continue with Step 3.
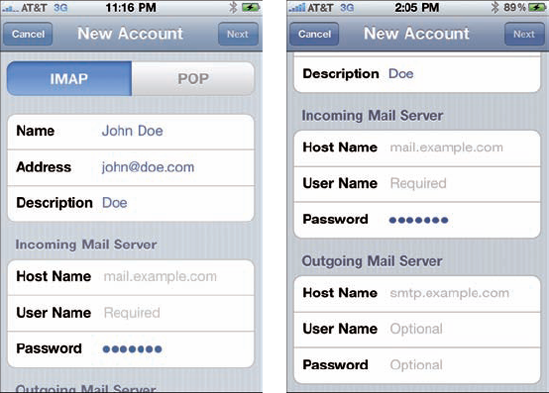
Tap the button at the top of the screen that denotes the type of e-mail server this account uses: IMAP or POP, as shown in Figure 11-3.
Fill in the Internet host name for your incoming mail server, which should look something like mail.providername.com.
Fill in your username and password.
Enter the Internet host name for your outgoing mail server, which should look something like smtp.providername.com.
You may have to scroll down to the bottom of the screen to see the outgoing mail server fields (refer to Figure 11-3, right).
Enter your username and password in the appropriate fields.
Tap the Next button in the upper-right corner to create the account.
Tip
Some outgoing mail servers don't need your username and password. The fields for these items on your iPhone note that they're optional. Still, we suggest that you fill them in anyway. That way, you won't have to add them later if your outgoing mail server does require an account name and password, which many do these days.
The iPhone is friendly for business users, in large measure because it makes nice with the Microsoft Exchange servers that are a staple in large enterprises.
What's more, if your company supports something known as Microsoft Exchange ActiveSync, you can exploit push e-mail (messages are pushed to your iPhone automatically as opposed to being pulled in on a schedule) so that messages arrive pronto on the iPhone, just as they do on your other computers. (To keep everything up to date, the iPhone also supports push calendars and push contacts.) For push to work, your company must be simpatico with one of the last several iterations of Microsoft Exchange ActiveSync. Ask your company's IT or tech department if you run into an issue.
Setting up Exchange e-mail isn't particularly taxing, and the iPhone connects to Exchange right out of the box. However, you still might have to consult your employer's techie types for certain settings.
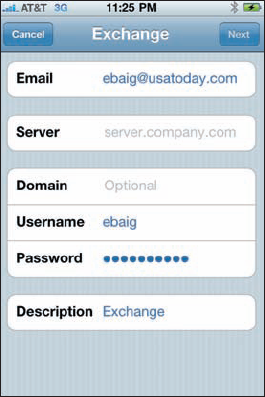
Start out by tapping the Microsoft Exchange icon on the Add Account screen. Fill in what you can: your e-mail address, username (usually as domainuser), and password. Or, call on your IT staff for assistance.
On the next screen, shown in Figure 11-4, enter the server address, assuming that the Microsoft Autodiscovery service didn't already find it. That address usually begins with exchange.company.com.
Warning
The company you work for doesn't want just anybody having access to your e-mail — heaven forbid if your phone is lost or stolen. So your bosses may insist that you change the passcode lock inside Settings on the phone. (This is different from the password for your e-mail account.) Skip over to Chapter 13 to find instructions for adding or changing a passcode. (We'll wait for you.) And, if your iPhone ends up in the wrong hands, your company can remotely wipe the contents clean.
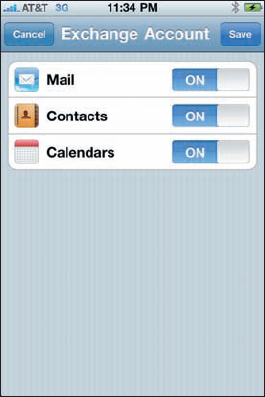
After your corporate account is fully configured, you have to choose which information you want to synchronize through Exchange. You can choose Mail, Contacts, and Calendars. Tap each one that you want to synchronize through Microsoft Exchange. After you select an item, you see the blue On button next to it, as shown in Figure 11-5.
Tip
By default, the iPhone keeps e-mail synchronized for three days. To sync for a longer period, head to Settings and tap Mail, Contacts, Calendars, and then tap the Mail account using ActiveSync. Tap Mail Days to Sync, and then tap No Limit or choose another time frame (1 day, 1 week, 2 weeks, or 1 month).
Tip
If you're moonlighting at a second job, you can now configure more than one Exchange ActiveSync account on your iPhone; there used to be a limit of just one such account per phone.
Now that your e-mail accounts are all set up, it's time to find out how to receive and read the stuff. Fortunately, you already did most of the heavy lifting when you set up your e-mail accounts. Getting and reading your mail is a piece of cake.
You can tell when you have unread mail by looking at the Mail icon at the bottom of your Home screen. The cumulative number of unread messages across all your e-mail inboxes appears in a little red circle in the upper-right area of the icon.
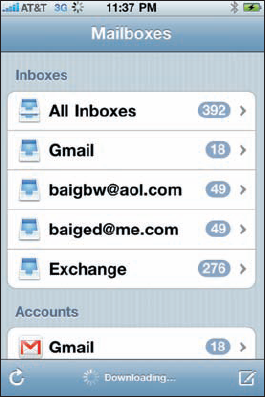
Tap the Mail icon now to summon the Mailboxes screen shown in Figure 11-6. At the top of the Inboxes section is the All Inboxes inbox, which as its name suggests is a repository for all the messages across all your accounts. The number to the right of All Inboxes should match the number on the Mail icon in your Home page. Again, it's the cumulative tally of unread messages across all your accounts.
Below the All Inboxes listing are the inboxes for your individual e-mail accounts. The tally this time is only for the unread messages in those accounts.
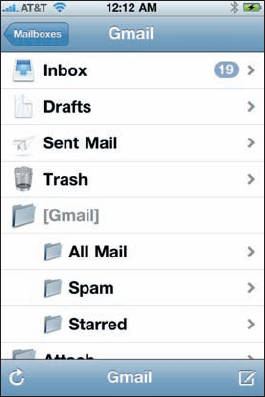
Scroll down toward the bottom of the Mailboxes screen and you'll find an Accounts section with a similar listing of e-mail accounts. But if you tap on the listings here, you'll see any subfolders for each individual account (Drafts, Sent Mail, Trash, and so on), as shown in Figure 11-7.
To read your mail, tap an inbox: either All Inboxes to examine all your messages in one unified view or an individual account to check out messages from just that account.
Note
If you have just a single mail account configured on your iPhone, you'll see only that one inbox on the Mailboxes screen.
When you tap a mailbox to open it, Mail fetches the most recent messages and displays the total number of unread messages at the top of the screen.
Now tap a message to read it. When a message is on the screen, buttons for managing incoming messages appear below it. These controls are addressed in the next section.
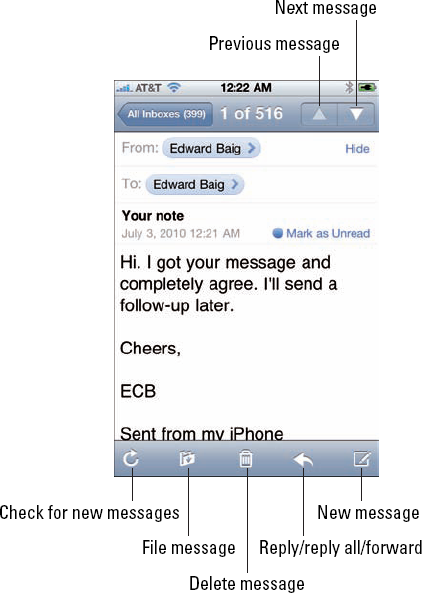
When a message is on your screen, you can do many tasks in addition to reading it (see Figure 11-8).
You can perform the following actions:
View the next message by tapping the next message arrow at the upper-right corner of the screen (it's the downward-pointing arrow).
View the preceding message by tapping the previous message arrow (the one pointing upward).
Check for new messages by tapping the check for new messages icon.
File this message in another folder by tapping the file message icon. When the list of folders appears, tap the folder where you want to file the message.
Delete this message by tapping the delete message icon. You have to dig in the trash to retrieve the message if you tap the delete message icon by mistake. Go to Mail Settings if you want the iPhone to ask you before deleting a message.
Reply, reply to all, or forward this message by tapping the reply/reply all/forward icon.
Create a new e-mail message by tapping the new message icon.
You can delete e-mail messages without opening them (see Figure 11-9).
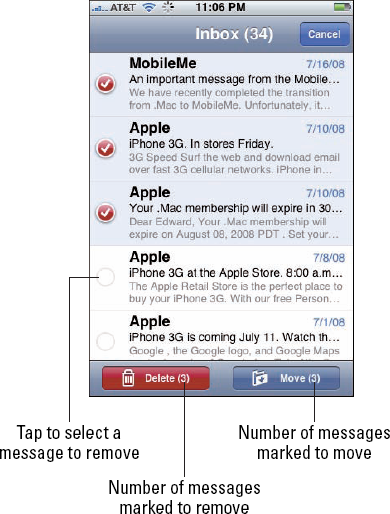
Delete your messages in two ways:
Swipe left or right across the message, and then tap the red Delete button that appears to the right of the message. In some e-mail accounts, notably Google's Gmail, an Archive button appears instead of Delete. Tap the button to archive the message; it is not deleted.
Tap the Edit button in the upper-right corner of the screen, and tap the little circle to the left of each message you want to remove. Tapping that circle puts a check mark in it and brightens the red Delete button at the bottom of the screen. Tap that Delete button to erase all messages you selected. Deleted messages are moved to the Trash folder.
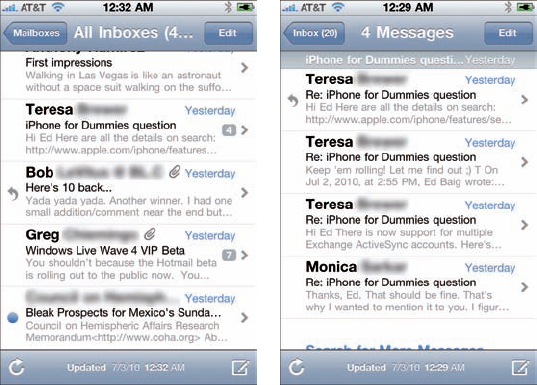
As part of the iOS 4 upgrade, Apple lets you thread messages or have Mail automatically group related missives. The beauty of this arrangement is that you can easily trace back an e-mail conversation. When you organize messages by a thread, the related messages show up as a single entry in the mailbox, with a number next to the right-pointing arrow in the entry indicating how many underlying messages are represented by the thread. So the number 4 next to Teresa's message in Figure 11-10 (left) shows that four messages constitute this particular thread; when you tap that listing, the four threaded messages appear, as shown in Figure 11-10, right.
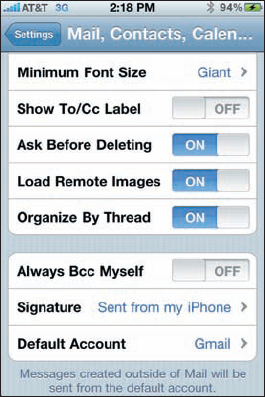
You have to turn on threading in Settings. From the Home screen, tap Settings, tap Mail, Contacts, Calendars, and tap Organize by Thread. Then tap the button so that it reads On, as shown in Figure 11-11. You may have to scroll down to see the Organize by Thread setting.
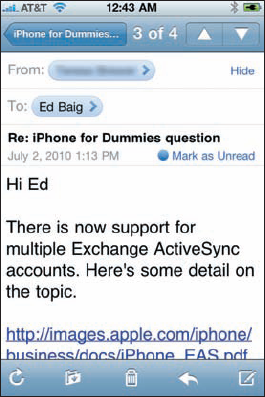
When you look at a message that's part of a thread, the numbers at the top of the screen tell you your location in the conversation. For example, in Figure 11-12, the note is number 3 of 4 in this thread.
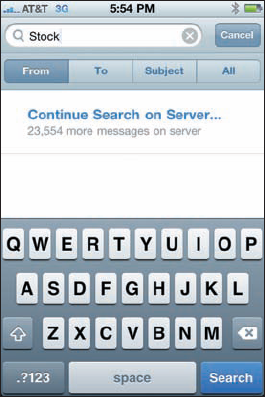
As part of Spotlight search, you can easily search through a bunch of messages to find the one you want to read right away — such as that can't-miss stock tip from your broker. Tap the status bar to scroll through the top of the inbox. You can type stock or whichever search term seems relevant. All matching e-mails that have already been downloaded appear. Or, by tapping in the search box itself, you can display tabs that let you narrow the search to the From, To, or Subject fields. It's too bad that (at press time, anyway) you can't run a search to find words within the body of an e-mail message.
If you're using Exchange, MobileMe, or certain IMAP-type e-mail accounts, you may even be able to search messages that are stored on the e-mail provider's servers or out in the Internet "cloud." When available, tap Continue Search on Server, as shown in Figure 11-13.
Warning
The capability to search e-mails may vary by e-mail account. In some instances, you can search only whole words; in other cases, partial words may work.
Tip
You can delete messages in bulk. In much the same way, you can move them to another folder in bulk. Tap Edit and then tap the circle to the left of each message you want to move so that a check mark appears. Tap the Move button at the bottom of the screen (refer to Figure 11-9), and tap the new folder where you want those messages to hang out.
Your iPhone can even receive e-mail messages with attachments in a wide variety of file formats:
Apple Keynote: .key
Apple Numbers: .numbers
Apple Pages: .pages
Contact information: .vcf
Images: .jpg, .tiff, .gif
Microsoft Excel: .xls, .xlsx
Microsoft PowerPoint: .ppt, .pptx
Microsoft Word: .doc, .docx
Preview and Adobe Acrobat: .pdf
Rich Text: .rtf
Text: .txt
Web pages: .htm, .html
Warning
If the attachment is a file format not supported by the iPhone (for example, a Photoshop .psd file), you see the name of the file but you can't open it on your iPhone.
Here's how to read an attachment:
Open the mail message containing the attachment.
Tap the attachment.
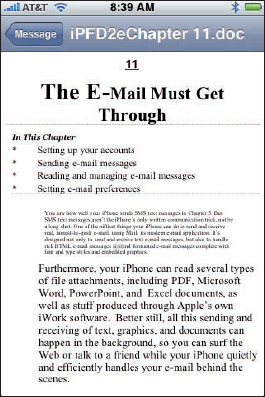
You probably need to scroll down to see the attachement, which appears at the bottom of the message. The attachment, like the one shown in Figure 11-14, downloads to your iPhone and opens automatically.
Read the attachment.
Tap the Message button in the upper-left corner of the screen to return to the message text.
Wait! You can do even more with your incoming e-mail messages:
To see all recipients of a message, tap the word Details (displayed in blue) to the right of the sender's name.
Tip
If all recipients are displayed, the word in blue is Hide rather than Details. Tap it to hide all names except the sender's.
To add an e-mail recipient or sender to your contacts, tap the name or e-mail address at the top of the message and then tap either Create New Contact or Add to Existing Contact.
To mark a message as unread, tap Mark As Unread, which appears near the top of each message in blue with a blue dot to its left. When you do, the message is again included in the unread message count on the Mail icon on your Home screen, and its mailbox again has a blue dot next to it in the message list for that mailbox.
To zoom in and out of a message, employ the pinch and unpinch gestures, which we suspect you excel at now.
To follow a link in a message, tap the link. (Links are typically displayed in blue and may be underlined, but sometimes they appear in other colors.) If the link is a URL, Safari opens and displays the Web page. If the link is a phone number, the Phone app opens and offers to dial the number. If the link is a map, Maps opens and displays the location. If the link is a day, date, or time, you can tap the item to create a Calendar Event. If the link is a shipper's tracking number, you may be able to get the status of a package. And last but not least, if the link is an e-mail address, a preaddressed blank e-mail message is created.
Tip
If the link opens Safari, Phone, or Maps and you want to return to your e-mail, press the Home button on the front of your iPhone and then tap the Mail icon.
So now that you're a whiz at reading and organizing incoming messages, let's look at how to use your iPhone to send e-mail.
Several subspecies of messages are available: pure text, text with a photo, a partially finished messages (a draft) that you want to save and complete later, a reply to an incoming message, and a message you want to forward to someone else. The following sections examine these subsets one at a time.
To compose a new e-mail message, tap Mail on the Home screen to open the Mailboxes screen (refer to Figure 11-6) or whichever screen was up when you last left the app.
Now, to create a new message, follow these steps:
Tap the New Message button in the lower-right corner of the screen.
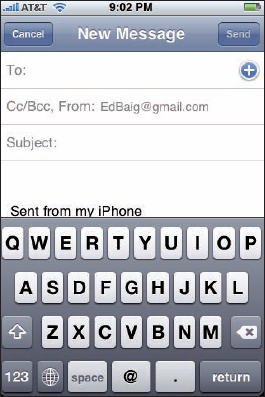
The button appears on all the Mail screens, so don't worry if you're not at the main Mailboxes screen. A screen like the one shown in Figure 11-15 appears.
Type the names or e-mail addresses of the recipients in the To field or tap the + button to the right of the To field to select a contact or contacts from your iPhone's address book.
(Optional) Enter a name in the Cc field, Bcc field, or both fields. Or choose to send mail from a different account in the From field, as follows:
Tap the field labeled Cc/Bcc, From.
Doing so breaks the single field into separate Cc, Bcc, and From fields. The Cc/Bcc label stands for carbon copy/blind carbon copy. Bcc enables you to include a recipient on the message that other recipients can't see has been included. It's great for those secret agent e-mails!
Tap the respective Cc or Bcc field and type the name.
Or, tap the + symbol that appears in those fields to add a contact.
Tip
If you start typing an e-mail address, e-mail addresses that match what you typed appear in a list below the To or Cc field. If the correct one is in the list, tap it to use it.
Tap the From field to send the message from any of your e-mail accounts on the fly, assuming, of course, that you have more than one account and want to send mail from an account different from the one already shown.
Type a subject in the Subject field.
The subject is optional, but it's considered poor form to send an e-mail message without one.
Type your message in the message area.
The message area is immediately below the Subject field.
Tap the Send button in the upper-right corner of the screen.
Your message wings its way to its recipients almost immediately. If you aren't in range of a Wi-Fi network or the AT&T EDGE or 3G data network when you tap Send, the message is sent the next time you're in range of one of these networks.
Tip
Apple includes a bunch of landscape orientation keyboards to various apps, including Mail. When you rotate the phone to its side, you can compose a new message using a wider-format virtual keyboard.
Forgive the cliché, but sometimes a picture truly is worth a thousand words. When that's the case, here's how to send an e-mail message with a photo enclosed.
An e-mail message appears onscreen with the photo already attached. The image appears to be embedded in the body of the message, but the recipient receives the image as a regular e-mail attachment. Just address the message and type whatever text you like, as you did for an all-text message in the preceding section, and then tap the Send button. You have the option to choose a file size for your picture, among Small, Medium, or Actual Size.
Sometimes you start an e-mail message but don't have time to finish it. When that happens, you can save it as a draft and finish it some other time.
Here's how: Start an e-mail message as described in one of the two preceding sections. When you're ready to save the message as a draft, tap the Cancel button in the upper-left corner of the screen and three buttons appear. Tap the Save Draft button if you want to save this message as a draft and complete it another time; tap the Delete Draft button to ditch your efforts; or tap Cancel to return to the message and continue crafting it to perfection.
Warning
If you tap the Delete Draft button, the message disappears immediately without a second chance. Don't tap Delete Draft unless you mean it.
To work on the message again, tap the Drafts mailbox for the account in question. All messages you saved as drafts hang out in that mailbox. Tap the one you want resume working on so that it reappears on the screen. When you're finished, tap Send to send it or Cancel to go through the drill of saving it as a draft again.
Tip
The number of drafts appears to the right of the Drafts folder, the same way that the number of unread messages appears to the right of other mail folders, such as your inbox.
When you receive a message and want to reply to it, open the message and then tap the reply/reply all/forward icon (labeled in Figure 11-8). Then tap the Reply, Reply All, or Forward button.
The Reply button creates a new e-mail message addressed to the sender of the original message. The Reply All button creates an outgoing e-mail message addressed to the sender and all other recipients of the original message. In both cases, the Subject line is retained with a Re: prefix added. So if the original Subject line were iPhone Tips, the reply's Subject line would be Re: iPhone Tips. You also see text from the original message in the body of your reply (whether you are replying to one person or more than one person).
Tapping the Forward button creates an unaddressed e-mail message that contains the text of the original message. Add the e-mail address(es) of the person or people you want to forward the message to, and then tap Send. In this case, rather than a Re: prefix, the Subject line begins with Fwd:. So this time the Subject line reads Fwd: iPhone Tips.
Tip
You can edit the Subject line of a reply or a forwarded message or edit the body text of a forwarded message the same way you would edit any other text. It's usually considered good form to leave the Subject lines alone (with the Re: or Fwd: prefix intact), but you may want to change them sometimes. Now you know that you can.
To send your reply or forwarded message, tap the Send button as usual.
You can customize the mail you send and receive in lots of different ways. In this section, we explore settings for sending e-mail. Later in this chapter, we show you settings that affect the way you receive and read messages. In each instance, you start by tapping Settings on the Home screen. Then:
To hear an alert when you successfully send a message: Tap the Sounds icon on the main Settings screen, and then turn on the Sent Mail setting. If you want to change other settings, tap the Settings button in the upper-left corner of the screen. If you're finished setting settings, press the Home button on the front of your iPhone.
Note
The preceding paragraph is similar for all the settings we discuss in this section and later sections, so we won't repeat them again. To summarize, if you want to continue using settings, you tap whichever button appears in the upper-left corner of the screen — it might be named Settings, Mail, Accounts, or something else. The point is that the upper-left button always returns you to the preceding screen so that you can change other settings. The same concept applies to pressing the Home button on the front of your iPhone when you're finished setting a setting. That action always saves the change you just made and returns you to the Home screen.
To add a signature line, phrase, or block of text to every e-mail message you send: Tap Settings, tap Mail, Contacts, Calendars, and then tap Signature. (You may need to scroll down to see it). The default signature is Sent from my iPhone. You can add text before or after it, or delete it and type something else. Your signature is now affixed to the end of all your outgoing e-mail.
To have your iPhone send you a copy of every message you send: Tap Settings, tap Mail, Contacts, Calendars, and then turn on the Always Bcc Myself setting.
To set the default e-mail account for sending e-mail from outside the Mail app: Tap the Settings icon on the Home screen, tap Mail, and then tap Default Account. Tap the account you want to use as the default. For example, when you want to e-mail a picture directly from the Photos app, this designated e-mail account is the one that's used. Note that this setting applies only if you have more than one e-mail account on your iPhone.
That's what you need to know about the settings that apply to sending e-mail.
This final discussion of Mail involves more settings that deal with your various e-mail accounts.
Several settings affect the way you check and view e-mail. You might want to modify some, so we describe what they do and where to find them:
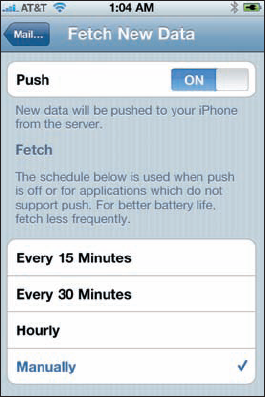
To specify how often the iPhone checks for new messages: Tap the Settings icon on the Home screen, tap Mail, Contacts, Calendars, and then tap Fetch New Data. You're entering the world of fetching or pushing. Check out Figure 11-16 to glance at your options. If your e-mail program supports push and you have it turned on (the On button is showing), fresh messages are sent to your iPhone automatically as soon as they reach the server. If you turned off push (Off is showing) or your e-mail program doesn't support it, the iPhone fetches data instead. Choices for fetching are Every 15 Minutes, Every 30 Minutes, Hourly, and Manually. Tap the one you prefer.
To determine these push and fetch settings for each account, tap Advanced at the bottom of the screen (it's not visible in Figure 11-15). Then tap the account in question. Push is shown as an option only if the e-mail account you tapped supports the feature.
As of this writing, Yahoo!, MobileMe, and Microsoft Exchange ActiveSync were among the awfully pushy e-mail accounts (but only in a good way).
To hear an alert sound when you receive a new message: Tap the Sounds icon on the main Settings screen and then turn on the New Mail setting.
To set the number of recent messages that appear in your inbox: Tap the Settings icon on the Home screen, tap Mail, Contacts, Calendars, and then tap Show. Your choices are 25, 50, 75, 100, and 200 recent messages. Tap the number you prefer.
Tip
You can see more messages in your inbox regardless of this setting by scrolling all the way to the bottom and tapping Download More.
To set the number of lines of each message to be displayed in the message list: Tap the Settings icon on the Home screen, tap Mail, Contacts, Calendars, tap Preview, and then choose a number. Your choices are 0, 1, 2, 3, 4, and 5 lines of text. The more lines of text you display in the list, the fewer messages you can see at a time without scrolling. Think before you choose 4 or 5.
To set the font size for messages: Tap the Settings icon on the Home screen, tap Mail, Contacts, Calendars, and then tap Minimum Font Size. Your options are Small, Medium, Large, Extra Large, and Giant. Use trial-and-error to find out which size you prefer. Select one and then read a message. If it's not just right, select a different size. Repeat until you're happy.
To specify whether the iPhone shows the To and Cc labels in message lists: Tap the Settings icon on the Home screen, tap Mail, Contacts, Calendars, and then turn on or off the Show To/Cc Label setting.
To turn on or off the Ask before Deleting warning: Tap the Settings icon on the Home screen, tap Mail, Contacts, Calendars, and then turn on or off the Ask before Deleting setting. If this setting is turned on, you need to tap the trash can icon at the bottom of the screen and then tap the red Delete button to confirm the deletion. When the setting is turned off, tapping the trash can icon deletes the message and you never see a red Delete button.
To specify whether the phone will automatically load remote images: Tap Load Remote Images so that the On button is showing. If it's off, you can still manually load remote images.
The last group of settings we explore in this chapter deals with your e-mail accounts. You most likely will never need most of these settings, but we'd be remiss if we didn't at least mention them briefly. So here they are, whether you need 'em or not:
To stop using an e-mail account: Tap the Settings icon on the Home screen, tap Mail, Contacts, Calendars, and then tap the account name. Tap the switch to turn off the account.
To delete an e-mail account: Tap the Settings icon on the Home screen, tap Mail, Contacts, Calendars, and then tap the account name. Scroll to the bottom and tap the red button that says Delete from My iPhone. You're given a chance to reconsider by tapping either Keep on My iPhone or Cancel.
The last settings are reached the same way: Tap the Settings icon on the Home screen, tap Mail, Contacts, Calendars, and then tap the name of the account you want to work with. Next, tap the Account Info button and then tap Advanced. The settings you see under Advanced and how they appear vary a little by account. This list describes some of the ones you see:
To specify how long until deleted messages are removed permanently from your iPhone: Tap Advanced and then tap Remove. Your choices are Never, After One Day, After One Week, and After One Month. Tap the choice you prefer.
To choose whether drafts, sent messages, and deleted messages are stored on your iPhone or on your mail server: Tap Advanced if this option is presented. Then, under the Mailbox Behaviors heading, choose various settings to determine whether you're storing such messages on the iPhone or on the server. Your options vary according to your e-mail account. If you choose to store any or all of them on the server, you can't see them unless you have an Internet connection (Wi-Fi, EDGE, or 3G). If you choose to store them on your iPhone, they're always available, even if you don't have Internet access.
Warning
We strongly recommend that you not change these next two items unless you know exactly what you're doing and why. If you're having problems with sending or receiving mail, start by contacting your ISP (Internet service provider), e-mail provider, or corporate IT person or department. Then change these settings only if they tell you to.
To reconfigure mail server settings: Tap Host Name, User Name, or Password in the Incoming Mail Server or Outgoing Mail Server section of the account settings screen and make your changes.
To adjust Use SSL, Authentication, IMAP Path Prefix, or Server Port: Tap Advanced, and then tap the appropriate item and make the necessary changes.
And that, as they say in baseball, retires the side. You're now fully qualified to set up e-mail accounts and send and receive e-mail on your iPhone.