
Animation is what Flash is all about. Sure, Flash has tons of drawing and special-effect tools, but they are all a means to an end: a series of slightly different drawings that you can string together to create the illusion of movement.
In the old days, animators had to create each drawing, or frame, by hand—a daunting process when you consider that your average feature presentation clicks by at 24 frames per second. That’s 1,440 drawings per minute of onscreen animation. Expensive? Hoo boy.
To keep those costs down, animation companies did what all self-respecting companies do: They figured out how to separate the highly skilled labor from the less-skilled labor. They figured out that there are key drawings (called keyframes) that show big changes in the finished animation, and a certain number of less-detailed, in-between drawings (regular frames) they could assign to lower-paid workers. For example, say you’re a producer working on an animation showing a cartoon kangaroo jumping up into the air. If you get a skilled animator to draw the kangaroo-on-the-ground, kangaroo-midway, and kangaroo-at-the-top frames, you can hand these keyframes off to a low-paid tweener. All the tweener has to do is copy the keyframes, make a few adjustments, and bingo: You’ve got yourself a finished animation at a bargain-basement price.
Flash, like the animation studios of old, gives you the opportunity to use tweening to slash the time it takes to produce a finished animation. In this chapter, you’ll see both approaches: frame-by-frame (still the best choice when you need to create highly complex, tightly controlled animations) and tweening (where Flash serves as your very own low-paid illustrator).
An animation is nothing more than a series of framed images displayed one after the other to create the illusion of motion. When you create an animation by hand in Flash, you create each frame yourself—either by using Flash’s drawing and painting tools (Chapter 2), or by importing images (Chapter 9) or movie clips that someone else has created.
The best way to gain an understanding of frames, keyframes, and Flash’s animation tools is to start animating by hand, frame by frame. Most of the time, though, you’ll use tweening (Animating Automatically (Tweening)) to save time and frustration. For more advice on when to use either technique, see the box on Frames and Keyframes.
Flash recognizes two different types of frames: keyframes, and plain old frames. Although in frame-by-frame animations most of the frames you create are keyframes, if you want to tell Flash to hold a particular image for effect, you need both types:
Keyframes are the important frames—the frames you designate to hold distinct images.
Frames, in a Flash animation, contain whatever image you associated with the last keyframe. Their purpose is to mark time. You use them to pace the action of your animation by telling Flash to skip a beat in the action here and there.
As you’ll see in the following section, you add both keyframes and frames to an animation using the timeline.
To build a frame-by-frame animation, you can use Flash’s drawing tools to draw the content of each frame on the stage, or you can import (Incorporating Graphics) existing images created in another program. Either way, you have to place an image in each keyframe you create.
Here are the steps to creating a frame-by-frame animation:
Open a blank Flash document.
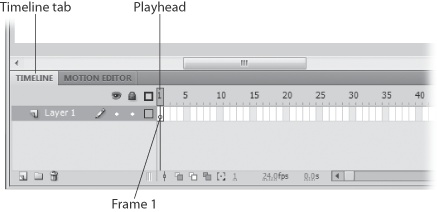
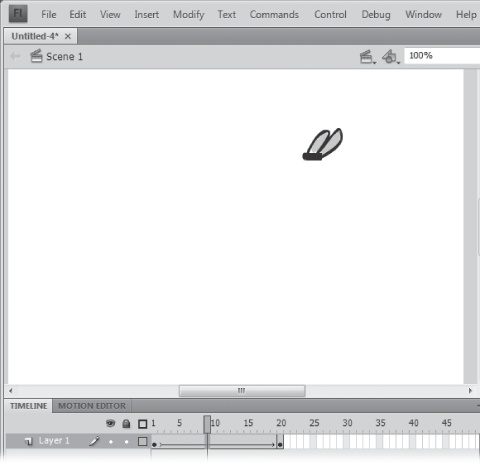
As the timeline in Figure 3-1 shows, Flash starts you out in Layer 1, Frame 1. (If you don’t see the timeline, select Window → Timeline.) Initially, a Flash document has only one frame, a keyframe at Layer 1, Frame 1.
Tip
You’ll learn how to add more layers to your animation later in this chapter. When you’ve got more than one layer, you have to click a layer name in the timeline to select the layer you want to animate.
The red rectangle over the Frame 1 is the playhead. It marks the current frame—the one that’s displayed on the stage. When you begin a new document, you can’t move the playhead until you add more frames, as described in step 3.
Using Flash’s paint and drawing tools, draw an image on the stage.
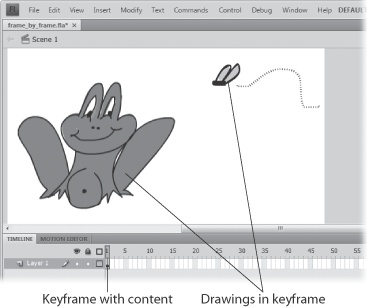
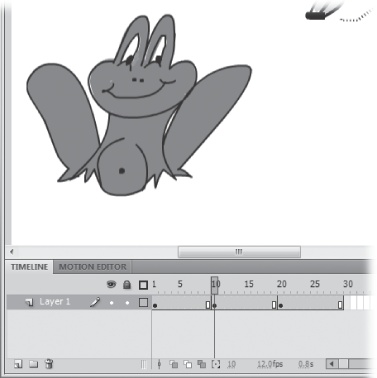
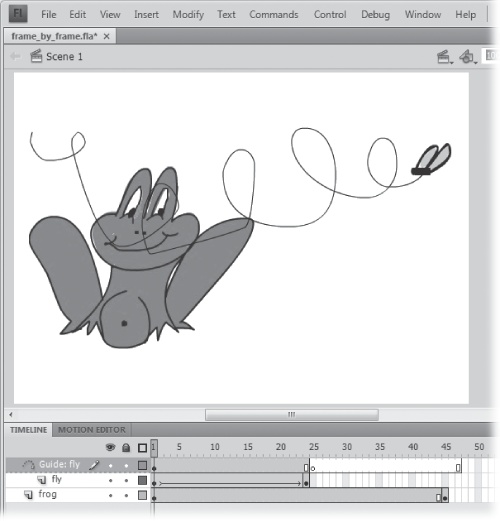
Figure 3-2 shows an example drawing of a frog with a tempting fly overhead. As soon as you add a drawing or any visual content to a keyframe, the hollow circle fills in, becoming a solid circle.
Note
If you have an existing image stored on your computer, you can bring it onto the stage. Select File → Import → Import to Stage, and then, in the Import window that appears, type in (or browse to) the name of the file you want to pull in. When you finish, click Open (Import on a Mac). (Chapter 9 covers importing files in more detail.)
Figure 3-2. Flash associates the selected keyframe with all the images you place on the stage—whether you draw them directly on the stage using the drawing and painting tools, drag them from the Library, or import them from previously created files. Here, Flash associates the frog-and-fly drawing with the keyframe in Frame 1.
Click to select another frame further out in the timeline.
Which frame you select depends on how long you want Flash to display the content associated with your first keyframe. Since Flash usually plays at a rate of 24 frames per second, selecting Frame 2 would tell Flash to display the two images so quickly that all you’d see is smooth, fast motion. For practice, so you can clearly see each frame of your work-in-progress, try Frame 20. Flash highlights the frame you select, as shown in Figure 3-3.
Figure 3-3. When you click a frame in the timeline, Flash highlights it with a tiny blue rectangle, as shown in Frame 20. The Properties panel starts out blank since you haven’t yet added a keyframe (or a regular frame) at Frame 20.
Note
Although Flash has a frame rate of 24 fps (frames per second) out of the box, you can change this setting. Learn how on Setting a Document Frame Rate.
Turn the selected frame into a keyframe by choosing Insert → Timeline → Blank Keyframe.
Flash moves the playhead to the selected frame (Frame 20 in Figure 3-4), inserts a keyframe icon, and clears the stage. A quicker way to insert keyframes, or any type of frame, is to right-click the frame, and then choose from the shortcut menu.
Tip
Using three shortcut keys is the quickest way of all to work with frames. The F5 key inserts a frame. The F6 key creates a keyframe, including the content from the previous frame. The F7 key creates an empty keyframe.
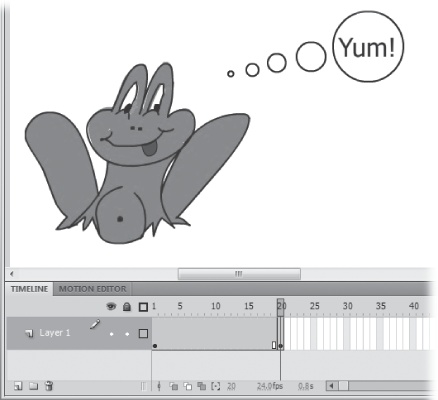
Figure 3-4. Here, the playhead is over the second keyframe, which tells Flash to place the content on the stage in the second keyframe (Frame 20). When it detects a new keyframe, Flash displays only the new content, so Frames 2–19 carry forward the content from Frame 1 (the first keyframe). You can verify this behavior by dragging the playhead (scrubbing) from Frame 20 back to Frame 1.
Draw a second image on the stage.
The second keyframe in Figure 3-4 shows the frog with a thought balloon instead of a fly. But if your two images are fairly similar, you can avoid having to completely redraw the image for your second keyframe, as you’ll see in the next step.
Click further out in the timeline (Frame 40, say), and choose Insert → Timeline → Keyframe.
Just as when you chose Insert → Timeline → Blank Keyframe, Flash still moves the playhead and inserts a keyframe icon; but instead of clearing the stage, Flash carries over the content from the previous keyframe, all ready for you to tweak and edit.
Repeat the previous step to create as many keyframes as you want.

To get the hang of frame-by-frame animation, adding two or three keyframes is plenty. But when you’re building an actual animation, you’ll likely need to add dozens or even hundreds of keyframes (or even more, depending on the length and complexity you’re shooting for).
Note
You can examine this sample animation to check your work. Simply download frame_by_frame.fla from the “Missing CD” page (http://missingmanuals.com/cds).
You have two choices when it comes to testing your animation, and both of them are simple:
Control → Play. The quickest and easiest approach is to test your animation inside the Flash development environment. Select Control → Play (or press Enter). When you do, Flash runs your animation right there on the stage. So, for example, if you create an animation containing just two keyframes (similar to the example on Creating a Frame-by-Frame Animation), Flash displays the content for the first keyframe, followed by the content for the second keyframe.
Control → Test Movie. Selecting Control → Test Movie exports your Flash document (compiles the .fla document into an executable .swf file) and automatically loads the .swf file into the built-in Flash Player. Figure 3-6 shows an example.
Testing your animation this way takes a bit longer, but it’s more accurate: You’re actually seeing what your audience will eventually see, from beginning to end. (In some cases—for example, if you’ve added a motion guide path as described on Motion guide layers (moving along a nonstraight path) to your animation—selecting Control → Play shows a slightly different result than selecting Control → Test Movie does.)
It’s rare that your first crack at any given animation will be your last. Typically, you’ll start with a few keyframes, test the result, add a few frames, delete a few frames, and so on until you get precisely the look you’re after.
This section shows you how to perform the basic frame-level edits you need to take your animation from rough sketch to finished production: inserting, copying, pasting, moving, and deleting frames.
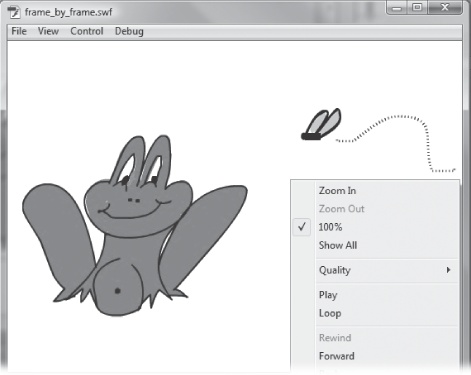
Figure 3-6. The first time you run your animation in Flash Player, Flash assumes you want to run it over (and over, and over, and over). Fortunately, you can rid Flash of this annoying assumption. Right-click your animation, and then click Loop to remove the checkmark. Other useful options you find include stopping your animation, rewinding it, and even stepping through it frame by frame. Chapter 18 covers animation testing in depth.
Selecting a single frame or keyframe is as easy as zipping up to the timeline and clicking the frame (or keyframe) you want to select, as shown in Figure 3-7.
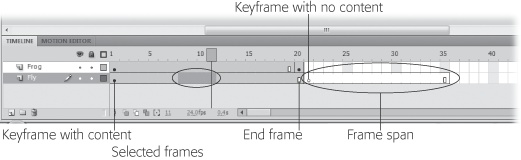
Figure 3-7. To select a single frame (including a keyframe), simply click the frame. To select multiple frames, drag or choose one of Flash’s other two multiple-frame-selection options. A frame span comprises a keyframe, an end frame, and all the frames between the keyframe and end frame. If you’ve added multiple layers to your animation, make sure you select frames from the correct layer.
But if you want to select multiple frames, Flash gives you four additional selection alternatives:
To select multiple contiguous frames. Click the first frame you want to select, and then drag your mouse to the last frame you want to select. Alternatively, click the first frame you want to select, and then Shift-click the last frame you want to select.
To select multiple noncontiguous frames. Ctrl-click (on the Mac, ⌘-click) each frame you want to select.
To select an entire frame span. Double-click any frame in the frame span. A frame span consists of all the frames between one keyframe (including that keyframe) and the next keyframe in the layer. So, for example, if you have a keyframe in Frame 15 and another keyframe in Frame 30, double-clicking any frame from Frame 15 through Frame 29 automatically selects every frame from Frame 15 through Frame 29.
To select all the frames on a layer. Click the name of the layer. In the example in Figure 3-7, clicking “Fly” would automatically select all the frames in the Fly layer; clicking “Frog” would automatically select all the frames in the Frog layer.
No matter which alternative you use, Flash highlights the frames to let you know you’ve successfully selected them.
The smoothness of your finished animation depends on the number of keyframes and regular frames you’ve included. This section shows you how to add and delete both to an existing animation.
Inserting keyframes. Typically, you’ll start with a handful of keyframes and need to insert additional keyframes to smooth out the animation and make it appear more realistic (less herky-jerky).
For example, say you’re working on an animation showing a dog wagging its tail. You’ve got a keyframe showing the tail to the left of the dog; one showing the tail straight behind the dog; and a final keyframe showing the tail to the right of the dog. You test the animation and it looks okay, but a little primitive.
Inserting additional keyframes showing the dog’s tail in additional positions (just a bit to the left of the dog’s rump, a little bit further to the left, a little further, and then all the way to the left) will make the finished sequence look much more detailed and realistic.
Note
Technically speaking, you don’t actually insert a keyframe in Flash; you turn a regular frame into a keyframe. But Flash-ionados speak of inserting keyframes, and so does the Flash documentation, so that’s how this section presents it.
To insert a keyframe into an existing animation:
In the timeline, select the regular frame you want to turn into a keyframe.
If you want to add a keyframe midway between Frame 1 and Frame 20 on Layer 1, for example, click in Layer 1 to select Frame 10, as shown in Figure 3-8.
Flash moves the playhead to the frame you selected.
Figure 3-8. Technically, you don’t always add a keyframe in Flash (unless you’re positioned over an existing keyframe or the very last frame in a layer). Instead, when you’re positioned over a regular frame, you turn that regular frame into a keyframe. As you can see here, Flash displays its usual icons to show the results: The selected frame, Frame 10, is now a keyframe (you can tell by the solid black dot in the timeline), and Frame 9 is the end frame, or the last frame that’ll display the contents of the previous keyframe, Frame 1 (you can tell by the hollow rectangle in Frame 9).
Select Insert → Timeline → Keyframe (to tell Flash to carry over the content from the previous keyframe so that you can edit it) or Insert → Timeline → Blank Keyframe (to tell Flash to clear the stage).
On the stage, Flash either displays the image associated with the previous keyframe or, if you inserted a blank keyframe, displays nothing at all.
Using the drawing and painting tools, add content for your new keyframe to the stage.
If you’ve already created drawings in another program, you can import them as described on Incorporating Graphics.
Inserting frames. Regular frames in Flash act as placeholders: They simply mark time while the contents of the previous keyframe display. So it stands to reason that you want to insert additional frames when you want to slow down the action a little. In fact, inserting frames is sort of like having a director yell, “Hold camera!” with the contents of the last keyframe remaining onscreen while the camera’s holding.
To insert a frame into an existing animation:
In the timeline, click to select the frame before which you want to add a frame. (Make sure the frame you select appears in the timeline after the keyframe you want to hold onscreen.)
Flash moves the playhead to the frame you selected.
Select Insert → Timeline → Frame (or press F5).
Flash inserts a new frame after the frame you selected, bumping up the total number of frames in your animation by one.
Deleting keyframes. Technically speaking, a keyframe is just a regular frame to which you’ve added unique content. So to delete a keyframe, you first need to turn it back into a regular frame, and then delete it. If you try to delete a keyframe without converting it, Flash removes the next standard frame from the timeline, but the keyframe doesn’t budge.
To clear a keyframe and turn it back into a regular frame (so you can delete it, as described next):
Tip
Because you can’t tie a drawing to a regular frame, clearing a keyframe means you lose anything you’ve drawn or imported to the stage for that keyframe. To get the contents of the stage back—perhaps you’d like to save your drawing as a reusable symbol or save it off in its own separate file, as shown in Chapter 6, before you delete it from this frame—select Edit → Undo Clear Keyframe.
Deleting frames. Deleting frames—like inserting them—lets you control the pace of your animation. But instead of padding sections of your animation the way inserting frames does, deleting frames squeezes together the space between your keyframes to speed up sections of your animation. When you delete a frame, you’re actually shortening your animation by the length of one frame.
For example, say you’re working on the animation showing a frog catching a fly. You’ve created three keyframes: one showing the frog noticing the fly, one showing the frog actually catching the fly, and one showing the frog enjoying the fly. If you space out these three keyframes evenly (say, at Frame 1, Frame 15, and Frame 30), all three images spend the same amount of time onscreen. That’s perfectly serviceable—but you can create a much more realistic effect by shortening the number of frames between the second and third keyframes (in others words, by deleting a bunch of frames between Frame 15 and Frame 30 to speed up this portion of the animation).
To delete frames:
Imagine you’re creating a complex animation in Flash. You want to show a couple of characters carrying on a conversation, a car speeding by in the background, and some clouds floating across the sky.
Theoretically, you could draw all of these elements together, in one layer (one set of frames). In the first frame, you could show the characters greeting each other, the car entering from stage left, and the first cloud drifting in from the right. In the second frame, the characters might begin speaking and waving their hands, the car might advance just a bit, more clouds might appear from the right, and so on.
Now imagine that your spec changes. It’s not a car you need in the background, but a galloping dog. A relatively simple change, conceptually, but because you’ve drawn all the graphic elements on a single set of frames, you would now need to redraw every single frame. You’d need to slice away the car where it touches the other elements, and then draw in the dog. And because the dog needs to appear behind the two chatting characters, you can’t even take advantage of Flash’s motion tweening (which you can learn how to do on Motion Tweening), or even copying and pasting to speed up the animation process (Copying and Pasting Drawn Objects).
Fortunately, Flash gives you an alternative: layers. Layers in Flash are virtual clear plastic sheets that you stack on top of each other to create composite frames. So you can draw each element of your animation in a separate layer: the clouds, the car, the first character, and the second character. When you stack the layers together, your animation is complete.
Then, when you need to replace the car with a dog, all you need to do is delete the car layer and create a dog layer. You’re working with a single object in your dog layer, so you can copy and paste, and even create motion and shape tweens, all without affecting any other part of your animation. And if you decide you want the dog to gallop in front of your characters instead of behind, you can make that change simply by restacking (reordering) your layers with the dog layer on top.
When you create a new document, Flash starts you out with one layer, cleverly called Layer 1, in the Layers area of the timeline (Figure 3-9).
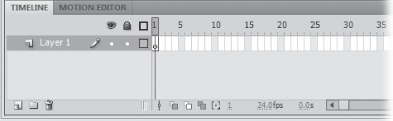
Figure 3-9. A layer is nothing more than a set of frames, which is why Flash displays layer names to the left of the timeline (that way, you can easily spot which frames belong to which layer). When you create a new document in Flash, Flash names your first set of frames Layer 1. At some point, replace it with a more meaningful name that describes the content of the layer. (See the tip on Motion guide layers (moving along a nonstraight path).)
To create an additional layer:
In the timeline, click the name of the layer you want to add a layer above.
If you’re starting out in a new Flash document, there’s only one layer to select—Layer 1.
Still in the timeline, right-click the layer name—in this example, Layer 1—and then, from the shortcut menu that appears, select Insert Layer.
Flash creates a new layer, named Layer 2, and places this new layer above the existing layer, as shown in Figure 3-10.
Note
Flash gives you two additional ways to create layers: by clicking the New Layer icon (Figure 3-10) and by selecting Insert → Timeline → Layer.

Figure 3-10. To create a new layer, select an existing layer, and then click the New Layer icon. Flash immediately creates a new layer, names it (here, Layer 2), and places it above the selected layer. The fact that Flash places the new layer above (and not below) the existing layer is important because each layer’s position determines how Flash displays your frames’ contents. Change your layers’ order by dragging them. If you can’t see all the layers in the timeline, just click the bottom top edge of the timeline, and then drag to resize it.
If you want to delete a layer, click to select the layer, and then click the trash can icon (Figure 3-10) in the lower-left corner of the timeline. Be careful though: when you delete a layer, you delete every frame in the layer and all the drawings, text, and other content in the frames.
When you create a frame-by-frame animation, it’s up to you to create every single keyframe and frame. And in cases where you want absolute control over every single image that appears in your finished animation, frame-by-frame animation is the way to go.
Often, however, you can get by with a little less control. If you want to create a scene of a ball rolling across a lawn, for example, you can create one keyframe showing a ball on the left side of the lawn, another keyframe showing the same ball on the right side of the same lawn, and tell Flash to create a tween, or all the keyframes in between. Bingo—scene done.
Tip
You can combine frame-by-frame animation with tweening. In fact, that’s what a lot of professional animators do: Take care of the complex stuff themselves, and rely on Flash to fill in the spots that aren’t as critical.
Tweening saves you more than just time and effort; when you go to publish your animation, it also saves you file size. That’s because Flash doesn’t save every single frame of a tweened animation the way it does with a frame-by-frame animation. Instead, for tweened animations, Flash saves only the keyframes you create, plus the information it needs to generate the tweened frames from your keyframes. And smaller file sizes are a good thing—especially if you’re planning to put your finished animation up on a Web site. (You can find out more about file sizes, including tips for optimization, in Chapter 19.)
Flash gives you three choices for creating tweens: shape tween, classic tween, and the new Flash CS4 motion tween (see the box on Shape Tweening (Morphing)). Here’s a guide to choosing the right type of tween for the job:
Shape tween. Use a shape tween when you want to dramatically change an object’s shape. For example, when you want to create a shape-morphing effect, like changing an acorn into a tree. (You can use a shape tween only when you’re tweening an editable object.)
Classic tween. This type of tween was called a motion tween in previous versions of Flash. Use it if you’re working with a document created with an earlier version of Flash or if you prefer the old tween method for a particular job. In most cases, the new motion tween gives you greater control over how the tween looks and acts, as described in the box on Shape Tweening (Morphing). Compared to the new motion tween, the classic tween is a simpler, no-nonsense way to make objects move on the stage, and it has a shorter learning curve. (You can use the classic tween on symbols and grouped objects.)
Motion tween. Flash CS4’s new motion tween is both more powerful and more complex than the classic version. Using its Motion Editor, you can move objects on the desktop and change their height, width, color, and transparency. You can create 3-D-style spinning effects. Motion tweening can handle most effects, but if you need to morph one shape into a completely different shape, use a shape tween instead. To use a motion tween, the object you’re tweening has to be a symbol (Symbols and Instances), or you have to convert it into one.
Flash CS4’s new motion tween has the steepest learning curve because you have to master the Motion Editor. But once you’ve put in the time, you’ll find the effort was well worth it, since you can tween how your object looks as well as how it moves, and you’ll probably end up using motion tween for most of your tweens.
If you’re new to Flash in general and tweening in particular, for a thorough education, work your way through this entire section. You’ll learn how to use all three types of tweens, plus all of Flash’s tweening tools along the way, like shape hints, easing, and motion paths. If you’re impatient, skip to the new motion tweening section on Motion Tweening.
If you’ve used Flash before, rest assured that shape tweening works just like it always has, and you can still create motion tweens the way you’re used to—just use the Create Classic Tween command instead of Create Motion Tween. When you’re ready to learn how to use the new Motion Editor for more powerful tweening, skip to Changing Transparency with the Motion Editor. There’s even more detail on using the Motion Editor in Chapter 7 on advanced tweening.
Shape tweening—sometimes referred to as morphing—lets you create an effect that makes one object appear as though it’s slowly turning into another object. All you have to do is draw the beginning object and the ending object, and Flash does all the rest.
For example, say you create a keyframe containing a yellow ball. Then, 24 frames along the timeline, you create another keyframe containing a green star. You apply a shape tween to the frame span, and Flash generates all the incremental frames necessary to show the ball slowly—frame by frame—transforming itself into a star when you run the animation.
Tip
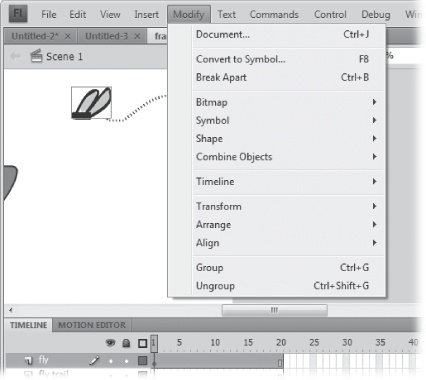
Shape tweens work only on editable graphics. If you want to tween a symbol (Symbols and Instances), you need to use a motion tween or a classic tween. If you want to tween a group of objects or a chunk of text, you need to ungroup the objects (Selecting part of a graphic element), break apart the text Modify → Break Apart, or use a motion tween.
Shape tweening lets you change more than just an object’s shape over a series of frames. Using a shape tween, you can also change an object’s size, color, transparency, position, scale, and rotation.
To create a shape tween:
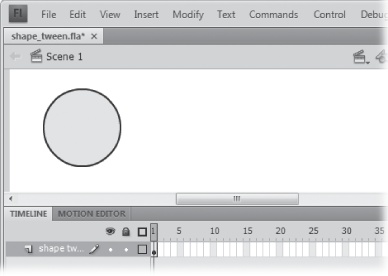
Select the frame where you want your tween to begin (for example, Frame 1).
Flash highlights the selected frame.
If the selected frame isn’t a keyframe (if you don’t see a dot in the frame), turn it into a keyframe by selecting Insert → Timeline → Keyframe.
Flash displays a dot in the frame to let you know it’s a keyframe.
On the stage, draw the shape you want to begin your tween.
In Figure 3-11, the beginning shape’s a ball—yellow circle with a black outline.
Figure 3-11. You can use any or all of Flash’s drawing and painting tools to create your first image. Just make sure you don’t group objects (Converting Strokes to Fills) or convert your object into a symbol (Symbols and Instances); shape tweening works only on ungrouped, editable objects in a single layer.
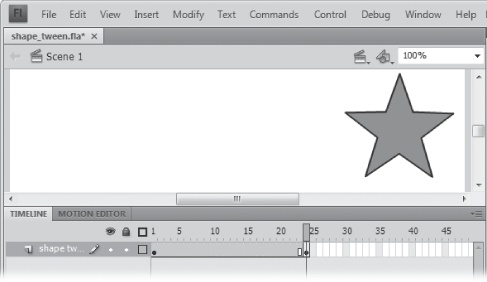
Select the frame where you want your tween to end (for example, Frame 24).
Flash highlights the selected frame.
Insert an ending point for your tween (and a clean, fresh stage on which to draw your ending shape) by selecting Insert → Timeline → Blank Keyframe.
The stage clears, the playhead moves to the selected frame, and Flash displays a hollow dot in the selected frame to let you know it’s a keyframe.
Tip
As explained on Inserting and deleting keyframes and frames, you can carry over your beginning image from the first keyframe and make changes to it by choosing Insert → Timeline → Keyframe (instead of Insert → Timeline → Blank Keyframe).
On the stage, use Flash’s drawing and painting tools to draw the shape you want to end your tween.
Your ending shape can differ from your first shape in terms of position, color, transparency, rotation, skew, and size, so go wild. In Figure 3-12, the ending shape’s a green, five-pointed star.
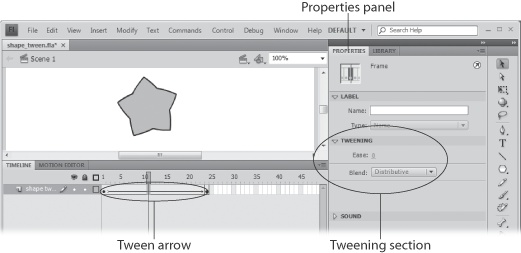
On the timeline, right-click any frame in the middle of the frame span, and then choose Shape Tween from the shortcut menu.
When you right-click, Flash moves the playhead and highlights the frame you clicked. When you choose Shape Tween, the frame span changes to a nice lime color and inserts an arrow to let you know you’ve successfully added a shape tween (Figure 3-13). A new Tweening section appears in the Properties panel. (If the Properties panel isn’t showing, choose Window → Properties.)
Figure 3-13. As soon as you create a tween, Flash displays an arrow spanning the frames that make the tween. A new Tweening section appears in the Properties panel.
Note
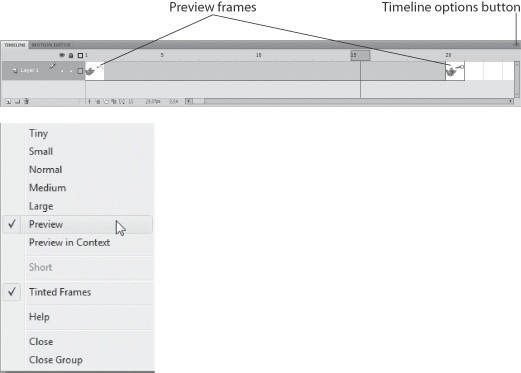
If you have Tinted Frames turned off, Flash doesn’t change a color behind the tweened frames. To turn on Tinted Frames, click the Options menu (the tiny, striped icon on the far right of the timeline, just above the frame numbers, as shown in Figure 3-12); and then select the Tinted Frames option. A checkmark indicates the option is turned on.
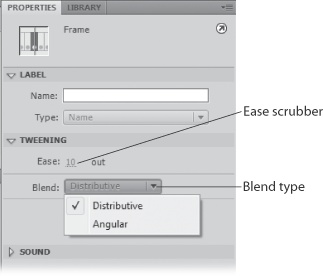
If you like, set the Ease and Blend shape tween options (Figure 3-14).
Ease tells Flash to speed up (or slow down) the tween. To change the Ease value, type a number or drag to change the number. If you want your tween to start out normally but speed up at the end, set the Ease value to a negative number. To tell Flash to start your tween normally but slow down at the end, use a positive number. (Zero means that when you play your animation, the tween appears to be the same speed throughout.)
Blend tells Flash how picky you want it to be when it draws its in-between frames. If you want to preserve the hard angles of your original shape, click the Blend drop-down box, and then select Angular; if you want Flash to smooth out the hard edges so that the tween appears softer, select Distributive.
Figure 3-14. Shape-related tweening options appear in the Properties panel: namely, Ease (to speed up or slow down your tween) and Blend (to tell Flash to preserve hard corners and angles from frame to frame or smooth them out). To preview the in-between frames Flash generated for you, just select any frame in the frame span.
Test your shape by selecting Control → Play.
Flash plays your shape tween on the stage (Figure 3-15).
Flash does a bang-up job when it comes to tweening simple shapes: circles, squares, stars, rain drops. But the more complicated the images you want to tween, the harder Flash has to work to calculate how to generate the in-between images.
Figure 3-15. When you run your animation, your beginning image appears to morph into your ending image, thanks to the in-between frames Flash generates when you create your shape tween. Because the pages of a book can’t show motion, here onionskin outlines (Editing Multiple Frames) represent the animated tween you’d see on the stage.
And if you think about it, that difficulty makes sense. Because complex beginning-and-ending images like a stylized acorn and tree (Figure 3-16 and Figure 3-17) contain a bunch of editable lines, shapes, and colors, Flash has to guess at which elements are most important and how you want the morph to progress from the first keyframe to the last.
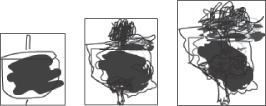
Figure 3-16. Left: The original acorn drawing: so far, so good. Middle: Flash’s first attempt at generating an in-between frame is a little scary. Right: Clearly, the acorn is changing and growing, but that’s about all you can say for this generated image.
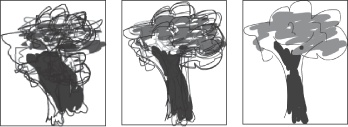
Figure 3-17. Left: You can almost make out the outline of a tree now. Middle: This one’s getting there … Right: And finally, at the end of the tween, Flash makes it to your original ending image.
Sometimes, Flash guesses correctly; other times, you need to give it a few hints. Adding shape hints to your tweens tells Flash how you want it to create each in-between frame, with the result that your finished tween appears more realistic—more how you want it to be.
In short, shape hints give you more (but not complete, by any means) control over the shape-tweened sections of your animation.
Note
Shape hints are especially valuable when you’re working on an animation that moves at a relatively slow frame rate; in other words, in situations when each separate frame will be visible to your audience’s naked eye.
To add shape hints to a shape tween:
Select the first frame of your tween.
Flash highlights the selected frame.
Choose Modify → Shape → Add Shape Hint (or press Ctrl+Shift+H [Windows] or Shift-⌘-H [Mac]).
Flash displays a hint (a red circle containing a letter from A–Z) in the center of your shape, as shown in Figure 3-18 (top).
Figure 3-18. Top: When you add a shape hint, Flash places it at the center of your object. All you have to do is drag it to the edge of your object. Bottom: The more shape hints you use (and the more accurately you place them around the edge of your object), the more closely Flash attempts to preserve your shape as it generates the tween frames. Make sure you place the hints in alphabetical order as you outline your shape. If you find after several tries that Flash doesn’t seem to be taking your hints, your shapes might be too complex or too dissimilar to tween effectively. In that case, you’ll want to create additional keyframes or even consider replacing your tween with a frame-by-frame animation.
Drag the hint to the edge of your shape.
Figure 3-18 (bottom) shows the result of dragging several hints to the edge of your shape.
Repeat as many times as necessary, placing hints around the outline of the object in alphabetical order.
The bigger or more oddly-shaped your object, the more hints you’ll need. Placing a hint at each peak and valley of your object tells Flash to preserve the shape of your beginning object as much as possible as it morphs toward the shape of your ending object.
Go to the last frame of the shape tween and adjust the shape hints to match the final shape.
When the animation runs, Flash uses the hints in both the beginning and ending keyframe to control the shape of the morphing object.
Test your animation by clicking Control → Play.
The tweened frames of your animation conform, more or less, to the hints you provided. Figure 3-19 and Figure 3-20 show you an example.
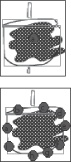
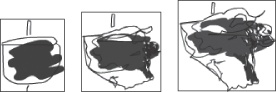
Figure 3-19. Left: The original acorn is the same here as it was in Figure 3-16. Middle: Compare this attempt at generating a first in-between frame to the one in It’s not exactly a prize pig, but it’s better. Right: Already, you can see the form of the tree taking shape.

Figure 3-20. Left: Here, the already-pretty-well-shaped tree looks as though it’s about to burst out of the acorn outline. Middle: Compared to tweening without shape hints (see Figure 3-17), this tween appears much smoother; you don’t see the Flash-generated squiggly lines that you see in Figure 3-19, and break the grafs. Right: The final frame of any tween appears the same, whether or not you use shape hints.
It’s easier for Flash to morph two simple shapes than one complex shape. So, if shape hints don’t help Flash solve shape tween confusion, try tweening parts of your drawing separately. For example, put the cap of an acorn on a layer by itself and put the bottom shell in a separate layer. Then you can shape tween the cap into the leaves of the tree, and shape tween the shell into the trunk of the tree, with results as shown in Figure 3-21.
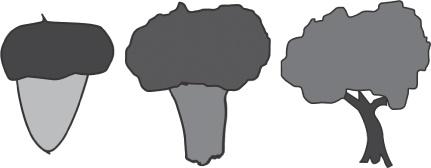
Figure 3-21. If you add a shape tween to a layer with more than one object, the results usually aren’t pretty. It’s best to place objects on separate layers. Here the cap of the acorn tweens into the leaves and the shell tweens into the trunk and branches. Using tweens on multiple layers, gives you more control over your animation.
Note
You can find the finished Flash document with the acorn tweening into a mighty oak at http://missingmanual.com/cds. The file is named shape_acorn.fla.
Classic tweening is similar to shape tweening: To create both types of tweens, all you need to do is create a beginning image and an ending image, and then tell Flash to generate all the “in-between” frames to create an animated sequence. And you can create a lot of the same effects using both types of tweens: You can create a series of frames that, when run, show an object changing size, position, rotation, and skew.
Note
As explained in the box on Shape Tweening (Morphing), what’s called a classic tween used to be called motion tween in the Flash before CS4. The new motion tween (Motion Tweening) is easy-to-use and puts a lot of tweening power in your hands. Classic tween is provided primarily for compatibility with older Flash documents.
But beyond that, there are two important differences between shape tweening and classic tweening:
Tweenable objects. While shape tweening works only on editable objects, classic tweening works only on noneditable objects: symbols, grouped objects (Converting Strokes to Fills), and text. And classic tweening, unlike shape tweening, limits you to one object per layer. (The single object can be a grouped object or a symbol containing multiple shapes; it just has to be a single object as far as Flash is concerned.)
Nonlinear paths. With classic tweening and motion tweening (Motion Tweening), you can create a series of frames that show an object moving across the stage in a nonlinear fashion: for example, swooping, diving, arcing, rotating, or pulsing. You can’t do that with shape tweening.
To create a classic tween:
Select the frame and layer where you want your tween to begin (for example, Frame 1 in Layer 1).
Flash highlights the selected frame.
On the stage, draw the shape (or create the text) you want to begin your tween.
In Figure 3-22, the beginning shape is a fly on the right side of the stage.
Convert the drawing to a noneditable form by selecting all the elements of your drawing, and then choosing either Modify → Group (to flatten all the elements into a single group) or Modify → "Convert to Symbol” (to convert the editable drawing into a reusable symbol).
Tip
For a quick refresher on symbols, see “Symbols and Instances” on Symbols and Instances. For the full story, see Chapter 6.
Flash displays a box around the entire drawing to show that it’s now a single, noneditable entity (Figure 3-22).
If the selected frame isn’t a keyframe (if you don’t see a dot in the frame), turn it into a keyframe by selecting Insert → Timeline → Keyframe.
Flash displays a dot in the frame to let you know it’s a keyframe.
Figure 3-22. If you apply a classic tween to an editable object, Flash groups the all the parts before creating the tween. This might seem capricious, but it’s actually practical. If you drew a complex object consisting of seven different shapes and didn’t flatten it into a symbol or a group, Flash wouldn’t know which shape to move where.
Select the frame where you want your tween to end (for example, Frame 10).
Flash highlights the selected frame.
Insert an ending point for your tween by selecting Insert → Timeline → Keyframe.
The playhead moves to the selected frame, and Flash displays a solid dot in the selected frame to let you know it’s now a keyframe, as shown in Figure 3-23.
Figure 3-23. Here, you see a symbol being dragged from the right side of the stage to the left side. Moving a symbol is the quickest way to create a classic tween, but it’s certainly not the only way. Using the Properties, Color Mixer, and Transform panels, you can create a tween that morphs an object’s color, transparency, rotation, scale, and skew.
On the stage, drag the object to somewhere else on the screen.
You can create a classic tween most easily by carrying over your beginning image from the first keyframe and moving it, but you can also create something much more sophisticated. To change the size, rotation, or position of your ending object, you can use the Properties and Transform panels.
Right-click any frame in the frame span, and then choose Create Classic Tween from the shortcut menu.
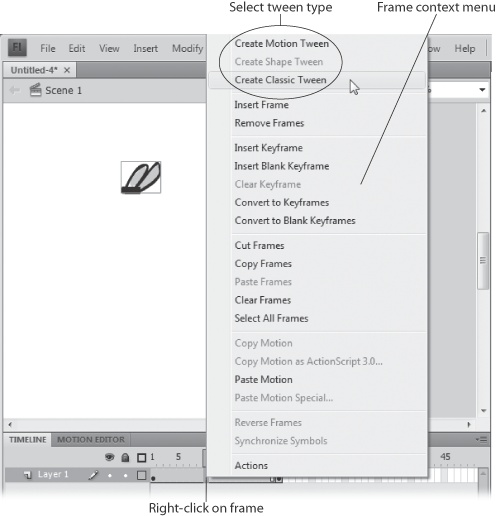
Flash highlights the selected frame. The frame shortcut menu (sometimes called a context menu) shows nearly two-dozen frame-related commands, as shown in Figure 3-24. The tweening options are at the top. You can also create a tween by selecting a frame, and then choosing Insert → Classic Tween.
Figure 3-24. Right-click the timeline to see related commands including the one used to Create a Classic Tween. All the tween commands appear at the top of the context menu.
Flash tints the background of the frame span and inserts an arrow (Figure 3-25) to let you know you’ve successfully added your classic tween. And in the Properties panel, motion-related tween options appear: Scale, Ease (Edit), Rotate, Orient to path, Sync, and Snap.
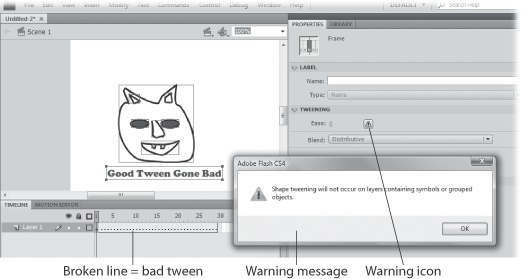
Tip
If you see a dashed line in the frame span (instead of an arrow), that’s Flash telling you that your classic tween is broken, as shown in Figure 3-26. Check to make sure you’re tweening noneditable objects (symbols, grouped objects, or text blocks) and that you’ve created both a beginning and an ending keyframe for your tween.
Figure 3-25. Flash adds a classic tween automatically (the instant you select Create Classic Tween from the shortcut menu), so depending on the frame you selected, the content on the stage might change. For example, here, Frame 9 is selected, so the contents of Frame 9 appear—a tweened image of the fly part way across the stage.
Figure 3-26. If a tween goes bad, you need to do some detective work. First check the timeline. If you see dashes in the tweened frame, that means something’s wrong. Select the first keyframe, and then check to see if you have a yellow warning icon in the Properties panel. Click the warning icon to display a mildly helpful message.
If you like, set the Ease option.
Ease tells Flash to speed up (or slow down) the tween. To change the Ease value, type a number or drag to change the number. Zero means that when you play your animation, the tween appears to be the same speed throughout. If you want your tween to start out normally but speed up at the end, set the Ease value to a negative number. To tell Flash to start your tween normally but slow down at the end, use a positive number.
You can even create a custom speed that varies throughout the tween. (Perhaps you’re tweening a scene of a mouse running past a gauntlet of cats, and want your mouse to speed up every time it passes a cat and slow down in-between.) To do so, click Edit easing (pencil icon). Then, in the Custom Ease In/Ease Out window that appears, drag the diagonal tween line to specify the relative speed for each frame of your frame span. When you finish, click OK.
Tip
The other classic tween–related options are useful only in the context of specific motion-related effects. Use Rotate to control the direction and number of times a tweened object spins. “Orient to path” and Snap are described beginning on Orient to path. The Sync option synchronizes the animation of graphic symbol instances by changing the number of frames in the symbol. The Scale checkbox allows (or prevents) changes to the H and W properties. For more finely-tuned motion effects, use the new motion tween (Starting Flash) rather than the classic tween.
Test your classic tween by selecting Control → Play.
Flash plays your classic tween on the stage.
The previous section showed you how to create a straight-line classic tween, where an object appears to move from one point on the stage to another. This section takes classic tweening a little further by explaining how you can use a motion guide layer to create a nonlinear classic tween.
Note
In Flash, there are more layers than just the generic ones you learned to create earlier in this chapter. There are also guide layers to help you position objects precisely on the stage (Guide layers), mask layers to hide and display specific portions of your images (Orient to path) for a peek-a-boo effect, and classic motion guide layers to create a nonlinear classic tween (these are the layers you get acquainted with in this section).
Using a motion guide layer to create a nonlinear classic tween is surprisingly easy. All you have to do is create a regular straight-line classic tween, as described on Classic Tweening. Then, you create a special type of layer called a motion guide layer. In the motion guide layer, you draw the path you want your object to follow. You can draw a twisty line, a curve, or whatever you like. Then you drag your objects to the beginning and the end of the path, respectively. The step-by-step example below takes you through the simple process.
You don’t see the actual path when you run your animation; you see it only when you’re editing your animation and testing it. You can think of a path as a kind of guideline that “shows” your objects how to move along a classic tween.
Note
You can find the finished Flash document with the frog fly and classic tween along a guide path at http://missingmanual.com/cds. The file is named classic_tween_guide.fla.
To create a tween along a nonlinear path using a motion guide layer:
Create a basic, straight-line classic tween.
The steps for creating one begin on Classic Tweening.
In the timeline, select the keyframe that begins your tween.
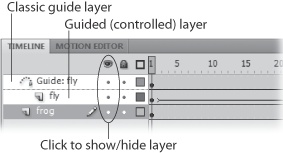
Flash highlights the selected keyframe as well as the name of the layer you’re working in (the active layer). In Figure 3-27, the active layer is “frog”.
Figure 3-27. When you create a motion guide layer, Flash places it directly above the active layer—and indents the active layer—to give you a visual reminder that the motion guide layer controls the active layer. As you see in the steps on these pages, the path you draw on your motion guide layer determines how the objects on your active layer behave during a classic tween.
Tip
You can rename a layer from Flash’s unimaginative Layer 1, Layer 2, and Layer 3 to something more meaningful, like Fly, Frog, or Fly Motion. (Doing so will help you remember what each layer contains—especially useful if you create animations with multiple layers.) To rename a layer: In the timeline, double-click the name of the layer you want to rename. In the editable name field that appears, type a new name, and then press Enter.
Right-click the name of the layer you want to control, and then choose Add Classic Motion Guide from the shortcut menu.
The layer you right-click is indented, and a new guide layer appears above it. The name of the guide layer includes the name of the layer it controls. For example, if the layer being guided is called “fly,” the guide layer is named “Guide: fly” as shown in Figure 3-27.
With the motion guide layer still selected, draw a path (the line you want your classic tween to follow) on the stage.
The Pencil is an easy tool to use for this task—especially with the Smooth option turned on, as described on Pen tool. But you can use any of Flash’s drawing tools to draw your path. Figure 3-28 shows you an example.
Figure 3-28. You can use any drawing or painting tool you like to create your path. If the path you create is a closed shape (like a circle) Flash will decide which direction the tween should go.
Tip
Some folks find it hard to concentrate on drawing a path with objects in the way. To temporarily hide the objects on the stage: On the timeline next to your non–motion guide layer, click the dot below the Show/Hide All Layers icon (the icon that looks like an eye, as shown in Figure 3-27). After you finish drawing your path, click the Show/Hide All Layers icon again to redisplay the objects on the stage.
In the non–motion guide layer, click to select the beginning keyframe for your animation.
Flash highlights the selected keyframe.
Click the center of your image to select it, and then drag the image until the center “snaps” onto one end of your path.
Flash displays a little circle in the center of your image to help you center the image directly onto your path, as shown in Figure 3-29.
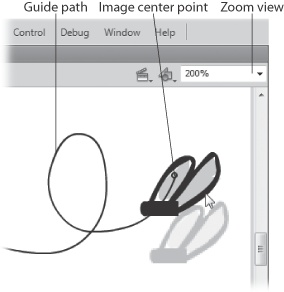
Your image doesn’t have to be at the very end of the path, but it does have to be exactly on the path. Flash helps you find the sweet spot if you turn on Snap to Objects (View → Snapping → Snap to Objects). Doing so tells Flash to widen the center circle and to jump to the path, when you move your image near the path. After you sense the snapping motion, release the mouse button.
Select the ending keyframe for your animation.
Flash highlights the selected keyframe.
On the stage, drag the image until the center “snaps” onto the other end of your path.
Again, as you drag your image, Flash displays a little circle in the center of your image to help you position it directly onto your path.
Test your guided classic tween by selecting Control → Play.
Flash plays your classic tween on the stage, moving your object along the path you defined in step 4. Figure 3-30 shows you an example.
If you’ve created a nonlinear path using a motion guide layer (Motion guide layers (moving along a nonstraight path)), you may have noticed that the object stays right-side up as it moves along the path—even if the path’s a loop-de-loop, like the one in the fly example. That effect might be what you want. If it isn’t, and you want your object to turn to face the path as it moves along, you can do so easily by turning on the “Orient to path” checkbox in the classic tween section of the Properties panel (Figure 3-31).
Imagine placing a sheet of red construction paper containing a cutout of a star over a piece of green construction paper. The result you see, when you look at the two sheets stacked on top of each other, is a green star on a red background. That’s the concept behind mask layers, a special type of layer that lets you create shaped “portholes” through which an underlying (masked) layer appears.
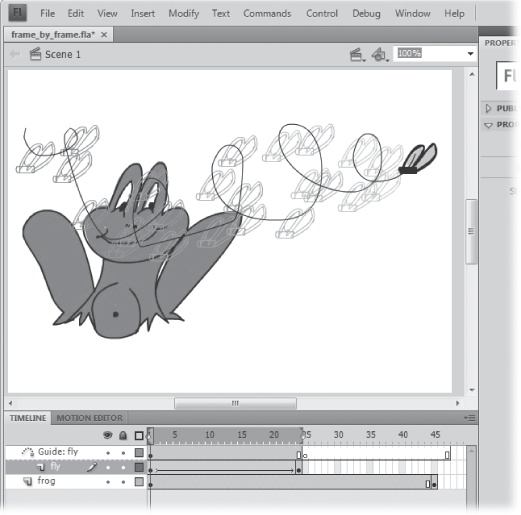
Figure 3-30. Here you see the effect of a motion guide layer: The fly buzzes along according to a nonlinear, loopy path—much more realistic and interesting than a straight shot from right to left. But notice that the fly always faces straight ahead, even when it’s upside down. If this isn’t the effect you want in your classic tweens, check out the “Orient to path” section on Orient to path.
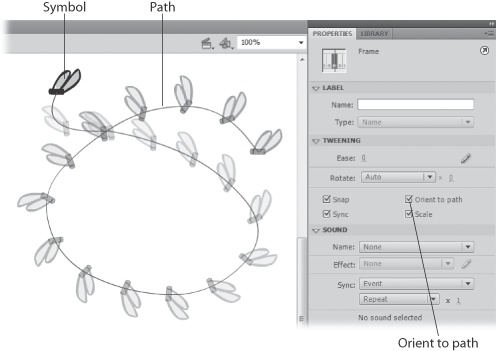
Figure 3-31. Turning on “Orient to path” in the Properties panel (click any frame in your classic motion tween layer to view Frame properties in the Properties panel) tells Flash to turn the object as it moves along the path. Here, onion skinning (Editing Multiple Frames) is turned on to show the fly’s position in different frames.
At a masquerade ball, masks hide the important stuff—your face. It’s a little different in Flash and other graphic arts endeavors. Masks hide part of a picture in order to reveal the important stuff—the subject. You use masks to direct the eye of your audience. And when you apply a classic tween to the porthole, you can create an effect that looks like a spotlight playing over an image—mighty cool, indeed.
Open the file mask_begin.fla.
You can download this file, a working example of the file (mask_finished.fla), and all the other examples shown in this chapter from the “Missing CD” page at http://missingmanuals.com/cds.
Click Layer 1 to select it.
In the example file for this section (mask_begin.fla), Layer 1 contains a bitmap image.
Click the Insert Layer button. (The Insert Layer button is on the bar below the layer names and looks like a folded-over page.)
Flash creates a new layer named Layer 2 and places it above Layer 1.
Double-click the layer icon next to Layer 2.
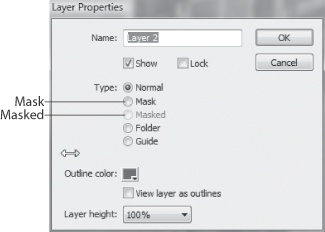
The Layer Properties window appears (Figure 3-32).
In the Layer Properties window, turn on the Mask checkbox, and then click OK.
Flash displays the mask icon next to Layer 2.
Double-click the layer icon next to Layer 1.
The Layer Properties window appears again.
This time, turn on the checkbox next to Masked, and then click OK.
Flash displays the masked icon next to Layer 1.
Tip
Flash gives you a bunch of ways to create masks and masked layers (by right-clicking an existing layer, and then choosing Mask or Masked, for example), but one thing doesn’t change: Masked layers have to appear directly below mask layers in the Layers window for the effect to work. If you create a mask layer and a masked layer in the wrong order, just drag the mask layer above the masked layer, and you’re all set.
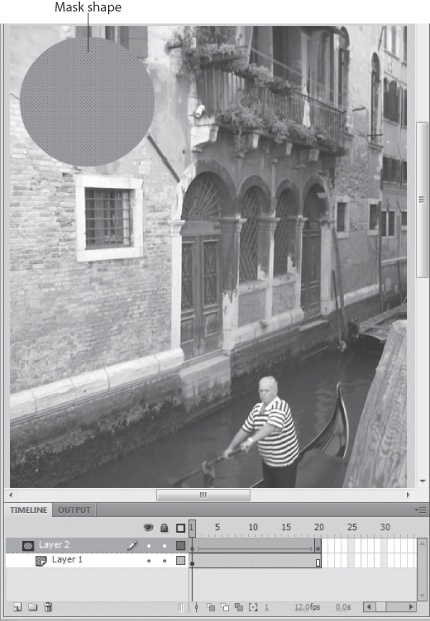
Click to select the first frame in Layer 2 (the mask layer). On the stage, click the Oval tool, and then draw a circle in the upper-right corner of the stage (Figure 3-33).
The oval can be any color you choose, since it won’t appear in the finished effect; instead, it’ll act as a see-through portal.
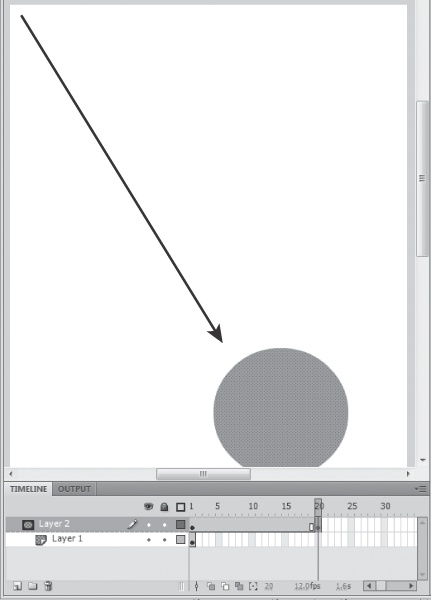
In Layer 2, click Frame 20, and then select Insert → Timeline → Keyframe.
Flash inserts a keyframe in Frame 20. On the stage, the bitmap image disappears so that all you see is the circle you drew in step 8.
Click the Select tool, and then drag the circle to the lower-right corner of the stage (Figure 3-34).
Figure 3-34. In this example, you’re creating a simple tween in Layer 2, so that the portal moves across the bitmap image showing only a circle’s worth of image at any one time (a spotlight effect). But you can create static portals (masks), too. The simplest is a circle or a square, but nice thick letters also make a compelling effect.
The circle jumps back into the upper-left corner of the stage, and the Properties panel appears.
Select Insert → Shape Tween.
Flash displays an arrow in Layer 2, from Frame 2 through Frame 19, showing you it’s created a successful shape tween.
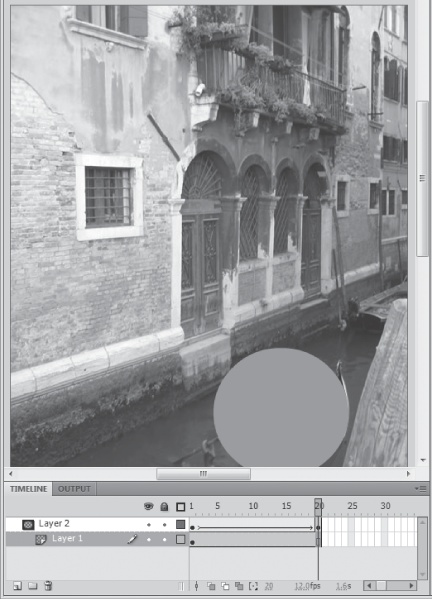
In Layer 1, click Frame 20, and then select Insert → Timeline → Keyframe.
Flash inserts a keyframe. On the stage, the bitmapped image appears behind the circle (Figure 3-35).
Figure 3-35. At Frame 20 (notice the position of the playhead), the bitmapped image appears on stage along with the circle. At this point, testing the animation by choosing Control → Test Movie shows you the mask effect. But to see the mask effect on the stage, in edit mode, you need to lock both the mask and masked layers.
Click the lock icon you see above the layers once to lock both Layer 1 and Layer 2.
Flash shows you the mask effect on the stage (Figure 3-36).
Run the animation by choosing Control → Test Movie.
In the test window, you see the circle move in a diagonal line, revealing the bitmap beneath just as though you were looking through a tube sweeping diagonally across the image.
In the previous section, you saw an example of an animated mask that moves in a straight line across the image on the masked layer. Wouldn’t it be great if you could add a motion path to the mask to make the spotlight dip and weave and wiggle its way around the image?
Well, you can—but not in the usual way.
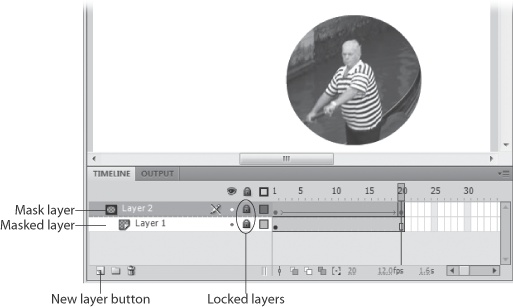
Figure 3-36. Here you see the effect at Frame 20: a circle’s worth of bitmap, just like that cutout star showing the green construction paper underneath. You can test the effect quickly on the stage by dragging the playhead backward, from Frame 20 to Frame 1.
Flash doesn’t let you apply a motion guide layer (Motion guide layers (moving along a nonstraight path)) to a mask layer. (Selecting a mask layer and clicking the Add Motion Guide icon has no effect, and right-clicking a layer, and then trying to choose Add Motion Guide from the shortcut menu doesn’t work, either: The Add Motion Guide option appears grayed out.) But you can add a motion path to a mask indirectly, by using an animated movie clip symbol as the mask shape. It’s a simple matter of creating the mask shape, and then converting it to a movie clip symbol before applying your motion tween. (You can learn a lot more detail about movie clip symbols on Symbols and Instances.)
Note
You can find a copy of the example shown in this section, at the “Missing CD” page (http://missingmanuals.com/cds). Look for mask_guide_begin.fla (ready for you to begin the exercise) and mask_guide_finished.fla (a completed, working example).
Here’s how to animate a mask layer, step by step:
Open the file make_guide_begin.fla. Click the first frame of a new document, and then add the image or drawing you want in the masked layer (Layer 1).
As you can see in Figure 3-37, the background image for this example file is a Venice scene.
Choose Insert → Timeline → Layer.
Flash creates a new layer named Layer 2 and places it just above Layer 1.
Double-click the layer icon next to Layer 2.
The Layer Properties window appears.
In the Layer Properties window, turn on the checkbox next to Mask, and then click OK.
Flash displays the mask icon next to Layer 2.
Double-click the layer icon next to Layer 1.
Once again, the Layer Properties window appears.
This time, turn on the checkboxes next to Masked and Lock, and then click OK.
Flash displays the masked icon next to Layer 1; there’s also a little padlock that lets you know Layer 1 can’t be edited (you don’t want to modify it inadvertently).
Click the first keyframe in Layer 2.
Flash highlights the selected keyframe.
Use the Oval tool to draw a circle on the stage.
So far, these are the same steps you take to create a straight-line motion tween.
Select the entire circle (including its outline if it has one), and then choose Modify → Convert to Symbol.
In the Convert to Symbol dialog box, choose Movie Clip from the drop-down menu, and then click OK.
The dialog box disappears.
On the stage, double-click the circle symbol.
Flash pops you into symbol editing mode: The content you placed in the masked layer appears grayed out, the name of your symbol appears in the Edit bar, and you see a fresh, clean timeline (the symbol’s timeline) containing just one layer.
On the stage, select the entire circle again (including its outline), and then choose Modify → Convert to Symbol.
The Convert to Symbol dialog box appears.
Leaving the Movie Clip option selected in the drop-down menu, click OK.
The dialog box disappears. Flash places a copy of this second symbol into the Library. On the stage, a selection box appears around the circle and a center point appears at the center’s circle.
Click Frame 20, and then select Insert → Timeline → Keyframe.
Flash inserts a keyframe into Frame 20.
Right-click Layer 1, and then choose Add Classic Motion Guide from the shortcut menu.
Flash creates a guide layer and places it directly above Layer 1.
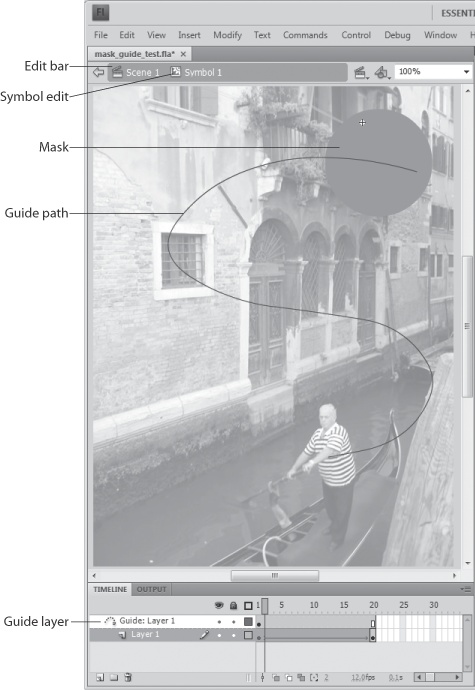
In Guide: Layer 1, click Frame 1 (the first keyframe). Then use the Pencil tool to draw a line (a motion path) on the stage.
The motion path you draw can be curved, circular, jagged—anything you like. Figure 3-37 shows an example.
In Layer 1, click Frame 1. Using the Selection tool, drag the circle until its center snaps to the first end of the motion path. Click Frame 20, and then drag the circle until its center snaps to the second end of the motion path.
You’ve just created the beginning and end points for the spotlight animation. Now you can tween it, as described next.
In Layer 1, right-click Frame 2, and then choose Create Classic Tween from the shortcut menu.
Flash saves the movie clip symbol and brings you back to the symbol timeline.
In the Edit Bar above the stage, click Scene 1.
Flash closes the Symbol Edit window and shows you the main timeline again, with a single frame.
Lock Layer 2, and then test your animation using Ctrl+Enter (⌘-Return on a Mac).
Locking Layer 2 masks the image in the layer except for the circle. When you test the animation, the circle moves around the image, like a spotlight. The motion repeats itself, as the movie clip symbol with the mask loops through its separate timeline.
The movie clip symbol takes up just one frame (Frame 1) of the mask layer, which is Layer 2. You know it’s a symbol because you see both the cross and circle that are the symbol’s registration point and transformation point, respectively; you know it’s in the first frame because when you click the first frame of Layer 2, Flash displays a selection box around the symbol, as shown in Figure 3-38.
If you’re a tween fan, you’re going to love all the new motion tween features introduced in Flash CS4. One of the biggest changes from the classic tween is the ability to make size, rotation, and color changes in any frame throughout the tween. The tools you use to make changes in your tween are much more precise and have more features than the old tools.
Note
If you’re learning Flash tweening for the first time, the new motion tween is a great place to start. It’s easy to use and very logical. If you’re a tween veteran from previous versions of Flash, consider this your re-education camp. The old motion tween is now called classic tween (Classic Tweening). The new, improved motion tween uses different tools and techniques, but you’ll love the results.

Figure 3-38. When you’ve finished adding the movie clip symbol to the mask layer, this is what you see: the selected symbol on top of the Layer 1 background. (You know it’s the mask layer—Layer 2—that contains the selected symbol because you can see that Layer 2 is highlighted.)
The next few examples show how to make a billboard sign, convert the sign to a symbol, and then use motion tweening to animate its position, size, color, and rotation. There are a few motion tween rules you need to keep in mind:
Motion tweens work on a single object. If you need to animate more than one object, put your objects on separate layers, and then apply motion tweens to each.
Motion tweens use symbols as the target object. If you combine several objects into one symbol, that’s considered a single object as far as motion tween is concerned.
Motion tweens use property keyframes to change the target object’s properties over the course of the tween. Don’t confuse property keyframes with plain old keyframes—they’re different beasts. Property keyframes are used only in motion tweens, and, as the name implies, they mark the points where the properties (position, size, color) of an object change.
Note
you can find the finished Flash document with the motion tween at http://missingmanual.com/cds. The file is named motion_tween_finished.fla.
The following example shows how to create a billboard sign using rectangle primitive and text tools. Then you use the Properties panel to change the appearance of the two parts that make the sign. The final step is to combine and convert the rectangle and text into a single Movie Clip symbol.
From the Tools palette, choose the Rectangle Primitive tool, and then draw a rectangle.
If the Tools palette isn’t showing, choose Window → Tools.
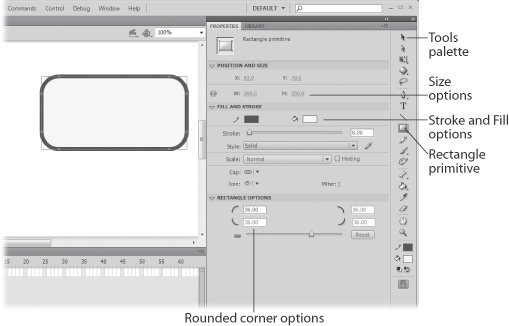
Use the Properties panel (Figure 3-39) to fine-tune the appearance of the rectangle with the following settings:
Under Position and Size: Click the numbers next to W (width) and type 300. Click the H (height) and type 150.
Under Fill and Stroke: Change the stroke to a dark brown and the fill to a pale yellow. Type 8 in the Stroke text box to change the thickness of the stroke.
Under Rectangle Options: Type 36 into a rounded-corner box. (If all the corners are going to be the same, you only need to enter a value in the upper-left corner.)
Figure 3-39. After you create your rectangle, you can adjust its size, color, and all other aspects of appearance using the controls in the Properties panel. Just select your rectangle and tweak away.
Tip
When you see blue numbers with tiny dots, that means you can change the value by scrubbing (clicking the number and dragging your mouse left or right). Most number values in the Properties panel are scrubbable. If your mouse has a wheel, you can move the cursor over the number, and then spin the mouse wheel.
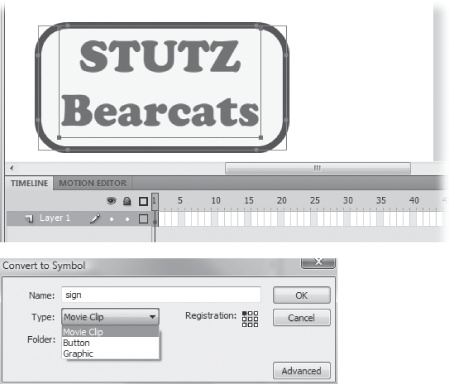
Type a message for your sign, like Stutz Bearcats, and then use the Properties panel to fine-tune its appearance so it looks good on your sign. For example:
Press Enter to put one word on each line.
Under Character: Choose a bold typeface, like Cooper Black, as shown in Figure 3-40.
Adjust the Size to fit on the signboard. Cooper Black set to 55 points works for this example.
Select both the rectangle and the text, and then convert the selection to a Movie Clip symbol (Modify → Convert to Symbol).
A dialog box opens where you can give your symbol and name like sign as shown in Figure 3-40. A drop-down menu gives you an opportunity to choose from three different types of symbols: MovieClip, Button, or Graphic.
Now that you’ve got a fancy billboard sign to animate, it’s time to put some motion in the motion tween. In the following steps, you’ll start with the sign in the upper-left corner, and then make it drop to the bottom of the stage and take a couple of bounces along the bottom as it moves to the right. After that, it will ricochet off the right wall and end up in the middle of the screen. Sound complicated? Not so with Flash. Creating a motion tween is simply a matter of deciding where you want to place the sign at different points of the timeline. Here are the steps:
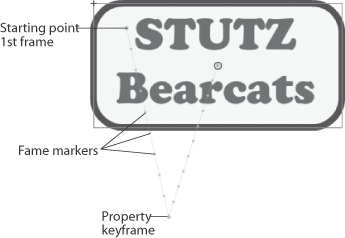
Drag the sign to the upper-left corner of the stage.
You don’t have to be precise about the placement. Wherever you drag it becomes the starting position for the sign in the first frame of the tween.
Click Frame 60, and then hit F5 to insert a frame.
Flash adds 59 frames to the timeline, creating a timeline that’s 60 frames long. The first frame in the timeline is a keyframe holding your sign.
Right-click one of the frames in the middle of the timeline, and then choose Create Motion Tween from the shortcut menu.
The frames in the timeline layer turn blue to indicate a motion tween.
Drag the playhead to the 10th frame, and then drag the sign to the bottom of the stage.
As you drag the sign, a line with little round points appears marking the motion across the sage. Each of the small points indicates the sign’s position at a particular frame. So, the third dot represents the third frame on the timeline.
A small diamond marks the point in the timeline where you changed the position of the sign. This point is called a property keyframe.
Note
The property keyframe is a new concept in Flash CS4. While it’s similar to a keyframe, it’s important to understand the differences. In keyframes, you can add and remove drawings from the stage. In property keyframes, you can only change the properties of the target object. You can’t add new elements to the stage.
Drag the playhead to the 20th frame, and then drag the sign up above the midpoint of the stage, as shown in Figure 3-41.
A new line appears on the stage following the motion of the sign, and a new property keyframe appears in the timeline at Frame 20.
Drag the playhead to the 30th frame, and then drag the sign back down to the bottom of the stage.
This frame marks the second time the sign bounces on the bottom of the stage. You can even position it so the bottom of the sign is below the bottom of the stage to indicate a deeper bounce!
Drag the playhead to the 40th frame, and then drag the sign to the middle of the right edge of the stage.
Now you’re bouncing off the walls, but then you knew it would come to this, didn’t you?
Drag the playhead to the 50th frame, and then drag the sign to the center of the stage.
Center stage makes for a good dramatic stopping point.
Test your animation to check out the motion by pressing Enter to run it within Flash or Ctrl+Enter (⌘-Return) to test the movie in Flash Player.
Your sign should follow the path from the upper-left corner down to the bottom of the stage for a couple of bounces, ricochet once off the right wall, and then come to a stop in the center.
Part of the power of the new motion tween method is that you can change almost any type of property anywhere along the timeline. This gives you much more control than was possible with the classic tween where Flash made most of the decisions between two standard keyframes. This section shows how change the W (width) and H (height) properties and following sections explain how to change the transparency and how to rotate an object, all in the same tween.
Motion alone is fine and dandy, but there have to be some ways to make this animation a little more exciting. For example, it would be more dramatic if the sign starts out small and then grows throughout the tween. Here’s a quick and easy way to make that happen:
Drag the playhead back to the first frame.
As you scrub (drag) the playhead, the sign moves along the motion path.
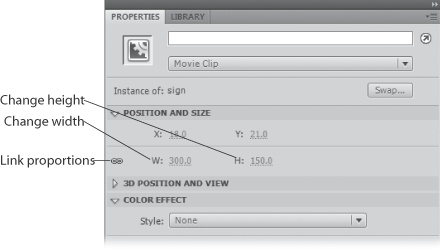
Select the sign, and then, in the Properties panel under Position and Size, change the sign’s dimensions to 100 x 50 pixels, as shown in Figure 3-42.
If you click the “link” symbol next to W (width) and H (height), the width to height proportions remain linked. Otherwise, you can change the width and the height independently.
Drag the playhead to the last frame (Frame 60).
As you drag, the smaller sign makes the journey along the motion path.
Click the Scale tool in the Tools palette, and then scale the Sign so that it nearly fills the stage.
Shift-click one of the corners to keep the sign proportions as you scale it. You can use the Scale tool to change both the size and the rotation of an object. If you need a refresher on using the Scale tool, see Scaling objects.
Scrub the playhead to see the scaling effect.
The sign starts off at Frame 1 and gradually grows to its monstrous size at the end of the animation.
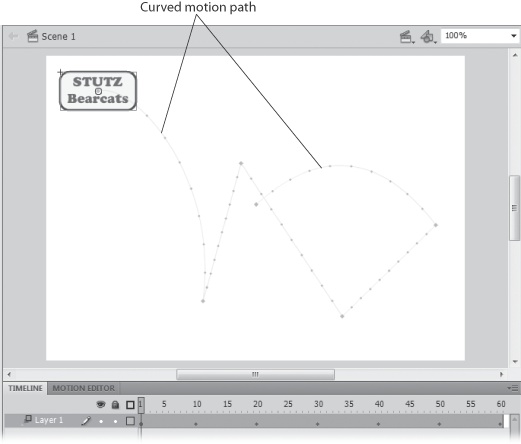
Use the Select arrow from the Tool palette to bend curves into the motion path.
The cursor shows a small curve icon when it’s close to the path, indicating that you can drag to shape the curve. You can edit the motion path by moving and bending the path as shown in Figure 3-43. When you hold the Select cursor over the path, a small curve appears next to the arrow. As you change the path, the number of frames between property keyframes may change. If you’re unhappy with a path edit, just press Ctrl+Z (or ⌘-Z on a Mac) to undo the change.
Test your animation either within Flash (Enter) or in the Flash Player (Ctrl-Enter).
The sign follows the curves you created in the motion path. The sign starts off small and grows throughout the animation until Frame 50, where it nearly fills the screen. For the last 10 frames, the sign stays the same size, because there were no further changes in its scale.
Property keyframes are markers in the timeline where a property value changes. If there’s a difference in a value between two property keyframes, Flash tweens (creates in-between frames) to accommodate the change. That’s what happened between Frame 1, where the sign dimensions were 100 x 50 pixels, and Frame 50, where the sign nearly fills the screen. There were no further size changes, so the sign’s dimensions don’t change for the last 10 frames of the animation.
You can create another dramatic effect for your sign by adjusting the transparency, or as the techies like to say, the alpha channel. Typically, computer video has RGB channels for red, green, and blue. To store information about the opacity and transparency of an image, programmers needed another channel, and they dubbed it the alpha channel because they needed another letter and why not start at the beginning of the alphabet?
Making your sign semi-transparent at the beginning, and then fully opaque at the end, increases the illusion that the sign is coming towards the audience. You can easily adjust transparency during a tween in Flash CS4’s new Motion Editor window. Chapter 7 in its entirety is devoted to the intricacies of the Motion Editor, but the next two sections will give you a working introduction. You’ll get a feeling for the way you set values for different motion tween properties:
Drag the playhead to Frame 1, and then click the layer to make sure that the motion tween is selected.
Your sign is back to its starting position on the motion path. When you select the motion tween, the words Motion Tween appear at the top of the Properties panel.
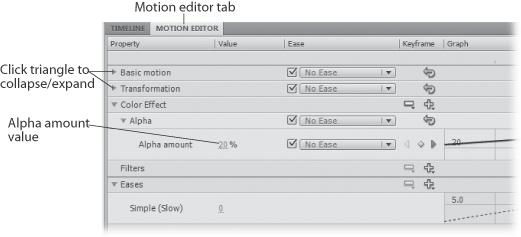
Click the Motion Editor tab next to the Timeline tab.
If you don’t see the Motion Editor tab, choose Window → Motion Editor to make it visible, as shown in Figure 3-44.
Figure 3-44. The Motion Editor is command central for tweaking every little detail in your motion tween. It’s made up of panels that give you access to properties, effects, and filters. Click the triangles to expand and collapse the different panels. Click the + and - buttons to add and remove effects and filters. The properties that use numeric values work just like the ones in the Properties panel: either click and type a number or use your mouse to scrub in a value.
In the Motion Editor window, find the Color Effect section, and then click the + sign to add an Alpha color effect to the tween.
If some of the panels are expanded, you may not see the Color Effect panel right away. Either close the open panels by clicking their flippy triangles, or use the scroll bar to find the Color Effect panel. When you click the + button, a shortcut menu gives you four color related choices: Alpha, Brightness, Tint, and Advanced Color. After you choose Alpha, a new subpanel opens showing an Alpha amount as a percentage.
Next to “Alpha amount”, change the value to 20 percent.
You can click the number, and then type 20, or you can scrub the value until 20 appears in the box. Notice how the graph to the right changes as you change the value. More on that in Chapter 7.
Click the Timeline tab, and then drag the playhead to the last frame.
By moving the playhead to a new location, you can enter a different Alpha value to create the tween.
Click the Motion Editor tab, and then change the Alpha amount to 100 percent.
Setting the Alpha amount to 100 percent makes the sign symbol completely opaque.
Test your animation in Flash or using the Flash Player.
At this point, the animation looks pretty much the same whether you run it inside of Flash (Enter) or you compile the animation and test it in the Flash Player (Ctrl+Enter). Position, size, and alpha properties are all visible inside of Flash, but that’s not always the case with some filters, components, timeline effects, and ActionScript code.
The previous examples used motion tweening to change the position, size, and transparency of the sign. This last tutorial shows you how to spin the sign using the rotation property. You can make your sign appear to tumble from its height and spin while it skips across the bottom of the stage and bounces off of the right side of the stage.
Drag the playhead to Frame 40.
This point is where the sign hits the wall on the right side of the stage.
Go to the Basic Motion section of the Motion Editor, and then change the Rotation Z value to 1800.
The Rotation Z value (Figure 3-45) rotates an object around its center point. The value refers to the degrees of a circle, so 360 is one complete rotation. A value around 1800 gives your sign a good spin in a clockwise direction.
Drag the playhead to Frame 50, and then change the Rotation Z value to –360.
A negative value rotates an object in a counter-clockwise direction, so this value creates the effect of the sign hitting the wall and taking on a counterspin.
Test your animation.
At this point your sign moves, grows, changes from semi-transparent to opaque, and spins around in different directions. If you want to explore, go ahead and continue to experiment with some of the other properties in the Motion Editor.
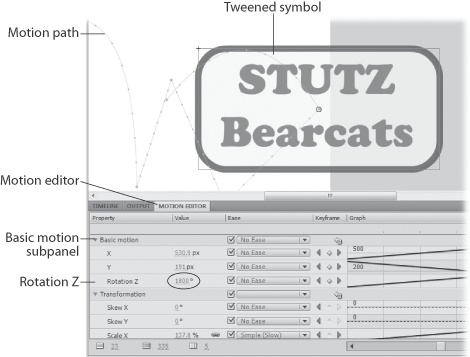
Figure 3-45. The Motion Editor is made up of numerous subpanels. Each subpanel gives you access to tweenable properties. Here the Rotation Z property is set to 1800. You can click and type in a value or drag to “scrub in” a value.
Depending on your computer power and personal taste, you may find that the sign spins a bit too fast as it bounces around. There are a couple of ways to change the spin speed. First of all, you can change the number of rotations by using smaller numbers in the Rotation Z value. Or, you can increase the length of time it takes your tween to run by adding frames to the timeline. The easiest way to do that is to click the edge of the last frame in the tween, and then drag it to the right. Flash inserts frames as you drag and keeps the changes (property keyframes) proportionally spaced.
You can insert more frames into the tween at any point along the timeline. Or you can change the number of spins, by using lower numbers in the Rotations Z value.
Note
This section gives you an introduction to the motion tween and Motion Editor. For a more complete rundown on using the Motion Editor to modify your tween, see Chapter 7.