
Chapter 8. Skillful Project Maintenance
If you have done any significant amount of software development, you’ll know that maintaining other people’s code can be a nightmare. You may have noticed that even maintaining your own code can quickly become hellish if you are away from a project for more than a few months. On the surface, it may seem that any project that is not actively being worked on by its original developers is doomed to stagnate.
There are ways to fight back against software rot, many of which have little to do with the quality of the code itself. Instead, by following some conventions as to how you structure your project, you can make it easier to navigate. By using lightweight tools, you can simplify automatic generation of API documentation, manage dependencies and custom-built software packages, and automate your software build process in a number of ways.
When you combine the project management utilities Ruby provides (RDoc, RubyGems, Rake, etc.) with some basic guidelines for how to lay things out, you end up with a powerful advantage. Rather than working around countless inconsistencies in overall project organization, you can reuse your knowledge from working on other projects to approach new codebases. Nowhere is this more valuable than in open source software, in which contributors may need to patch code that they have never worked with before.
For this reason, we’re going to kick off this chapter with a look at the benefits that standards can offer us, through a brief review of the conventions used in the Haml project. As we explore its codebase, try to imagine yourself as the new maintainer of the project. In that way, we’ll see how far our assumptions about the overall structure of a skillfully maintained Ruby project can get us.
Exploring a Well-Organized Ruby Project (Haml)
Haml is a clean and powerful XHTML templating engine for Ruby that is used by many as an alternative to ERB within web applications. It was originally developed by Hampton Catlin and is now actively maintained by Nathan Weizenbaum. Though the features of this library are certainly interesting in their own right, we’ll primarily be focusing on the aspects of what makes Haml a maintainable project. To do this, we can pretend we have no idea what it actually does, and seek to discover a bit about these details by exploring the source code itself.
After grabbing the source,[12] we can start by looking for a file called README or something similar. We find one called README.rdoc, which gives us a nice description of why we might want to use Haml right at the top of the file:
Haml and Sass are templating engines for the two most
      common types of documents on the web: HTML and CSS, respectively. They
      are designed to make it both easier and more pleasant to code HTML and
      CSS documents, by eliminating redundancy, reflecting the underlying
      structure that the document represents, and providing elegant, easily
      understandable, and powerful syntax.
The rest of the file fills in other useful details, including how to install the library, some usage examples, a list of the executables it ships with, and some information on the authors. For a user, this might be enough to get up and running with the library. But from our “imaginary new maintainer” perspective, one line in the README caught my eye: To use Haml and Sass programmatically, check out the RDocs for the Haml and Sass modules.
This indicated to me that the project has autogenerated API documentation, which is as good a place as any to start when you’re first getting to know the low-level details of a project. Noticing the project also has a Rakefile, we can check to see whether there is a task for generating the documentation:
sandal:haml $ rake --tasks
(in /Users/sandal/devel/haml)
rake benchmark                 # Benchmark haml against ERb.
rake clobber_package           # Remove package products
rake clobber_rcov              # Remove rcov products for rcov
rake clobber_rdoc              # Remove rdoc products
rake gem                       # Build the gem file haml-2.1.0.gem
rake install                   # Install Haml as a gem.
rake package                   # Build all the packages
rake profile                   # Run a profile of Haml.
rake rcov                      # Analyze code coverage with tests
rake rdoc                      # Build the rdoc HTML Files
rake release                   # Release a new Haml package to Rubyforge.
rake repackage                 # Force a rebuild of the package files
rake rerdoc                    # Force a rebuild of the RDOC files
rake test                      # Run tests / To run with an alternate versi...
rake test:rails_compatibility  # Test all supported versions of rails.
Sure enough, midway down the task list, we see rake rdoc. Running this command spits out a
bunch of noisy output, and then eventually generates some HTML
documentation in the rdoc/ directory. If we open up
rdoc/index.html in our browser, we can see a complete
class listing of the project, along with the familiar
README in HTML format. If we quickly scan the list of
classes, Haml::Engine is among the most
interesting, based on name. Pulling up the documentation, we see a brief
summary of the object along with its methods and attributes (Figure 8-1).

Clicking on any of the methods in the list will bring us to their specific documentation, where we can even view their source, among other things. In the interest of peering under the hood, let’s take a look at the source. We can see a hint from the RDoc that this library follows a common convention, with source files in lib/module_name/class_name.rb, which in this case is lib/haml/engine.rb.
Looking at just the top of the file, we see that the RDoc is actually being generated directly from the source:
module Haml
  # This is the class where all the parsing and processing of the Haml
  # template is done. It can be directly used by the user by creating a
  # new instance and calling <tt>to_html</tt> to render the template. For example:
  #
  #   template = File.read('templates/really_cool_template.haml')
  #   haml_engine = Haml::Engine.new(template)
  #   output = haml_engine.to_html
  #   puts output
  class Engine
     #...
  end
end
We could read directly through the source now to see which functions
are most important, but tests often provide a better road map to where the
interesting parts are. There are a few conventions for how to label test
files, but the one Haml uses is straightforward and common. We find the
relevant tests for Haml::Engine in
test/haml/engine.rb.
Although we won’t look through this file in great detail, you’ll
find that it provides comprehensive testing of the overall templating
language that Haml::Engine processes.
The top of the file starts with a couple helpers to keep the tests clean,
including one that renders Haml to HTML:
def render(text, options = {}, &block)
  scope  = options.delete(:scope)  || Object.new
  locals = options.delete(:locals) || {}
  engine(text, options).to_html(scope, locals, &block)
end
Already this gives us some hints as to how Haml::Engine works. We can see that this helper
is further aided by another method that initializes the Haml::Engine, which is not particularly
important for us to look at.
If we look just a little deeper in the file, we start to see how
render() is being used to generate HTML
for comparison to the expected values:
def test_empty_render_should_remain_empty
  assert_equal('', render(''))
end

def test_attributes_should_render_correctly
  assert_equal("<div class='atlantis' style='ugly'></div>",
    render(".atlantis{:style => 'ugly'}").chomp)
end

def test_ruby_code_should_work_inside_attributes
  author = 'hcatlin'
  assert_equal("<p class='3'>foo</p>", render("%p{:class => 1+2} foo").chomp)
end
This is just a tiny sampling of what is covered in this test case,
but it gives you a clear sense of how tests are very useful in describing
how some code is meant to be used. If we wanted to dig around and make
some changes to how the code worked, we would first need to verify that
the tests actually complete successfully. We can use rake again for this. Though the output is a
little messy, we can see that the whole suite is passing without errors
upon running the rake test
command:
sandal:haml $ rake test
(in /Users/sandal/devel/haml)
[ file list omitted ]
Started
.................................................................................
.................................................................................
....... merb couldn't be loaded, skipping a test.................................
Finished in 5.031813 seconds.

232 tests, 1812 assertions, 0 failures, 0 errors
This tells us that Haml is working fine on our system, at least to
the extent that the original developers have specified. It is impossible
to know if tests are truly comprehensive, but by the looks of Haml’s
tests, which even include examples covering some regressions, you can be
fairly confident that the tests will provide a decent safety net. By
looking through these tests, we see that most of them hinge on the
Haml::Engine constructor, as well as
the Haml::Engine#to_html
method.[13] Though we won’t get into it here, this seems like a good
entry point to study if you want to get more familiar with the core of
Haml’s implementation. Along the way, you will likely encounter new
objects and methods that you aren’t familiar with. When this happens, go
back to the tests and API documentation as needed. Repeating this process
is a surefire way to learn any well-tested library that follows common
Ruby organizational conventions. But for now, let’s revisit something we
glossed over a bit earlier.
When we saw the rake task listing
earlier, we saw all sorts of different tasks available to us. We covered
the way to set up a test task in Chapter 1, Driving Code Through Tests—and we’ll look at the RDoc generation task a
little later on in this chapter—but one task that is particularly
interesting is the rake install task,
which will install Haml as a gem from the current sources. This can be
very handy for testing your custom modifications locally, so let’s take a
look at how that works:
desc "Install Haml as a gem."
task :install => [:package] do
  sudo = RUBY_PLATFORM =~ /win32/ ? '' : 'sudo'
  gem  = RUBY_PLATFORM =~ /java/  ? 'jgem' : 'gem'
  sh %{#{sudo} #{gem} install --no-ri pkg/haml-#{File.read('VERSION').strip}}
end
Here, we see that Haml has provided a Rake task that will install a
generated gem for you. It is smart about whether or not to use sudo, depending on whether you are running on
Windows. It also has some provisions built in to check whether you’re
running on JRuby, where gems are installed via jgem instead of gem. Finally, it just executes a shell command
in which it reads the current version from a file called VERSION. As you can see, the contents of
this file are far from exciting:
sandal:haml $ cat VERSION
2.1.0
Using this approach, the Rakefile is kept independent of a particular version number, allowing a single place for updating version numbers. All of these tricks are done in the name of simplifying maintainability, making it easy to generate and install the library from source for testing.
Though I’ll cover how to set up gem specs in detail later, we can
take a quick look at the :package task
that :install depends on. It is
actually generated via a utility provided with Rake, called Rake::GemPackageTask:
require 'rake/gempackagetask'
load    'haml.gemspec'

Rake::GemPackageTask.new(HAML_GEMSPEC) do |pkg|
  if Rake.application.top_level_tasks.include?('release')
    pkg.need_tar_gz  = true
    pkg.need_tar_bz2 = true
    pkg.need_zip     = true
  end
end
Here, we see that Haml customizes things a bit by generating zipped
archives only when the :release task is
executed. Otherwise, only a gem is produced. This is mainly because zipped archives are not necessary
for a local gem install, and Haml uses its :package task both for preparing files for a
release and for local builds.
Though we haven’t dug down to actually fix anything in this code yet, or make any significant changes, we can see how much decent project organization comes into play when it comes to maintainability. Without any previous experience with the library, we were able to figure out what it is meant to do, saw a few examples of how it worked, generated documentation directly from the source that gave us some clues as to what the important objects were, and then found tests that described exactly how these objects should work.
We were able to run these tests to verify that the expectations set by the project maintainers were being upheld. We also saw how to build and install a package from source to be used system-wide via RubyGems. This provides us a way to try out our modifications locally before releasing the code in the wild, using the same packaging system that Ruby libraries are typically distributed through.
The important thing to remember here is that although Haml is a very good example of a Ruby library that is highly consistent with conventions, it didn’t invent any of them. In fact, this entire section was written based on my previous assumptions on how a well-structured Ruby project should operate, based on my experiences working with many popular open source codebases. We’ll now move from how this works in other people’s code to how you can follow these conventions in your own projects. Once those basic ground rules are established, we can move on to specific details about how to use tools such as RDoc, RubyGems, and Rake effectively to make maintenance much easier.
Conventions to Know About
When we walked through Haml in the previous example, we could see that it had a high degree of discoverability baked in through the conventions it uses. Though Ruby is free-form in nature and allows you to structure your files in pretty much any way you want, it makes sense to standardize in most cases. Making your project easily accessible to your users so they can figure out some questions on their own is one of the easiest things you can do to make your project more maintainable. Though each of the tips in this section may seem a bit trivial, combining them can be very powerful.
What Goes in a README
A somewhat universal software development standard is to have a README file that provides a starting point to your software. Finding the right balance of information to include in this file can be a bit of a challenge.
Minimally speaking, a good README should include everything that is necessary to begin working with a project, and nothing more. For starters, you’ll need a brief one- or two-paragraph description of what the project is for, and what problems it is meant to solve. Drawing from another good open source example, we can see that the README for James Gray’s HighLine library opens in exactly this way:
== Description

Welcome to HighLine.

HighLine was designed to ease the tedious tasks of doing console input and
output with low-level methods like gets() and puts().  HighLine provides a
robust system for requesting data from a user, without needing to code all the
error checking and validation rules and without needing to convert the typed
Strings into what your program really needs.  Just tell HighLine what you're
after, and let it do all the work.
Next, it is generally a good idea to point out a couple of the core classes that make up the public API of your project. You don’t need to be comprehensive here; you just need to point out where the good starting points might be for users who wish to browse the API documentation:
== Documentation

See HighLine and HighLine::Question for documentation.
Because sometimes raw API documentation isn’t enough to get people started, it’s often a good idea to include a brief synopsis of your project’s capabilities through a few simple examples. You probably don’t want to get into very complicated needs here, just something to help users get their feet wet:
== Examples

Basic usage:

  ask("Company?  ") { |q| q.default = "none" }

Validation:

  ask("Age?  ", Integer) { |q| q.in = 0..105 }
  ask("Name?  (last, first)  ") { |q| q.validate = /Aw+, ?w+/ }

Type conversion for answers:

  ask("Birthday?  ", Date)
  ask("Interests?  (comma sep list)  ", lambda { |str| str.split(/,s*/) })

Reading passwords:

  ask("Enter your password:  ") { |q| q.echo = false }
  ask("Enter your password:  ") { |q| q.echo = "x" }

ERb based output (with HighLine's ANSI color tools):

  say("This should be <%= color('bold', BOLD) %>!")

Menus:

  choose do |menu|
    menu.prompt = "Please choose your favorite programming language?  "

    menu.choice(:ruby) { say("Good choice!") }
    menu.choices(:python, :perl) { say("Not from around here, are you?") }
  end

For more examples see the examples/ directory of this project.
If your install instructions are simple, you can just embed them in your README file directly. However, in the case of HighLine, several install methods are supported, and optional dependencies enable certain features. For this reason, the README simply contains a reference that tells the user to look in the INSTALL file. This is what that file looks like:
= Installing HighLine

RubyGems is the preferred easy install method for HighLine.  However, you can
install HighLine manually as described below.

== Installing the Gem

HighLine is intended to be installed via the
RubyGems[http://rubyforge.org/projects/rubygems/] system.  To get the latest
version, simply enter the following into your command prompt:

  $ sudo gem install highline

You must have RubyGems[http://rubyforge.org/projects/rubygems/] installed for
the above to work.

== Installing Manually

Download the latest version of HighLine from the
{RubyForge project page}[http://rubyforge.org/frs/?group_id=683].  Navigate to
the root project directory and enter:

  $ sudo ruby setup.rb

== Using termios

While not a requirement, HighLine will take advantage of the termios library if
installed (on Unix).  This slightly improves HighLine's character reading
capabilities and thus is recommended for all Unix users.

If using the HighLine gem, you should be able to add termios as easily as:

  $ sudo gem install termios

For manual installs, consult the termios documentation.
Finally, once you’ve told users what your project is, where to look for documentation, how it looks in brief, and how to get it installed, you’ll want to let them know how to contact you in case something goes wrong:
== Questions and/or Comments

Feel free to email {James Edward Gray II}[mailto:[email protected]] or
{Gregory Brown}[mailto:[email protected]] with any questions.
In the case of HighLine, we have a very minimal process because the library is small and simple. If you’re working on a bigger project, this might be the right place to link to a mailing list or bug tracker.
This pretty much sums up everything you need to know to write a good README. Although this explanation is admittedly not Ruby-specific, it is a skill that helps make even in-house projects much more accessible. A decent README will instruct other developers about the bare minimum details, and get them launched in the right direction for working with your code.
Keep your README short and sweet so that it mainly points to information rather than containing a ton of information within itself. From a maintainability standpoint, this makes it much less likely that your README will become out-of-date or irrelevant.
Laying Out Your Library
Library files are generally kept in a lib/ directory. Generally speaking, this directory should only have one file in it, and one subdirectory. Earlier when we looked at Haml, we saw that the structure was lib/haml.rb and lib/haml/. For HighLine, it is lib/highline.rb and lib/highline/.
The Ruby file in your lib/ dir should bear the name of your project and act as a jumping-off point for loading dependencies as well as any necessary support libraries. The top of lib/highline.rb provides a good example of this:[14]
#!/usr/local/bin/ruby -w

require "erb"
require "optparse"
require "stringio"
require "abbrev"

require "highline/compatibility"
require "highline/system_extensions"
require "highline/question"
require "highline/menu"
require "highline/color_scheme"

class HighLine
 # ...
end
Here we see some of the standard libraries HighLine needs to use,
as well as the rest of the classes that make up the project. In
HighLine’s case, there are no deeply nested classes, so most of these
map directly to class names, such as
“highline/question” → HighLine::Question. This means that when you
do a simple require "highline", all
the necessary classes to use the library are loaded through this single
file.
If you have deeply nested classes in your projects, you will typically repeat this process for each level of nesting. Here’s a simple abstract example of how that might work:
# a.rb
require "a/b"

# a/b.rb

require "a/b/c"
require "a/b/d"

# a/b/c.rb

module A
  module B
    class C
      # ...
    end
  end
end

# a/b/d.rb

module A
  module B
    class D
      #...
    end
  end
end
With a file structure as indicated by the comments in the example
code, and the necessary require statements in place,
we end up being able to do this:
>> require "a"
=> true

>> A::B::C
=> A::B::C

>> A::B::D
=> A::B::D
Although this is much more important in large systems than small ones, it is a good habit to get into. Essentially, unless there is a good reason to deviate, files will often map to class names in Ruby. Nested classes that are large enough to deserve their own file should be loaded in the file that defines the class they are nested within. Using this approach allows the user a single entry point into your library, but also allows for running parts of the system in isolation.
Although these conventions will take you far, in certain cases
it’s fine to deviate from them. Filenames do not necessarily need to be
representative of a class at all. For example, in HighLine, we have
lib/highline/import.rb, which simply injects some
of HighLine’s functionality into Kernel. This code contains no class
definitions to speak of. This is essentially organization by concept,
and can work fine for certain needs. Prawn has a similar feature called
lib/prawn/measurement_extensions.rb, which adds
some methods to Numeric for
simplified PDF point conversions. This is disabled by default, but once
required, you end up with the following functionality:
>> require "prawn/measurement_extensions"
=> true
>> 1.in
=> 72
>> 1.mm
=> 2.83464566929134
In the more general case, you might have files that contain extensions to provide backward compatibility with Ruby 1.8, or ones that make minor changes to core Ruby classes. Decent names for these are lib/myproject/compatibility.rb and lib/myproject/extensions.rb, respectively. When things get complicated, you can of course nest these and work on individual classes one at a time. For example, the following extension might be called lib/myproject/extensions/enumerable.rb:
module Enumerable
  def injecting(x)
    inject(x){|a,i| yield(a,i); a }
  end
end
However you choose to organize your files, one thing is fairly well agreed upon: if you intend to modify core Ruby in any way, you should do it in files that are well marked as extension files, to help people hunt down changes that might conflict with other packages. Do not randomly go about opening core classes in your other library files, unless you want to frustrate your users.
Generally speaking, following sound naming conventions and setting
up your requires in an organized fashion helps make
it easier to remember where to find the various classes and modules that
your project implements. Of course, this should be done in moderation,
as relatively small projects might meaningfully fit all in one file.
However, if and when you do decide to break things down, following this
general approach should serve you well.
You’ll notice that none of the kinds of files we’ve talked about so far are meant to be executed directly. Though scripts and applications that are meant to be run directly do not belong in lib/, they of course have a home and some basic guidelines to follow, so let’s take a closer look at how to work with them.
Executables
Scripts and applications are usually placed in a
bin/ dir in Ruby projects. These are typically
ordinary Ruby scripts that have been made executable via something like
a combination of a shebang line and a chmod
+x call. To make these appear more like ordinary command-line
utilities, it is common to omit the file extension. As an example, we
can take a look at the haml
executable:
#!/usr/bin/env ruby
# The command line Haml parser.

$LOAD_PATH.unshift File.dirname(__FILE__) + '/../lib'
require 'haml'
require 'haml/exec'

opts = Haml::Exec::Haml.new(ARGV)
opts.parse!
Here we see most of the common conventions for working with Ruby scripts in action. You can see that the executable starts with a shebang line that indicates how to find the Ruby interpreter. This is followed by a line that adds the library to the loadpath by relative positioning. Finally, the remaining code simply requires the necessary library files and then delegates to an object that is responsible for handling command-line requests. Ideally speaking, most of your scripts in bin/ will follow a similar approach.
Tests
There are a few common conventions for tests, depending on what
your needs are. However, among the most straightforward is to simply
place your tests in a /test folder. For something
like Prawn, we use the format
test/test_classname.rb, but omit the namespace. So for
Prawn::Document, we have
test/document_test.rb rather than
test/prawn_document_test.rb. If you have a project
that spans multiple namespaces, it’s fine to organize your tests in a
similar way to libraries. In the Haml library, a tool called Sass is
also provided, so the test structure includes files like
test/haml/engine_test.rb and
test/sass/engine_test.rb, which share the same
basename but coexist peacefully due to the folder structure.
Consistency in naming of test files is important, because setting up files to run an automated test suite often involves matching a filename pattern. We’ll get to this a bit later, but it is worth keeping in mind.
Ideally speaking, each individual test case should load a test
helper file that does the grunt work of requiring all necessary
libraries and providing supporting functionality as needed. This is done
via a simple dynamic require relative to the position
of the current test:
require File.dirname(__FILE__) + '/test_helper'
The purpose of a test_helpers.rb file is to DRY up configuration so that each test case does not begin with a chunk of boilerplate code that is repeated again and again. Individual test cases of course can have their own specific helpers within them, but those that are reused across many of the tests should end up here. Although we talk about this in much greater detail in Chapter 1, Driving Code Through Tests, here’s a quick sample of a test helper file from Haml:
lib_dir = File.dirname(__FILE__) + '/../lib'
require File.dirname(__FILE__) + '/linked_rails'

require 'test/unit'
$:.unshift lib_dir unless $:.include?(lib_dir)
require 'haml'
require 'sass'

# required because of Sass::Plugin
unless defined? RAILS_ROOT
  RAILS_ROOT = '.'
  MERB_ENV = RAILS_ENV  = 'testing'
end

class Test::Unit::TestCase
  def munge_filename(opts)
    return if opts[:filename]
    test_name = caller[1].gsub(/^.*'(?:w+ )*(w+)'.*$/, '1')
    opts[:filename] = "#{test_name}_inline.sass"
  end
end
Examples
In addition to tests, examples form a great way to discover how a system works, as well as an extra safety net for detecting regressions. Typically, these files will go in an examples/ directory.
It is useful to organize these examples by concept, rather than class name. As an illustration, here’s what HighLine’s examples/ directory looks like:
$ ls examples/
ansi_colors.rb    limit.rb    password.rb
asking_for_arrays.rb  menus.rb    trapping_eof.rb
basic_usage.rb    overwrite.rb    using_readline.rb
color_scheme.rb    page_and_wrap.rb
Each of these names hint at what these examples will demonstrate, making it easy for users to find what they are interested in. If you have a more complex system, you can use folders to organize your examples into groups. Here’s what that approach looks like in Prawn:
$ ls -R examples/
bounding_box              general      m17n
font_calculations.pdf     graphics      text

examples/bounding_box:
bounding_boxes.rb     russian_boxes.rb

examples/general:
background.rb    measurement_units.rb     page_geometry.rb
canvas.rb        multi_page_layout.rb

examples/graphics:
basic_images.rb    image_flow.rb       remote_images.rb
cmyk.rb            image_position.rb   ruport_style_helpers.rb
curves.rb          line.rb             stroke_bounds.rb
hexagon.rb         png_types.rb
image_fit.rb       polygons.rb

examples/m17n:
chinese_text_wrapping.rb   utf8.rb
euro.rb                    win_ansi_charset.rb
sjis.rb

examples/text:
alignment.rb             font_size.rb      span.rb
dfont.rb                 kerning.rb        text_box.rb
family_based_styling.rb  simple_text.rb    text_flow.rb
font_calculations.rb     simple_text_ttf.rb
However you choose to organize your examples, you’ll want to use a similar trick to writing your binary files, in that your examples should modify the loadpath to include your library based on their relative positions. This is to prevent you from having to install your locally modified library before running your examples against it. Here’s an example from Prawn to see what this looks like:
# encoding: utf-8
#
# Demonstrates how to enable absolute positioning in Prawn by temporarily
# removing the margin_box via Document#canvas()
#
$LOAD_PATH.unshift(File.join(File.dirname(__FILE__), '..', '..', 'lib'))
require "prawn"

Prawn::Document.generate("canvas.pdf") do
  canvas do
    text "This text should appear at the absolute top left"

    # stroke a line to show that the relative coordinates are the same as absolute
    stroke_line [bounds.left,bounds.bottom], [bounds.right,bounds.top]
  end
end
There might be some other conventions to be aware of, but the ones we’ve covered so far are the most common. Even if they seem a bit dull on their own, they really will help make your project maintainable. By writing your code in a conventional way, you spare yourself the need to write copious documentation about the overall organization of your project. Most of the tips here focus on discoverability, which is essential for making your project easier for others to maintain, or for when you get reassigned to some of your own old code a couple years down the line. Here are the key things to remember about the conventions we’ve discussed so far:
Every project, large or small, deserves a README file. At a minimum, it should include a short description of what the project is useful for, a small sampling of code examples that illustrate some core features, and some pointers of where to dig deeper if the user is interested in learning more. It should also indicate whom to contact when something goes wrong, whether it be an individual developer or a team that’s operating a mailing list or bug tracker.
The key folders to remember are lib/, bin/, examples/, and test/. Each has its own conventions about what it should contain and how it should be organized, which is significant both for the sake of consistency and to satisfy various other software tools that depend on these conventions.
One thing to remember about files in lib/ is that you should be sure to explicitly separate out core extensions from your main library classes. Instead, keep them in a file such as lib/projectname/extensions.rb. If you have a lot of extensions, it might make sense to break them out class by class, such as lib/projectname/extensions/string.rb.
Well-organized tests and examples can go a long way to improving the understandability of a project, which, in turn, improves the maintainability.
Whether you follow standard Ruby conventions or not in your project organization, you should strive to be consistent. The easier it is to navigate around a project, the more likely it is that you’ll be able to understand it if you have to look at it again a few years down the line.
If you plan to distribute your code publicly, be sure to include a LICENSE text file, possibly paired with a COPYING file if you are offering the GNU GPL as a licensing option.
API Documentation via RDoc
RDoc provides an easy and powerful way to document your Ruby APIs. By simply writing comments in your source code with some lightweight markup here and there, you can automatically generate comprehensive documentation. Of course, a documentation tool isn’t going to be all that useful without some solid guidelines for how functions should actually be documented. We’ll cover both RDoc and Ruby documentation best practices here, as they complement each other nicely.
Basic Documentation Techniques and Guidelines
Usually, you’ll want to start off the documentation for any
function with a short description of what it does. You can then follow
up with a description of the accepted arguments and any defaults used.
Finally, if it makes sense to do so, an example or two helps make things
easier to follow. Figure 8-2 shows how we do this for
the Prawn::Document constructor
method.
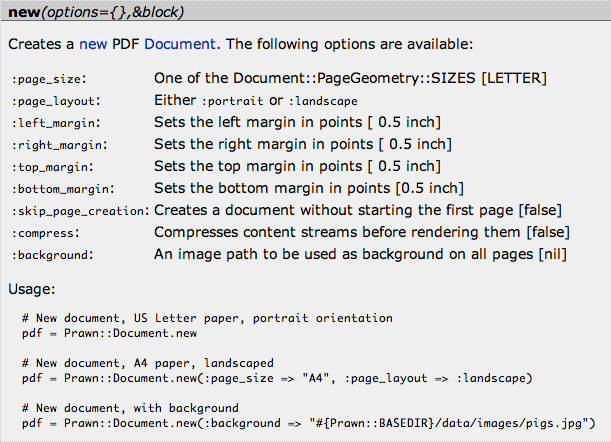
Although the end result is nicely formatted, it doesn’t take much extra work in the source comments to get this sort of output. Here’s what the actual code comments that match Figure 8-2 look like:
class Prawn::Document

    # Creates a new PDF Document.  The following options are available:
    #
    # <tt>:page_size</tt>:: One of the Document::PageGeometry::SIZES [LETTER]
    # <tt>:page_layout</tt>:: Either <tt>:portrait</tt> or <tt>:landscape</tt>
    # <tt>:left_margin</tt>:: Sets the left margin in points [ 0.5 inch]
    # <tt>:right_margin</tt>:: Sets the right margin in points [ 0.5 inch]
    # <tt>:top_margin</tt>:: Sets the top margin in points [ 0.5 inch]
    # <tt>:bottom_margin</tt>:: Sets the bottom margin in points [0.5 inch]
    # <tt>:skip_page_creation</tt>:: Toggles manual page creation [false]
    # <tt>:compress</tt>:: Compresses content streams before rendering them [false]
    # <tt>:background</tt>:: An image path to be used as background on all pages [nil]
    #
    # Usage:
    #
    #   # New document, US Letter paper, portrait orientation
    #   pdf = Prawn::Document.new
    #
    #   # New document, A4 paper, landscaped
    #   pdf = Prawn::Document.new(:page_size => "A4", :page_layout => :landscape)
    #
    #   # New document, with background
    #   img = "#{Prawn::BASEDIR}/data/images/pigs.jpg"
    #   pdf = Prawn::Document.new(:background => img)
    #
    def initialize
       #...
    end

end
As you can see here, we just use a little HTML-style formatting to
indicate that the options text should be displayed in a fixed-width
font, then use the :: syntax to indicate that this is
a two-column table. The rest of the text is essentially just plain text.
Code samples are automatically formatted, as long as they are indented a
bit from the prose.
As another example, we can look at some of the API documentation from Ruby’s pstore standard library. The one in Figure 8-3 uses a heading to make the example stand out, and it also includes a warning about when using the function is valid and the error you will encounter otherwise.
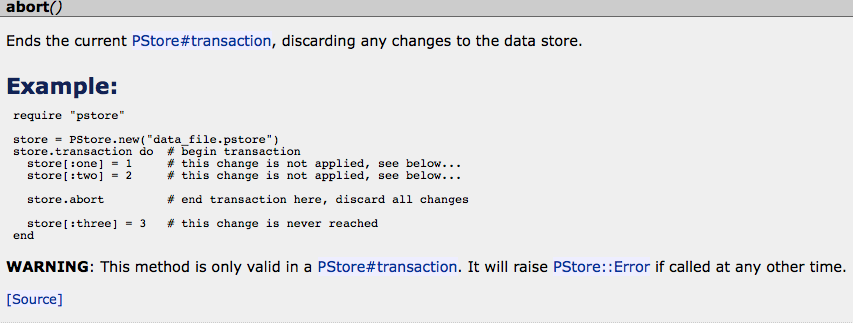
The comments used to generate this are simple, as you might expect:
# Ends the current PStore#transaction, discarding any changes to the data
# store.
#
# == Example:
#
#  require "pstore"
#
#  store = PStore.new("data_file.pstore")
#  store.transaction do  # begin transaction
#    store[:one] = 1     # this change is not applied, see below...
#    store[:two] = 2     # this change is not applied, see below...
#
#    store.abort         # end transaction here, discard all changes
#
#    store[:three] = 3   # this change is never reached
#  end
#
# *WARNING*:  This method is only valid in a PStore#transaction.  It will
# raise PStore::Error if called at any other time.
#
def abort
  # ...
end
You can see that through simple markup, you can generate nice HTML output without sacrificing the readability of the plain text. You might have also noticed that RDoc will link together documentation about classes or methods in your project without specifying any special syntax.
Although you can get very far with just the basic formatting in
these two examples, there are times where finer-grained control is
needed. We’ll now go over a way to give the rdoc generator some hints as to how your code
and comments should be processed.
Controlling Output with RDoc Directives
Even if your code is not commented, running RDoc against it will generate some useful content that clearly lays out the structure of your API. You can get a whole lot more out of it by generating your documentation from commented code that includes some light formatting syntax. In many cases, the default behaviors for documentation generation work well enough, and this is why many people never bother to learn about the directives you can use to customize things.
We’ll cover just a few of the things you can do with RDoc directives, focusing mainly on the kinds of things I’ve found useful in my projects and have seen used effectively in other projects. If you want to know the full range of what is available, be sure to consult the RDoc website for a complete listing.
We’ll start with one of the most simple and common directives
available, :nodoc:. Although RDoc is
smart enough to hide private methods, it can’t really make a judgment call about whether a method
belongs to the external or internal API of a project. Ideally speaking,
we want to expose our users only to the functions we intend for them to
use. By hiding everything that the typical user won’t need to know
about, we can really cut down on the noise in our
documentation.
Using this directive is easy—just drop it in wherever you want to exclude some content from the generated documentation. The most simple case is doing this at the method level:
class Prawn::Document

  # Stores the current state of the named attributes, executes the block, and
  # then restores the original values after the block has executed.
  #
  def mask(*fields) # :nodoc:
    stored = {}
    fields.each { |f| stored[f] = send(f) }
    yield
    fields.each { |f| send("#{f}=", stored[f]) }
  end

end
Here we have a method that is part of the public interface of
Prawn::Document, but is meant
primarily for internal use. By adding a :nodoc: comment on the same line as the method
signature, we can ensure that this method will not appear in the
generated documentation. We can also use this directive at the
class/module level:
# reference.rb : Implementation of PDF indirect objects

module Prawn

  class Reference #:nodoc:

    # seecrets

  end

end
End users of Prawn will likely never need to worry about how we implement what are essentially pointers to low-level PDF data structures, so we can safely hide this entire class from public view, as far as documentation is concerned. Because the syntax is identical to skipping the documentation for a function, it is easy to remember.
It may look like the :nodoc:
directive operates at the block level, hiding everything nested inside a
class or module. However, this is not the case by default. This means
that if I had a module called Prawn::Reference::Helpers, it would still be
documented unless explicitly marked otherwise with a subsequent :nodoc: comment. There is a way to hide
everything nested within a class, using the :nodoc: all directive, but I would not
recommend it, as it may accidentally hide worthwhile information.
It is important use :nodoc:
with a bit of caution. If you expose too little documentation to your
users, they may not find the features they need easily enough. Generally
speaking, you should use :nodoc: only
on features that are clearly a part of your project’s internals, and not
on features that might be a bit low-level but could still be potentially
useful to others. If in doubt, keep your documentation public, putting a
warning or two in the comments as needed.
Sometimes you don’t need to outright hide a function’s documentation, but rather, just modify it a bit. The following code is an example of where this feature comes in handy:
class Prawn::Document
  # :call-seq:
  #   bounding_box(point, options={}, &block)
  #
  # A bounding box serves two important purposes:
  # * Provide bounds for flowing text, starting at a given point
  # * Translate the origin (0,0) for graphics primitives, for the purposes
  # of simplifying coordinate math.
  #
  # (rest omitted, as this documentation is pretty lengthy)
  #
  def bounding_box(*args, &block)
    init_bounding_box(block) do
      translate!(args[0])
      @bounding_box = BoundingBox.new(self, *args)
    end
  end
end
Here, the :call-seq: hook is
used to modify what will be displayed as the method signature in the
documentation. The reason is that the function shown is nothing more
than a simple wrapper around a constructor for another object. In cases
like these, it’s best to slurp up all the arguments and pass them along,
because then the exact signature of the constructor does not need to be
known.
However, since documentation involving anything(*args, &block) can be a little
opaque, :call-seq gives us a way to give a better hint
at the interface of our function. In the end result, the documentation
is displayed as if the method had the signature specified in :call-seq:, so it is completely transparent in
nature.
You can also use :call-seq: to
provide hints at function return values, as you can see in this example
from Jeremy Hinegardner’s hitimes library:[15]
module Hitimes

  class Timer

    class << self

      #
      # :call-seq:
      # Timer.now -> Timer
      #
      # Return a newly allocated Timer that has already been started
      #
      def now
        t = Timer.new
        t.start
        return t
      end

      #
      # :call-seq:
      # Timer.measure { ... } -> Float
      #
      # Return the number of seconds that a block of code took to
      # execute.
      #
      def measure( &block )
        Interval.measure { yield }
      end
    end

    # ...
  end
end
The :call-seq: directive will
completely replace the method signature with everything that comes after
it continuing up until the next blank line. In this way, you can tell
RDoc exactly how you want your method’s signature to be represented.
Although this feature is a must-have in certain cases, you can of course
rely on the defaults in many cases, so your best bet is to try to see
how things look without :call-seq:
first and then tweak things as needed.
The last directive trick I’ll show before we move on provides a simple way to group together sets of functions into distinct sections within your documentation. This provides a way for RDoc to generate a table of contents for navigating your module or class definition.
The following example shows this directive being used within
Prawn::Measurements, which supports
both imperial and metric conversions:
module Prawn
  module Measurements

    # -------------------------------------------------------------------
    # :section: Imperial Conversions
    # Convert several metric units to one another and to PDF points
    # -------------------------------------------------------------------

    def ft2in(ft)
      return ft * 12
    end

    def in2pt(inch)
      return inch * 72
    end

    # ...

    # -------------------------------------------------------------------
    # :section: Metric Conversions
    # Convert several metric units to one another and to PDF points
    # -------------------------------------------------------------------

    def cm2mm(cm)
      return cm*10
    end

    def mm2pt(mm)
      return mm*(72 / 25.4)
    end

    # ...
  end
end
The :section: directive allows
you to embed a description of the section that is displayed in the
generated documentation. To get a sense of how this works, Figure 8-4 shows a screenshot of the “Imperial Conversions”
section.
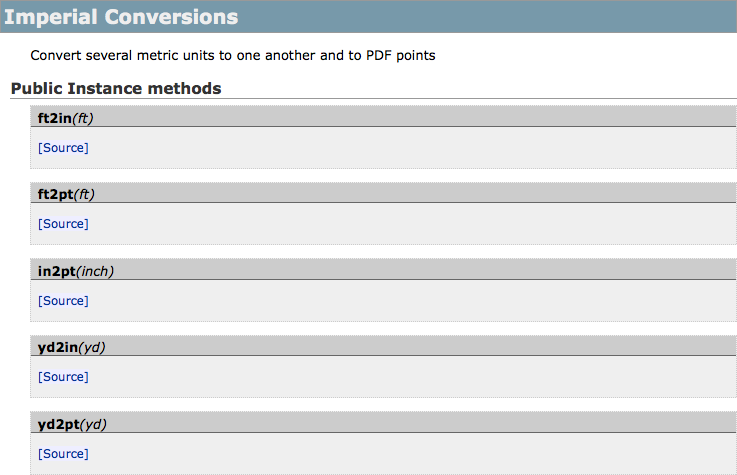
Grouping by sections in RDoc is a majorly underused feature and goes a long way toward making your documentation easy to approach. Although not all classes and modules can be meaningfully split up this way, it is a really good idea to use this feature if it makes sense to do so. Section titles and descriptions can help your users or fellow developers pinpoint the parts of a class they are interested in.
Though we could go on to discuss even more RDoc directives, we’ve
probably covered enough to get you started. When you put together the
ideas in this section, you can easily see that Ruby provides a powerful
documentation system that is easy to work with and use. I have not
covered the specifics of how the actual rdoc command-line utility works, as this is
something you can easily look up. However, we will cover how to build an
RDoc generation task for Rake a little bit later in this chapter, so be
sure to look out for that if you want an easy way to automate your
documentation generation.
We’re about to move on to other things, but before we do that, here are the key things to remember about RDoc and the process of documenting Ruby projects in general:
Good documentation provides clear examples of how to use your code, clearly documents the interface of your functions, and provides enough contextual description to give you a sense of whether a given function is going to be useful to you.
Although RDoc’s formatting language is simple and does not greatly affect the readability of plain-text comments, it’s worth remembering that without a little attention to markup, the RDoc generated from your source files may have some minor issues.
Features that are part of the public interface of your project but are intended more for internal or specialized use can be hidden via the
:nodoc:directive, either at the function or class/module level.The
:call-seq:method can be used to create custom overrides of documented method signatures. This can be quite useful for documenting methods with dynamic argument processing. It is also useful for indicating what a method might return, which is not something RDoc does by default.Using the
:section:directive, you can break up the documentation of a class or module into distinctly grouped segments, each with an optional description. This is a great organizational technique that is severely underused at this point in the Ruby community.
So far, we’ve been talking about nuts-and-bolts project maintenance techniques that make your project more accessible to others. Now, we’ll focus on the task of actually making your code available to others, in the form of RubyGems.
The RubyGems Package Manager
When you run code locally, it is possible to take a lot of things for granted. You can use various tricks to hack Ruby’s loadpath from the command line, count on certain packages being installed, and otherwise introduce dependencies on the particular configuration of your machine.
RubyGems provides a way to help mitigate all these concerns, in the form of a full-blown package management system. I assume that everyone who is reading this book is familiar with installing software from gems, but has not necessarily managed their own gems before. Knowing how to build your own packages can be useful, whether you’re distributing open source code or just sharing packages within an organization, so we’ll focus on that aspect here.
Writing a Gem::Specification
A gem specification (or gemspec) is essentially a project manifest with some special metadata that is used at package install time. The easiest way to describe how to build a gemspec is by working through a real example of one. As we’ve had good luck so far with looking at how Haml does things, we can turn to it yet again without being disappointed:
require 'rubygems'
require 'rake'

HAML_GEMSPEC = Gem::Specification.new do |spec|
  spec.name = 'haml'
  spec.rubyforge_project = 'haml'
  spec.summary = "An elegant, structured XHTML/XML templating engine. " +
                 "Comes with Sass, a similar CSS templating engine."
  spec.version = File.read('VERSION').strip
  spec.authors = ['Nathan Weizenbaum', 'Hampton Catlin']
  spec.email = '[email protected]'
  spec.description = <<-END
      Haml (HTML Abstraction Markup Language) is a layer on top of XHTML or XML
      that's designed to express the structure of XHTML or XML documents
      in a non-repetitive, elegant, easy way,
      using indentation rather than closing tags
      and allowing Ruby to be embedded with ease.
      It was originally envisioned as a plugin for Ruby on Rails,
      but it can function as a stand-alone templating engine.
    END

  # We need the revision file to exist,
  # so we just create it if it doesn't.
  # It'll usually just get overwritten, though.
  File.open('REVISION', 'w') { |f| f.puts "(unknown)" } unless File.exist?('REVISION')
  readmes = FileList.new('*') do |list|
    list.exclude(/(^|[^.a-z])[a-z]+/)
    list.exclude('TODO')
    list.include('REVISION')
  end.to_a
  spec.files = FileList['rails/init.rb', 'lib/**/*', 'bin/*', 'test/**/*',
    'extra/**/*', 'Rakefile', 'init.rb'].to_a + readmes
  spec.executables = ['haml', 'html2haml', 'sass', 'css2sass']
  spec.homepage = 'http://haml.hamptoncatlin.com/'
  spec.has_rdoc = true
  spec.extra_rdoc_files = readmes
  spec.rdoc_options += [
    '--title', 'Haml',
    '--main', 'README.rdoc',
    '--exclude', 'lib/haml/buffer.rb',
    '--line-numbers',
    '--inline-source'
   ]
  spec.test_files = FileList['test/**/*_test.rb'].to_a
end
Even if you haven’t built a Gem::Specification before, you’ll note that
most of these attributes are just routine metadata that is associated
with any ordinary Ruby project. So let’s break things down and look at
the more interesting aspects of the specification and what they do.
We’ll start with the code that indicates what files should be included
in the gem:
File.open('REVISION', 'w') { |f| f.puts "(unknown)" } unless File.exist?('REVISION')
readmes = FileList.new('*') do |list|
  list.exclude(/(^|[^.a-z])[a-z]+/)
  list.exclude('TODO')
  list.include('REVISION')
end.to_a

spec.files = FileList['rails/init.rb', 'lib/**/*', 'bin/*', 'test/**/*',
    'extra/**/*', 'Rakefile', 'init.rb'].to_a + readmes
Here we see that Haml is filtering the project files to decide
which text files it should include as part of the package. These include
things like README.rdoc, MIT-LICENSE,
VERSION, FAQ, and other common
text files you’ll find littering open source Ruby projects. Using a
FileList to build up readmes allows files to be automatically
included based on a naming convention rather than explicitly added to
the list. After this is done, the readmes list is combined with another FileList that uses globs to pull in all of the
necessary library, executable, and test files, among other
things.
It is important to keep in mind that only files specified in this
way will be included in a gem, and those that do not match these
patterns and globs will not be included without modification. If you
want to see exactly what files were included in any given gem you have
installed, you can use the gem unpack
command to dump its source into your working directory, which can be a
useful way to debug issues with your gem specifications when it comes to
this particular issue.
Making sure that your gem knows what files to use is the most important thing, but there are other configuration-related issues that are useful to deal with as well. If you follow the convention of putting your executables in bin/, you can let RubyGems know which ones should be accessible from your system path using the following bit of code:
spec.executables = ['haml', 'html2haml', 'sass', 'css2sass']
This code will properly install your executables in a system-independent way, allowing them to work even on the Windows command line. On Mac OS X, here’s what I see after installing the Haml gem:
$ which haml
/usr/local/bin/haml

$ which html2haml
/usr/local/bin/html2haml
This is a great feature, because it means that you can easily package and distribute not just libraries as RubyGems, but scripts, utilities, and applications as well.
If you want to give your users the opportunity to run your tests
automatically at install time, you can easily do that as well. We see
that Haml does this via a simple FileList that describes the naming convention
of its tests:
spec.test_files = FileList['test/**/*_test.rb'].to_a
This feature can be a little tricky to get right, and as it turns
out gem install haml --tests does not work properly on my
machine, due to some dependency-related issues. In order for this
feature to work properly, you need to be very explicit about your
dependencies and very disciplined about the assumptions you make
regarding your current $LOAD_PATH. I
include a mention of it here because it is a solid practice when done
right—but with the warning that the vast majority of RubyGems do not
handle this properly, whether or not they include this line in their
gemspec.
The last interesting thing about this particular gem specification
is that it provides some information about how its RDoc should be
rendered. If you didn’t already know about it, RubyGems ships with a gem
hosting/documentation server that can list all of the API documentation
for your installed gems. This is usually fired up via the gem server command, which will start a service
that is accessible at http://localhost:8808. By
specifying some details about whether and how this RDoc should be
generated in your gemspec, you can control what your users will end up
seeing. Here are the RDoc-related
lines from the Haml gemspec:
spec.has_rdoc = true
spec.extra_rdoc_files = readmes
spec.rdoc_options += [
  '--title', 'Haml',
  '--main', 'README.rdoc',
  '--exclude', 'lib/haml/buffer.rb',
  '--line-numbers',
  '--inline-source'
 ]
The first line here indicates that the gem does ship with a
meaningful RDoc, allowing it to be generated for viewing from the gem
server. The next line indicates that there are some extra files that
should be included; by default, only files in lib/
will be processed. Finally, an array of raw options are specified to be
passed along to the underlying rdoc
executable on the user’s system. I won’t cover these in detail, but they
should be fairly self-explanatory.
Now that we’ve covered most of the interesting aspects of a
Gem::Specification, we can briefly
mention how to build a gem. We showed earlier how to do this via a
custom Rake task, but in case you want to build a standalone gem, here’s
a quick example:
$ gem build haml.gemspec
Successfully built RubyGem
Name: haml
Version: 2.1.0
File: haml-2.1.0.gem
Once you have a gem in hand, you can pass it around for direct
installation from file, host it locally via gem
server by simply installing it yourself, or upload it to a
distributor such as RubyForge or GitHub for an open source
release.
If your gem does not depend on other Ruby libraries, you’re pretty much all set at this point. However, many times we build our libraries and applications on top of other, lower-level libraries. In those cases, we don’t want to force our users to manually install all the dependencies they’ll need. Luckily, RubyGems makes it easy to work around this.
Working with Dependencies
Manual dependency resolution can be hellish to deal with. However, if we configure things properly, end users should never need to think much about the dependencies of the gems they install. This is done through direct dependency mapping within a gemspec. An interesting application of this is in the prawn gem, which is really nothing more than a stub that indicates which subpackages need to be installed to have a full Prawn installation up and running:
Gem::Specification.new do |spec|
spec.name = "prawn"
spec.version = "0.5.0"
spec.platform = Gem::Platform::RUBY
spec.summary = "A fast and nimble PDF generator for Ruby"
spec.add_dependency('prawn-core', '~> 0.5.0')
spec.add_dependency('prawn-layout', '~> 0.2.0')
spec.add_dependency('prawn-format', '~> 0.1.0')
spec.author = "Gregory Brown"
spec.email = "[email protected]"
spec.rubyforge_project = "prawn"
spec.homepage = "http://prawn.majesticseacreature.com"
spec.description = "Prawn is a fast, tiny, and nimble PDF generator for Ruby"
endIn this example, only three lines are of particular interest:
spec.add_dependency('prawn-core', '~> 0.5.0')
spec.add_dependency('prawn-layout', '~> 0.2.0')
spec.add_dependency('prawn-format', '~> 0.1.0')In this example, we are indicating that in order to install prawn, three other gems need to be installed: prawn-core, prawn-layout, and prawn-format. Here we are using what is called a pessimistic version constraint, to help ensure that the versions we install are compatible with one another.
The way it works is that when you use ~>, you are indicating that your gem will
work with any version within a certain line of releases. We could
actually rewrite the specification in a more explicit way:
spec.add_dependency('prawn-core', '>= 0.5.0', '< 0.6.0')
spec.add_dependency('prawn-layout', '>= 0.2.0', '< 0.3.0')
spec.add_dependency('prawn-format', '>= 0.1.0', '< 0.2.0')This would mean the same exact thing, but requires a lot more
typing. So essentially, what this operator offers is a little
flexibility in your last version number. You could actually be even more
flexible with this, where ~> 1.0 means any
1.x.y version.
Because every project is maintained in a different way, the right
string to use depends highly on individual release policies. In the case
of Prawn, we guarantee that our officially supported gems will not
change API at all from x.y.z to
x.y.(z+1), but that API changes are
possible when the middle version number changes. Therefore, our gem
specifications are tailored to fit to that maintenance strategy.
In other situations, you may want to go to one extreme or another regarding versioning. For example, you can lock to an exact version of a gem:
spec.add_dependency('ruport', '=1.0.0')If you have this in your gemspec, Ruport 1.0.0 will be installed
specifically, and when your library is loaded or an executable is used,
you can be sure that exact version of the dependency will be loaded as
well. Although this is the best way to be absolutely sure your code will
work the same on your system as it will on others, it is also quite
constraining. RubyGems is not currently capable of activating more than
one version of a library simultaneously, so this means that you may
introduce some conflicts with other packages that rely on different
versions of your dependencies. Generally speaking, unless there is a
very good reason for specifying an exact dependency version, you should
be a bit more lenient, allowing the user to lock down to a particular as
necessary via the Kernel#gem
method.
On the other end of the spectrum, it is also possible to specify a dependency without any version at all:
spec.add_dependency('highline')When you do this, your gem will only check to make sure the dependency is installed, and will do absolutely no version checking. This means that if the installed version of a gem on a user’s system is ancient or bleeding edge while yours is somewhere in between, some conflicts may arise. Of course, this does put the power back in the user’s hands. The important thing to remember if you go this route is to clearly document which versions of your dependencies are required, but at that point, you might as well just go ahead and use either version ranges or pessimistic version constraints.
That having been said, this feature can be quite useful in alpha- or beta-level projects that have not yet solidified what exact versions of various libraries they will depend on, as it allows for the greatest level of control from the end user perspective.
A final note about developing gem specifications is that
occasionally, some extra libraries are needed for development but not
for actually running your software. RubyGems allows you to specify
development dependencies that can be installed alongside the runtime
dependencies via the gem install whatever
--development command. This can be useful for helping
potential contributors get set up with all the necessary tools they’ll
need for building your project and running its tests.
At the time of writing this chapter, we haven’t set this up yet in the prawn gem, but if we do, it’ll end up looking something like this:
spec.add_runtime_dependency('prawn-core', '~> 0.5.0')
spec.add_runtime_dependency('prawn-layout', '~> 0.2.0')
spec.add_runtime_dependency('prawn-format', '~> 0.1.0')
spec.add_development_dependency('test-unit', '= 1.2.3')
spec.add_development_dependency('test-spec', '~> 0.9.0')
spec.add_development_dependency('mocha', '~> 0.9.0')In this code, add_runtime_dependency is just an alias for
add_dependency, but it provides a
clearer indication of which dependencies are meant for runtime and which
are solely for development. If we specified our gem in this way,
prawn-core, prawn-layout, and
prawn-format would always be installed, but
test-unit, test-spec, and
mocha would be installed only if the --development flag were used. Development
dependencies are a great idea and are fairly new in RubyGems, so with a
little luck, more projects will start using them in the
future.
There is a ton more we could discuss about the RubyGems system, but my goal was to expose you only to the things you’ll need to know to package your code up and start sharing it with others, whether between coworkers or with the Ruby community at large. I’ve tried to cover some of the features that first-time gem builders typically miss out on, in hopes that we can take better advantage of the full-blown package management system Ruby provides us. Here are the key things to remember:
Gems do not automatically include certain files or folders within a project. Instead, it is necessary to list explicitly in your gemspec which files should be included. In most cases, a
FileListis useful for aggregation here, which can be used by simply requiring the rake library.You can specify which scripts in your gem are executable, and RubyGems will take care of putting these executables in the right place on your system, setting up proper file modes regardless of what operating system you are on.
If you enable RDoc generation, your gem will automatically generate its documentation upon install on a user’s machine, viewable through a locally running
gem server.A severely underused feature is
spec.test_files, but special care must be given to both dependency specification and loadpath hackery to make it work properly.RubyGems provides a fairly robust solution for dependency resolution that provides a high degree of flexibility when it comes to deciding how strict to be about versioning for any library your package depends on.
If your project has development-specific dependencies that are not needed at runtime, add them to your gemspec via
spec.add_development_dependency().
We’ve talked about organizing, documenting, and packaging your code. Now it’s time to talk about how to manage these tasks all in one place.
Rake: Ruby’s Built-in Build Utility
We already covered a bit about Rake in the very beginning of this
chapter. I am also quite sure that anyone who would buy this book at least
knows what a Rakefile is and has probably used one before. This toolkit
was initially popular among project maintainers for simplifying package
and documentation generation, but was popularized by Rails as a way to
wrap pretty much any task into something that could be conveniently
triggered on the command line. Although rake technically is little more than a Ruby
replacement for make, the flexibility
of configuring it via a general-purpose language such as Ruby has really
made it a powerful tool.
We already covered some of the built-in features of Rake, including
Rake::GemPackageTask, but let’s take a
look at another one. The following code is what Haml uses to provide a
rake rdoc task:
Rake::RDocTask.new do |rdoc|
  rdoc.title    = 'Haml/Sass'
  rdoc.options << '--line-numbers' << '--inline-source'
  rdoc.rdoc_files.include(*FileList.new('*') do |list|
                            list.exclude(/(^|[^.a-z])[a-z]+/)
                            list.exclude('TODO')
                          end.to_a)
  rdoc.rdoc_files.include('lib/**/*.rb')
  rdoc.rdoc_files.exclude('TODO')
  rdoc.rdoc_files.exclude('lib/haml/buffer.rb')
  rdoc.rdoc_files.exclude('lib/sass/tree/*')
  rdoc.rdoc_dir = 'rdoc'
  rdoc.main = 'README.rdoc'
end
Here we see that the options used are very similar to what we
discussed in the previous section about RubyGems. However, once this is
set up, you can simply type rake rdoc at any time to generate the API
documentation directly from the current source code. This does not require
installing the library or running a long string of command-line arguments,
which are the two main reasons it is beneficial to us. When we used this
command earlier, we didn’t need to know a thing about it; we were able to
just know what it did and execute it based on the rake
--tasks listing for the project.
Rake provides a great way to increase the discoverability of your project, in that it allows users who do not necessarily understand the details about the underlying processes to do administrative tasks. Any shell scripts to maintain projects are ripe candidates for being wrapped with Rake.
To give you an example of how you’d use this for custom needs, I can
show you what I use to generate a local copy of this book in PDF format. I
have been writing it in AsciiDoc and generating DocBook XML. I then use
dblatex to render a PDF for me. Rather
than remember all the details of how to do this, I much prefer to type the
following command whenever I want a new build of my book:
rake build
Here’s the pair of tasks that makes it possible for me to do this:[16]
task :convert_all do
  FileList[File.join(File.dirname(__FILE__), 'manuscript', '*.txt')].each do |src|
    target = File.join target_dir, File.basename(src).sub(".txt", ".xml")
    chap = File.basename(target)
    sh "asciidoc -d book -b docbook -a sectids! -o ch_#{chap} -s #{src}"
  end
end

task :build => [:convert_all] do
  sh "dblatex book.xml"
  sh "open book.pdf"
end
These tasks yet again make gratuitous use of FileList for doing glob-based filtering of a
directory. In :convert_all, we are
taking all the .txt files in a manuscript/directory
and running them through asciidoc to
generate DocBook XML. Our :build task
depends on convert_all, which ensures
that new XML documents are generated from the text-based sources every
time we end up building a PDF. The PDF is generated by
dblatex and then displayed in OS X Preview via the
open command.
This is just one example of a custom Rake task, but there are
endless possibilities. Heading back to the Haml Rakefile, we can see that
the developers even use Rake to manage pushing releases out to RubyForge
using the rubyforge command-line
utility:[17]
desc "Release a new Haml package to Rubyforge. Requires the NAME and VERSION flags."
task :release => [:package] do
  name, version = ENV['NAME'], ENV['VERSION']
  package = "#{ENV['NAME']} (v#{ENV['VERSION']})"
  sh %{rubyforge login}
  sh %{rubyforge add_release haml haml "#{package})" pkg/haml-#{version}.gem}
  sh %{rubyforge add_file haml haml "#{package}" pkg/haml-#{version}.tar.gz}
  sh %{rubyforge add_file haml haml "#{package}" pkg/haml-#{version}.tar.bz2}
  sh %{rubyforge add_file haml haml "#{package}" pkg/haml-#{version}.zip}
end
In HighLine, we also used Rake to upload our website and
documentation for the project via scp:
desc "Upload current documentation to Rubyforge"
task :upload_docs => [:rdoc] do
  sh "scp -r doc/html/* " +
     "[email protected]:/var/www/gforge-projects/highline/doc/"
  sh "scp -r site/* " +
     "[email protected]:/var/www/gforge-projects/highline/"
end
As you can see, a well-tuned Rakefile is an asset to have in any project. If you want to use tasks from a number of sources, or have a large number of tasks that might end up causing name clashes, you can even use namespaces to segment things out. Though I’ll leave the details for the reader to discover, the basic syntax looks like this:
namespace :site do
  task :generate do
    puts "Generating site"
  end
end

namespace :docs do
  task :generate do
    puts "Generating Documents"
  end
end
Here’s how you’d run each of these tasks on the command line:
$ rake site:generate
(in /Users/sandal)
Generating site

$ rake docs:generate
(in /Users/sandal)
Generating Documents
Of course, if you only have a few tasks that aren’t very related to one another, there is no need to worry about namespacing. Unless you are managing a fairly large number of tasks, or redistributing tasks as part of a library, you can stick to the basics.
Rake is a very powerful tool that deserves its own chapter or even its own cookbook. There are a ton of useful recipes out there in the wild, so be sure to make the Rakefile one of your first stops in any new codebase you need to review. Understanding and using Rake effectively is key to successfully managing any moderately complex Ruby project, so be sure not to overlook its significance and practical utility.
If you want to make the most out of this tool, there are just a few things to keep in mind:
Rake provides custom tasks for common needs such as generating RDoc, running unit tests and packaging up a project for distribution. Because these tasks are highly configurable, it is better to use them than to reinvent the wheel.
Any other repetitive action that is necessary for maintaining your project can be wrapped in a task to simplify things. Typically, any lengthy command that needs to be run in the shell is fair game for this sort of simplification.
Any task that has a preceding
desc()call will be listed with a meaningful message in therake --tasksoutput for your project.Rake’s ability to define prerequisite tasks allows you to build dependency-based workflows that allow you to model multiple-step tasks as needed.
Namespaces can be used to segment off tasks into their own subspaces, minimizing the risk of naming clashes.
I’ve tried to stick mainly to the easily overlooked aspects of Rake here, but there is a whole lot that we could have covered and didn’t. Be sure to consult the Rake documentation if you’re interested in finding out more.
Conclusions
Depending on what you were looking for, this chapter may have been a bit different from what you were expecting based on the title. However, what you will find is that the things we’ve discussed here will really take you far when it comes to improving the maintainability of your projects. Though far from glamorous, things like good documentation, well-organized folders and files, and a way to automate as much of the grunt work as possible does a whole lot for your projects.
Poorly maintained projects can be a huge drain on developer productivity and morale, yet nicely curated code can be downright enjoyable to work with, even if you’re brand-new to a project. The tools and techniques we’ve discussed so far aren’t going to make maintenance completely painless, but will still provide a solid foundation to work off of that will grow over time.
We’ve now reached the end of the last official chapter in this book. However, I hope that you will not stop here, as there are still three very useful appendixes left for your enjoyment. If you turn the page, you’ll notice that these aren’t simply tables of reference data for looking up, but instead, tightly packed bundles of bonus material that didn’t quite fit into the main flow of the book. There is still a ton of real code left to walk through in the book, so if you put it down now, you’d be short-changing yourself.
Whether you continue to read on or not, I hope you have enjoyed what you have read so far, and that you can put it into practice in your day-to-day work.
[13] Which happens to be an alias to Haml::Engine#render, as indicated by the
RDoc.
[14] Documentation omitted to simplify example.
[15] A high-resolution timer library: http://copiousfreetime.rubyforge.org/hitimes.
[16] The convert_all task was
actually based on a contribution Rick DeNatale made to my build
process for The Ruport
Book.