
Chapter 7. Building a Graphical User Interface: Going all gooey
Your coding skills are great and getting better all the time.
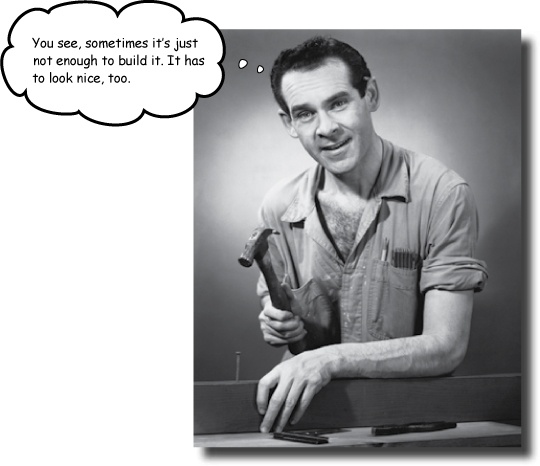
It’s just a shame your programs are not that nice to look at. Displaying prompts and messages on a text-based console is all well and good, but it’s so 1970s, isn’t it? Add some green text on a black background and your retro look will be complete. There has to be a better way to communicate with your users than the console, and there is: using a graphical user interface or GUI (pronounced “gooey”). Sounds cool, but complex, and it can be. But, don’t fret; learning a trick or two will have your code all graphical in no time. Let’s get all gooey (sorry, GUI) in this chapter.
Head First TVN now produces game shows
It’s more than just sports at Head First TVN, as the station has entered the lucrative world of live game show broadcasting. Their flagship show, Who Wants to Win a Swivel Chair, is attracting viewing figures in the millions... not bad for a station that operates on a shoestring budget.
You’ve been approached by their stressed-out (but incredibly smooth) game show host to help with a program he needs. TVN was so impressed with your work last time that they are offering two free, front-row tickets to the Grand Final as payment for your work.

You’ve had a few conversations with the host and determined a list of program requirements:
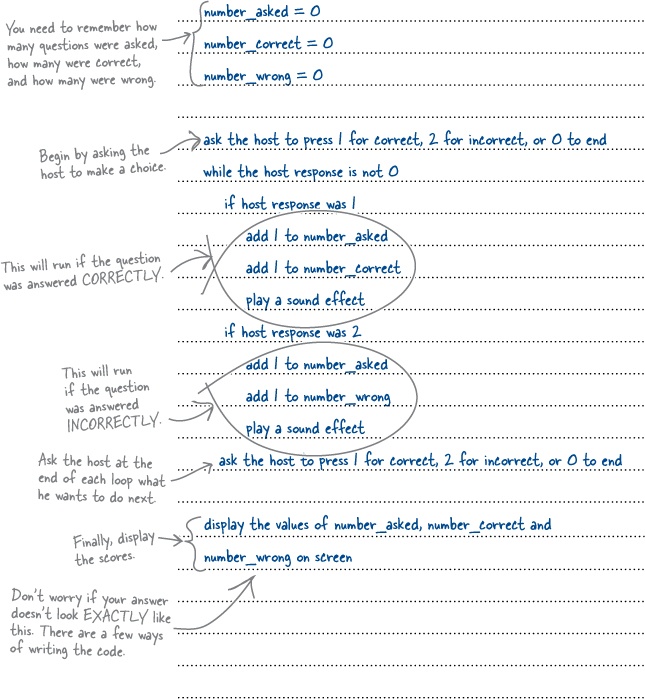
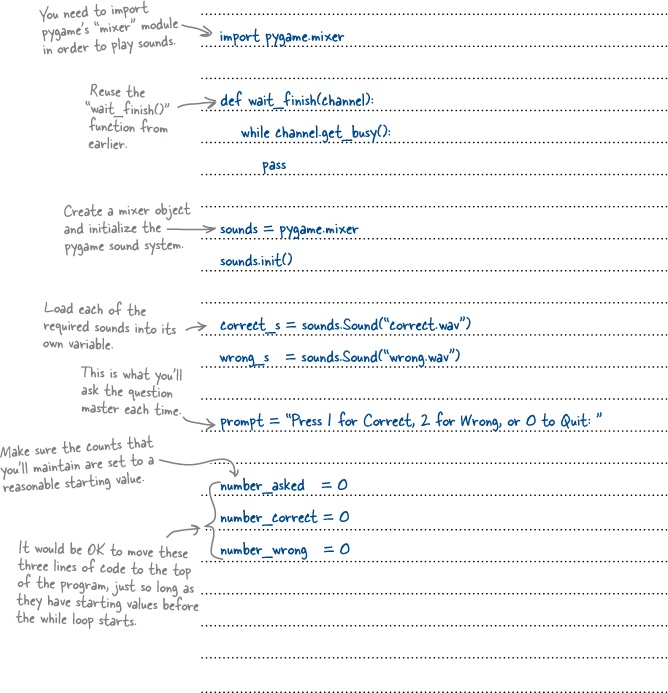
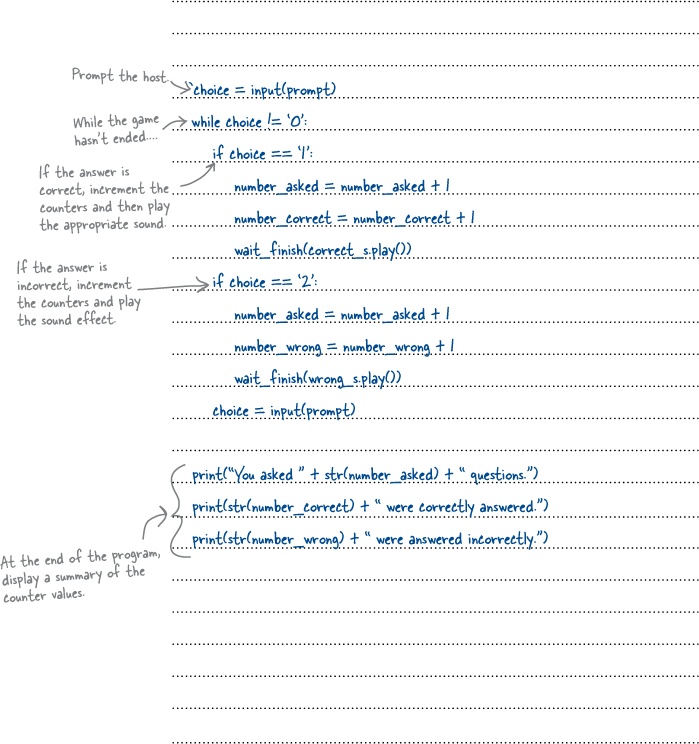
1. The host wants to be prompted after a question has been asked to press either 1 for a correct answer or 2 for a wrong answer.
2. Based on the key pressed, an appropriate sound effect needs to play.
3. The program needs to remember how many answers were correct and how many were wrong.
4. The host will end the quiz by pressing 0. Then the program will display the number of right, wrong, and asked questions.
Let’s flesh out what’s required in pseudo-code.
Use the space provided below to write the pseudo-code for the program you’ve been asked to write for TVN:
You were asked to use the space provided below to write the pseudo-code for the program you’ve been asked to write for TVN:
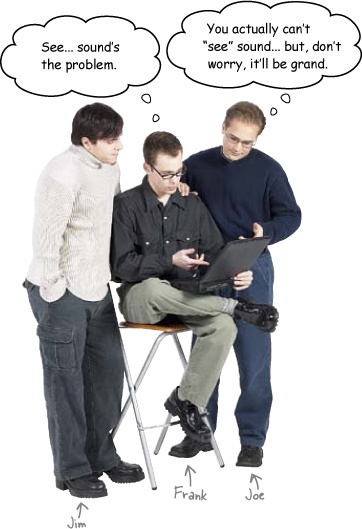
Frank: I think sound is going to be a problem.
Jim: Sounds easy to me...
Joe & Frank: <groan>.
Jim: Sorry, couldn’t resist that one. Seriously, though, how hard can it be to play a sound from a program?
Joe: Playing a sound is not the problem; getting it to work on multiple platforms can be. For instance, what works on Windows might not work on Mac OS X or Linux.
Jim: That’s not a problem. I only use Windows, so I’ll be OK.
Frank: Good for you, but the rest of us want to play, too, and we don’t want to have to... um... eh... downgrade to Windows.
Jim: Typical: have a swipe at Windows when something doesn’t work on your non-Windows computer.
Joe: Cool it, guys. We need to stop bickering and come up with a solution that lets us play sounds and works on Windows, Mac OS X, and Linux. And it has to work with Python, too.
Jim: You mean Python doesn’t support sound as standard?!?
Frank: No, not really. In fact, very few programming languages support sound in a cross-platform way. This isn’t just a Python problem.
Jim: So... we’re outta luck then. Does that mean it’s time to go home?
Joe: Not so fast, Jim! I’m pretty sure pygame can help here.
Jim: So... I can’t go home early, but I can play games?
Frank: Seriously, Jim, I think Joe’s right. We can use pygame to play our sounds in Python.
Jim: And it’ll work on Windows, Mac OS X, and Linux?
Joe: Yes, I’m pretty sure it will. Granted, pygame’s a set of gaming libraries for Python, but all we need to use is the bit that handles playing sounds.
Jim: Sounds great. I can’t wait to see it in action.
Frank: Didn’t you mean “hear it in action”?
Jim & Joe: <groan>.
pygame is cross platform
Before continuing with the rest of this chapter, you need to take five to download and then install the pygame technology onto your computer. The pygame technology is an example of what’s known as a third-party library: that’s extra functionality that can be added into your Python environment, but which isn’t part of the standard library.
As installing pygame tends to be a very platform-specific thing, we’ve uploaded a set of instructions onto the Head First Programming website for you to follow.

STOP! Don’t proceed with the rest of this chapter until you’ve installed pygame for Python 3 on your computer.
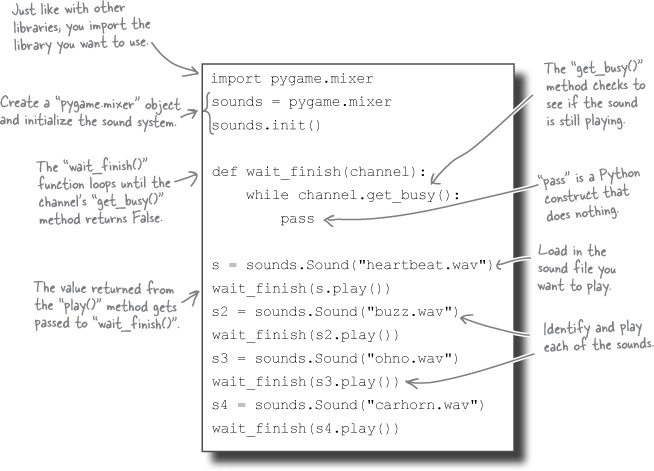
Load this!
To run this program on your computer, you obviously need pygame installed and you need to download the sound files for this chapter from the Head First Programming website. Be sure to put the sound files in the same directory/folder as your program.
You’ve successfully downloaded/installed pygame and grabbed a copy of the Head First Programming sound files for this chapter. Now, test the pygame program in IDLE to see if things are working correctly:

Sounds like pygame is up and running!

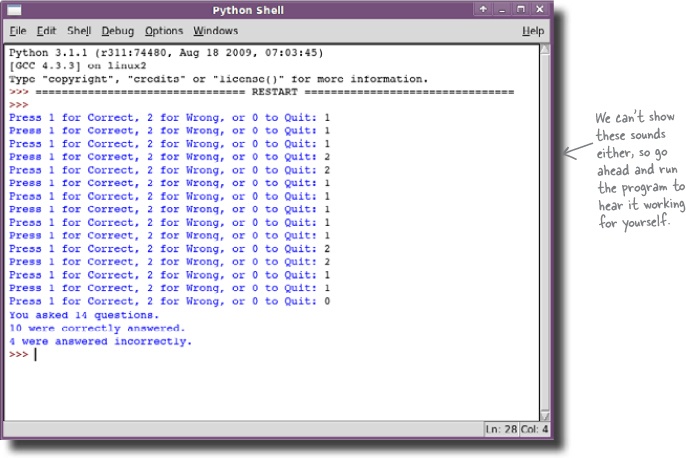

0... 2... 1... 9... blast off!

Your program’s looking pretty dated.
The program works, but it’s not going to win a Visual Design Award any time soon. And its use of key presses makes it a little hard to use, too.
So, its looks could be improved and its usability could be better.
It sounds like you need a graphical user interface, or GUI.
You needed to design the look of the GUI for TVN. You were asked to draw what you think your GUI should look like in the space provided below.

Frank: Since when have you been an expert on GUIs?
Jim: Isn’t every Windows user?
Joe: Well, of course, everyone knows how to use a GUI, but we are talking about creating a GUI in code.
Jim: Ah... oh... um... eh... now, where shall we start?
Frank: It turns out that writing code for a GUI application is... well... just like writing any other code. If you know how to program, you know how to create a GUI. It’s just a matter of selecting the correct GUI library, learning how to use it, then writing the code.
Joe: So we’ll head off to the Python Package Index and grab us some GUI libraries, eh?
Frank: Not so fast. Python comes with a GUI library as standard, called tkinter.
Jim: tk-what?
Frank: tkinter. The “tk” bit refers to the fact that Python’s standard GUI library is built on top of the very popular Tk technology. The “inter” bit is short for “interface.”
Jim: So we’re going to build a GUI interface in Python running on Tk using tkinter?
Frank: Yes, we are. That’s not too confusing, is it?
Joe & Jim: Well... not if you say so.
Frank: The big thing with creating GUIs is understanding the event loop.
Joe: Ah, that’s just looping code that reacts when certain things happen, isn’t it? It’s just like the while loop in the non-GUI version of TVN’s program. In that code, that loop is an event loop, isn’t it?
Frank: It sure is. Although the GUI event loop tends to be extra capable and can do lots more than the simple while loop.
Joe: That sounds complex. Is it?
Frank: No, not really. It just takes a little getting used to.
Jim: But, it’s all just code, isn’t it?
Frank: Yes, Python code using the tkinter library.
Joe: OK. Let’s get to it, since we already know how to program...
tkinter gives you the event loop for free
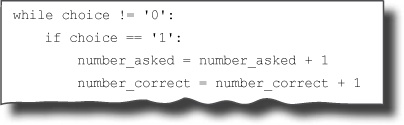
In order to process events efficiently, GUIs employ an event loop. Event loops watch and wait for events, calling a piece of code each time an event occurs. If you think about the current TVN Game Show program, it already has a very basic event loop that waits for the host to press 1, 2, or 0. The program then calls some code before waiting again for another key-press event from the host. To implement this in code, you used a while loop:
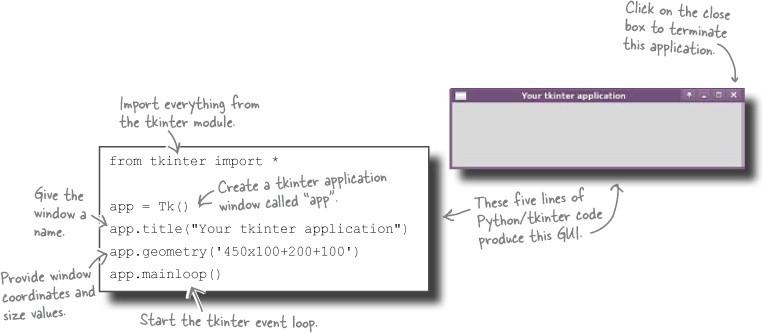
In tkinker, you don’t need to write a while loop like you did for your non-GUI program. In tkinter, call the mainloop() method instead:
To add a button to your application, use code like this, being sure to put these two lines of code before the call to mainloop():

tkinter is packed with options
The pack() method lets you position the button in the application window. If you provide a value for the side parameter to pack(), you can control where in the window the button appears. Here are the legal values for side:
pack(side = 'left')Position the button on the left side of the window.
pack(side = 'right')Position the button on the right side of the window.
pack(side = 'top')Position the button at the top of the window.
pack(side = 'bottom')Position the button at the bottom of the window.
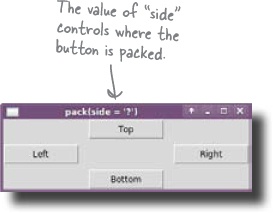
It is also possible to add some padding around buttons (to make them look nicer in your window):
pack(padx = 10, pady = 10)Position the button with 10 pixels padding on all four sides.
Based on what you now know about tkinter windows and buttons, you were to write the code to display the GUI that you need for the TVN program:
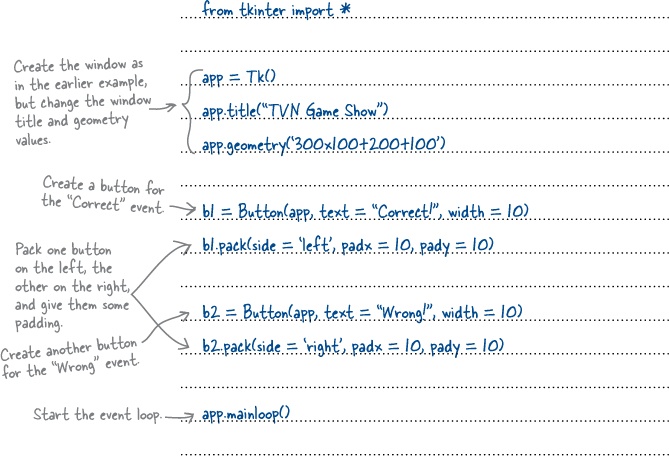
Let’s take your first GUI program for a test drive. With your tkinter code entered into IDLE, save it as tvn.pyw and press F5 to see how it looks:
Note
There’s a convention in the Python world that suggests naming tkinter programs with a “.pyw” extension, as opposed to the usual “.py”. This helps your operating system run your tkinter programs properly, especially on Windows.

That’s one nice, professional-looking GUI! What do the people at TVN think?
The GUI works, but doesn’t do anything

The graphical user interface might be ready, but the program is not complete.
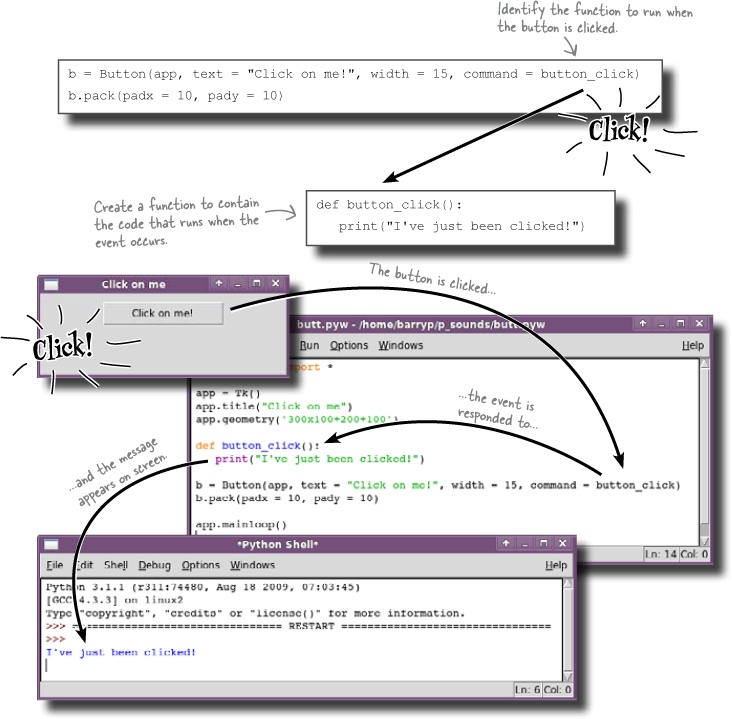
Connect code to your button events
When you click on a button, the tkinter event loop captures the event and looks for something to do with it. The trouble is, as your program stands, you have not detailed what that something to do is. Your buttons have no code associated with them, so the events occur but go unnoticed. To connect code to buttons, put the code you want to run in its own function and then name the function in the button code by providing a command parameter:
You were to take your pencil and mark the parts of the code on the previous (and facing) page to identify the code you would extract and turn into functions so that you can then connect the functions to the buttons in your GUI. You were also to mark the other parts of this program that also need to be added to the GUI version:
You were to think about how many functions you might need. You were to write their names here:


With the code you need identified, you were to take the time to update your GUI application with the new functions and whatever other code you’ve extracted from the non-GUI program.
You were asked to produce a new program that is a combination of your existing GUI code and the extracted code from this program.
The GUI program’s now ready for a screentest


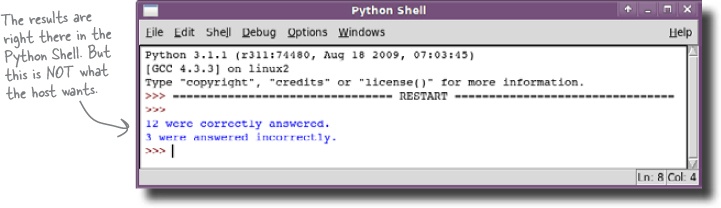
But TVN is still not happy

The results appeared in the Python Shell, not in the GUI, so the host missed seeing them. When you point this out to him, he’s less than impressed and makes it clear that he expects the results to appear in the GUI.
You need some way to display messages in the GUI.


Label it
When it comes to adding a label to your GUI, use the tkinter Label widget. You create it in code not unlike the way you create a button. Here’s the code to add a label to an existing GUI application. The label simply displays a string:

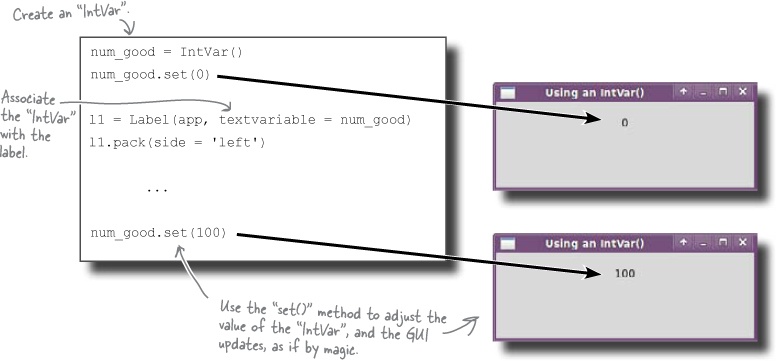
Another variation replaces the text parameter with textvariable. If you assign a special tkinter variable to this parameter, the label will change whenever the value of the variable changes, automatically:
Based on what you now know about adding a label to a GUI, you were asked to rework your GUI code so that it uses two labels. One should display the number of correct answers and the other should display the number of wrong answers. We left plenty of room for you to write in all the code that your program now needs.


Your Programming Toolbox
You’ve got Chapter 7 under your belt. Let’s look back at what you’ve learned in this chapter:
Programming Tools
* Using a third-party programming library
* Playing with a sound library
* Event loops - respond to events when they occur
* Event handler - code that executes when a certain event occurs
* GUI - a graphical user interface (looks nice, doesn’t it?)
* Widget - a GUI interface element
Python Tools
* pygame - a professional-level set of gaming libraries that support sound
* pass - a piece of code that does nothing
* tkinter - a standard library for creating GUIs
* Tk() - a blank GUI app
* Button() - a tkinter button widget
* Label() - a tkinter label widget
* IntVar() - a tkinter integer variable that can update the GUI “as if by magic”