The Microsoft Build Engine (MSBuild) is the build environment for Visual Studio. The build process is described in an XML-based project file. MSBuild replaces traditional .mak files. The project file describes the build process, build configuration, and input and output.
For deployment, Visual Studio 2008 supports traditional deployment based on Windows Installer technology. With Windows Installer technology, an application is packaged in a Setup.exe file, which is then deployed to the local machine or a public share. The Setup.exe program installs the application on the local machine. ClickOnce deployment is available in Visual Studio 2008 as an alternate deployment strategy. ClickOnce deploys an application from a central location and combines the functionality and "look and feel" of a desktop application with a Web-based delivery system.
MSBuild does not require Visual Studio. This program is ideal to use in lab environments in which Visual Studio is not installed. Individual builds are organized in project files. Build project files are XML files and have a .proj extension. As an XML file, the build project is platform-independent and extensible. For a complete explanation of MSBuild, consult the MSBuild Reference MSDN at http://msdn2.microsoft.com/en-us/library/0k6kkbsd.aspx.
Build projects consist of items, properties, and tasks, as described in the following sections.
Items are the input of the build process. Items are created as child elements of the ItemGroup element. Items that share the same name are considered a collection. Item collections are addressable in the build project as @(ItemCollectionName). Item collections are primarily used as parameters in build tasks.
For example, the Compile element is a standard item. It defines the source files that are included or excluded from the build. The Include attribute specifies a file to be included in the build. The Exclude attribute, naturally, excludes files. The following code defines a Compile collection, which includes two items and excludes a third item:
<ItemGroup>
  <Compile Include="source1.cs"/>
  <Compile Include="source3.cs" Exclude="source2.cs"/>
</ItemGroup>
Properties are configuration data for the build process that represent individual values and cannot be grouped into collections. They are defined as child elements of the PropertyGroup element. Refer to properties in the project using the $(property) syntax.
<PropertyGroup>
  <ApplicationVersion>1.2.3.4</ApplicationVersion>
</PropertyGroup>
There are several reserved properties in the MSBuild environment. Table 4-4 lists the reserved properties.
Table 4-4. Reserved properties
Property | Description |
|---|---|
MSBuildProjectDirectory | The absolute path to the MSBuild project file. |
MSBuildProjectFile | The name and extension of the MSBuild project file. |
MSBuildProjectExtension | The file extension of the MSBuild project file. It should be prefixed with a dot (.). |
MSBuildProjectFullPath | The fully qualified name of the MSBuild project file. |
MSBuildProjectName | The name of the MSBuild project file without the extension. |
MSBuildBinPath | The path to the MSBuild binaries. |
MSBuildProjectDefaultTargets | The list of targets available to the DefaultTargets attribute of the Project element in the MSBuild project file. Refer to documentation of the DefaultTargets attribute for more information. |
MSBuildExtensionsPath | The supplemental directory for custom target files. This is a subdirectory of the Program Files directory. |
Tasks are the build operations of an MSBuild project. Each task is a child element of the Target element. Tasks can accept parameters, which are attributes of a Task element. Item collections and properties, as described previously, are valid parameters to tasks. Create multiple targets to batch groups of build operations. The MSBuild tool can invoke different targets. For example, you can create targets for release versus debug builds.
Tasks are written in a managed language and are available to any MSBuild project. You can create custom tasks for MSBuild projects. All tasks must implement the ITask interface.
Table 4-5 lists the default tasks available in the MSBuild environment.
Table 4-5. Default tasks
Task | Description |
|---|---|
AL | Invokes the Assembly Linker (AL) tool. |
AspNetCompiler | Invokes aspnet_compiler.exe, which precompiles ASP.NET applications. |
AssignCulture | Creates culture metadata for files that have a culture identifier. |
CallTarget | Invokes the specified target. |
CombinePath | Combines paths into a single path. |
ConvertToAbsolutePath | Converts a relative path to an absolute path. |
Copy | Copies files to a specified directory. |
CreateCSharpManifestResourceName | Creates a C# manifest name for a resource or resource file. |
CreateItem | Copies task items between collections. |
CreateProperty | Copies task properties. |
CreateVisualBasicManifestResourceName | Creates a Visual Basic manifest name for a resource or resource file. |
Csc | Invokes csc.exe, which is the C# compiler. |
Delete | Deletes files. |
Error | Stops a build and logs an error. |
Exec | Executes an application or command. |
FindUnderPath | Determines which files are found within a specified directory and its subdirectories. |
GenerateApplicationManifest | Creates an application or native manifest for a ClickOnce application. |
GenerateBootstrapper | Locates, downloads, and installs an application. |
GenerateDeploymentManifest | Creates a deployment manifest for a ClickOnce application. |
GenerateResource | Creates .resources files from .txt and .resx files. |
GetAssemblyIdentity | Returns assembly metadata and stores the results in an item collection. |
GetFrameworkPath | Obtains the path of the .NET Framework assemblies. |
GetFrameworkSDKPath | Obtains the path of the .NET Framework software development kit (SDK). |
LC | Converts a .licx file to a .license file. |
Makedir | Makes a directory. |
MSBuild | Builds an MSBuild project from another build project. |
ReadLinesFromFile | Reads MSBuild items from a file. |
RegisterAssembly | Reads the metadata of an assembly and registers the assembly as a COM server, which allows COM clients to access the assembly. |
RemoveDir | Deletes a directory. |
RemoveDuplicates | Removes duplicates from an item collection. |
ResGen | Uses the GenerateResource task to convert between .resources files. |
ResolveAssemblyReference | Determines which assemblies depend on another assembly. |
ResolveComReference | Resolves the location of type library (TLB) files. |
ResolveKeySource | Determines the strong name of a key source. |
ResolveNativeReference | Resolves native references. |
Sgen | Wraps the XML Serialization Generator Tool (sgen.exe). |
SignFile | Signs a file with a certificate. |
Touch | Sets the access and modification timestamp of a file. |
UnregisterAssembly | Unregisters an assembly from the registry. Afterward, the assembly is no longer available to COM clients. |
Vbc | Invokes vbc.exe, which is the Visual Basic .NET compiler. |
VcBuild | Acts as a proxy to vcbuild.exe, which builds a Visual C++ project. |
WriteLinesToFiles | Writes the paths of the specified items to a file. |
MSBuild elements and attributes are assembled in a project file. An MSBuild project can have any number of tasks, item collections, and properties. This is a general skeleton of an MSBuild project:
<?xml version="1.0" encoding="utf-8"?>
<!-- MSBuild Schema -->
<Project xmlns="http://schemas.microsoft.com/developer/msbuild/2003">
  <ItemGroup>
    <!-- Item Collection -->
  </ItemGroup>
  <Target Name="Task1">
    <!-- Task(s) -->
  </Target>
  <PropertyGroup>
    <!-- Properties -->
  </PropertyGroup>
  <ItemGroup>
    <!-- Item Collection -->
  </ItemGroup>
  <Target Name="Task2">
    <!-- Task(s) -->
  </Target>
</Project>
Here is the syntax to execute the project from an MSBuild command line:
Msbuild switches projectfileMSBuild command-line switches are listed in Table 4-6.
Table 4-6. MSBuild command-line switches
Task | Description |
|---|---|
/help | Displays help information on the MSBuild command; /? and /h are also help switches. |
/noconsolelogger | Disables the default console logger. Events will not be logged to the console window. |
/nologo | Suppresses the startup banner and copyright information. |
/version | Displays the version of the MSBuild tool. |
@file | Reads command-line instructions from a batch file, which allows scripting of the build process. |
/noautoresponse | Disables the automatic include of the MSBuild.rsp file. |
/target:targetnames | Identifies the targets to execute, such as release or debug. The targets are delimited by commas or semicolons. |
/property:name=value | Sets the value of a property. Multiple properties are delimited by commas or semicolons. |
/logger:logger | Logs MSBuild events to a logger. |
/consoleloggerparameters: parameters | Sets the parameters of the console logger. |
/verbosity:level | Sets the amount of information written to the event log. The levels filter what is written to the event log as follows: q—quiet m—minimal n—normal d—detailed diag—diagnostic |
/validate:schema | Validates the project file. If no schema is provided, the default schema is used to perform the validation. |
This section provides an example of a normal MSBuild project. The project contains two tasks: The first task compiles an assembly from the available source files, and the second task creates a DLL from a source file. The project then compiles the remaining source files, which need a reference to the just-built DLL. The sample MSBuild project is documented with steps. Here is the project, followed by a description of each step:
<?xml version="1.0" encoding="utf-8"?>
<!-- Step One-->
<Project xmlns="http://schemas.microsoft.com/developer/msbuild/2003">
  <!-- Step Two -->
  <ItemGroup>
    <Compile Include="source1.cs"/>
    <Compile Include="source2.cs"/>
  </ItemGroup>
  <!-- Step Three -->
  <PropertyGroup>
    <DebugType>none</DebugType>
  </PropertyGroup>
  <PropertyGroup>
    <AssemblyName>sample.exe</AssemblyName>
  </PropertyGroup>
  <!-- Step Four -->
  <Target Name="Application1">
    <Csc Sources="*.cs" OutputAssembly="$(AssemblyName)"
         DebugType="$(DebugType)"/>
  </Target>
  <!-- Step Five-->
  <Target Name="Application2">
    <Csc Sources="source3.cs" TargetType="library"/>
    <Csc Sources="@(compile)" References="source3.dll"
         OutputAssembly="$(AssemblyName)" DebugType="$(DebugType)"/>
  </Target>
</Project>
Step One sets the schema for the MSBuild schema.
Step Two creates an item collection for the Compile element. The source files source1.cs and source2.cs are named in the collection.
Step Three sets the defaults for the DebugType and AssemblyName properties.
Step Four defines target Application1, which has a single task. The task compiles the source files in the current directory. It uses both the AssemblyName and DebugType properties.
Step Five defines target Application2, which contains two tasks. The first task compiles source3.cs and places the results in a library assembly; the second task compiles the item collection and references the library assembly.
The following MSBuild command reads the sample.proj project file. The output is the donis.exe assembly. The DebugType property is assigned full and the AssemblyName property is assigned donis.exe. This overwrites the default values of those properties. Finally, MSBuild invokes the Application1 target:
C:>msbuild /p:debugtype=full,assemblyname=donis.exe sample.proj /target:application1
The following MSBuild command executes the tasks of the Application2 target:
C: >msbuild /p:debugtype=full,assemblyname=donis.exe sample.proj /target:application2
With ClickOnce deployment, users can browse and install Windows applications published on an ASP.NET Web server. Setup and deployment of desktop and non-Web applications have become increasingly complex. For desktop applications, installation must be repeated for updates and future versions of the product. There is also the productivity problem of having to install the product physically on multiple, individual machines. Conversely, deployment of Web applications is hands-free. You simply browse to the application using the proper Uniform Resource Locator (URL). No installation is required. Web applications are also self-updating. Users automatically obtain the latest version of the Web application whenever an updated Web site application is browsed. Productivity is improved because per-machine updates are automatic. The benefits of Web distribution extend to ClickOnce deployment.
ClickOnce deployment is nonintrusive. Conversely, Windows Installer technology is intrusive because the application is installed to the local machine. ClickOnce deployment downloads an application into the download cache, in which there is only a limited impact on the local machine. There are security considerations because these applications execute in the download cache with potentially limited security privileges. These security considerations must be addressed in the application or on the local machine. Because the deployment is hands-free, the user experience improves.
ClickOnce applications are self-updating, which is particularly useful for applications that require frequent updates. Deploying applications that require frequent updates within the Windows Installer technology model is a time-consuming process. ClickOnce applications are deployed once and updated online automatically. Updates simply require online connectivity.
Another benefit includes the security privileges required to perform an installation. Windows Installer technology sometimes requires administrative permissions, but ClickOnce deployment does not require administrative permissions to deploy the application.
ClickOnce deployment publishes an application at a Web site on an ASP.NET server. The client machine must support the .NET Framework. This is more likely in an intranet deployment, where the client desktops are more controlled. It is also feasible in an extranet environment, in which requirements can be published and a reasonable level of compliance can be expected. ClickOnce applications can be initially deployed in a traditional manner, but require online connectivity for self-updating.
ClickOnce deployment has two modes of deployment. The online-only mode executes the application from the Web (in the download cache), which requires the client to be connected to the server whenever the application is executed. The full installation mode performs the installation on the client computer. This is similar to a traditional installation from an .msi or .cab file. Updates still require online connectivity.
ClickOnce deployment uses an application manifest (which is an XML file) to define dependent assemblies, files, and security permissions required for the application. ClickOnce deployment also uses a deployment manifest. This manifest contains deployment configuration information, such as the current version, the location of required files, deployment mode, and update policies.
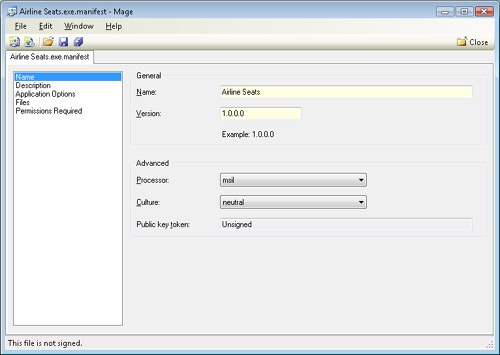
Create application and deployment manifests with the Manifest Generation And Editing Tool (Mage), which is distributed with the Windows SDK Update for Windows Vista. To create a new application manifest, choose the File menu and then choose the New submenu. From the submenu, select Application Manifest. The application manifest appears with the Name entry selected in the left-hand pane. The Name window contains the general information on the deployment. The Airline Seats application, referred to earlier in this chapter, is published as a ClickOnce application. (The section "Publish a ClickOnce Application," later in this chapter, explains how to create a manifest.exe file.) You can open an existing manifest file (which will have a .manifest extension) by choosing Open from the File menu and browsing to the appropriate location. Figure 4-41 shows a view of the Name window in the Mage tool for the Airline Seats application.
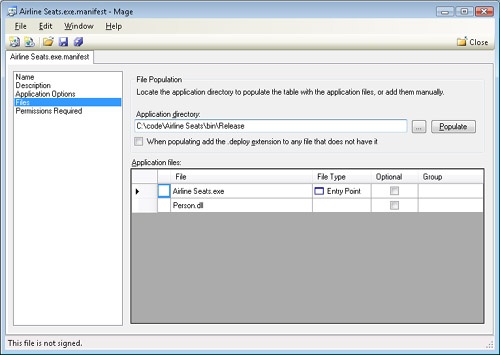
The Files window, shown in Figure 4-42, lists the files included in the deployment.
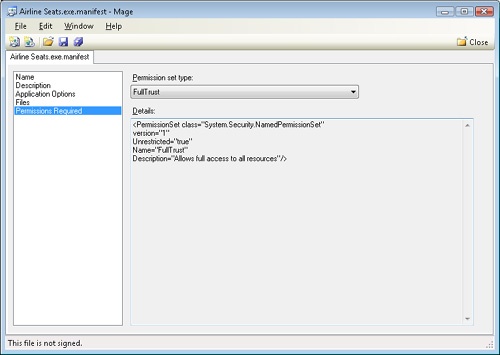
The Permissions Required window (shown in Figure 4-43) sets the security required to execute the deployed application.
You also can open the deployment manifest (which will have a .application extension) using the Mage tool. The Name window is the same for both the deployment and application manifests. For the deployment manifest, the two most important windows are the Deployment Options window and the Update Options windows.
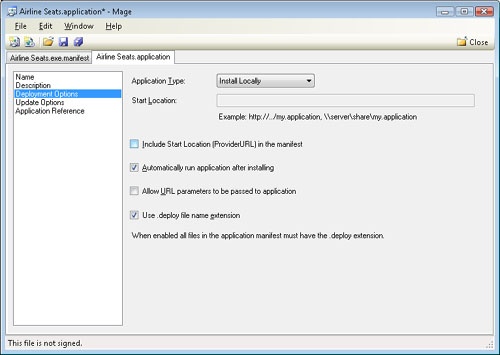
The Deployment Options window (shown in Figure 4-44) sets the ClickOnce deployment mode and the URL of the published application.
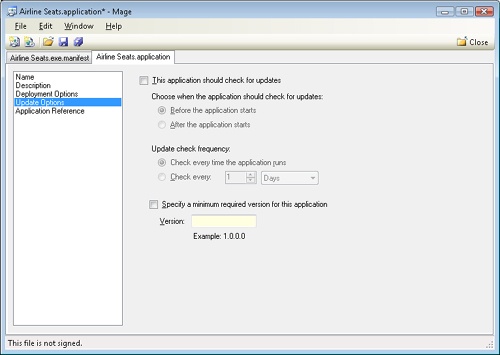
The Update Options window (shown in Figure 4-45) configures how updates are managed for an application deployed with ClickOnce technology.
Fortunately, ClickOnce deployment is automated in Visual Studio 2008, including the creation of manifest files and configuration of Web servers. In Visual Studio 2008, developers use the Publish Wizard to set up an application for ClickOnce deployment. Right-click the project and choose Publish to start the Publish Wizard.
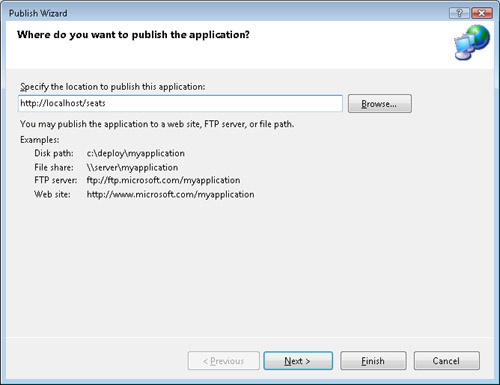
The Publish Wizard has several steps. The first step identifies the URL to which the application is to be published. Figure 4-46 shows the first window of the Publish Wizard.
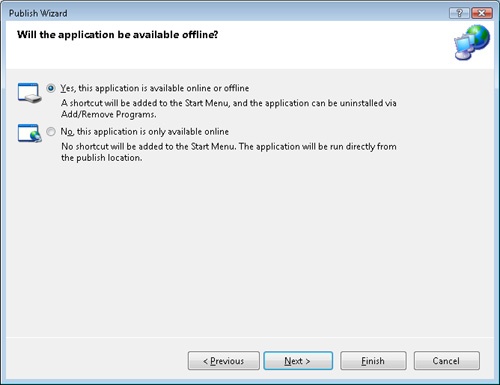
Step 2 of the Publish Wizard, shown in Figure 4-47, sets how the application is deployed.
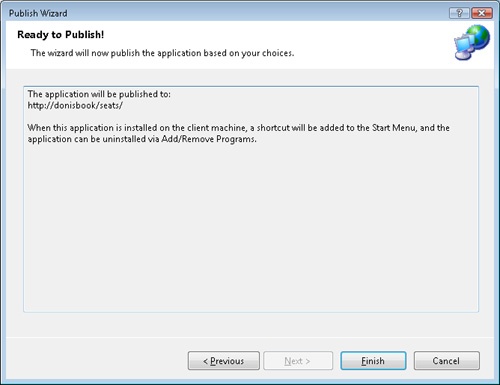
Step 3 of the wizard, shown in Figure 4-48, is the confirmation window, in which a developer can review the ClickOnce settings and confirm the deployment.