
Chapter 1. C# and F# Data Structures
In this chapter, I’ll compare and contrast various data structures from F# and C# programming languages. F# is a powerful multiparadigm language that supports imperative, object-oriented, and functional programming. C# is a multiparadigm language with more of a focus on imperative and object-oriented programming. A C# program usually consists of statements to change the program’s state. An imperative language describes how to finish a task with exact steps. A functional-first language, like F#, is more declarative, describing what the program should accomplish.
One example of a programming language adopting functional programming is the C# version 3.0 introduction of LINQ (Language INtegrated Query). The growing popularity of Scala and Closure shows functional programming is growing. In addition, F# is another tool Microsoft ships with Microsoft Visual Studio to solve ever-changing programming challenges. Which language you choose to use depends on your experience and environment, but keep in mind you do not need to make an exclusive selection. I hope this book provides some information that helps you make appropriate decisions.
Any programming language is designed to perform some computation and to process data. The way that data is organized and stored is referred to as the data structure. This chapter introduces basic data structures for F#, explains how they relate to C#, and details how you can apply them to create imperative programs. I will follow the tradition in programming books of presenting a Hello-World-like application to introduce a new language. I will provide simple C# code along with the F# imperative equivalent.
Example 1-1 shows an imperative approach that simply adds up the odd numbers from 0 to 100. C# supports functional programming (such as a LINQ feature), and there is a more concise way to implement the same functionality, which I’ll show later in this chapter.
// add all odd numbers from 0 to 100 and print out the result in the console
int sum = 0;
for (int i = 0; i<=100; i++)
{
    if (i%2 != 0)
         sum += i;
}

Console.WriteLine("the sum of odd numbers from 0 to 100 is {0}", sum);
F# implementation
let mutable sum = 0
for i = 0 to 100 do
    if i%2 <> 0 then sum <- sum + i
printfn "the sum of odd numbers from 0 to 100 is %A" sum
By porting this C# code to the F# equivalent, I’ll cover the follow topics:
The basic data type (such as primitive type literals). See the Basic Data Types section.
The if, while, and for syntax. See the Flow Control section.
After implementing the same functionality in F#, I’ll cover some F# data structures, such as Seq and tuple. Although this particular sample does not require Microsoft Visual Studio 2012, it is highly recommended that you install it, which is the minimum requirement for various samples in this book. I’ll also introduce F# Interactive and some other useful add-ins to improve your overall F# programming experience.
Note
Because Visual Studio IDE features are not the focus of this book, I encourage you to look at the MSDN website (www.msdn.com) or Coding Faster: Getting More Productive with Microsoft Visual Studio (Microsoft Press, 2011) to explore the topic by yourself.
Now it’s time to start our journey!
Basic Data Types
F# is a .NET family language; therefore, the basic type definition and reference are similar to C#. Table 1-1 lists the C# and F# data types as well as the way to define a variable with each type. F# is a strongly typed language. Any errors related to type conversion are reported at compile time. These errors can be detected at an early stage of development and checked, which enables them to be fixed at compile time.
One big difference between the C# and F# definitions is that the F# examples do not need an explicitly defined type. This is because F# is often able to infer a type from the assigned value. To most C# developers, this feature is a lot like the var keyword in C#. There are some fundamental differences between var and let, but you can think of them as equals for now.
Data Type | C# Representation | F# Representation |
Int | int i = 0; | let i = 0 or let i = 0l |
Uint | uint i = 1U; | let i = 1u or let i = 1ul |
Decimal | decimal d = 1m; | let d = 1m or let d = 1M |
Short | short c = 2; | let c = 2s |
Long | long l = 5L; | let l = 5L |
unsigned short | ushort c = 6; | let c = 6us |
unsigned long | ulong d = 7UL; | let d = 7UL |
byte | byte by = 86; | let by = 86y let by = 0b00000101y let by = ‘a’B |
signed byte | sbyte sby = 86; | let sby = 86uy let sby = 0b00000101uy |
bool | bool b = true; | let b = true |
double | double d = 0.2; double d = 0.2d; double d = 2e-1; double d = 2; double d0 = 0; | let d = 0.2 or let d = 2e-1 or let d = 2. let d0 = 0x0000000000000000LF |
float | float f = 0.3; or foat f = 0.3f; float f = 2; float f0 = 0.0f; | let f = 0.3f or let f = 0.3F or let f = 2.f let f0 = 0x0000000000000000lf |
native int | IntPtr n = new IntPtr(4); | let n = 4n |
unsigned native int | UIntPtr n = new UIntPtr(4); | let n = 4un |
char c = ‘c’; | let c = ‘a’ | |
string | string str = “abc”; | let str = “abc” |
big int | BigInteger i = new BigInteger(9); | let i = 9I |
One particular F# feature I’d like to call out is the syntax for creating an array of bytes to represent an ASCII string. Instead of asking you to constantly call into the Encoding.ASCII.GetBytes function, F# provides the “B” suffix to define an ASCII string. The string in .NET is Unicode-based. If you are mainly programming an ASCII string, you will not like this. In the following code, the representation for asciiString is a byte[] type internally:
let asciiString = "abc"B  // F# code
byte[] asciiBytes = Encoding.ASCII.GetBytes(value);  // C# code
Unlike C#, float in F# is a double-precision floating point number, which is equivalent to a C# double. The float type in C# is a single-precision numerical type, which can be defined in F# via the float32 type. The .NET 32-bit and 64-bit floating numbers can be positive infinite or a NaN value. F# uses shortcut functions to represent these values:
Positive Infinity infinity is System.Double. PositiveInfinity and infinityf is System.Single. PositiveInfinity
NaN nan is System.Double.NaN and nanf is System.Single.NaN
The F# compiler does not allow any implicit type conversion. For a C# developer, an integer can be converted to a float implicitly, and this gives the impression that 29 is the same as 29.0. Because implicit conversion is not allowed in F#, the explicit conversion float 29 is needed to convert the integer 29 to a float type. The explicit conversion can eliminate the possibility of lose precision when the conversion is implicit.
F# 2.0 had two syntaxes for strings: normal strings, and verbatim strings, which are prefixed by the at sign (@). F# 3.0 introduces a new feature to define strings using a triple-quoted string.
Triple-Quoted Strings
F# supports normal strings and verbatim strings. This is equivalent to the options that C# provides. Examples of normal and verbatim string definitions are shown in Example 1-2. The execution result shown in the listing is an example of a normal string and verbatim string being bound to specific values within the F# Interactive window (which I’ll introduce shortly in the Using F# Interactive section). The result shows the variable name, type, and value.
Normal and verbatim strings are useful for a variety of tasks. However, scenarios that require included characters, such as double quotes, are still difficult to implement because of the need to escape these characters. Example 1-3 shows examples of this.
// use backslash () to escape double quote
let a = "this is "good"."

// use two double quote to escape
let b = @"this is ""good""."
F# 3.0 introduces a new string format—a triple-quoted string—that alleviates this pain. Everything between the triple quotes (“””) is kept verbatim; however, there is no need to escape characters such as double quotes. Triple-quoted strings have a number of use cases. A few examples include the creation of XML strings within your program and the passing of parameters into a type provider. Example 1-4 shows an example.
Variable Names
How to define a variable name is a much-discussed topic. One design goal for F# is to make variable names resemble more normal human language. Almost every developer knows that using a more readable variable name is a good practice. With F#, you can use double-backticks to include nonalphabet characters in the variable name and eventually improve the readability of your code. Examples are shown in Example 1-5.
Flow Control
To write F# applications in an imperative style, you need to know how to define flow-control statements. F# supports several types of flow control to accomplish this, including the for loop, while loop, and if expression. These statements segment the program into different scopes. C# uses “{“ and “}” to segment code into different scopes, while F# does not use those items. Instead, F# uses the space indent to identify different program scopes. This section discusses these three statements in detail.
Note
Visual Studio can automatically convert the Tab key to a space. If you edit F# code in another editor that does not support this conversion, you might have to do it manually.
for Loop
There are two forms of the for loop: for...to/downto and for...in. The for...to/downto expression is used to iterate from a start value inclusively to or down to an end value inclusively. It is similar to the for statement in C#.
FOR...IN is used to iterate over the matches of a pattern in an enumerable collection—for example, a range expression, sequence, list, array, or other construct that supports enumeration. It is like foreach in C#. Looking back at the C# code that began this chapter, you see that you can use two F# options (as shown in Example 1-6) to accomplish the loop of code for each number between 0 and 100. The first approach uses FOR...TO, and the second approach uses for...in.
Note
The [0..100] defines a list with elements from 0 to 100. The details about how to define a list are discussed later in this book.
Some readers might immediately ask how to make the for...to/downto to increase or decrease by 2. for...to/downto does not support this, so you have to use for...in with a sequence or list. And I can assure you, you will not use for loop that often when you understand how to use a sequence or list.
while Loops
Another approach that could be used to accomplish the goal of this example is to use a while loop. F# and C# approach the while loop in the same way. Example 1-7 shows an example.
Note
It’s optional to use a semicolon to end a statement. The semicolon is needed only when multiple statements are placed on the same line.
The definition for variable i in the previous code snippet has the mutable keyword in the definition. The mutable keyword indicates i is a mutable variable, so its content can be modified by using the <– operator. This brings up an interesting and crucial concept in F#: a variable without the mutable keyword is an immutable variable, and therefore its value cannot be changed. The C# code int i = 0 is equivalent to the F# code let mutable i = 0. This looks like a small change, but it is a fundamental change. In C#, the variable is mutable by default. In F#, the variable is immutable by default. One major advantage to using immutable variables is multi-thread programming. The variable value cannot be changed and it is very easy and safe to write multi-thread program.
Although F# does not provide do...while loop, it won’t be a problem for an experienced C# developer if he is still willing to use the C# imperative programming model after learning about F#. Actually, the more you learn about F#, the less important the do...while loop becomes.
if Expressions
At this point, the only part left is the if expression. In the earlier example, you need if to check whether the value is an odd number. Note that in F# if is an expression that returns a value. Each if/else branch must return the same type value. The else branch is optional as long as the if branch does not return any value. The else must be present if the if branch returns a value. It is similar to the “?:” operator in C#. Although a value must be returned, that returned value can be an indicator of no value. In this case, F# uses “unit” to represent the result. Unlike C#’s if...else, F# uses elif to embed another if expression inside. Example 1-8 shows an example of this. In Example 1-9, you can see a comparison between the C# and F# code required to check that a value is odd or even.
Match
In addition to the if statement, C# and F# have another way to branch the execution of code. C# provides a switch statement, and F# provides a match expression. F# developers can use a match expression to achieve the same functionality as the switch statement in C#, but the power of match expressions does not stop there. I will discuss the additional features that match provides in Chapter 6. An example of a simple implementation of match that is similar in concept to a C# switch statement is shown in Example 1-10.
C# switch statement
int i = 1;
switch (i)
{
    case 1:
        Console.WriteLine("this is one");
        break;
    case 2:
        Console.WriteLine("this is two");
        break;
    case 3:
        Console.WriteLine("this is three");
        break;
    default:
        Console.WriteLine("this is something else");
        break;
}
F# match statement
let intNumber = 1

match intNumber with
    | 1 -> printfn "this is one"
    | 2 -> printfn "this is two"
    | 3 -> printfn "this is three"
    | _ -> printfn "this is anything else"
Console Output
Now you have almost everything to make the functionality work. The last missing piece is to let the computer tell you what was achieved by using console output. In the C# code, you use the Console.WriteLine method. Because F# is a .NET language, you can use Console.WriteLine from it as well. However, F# also provides a function called printfn that provides a more succinct and powerful option. Example 1-11 shows an example of both of these approaches.
F#’s printfn is stricter than C#’s Console.WriteLine. In C#, {<number>} can take anything and you do not have to worry about the type of variable. But F# requires that the placeholder have a format specification indicator. This F# feature minimizes the chance to make errors. Example 1-12 demonstrates how to use different type-specification indicators to print out the appropriate values. If you really miss the C# way of doing this, you can use %A, which can take any type. The way to execute the code will be explained later in this chapter.
   let int = 42
   let string = "This is a string"
   let char = 'c'
   let bool = true
   let bytearray = "This is a byte string"B

   let hexint = 0x34
   let octalint = 0o42
   let binaryinteger = 0b101010
   let signedbyte = 68y
   let unsignedbyte = 102uy

   let smallint = 16s
   let smalluint = 16us
   let integer = 345l
   let usignedint = 345ul
   let nativeint = 765n
   let unsignednativeint = 765un
   let long = 12345678912345789L
   let unsignedlong = 12345678912345UL
   let float32 = 42.8F
   let float = 42.8

   printfn "int = %d or %A" int int
   printfn "string = %s or %A" string string
   printfn "char = %c or %A" char char
   printfn "bool = %b or %A" bool bool
   printfn "bytearray = %A" bytearray

   printfn "hex int = %x or %A" hexint hexint
   printfn "HEX INT = %X or %A" hexint hexint
   printfn "oct int = %o or %A" octalint octalint
   printfn "bin int = %d or %A" binaryinteger binaryinteger
   printfn "signed byte = %A" signedbyte
   printfn "unsigned byte = %A" unsignedbyte

   printfn "small int = %A" smallint
   printfn "small uint = %A" smalluint
   printfn "int = %i or %A" integer integer
   printfn "uint = %i or %A" usignedint usignedint
   printfn "native int = %A" nativeint

   printfn "unsigned native int = %A" unsignednativeint
   printfn "long = %d or %A" long long
   printfn "unsigned long = %A" unsignedlong
   printfn "float = %f or %A" float32 float32
   printfn "double = %f or %A" float float
int = 42 or 42
string = This is a string or "This is a string"
char = c or 'c'
bool = true or true
bytearray = [|84uy; 104uy; 105uy; 115uy; 32uy; 105uy; 115uy; 32uy; 97uy; 32uy; 98uy;
121uy; 116uy; 101uy; 32uy; 115uy; 116uy; 114uy; 105uy; 110uy; 103uy|]
hex int = 34 or 52
HEX INT = 34 or 52
oct int = 42 or 34
bin int = 42 or 42
signed byte = 68y
unsigned byte = 102uy
small int = 16s
small uint = 16us
int = 345 or 345
uint = 345 or 345u
native int = 765n
unsigned native int = 765un
long = 12345678912345789 or 12345678912345789L
unsigned long = 12345678912345UL
float = 42.800000 or 42.7999992f
double = 42.800000 or 42.8
The Console has In, Out, and Error standard streams. F# provides stdin, stdout, stderr, which correspond to these three standard streams. For the conversion task, you already have all the building blocks. So let’s give it a try in Example 1-13.
C# version
// add all odd numbers from 0 to 100 and print out the result in the console
int sum = 0;
for (int i = 0; i<=100; i++)
{
    if (i%2 != 0)
         sum += i;
}

Console.WriteLine("the sum of odd numbers from 0 to 100 is {0}", sum);
F# version
let mutable sum = 0
for i = 0 to 100 do
    if i%2 <> 0 then sum <- sum + i
printfn "the sum of odd numbers from 0 to 100 is %A" sum
Example 1-14 shows how to use a list and a for...in loop to solve the same problem. Compared to Example 1-13, this version has the following changes:
Uses for...in to iterate through 0 to 100, where [1..100] is an F# list definition
Uses the printf function, which does not output the “ ”
Replaces %A with %d, which tells the compiler that the sum variable must be an integer
Run Your Program
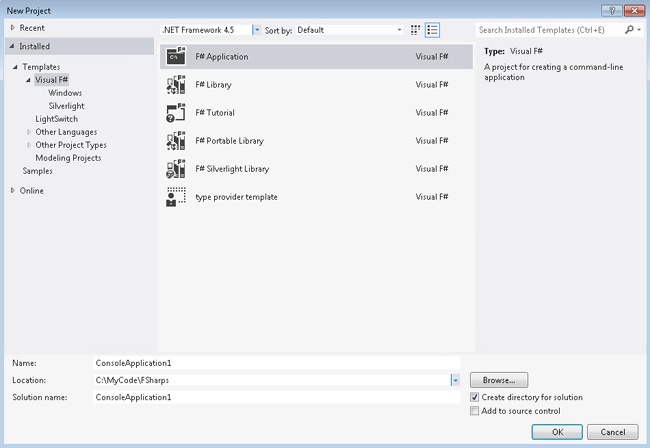
You can run your program from Visual Studio in two ways: create an F# project, much like you would a C# project, or use the F# Interactive window. F# supports the following project types in Visual Studio 2012:
F# Application is a console-application project template.
F# Library is a class-library template.
F# Tutorial is a console application that contains F# samples. I highly recommend going through all of these samples.
F# Portable Library is a class library for F# libraries that can be executed on Microsoft Silverlight, Windows Phone, and Windows platforms, including Windows 8.
F# Silverlight Library is a Silverlight class-library template.
If you want to execute the sample code shown in this chapter up to this point, the F# application project is a good choice.
Note
Microsoft Visual Studio Express 2012 for Web is free. Although its name suggests it is for web development and does not support a portable library, you can use it to create a console application by using the F# tutorial template.
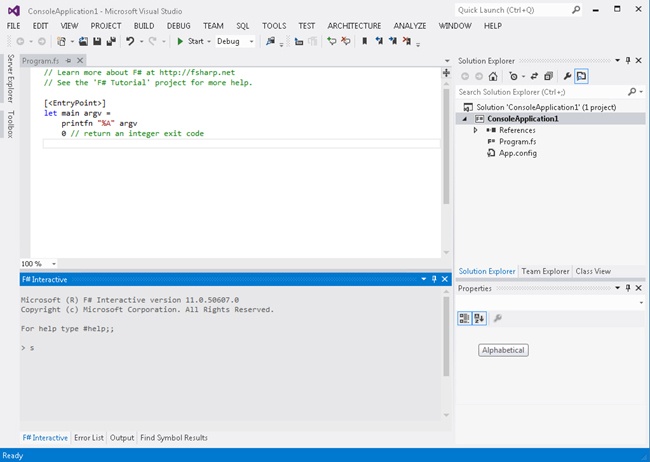
Creating a Console Application
Figure 1-1 shows the project template list. You can select F# Application and accept the default name. This F# console-application template creates a solution with a console-application project that includes a default Program.fs file, as you can see in Figure 1-2. To run the simple summing application we’ve been referring to throughout this chapter, simply replace the content of Program.fs with the F# code from Example 1-13. The steps are primarily the same for the creation of other project types, so I’ll leave this to you to explore.
Using F# Interactive
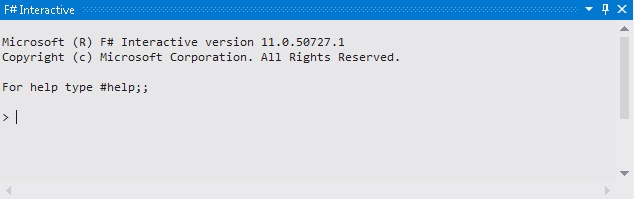
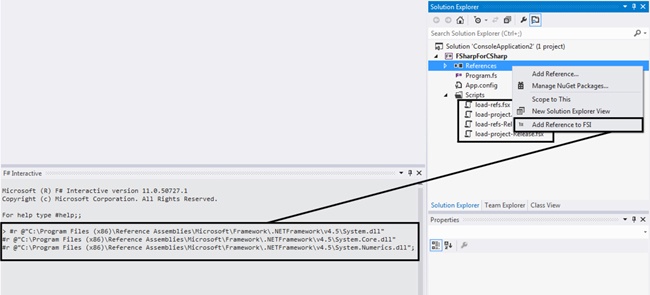
For simple programs like the one in Example 1-13, F# ships with an F# Interactive feature (FSI). You can use this to test small F# code snippets. In Visual Studio, the F# Interactive window can be found in the View menu. Depending on the development profile you’re using, you can find the F# Interactive window under View, Other Windows, or you can access it directly in the View menu, as shown in Figure 1-3. An example of the FSI window is shown in Figure 1-4.

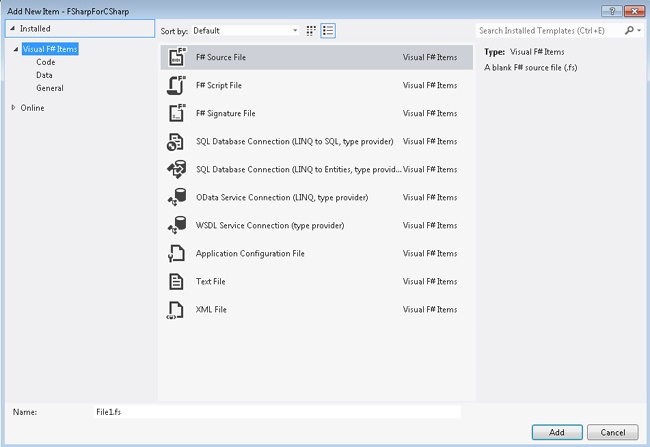
The FSI window accepts user input, so you can execute your code directly in it. You can use two semicolons (;;) to let FSI know that the statement is finished and can be executed. One major limitation for FSI is that the FSI window does not provide Microsoft IntelliSense. If you don’t want to create a full project and still want to use IntelliSense, the F# script file is your best option. You can go to File, New to create a new script file, as shown in Figure 1-5.
Note
Many item templates are listed in Figure 1-5. I’ll introduce them later. For now, you need only an F# source file and an F# script file.
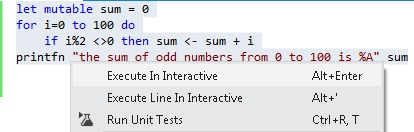
The primary difference between an F# source file and an F# script file is the build action. The F# source file is a file with an extension of .fs, which will be compiled. Its action is set to Compile. The F# script file has an extension of .fsx, and its build action is set to None, which causes it to go into the build process by default. No matter which file type you decide to use, you can always execute the code by selecting it and using the context (that is, right-click) menu option Execute In Interactive. If you prefer using the keyboard, Alt+Enter is the keyboard shortcut as long as the development profile is set to F#. This command sends the selected code to be executed in FSI, as shown in Figure 1-6. There is also another menu option labeled Execute Line In Interactive. As its name suggests, this option is used to send one line of code to the FSI. The shortcut key for Execute Line In Interactive is Alt + ‘.
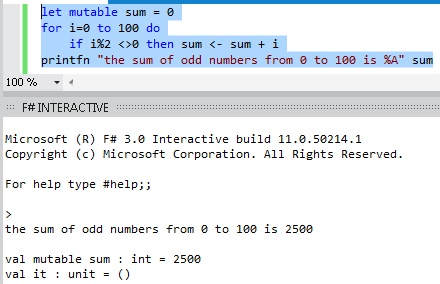
OK, let’s put the code in the Program.fs. After that, you can select the code and send it to FSI. The execution result is shown in the FSI window, which then displays the expected result of “the sum of odd numbers from 0 to 100 is 2500,” as shown in Figure 1-7. Congratulations! You’ve got your first F# program running.
Tip
FSI provides a #time switch you can use to measure the execution time of your code and Gen 0/1/2 collection numbers. An example of the #time switch usage is shown in Example 1-15. Interested users can perform a long run computation and see how this option works. Other directives can be found in the FSI Directives section later in the chapter.
After executing the program, FSI’s state is changed causing it to become polluted. If you need a clean environment, you can use Reset Interactive Session. If you want to clear only the current output, you should select Clear All. The context menu (shown in Figure 1-8) shows all the available options. You can bring it up by right-clicking in the FSI window.
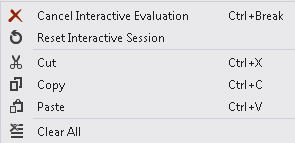
The full list and a description of each command provided in the FSI context menu is shown in Table 1-2.
FSI Command | Description |
Cancel Interactive Evaluation | Cancels the current FSI execution. |
Reset Interactive Session | Resets the current FSI execution session. |
Cut | Cuts the selection in the current editing line to the clipboard. The result from a previous execution or banner cannot be cut. |
Copy | Copies the selection to the clipboard. |
Paste | Pastes the clipboard text content to the current editing line. |
Clear All | Clears all content in the FSI window, including the copyright banner. |
FSIAnyCPU
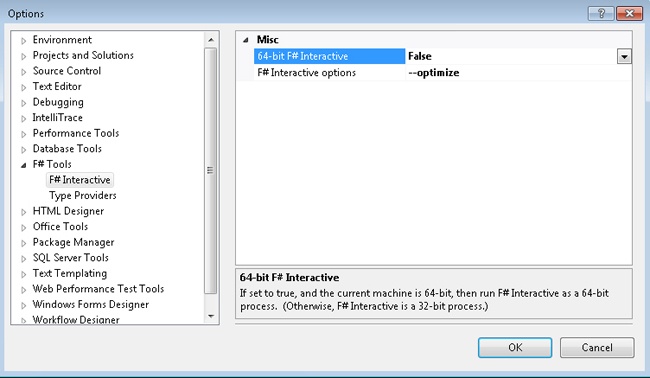
The FSIAnyCPU feature was added with Visual Studio 2012. FSI will be executed as a 64-bit process as long as the current operating system is a 64-bit system. The FSIAnyCPU feature can be enabled by clicking Option, F# Tools, F# Interactive, as shown in Figure 1-9.
You can use Process Manager to check whether the FSIAnyCPU process is running, or you can use the sizeof operator to check the current IntPtr size. The 32-bit machine’s IntPtr is 32-bit, so the sizeof operator returns 4 while the 64-bit machine will return 8. Example 1-16 shows the execution result from my 32-bit laptop.
FSI Directives
In addition to the #time directive, FSI offers several others:
#help is used to display the help information about available directives.
#I is used to add an assembly search path.
#load is used to load a file, compile it, and run it.
#quit is used to quit the current session. You will be prompted to press Enter to restart. This is how to restart a session from the keyboard.
#r is used to reference an assembly.
The FSI is a great tool that can be used to run small F# snippets of your code for test purposes. If your code is used to perform file I/O operations, the FSI’s default directory is the temp folder. Example 1-17 shows how to get the current FSI folder and change its default folder.
Compiler Directives
FSI is a nice feature to have when you want to execute small programs. However, it is not a good choice for building executable binaries. To build binaries, you need to use Visual Studio. We’ll use it to create one of the projects previously mentioned in this chapter. The build and execution process and experience is largely the same for both F# and C# applications, though they have different compilers. I already presented the FSI directives, and I will now list the F# compiler directives. The following five directives are supported by F#:
if is used for conditional compilation. Its syntax is if <symbol>. If the symbol is defined by the compiler, the code after the if directive is included in the compilation, as shown in Example 1-18.
else is used for conditional compilation. If the symbol is not defined, the code after else is included in the compilation, as shown in Example 1-18.
endif is used for conditional compilation, and it marks the end of the conditional compilation. This is also shown in Example 1-18.
line indicates the original source code line and file name.
nowarning is used to disable one or more warnings. F# tends to be more restrictive and gives more warnings than C# does. If your organization has a zero-warning policy, you can ignore specific warnings by using the nowarning directive. Only a number is needed as a suffix to a nowarning directive, and you can put multiple warning numbers in one line, as in the following example:
nowarning "1" "2" "3"
#if VERSION1

let f1 x y =
   printfn "x: %d y: %d" x y
   x + y

#else

let f1 x y =
   printfn "x: %d y: %d" x y
   x - y

#endif
Note
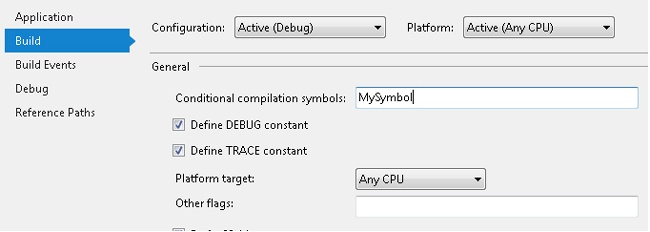
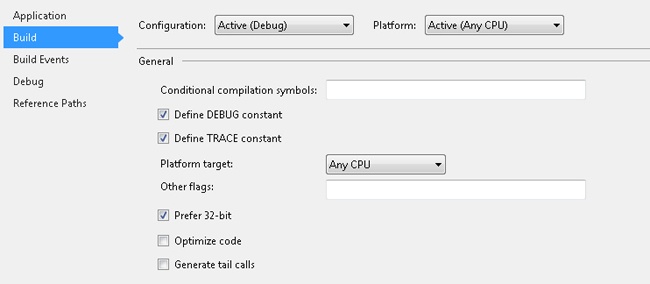
There is no #define directive. You have to either use a compiler option to define a symbol or define that symbol in the project properties. An example is shown in Figure 1-10.
The INTERACTIVE compile symbol is a build-in compile symbol. The code wrapped by this symbol will be included in the FSI execution but not in the project build process. Example 1-19 provides an example. If you are trying to include code only during the project build, the COMPILED symbol can be used, as shown in Example 1-20.
Some Useful Add-ins
Visual Studio is a powerful editor with a rich set of editing features. However, some Visual Studio add-ins designed for F# are still recommended as a way to improve your coding experience.
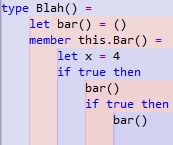
F# depth colorizer. Because F# uses space indents to scope the code, you can run into some seemingly weird errors only because an extra space is needed 10 lines earlier. This extension can highlight this type of indentation problem. This add-in is used to help align code blocks by using different colors. I strongly recommend that you install it if your project gets big. You can download it from the Visual Studio gallery at http://visualstudiogallery.msdn.microsoft.com/0713522e-27e6-463f-830a-cb8f08e467c4. Figure 1-11 shows an example of the F# depth colorizer in use.
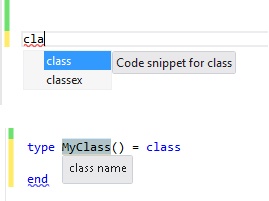
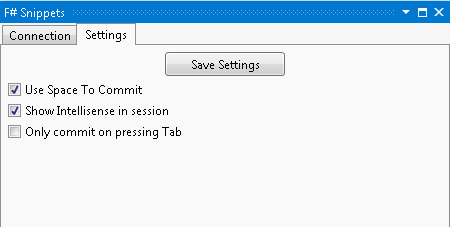
F# code snippet. The code snippet add-in brings the common code—for example, the class definition—to your fingertips. Unlike the C# snippet, the F# snippet also adds any needed dynamic-link library (DLL) references into the project. You can download the add-in and snippet files from http://visualstudiogallery.msdn.microsoft.com/d19080ad-d44c-46ae-b65c-55cede5f708b. An example of the extension in use is shown in Figure 1-12. The configuration options that the tool provides are shown in Figure 1-13.
Add reference add-in. Visual Studio’s project system provides a nice UI to manage the reference DLLs. This add-in sends reference statements to FSI and adds reference scripts to the Script folder in the current project. Take a look at Figure 1-14.
List, Sequence, and Array Data Structures
We successfully finished our first task: converting a simple C# program to F#. These days, many C# developers might choose to use LINQ to solve this problem. As I mentioned in this chapter’s introduction, long before C# had this LINQ feature, F# had it as a functional programming feature. In this section, you’ll learn how to define and use collection data, including the following items: list, sequence, and array. After introducing the list, sequence, and array structures, I’ll show you how to use a functional programming style to convert simple C# programs to F#.
Lists
First, we start with the list structure, which you used once in the C#-to-F# conversion task. An F# list is an ordered, immutable series of same-type elements. Example 1-21 shows different ways to define a list.
//defines a list with elements from 1 to 10.
let list0 = [1..10]

//defines a list with element 1, 2, and 3.
let list1 = [1;2;3]

//defines a list with elements 0, 1, 4, 9, and 16.
let list2 = [for i=0 to 4 do yield i*i]

//defines an empty list
let emptyList = [ ]
let emptyList2 = List.empty
Note
The emptyList element invokes the Empty function, which returns List.Empty, while emptyList2 returns List.empty directly.
Unlike C#, F# uses a semicolon to separate the element in an array.
There are two operators that are useful when working with a list:
:: (cons) operator. The :: operator attaches an element to a list. The F# list class has a constructor that takes an element and a list. This operator actually invokes this constructor and returns a new F# list. Its time complexity is O(1).
let list1With4 = 4::list4
Here, list1With4 is a list defined as
= [4;1,2;3].@ operator. The @ operator concatenates two lists and returns a new instance of F# list It time complexity is O(min(M, N)) where M is list0’s length and N is list1’s length.
let list0And1 = list0 @ list1
Here, list0And1 is a list defined as
= [1;2;3;4;5;6;7;8;9;10;1;2;3], where 1, 2, and 3 are from list1.
Lists support indexing. Unlike C#, if you want to use an indexer in F#, you need to use dot notation. This means that you need to put an extra dot between the list variable and the indexer. Example 1-22 shows this in action. F# list is a linked list and the time complexity is O(i), where i is index passed in the statement.
list0[0]  //won't compile
list0.[0] // correct. Using a dot notation
F# lists support something called structural equality. Structural equality is to check equivalent identity. Example 1-23 shows that the list can be equal if elements in both lists are equal. Comparisons between incongruous lists (apples-to-oranges comparisons) are not allowed. As an example, Example 1-24 will not compile because the comparison between TextBox and Button doesn’t make sense. Additionally, comparisons can be performed only if the elements support equality comparisons. Structural comparison is to provide an ordering of values.
// the following code compiles
open System.Windows.Forms

let l1 = [ new TextBox(); new Button(); new CheckBox() ]
let l2 = [ new Button(); new CheckBox(); new TextBox() ]

// the following code does not compile
// printfn "%A" (l1 < l2) // not compile
Note
If you want to use the F# list type in a C# project, you need to add a reference to Microsoft.FSharp.Core.dll.
The F# list might suggest it has some relationship with the List<T> type. Actually, the list type is a Microsoft.FSharp.Collections.FSharpList<T> type. It does implement the IEnumerable<T> interface, but it is not very similar to the List<T> type.
Sequences
According to MSDN documentation, a sequence is a logical series of elements of one type. Sequences are particularly useful when you have a large, ordered collection of data but do not necessarily expect to use all the elements. Individual sequence elements are computed only as required, so a sequence can provide better performance than a list in situations in which not all of the elements are needed. Any type that implements the System.IEnumerable interface can be used as a sequence. Defining a sequence is similar to defining a list. Example 1-25 shows a few examples of how to define a sequence.
// defines a sequence with elements from 1 to 10.
let seq0 = seq { 1..10 }

// defines a sequence with elements 0, 1, 4, 9, and 16.
let seq2 = seq { for i=0 to 4 do yield i*i }

// defines a sequence using for...in
let seq1 = seq {
    for i in [1..10] do i * 2
}

// defines an empty sequence
let emptySeq = Seq.empty
Note
Be aware that seq { 1; 2; 3 } is not a valid way to define a sequence. However, you can use the yield keyword to define a sequence as shown here: seq { yield 1; yield 2; yield 3 }.
A sequence is shown as an IEnumerable<T> type when viewed in C#. When you expose a sequence to a C# project, you do not need to add Microsoft.FSharp.Core.dll.
Arrays
The definition from MSDN says that arrays are fixed-size, zero-based, mutable collections of consecutive data elements that are all of the same type. Example 1-26 shows how to define an array.
// defines an array with elements from 1 to 10.
let array0 = [| 1..10 |]

// defines an array with elements 1, 2, and 3.
let array1 = [| 1;2;3 |]

// defines an array with elements 0, 1, 4, 9, and 16.
let array2 = [| for i=0 to 4 do yield i*i |]

// defines an empty array
let emptyArray = [| |]
let emptyArray2 = Array.empty
Note
Like the empty case in Seq, both emptyArray and emptyArray2 invoke a function that returns Array.empty.
Arrays support indexing. Unlike C#, when you use an indexer in F#, you need to use dot notation. Therefore, an extra space is needed between the variable name and indexer. Example 1-27 shows an example of this.
array0[0]  //won't compile
array0.[0] // correct. Using a dot notation
Arrays also have the comparison feature, as shown in Example 1-23. By changing the list syntax to an array syntax, you can get the same code to perform the structural equality comparison. Example 1-28 shows an example.
let l1 = [| 1; 2; 3 |]
let l2 = [| 2; 3; 1 |]
printfn "l1 = l2? %A" (l1 = l2)
printfn "l1 < l2? %A" (l1 < l2)
Another interesting feature provided for working with arrays in F# is slicing. You use slicing to take a continuous segment of data from an array. The syntax for slicing is straightforward: myArray.[lowerBound .. upperBound]. Example 1-29 shows how to use slicing.
// define an array with elements 1 to 10
let array0 = [| 1 .. 10 |]

// get slice from element 2 through 6
array0.[2..6]

// get slice from element 4 to the end
array0.[4..]

// get the slice from the start to element 6
array0.[..6]

// get all the elements (copy the whole array)
array0.[*]
Arrays are the same in both F# and C#. You do not have to reference to Microsoft.FSharp.Core.dll to expose an array from an F# library.
Pipe-Forward Operator
Before presenting the F# code used to rewrite the example from the beginning of this chapter in a functional style, I must first explain the pipe-forward operator (|>). If you’re familiar with UNIX’s pipeline, you can think of this operator as something similar. It gets the output from one function and pipes that output in as input to the next function. For example, if you have the functions g(x) and f(x), the f(g(x)) function can be written by using a pipe-forward operator, as shown in Example 1-30.
The C# program at the beginning of this chapter focused on how to process each single element from 0 to 100 by iterating through the elements. If the element was an odd number, it was added to a predefined variable. Do we really have to think like this?
F# provides a way to think differently. Instead of thinking about how to process each single element, you can think about how to process the whole data set as a single element—a collection of data. The whole process can instead be thought about like this: after being given data from 0 to 100, I get a subset of the given data that contains only odd numbers, sum them up, and print out the result. The C# code to implement this logic is shown in Example 1-31, as is the equivalent F# code. The use of the pipe-forward operator allows the F# code to become even more succinct and beautiful than the already beautiful LINQ code. The pipe-forward operator brings the result from Seq.sum to printfn. Isn’t that simple?
C# code
var sum = dataFrom0to100
    .Where(n=>n%2!=0)    //filter out the odd number
    .Sum()                  //sum up

//output the result
Console.WriteLine("the sum of the odd number from 0 to 100 is {0}", sum);
F# code
seq { 0..100 }                          //given data from 0 to 100
|> Seq.filter (fun n -> n%2<>0)     //data subset contains only
odd number
|> Seq.sum                               //sum them up
|> printfn "the sum of odd number from 0 to 100 is %A"   //print out the result
When the F# code is shown side by side with the C# equivalent, it’s easy to tell that Seq.filter is a built-in function used to filter data and Seq.sum is a function used to sum up the elements in a provided sequence. Because printfn, which originally needs two parameters, gets its second parameter from the pipe-forward operator (|>), it takes only one explicitly provided parameter. Seq module functions are discussed in more detail in the “Seq/List/Array Module Functions” section.
From a coding experience and readability perspective, the functional way is much better than the imperative way. F#, as a functional-first language, shows this advantage very clearly. It can chain the functions together more naturally.
One headache for LINQ developers is the debugging of LINQ code. This would also be a headache for F# if FSI was not present. The FSI lets you execute some code to set up the test environment and then send the code that needs to be tested. In the previous example, if you are not sure if the filter gives you the right result, you can select the first two lines and send them to the FSI. After finishing one test, Reset Interactive Session is a convenient way to reset your environment. Isn’t that nice!
If you’re still digesting the pipe-forward operator, you can think of the parameter on the left side of the operator as the suffix to the end of the right part. The two statements shown next in Example 1-32 are basically the same.
mySeq |> Seq.length       // get the length of the sequence
Seq.length mySeq           // the same as the expression above with |>
Tip
FSI is not only a good approach for debugging a program and running unit tests, it’s also a quick way to check a function’s definition. For example, you can type Seq.filter into the FSI window. FSI then shows you the function definition, which saves you the two seconds of going to the MSDN documentation.
The Sequence, List, and Array Module Functions
Now you must be wondering where someone can find functions like Seq.filter and Seq.sum. They are located inside three modules: Seq, List, and Array module. Module is a special way for organizing F# code that will be discussed later in this chapter. For the convenience of later discussion, we denote seq, list, and array as collections. The functions listed next are the most commonly used ones. Refer to MSDN document http://msdn.microsoft.com/en-us/library/ee353413 for a complete function list.
length
It is easy to get the length of a list or an array by using the length function. The LINQ Count extension method provides the same functionality. An example is shown in Example 1-33.
exists and exists2
Seq, list, and array all provide the same functions to check whether an element exists and to see whether two collections contain the same element at the same location. The exists function is used to check for a single element, and exists2 is used for checking two collections. Example 1-34 shows how to use Seq.exists and Seq.exists2.
let mySeq = seq { 1..10 }
let mySeq2 = seq { 10..-1..1 }

// check if mySeq contains 3, which will make "fun n -> n = 3" return TRUE
if mySeq |> Seq.exists (fun n -> n = 3) then printfn "mySeq contains 3"

// more concise version to check if it contains number 3
if mySeq |> Seq.exists ((=) 3) then printfn "mySeq contains 3"

// check if two sequences contain the same element at the same location
if Seq.exists2 (fun n1 n2 -> n1 = n2) mySeq mySeq2 then printfn "two sequences contain
same element"
You might have trouble understanding the ((=) 3) in the code from the previous example. Everything in F# is a function, and the equal sign (=) is no exception. If you want to see the equal sign definition, you can run the FSI code shown in Example 1-35. The definition is as follows:
('a -> 'a -> bool)This definition is a function function that takes an ‘a and returns a function (‘a -> bool). ‘a is something not familiar. It is a type and will be determined by type inference which will be introduced later in this chapter. When an argument is provided to this function, it returns a new function. Back to our sample code of ((=) 3): the code generates a function that takes one argument and checks whether the passed-in argument is equal to 3.
let f = (=);;

val f : ('a -> 'a -> bool) when 'a : equality
You might be wondering, “What about ((>) 3)? Does it equal x > 3 or 3 > x?” Good question! Again, let us ask FSI. Example 1-36 shows the result. The first statement defines the function, and the second one passes 4 to the statement. If the parameter 4 is going to the left side of the equation, the final result should be 4>3 = TRUE. Because the final result is FALSE, the 4 must be on the right side.
forall and forall2
The forall function can be used to check whether all of the elements in a collection meet certain criteria. The LINQ All extension method provides the same functionality. Example 1-37 shows an example of how to use Seq.forall.
let myEvenNumberSeq = { 2..2..10 }

// check if all of the elements in the seq are even
myEvenNumberSeq |> Seq.forall (fun n -> n % 2 = 0)
Like the exists2, forall2 provides functionality similar to forall, but it provides the functionality across two collections. If and only if the user function returns TRUE for the two-element pairs,forall2 returns TRUE. Example 1-38 shows this in action.
find
The find function is more like the First extension method on IEnumerable. It raises KeyNotFoundException if no such element exists. See Example 1-39.
// use let to define a function
let isDivisibleBy number elem = elem % number = 0

let result = Seq.find (fun n -> isDivisibleBy 5 n)[ 1 .. 100 ]
printfn "%d " result    //result is 5
The findIndex function is designed to allow for a quick lookup of an element’s index. You can find sample code in the MSDN documentation (http://msdn.microsoft.com/en-us/library/ee353685).
map
The map function is used to create a new collection based on a given collection by applying a specified function to each element in the provided collection. The LINQ Select extension method provides the same functionality. See Example 1-40.
filter
The filter function returns a new collection containing only the elements of the collection for which the given predicate returns TRUE. The LINQ Where extension method provides the same functionality. See Example 1-41.
fold
The fold function aggregates the collection into a single value. Its definition from MSDN shows that fold applies a function to each element of the collection and threads an accumulator argument through the computation. The LINQ Aggregate extension methods perform the same functionality. Example 1-42 shows an example that sums all elements in the given sequence.
let mySeq = { 1..10 }
let result = Seq.fold (fun acc n -> acc + n) 0 mySeq
printfn "the sum of 1..10 is %d" result                    //sum = 55
One application of the fold function is to get the length of a collection. The built-in function length supports only 32-bit integers. If the sequence length is a very big number, such as int64 or even bigint, the fold function can be used to get the length. The following sample gets the sequence length in bigint. See Example 1-43, which shows the code to accomplish this.
collect
The collect function applies a user-defined function to each element in the collection and joins results. One good application of this function is the LINQ SelectMany extension method. The SelectMany method flattens the hierarchy and returns all the elements in the second-level collection. The following sample first generates a list of lists and then combines all the lists. See Example 1-44.
append
This method takes two collections and returns a new collection where the first collection’s elements are followed by the second collection’s elements. The LINQ Concat function provides the same functionality. See Example 1-45.
Math Operations
In addition to the transformation functions, F# provides a rich set of functions that perform mathematical operations on collections:
min and max. The min and max functions are used to find the minimum or maximum value in a collection. These functions are just like the LINQ min and max functions. See Example 1-46.
average. The average function is used to get the mean of all elements in a collection. Because F# does not have implicit type conversion from integer to float, the following code generates an int and does not support DivideByInt operator, which means the operand has to be transformed to a data type that supports divide, such as float or float32. See Example 1-47.
Example 1-47. The average function used with integerlet myList = [1..10] // does not compile because int does not support "DivideByInt" let myListAverage = myList |> List.averageYou can use map to change the integer element into a float element. Again, the float is also a function that converts an integer to a System.Double. See Example 1-48.
sum. The sum function returns the sum of elements in a collection. The sum result type depends on the input sequence element type. The example in Example 1-49 showcases this.
zip and zip3
The zip function combines two sequences into a sequence of pairs. The zip3 function, as its name suggests, combines three sequences into triples. The zip sample is shown in Example 1-50. You can find a zip3 sample on MSDN (http://msdn.microsoft.com/en-us/library/ee370585.aspx).
rev
The rev function reverses the elements in a list or array. The sample code is shown in Example 1-51.
sort
The sort function sorts the given list using Operators.compare. If the original element’s order is preserved, this is called a stable sort. The sort function on Seq and List are stable sorts, while Array.sort is not a stable sort. See Example 1-52.
Convert to Seq/List/Array
Each type of collection has its unique usage. It is common to convert one type to the other type. It is easy to tell how to convert to a new type by looking at the functions. The sample code is shown in Example 1-53.
Seq.toList is used to convert a seq to a list.
Seq.toArray is used to convert a seq to an array.
List.toSeq is used to convert a list to a seq.
List.toArray is used to convert a list to an array.
Array.toSeq is used to convert an array to a seq.
Array.toList is used to convert an array to a list.
// define a sequence
let mySeq = { 1..5 }

// define a list
let myList = [ 1.. 5 ]

// define an array
let myArray = [| 1..5 |]

// convert seq to a list
let myListFromSeq = mySeq |> Seq.toList

// convert seq to an array
let myArrayFromSeq = mySeq |> Seq.toArray

// convert list to an array
let myArrayFromList = myList |> List.toArray

// convert list to an seq
let mySeqFromList = myList |> List.toSeq

// convert array to a list
let myListFromArray = myArray |> Array.toList

// convert array to a seq
let mySeqFromArray = myArray |> Array.toSeq
Convert from Seq/List/Array
Unlike C#, which uses a from prefix, F# uses an of prefix to represent a function that converts from one collection type to another. See Example 1-54 for examples.
Seq.ofList is used to convert from a list to a seq.
Seq.ofArray is used to convert from an array to a seq.
List.ofSeq is used to convert from a seq to a list.
List.ofArray is used to convert from an array to a list.
Array.ofSeq is used to convert from a seq to an array.
Array.ofList is used to convert from a list to an array.
let mySeq = { 1..5 }
let myList = [ 1.. 5 ]
let myArray = [| 1..5 |]

// convert from list to a seq
let mySeqFromList = myList |> Seq.ofList

// convert from an array to a seq
let mySeqFromArray = myArray |> Seq.ofArray

// convert from a seq to a list
let myListFromSeq = mySeq |> List.ofSeq

// convert from an array to a list
let myListFromArray = myArray |> List.ofArray

// convert from a seq to an array
let myArrayFromSeq = mySeq |> Array.ofSeq

// convert from a list to an array
let myArrayFromList = myList |> Array.ofList
Of the three collection-related data structures discussed so far, sequence is likely the most interesting. A function that takes seq<’T> as an input parameter always works with list, array, set, and map in F#. Additionally, if you expose seq to a C# project, a reference to Microsoft.FSharp.Core.dll will not be required. Last, C#’s LINQ operations will work on sequences.
Table 1-3 lists all of the functions supported and a description of the performance of each.
Array | List | Seq | Map | Set | Description | |
append | O(m+n) | O(min(m,n)) | O(1) | Concatenates two collections. | ||
add | O(lgN) | O(lgN) | Adds a new element, and returns a new collection. | |||
average /averageBy | O(n) | O(n) | O(n) | Gets an average of all elements. | ||
blit | O(n) | Returns a slice of the array. | ||||
cache | O(n) | Caches elements. | ||||
cast | O(n) | Converts an element to a specified type. | ||||
choose | O(n) | O(n) | O(n) | Chooses the element if not return None. | ||
collect | O(n) | O(n) | O(n) | Applies a function to each element, and concatenates the results. | ||
compareWith | O(n) | Compares element by element using a given function. | ||||
concat | O(n) | O(n) | O(n) | Concatenates two collections. | ||
contains | O(logN) | Tests whether contains the specified element. | ||||
containsKey | O(logN) | Tests whether an element is in the domain of the map. | ||||
count | O(n) | Counts the number of elements in the set. | ||||
countBy | O(n) | Counts the generated key numbers. The key is generated from a function. | ||||
copy | O(n) | O(n) | Creates a copy of the collection. | |||
create | O(n) | Creates an array. | ||||
delay | O(1) | Returns a sequence that is built from the given delayed specification of a sequence. | ||||
difference | O(m*lgN) | Returns a new set with an element in set1 but not in set2. | ||||
distinct/ distinctBy | O(1) | Returns a new seq with removing duplicated elements. | ||||
empty | O(1) | O(1) | O(1) | O(1) | O(1) | Creates an empty collection. |
exists | O(n) | O(n) | O(n) | O(logN) | O(logN) | Tests if any element satisfies the condition. |
exists2 | O(min(n,m)) | O(min(n,m)) | Tests whether any pair of corresponding elements of the input sequences satisfies the given predicate. | |||
fill | O(n) | Sets the range of element to a specified value. | ||||
filter | O(n) | O(n) | O(n) | O(n) | O(n) | Returns a new collection of elements satisfying the given criteria. |
find | O(n) | O(n) | O(n) | O(lgN) | Returns the first element satisfying the given criteria. | |
findIndex | O(n) | O(n) | O(n) | Returns the first element index satisfying the given criteria. | ||
findKey | O(lgN) | Evaluates the function on each mapping in the collection, and returns the key for the first mapping where the function returns TRUE. | ||||
fold | O(n) | O(n) | O(n) | O(n) | O(n) | Applies a function to each element of the collection, threading an accumulator argument through the computation. |
fold2 | O(n) | O(n) | Applies a function to corresponding elements of two collections, threading an accumulator argument through the computation. | |||
foldBack | O(n) | O(n) | O(n) | O(n) | Applies a function to each element of the collection, threading an accumulator argument through the computation. | |
foldBack2 | O(n) | O(n) | Applies a function to corresponding elements of two collections, threading an accumulator argument through the computation. | |||
forall | O(n) | O(n) | O(n) | O(n) | O(n) | Tests whether all elements meet a condition. |
forall2 | O(n) | O(n) | O(n) | Tests whether all corresponding elements of the collection satisfy the given predicate pairwise. | ||
get/nth | O(1) | O(n) | O(n) | Returns elements by a given index. | ||
head | O(1) | O(1) | Returns the first element. | |||
init | O(n) | O(n) | O(1) | Initializes the collection. | ||
initInfinite | O(1) | Generates a new sequence which, when iterated, will return successive elements by calling the given function. | ||||
isProperSubset/ isProperSuperset | O(M * log N) | Tests whether the first set is a proper subset/superset of the second set. | ||||
isSubset/ isSuperset | O(M * log N) | Tests whether the first set is a subset/superset of the second set. | ||||
iter | O(n) | O(n) | O(n) | O(n) | O(n) | Applies a function to elements in the collection. |
iter2 | O(n) | O(n) | O(n) | Applies a function to a collection pairwise. | ||
length | O(n) | O(n) | O(n) | Returns the number of elements. | ||
map | O(n) | O(n) | O(1) | Applies the function to each element. | ||
map2 | O(n) | O(n) | O(1) | Applies the function to a collection pairwise. | ||
map3 | O(n) | Creates a new collection whose elements are the results of applying the given function to the corresponding elements of the three collections simultaneously. | ||||
mapi | O(n) | O(n) | O(n) | Builds a new collection from a collection with the index passed in. | ||
mapi2 | O(n) | O(n) | Builds a new collection from two collections pairwise with an index passed in. | |||
max/maxBy min/minBy | O(n) | O(n) | O(n) | Finds the max/min element. | ||
maxElement/ minElement | O(log N) | Finds the max/min element in the set. | ||||
ofArray | O(n) | O(1) | O(n) | O(n) | Gets a collection from an array. | |
ofList | O(n) | O(1) | O(n) | O(n) | Gets a collection from a list. | |
ofSeq | O(n) | O(n) | O(n) | O(n) | Gets a collection from a seq. | |
pairwise | O(n) | Returns a sequence of each element in the input sequence and its predecessor, with the exception of the first element, which is only returned as the predecessor of the second element. | ||||
partition | O(n) | O(n) | O(n) | O(n) | Splits the collection into two collections, containing the elements for which the given predicate returns true and false, respectively | |
permutate | O(n) | O(n) | Makes a permutation of the collection. | |||
pick | O(n) | O(n) | O(n) | O(lg N) | Applies the given function to successive elements, returning the first result where the function returns Some. | |
readonly | O(n) | Creates a new sequence object that delegates to the given sequence object. | ||||
reduce | O(n) | O(n) | O(n) | Applies a function to each element of the collection, threading an accumulator argument through the computation. | ||
reduceBack | O(n) | O(n) | Applies a function to each element of the collection, threading an accumulator argument through the computation. | |||
remove | O(lg N) | O(lg N) | Removes the element. | |||
replicate | O(n) | Creates a list of a specified length with every element set to the given value. | ||||
rev | O(n) | O(n) | Reverses the collection. | |||
scan | O(n) | O(n) | O(n) | Applies a function to each element of the collection, threading an accumulator argument through the computation. | ||
scanBack | O(n) | O(n) | Similar to foldBack, but returns both the intermediate and final results. | |||
singleton | O(1) | O(1) | Returns a collection that contains only one element. | |||
set | O(1) | Sets the element value. | ||||
skip | O(n) | Skips n elements. | ||||
skipWhile | O(n) | Skips an element when it meets the condition. | ||||
sort/sortBy | O(N log N) Worst is O(N^2) | O(N lg N) | O(N lg N) | Sorts the collection. | ||
sortInPlace/ sortInPlaceBy | O(N log N) Worst is O(N^2) | Sorts the collection by mutating the collection in place. | ||||
sortWith | O(N log N) Worst is O(N^2) | O(N lg N) | Sorts the collection by the given function. | |||
sub | O(n) | Gets a sub array. | ||||
sum/sumBy | O(n) | O(n) | O(n) | Gets the sum of a collection. | ||
tail | O(n) | Returns collection without the first element. | ||||
take | O(n) | Takes n elements from the collection. | ||||
takeWhile | O(1) | Returns a sequence that, when iterated, yields elements of the underlying sequence while the given predicate returns true. | ||||
toArray | O(n) | O(1) | O(n) | O(n) | Returns an array from the collection. | |
toList | O(n) | O(1) | O(n) | O(n) | Returns a list from the collection. | |
toSeq | O(n) | O(n) | O(n) | O(n) | Returns a seq from the collection. | |
truncate | O(1) | Truncates the collection. | ||||
tryFind | O(n) | O(n) | O(n) | O(lg N) | Tries to find the element by the given function. | |
O(n) | O(n) | O(n) | Tries to find the element index by the given function. | |||
tryFindKey | O(lg N) | Tries to find the key by the given function. | ||||
tryPick | O(n) | O(n) | O(n) | O(lg N) | Returns the first result when the function returns Some. | |
unfold | O(n) | Returns a seq from a given computation. | ||||
union | O(m * lg N) | Returns a union of two collections. | ||||
unionMany | O(n1 * n2...) | Returns a union of collections. | ||||
unzip/unzip3 | O(n) | O(n) | O(n) | Splits the collection into two collections. | ||
windowed | O(n) | Returns a sequence that yields sliding windows of containing elements drawn from the input sequence. | ||||
zip / zip3 | O(n) | O(n) | O(n) | Makes collections into a pair/triple collection. |
There are two other primary collection data structures: map and set. Map is an immutable dictionary of elements; elements are accessed by key. Set is an immutable set based on binary trees; the comparison is the F# structural comparison function. For detailed information on these, refer to MSDN at http://msdn.microsoft.com/en-us/library/ee353686.aspx and http://msdn.microsoft.com/en-us/library/ee353619.aspx.
What Changed
The sequence operation is very much like the LINQ operation, and these operations will be used often in the rest of this book.
The functional style is very different from the imperative style. Imagine presenting the problem of adding all odd numbers between 0 and 100 to a person without any formal computer background. Most likely, that person would go about solving the problem in the same way that the functional approach presented. They would start by finding all of the odd numbers and then adding them up. This is simply a more straightforward approach that more closely resembles how people think about problems.
On the other hand, a person with a deeply rooted imperative software background will likely lean toward a solution with a sum variable, IF statement, and FOR loop. If you look at the history of programming languages—from binary coding to assembly language to modern-day programming languages such as C#—the trend is that the programming language is more and more like a human language. The more the programming language resembles the human language, the more programmers will adopt it in their daily work and, consequently, make the language successful.
Other F# Types
Our next task is to refactor the F# code. During the refactoring process, more F# types are explored. These types are the foundation on which you will build when I introduce F# classes in Chapter 2.
Defining Constants by Using Attributes
C# supports constants through the use of the const keyword. The designers of F# decided not to introduce many keywords and thus left them open for use as variable names. Instead, F# uses an attribute to define constant values. In F#, an attribute needs to be put between [< and >]. When I present more F# features, you will find F# uses more attributes than keywords when defining a data type. See Example 1-55. In this example, Literal is an attribute that indicates to the F# compiler that myConstant is a constant.
F# uses some compiler tricks to replace a variable with the constant value, as you can see in Example 1-56.
[<Literal>]
let upperLimit = 100

seq { 0..upperLimit }                //given data from 0 to 100
|> Seq.filter (fun n -> n%2<>0)      //data subset contains only odd numbers
|> Seq.sum                                  //sum them up
|> printfn "the sum of odd number from 0 to 100 is %A"  //print out the result
Enumerations
The enumeration type provides a way to define a set of named integral constants. Example 1-57 shows how to define an enumeration type. Each field must be a unique value. Example 1-58 shows how to use the enumeration value once it is defined.
Note
Each item in the enumeration must have an integral value assigned to it; you cannot specify only a starting value.
let option1 = OptionEnum.Option1
let opton1Value = int OptionEnum.Option1    //option1 value is integer 1
Like C#, F# does not allow integral type values to be directly set to an enumeration variable. Instead, a conversion with type is needed, as shown in Example 1-59.
The bitwise operation can use the optimized algorithm to check the odd number. You can use enumeration and a bit operation, as shown in Example 1-60. F# supports five bitwise operators, which are listed in Table 1-4.
type EvenOddFlagEnum =
    |  Odd = 0x1
    |  Even = 0x0

seq { 0..100 }                             //given data from 0 to 100
|> Seq.filter (fun n -> n &&& (int EvenOddFlagEnum.Odd) <> 0 ) //data subset contains only odd numbers
|> Seq.sum                               //sum them up
|> printfn "the sum of odd number from 0 to 100 is %A" //print out the resultTuples
A tuple is a grouping of unnamed but ordered items. The items in a tuple can have different types. Example 1-61 demonstrates how to define a tuple.
// Tuple of two integers: int * int
( 1, 5 )

// Tuple with three strings: string * string * string
( "one", "two", "three" )

// mixed type tuple: string * int * float
( "one", 1, 2.0 )

// Tuple can contain non-primitive type values
( a + 1, b + 1)

//tuple which contains tuples: (int * int) * string
((1,2), "good")
The tuple introduces an interesting phenomenon. How many parameters are there in the function F(1,2,3)? Three is the wrong answer. The function F takes only one parameter, whose type is a tuple, and the tuple is of type int*int*int. A function that takes three parameters is defined as F 1 2 3. A tuple can be used to group parameters together to make sure that related parameters are always passed into a function. For example, if you always need to pass the first name and last name together into a function named g, it is better to declare g like this:
// indicate first name and last name be provided together
g (firstName, lastName)
That way is better than the following approach:
// indicate first name and last name can be passed separately
g firstName lastName
The tuple supports structural equality. This means that the code shown in Example 1-62 returns true. This concise syntax can make your code more readable.
Forming a tuple can be as simple as putting all elements between a pair of parentheses, although parentheses are optional if omitting them does not introduce confusion. Retrieving the elements requires two functions: the fst and snd functions are used to retrieve the first and the second elements, respectively, from a tuple. See Example 1-63.
// define tuple without parentheses
let a = 1, 2
let b = 1, "two"

// get first element in a tuple
let isOne = fst a

// get second element in a tuple
let isTwo = snd b
If the third or fourth element is needed, the functions defined in Example 1-64 can be used. The underscore (_) stands for a placeholder where the value can be ignored. You’ll find the underscore used in other places as well. It’s a way to tell the F# compiler that this is something you don’t care about.
// get the third value of the triple
let third (_,_,c) = c

// get the fourth value of the quadruple
let fourth (_,_,_,d) = d

third (1,2,3) // return 3
fourth (1,2,3,4) //return 4
There is another way to retrieve the embedded elements without using these functions. Example 1-65 shows that the F# compiler can figure out that the element in l is a triple. The variables a, b, and c are used to hold the element values in the triple.
Functions
If you want to refactor the F# code in the conversion task, one possible way is to define a function that checks whether a given number is odd. Defining a function is a simple task for an experienced C# developer. Most likely, you already figured out how to write an F# function. One thing I want to point out is that F# does not have a return keyword. As a result, the value from the last expression is always the returned value. The following function defines an operation that increments a given integer by one:
let increaseOne x = x + 1
If you run the code in FSI, the result shows that the function takes an integer as input and returns an integer as output. The result might look strange, but it’s still understandable:
val increaseOne : int -> int
Things start to get more interesting when you try to define a sum function that takes two parameters. Example 1-66 shows the code definition and its execution result in FSI.
// define a sum function that takes two parameters
let sum x y = x + y

// FSI execution result
val sum : int -> int -> int
sum is a curried function. You can envision this function as something that takes x as a parameter and returns a new function that takes a parameter called y. The beauty of this approach is that it enables you to define a new function based on an existing partially applied function. For example, the increaseOne function is really a sum function where y is always 1. So you can rewrite the increaseOne function as follows:
let increaseOne2 = sum 1
If you give 4 to this increaseOne2 function, the return value will be 5. It’s like passing 4 and 1 into the sum function.
increaseOne2 4    // returns 5
sum 4 1             // pass 4 and 1 into the sum function and yield 5
Note
You might be tempted to invoke this sum function with the following syntax: sum(4,1). If you do this, an error message will point out that the expression expects a type of int*int. However, (4,1) is an F# type called a tuple. The code sum(4,1) is trying to pass a tuple type into sum, which confuses the F# compiler.
Now you can define your own function and refactor the conversion-task F# code, as shown in Example 1-67.
// define an enum
type EvenOddFlagEnum =
           |  Odd = 0x1
           |  Even = 0x0

// define a function to check if the given number is odd or not
let checkOdd n = n &&& (int EvenOddFlagEnum.Odd) <> 0

seq { 0..100 }                          //given data from 0 to 100
|> Seq.filter checkOdd                //data subset contains only odd numbers
|> Seq.sum                               //sum them up
|> printfn "the sum of odd number from 0 to 100 is %A"   //print out the result
As the code is getting cleaner, somebody might notice the Seq.filter function takes a function as input. Yes, F# treats values and functions the same. If a function takes a function as input or returns a function, that function is called a higher-order function. In Example 1-67, Seq.filter is a higher-order function. The Seq.filter function provides the skeleton of a filter algorithm. You can then implement your special filter mechanism and pass your function into the skeleton function. Higher-order functions provide an extremely elegant way to reuse code. The higher-order function is a light-weight Strategy design pattern.
We have finished our refactoring work. You might already be eager to see the class definition in F#, but before I start introducing how F# handles object-oriented concepts such as classes, we need to spend a little more time on some basics.
Recursive Functions
The keyword rec is needed when defining a recursive function. Example 1-68 shows how to use the rec keyword to define a function to compute Fibonacci numbers.
let rec fib n =
   if n <= 2 then 1
   else fib (n - 1) + fib (n - 2)
Note
This recursive version does not use a tail call (which is defined later in this section), so this version can generate a stack overflow error.
Sometimes a function is mutually recursive because the calls form a circle. Example 1-69 shows the mutually recursive Even and Odd functions. The F# variable and function resolution is from top to bottom and from left to right. All the functions and variables must be declared first before they can be referenced. In this case, you have to use the and keyword to let the compiler know.
let rec Even x =               //Even calls Odd
   if x = 0 then true
   elif x = 1 then false
   else Odd (x - 1)
and Odd x =                      //Odd calls Even
   if x = 1 then true
   elif x = 0 then false
   else Even (x - 1)
In C# code, the stack overflow exception can happen when you use a recursive function. A small amount of memory is allocated when doing each recursive function call, and this allocation can lead to a stack overflow exception when a large amount of recursion is needed. A tail call is a function call whose result is immediately treated as the output of the function. Thanks to the tail call in F#, the F# compiler generates a tail-call instruction to eliminate the stack overflow problem when possible. Figure 1-15 shows the project setting’s Build tab, which is where you can select (or deselect) the Generate Tail Calls check box.
Pipe/Composite Operators
Because functional programming languages see no difference between data and functions, you might be wondering if there are any operators specifically for functions. The pipe-forward operator was introduced already. The real function operators are forward and backward composite operators. See Example 1-70.
let f0 x = x * 2
let f1 x = x + 7

//composite f and g to get a new function
// g(x) = x + 11
// the f0 function is executed first and then f1
let g = f0 >> f1

// result is 2*2+7 = 11
let result = g 2
The forward composite operator executes the function from left to right. The backward composition operator executes the function in the opposite direction, from right to left. Example 1-71 demonstrates these two operators.
let f0 x = x * 2
let f1 x = x + 7

// composite f and g to get a new function
// g(x) = x + 11
// the f1 function is executed first and then f0
let g = f0 << f1

// result is (2+7)*2 = 18
let result = g 2
Similar to the backward composite operator, F# also has a backward pipe operator (<|). The backward pipe operator uses left associativity. The code f <| g <| x is parsed as (f <| g) <| x. It is not parsed as f <| (g <| x), which is equivalent to x |> g |> f. See Example 1-72.
Note
Pipe operators and composite operators do not affect function execution performance. You can choose either of them according to your preference.
If you are curious about how to allow a C# method to hook into the pipe operation, Example 1-73 shows an example. The code takes an integer list as input, converts each item into a string, and joins them by using “*” as a separator. Because String.Join has many overloaded functions, you have to tell the compiler which overload format you prefer. We use FuncConvert.FuncFromTupled to convert the .NET function to a curried format, which is easier to work with when using the pipe operator.
let input = [ 1..10 ]

// assign String.Join to join with the string*string list as function signature
let join : string*string list -> string = System.String.Join

// convert join to curry format
let curryFormatJoin = FuncConvert.FuncFromTupled join

input
|> List.map (fun number -> string(number))  //convert int to string
|> curryFormatJoin "*"      // join the string list to a string string using "*"
In functional programming, the function is a first-class citizen. Some readers might try to explore mathematical operations with functions. The pipeline operator and the composite operator can be viewed as the add operation, which combines two functions. Example 1-74 does not compile because you cannot compare two functions.
Unit Types
If a C# method does not have a return value, you use void to tell the compiler. In F#, the unit keyword is used to accomplish this. There are two ways to tell the compiler that a function returns void:
Specify the return type in the function. See Example 1-75.
Make the “()” be the last statement. As I mentioned earlier in this chapter, F# functions do not use the return keyword. Instead, F# takes the type from the last statement that the function returns. So the following function returns unit as well. You can use the ignore operator to throw away the computation result, which makes the function return nothing.
// define a function returns unit
let f x = () // f : 'a -> unit

// use ignore to throw away the keyboard input and f2 returns unit
let f2 () = System.Console.ReadKey() |> ignore
Note
When a function can be passed in as a parameter to another function, the passed-in function is of type Microsoft.FSharp.Core.FSharpFunc. The function, which is passed in as a parameter, can be called by calling the Microsoft.FSharp.Core.FSharpFunc.Invoke method. When this is the case, the Invoke a function returning unit actually returns the Microsoft.FSharp.Core.Unit type, which is not void at all. Fortunately, the F# Compiler handles this so that you do not have to be aware of the subtle difference when coding.
Type Aliases
Another nice F# feature allows you to give a type an alias. Example 1-76 shows how to give the built-in system type int a different name. This feature is more like typedef in C++. From the execution result, you can see that the int type can now be referenced by using I.
Type Inferences
At this point, you might still be wondering why you don’t have to specify type information when writing the F# code shown in Example 1-13. You might get the wrong impression that F# is a scripting language or a dynamic language, which usually do not emphasize the type. Actually, this is not true; F# is a strongly typed language. F# provides the ability to leave off type definitions through a feature called type inference, which can identify type information based on how code is used. Example 1-77 shows the function f and how its definition is shown in FSI. The type for s can be determined by the function call System.String.IsNullOrEmpty, which takes a string and returns a Boolean. This is how F# identifies the type information.
> let f s = System.String.IsNullOrEmpty s;;

val f : string -> bool
Type inference works great, but it will need help sometimes, such as when processing overloaded methods, because overloaded methods distinguish themselves from each other by parameter types. For the example, in Example 1-78, the LastIndexOf method can get both char and string as input. You did not expect that the compiler could read your mind, did you? Because the variable ch can be either the string or char type, you have to specify the type for the variable ch. If you do not tell the compiler the parameter type, there is no way for F# to figure out which overloaded method to use. The correct code is shown in Example 1-79.
> let f ch = "abc".LastIndexOf(ch);;

  let f ch = "abc".LastIndexOf(ch);;
  -----------^^^^^^^^^^^^^^^^^^^^^

stdin(10,12): error FS0041: A unique overload for method 'LastIndexOf' could not be
determined based on type information prior to this program point. A type annotation may
be needed. Candidates: System.String.LastIndexOf(value: char) : int, System.String.
LastIndexOf(value: string) : int
> let f (ch:string) = "abc".LastIndexOf(ch);;

val f : string -> int
It’s good to understand how type inference process work. It is performed from top to bottom and from left to right. It does not start from the program’s main function. So the code in Example 1-80 does not compile. The string type cannot be inferred from the str.Length because there are tons of types in .NET that have a Length property.
let f str = str.Length  // str type cannot be determined

[<EntryPoint>]
let main argv =
    let result = f "abc"
    0 // return an integer exit code
Note
It’s a best practice to write the code as you go and let the F# compiler figure out the type for you. If there is an error, look at the code above the line that the error is pointing to. Those errors can often be easily fixed by providing type information. Type inference is processed from top to bottom, which could not be the order of how code is executed. The program entry point is usually located at the end of the file, but decorating the variable at entry point does not help.
IntelliSense uses a different way to provide type information for users. Therefore, sometimes IntelliSense shows the type information but the code will not compile. A simple code example is shown next. The type for str on the second line is unknown, although IntelliSense shows that str is of the System.String type.
let f str =
    let len = str.Length // str type is unknown
    str + "aa"
Type inference tends to make code more general. This simplicity not only saves you typing time, it also improves the readability by making the code more intuitive and friendly, as I think you can see in Example 1-81.
If you’re not convinced yet, Example 1-82 demonstrates how to use type inference and a tuple to create a general swap function. The function can handle any data type. If you try to use C# to implement the same function, you’ll find the F# code is more clean and elegant. If you use Visual Studio or MonoDevelop, type information can be shown when hovering over the function.
Interop and Function Parameters
Some F# users start to use F# as a library authoring tool. The F# library is then referenced and invoked from some C# library or application. Because F# is a .NET language, using interop with other .NET languages is seamless. Adding a reference to an F# project is exactly same as adding one to a C# project. The only thing that needs to be explained here is how to add a reference to FSI:
Use #r to reference a DLL.
Open the namespace.
Example 1-83 shows how to reference System.Core.dll, open the System.Collections.Generic namespace, and use the HashSet<T> type.
#r "System.Core.dll"
open System.Collections.Generic
let a = HashSet<int>()
Note
F# does not need new to instantiate an object. However, the new keyword is recommended when the class type implements the IDisposable interface.
Compared to C#, there is little difference in the approach for invoking a .NET method in F#. Here’s how to use a .NET method to convert a string to an integer:
System.Convert.ToInt32("234")Passing a tuple to a C# function seems to work well until you have a function that requires an out parameter. Tuples do not provide a way to say that a value is ref or out, but a tuple does help to solve this problem. If you have a C# function like the following
public int CSharpFunction(int k, out int n)
the function actually returns two values to the invoker. So the solution is to declare a tuple to hold the returned values:
let returnValue, nValue = CSharpFunction(1)
This approach works for the method, which is not externally declared. A call to an externally declared method requires the & operator. Example 1-84 shows how to handle an out parameter in an extern function.
C# function definition
[DllImport("MyDLL.dll")]
public static extern int ASystemFunction(IntPtr inRef, out IntPtr outPtr);
Define and invoke the function in F#
[<System.Runtime.InteropServices.DllImport("something.dll")>]
extern int ASystemFunction(System.IntPtr inRef, System.IntPtr& outPtr);

let mutable myOutPtr = nativeint 1
let n = ASystemFunction (nativeint 0, &myOutPtr)
If you want to expose an out parameter to a C# project, you need a special attribute named System.Runtime.InteropServices.Out. By decorating a parameter with this attribute in F#, the C# invoker can see that the parameter is intended to be an out parameter. See the sample in Example 1-85. The byref keyword is used to declare the variable as being passed in as a reference type.
let f ([<System.Runtime.InteropServices.Out>]a: int byref) = a <- 9I covered the out parameter, so now let’s shift our attention to ref. It’s easy to handle the C# ref definition as well. Example 1-86 shows how to handle ref parameters in F#. There is a ref keyword in the sample code, which I’ll introduce in Chapter 6. For now, think of it as a reference variable.
C# function definition
namespace CSharpProject
{
    public class Chapter1Class
    {
        public static int ParameterFunction(int inValue, ref int refValue)
        {
            refValue += 3;
            return inValue + 7;
        }

        public static void ReturnSample(out int x)
        {
            x = 8;
        }
    }
}
F# code invoking the C# function
//declare a mutable variable
let mutable mutableValue = 2

// declare a reference cell
let refValue = ref 2

// pass mutable variable into the function
let refFunctionValue = CSharpProject.Chapter1Class.ParameterFunction(1, &mutableValue)

// pass reference cell into the function
let refFunctionValue2 = CSharpProject.Chapter1Class.ParameterFunction(1, refValue)

// out parameter
let mutable x = Unchecked.defaultof<_>
CSharpProject.Chapter1Class.ReturnSample(&x)
If you want to expose a ref parameter from an F# function to a C# project, removing the Out attribute from the function definition will do the trick. The use of the byref keyword indicates that this is a reference parameter. The code is shown in Example 1-87.
Module, Namespace, and Program Entry Points
Now that the small F# program is clean, you might want to build an executable. Example 1-1 is a code snippet, and you need to use Visual Studio to write, debug, and publish a product. This section will cover how to create an F# console application using Visual Studio. Figure 1-16 shows how to create an F# console application.
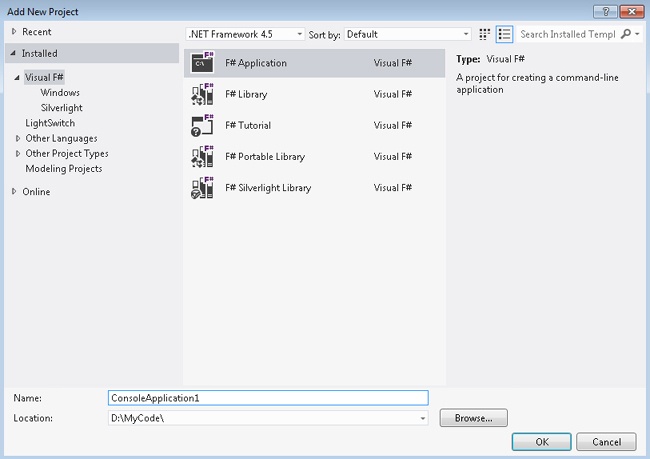
The default Program.fs file contains a main function with an EntryPoint attribute; see Figure 1-17. Actually, F# does not need an entry function to be defined. For a single file project, the content is executed from the first line to the last.

If using the EntryPoint attribute is the preferred way, the function must meet the following criteria:
The function must be decorated with the [<EntryPoint>] attribute.
The function must be in the last file in the project.
The function must return an integer as exit code.
The function must take a string array, string[], as input.
Tip
In an F# DLL, modules are initialized by a static constructor. This guarantees the initialization occurs before any of the module’s values are referenced. On the other hand, in an F# executable, the initialization is performed in the application’s entry point, which is defined by the EntryPoint attribute. It is recommended that you explicitly define an entry point for an F# executable by using EntryPoint.
When you add the F# item in your console project, it can immediately make your code unable to compile. The newly added item is the last item in the project system. This breaks the second requirement in the preceding list. You can use the context menu—see Figure 1-18—or Alt+Up/Down Arrow keys, if the development profile is set to F#, to move your item up and down the project system.
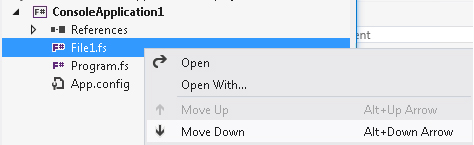
It’s always a good coding practice to divide the code into different units when the project has multiple files. F# provides the module or namespace to divide the code into small units. They have subtle differences, which I will discuss later in this chapter.
If you delete all content in the Program.fs file and paste the code shown in Example 1-33, which does not have a module definition, the F# compiler will create an anonymous module. Its name is the file name with the first letter capitalized. For example, if your code is in file1.fs, the module name will be File1. You can also explicitly provide module names at the first line of the file, as shown in Example 1-88.
A module can contain other modules, type definitions, expressions, values, or any combination of those, but namespaces cannot be inside a module. The nested module needs to be indented and must have an equal sign (=) as a suffix. See Example 1-89.
module Print

// general print function
let print x = printf "%A" x

// define sub module NumberPrint
module NumberPrint =
    // function to print int
    let printInt = printf "%d"

    // function to print float
    let printFloat = printf "%f"

// define sub module StringPrint
module StringPrint =
    // function to print string
    let printString = printf "%s"

    // function to print char
    let printChar = printf "%c"

// define sub module with new type
module NewTypes =
    // define a 2D point
    type Point2D = float32*float32

// invoke print functions
NumberPrint.printFloat 4.5
NumberPrint.printInt 2
StringPrint.printChar 'c'
StringPrint.printString "abc"
If you want a scope to hold the functions and variables, the namespace and module are the same from F#’s point of view. If the F# project is going to be a library opened from a C# project, the namespace is a better choice. The module is a static class when it’s viewed from the C# side. By using a module name and function name together, you can reference a function defined in a different module. If you want to reference a function inside a module, you can use the open keyword to open that module or decorate the module with the AutoOpen attribute, which can open the module automatically, essentially causing the function to be placed in the global namespace. See Example 1-90.
module Print

// general print function
let print x = printf "%A" x

// auto open  NumberPrint module
[<AutoOpen>]
module NumberPrint =
    // function to print int
    let printInt = printf "%d"

    // function to print float
    let printFloat = printf "%f"

module StringPrint =
    // function to print string
    let printString = printf "%s"

    // function to print char
    let printChar = printf "%c"

// invoke print functions
printFloat 4.5
printInt 2

// use module name to reference the function defined in the module
StringPrint.printChar 'c'
StringPrint.printString "abc"

// open StringPrint module
open StringPrint

printChar 'c'
printString "abc"
The RequireQualifiedAccess attribute indicates that a reference to an element in that module must specify the module name. Example 1-91 shows how to decorate the attribute on a module and reference a function within.
[<RequireQualifiedAccessAttribute>]
module MyModule =
    let f() = printfn "f inside MyModule"

//reference to f must use MyModule
MyModule.f()
Modules can be extended by creating a new module with the same name. All the items—such as functions, types, expressions, and values—will be accessible as long as the new module is opened. See Example 1-92. To invoke the extended method, you can open the namespace MyCollectionExtensions. Example 1-93 opens the namespace, and the extension method is shown.
Namespace MyCollectionExtensions

open System.Collection.Generic

// extend the array module by adding a lengthBy function
module Array =
    let lengthBy filterFunction array =
array |> Array.filter fiterFunction |> Array.lengthopen MyCollectionExtensions let array = [| 1..10 |] let evenNumber = array |> Array.lengthBy (fun n -> n % 2 = 0 )
As mentioned previously, if the F# code needs to be referenced from other .NET languages, a namespace is the preferred way to organize the code. Namespaces can contain only modules and type definitions. You cannot put namespaces, expressions, or values inside of a namespace. See Example 1-94.
namespace MySpace

// define a 3D point
type Point3D = Point of float32 * float32 * float32

// define module inside namespace
module HelloWorld =
    let msg = @"Hello world"
    printfn "%s" msg

// the following line won't compile because a namespace cannot contain value or expression
// let a = 2