CHAPTER 10
Windows Azure Pack
This chapter provides a brief overview of Windows Azure Pack for Windows Server. The topics covered in this chapter include
▪ Introduction to Windows Azure Pack
▪ Windows Azure Pack in action
▪ Insights from the experts
▪ How to learn more
Introduction to Windows Azure Pack
We’ve saved the best until last. Windows Azure Pack enables you to implement the Windows Azure experience right inside your own datacenter. It’s a set of technologies you install and run on top of Windows Server 2012 R2 and System Center 2012 R2 that lets you build a multitenant private cloud with self-service capabilities for provisioning and managing instances of Web Sites, Virtual Machines, Service Bus, SQL and MySQL databases, and other Windows Azure–like cloud services in your own datacenter. Best of all, Windows Azure Pack is available to Microsoft customers at no additional cost.
MORE INFO If you’re new to Windows Azure concepts and technologies, you should download and read the free ebook Introducing Windows Azure for IT Professionals from Microsoft Press at http://blogs.msdn.com/b/microsoft_press/archive/2013/10/01/free-ebook-introducing-windows-azure-for-it-professionals.aspx.
Windows Azure Pack architecture
Windows Azure Pack provides two types of management portals you can use in your environment:
▪ Management portal for administrators A web-based portal you can use for building resource clouds, offering hosting plans to tenants, managing tenant user accounts, generating usage reports, implementing quotas and billing, and automating cloud management processes using runbooks. This portal is intended for those who will be administering Windows Azure Pack in your environment.
▪ Management portal for tenants A web-based portal similar to the one for administrators but with functionality that targets those who consume cloud services such as departments, divisions, and other internal customers. This portal enables users to provision, configure, manage, and monitor their web applications, virtual machines, and other cloud resources running on Windows Azure Pack.
Implementing Windows Azure Pack
Windows Azure Pack can be implemented in various ways depending on the needs and size of your organization. Deployment options include
▪ Express deployment This approach installs all Windows Azure Pack required components on a single server. Express deployment should be used only for proof-of-concept testing purposes because the consolidation of so many components could cause performance delays in a production environment.
▪ Distributed deployment This approach installs Windows Azure Pack required components on up to eight servers in your environment. Distributed deployment can be used in production environments. It provides greater scalability and enables load-balancing.
In addition to choosing your deployment architecture, you can also choose to deploy any or all of the following optional resource providers available in Windows Azure Pack:
▪ Web Sites This service allows you to offer tenants the ability to request their own high-density, scalable shared Platform as a Service (PaaS) capabilities for running their ASP.NET, PHP, and Node.js web applications. Web Sites includes a customizable web application gallery that includes open source web applications and allows for integration with source control systems for building custom-developed web sites and applications.
▪ Virtual Machines This service allows you to offer tenants Infrastructure-as-a-Service (IaaS) capabilities for running their Windows and Linux virtual machines. Virtual Machines includes a virtual machine template gallery (with a selection of Windows Server and Linux distributions), various scaling options, and virtual networking capabilities.
▪ Networks This service allows you to offer tenants their own private virtual networks, which can be fully isolated or connected to other logical networks. This enables users to connect their virtual machines (VMs) together, create guest clusters, or test new applications that could cause conflicts with infrastructure servers on the production networks.
▪ Service Bus This service allows you to offer tenants reliable messaging services to connect the different components of their distributed applications. Service Bus includes queued and topic-based publish/subscribe capabilities and supports a variety of standard messaging protocols.
▪ SQL and MySQL This service allows you to offer tenants dedicated database instances for their web applications hosted on the Web Sites service.
▪ Automation and extensibility These capabilities allow administrators to implement automation by integrating additional custom services, such as a runbook editor and execution environment, into the Windows Azure Pack services framework, known as Service Manager Automation (SMA). A Windows Azure Pack runbook is designed to automate Windows PowerShell workflows. A comparison between SMA and System Center Orchestrator can be found in the “Insights from the experts” section later in this chapter.
Windows Azure Pack in action
Let’s now look at a few examples of Windows Azure Pack in action. Figure 10-1 shows Windows Azure Pack with the My Account workspace selected. This workspace allows the user to subscribe to different service plans. In this screen shot, the self-service user is reviewing all the different service offerings, including Web Sites, Virtual Machines, Networks, Service Bus, SQL Server Databases, and MySQL Databases.
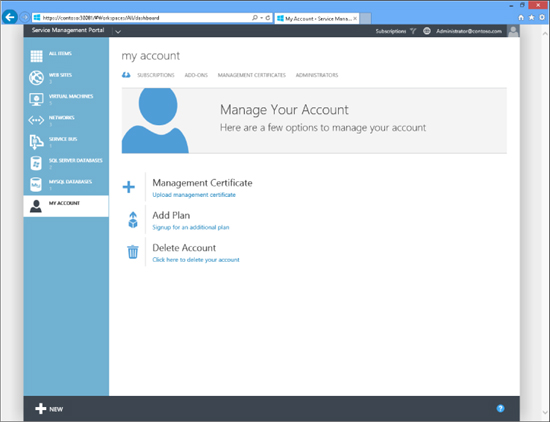
FIGURE 10-1 Reviewing your service offerings in the Windows Azure Pack self-service portal
Figure 10-2 shows Windows Azure Pack with the Web Sites workspace selected. This workspace is used configure websites from a gallery of images. In this screen shot, the end user is preconfiguring the .NET and PHP versions, architecture, websockets, certificates, and more so that these services are already working as soon as the website is provisioned.
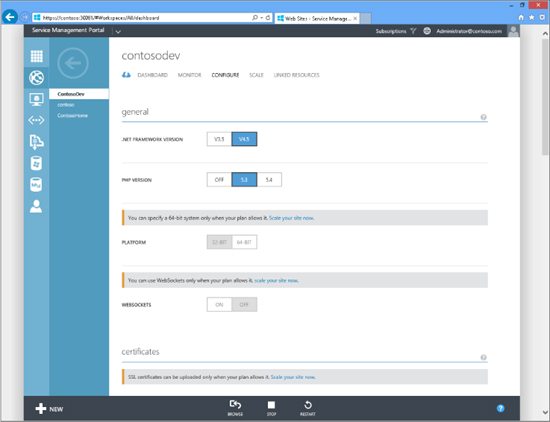
FIGURE 10-2 Configuring services for a website
Figure 10-3 shows Windows Azure Pack with the Virtual Machines workspace selected. This workspace is used to configure Hyper-V Virtual Machines from a gallery of images. In this screen shot, the end user is configuring the VM to use a SQL Server 2012 .VHDX file and providing different hardware and software settings.
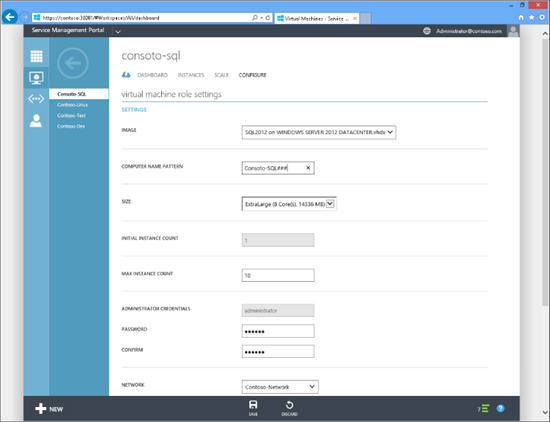
FIGURE 10-3 Configuring the settings for a virtual machine
Figure 10-4 shows Windows Azure Pack with the Virtual Machines workspace selected. In this screen shot, the end user is viewing the resources his VM is consuming.
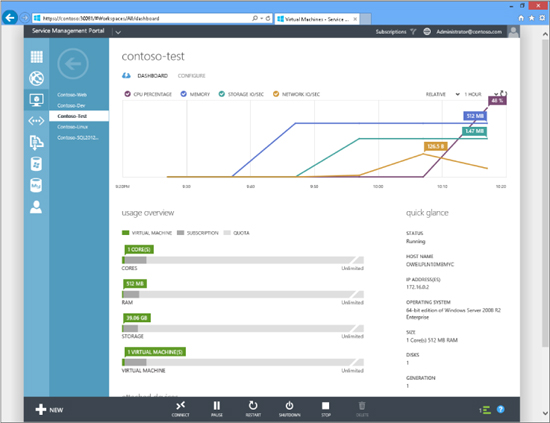
FIGURE 10-4 Viewing resources consumed by a virtual machine
Figure 10-5 shows Windows Azure Pack with the Virtual Machines workspace selected. In this screen shot, the end user is browsing from a gallery of preconfigured Web App images.

FIGURE 10-5 Choosing a preconfigured image for a web application
Insights from the experts
We’ll conclude this chapter by hearing from one of our experts at Microsoft, who provides us with an in-depth look at Service Management Automation (SMA), a new workflow management solution for Windows Azure Pack.
Working with Service Management Automation
SMA is a set of tools for Windows Azure Pack that enables you to automate the creation, monitoring, and deployment of resources in your environment. SMA can be installed from the System Center 2012 R2 Orchestrator installation software and allows you to run Windows PowerShell, workflow-based runbooks that support parallel execution, sequential execution, interruptible jobs, and state tracking. That’s a lot of powerful features to introduce into a product, and it brings us to the next levels of automation in cloud environments.
SMA is made of several components, including a web service endpoint, a runbook worker server, a Windows PowerShell module, and a database. You can install the SMA web service and up to three runbook workers from the Orchestrator 2012 R2 Setup program, and an Orchestrator installation is not required in order to have SMA in your environment. Remember, however, that SMA does not replace Orchestrator either. You need to carefully consider the elements you want to automate before choosing your automation tools.
SMA is mainly intended to be accessed via the Windows Azure Pack portal. Within the Windows Azure Pack interface is a GUI representation of the SMA service where you can build, import, and run runbooks. For now, however, don’t worry too much about the similarity of the terminology between SMA and Orchestrator, as it might just get a little confusing!
SMA is a web-based service that connects to a SQL database and stores its configuration details and runbooks in an SQL database. It also stores information on which runbooks to execute using what parameters. When you ask a runbook to execute or when you schedule a runbook, SMA becomes a job and is entered into a job table in the SQL database that the runbook worker servers poll and execute whenever a job is present.
Although it is much easier to work with SMA via the Windows Azure Pack, you can also utilize the Windows PowerShell module to perform the same functions. And in some cases you can do this only via the Windows PowerShell module—for example, if you want to deploy more than one runbook worker server.
Let’s clarify one bit of terminology before moving forward. I mentioned SMA uses runbooks for automating tasks, but these runbooks are different than Orchestrator runbooks. For example, Orchestrator runbooks are visual, as shown here:
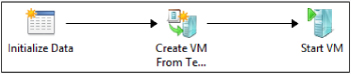
Each item in an Orchestrator runbook is an activity and generally has some small fields you need to configure with input parameters and output data. However, you don’t really have to understand the logic behind these activities because they are precompiled pieces of code.
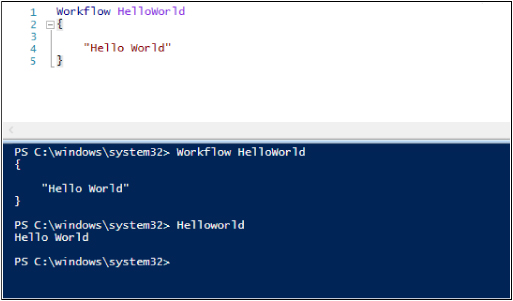
The runbooks in SMA, on the other hand, are Windows PowerShell workflows, which are a collection of cmdlets. Here is a sample runbook you can use with SMA:
A brief introduction to Windows PowerShell workflows
As you can see in the preceding screen shot, the workflow we have created is fairly basic. A key thing you might have noticed is that it looks like a Windows PowerShell function, but it is not! Workflows include several features that require you to author the script a little differently, and the main reason for these differences is that they actually don’t execute under Windows PowerShell—they execute instead under Windows Workflow. This means that the code you write for your workflow gets translated to XAML and then runs under Windows Workflow.
Let’s introduce a couple of simple concepts that are directly related to SMA to help you move forward.
First let’s lay down some simple rules concerning workflows:
▪ You can’t use aliases, which are references to other cmdlets, files, scripts, and so on.
▪ You need to use the full argument name—that is, you cannot use short argument names.
Let’s look at an example of creating a workflow in order to better understand how they work.
Problem: We need to gather information about the BIOS versions deployed on our servers. The information we need includes Manufacturer, Release Date, and SMBiosVersion. Once we gather this information, we can use it to determine if we need to perform a BIOS update on any of our servers.
Solution: To begin, we first need to create our workflow by using the keyword “workflow” followed by a functional name and the curly brackets that will encapsulate our code:
Workflow DetectBios { }
Next, we need an input parameter that will ask for the name of the server we want to gather BIOS information from. We need to use the param keyword to gather such input. Our workflow now becomes the following:
  Workflow DetectBios{
    Param([string]$srvname) }
You can see that we have defined the input variable $srvname and typecast it as a string.
The next thing we need to do is introduce some logic to gather the BIOS information from the server. Traditionally, we would have used the following code to do this:
Gwmi Win32_Bios
or more specifically:
gwmi –computername Server01 –class Win32_Bios
Remember, however, that you cannot use aliases in workflows. So instead of using the alias gwmi for this purpose, we have to use the full version of the cmdlet—namely, get-wmiobject. Also, in workflows you cannot specify the –computername argument. Finally, we need to run get-wmiobject in a special way. Specifically, to execute the command correctly within a workflow, we have to use something called InlineScript, which allows standard Windows PowerShell commands to execute in a normal way and then return the data to the workflow.
In our sample workflow, our code now becomes the following:
  Workflow DetectBios{
  Param([string]$srvname)
  $biosinfo=InLineScript{ Get-Wmiobject –Class Win32_Bios | Select
     Manufacturer,SerialNumber,releaseDate,SMBIOSBIOSVersion }
     –pscomputername $server
  $biosinfo
   }
We included the $biosinfo variable on the second last line to provide output for the command so that when you run the workflow it will output something into the console. We also used the –pscomputername argument. This is similar to using the –computername argument if you run get-wmiobject normally, and it simply means that the cmdlet specified in the InlineScript section of the code will get executed directly on the target server.
If you run this workflow directly from Windows PowerShell using an account that has permissions to query BIOS information on the remote server, some information will be returned. It is important to ensure that the service accounts for the runbook server have the necessary privileges on remote servers to query such information.
A powerful feature of SMA is the ability to create resources for later use by other SMA runbooks. These resources can include Windows PowerShell modules, variables, schedules, credentials, and connections. Here, we’re going to call the stored credentials and use them in the workflow. Later in this section, we’ll show you how to create resources when you are in the Windows Azure Pack portal.
You can call resources in a workflow by using one of several Get-Automation* cmdlets. In this case, we’ll use the Get-AutomationPSCredential cmdlet, which requires that you know the name of the resource you are calling. Our sample workflow now becomes this:
  Workflow DetectBios{
  Param([string]$srvname)
  $Credentials = Get-AutomationPSCredential –Name "Admin"
  $biosinfo=InLineScript{ Get-Wmiobject –Class Win32_Bios | Select
     Manufacturer,SerialNumber,releaseDate,SMBIOSBIOSVersion }
     –psComputerName $server –psCredential $Credentials
  $biosinfo
   }
Our workflow will now execute under the specified Admin account so that it can retrieve the BIOS information we requested.
But let’s say we wanted to change the Windows Management Instrumentation (WMI) class we wanted to query for. Now our workflow really becomes a tool for IT administrators because it makes it really easy to query lots of WMI information. Here, we changed the workflow name and the variables used. The main thing to realize from this script is the use of the variable $using:wmiclass inside the InlineScript. Because the InlineScript activity runs Windows PowerShell commands in a workflow, we need to tell it to use our variable wmiclass by using the $using variable.
Our script now looks like this:
  Workflow WMIClassQuery{
  Param([string]$srvname,[string]$wmiclass)
  $Credentials = Get-AutomationPSCredential –Name "Admin"
  $wmiinfo=InLineScript{ Get-Wmiobject –Class $Using:wmiclass }
     –psComputerName $server –psCredential $Credentials
  $wmiinfo
   }
Let’s save the code for the DetectBios workflow as DetectBios.ps1 because we’ll be using it later on.
SMA with Windows Azure Pack
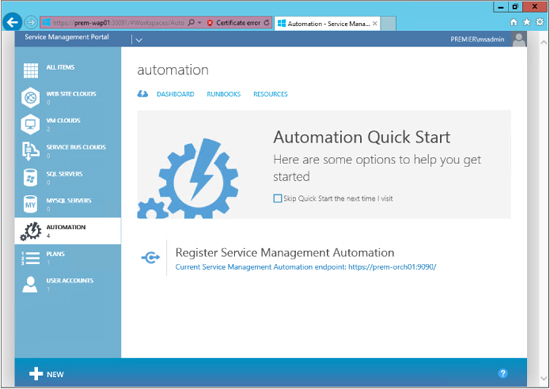
The Windows Azure Pack (WAP) is a front-end web portal that provides access in order to request services (such as virtual machines, web sites, SQL servers, and so on). If you have used Windows Azure services before (http://www.windowsazure.com), you will notice that the Windows Azure Pack portal looks almost exactly the same, except it is missing several services that are only offered in Azure. Here is what the Windows Azure Pack portal looks like:
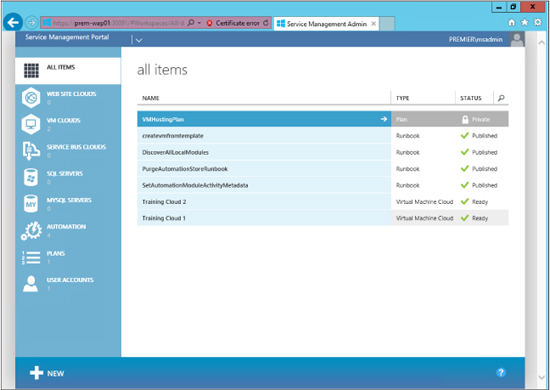
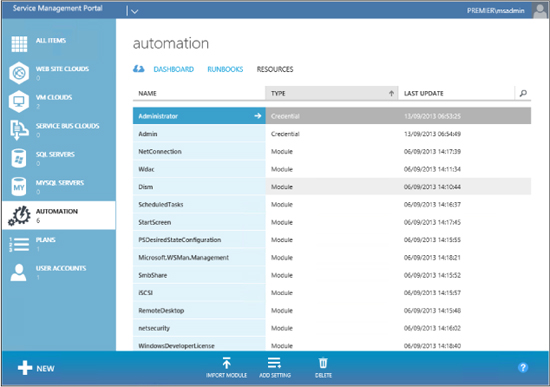
You can see on the left side that there are many options you can configure and provision for tenants to request services for. This is good, but here we will be focusing on automation. Automation in this case is the web GUI for SMA. The first thing you need to do is register your SMA endpoint. Here is what the Automation section of the Windows Azure Pack portal looks like with the SMA endpoint registered:
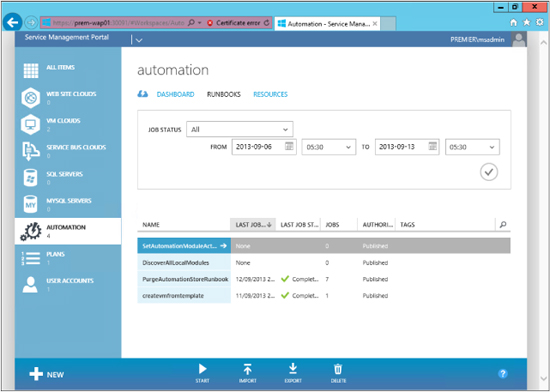
In the preceding screen shot, you can see three pages you can select from: Dashboard, Runbooks, and Resources. Dashboard will give you a summary of what has happened in relation to automation. This is useful for a quick look to see if you have lots of jobs failing or a large number of runbooks executing that you were not expecting. But the two views we are most interested in here are Runbooks and Resources.
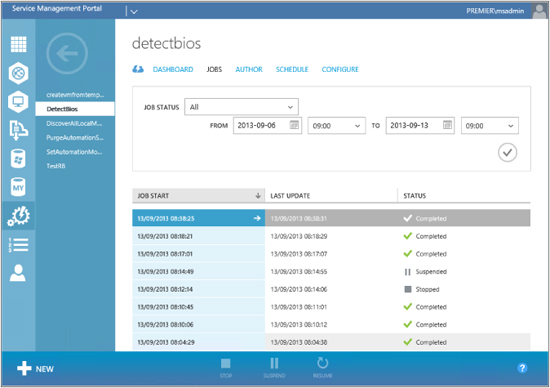
The next screen shot shows an example of the Runbooks page. The first thing to notice here is that you can filter by Job Status, allowing you to get a clear picture of what works and what doesn’t. In the lower half of the page, you can see four runbooks that are already in place, together with information about their status:
The bottom bar shows the options that are available for the runbooks. By using the New button, you can create a new runbook in the portal:
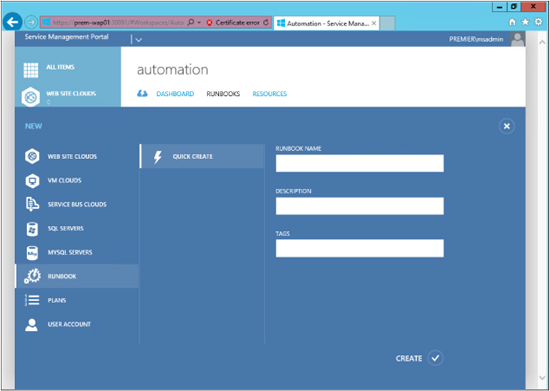
You can simply enter the information necessary and click Create to generate a basic runbook that has the initial Workflow name {} element you desire.
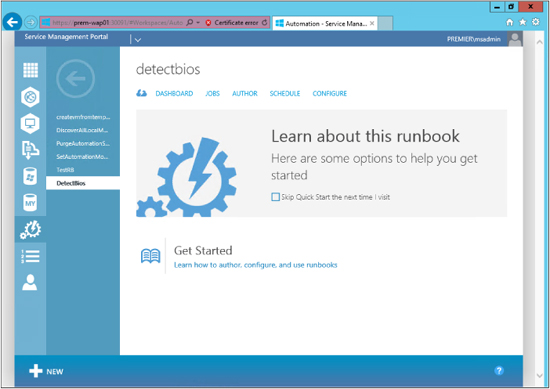
Because we already created a runbook earlier and saved it as the DetectBios.ps1 file, let’s now import it into SMA via WAP. Windows Azure Pack does some basic error checking to ensure the workflow is in the right format for a runbook, and then a new runbook called detectbios is created.
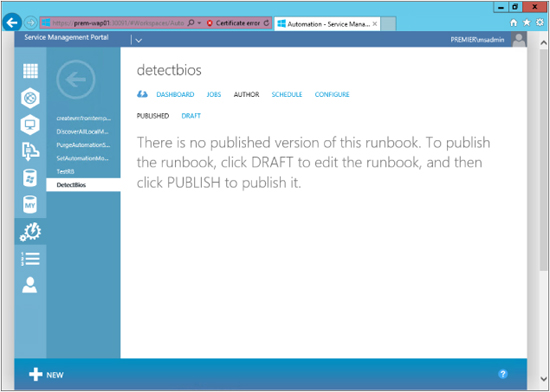
All runbooks are assigned the Draft status when they are first imported. This allows you to test the runbook; then, once you are satisfied, you can publish the runbook for wider use by other tenants. To view the properties of the runbook, you just click on the runbook name or click the arrow that appears when you hover the cursor over the name of the runbook.
Because we have not yet run this runbook, there will be nothing in the Dashboard or Jobs page worth noting. With this in mind, the first page worth examining is Author, as shown in the screen shot on the following page. As you can see, there are two possible states that a runbook can be in: Draft and Published. These are similar to the Checked In/Checked Out states in Orchestrator:
As mentioned previously, when you import a runbook, the default state it will be in is Draft. In the next screen shot, you can see our runbook in the Draft state together with the code associated with it. On this page, you can edit your workflow if you need to make changes during your testing:
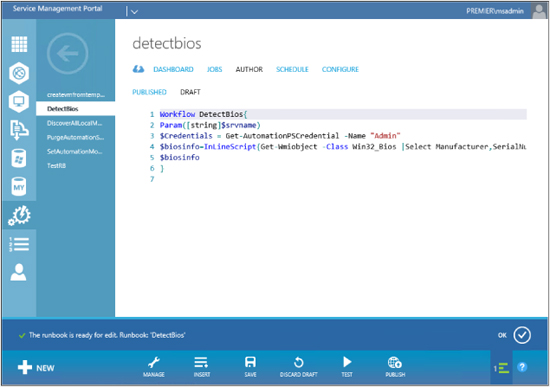
At the bottom of the screen, there are some new options to examine. The Manage button allows you to either import a custom Windows PowerShell module you are dependent on or create a setting (which are stored under Resources), such as a new set of credentials or a new connection. Insert allows you to select settings you already configured and inject them into the workflow code.
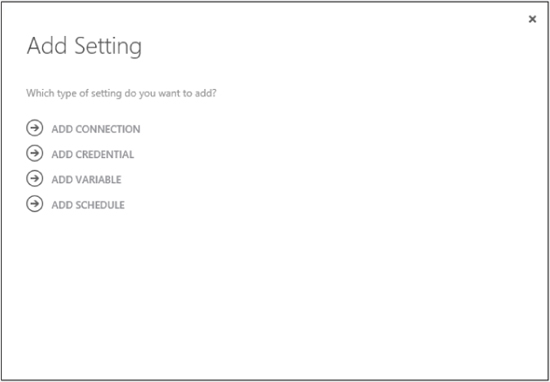
In our case, we already created the workflow and referenced Admin credentials in it, but because we have not yet created our Admin credentials, if we test our runbook now it will fail. We can do this by using the Manage button and then selecting Add Setting.
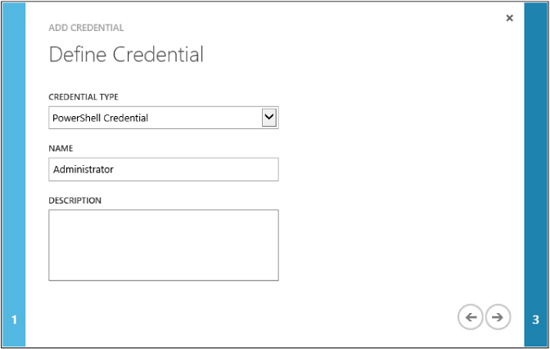
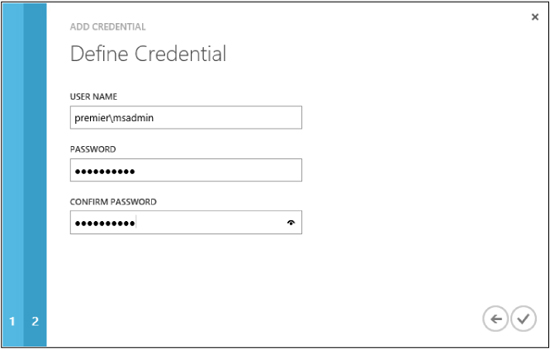
We will choose the Add Credential option. This brings us to the Define Credential dialog box shown on the following page, where we choose which type of credentials we want to store. We have the choices here of selecting either PowerShell Credential or Certificates. In our case, we need to choose PowerShell Credential. The Name field should show the name we already referenced in our runbook—namely, Administrator:
Next we need to specify the username and password for the credentials. Because there is no field for specifying the domain, you have to ensure the username is in the format domainusername:
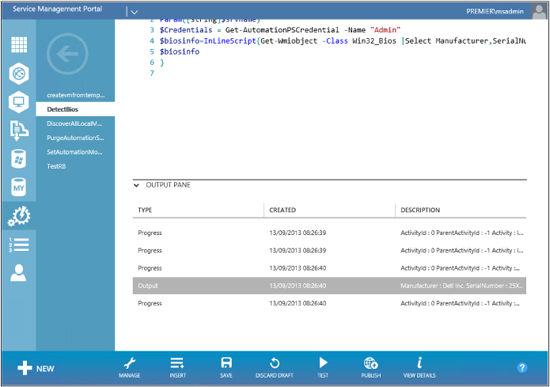
Now let’s perform a test of our runbook. We can do this by pressing Test on the bottom menu. Attempting to start the runbook causes it to notice the param line, which is asking for input. This displays a screen asking for the input variable—in this case, SRVNAME. When the runbook has completed its run, it will display in the output pane on the same screen, as shown here:
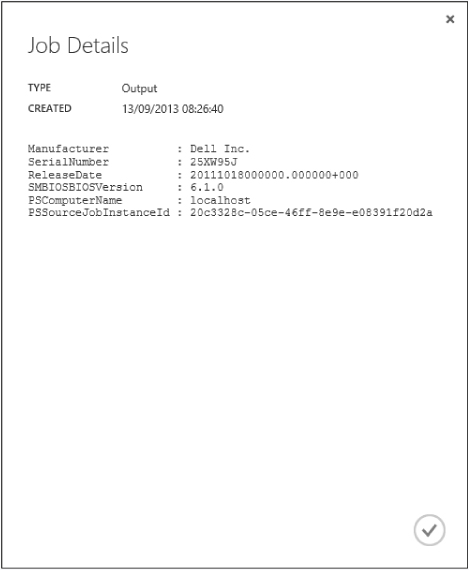
You can click View Details on the bottom menu to view the output of the runbook you just tested:
The final step is to publish our runbook now that we have verified its operation. To do this, click the Publish button on the bottom menu. You will be asked if you are sure whether you want to save and publish your runbook. The runbook will now switch from Draft and Published, and you will no longer be able to edit its code. If you click back on the Draft page, however, you will get an option to edit the code and it will unpublish your runbook and return it to its Draft state.
If you now click on Dashboard, you will see a Start button on the bottom menu:
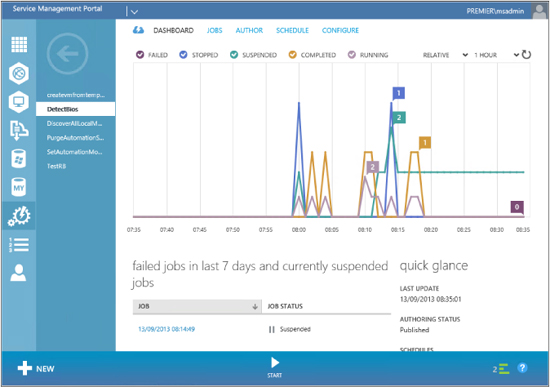
Click the Start button. As in the test run, the runbook will prompt you for SRVNAME. Once you have supplied this information, the runbook will execute and you will be able to view the results on the Jobs page:
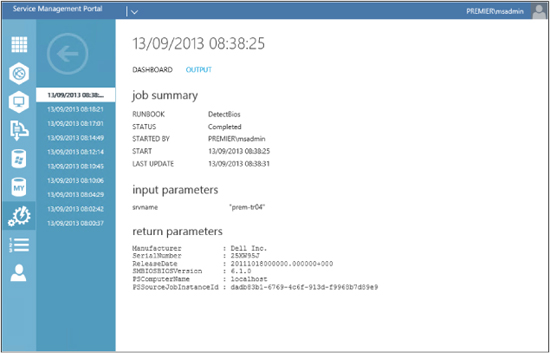
If you double-click on the last job run (which in this walkthrough is the DetectBios job), you will get a dashboard summary of its input and output as shown here:
Finally, let’s also take a look at the Resources page of the Automation section of WAP. The resources on this page can include modules, connections, credentials, and so on. The procedure for creating any of these resources is exactly as described earlier: just use the Add Setting button and choose the appropriate resource you wish to add. In the following screen shot, you can see all the resources that are stored and ready for calling within our runbooks:
SMA with Windows PowerShell
Now that we understand how the Windows Azure Pack portal works with SMA, let’s see how to work with SMA without using the Windows Azure Pack portal. SMA can be managed in this way entirely using Windows PowerShell.
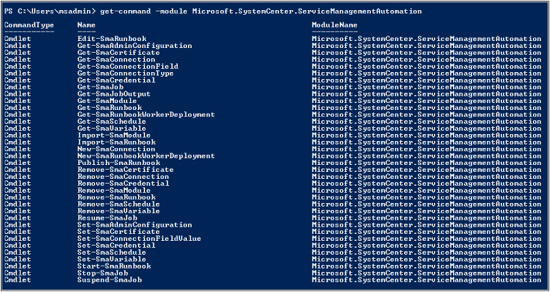
First let’s see what commands are available for doing this via Windows PowerShell. The name of the Windows PowerShell module for SMA is Microsoft.SystemCenter. ServiceManagementAutomation. If we want to see all the cmdlets available to use in this module, we can do this using the following syntax:
get-command –module Microsoft.SystemCenter.ServiceManagementAutomation
Here is the output from this command, which lists all available cmdlets for SMA:
Let’s now take a closer look at some of these cmdlets:
▪ Get-SmaCredential
▪ Set-SmaCredential
▪ Get-SmaRunbook
▪ Start-SmaRunbook
▪ Get-SmaJob
▪ Get-SmaJobOutput
▪ Import-SmaRunbook
▪ Edit-SmaRunbook
▪ Publish-SmaRunbook
Each of these cmdlets when executed will want to know the WebServiceEndpoint, which is the SMA web service that has been previously deployed. The SMA web service installs by default to port 9090. The cmdlet automatically assumes this port, so you can just specify the basic URL like https://server01 and it will automatically connect to port 9090.
The first cmdlet we will look at is Get-SmaCredential. The syntax to run it is as follows:
Get-SmaCredential –WebServiceEndpoint https://server01
Some output from running this command is shown here:
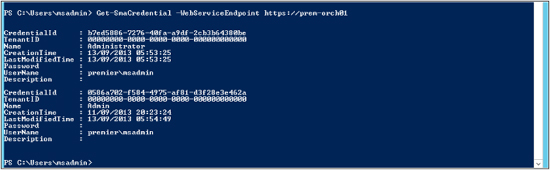
You can see some credential information for the Administrator and Admin accounts we previously set up in WAP.
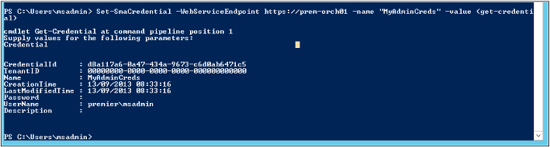
If you want to create a new set of credentials, you can use Set-SmaCredential. The following syntax can be used:
   Set-SmaCredential –WebServiceEndpoint https://server01
      –name "MyAdminCreds" –value (get-credential)
Using this command will create a new set of credentials that you can then call by using MyAdminCreds. Here is some output for this command:
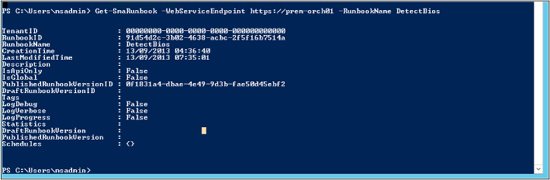
Next, let’s see which runbooks are available on our SMA installation. Because we already created a few runbooks from our Windows Azure Pack portal, we should be able to detect our DetectBios runbook. The syntax is as follows:
  Get-SmaRunbook –WebServiceEndpoint https://server01
     –Runbookname DetectBios
Some things to notice in the output shown next are PublishedRunBookVersionID and DraftRunbookVersionID, which you can use to determine whether the runbook is draft or published:
Let’s now invoke this particular runbook by using the Start-SmaRunbook cmdlet. First, we need to capture the RunbookID using the following syntax:
  $runbookid = (Get-SmaRunbook –WebServiceEndpoint https://server01
     –Runbookname DetectBios).Runbookid
Now we can use the captured RunbookID in the following syntax:
  $jobid = Start-SmaRunbook –WebServiceEndpoint https://server01
    –Runbookid $runbookid –parameters @{"SRVNAME="SERVER02"}
Here, we stored the job in a variable named $jobid, so we can query the job later and use this information. We also used a hash table to specify the input parameters for our runbook. Because we have a single input parameter named $srvname, in the hash table we do not specify the $.
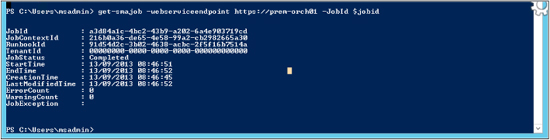
Next we will query the job using the Get-SmaJob cmdlet, which has the following syntax:
Get-SmaJob –WebServiceEndpoint https://server01 –jobid $jobid
The output is shown here:
Because the job has completed, we will review its output to ensure it’s the same as what we got in the Windows Azure Pack portal. To do this, we can use the Get-SmaJobOutput cmdlet with the following syntax:
  Get-SmaJobOutput –webserviceendpoint https://server01 –jobid $jobid
     –outputtype Output
There are many options you can choose from for OutputType, such as the following:
▪ Any
▪ Error
▪ Output
▪ Progress
▪ Warning
In the next screen shot, we show that the output of the job is very similar in Windows PowerShell to what we observed previously in the Windows Azure Pack portal:

The last set of cmdlets we want to examine are those for importing a runbook, publishing it, and turning it back to draft for further editing. We will use this example again:
  Workflow WMIClassQuery{
  Param([string]$srvname,[string]$wmiclass)
  $Credentials = Get-AutomationPSCredential –Name "Admin"
  $wmiinfo=InLineScript{ Get-Wmiobject –Class $Using:wmiclass }
      –psComputerName $server –psCredential $Credentials
  $wmiinfo
   }
Let’s now save this as a .ps1 file named WMIClassQuery.ps1 in a folder named c:scripts. Now let’s import the workflow we just saved as a runbook by using the following syntax:
  $runbook = Import-SmaRunbook –Runbookpath c:scriptsWmiClassQuery.ps1
     –WebServiceEndpoint https://server01
Here is some output from running Import-SmaRunbook:
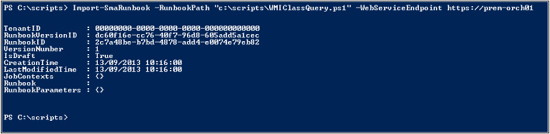
As shown by the previous code sample, we can store the output of the Import-SmaRunbook command in a variable named $runbook so that we can use the runbook ID for the next commands.
To publish the runbook so that it can be executed, we use the Publish-SmaRunbook cmdlet. Here is the syntax:
  Publish-SmaRunbook –WebServiceEndpoint https://server01
     –Runbookid $runbook.runbookid
The preceding command changes the runbook status from Draft to Published.
Now let’s use the Start-SmaRunbook cmdlet and specify the parameters for SRVNAME and WMICLASS using the following syntax:
  $jobid = Start-SmaRunbook –Runbook $runbook.runbookid
     –WebServiceEndpoint https://server01
     –parameters @{"SRVNAME"="SERVER01";
     "WMICLASS"="Win32_ComputerSystem"}
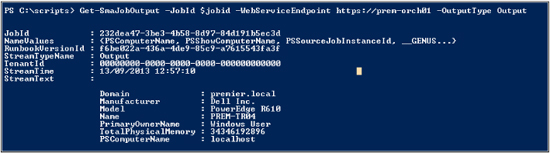
We wait a few seconds for the job to invoke and complete. Finally, we use the Get-SmaJobOutput cmdlet to display the output of the job:
  Get-SmaJobOutput –jobid $jobid –WebServiceEndpoint https://server01
     –OutputType Output
The output in this example is from calling the Win32_ComputerSystem class, as shown here:
In conclusion, SMA is a powerful product that has huge potential to enhance datacenter automation through self-service. For additional information, see the “Get Started with Service Management Automation: Walkthrough Guide” at http://technet.microsoft.com/en-us/library/dn296458.aspx.
John McCabe
Sr. Premier Field Engineer at Microsoft
How to learn more
The following sections provide links where you can learn more about Windows Azure Pack.
Product home page
Your starting point for exploring, trying, buying, deploying, and supporting Windows Azure Pack is this page on Microsoft’s Server and Cloud Platform site: http://www.microsoft.com/en-us/server-cloud/products/windows-azure-pack/default.aspx.
TechNet Library
Technical information on deploying and administering Windows Azure Pack can be found at http://technet.microsoft.com/en-us/library/dn296435.aspx. You can also download technical documentation for Windows Azure Pack from the Microsoft Download Center at http://www.microsoft.com/en-us/download/details.aspx?id=40792.
TechNet wiki
The Windows Azure Pack wiki can be found at http://social.technet.microsoft.com/wiki/contents/articles/20689.wap-wiki-a-collection-of-windows-azure-pack-and-related-blogsvideos-and-technet-articles.aspx.
TechNet forums
To get answers to your questions about Windows Azure Pack, try posting to one of the Windows Azure Pack forums on TechNet at http://social.msdn.microsoft.com/Forums/windowsazure/en-US/home?forum=windowsazurepack.
Channel 9
Channel 9 on MSDN has lots of helpful videos on Windows Azure Pack. See http://channel9.msdn.com/search?term=azure+pack&type=All.
@WindowsAzure is your official Twitter source for Windows Azure solutions and news. You can find reviews, discussions, and helpful information at https://twitter.com/windowsazure.