
Chapter 2. Planning and implementing user state virtualization
Understanding user state and user profiles
Understanding and planning user state virtualization
Technology users are becoming more mobile. However, when they are away from their main office, they expect the same technology experience with any device that they use—whether it’s a phone, tablet, laptop, or desktop. Users don’t want varying configurations among their devices because it can be confusing and it wastes their time.
Information Technology (IT) departments also want well-managed systems to offer users the experience level they have come to expect, without a labor-intensive process to make that happen. Windows operating systems include several technologies that make this possible. For example, you can use the Folder Redirection and Offline Files technologies together to redirect the path of local folders, such as the Documents folder, to a network location, while caching the contents locally for increased speed and availability. You can use roaming user profiles to redirect a user profile to a network location so that another device can provide the same user experience and data that a user has configured elsewhere. You also can configure the Primary Computer setting for a user to control which domain computers use roaming user profiles and which use redirected folders.
At the enterprise level, you can implement Microsoft User Experience Virtualization (UE-V) for user state virtualization. It synchronizes user applications and Windows settings to deliver a user’s personal experience across many domain devices. UE-V integrates with existing management tools and provides detailed control and synchronized settings.
Understanding user state and user profiles
User state is a general term that describes settings and data that define the work environments for users on their devices. For each user, the user state is a collection of files and folders rather than a single file. In Windows 8.1, user state information is stored separately from files and settings that are specific to the operating system and applications.
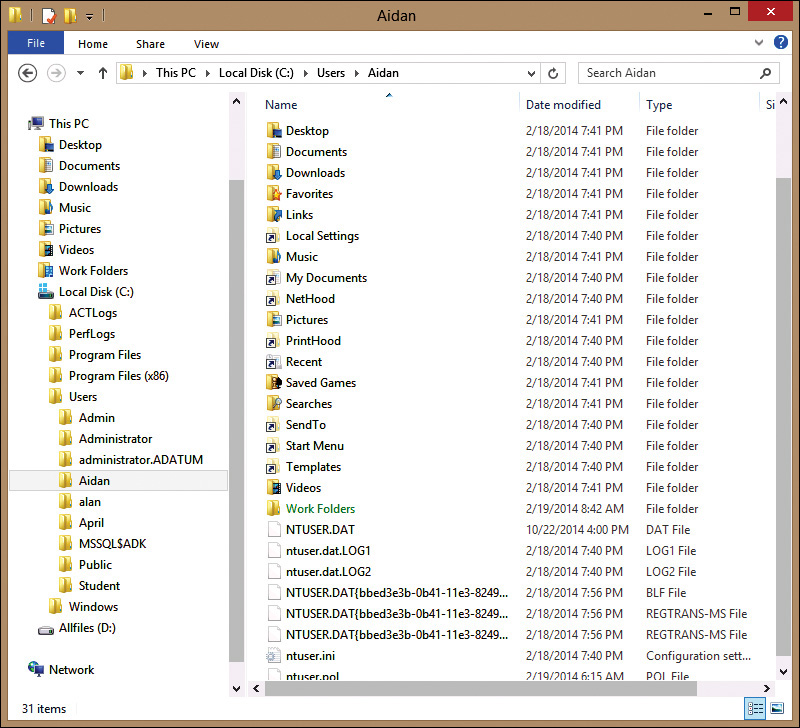
Each user of a computer running a Windows client operating system has separate user state information. This means that every user has a user state that is independent of other users on the same computer. Windows client operating systems refer to user state as a user profile, which is stored in C:Users. For example, a user with the logon name Aidan would have a user profile stored in C:UsersAidan. Figure 2-1 shows the contents of a user profile in Windows 8.1.
User profile creation
When a user logs on to a computer for the first time, the operating system automatically creates a local user profile. That local user profile is used for all subsequent logons to the same computer. If the user logs on to a second computer, a new local user profile is created on the second computer. By default, there is no synchronization of profile information among local user profiles. This means that modifications and documents that the user creates on one computer won’t be used or available on other computers. Therefore, local profiles should be avoided if a user logs on to multiple devices.
Local user profiles are created from the default user profile stored in C:UsersDefault. When a user logs on to a computer for the first time, the default user profile is copied to the folder containing the local user profile for that user. The default user profile acts as a starting point that users can customize.
Inside OUT: Modifying the default profile
• Copy files and shortcuts into the default user profile.
• Use registry editing tools to modify NTUSER.DAT in the default user profile.
• Create a new default user profile when you run Sysprep.
![]() For more information about using CopyProfile to modify the default user profile, see http://technet.microsoft.com/en-us/library/hh825135.aspx.
For more information about using CopyProfile to modify the default user profile, see http://technet.microsoft.com/en-us/library/hh825135.aspx.
Data in the public user profile stored in C:UsersPublic is shared by all users on the local computer. Windows merges the public user profile folder contents with the user’s own user profile when logging on. For example, if a shortcut is placed in the Desktop folder of the public user profile, then that shortcut appears on the desktop of each user. The shortcut file isn’t copied to each user profile, but it’s displayed as though it was.
If an error prevents a user’s profile from loading properly, a temporary user profile is created. The user is informed that a temporary user profile is being used. This is important because when the user logs off, the contents of the temporary user profile are deleted. Any files or settings created and saved in the temporary user profile are lost.
User profile content
Most of the user-specific settings in Windows 8.1 are stored in the registry. These include user-specific operating system settings, such as desktop configuration, and application settings, such as profile configuration for Microsoft Outlook. The user portion of the registry is NTUSER.DAT.
A unique copy of NTUSER.DAT is stored in the user profile folder of each user. When a user signs in, the HKEY_CURRENT_USER registry key is linked to the HKEY_USERS registry key for that user. The HKEY_USERS key for a specific user links to the NTUSER.DAT file for that user.
Each user profile also has an AppData folder that is used to store application-specific data. Although individual settings such as options within an application can be stored in the registry, other application-specific information such as template files can’t. When applications need to store user-specific data files, the files are stored in AppData.
Within AppData, there are three folders:
• Local This folder contains application settings and data that are computer specific. In this folder, applications store data that should not roam between computers. Typically this data does not roam between computers because it’s too large or isn’t important. For example, cached files or temporary files do not need to roam.
• LocalLow Like the local folder, this folder is used to store application data that is either too large or not important enough for roaming. However, this folder is for low-integrity applications to use to isolate data from those applications. For example, applications that run within Internet Explorer Enhanced Protected Mode use this location for their data and settings.
• Roaming This folder contains application data and settings that can roam between computers. Data inside this folder isn’t computer dependent and is limited in size, so it can roam with a user from computer to computer.
In addition to user settings, each user profile contains folders for user data. Some of the folders that store user-specific data are:
• Desktop This folder contains any files and shortcuts that appear on the user’s desktop. The data stored here is important because users often start applications from desktop shortcuts and may store frequently used files on the desktop.
• Downloads Files downloaded from the Internet are stored in this folder. The size of this folder will vary significantly among users. For example, a typical office worker may occasionally download documents from the Internet, which will be a few megabytes. An administrator may regularly download large files for software updates or application installation.
• Favorites This folder contains favorites that are created in Internet Explorer. Favorites are a critical part of user profiles because users want to retain a quick way to access frequently used websites.
• Documents This folder is designed to hold personal user documents. However, in most corporate environments, users are discouraged from storing data files in their user profile because information on their desktop computer isn’t backed up.
• Music This folder is meant to hold music files. This folder is seldom used in corporate environments.
• Pictures This folder is meant to hold picture files. Most users in a corporate environment will have a small number of pictures stored in this folder. However, users with job roles that specifically deal with pictures may store a very large number of pictures.
• Videos This folder is meant to hold video files. Unless users have a job role that specifically deals with videos, this folder will typically have few, if any, files. However, because video files can be very large, even a few video files can be a large amount of data.
Understanding and planning user state virtualization
Centralized management and storage of user state is desirable because it provides users with mobility and flexibility and it helps IT departments manage costs and compliance. User state virtualization provides users with the ability to use multiple devices and have the same user state on each device. For example, if you modify the configuration of Microsoft Word on one computer, that updated configuration will be available on other computers on which you use Word. User state virtualization provides a consistent, familiar experience that enables users to increase their productivity. Users always will have access to their personal experience on any managed computer or device, and when user state virtualization is combined with Folder Redirection and Offline Files, their data will move with them.
You can implement user state virtualization to address the following challenges:
• Backing up user data and settings Most organizations do not back up user data and settings from individual devices because it’s too difficult to manage or too costly. If data is stored on a device such as a laptop or tablet and that device is lost, the data is lost with it.
• Migrating the user state to new devices When users get a new device, it’s time-consuming to manually migrate data and settings to a new device. If users keep a lot of local data, the migration process can take an hour or more.
• Migrating the user state to new operating systems Companies typically do not perform an in-place upgrade when implementing a new operating system. Instead, they perform a clean installation of the operating system and then migrate user settings and data from the old computers. If the deployment process requires you to back up the user state before the operating system update and restore the user state afterward, it significantly slows down the operating system deployment process. With user state virtualization in place, some organizations even have enabled end users to redeploy the operating system on their computers without intervention from IT staff.
• Making data and consistent settings available, regardless of the device Users can use many different devices types for work. For example, they can have a desktop computer in the office, an RDS server for remote work from home, and a tablet for use when out of the office. Users need to have consistent data and settings on all devices to support their productivity.
• Consumerization of IT Many organizations are starting to allow users to bring in their own devices to access corporate systems. Even though some devices run operating systems other than Windows, they usually can browse the Internet and send and receive email, instant messages, and text messages. The challenge is to provide similar and familiar user environments and data to these devices.
User state virtualization provides a solution to these challenges. By using user state virtualization, organizations store users’ data and settings in a central location and optionally cache them locally for offline usage when users are mobile. Typically, this location is a network share on a file server or network attached storage (NAS) device. The result is that when users roam, their data and settings follow them from computer to computer, including to their mobile devices. This effectively separates data that is user-specific and can roam from data that is computer-specific and must be stored locally.
User state virtualization also can mitigate productivity loss because of computer replacement. The central copy of the data is on a network, so it’s restored easily in the event of a lost or stolen computer, and the user’s settings can be reapplied automatically. When the IT department sets up the policy to allow offline access to a redirected folder, BitLocker Drive Encryption can be applied to the computer to help ensure data safety. A typical example of this type of user state virtualization is the use of Folder Redirection with Offline Files and a roaming user profile.
User state virtualization centralizes the storage of the user state that typically resides on users’ computers, thus simplifying the backup and management of business-critical data. It also decouples user state from the operating system, which enables the same user state to be used on different operating systems. For example, the operating system can be reverted while the user state is preserved, such as with pooled virtual desktops when user profile disks are used. When you back up the central storage, the user state that was synchronized from users’ computers also is backed up.
Centralized management of user state also provides the following benefits:
• Ability to work from different computers Centralized data and settings can synchronize across different computers, thereby providing users with flexibility and mobility options that can improve productivity. Each computer at which a user signs in has the same settings and data.
• Ability to work when disconnected from an enterprise’s network User state virtualization technologies can automatically cache local updates to user data and settings so they can synchronize with the central store when network connectivity is reestablished.
• Faster and easier user migration User state virtualization technologies enable the dynamic creation of the user state on new computers over the network, thereby simplifying migration. The user state information is copied from the central storage location and placed in the local profile.
• Recovery from disaster scenarios, such as when hard disks fail or computers are lost or stolen Centralized data and settings that are backed up regularly can be restored automatically to new hard disks when the user logs on, thereby reducing the time required for organizations and users to regain productivity.
• Using familiar user state data on devices When a user is working from a device that isn’t a domain member (for example, a Windows RT tablet) or runs a non-Microsoft operating system, the user still can benefit from user state virtualization. Different devices can use other technologies, such as Virtual Desktop Infrastructure (VDI). In this scenario, a device receives a copy of a remote client desktop session, and user state virtualization adds the user state data to that session.
Microsoft has developed a planning strategy for enterprise user state virtualization. This strategy presents a systematic method of identifying an organization’s user and IT needs to design and plan a suitable user state virtualization strategy. The key to planning the correct user state virtualization strategy for your organization is to assess the organization’s business requirements.
The following steps guide you through the prevalent requirements for IT and the common user in most organizations. Each step contains job aids in the form of checklists that you can use to track relevant business requirements so that you can provide these requirements to IT infrastructure designers to assist in the user state virtualization planning process.
The user state virtualization planning strategy contains five steps that guide the planner through user and IT requirements, and it contains real-world scenarios that influence user state virtualization solution planning:
• Assess user data requirements
• Assess user settings requirements
• Evaluate compatibility considerations
• Evaluate infrastructure and manageability requirements
• Evaluate usage scenario considerations
These steps are not sequential, meaning that you can perform them in any order. However, to understand the suitability and importance of the various technologies, you should complete them all.
![]() For more information about this planning strategy, download the Windows User State Virtualization Guide from http://go.microsoft.com/fwlink/?LinkId=286564.
For more information about this planning strategy, download the Windows User State Virtualization Guide from http://go.microsoft.com/fwlink/?LinkId=286564.
Assess user data requirements
The first step of the user state virtualization planning strategy is to assess user data requirements. This step involves identifying which portions of user data are important to the organization, discovering technology limitations, and identifying real-world considerations that apply to the organization.
In this assessment, you’re concerned with user data that resides in user profiles. Data stored in shared folders isn’t part of the evaluation for planning user state virtualization.
The main technologies available for managing user state data are Folder Redirection, roaming user profiles, and Offline Files. In general, it’s beneficial to minimize the amount of data stored in user profiles. When user data is stored in a central file share, it’s easier to back up and restore. Reducing the data in a user profile also speeds up the login process for users who have roaming user profiles.
One common way to reduce the amount of data in local profiles is by using Folder Redirection. The Documents folder is a logical place for users to store their data, but it’s part of the local user profile. You can redirect Documents to a file share for shared data or a user home folder. If that data needs to be taken on the road with a mobile computer, then Offline Files can be used.
Folder Redirection can be used only for known common folders supported by Folder Redirection. If there are custom folders in the profile, then the only user state virtualization method that you can use is roaming user profiles.
Assess user settings requirements
Assessing user settings requirements addresses virtualization of the user settings. In this step, you identify which components of user settings are relevant to the business, discover technology limitations, and identify real-world considerations that apply to your organization.
The term user settings refers to user-specific customizations of applications and the operating system. Examples of user settings include: network drive mappings, printer connections, the Start screen layout, keyboard and mouse layouts, desktop wallpaper, and dictionary and spelling checker options in Microsoft Word. Such settings typically are stored either within the HKEY_CURRENT_USER portion of the registry hive or in configuration files in the AppDataRoaming folder in the user profile.
Roaming user profiles and UE-V can be used to virtualize user settings that are stored in the HKEY_CURRENT_USER registry hive. To virtualize user settings in the AppDataRoaming folder you can use Roaming User Profiles, UE-V, or Folder Redirection.
Roaming user profiles technology does not allow virtualization of specific keys or subkeys within HKEY_CURRENT_USER. However, UE-V does allow specific keys and subkeys to be virtualized.
In Windows 8.1, roaming user profiles allow background synchronization of HKEY_CURRENT_USER so that updates to the hive can synchronize to the profile server while the user is logged on, as opposed to synchronization only during logon or logoff. UE-V also synchronizes periodically.
Evaluate compatibility considerations
Evaluating compatibility for user state virtualization requires you to consider the compatibility of different operating systems, device types, and applications. When you design user state virtualization, you need to determine which settings can be virtualized and which can’t. Some of the things you need to consider are:
• Operating system compatibility The settings that a user configures in one operating system may not be valid in another operating system. In such a case, it isn’t possible for the settings to be virtualized. For example, a user may have a roaming user profile that is configured for Windows 8.1. When logging on to an older computer running Windows 7, Start screen customization won’t be relevant. Even for Windows 8.1, the RT edition of Windows 8.1 has different capabilities from Windows 8.1 Professional.
• Device type compatibility The settings that are available for one type of device are not necessarily available for all devices. Bring Your Own Device (BYOD) introduces a wide number of device types, such as Apple iPads and Android-based devices. These devices typically have very different user states, and there may be very few settings that you can synchronize among the device types. The typical user state virtualization technologies such as roaming user profiles and Folder Redirection are not cross-platform.
• Application compatibility The settings for applications typically are specific to that application. So, settings for Word 2013 can’t be applied to another document editor on an Android device. You also need to be concerned about the version of a specific application. Word 2010 and Word 2013 have many settings in common that can be used across devices with the two different versions, but you can expect that Word 2013 will have settings that can’t be applied to Word 2010.
Evaluate infrastructure and manageability requirements
Like any other technology that you implement, you need to ensure that the necessary infrastructure is available to support user state virtualization. For example, to support roaming user profiles, you need to have fast and low-latency connectivity between the clients and the roaming profile storage location. It’s not a reasonable scenario to have roaming user profiles between physical locations with slow WAN links.
Another major consideration for infrastructure is availability and redundancy. Most of the user virtualization technologies centralize data storage in a location such as a file share. You need to be aware of what happens when that centralized location isn’t available. For example, if you redirected folders to a central file share and that share isn’t available, then the setting and data stored in that share are not available to users. You can mitigate this by making the central file share highly available or by using Offline Files.
From a management perspective, you need to identify how you will manage each of the user state virtualization technologies that you choose to implement. In many cases, you can implement user state virtualization by using Group Policy. Using Group Policy whenever possible simplifies configuration because you can create a single Group Policy object that is applied to many users. For example, you can implement Folder Redirection by using Group Policy.
Evaluate usage scenario considerations
To select the appropriate user state virtualization technologies, consider how your users work. The three commonly considered usage scenarios are
• Assigned computer Each user is assigned a dedicated computer, and the user works only with that assigned computer.
• Occasionally roaming user Users are assigned dedicated computers, but they occasionally might use public computers.
• Always roaming user Users are not assigned a dedicated computer; instead, they always log on to a computer within a shared pool of computers.
Assigned computer user scenario
Users with assigned computers might not need to use different computers in the organization. However, implementing a user state virtualization strategy can be useful because it provides the ability to centralize a user’s business-critical data so that it can be backed up easily. User state virtualization also provides the ability to cache data files locally so that users can continue to work when remote network servers and mail servers are offline. If these users are assigned laptop computers, user state virtualization also provides the ability to work while traveling. Taking additional steps such as configuring Outlook connectivity to the Microsoft Exchange Server can improve the user experience in this scenario.
The following considerations are relevant to Folder Redirection, Offline Files, and roaming user profiles in an assigned computer user scenario:
• Use Folder Redirection to redirect users’ data folders.
• Use Offline Files so that business users can continue working when they are disconnected from the network.
• Use the Slow-link mode of Offline Files so that users automatically work on locally cached copies of data when the network connection is slow.
• Enforce periodic synchronization of the Offline Files stored to the redirected folder on the corporate server so that the centrally managed business data remains current.
• Avoid redirection of the AppDataRoaming folder unless it contains business-critical data.
• Avoid redirection of known folders such as Music and Videos unless they contain business-critical data.
• Avoid the use of roaming user profiles unless business-critical settings or data exist in the HKEY_CURRENT_USER hive of the registry.
The following considerations are relevant to Outlook and Exchange Server or Office 365 with an assigned computer user scenario:
• Configure Outlook in cached/offline mode to enable indexing and to allow users to continue working while offline.
• Avoid the use of .pst files for email storage. Office 365 supports large mailboxes, which negate the need for .pst files. For an on-premises implementation of Exchange Server, you should design the implementation to support large mailboxes or online archive mailboxes.
These configuration settings provide an optimal user experience for an assigned computer scenario. Users have access to all of their data immediately after they log on via Folder Redirection, and email is available after an initial download. The ability to search email messages and data files is immediate after initial indexing.
Occasionally roaming user scenario
The occasionally roaming user scenario applies to users who are assigned a primary computer but occasionally need to work from shared public computers or kiosks. User state virtualization provides the ability to cache user state on local computers and to synchronize user state across different computers in the organization. This benefits users when they work offline and when they log on to different computers, such as public kiosk computers. Taking additional steps such as configuring Outlook connectivity to Exchange Server can improve the user experience in this scenario.
The following considerations are relevant to Folder Redirection, Offline Files, and roaming user profiles with an occasionally roaming user scenario:
• Do not use Folder Redirection to redirect application settings stored in the AppDataRoaming folder, because users on a kiosk computer typically do not need to access application-specific files such as custom dictionaries or templates.
• Disable Offline Files so that redirected data files that the user accesses are not cached locally.
• Consider using mandatory profiles for kiosk computers, in which saving user settings isn’t required.
The following consideration is relevant to Outlook and Exchange Server or Office 365 with an occasionally roaming user scenario:
• Configure Outlook to run in Online mode so that email isn’t stored on the public computer. This will help ensure that the hard drives of public kiosk computers do not accumulate user profile data.
Always roaming user scenario
The always roaming user scenario applies to users who are not assigned personal computers, but instead always log on to an available computer from a pool of shared computers. Examples of such users are call center employees or employees in a help desk environment and users who log on to pooled virtual desktops in a VDI scenario. Taking additional steps such as configuring Outlook connectivity to Exchange Server can improve the user experience in this scenario.
The following considerations are relevant to Folder Redirection, Offline Files, and roaming user profiles with an always roaming user scenario:
• Use Folder Redirection to redirect users’ data folders.
• Avoid using Offline Files so that hard drives of shared computers do not accumulate data from multiple users.
• Turn on indexing on the remote server to enable search for redirected data.
• Avoid redirection of the AppDataRoaming folder unless it contains business-critical data.
• Avoid redirection of known folders such as Music and Videos unless they contain business-critical data.
• Avoid the use of roaming user profiles unless business-critical settings or data exist in the HKEY_CURRENT_USER hive of the registry.
• Consider using UE-V to allow application settings to be synchronized across computers if required.
The following considerations are relevant to Outlook and Exchange Server or Office 365 with an always roaming user scenario:
• Configure Outlook in Online mode so that email does not cache on the local computer.
• Configure Outlook to use Exchange Server for searches, which is the default functionality when Outlook is configured in Online mode.
• Consider using Outlook Web App instead of Outlook. Outlook Web App provides most of the functionality available in Outlook and can be used without any configuration of individual client computers.
This configuration emphasizes storing data on the central server, and data does not cache locally on the shared computers. Users will have access to all of their data immediately after logging on via Folder Redirection. Email also is available immediately after Outlook starts, and there is no need to wait for email to download. The ability to search email messages and data files is immediate because there is no need to build a local index. Instead, the indexes on Exchange Server are used for email searches and indexes on the file server are used for file system searches. This configuration minimizes network transmission of user state information every time a user logs on, but it will place an additional load on the supporting infrastructure, such as Exchange Server and the file system, because copies of email and data are stored on the network.
Configuring user state virtualization technologies
The most commonly used technologies for implementing user state virtualization are those included as part of Windows Server 2012 R2 and Windows 8.1. Any organization can implement these technologies with no additional licensing costs. User state virtualization technologies that are part of Windows operating systems include the following:
• Roaming user profiles
• Folder Redirection
• Offline Files
• Credential Roaming
• User profile disks
Configuring roaming user profiles
Roaming user profiles allow enterprises to store users’ profiles on a central network location instead of storing them locally on the users’ client computers. The roaming user profile structure is the same as that of local profiles, but the location of the roaming folder is different.
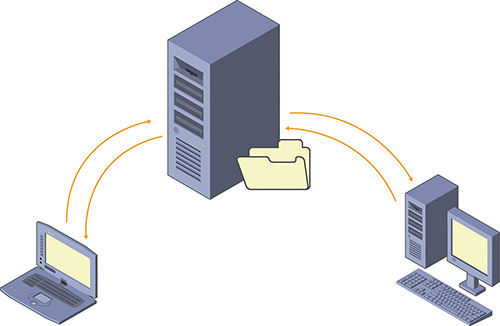
Roaming user profiles are stored on a network share so that they are accessible from any computer. When a user with a roaming user profile logs on to a new computer for the first time, the roaming user profile is copied to the new computer as a local user profile and used locally while the user is logged on. When the user logs off, the local user profile and all of the changes that have been made to it are uploaded to the network location to update the roaming user profile. Figure 2-2 shows this process.
If a user modifies files or settings that are stored outside the user profile, they are not included in the roaming user profile. The modified files outside the profile are available only on the computer on which they were made—they do not roam with the user.
Preparing a share for roaming user profiles
To prepare to use roaming user profiles, you need to create and configure a network share that holds the roaming user profiles. It’s important to secure the network share properly because sensitive data could be contained in the roaming user profiles. For example, a roaming user profile contains the files in the Documents folder for a user. Users assume that this data is private and protected. Additionally, a roaming user profile contains any certificates that have been assigned to the user.
When you create a shared folder for roaming user profiles, you need to consider both share and NTFS permissions. The minimum share permission that you can provide for the shared folder is Modify. The Modify share permission is necessary to allow users to create, delete, and modify files in their own roaming user profile folder.
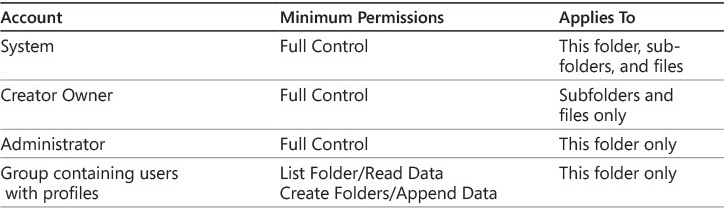
NTFS permissions for roaming user profiles need to be set at the root folder and at the folder for each roaming user profile. At the root folder, the minimum permissions you can assign are listed in Table 2-1.
You typically do not create individual folders in the share for each roaming user profile. Instead, the Windows client operating system creates the folders for each roaming profile as part of the logon process. When you allow users to create the folders for the roaming user profiles, inheritance for NTFS permissions is disabled and the user is assigned as owner of the folder. The NTFS permissions assigned to each roaming user profile folder are listed in Table 2-2.

Configuring the user object for roaming user profiles
You can configure the user object with the path for a roaming user profile by using Active Directory Users and Computers or Active Directory Administrative Center. The path you configure is a universal naming convention (UNC) path for the share containing the user profiles and includes the name of the user. To simplify the creation process, you can use the environment variable %username%. The variable is substituted with the name of the user. For example, the actual UNC path with the username resolved might be \LON-DC1ProfilesApril.
Perform the following steps to configure a user for a roaming user profile:
1. Open Active Directory User and Computers or Active Directory Administrative Center and locate the user account you want to modify.
2. Right-click the user account and click Properties.
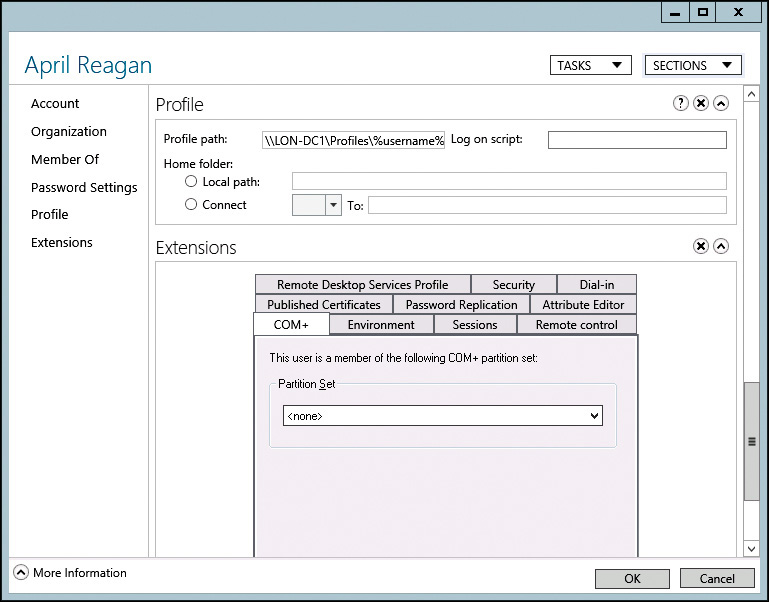
3. In the user account properties window, on the Profile tab, set the Profile path as \ServerProfileShare\%username%, as shown in Figure 2-3, and then click OK.
Managing user profiles by using Group Policy
You can use Group Policy to manage user environments centrally, including many of the user profile settings. Group Policy includes many user profile–related settings that you can configure for users and computers.
In a GPO, user-specific settings for user profiles are configured in User ConfigurationPoliciesAdministrative TemplatesSystemUser Profiles. Some of the user-specific GPO settings that you can configure for user profiles include:
• Exclude Directories In Roaming Profile AppDataLocal and AppDataLocalLow folders, which are part of the local user profile, are excluded from roaming by default. By configuring this setting, you can exclude additional directories from roaming. For example, if a folder contains settings and data that can be used only on a single computer because an application is installed on only that computer or because only that computer is equipped with a specific hardware device.
• Limit Profile Size You can limit the user profile size, and this limit applies to local profiles and roaming user profiles. By default, user profile size isn’t limited. If you limit profile size and a user exceeds it, the user’s profile won’t synchronize with the network location if the roaming user profile is used.
In a GPO, computer-specific settings for user profiles are configured in Computer ConfigurationPoliciesAdministrative TemplatesSystemUser Profiles. Some of the computer-specific GPO settings that you can configure for user profiles include:
• Add The Administrators Security Group To Roaming User Profiles By default, only the users have Full Control permissions to their roaming profile. If you configure this setting, administrators also will have full access and will be able to view user profile content. You should be aware that administrators always can take ownership of the files and folders and then modify permissions.
• Delete Cached Copies Of Roaming Profiles By default, a local copy of the roaming user profile is kept on the computer when the user logs off. If you configure this setting, the local copy of the roaming user profile will be deleted when the user logs off.
• Only Allow Local User Profiles By configuring this setting, only local user profiles will be used on the computer where this setting is effective. If a user who logs on is configured with a roaming user profile, a new local user profile will be created on the computer, and that profile will be used when the user logs on to that computer in the future.
• Set Roaming Profile Paths For All Users Logging Onto This Computer If you want all users who log on to a computer to use roaming user profiles, you should configure this Group Policy setting. As part of the configuration, you can specify the network location where roaming user profiles will be stored. You should use the %username% variable in the path to specify a different profile directory for each user.
• Prevent Roaming Profile Changes From Propagating To The Server When a user is configured with a roaming user profile, the user’s roaming profile is copied from the network location to the computer the user logs on to. The user’s changes write to the local copy of the profile, and by default, all changes from the local copy of the profile synchronize with the network copy when the user logs off. By configuring this setting, you modify this behavior and prevent synchronization of the local copy of the profile with the network copy when the user logs off. The result is similar to how the user would be configured with a mandatory profile.
• Set The Schedule For Background Upload Of A Roaming User Profile’s Registry File While User Is Logged On By default, a local copy of the roaming user profile, including the user registry file (NTUSER.DAT), synchronizes only when a user logs on and off. If you configure this setting, the roaming user profile still synchronizes only when the user logs on and off. However, you can specify the interval or time of day at which the local copy of the user registry file will synchronize with the network copy, regardless of whether the user logs off.
Mandatory user profiles
A mandatory user profile is a type of roaming user profile that prevents users from saving changes to their user profile. Like a typical roaming user profile, the profile is downloaded at logon. However, a mandatory profile does not synchronize to the network location when the user signs out. When the user signs in again, the original, unmodified profile is downloaded from the network location, and all previous profile changes are lost.
You convert a normal roaming user profile to a mandatory user profile by renaming the file NTUSER.DAT to NTUSER.MAN. The Windows client operating system recognizes this change and uses the profile as a mandatory user profile. The file NTUSER.MAN instead of the file NTUSER.DAT is loaded for the user portion of the registry while signed in.
You’re more likely to use Group Policy than mandatory user profiles to restrict the user environment. However, in a kiosk scenario, mandatory profiles might be useful as a simple way to ensure that the profile is never modified permanently.
Caution
If you use mandatory user profiles for normal users and those users save files to either the desktop or My Documents folder, those files are lost when the user signs out. This is very risky in a typical work environment. You can mitigate the risk somewhat by using Folder Redirection to point common locations like Documents and the desktop to a network location that will be preserved between logons.
If a user signs in and the network location storing a mandatory user profile isn’t available, the cached copy of the mandatory user profile is used. In this situation, profile changes from the last user, such as files on the desktop, will still be present when the user signs in because the user profile from the network isn’t copied down to overwrite the local profile.
To ensure that users never get cached changes to a profile, you can create a super-mandatory user profile. When a roaming profile is super mandatory and the network location storing the profile isn’t available, the user is unable to sign in.
To change a mandatory user profile to a super-mandatory user profile, you rename the folder containing the profile to include the .man extension. For example, if a roaming user profile is stored in the \ServerProfilesUser1.V2 folder, you can rename the folder to User1.man.V2 and configure the user with the \ServerProfilesUser1.man profile path.
Configuring Folder Redirection
One limitation of using roaming profiles is that if you configure users with roaming profiles, each time they log on, the entire profile synchronizes with the local copy on the computer. If a user logs on to a computer for the first time or if the local copy of the profile is deleted, this can cause the entire profile to download. Because the profile contains data folders, such as My Documents, Music, Videos, and Downloads, and these folders can contain large amounts of data, the process of downloading the entire profile can cause considerable network traffic and can take considerable time. This can result in very slow logons.
Similarly, when the user logs off, the entire profile must synchronize back to the network location, which can cause a slow logoff if a user added a considerable amount of data to her profile. To ensure that the logon and logoff process are performed quickly, it’s recommended that you separate user data from the user profile but keep the user data on a network location. This way, the data can follow users, but it does not slow down the logon and logoff process.
Folder Redirection is a client-side technology that provides the ability to change the target location of user-specific folders within the user profile, such as Documents or Desktop. For example, an administrator can redirect the Documents folder from a local or roaming user profile to a separate network location. The content of a redirected folder is available from any computer on the network and isn’t copied to the computer to which the user logs on, as with roaming user profiles.
Redirected folders are stored only on a network share, and users access them transparently in the same way as when they are stored in a local user profile. The Offline Files feature, which is enabled by default when redirected folders are used, provides users with access to content in redirected folders even if there is no network connectivity.
The Windows operating system supports the redirection of the following 13 folders that are found within user profiles. These folders are often referred to as known folders:
• AppDataRoaming
• Desktop
• Start Menu
• Documents
• Music
• Videos
• Favorites
• Contacts
• Downloads
• Links
• Searches
• Saved Games
You can configure redirection of some folders manually from the user profile. For example, you can redirect the Documents folder to a network location, as shown in Figure 2-4. When you change the location, you have the option to move the existing data from the local profile.

In most cases, you want to configure Folder Redirection for a large number of users. Getting this done is more efficient if you use Group Policy. You can configure Folder Redirection by modifying User ConfigurationPoliciesWindows SettingsFolder Redirection settings in a GPO.
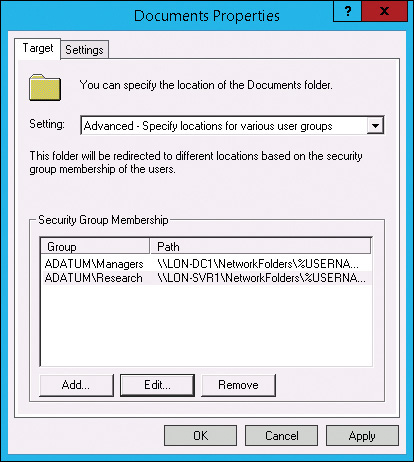
When you use Group Policy to enable Folder Redirection, you can use basic or advanced settings. Basic Folder Redirection redirects the folder for all users to a single network share. Advanced Folder Redirection redirects the folder for users to different shares based on group membership, as shown in Figure 2-5.
In a large organization, you won’t be able to redirect all folders to a single network share. It isn’t practical because the data storage requirements might be too large and it might overload that network share. In addition, users might be in various locations.
You can accommodate multiple shares for redirected folders with Basic or Advanced Folder Redirection. With Advanced Folder Redirection, you divide users based on group membership and direct their content to different file shares. You can accomplish this with Basic Folder Redirection by applying different GPO settings to different OUs. You can choose the option that suits your organization best.
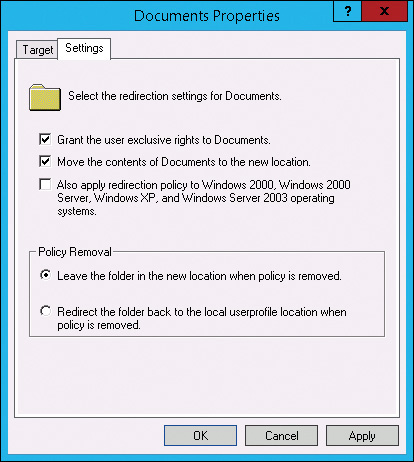
Each folder that you redirect has additional settings, shown in Figure 2-6, that are important to know. These setting are:
• Grant The User Exclusive Rights To Folder This option sets NTFS permissions to ensure that only the user has access to the redirected folder. This is enabled by default but should be disabled when multiple users are being redirected to a shared location.
• Move The Contents Of Folder To The New Location When this option is selected, the contents of the redirected folder in the local user profile are copied to the redirected location. This is useful when implementing redirected folders to ensure that users retain access to all of their data. If you don’t enable this option, the data remains on the local computer but to users it appears as if the data has been deleted.
• Also Apply Redirection Policy To Windows 2000, Windows 2000 Server, Windows XP, And Windows Server 2003 Operating Systems This option applies the redirection policy to older operating systems. In most organizations, this option is now irrelevant.
• Leave The Folder In The New Location When Policy Is Removed This option leaves the folder redirected when the user falls outside the scope of the policy. Effectively, this means the folder redirection change is permanent unless a new policy is created that forces the folder to be local again.
• Redirect The Folder Back To The Local Userprofile When Policy Is Removed This option forces the folder to be part of the local user profile again if the user falls outside the scope of the policy. This can be useful as part of decommissioning Folder Redirection.
Folder Redirection provides several advantages, which include the following:
• Content of redirected folders is available from any computer in the domain.
• Content of redirected folders does not copy to the local computer, which minimizes network traffic when a user logs on.
• Administrators can set quotas and permissions on redirected folders. By doing so, administrators can control how much space a user can utilize and whether the user can modify contents of that part of the folder—for example, the Desktop.
• Redirected folders are stored on network locations or network shares, not on local computers. If a local hard drive fails, users still can access data in redirected folders from a different computer.
• Contents of redirected folders can be backed up centrally because they are not stored locally on user computers. If Shadow Copies for Shared Folders is configured on a network location, users can access previous versions of their redirected files.
Configuring Offline Files
One of the common difficulties administrators experience is the management of user data on mobile computers. Even with improvements in mobile communication, mobile users need to keep files locally on their mobile computer for situations in which network connectivity is either unreliable or unavailable. The problem with users storing files on a mobile device is twofold:
• Mobile computers are seldom backed up Most organizations have a policy in place that mobile computers are not backed up. This leaves the data stored on mobile computers vulnerable to hardware failure. Typically, a policy states that all files from mobile computers should be copied to a network share, but if the process isn’t automated it’s easy for users to forget.
• Multiple copies of files When users take a copy of a file from the network and modify it, they may forget to copy the updated file back to the network quickly. In the meantime, other users might take copies of that file and make their own changes or modify the network version of the file. When there are multiple modified versions of a file, it can be difficult to merge the changes.
You can use Offline Files to help resolve data problems for mobile users. When you implement Offline Files, the files are cached locally on the mobile computer and automatically synchronized to the network share when there is connectivity. Automatic synchronization to the network share ensures that updated files are copied to a location that is easily backed up and reduces the likelihood of multiple file copies.
From the user’s perspective, Offline Files are transparent. Users access the cached files on their computer by using the same network path from which they were cached. For example, Offline Files cached from a mapped drive M are accessible through the M drive even when the user is disconnected from the network.
When there is a slow or unreliable connection to a server, Offline Files can improve file access performance. For example, if a user is connected over a relatively slow VPN connection, Offline Files allows the user to work with a local cached copy of the file that is fast to open and save. After the file is saved, it’s synchronized back to the server by Offline Files.
When you implement user state virtualization by using Folder Redirection, Offline Files can be an important part of ensuring that users have reliable access to their redirected folders. The most obvious benefit is for mobile computers for which Offline Files are used when the mobile computer is out of the office. Offline Files also provide reliable access to redirected folders if the server holding redirected folders experiences an outage.
Operating modes of Offline Files
The default mode for Offline Files is online mode. If the network file share is available, users access and modify files directly on the file share. As the files are updated on the network share, the cached copy of the file also is updated.
If the computer can’t connect to the network share, it automatically switches to auto offline mode for that share. In auto offline mode, all file access and changes are performed by using the local cached copy of the files. The Offline Files client tries to access the file share every two minutes to reestablish online mode. While the folder is in auto offline mode, users can’t access previous versions of the file.
The combination of online mode and auto offline mode works well for users with reliable connectivity to the network when they are in the office. However, if the network connection is slow or unreliable, you may want to force the cached files to be used. Forcing the use of cached files has the following benefits:
• Users experience faster access to files in redirected folders, especially potentially large folders such as the Documents folder.
• Network bandwidth is reduced, decreasing costs on expensive wide area network connections or metered connections, such as a 4G mobile network connection.
You can use the following methods to force the cached files to be used:
• Configure Slow-Link Mode You can use Group Policy to configure the network latency at which cached files are used. By default, Windows 7 uses a threshold of 80 milliseconds (ms) and Windows 8.1 uses a threshold of 35 ms. You can use the Configure Slow-Link Mode setting to override the default values and set different latency thresholds for different UNC paths. Slow-link mode is useful to identify when the network connectivity is poor and use cached files automatically. This is useful for mobile users who connect by using a VPN or from a remote office with high network latency.
• Enable always offline mode To ensure that a remote user does not have varying experiences, you can force Offline Files to always work with cached files regardless of the network latency. This can be useful if the network quality varies significantly over time. To enable always offline mode, you configure the Configure Slow-Link Mode setting with a value of 1 ms. This mode is available only in Windows 8 and newer. When this mode is enabled, background synchronization occurs every 60 minutes by default. You can change the background synchronization interval by configuring the Configure Background Sync setting in a GPO.
• Manually switch to offline mode If you provide users with guidance on when to use Offline Files, you can instruct them how to manually enable offline mode by using File Explorer. In Windows 8, this option can be difficult to find. Figure 2-7 shows where the Work Offline option is located in File Explorer.

Configuring shares for offline folders
When you share a folder on a computer running Windows Server 2012 R2, you can configure how files on that share are made available offline. To configure offline settings, perform the following steps:
1. On the file server, in File Explorer, right-click the shared folder and click Properties.
2. In the Shared Folder Properties window, on the Sharing tab, click Advanced Sharing.
3. In the Advanced Sharing window, click Caching.
4. In the Offline Settings window, shown in Figure 2-8, select the appropriate option for offline files and click OK.
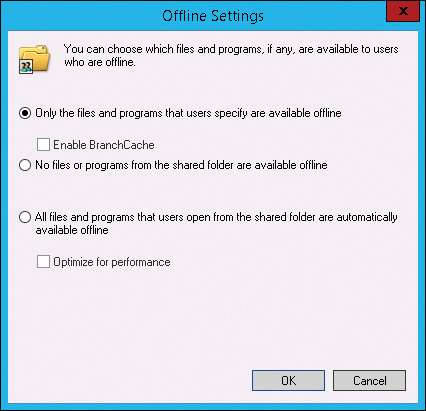
The default setting for a shared folder is Only The Files And Programs That Users Specify Are Available Offline. This is a reasonable setting to use because it provides users with the option to make files available offline but does not do it automatically. This minimizes the number of offline copies of a file and reduces the likelihood of a synchronization conflict.
The Enable BranchCache option is available if you have installed the BranchCache feature on the server. BranchCache is a file-caching solution for branch offices or remote users. However, unlike Offline Files, the cached copy of the file can be used only when the original copy of the file is online and it can be verified that the cached copy is up to date.
![]() For more information about BranchCache, see the BranchCache webpage on TechNet at http://technet.microsoft.com/en-ca/network/dd425028.aspx.
For more information about BranchCache, see the BranchCache webpage on TechNet at http://technet.microsoft.com/en-ca/network/dd425028.aspx.
For shared folders for which you don’t want any files to be taken offline, you can select No Files Or Programs From The Shared Folder Are Available Offline. You may want to select this option for shared folders that many users access to ensure that there is no possibility of synchronization conflicts.
For folders that are used exclusively by a single person, you should consider using the All Files And Programs That Users Open From The Shared Folder Are Automatically Available Offline option. Selecting this option provides the simplest way for users to make files available offline because it happens automatically as they use each file. For redirected folders, this is a good option because the users never need to identify which files are cached. The Optimize For Performance option is obsolete for Windows Vista and newer versions of Windows.
Configuring Offline Files in Windows 8
Users can make files or folders available offline by using File Explorer to browse to the file or folder, right-click the file or folder, and then select Always Available Offline. At that point, the file is cached locally and monitored for updates.
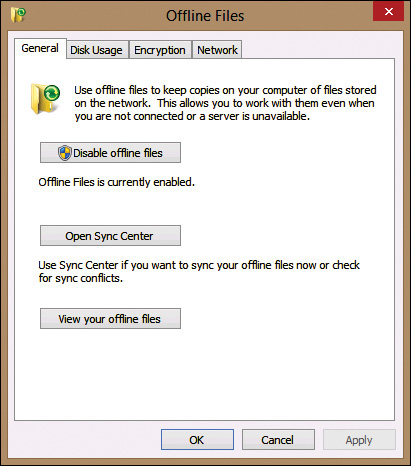
You also can configure several options for Offline Files from the Manage Offline Files option on the Start screen. This opens the Offline Files dialog box, shown in Figure 2-9. You can use this dialog box to do the following:
• Disable offline files
• Open Sync Center
• View your offline files
• Configure disk space limits for offline files
• Enable encryption for offline files
• Configure the interval for slow-link detection
Encrypting Offline Files helps secure the cached files and prevent an unauthorized user from gaining access to them. If you don’t encrypt the cached files, an unauthorized user with physical access to the computer can gain access to the cached files in minutes. With encryption enabled, it’s extremely difficult for an unauthorized user to gain access to the cached files.
The use of metered networks, such as wireless networks from a mobile communications provider, is becoming more common for network devices. For example, some tablets use a subscriber identity module (SIM) card to connect with mobile data networks. Laptop computers also may have this functionality built-in or use a USB dongle to provide connectivity to mobile data networks. Mobile data networks typically charge based on the volume of data transmitted over the network, and subscriber plans have limited amounts of data included in a given service plan. All mobile broadband connections are configured as metered by default. Wi-Fi networks are not configured as metered connections by default, but you can configure them as metered connections.
Note
If you tether your mobile computer to a mobile phone that has data access, Windows 8.1 connects to the mobile phone by using Wi-Fi. Because this is a Wi-Fi connection, it won’t be metered by default.
Windows 8 and Windows 8.1 can identify the use of metered networks for synchronization. Using cost-aware synchronization, Windows 8 and newer can deactivate background synchronization in the following scenarios:
• When the user is using a metered network connection, such as a 4G mobile network connection
• When the subscriber is near or over his bandwidth limit
• When the user is roaming on another provider’s network
Cost-aware synchronization on metered networks helps users avoid unexpectedly high data usage costs when they use metered connections that have usage limits or while roaming on another provider’s network.
Windows 8, Windows Server 2012, and newer Windows operating systems automatically track roaming and bandwidth usage limits for users when they are on metered connections. When users are roaming, near their bandwidth limit, or over their limit, the Windows operating system switches to offline mode and prevents all synchronization. Users still can initiate synchronization manually, and administrators can override cost-aware synchronization for specific users, such as executives. When the user no longer has the conditions that inhibit connectivity, normal synchronization occurs.
Metered network connections usually have round-trip network latencies that are slower than the default 35 ms latency value for transitioning to offline mode based on slow-link detection. Therefore, these connections usually transition to offline mode automatically.
Using the Primary Computer setting
When administrators configure users with roaming user profiles and Folder Redirection, these settings apply to users regardless of the domain computer to which they log on. However, sometimes you might want to restrict roaming user profiles and Folder Redirection to be available only when a user logs on to specific computers. This could be because you do not want a user to leave any personal or company data when she logs off, or because you do not want to roam the user’s settings and data between 32-bit and 64-bit client computers. For example, if your organization has a computer lab for training, you would not want roaming user profiles to be used in the computer lab.
Starting with Windows 8 and Windows Server 2012 in domain environments, you can apply this restriction by using the Primary Computer feature. By using the Primary Computer feature, an administrator can specify a list of computers, known as Primary Computers, for each domain user. Then, Folder Redirection, roaming user profiles, or both features are used only when a user logs on to a computer on her Primary Computer list, which can be controlled by using Group Policy.
To use the Primary Computer feature, the Active Directory Domain Services (AD DS) schema must be extended to at least the Windows Server 2012 level. A Windows Server 2012 or newer domain controller isn’t required, but the AD DS schema must be extended. The Primary Computer feature works only when a user logs on to a Windows 8, Windows Server 2012, or a newer Windows operating system because older Windows versions ignore the Primary Computer setting. To configure Primary Computers for a user, include the list of computer names in the msDS-PrimaryComputer attribute in the user account. This attribute isn’t included as a field in any of the graphical management tools. However, both Active Directory Users and Computers and Active Directory Administrative Center allow you to edit arbitrary attributes in user accounts.
To add a Primary Computer list by using Active Directory Administrative Center, perform the following steps:
1. In Active Directory Administrative Center, locate the user account you want to modify and open the Properties of the user account.
2. In the user account window, click Extensions and then click the Attribute Editor tab, as shown in Figure 2-10.
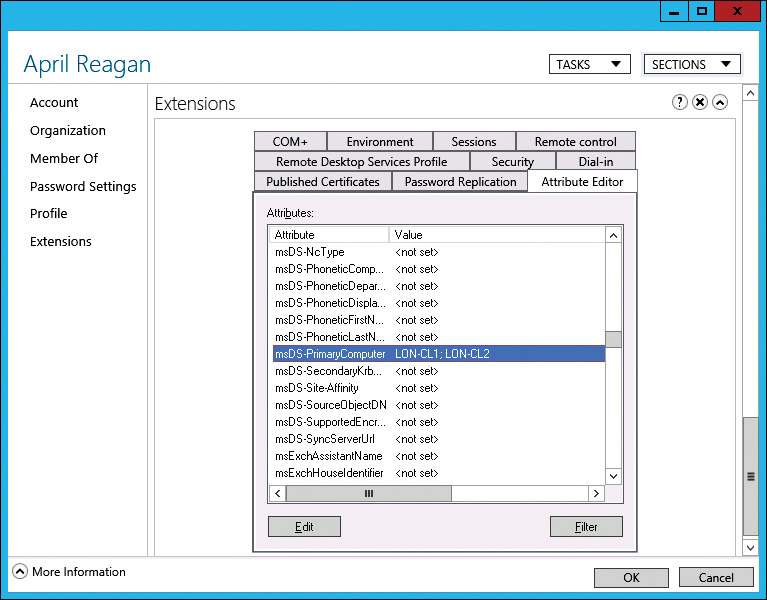
3. In the list of attributes, scroll down and double-click msDS-PrimaryComputer.
4. In the Multi-valued String Editor window, in the Value To Add box, type the name of a primary computer and click Add.
5. Repeat step 4 for any additional primary computers and then click OK.
6. Click OK to close the user account window.
After configuring the list of Primary Computers for a user, you also should enable the Redirect Folders On Primary Computers Only and Download Roaming Profiles On Primary Computers Only Group Policy settings.
Configuring Credential Roaming
Some organizations have deployed certificates to end users. Certificates can be used for encryption or authentication. If you have implemented certificates for end users, it’s important to understand that the certificate is stored in the local user profile. If a user is issued a certificate while logged on at one computer and then logs on at another computer, the certificate isn’t automatically available. One solution to this problem is to implement roaming user profiles. However, if you want to specifically allow certificates to roam with users, you can implement Credential Roaming.
Credential Roaming was introduced in Windows Server 2008 R2 and Windows 7 and is enabled by using Group Policy. When you enable Credential Roaming, existing user certificates are copied from the local profile into Active Directory as part of the user object. In the future, each time the user signs in to a new computer the certificates for the user are copied from Active Directory to the new local profile.
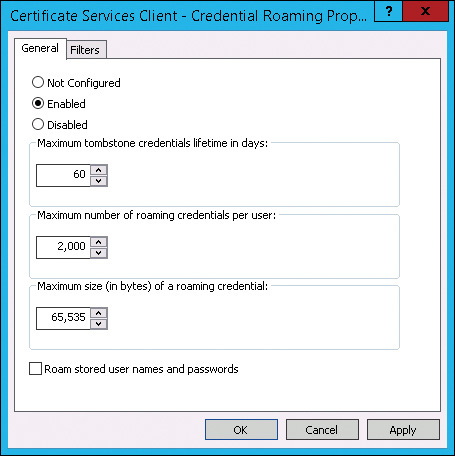
You configure Credential Roaming by using Group Policy, as shown in Figure 2-11. The Certificates Services Client - Credential Roaming setting is located in User ConfigurationPoliciesWindows SettingsSecurity SettingsPublic Key Policies. In addition to enabling Credential Roaming, you can configure the following settings:
• Maximum Tombstone Credentials Lifetime In Days Defines how long a credential is retained in Active Directory after it has been deleted locally.
• Maximum Number Of Roaming Credentials Per User Defines the maximum number of certificates and keys that can be used by Credential Roaming. The default value of 2,000 should be sufficient for most organizations.
• Maximum Size (In Bytes) Of A Roaming Credential Defines the maximum size of any one roaming credential. This limit ensures that the Active Directory database does not grow too large in organizations with many users.
• Roam Stored User Names And Passwords Controls whether stored user names and passwords accessible in Credential Manager are included for roaming.
Enabling user profile disks
If you have implemented desktop virtualization with session-based virtual desktops or virtual machine (VM)–based virtual desktops, you can implement user profile disks to user profiles in a central location. User profile disks are similar to roaming user profiles because they store profiles in a central location. However, user profile disks are used exclusively for session-based virtual desktops or VM-based virtual desktops. For example, if you have multiple RD Session Host servers, user profile disks allow users to have a consistent profile regardless of the RD Session Host server to which they are connected.
When you enable user profile disks, a virtual hard disk is created for each user who signs in. When the user signs in, the virtual hard disk for that user is mounted as the storage location for the user profile. User profile information isn’t copied or cached.
![]() See more information about user profile disks in Chapter 8, Planning and deploying session-based desktops.
See more information about user profile disks in Chapter 8, Planning and deploying session-based desktops.
Configuring User Experience Virtualization
UE-V is an enterprise solution that enables you to synchronize operating system settings, desktop app settings, and Windows Store app settings among computers in the same AD DS domain environment. Unlike roaming user profiles, which roam all settings in the profile among computers, UE-V allows you to be selective about which settings roam among computers.
With UE-V, nothing roams unless specifically enabled. UE-V provides several default settings location templates that define where each app stores its settings. You can create additional settings location templates, and UE-V will synchronize only those settings that are defined and enabled in the settings location templates.
Note
An administrator can control only if UE-V will synchronize the settings for Windows Store apps. An administrator can’t control which Windows Store app settings will be synchronized.
UE-V stores settings on a network location as soon as a user closes an app, and those settings can synchronize on other computers without the user having to log off. Computers periodically synchronize their settings with a network location, and if computers have permanent connectivity to a network location, you can configure them to use those settings immediately.
UE-V synchronizes settings between applications on different operating system versions as long as the applications are stored in the same location. Regardless of how an application is deployed, UE-V can synchronize settings among locally installed applications on one computer, Microsoft Application Virtualization (App-V) applications on another computer, and RemoteApp programs on the RD Session Host. UE-V also can synchronize settings between Windows Store apps that run on physical and virtual computers, such as the virtual desktops that are used in VDI implementations.
Note
UE-V does not synchronize user data; it only synchronizes settings. If you need to synchronize user data, you can combine UE-V with Folder Redirection or roaming user profiles.
Windows 8 and Windows 8.1 allow users to link a Microsoft account with a domain account for authentication. When the two accounts are linked, UE-V only synchronizes settings for desktop apps. Users can synchronize other settings, such as operating system settings and Windows Store app settings, by using OneDrive. In UE-V 2.1, administrators can control if Windows Store apps will synchronize by using UE-V or OneDrive.
To use UE-V, you must have a supported operating system, as shown in Table 2-3. Notice that Windows Server is supported so that UE-V can be used on RD Session Hosts. For client operating systems, both 32-bit and 64-bit operating systems are supported.
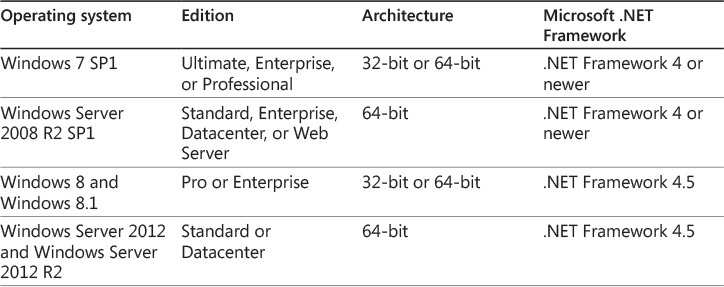
Besides the requirements for supported operating systems, there are no additional random access memory (RAM) requirements for UE-V. Administrator user rights are required to install the UE-V agent, and you must restart the computer to make the UE-V agent operational.
You must install .NET Framework 4 or newer and Windows PowerShell 3.0 or newer before you can install the UE-V agent. A default installation of Windows 8 or Windows 8.1 meets those requirements. However, on Windows 7 SP1, you need to install Windows PowerShell 3.0 before you can install the UE-V agent.
UE-V compares local time on a client computer with the time stamp of the stored settings on a network location to decide if settings synchronization is required. Because of that, computer clocks on UE-V client computers should be synchronized, which is the default behavior in an AD DS environment. If computer clocks are not synchronized, older settings can overwrite newer settings, or newer settings might not be stored to the network location. This should not be a concern in most environments because client computers synchronize time by using domain controllers.
UE-V architecture
To understand how to implement and manage UE-V, you should be familiar with its high-level architecture and the items here that enable synchronization of settings between computers, as shown in Figure 2-12. Understanding these items here ensures that you can identify which items here need to be configured to obtain the configuration that you desire.
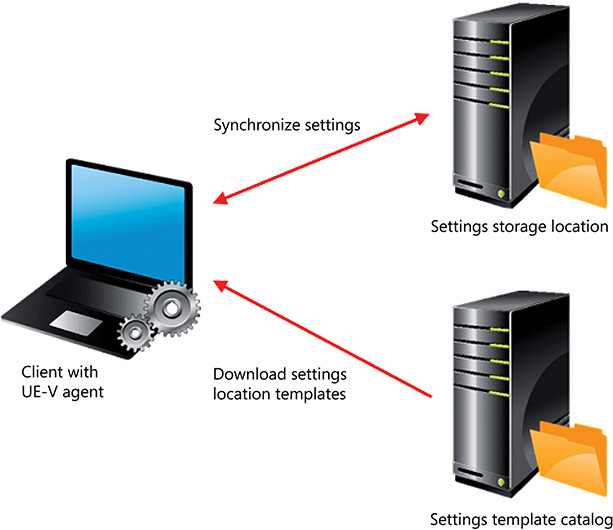
You must install the UE-V agent on every computer that will synchronize settings. The UE-V agent monitors changes to settings and synchronizes them between computers. It stores settings on a network location called the settings storage location, and it periodically synchronizes the local cache with the settings storage location. When you start an application, the UE-V agent applies settings from the local cache, and when you close an application, the UE-V agent stores the application settings to the settings storage location. Application settings are available for synchronization as soon as you close an application. However, remember that when you start an application, settings from the local cache, not settings from the settings storage location on the network, are used by default. In an environment in which a computer has permanent network connectivity, you can modify this behavior and always use the settings from the settings storage location on the network. Operating system settings apply when a user logs on, when a computer is unlocked, or when a user connects remotely to a computer. The UE-V agent saves settings when a user logs off, when a computer locks, or when a remote session disconnects.
A settings storage location is the network location where the UE-V agent stores the settings that are synchronized. Administrators can specify this location during UE-V agent installation, in AD DS as a user’s home folder, or by using Group Policy. The settings storage location can be on any file share where users have read and write access. The UE-V agent verifies the location and creates a hidden system folder named SettingsPackages, where settings are stored.
A settings location template is an XML file that specifies the settings locations where values are stored on a computer, not the settings values. Only settings defined in the settings location templates are captured and applied on UE-V client computers. Several settings location templates, such as Microsoft Office 2010, Office 2007, Windows Internet Explorer 8, Internet Explorer 9, Internet Explorer 10, and desktop settings, are included with UE-V. You can create additional settings location templates by using the UE-V Generator. The UE-V Generator is included as part of UE-V.
A settings template catalog is a folder that stores settings location templates. This usually is a shared folder, although a settings template catalog also can be a local folder. By default, a UE-V agent reads new or updated settings location templates from this folder once per day. This is done by a scheduled task named Template Auto Update that runs daily at 3:30 A.M., and it applies the changes (modified, added, or removed templates) to the UE-V agent. If only the default settings location templates are used, the settings template catalog isn’t used.
Desktop app settings, Windows settings, and Windows Store app settings are stored in settings packages, which the UE-V agent creates in the settings storage location. A settings package is a collection of settings that is defined in the settings location templates. A UE-V agent that runs on one computer reads and writes to a settings storage location independently of UE-V agents that run on other computers. The most recent settings and values are applied when the next UE-V agent synchronizes with the settings storage location.
UE-V includes several operating system and application settings location templates. When you need to synchronize the settings of additional applications, you can use the UE-V Generator to create additional custom settings location templates. The UE-V Generator monitors the registry, the HKEY_CURRENT_USER registry subtree, and file systems, including the AppDataRoaming and AppDataLocal folders in user profiles, to discover where application settings are stored. You can modify a generated template and include it in the settings template catalog. You also can use the UE-V Generator for editing existing templates or for validating templates that were created in another XML editor.
Comparing user state virtualization options
When you want to synchronize settings among the different devices to which a user logs on, you can use different solutions such as roaming user profiles, a Microsoft account, or UE-V. Table 2-4 summarizes the capabilities of each of these technologies.
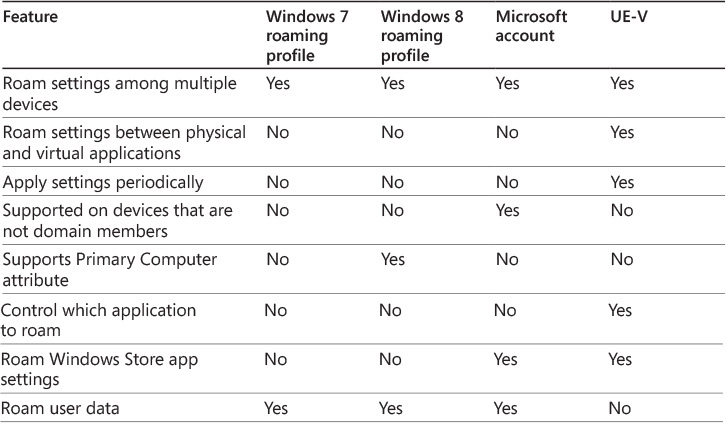
A Microsoft account is the only solution that can synchronize settings even if devices are not domain members. However, it requires Internet connectivity because it stores settings in the cloud. You can synchronize Windows Store app configurations only when logging on with a Microsoft account or by using UE-V. When a user has a Microsoft account linked to his domain account, UE-V will synchronize desktop app settings only. You can use a Microsoft account and OneDrive synchronization to synchronize other settings. With UE-V 2.1, administrators can configure whether Windows Store apps will synchronize by using UE-V or a Microsoft account.
Roaming user profiles can synchronize only the entire profile, including the settings and data that are stored in the profile. You can’t control which settings you want to synchronize. In contrast, in Windows 8 and Windows 8.1 you can control the devices on which you want to synchronize settings by configuring the Primary Computer user Active Directory attribute. Roaming user profiles copy to a file server only when users log off, and they do not synchronize periodically. When you configure Folder Redirection, redirected folders are exempt from this copying.
If you use UE-V to synchronize settings, you must install a UE-V agent on the device. UE-V can synchronize only those settings that are defined in the settings location templates, and it’s the only solution that can synchronize settings between physical and virtual applications. In addition, UE-V is the only solution that applies settings periodically, not only when the user logs on. UE-V isn’t included in the operating system, and you must obtain and license it separately. In contrast, roaming user profiles is a feature of domain-member devices that run any version of the Windows operating system.
Preparing to deploy UE-V
Before you deploy the UE-V agent to client computers, you need to prepare the necessary infrastructure. This includes:
• Configuring the settings storage location.
• Configuring the settings template catalog.
• Adding UE-V Group Policy administrative templates.
The settings storage location for UE-V is the file system location where the settings for a user are stored. You can configure either user home directories or a network share as the settings storage location. You can configure the UE-V agent with the settings storage location by using an installation parameter, a Windows PowerShell cmdlet, or Group Policy settings.
If you choose user home directories as the settings storage location, the home directory for each user must be defined in the AD DS user object for each user. The NTFS and share permissions that allow users to create and modify files in their home folder also are sufficient for UE-V.
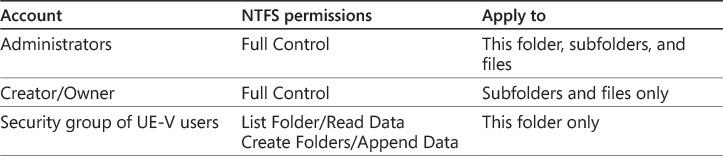
If you choose a network share at the settings storage location, you need to ensure that the share has the correct permissions. Both Administrators and a security group containing the UE-V users should have Full Control share permissions on the network folder. The NTFS permissions for the root folder are described in Table 2-5.
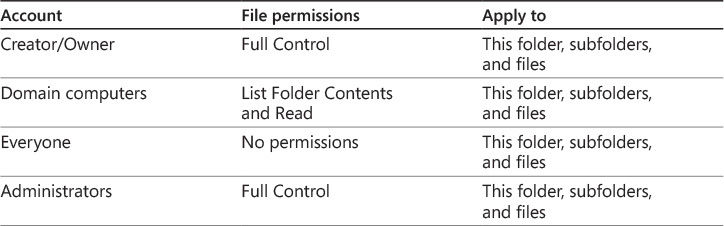
A settings template catalog is required if you want to use UE-V to synchronize other application settings in addition to the settings that are provided by default. The settings template catalog is a network share where custom settings location templates are stored. If your UE-V deployment will use the settings template catalog, you should create and share a folder with the appropriate permissions, as shown in Table 2-6 and Table 2-7. You can configure the UE-V agent with the settings template catalog location by using an installation parameter, a Windows PowerShell cmdlet, or Group Policy settings.

Most configuration of the UE-V agent is performed by configuring Group Policy objects with the appropriate settings. Windows Server does not include the UE-V configuration options in the Group Policy editor by default. You need to add the Group Policy administrative template for UE-V to enable the UE-V configuration options in the Group Policy editor.
Typically, larger Windows-based networks have configured a central store for Group Policy administrative templates. The central store lets you place the administrative templates in a single location, and they are available throughout the domain. If you have configured a central store, the administrative templates are copied to %SystemRoot%SYSVOL<AD DS name>PoliciesPolicyDefinitions on a domain controller. The template files will be replicated to all domain controllers. If you have not configured a central store for administrative templates, then copy the administrative templates to %SystemRoot%PolicyDefinitions on the computer you’re using to edit the Group Policy object.
Administrative templates are .ADMX and .ADML files. You can download the administrative templates for UE-V from the Microsoft Download Center at http://go.microsoft.com/fwlink/?LinkID=510001.
Deploying the UE-V agent
You can deploy the UE-V agent by using almost any software or operating system deployment tool, such as manual installation or Group Policy, or by including it in a standard desktop image. Table 2-8 describes the installation methods and when you would use each.
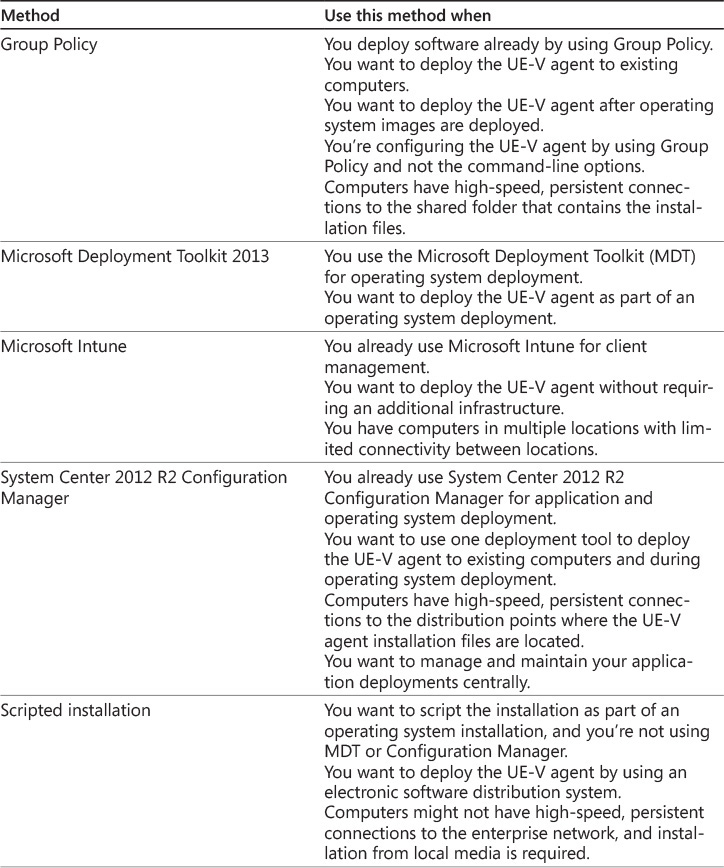
You can install the UE-V agent by running AgentSetup.exe, AgentSetup32.msi, or AgentSetup64.msi. AgentSetup.exe detects the appropriate processor architecture and runs the correct .MSI file. If you run the .MSI file directly, you need to ensure that you have selected the correct .MSI for the processor architecture.
You can include command-line parameters during installation to configure the UE-V agent. For example, you can use the /norestart parameter to prevent the installation from restarting the computer after installation. The command-line parameters can be used for AgentSetup.exe or the MSI files.
The following example shows how to use AgentSetup.exe to perform an installation that installs silently, does not restart the computer after installation, and creates a logfile:
AgentSetup.exe /quiet /norestart /log "%temp%UE-VInstall.log"
The following example shows how to use AgentSetup64.msi to perform an installation that installs silently, does not restart the computer after installation, and creates a logfile:
msiexec.exe /i "<path to msi>AgentSetup64.msi" /quiet /norestart /l*v "%temp%
UE-VInstall.log"
![]() For more information about the command-line parameters you can use for installing the UE-V agent, see Deploy Required Features for UE-V 2.x on TechNet at http://technet.microsoft.com/en-us/library/dn458891.aspx.
For more information about the command-line parameters you can use for installing the UE-V agent, see Deploy Required Features for UE-V 2.x on TechNet at http://technet.microsoft.com/en-us/library/dn458891.aspx.
Inside OUT: Defining the settings storage location with %username%
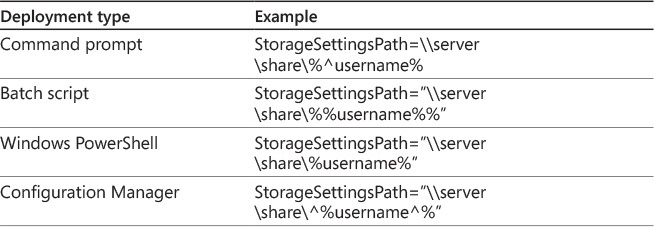
After the UE-V agent installs, you must restart the computer to make the UE-V agent operational. After the installation, a new service named User Experience Virtualization is installed. Also, the following six scheduled tasks are added:
• Collect CEIP Data
• Monitor Application Settings
• Sync Controller Application
• Synchronize Settings at Logoff
• Template Auto Update
• Upload CEIP Data
These tasks periodically synchronize the local cache with the settings storage location, check for updates in the UE-V settings location templates, and upload data if you joined the Customer Experience Improvement Program (CEIP). The UE-V agent installation also installs the Company Settings Center, which you can use to control which settings UE-V should synchronize, to trigger the synchronization manually, and to view the synchronization status of UE-V.
Managing the UE-V agent
After installing the UE-V agent, you can manage it by using Group Policy or Windows PowerShell. Windows PowerShell is useful when you’re working with a single client computer, but to configure large numbers of computers, Group Policy is preferred. After you install the UE-V Group Policy .admx and .adml files, the Microsoft User Experience Virtualization node appears under PoliciesAdministrative TemplatesWindows Components in the Group Policy Management Editor window for both Computer Configuration and User Configuration. You can configure certain UE-V Group Policy settings only for computers, some only for users, and some for both. Table 2-10 lists the Group Policy settings you can configure.

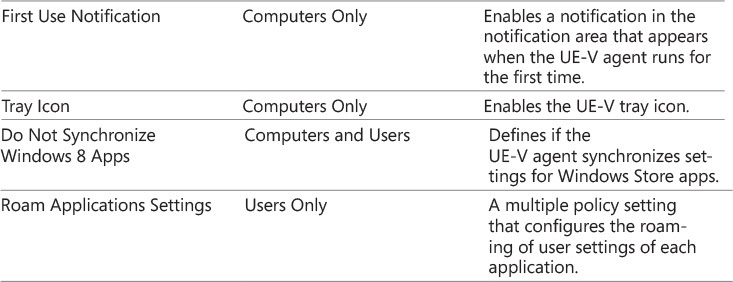
When you install the UE-V agent, it includes the UE-V module for Windows PowerShell. This module includes 20 cmdlets for managing the UE-V agent. Some of the cmdlets are listed in Table 2-11. To get a list of all available UE-V cmdlets, run the following command:
Get-Command -Module uev
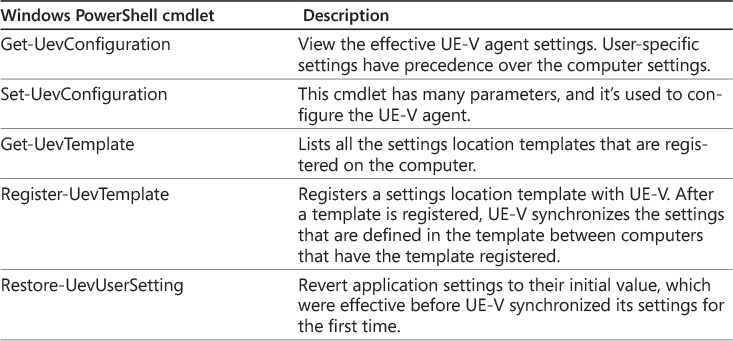
UE-V settings that can be configured in different places have the following order of precedence:
1. User-targeted settings that are managed by Group Policy
2. Computer-targeted settings that are managed by Group Policy
3. Configuration settings that are defined by the current user who uses Windows PowerShell or WMI
4. Configuration settings that are defined for the computer that uses Windows PowerShell or WMI
This means that if the same UE-V settings are configured in multiple places, configuration in the user part of Group Policy has precedence over configuration in the computer part of Group Policy. Group Policy has precedence over locally configured settings.
Managing default settings location templates
UE-V only synchronizes settings that are defined in the locations specified by the settings location templates. Settings location templates are XML files that specify, for each application, where in the registry and on the file system the application stores its settings. UE-V includes several predefined settings location templates, and administrators can create additional templates for custom applications. Not all application settings can safely roam between computers. Settings that synchronize by using UE-V must meet the following criteria:
• Settings must be stored in an accessible location UE-V can synchronize settings only in the HKEY_CURRENT_USER registry subtree and the AppDataRoaming or AppDataLocal folders in a user profile. If an application stores its settings in other locations, you can’t synchronize its settings by using UE-V.
• Settings should not be specific to a particular computer Some settings, such as network configuration, are relevant only for a certain computer and should not synchronize with other computers.
• Settings must synchronize without the risk of corrupting data For example, if settings are stored in a database file, these settings should not synchronize by using UE-V. You should consider another solution, such as storing the database file with configuration settings on a network location.
When you install a UE-V agent, it includes settings location templates for operating system settings and common Microsoft applications. You can view the list of registered settings location templates by running the Get-UevTemplate cmdlet, as shown in Figure 2-13. The settings location templates included with the UE-V agent are stored in the Microsoft User Experience VirtualizationTemplates folder.
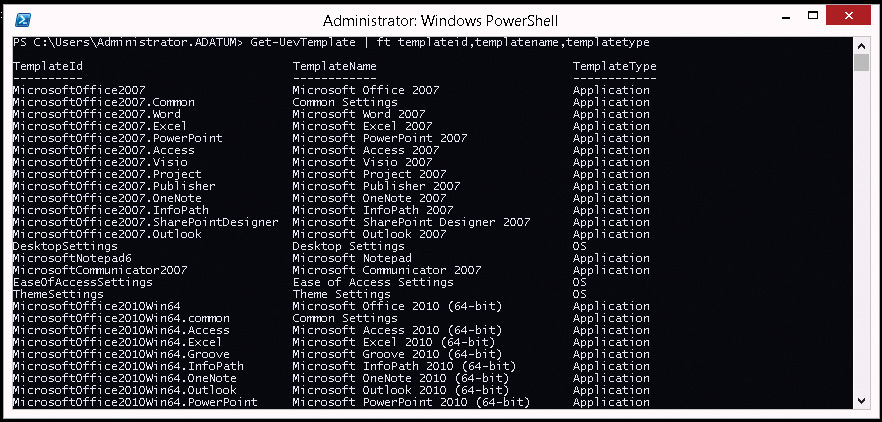
The default settings location templates in UE-V 2.0 enable synchronization of the following settings:
• Office 2007 configuration
• Office 2010 configuration
• Internet Explorer options (Internet Explorer 8, 9, 10, 11)
• Windows accessories (Calculator, Notepad, Wordpad)
• Desktop settings (desktop background, folder options, region and language settings)
• Ease of access feature configuration
Synchronization is enabled for the following applications by default. However, you can use Group Policy to disable synchronization for the default applications:
• Calculator
• Internet Explorer 8, 9, 10, 11
• Internet Explorer Common Settings
• Microsoft Office 2007 Applications (Word, Excel, and so on)
• Microsoft Office 2007 Common Settings
• Microsoft Office 2010 Applications (Word, Excel, and so on)
• Microsoft Office 2010 Common Settings
• Notepad
• Wordpad
Also, users can control which settings are synchronized by using the Company Settings Center. The Company Settings Center is added as part of the UE-V agent installation. It can be accessed from the Start screen or from the UE-V notification icon. Users can enable and disable the synchronization of Windows settings and application settings, as shown in Figure 2-14.
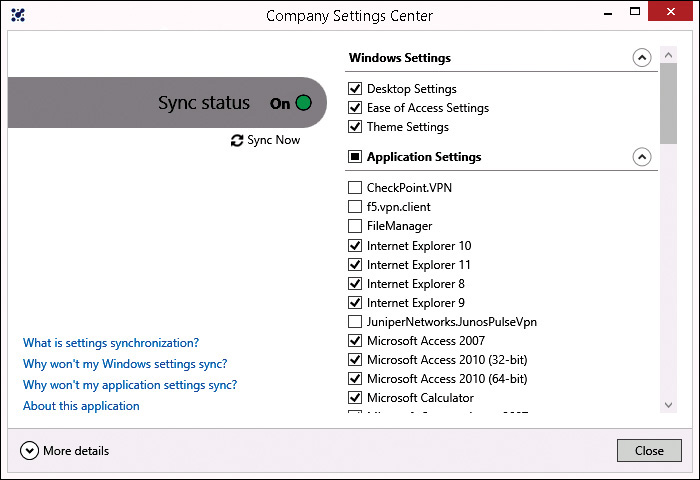
UE-V also synchronizes Windows Store app settings. Settings location templates aren’t used for Windows Store apps because they synchronize only the settings that were configured to synchronize by the application developer. You can run the Windows PowerShell cmdlet Get-UevAppxPackage to view the list of Windows Store apps and their synchronization status.
You can use Group Policy to disable synchronization for some Windows 8 apps. Figure 2-15 shows the Windows 8 apps that are synchronized by default.
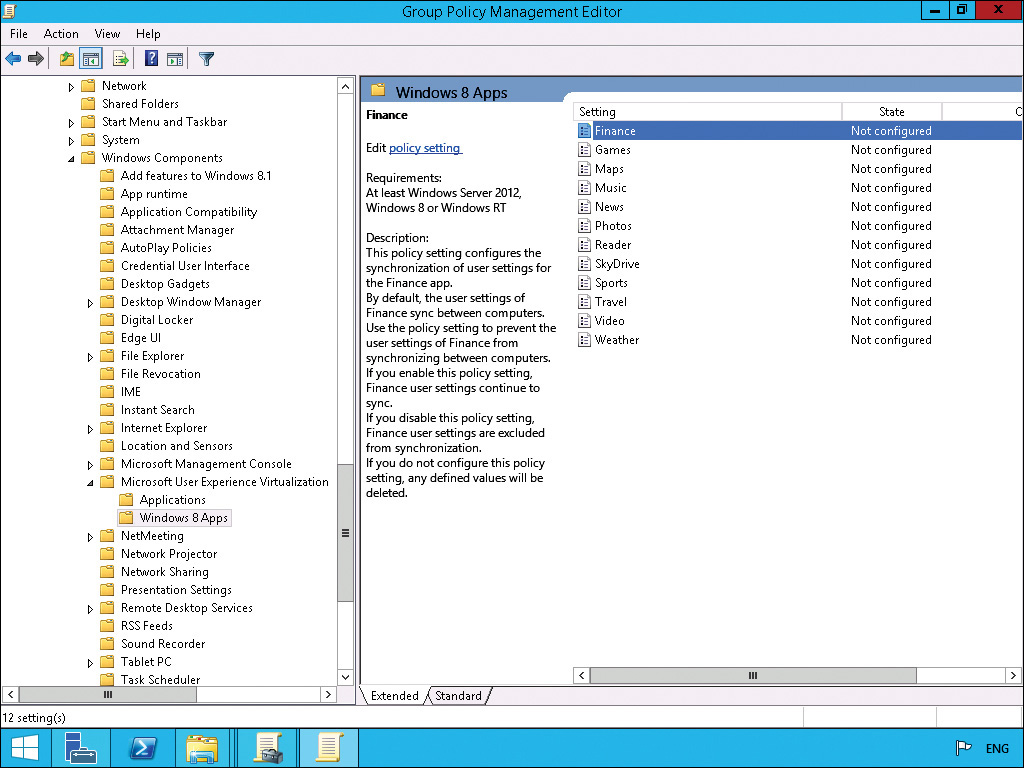
Creating and managing custom settings location templates
If you want to synchronize application settings that default settings location templates do not cover, then you must obtain or create additional settings location templates. You can obtain custom settings location templates online from the UE-V 2.0 template gallery. If a custom settings location template isn’t available, you must create your own template by using the UE-V Generator.
When you need to create custom settings location templates for an application, you can use the UE-V Generator to monitor where the application stores its settings and generate a settings location template. You can use the UE-V Generator only for locally installed applications. You can’t use the UE-V Generator for applications delivered by App-V or RemoteApp. You also can’t use the UE-V Generator for Java applications or Windows 8 apps.
The UE-V Generator isn’t installed by default. You need to install it from the MDOP installation DVD. To install the UE-V Generator, run ToolsSetup.exe from the MDOP installation DVD or select it from the installation menu on the DVD, as shown in Figure 2-16.
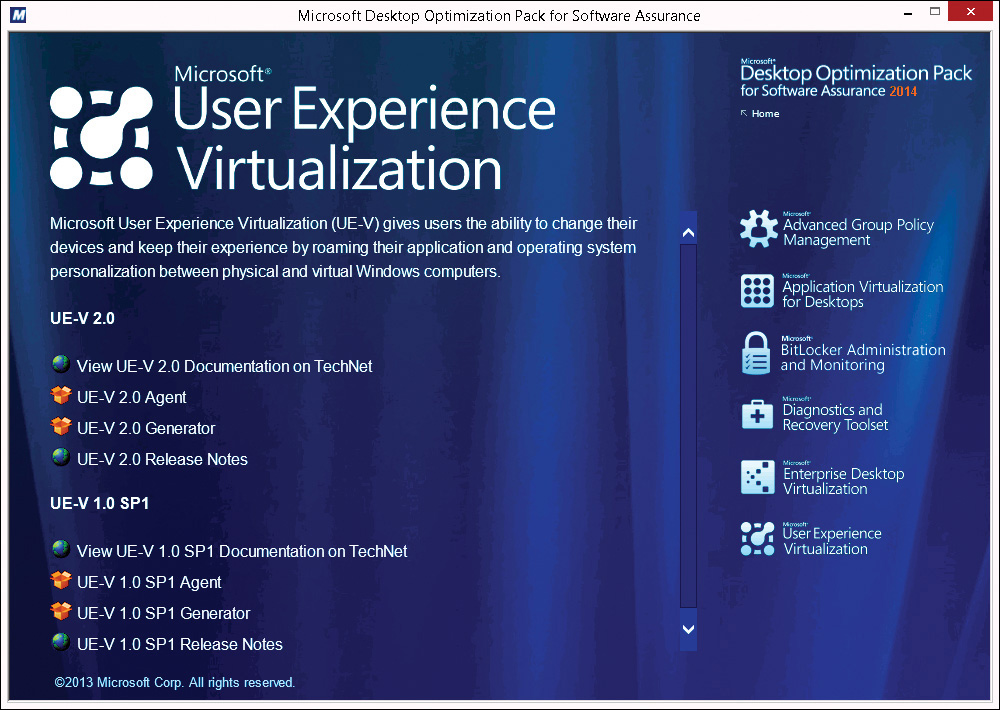
To create a custom settings location template by using the UE-V Generator, perform the following steps:
1. Click the Start button, type User, and click Microsoft User Experience Virtualization Generator.
2. In the Microsoft User Experience Virtualization (UE-V) Generator window, click Create A Settings Location Template.
3. In the Create A Settings Location Template Wizard, on the Specify Application page, shown in Figure 2-17, enter the following items and click Next:
![]() File Path This is the path to the application executable that will be monitored.
File Path This is the path to the application executable that will be monitored.
![]() Command-Line Arguments This is any additional command-line arguments that need to be passed to the executable for it to function properly. In most cases, this box will be blank.
Command-Line Arguments This is any additional command-line arguments that need to be passed to the executable for it to function properly. In most cases, this box will be blank.
![]() Working Folder Some applications require you to provide a folder in which the application starts to locate additional files that the application uses. In most cases, when required, this will be the folder in which the executable is located.
Working Folder Some applications require you to provide a folder in which the application starts to locate additional files that the application uses. In most cases, when required, this will be the folder in which the executable is located.
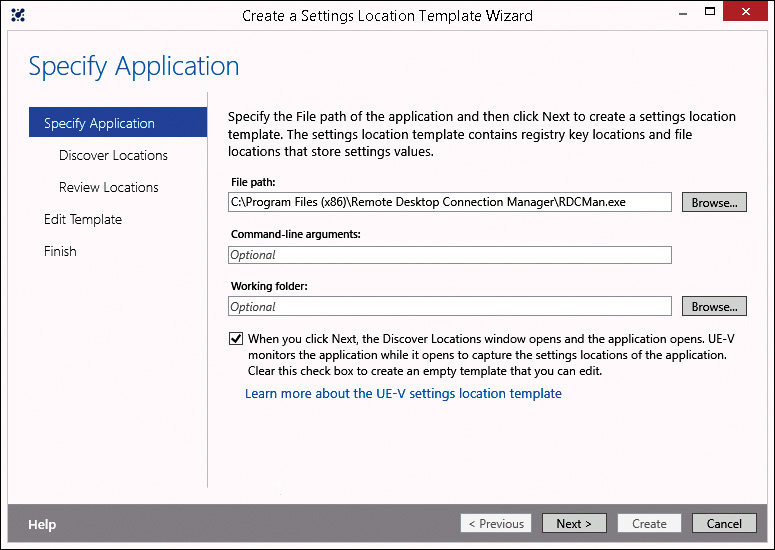
4. Wait while UE-V Generator starts the application and monitors the settings locations.
5. After the application has completely started, close the application.
6. When location discovery is complete, click Next.
7. On the Review Locations page, you can review the registry and file locations that were identified by monitoring, as shown in Figure 2-18.
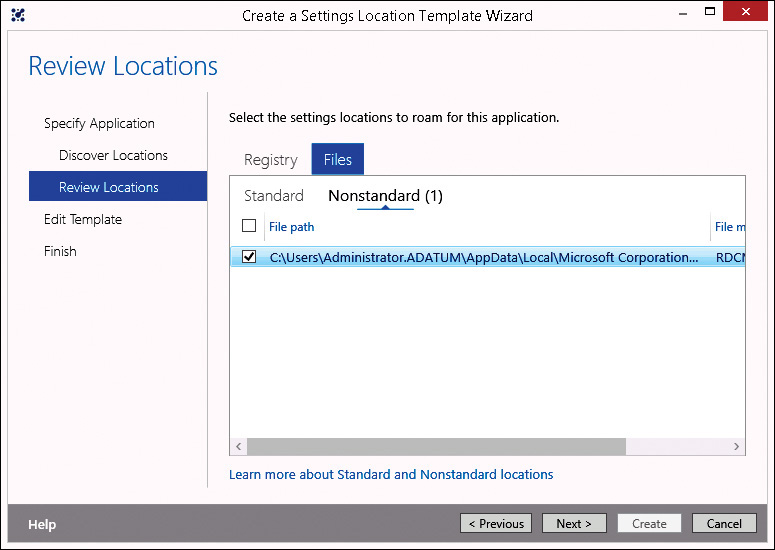
8. Select the check boxes for the files and registry locations that you want to roam as part of the application and click Next. Standard locations are selected by default. Nonstandard locations must be selected.
9. On the Edit Template page, as shown in Figure 2-19, you can edit the template information before it’s created.
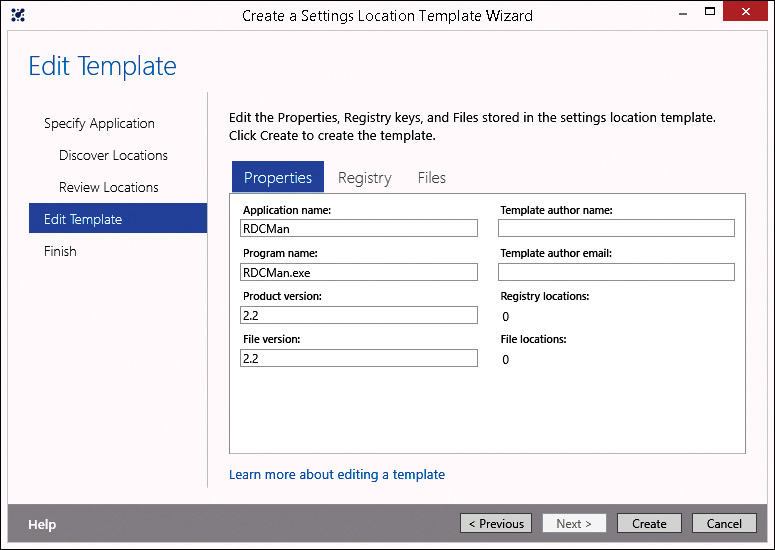
![]() On the Properties tab, you can modify Application properties such as the application name. Most of this information is gathered from properties of the executable file and does not need to be modified.
On the Properties tab, you can modify Application properties such as the application name. Most of this information is gathered from properties of the executable file and does not need to be modified.
![]() On the Registry tab, you can modify the registry settings that are being synchronized. You can add or remove keys. You also can adjust the scope to identify whether subkeys should be included.
On the Registry tab, you can modify the registry settings that are being synchronized. You can add or remove keys. You also can adjust the scope to identify whether subkeys should be included.
![]() On the Files tab, you can modify the list of file locations. To add a specific file, add the folder that contains the file and enter the file name as the file mask. To include all files in a folder, leave the file mask empty.
On the Files tab, you can modify the list of file locations. To add a specific file, add the folder that contains the file and enter the file name as the file mask. To include all files in a folder, leave the file mask empty.
10. When eyou’re done editing the template, click Create.
11. In the Save As window, browse to the location where you want to save the file, enter an appropriate file name, and click Save.
12. On the Finish page, click Close.
The UE-V Generator creates an XML file that the UE-V agent uses to roam settings for the application. You always should test a custom settings location template before you make it available to users. When that testing is complete, you deploy the custom settings location template to the settings template catalog file share.
Because the settings template catalog is a network share, you can just copy the XML file that the UE-V Generator created to that network share. Each UE-V client computer has a Template Auto Update scheduled task that runs once daily and updates settings location templates on a client. You can force the UE-V agent to apply custom settings location templates from a catalog immediately by running ApplySettingsTemplateCatalog.exe or by using the Windows PowerShell cmdlet Register-UevTemplate.
You also can use the UE-V generator to edit and validate existing templates. The interface for editing an existing template is the same as that for creating a new template. You’re able to modify the file and registry locations for the application. Validating a template is done when you have manually edited the XML in a template. When you validate a template, you’re verifying that it’s still in the proper format.