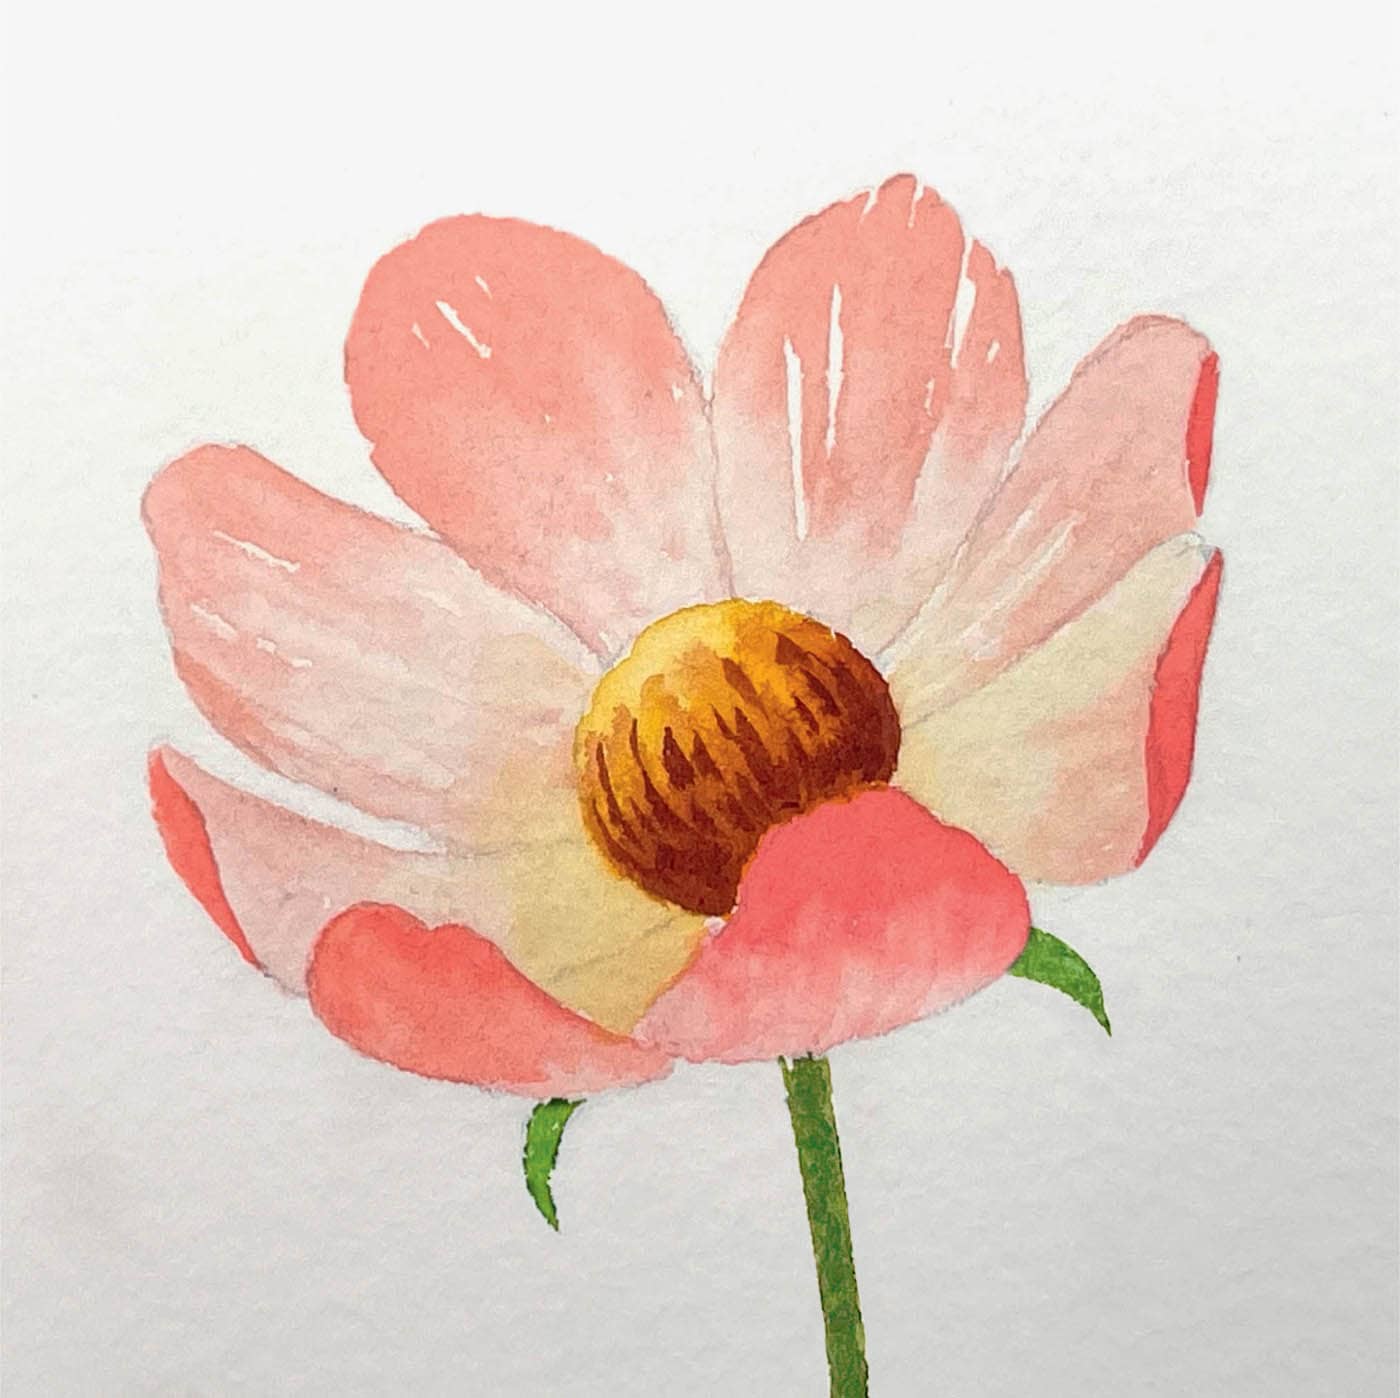
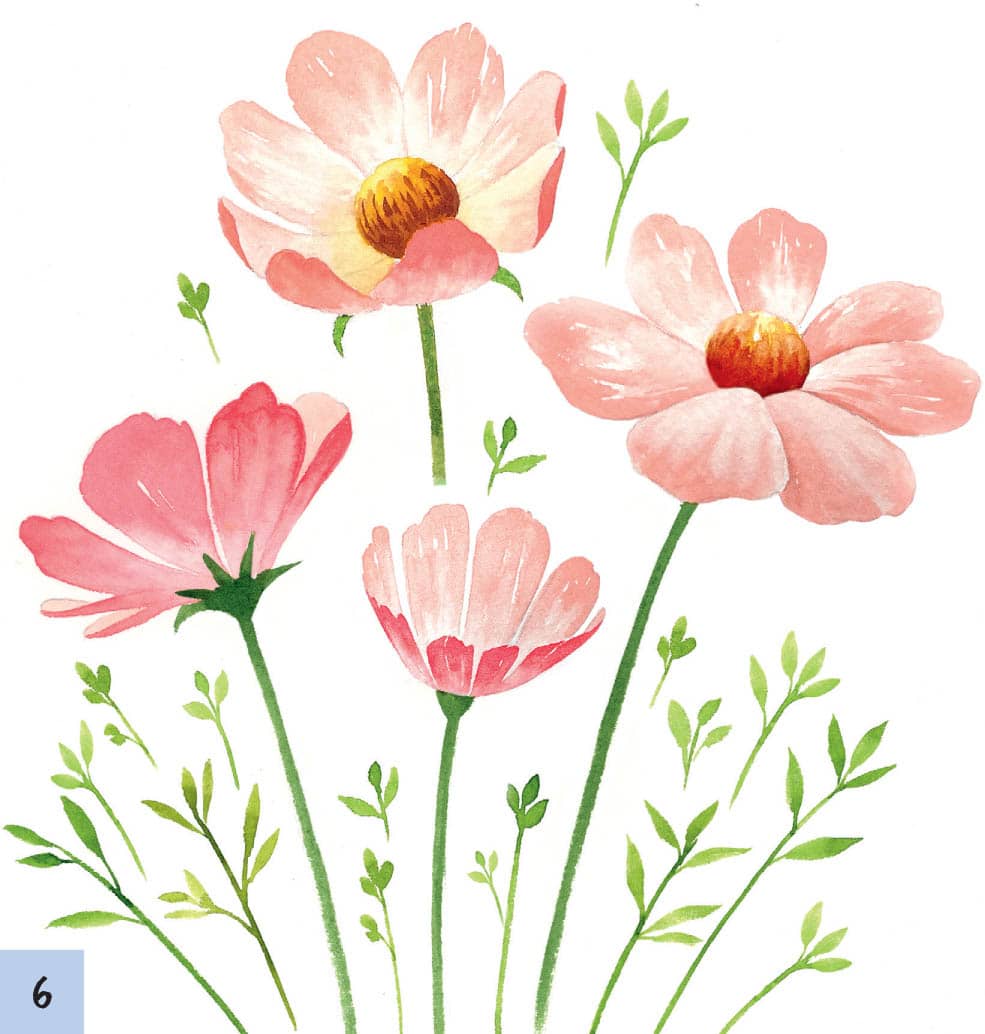
The cosmos has a simple shape, but the number of petals makes it look complicated. However, the flower’s balanced form makes it easy for beginners to draw and paint.
SKETCH THE FLOWERS
You’ll learn how to sketch a cosmos in four different angles using the three-step method.
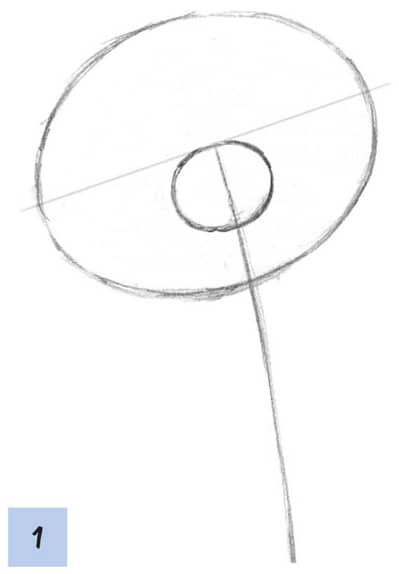
Angle A
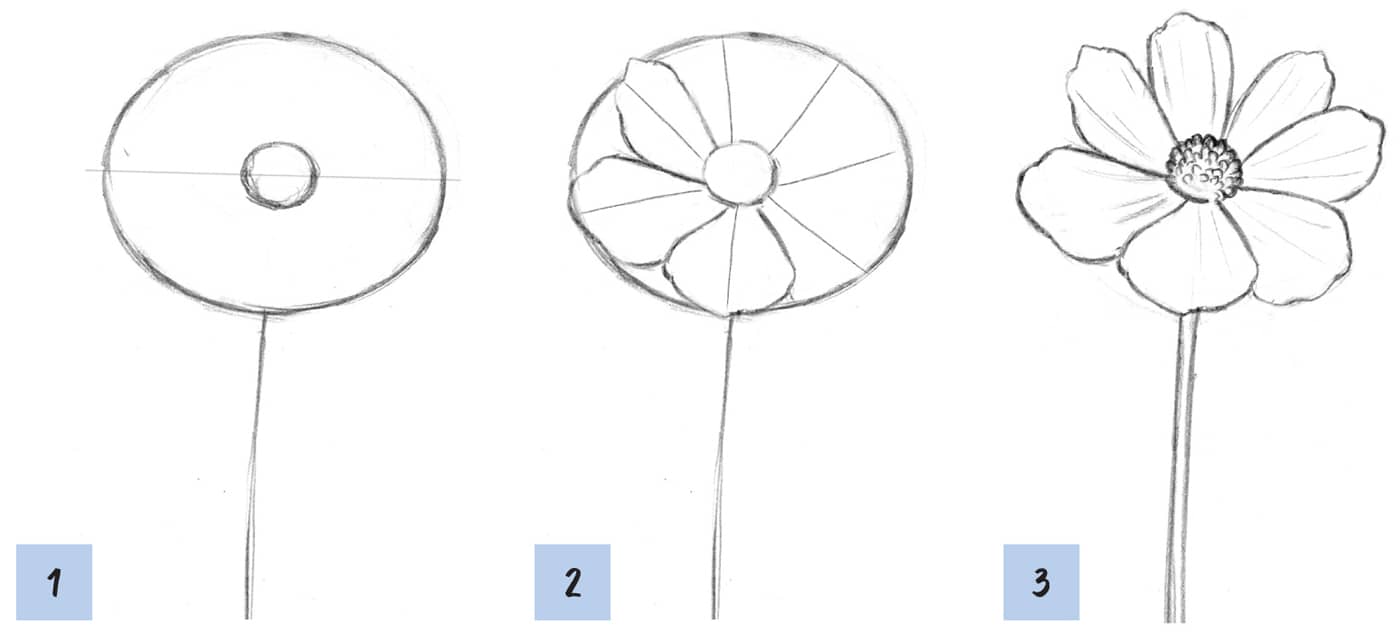
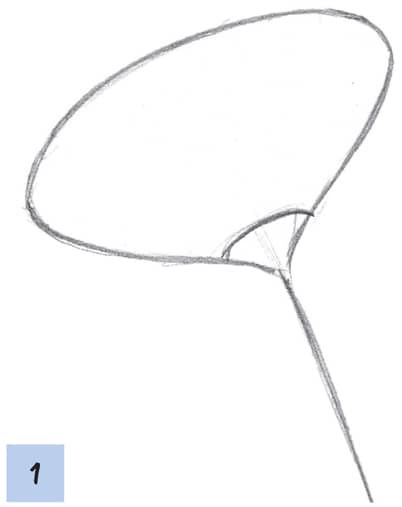
1Draw a long, horizontal oval and draw a guideline through the center. Draw a small circle just below the guideline of the larger oval. Draw the stem, creating a line slightly slanting to the right.
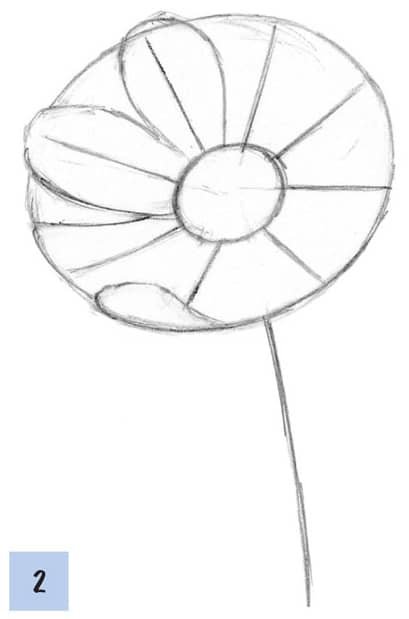
2Draw eight guidelines radiating from the center circle to mark the positions of the flower petals. Use the guidelines to draw each flower petal. Notice that some petals are curved, and some curve so much that the reverse side of the petal shows.
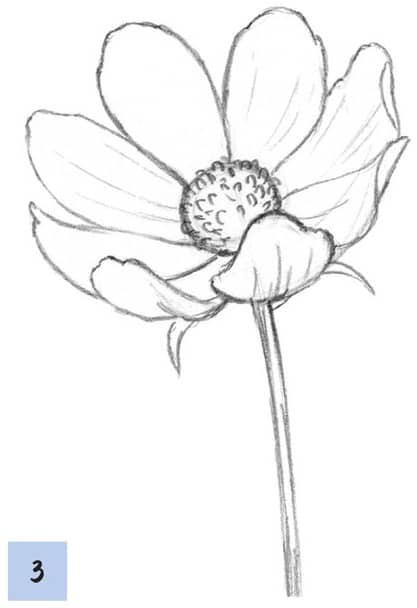
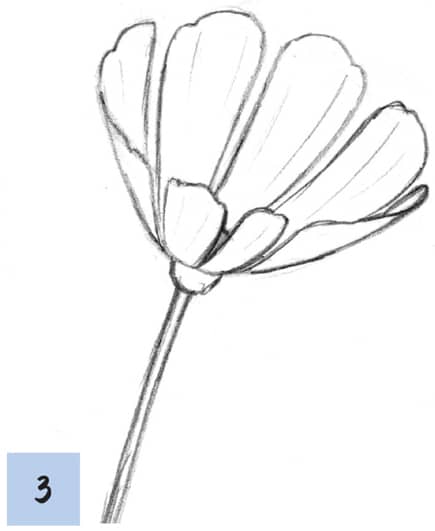
3Draw a detailed outline of petals, creating some with folded tips that show the reverse side. Add some thickness to the stem and draw a sepal to make a complete cosmos. Erase the guidelines.
Angle B
Draw the flower using the three-step method following Angle A, steps 1 to 3. For this flower, draw seven petals. While these petals are flat, notice that some overlap.
Angle C
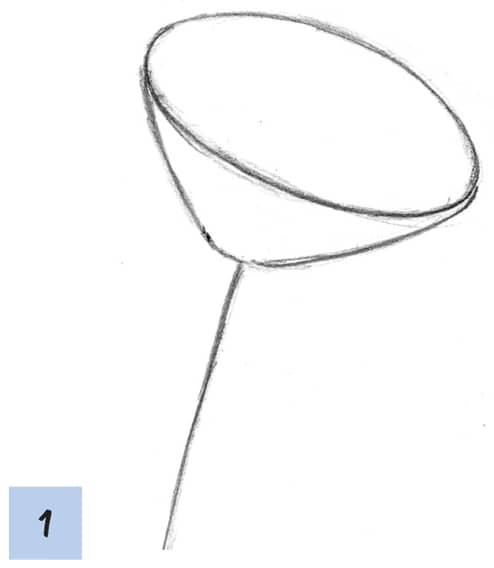
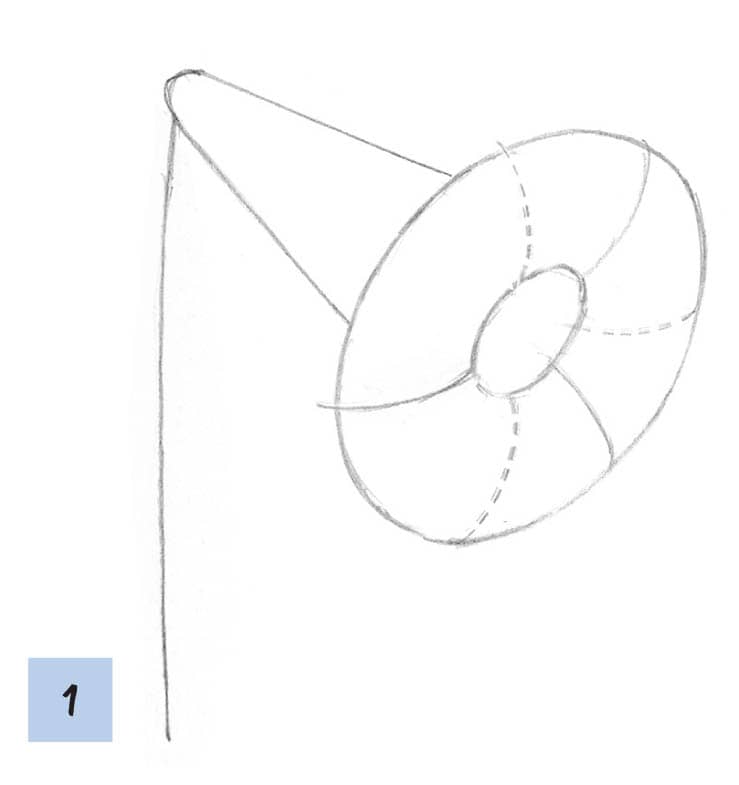
1Draw a horizontal oval and add a cone. Draw a stem slightly slanted toward the left.
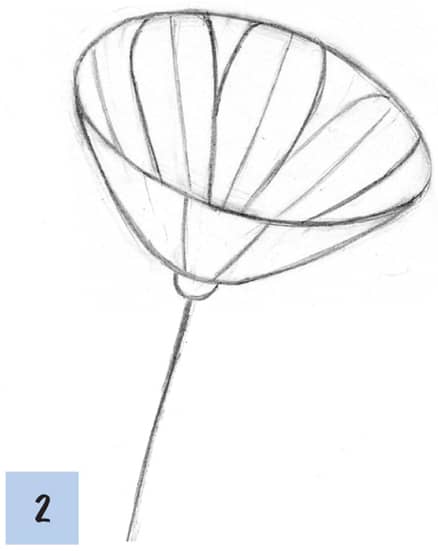
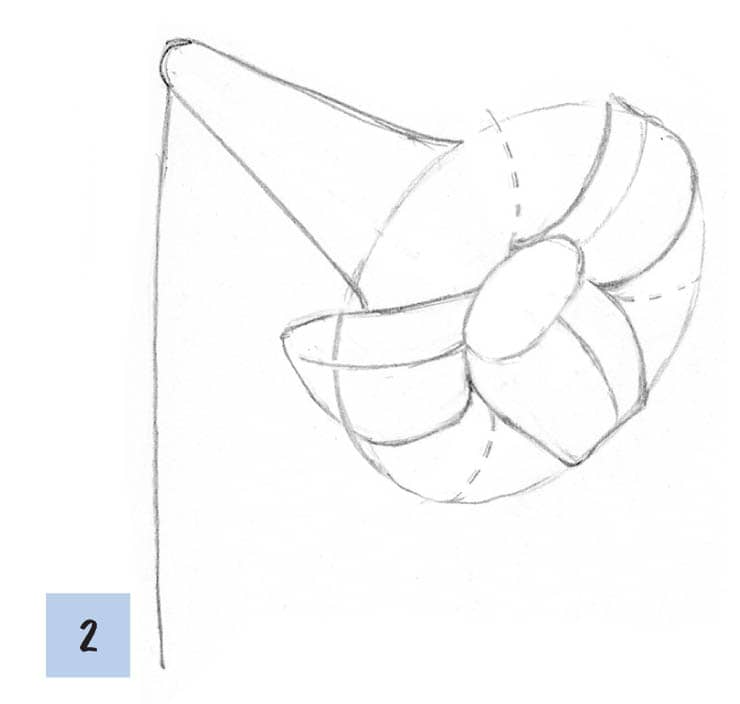
2Following the shape of the cone, draw six guidelines to mark the positions of flower petals. Use each guideline to draw the flower petals. Draw a sepal at the bottom of the cone.
3Add details to the shape of the flower petals. Make the tops of the petals a little uneven, and add lines to denote creases and emphasize the petals’ curves. Add thickness to the stem. Erase the guidelines.
Angle D
1Draw a curved cone shape. Unlike the cone in Angle C, which is three-dimensional, this one is flat. Draw a line slanted to the right for the stem.
2Draw four guidelines for the center flower petals (a). Draw two more guidelines for petals that will be outside the cone shape (b).
3Add details to the flower petals, again making the tips of the petals uneven and adding crease lines. Create a spiky sepal at the bottom of the cone. Add thickness to the stem and erase the guidelines.
PAINT THE FLOWERS
Angle A
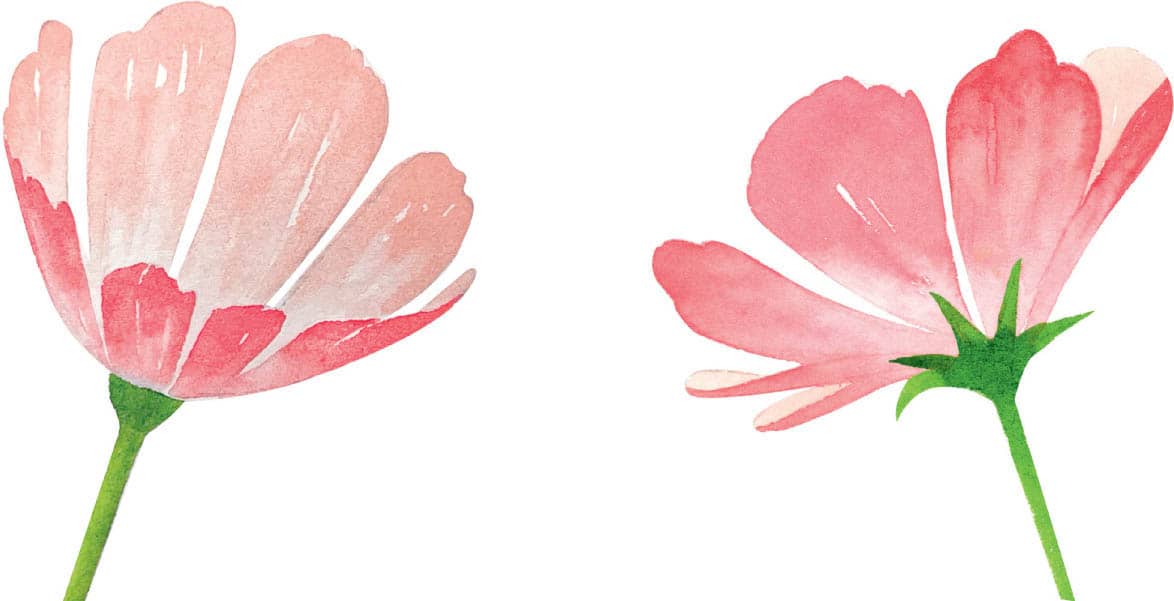
Using different colors on the front and back sides of petals gives flowers dimension and makes them come to life. In this section, you’ll learn how to use color effectively to differentiate the front and back sides of flower petals.
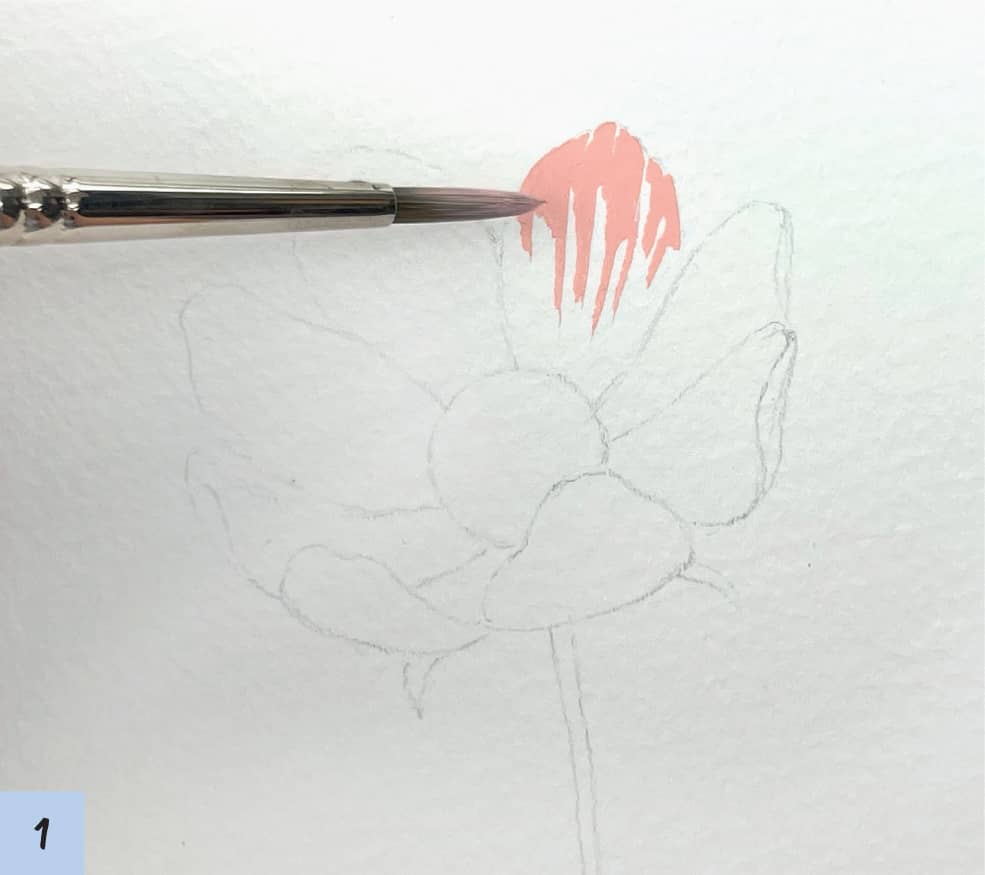
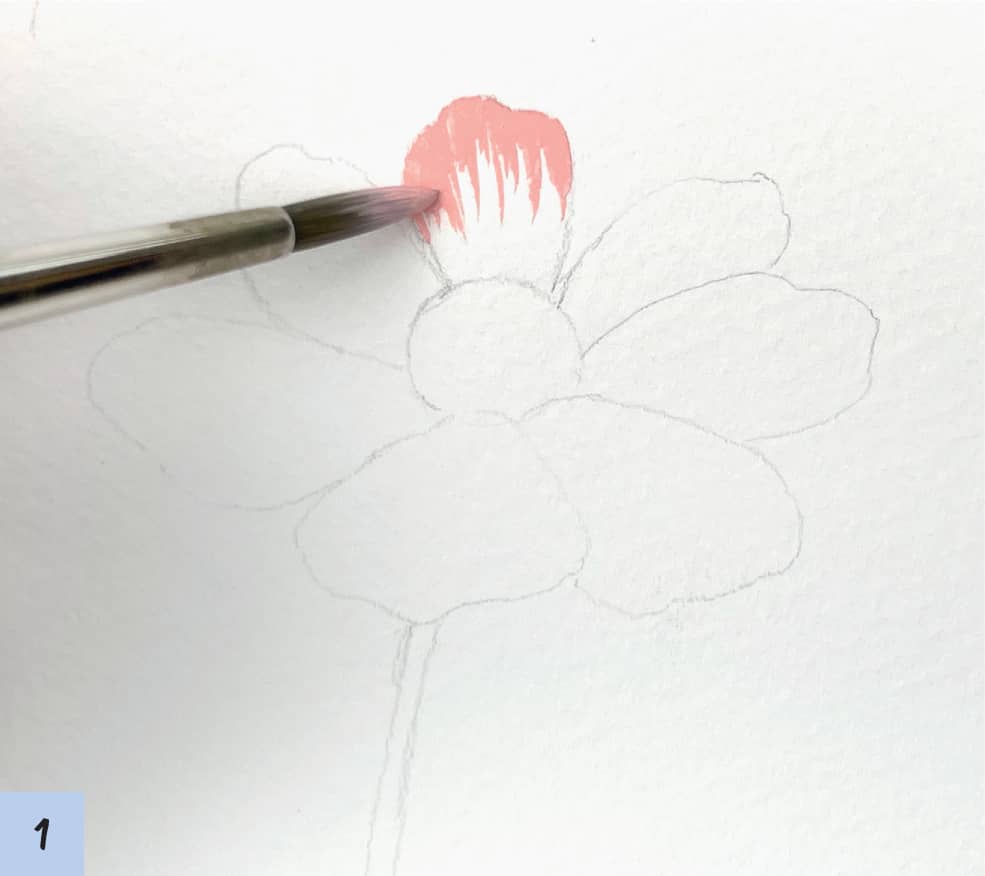
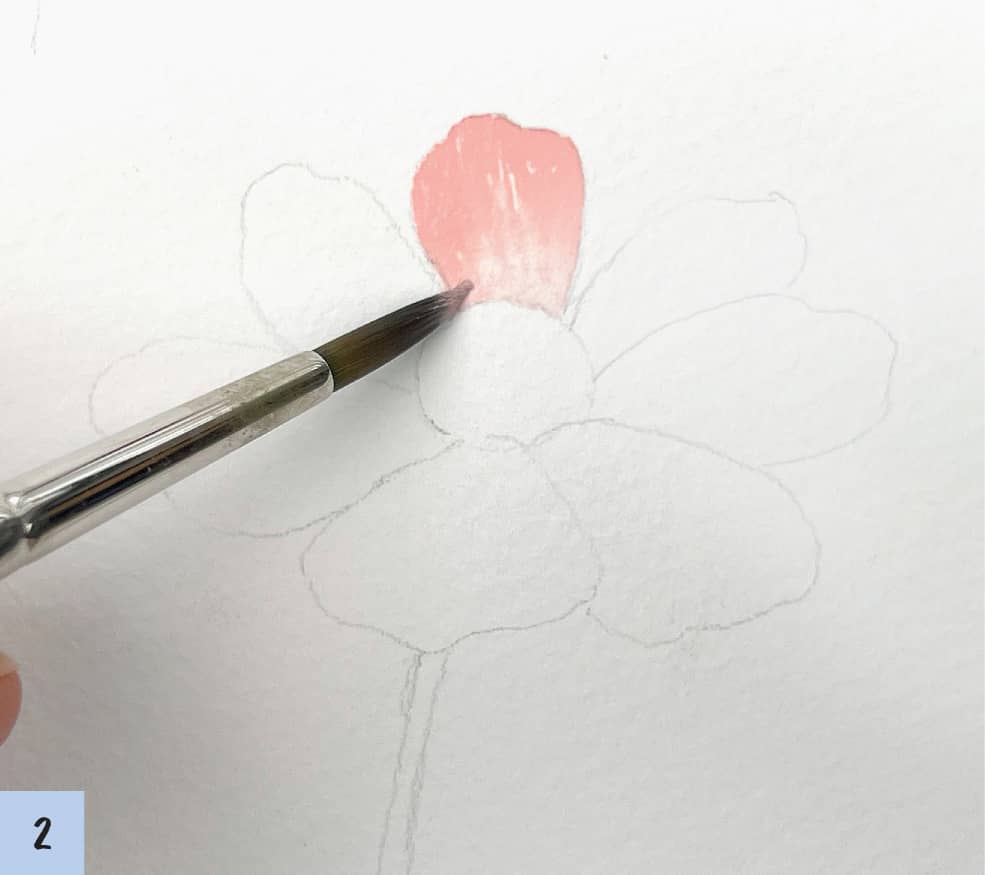
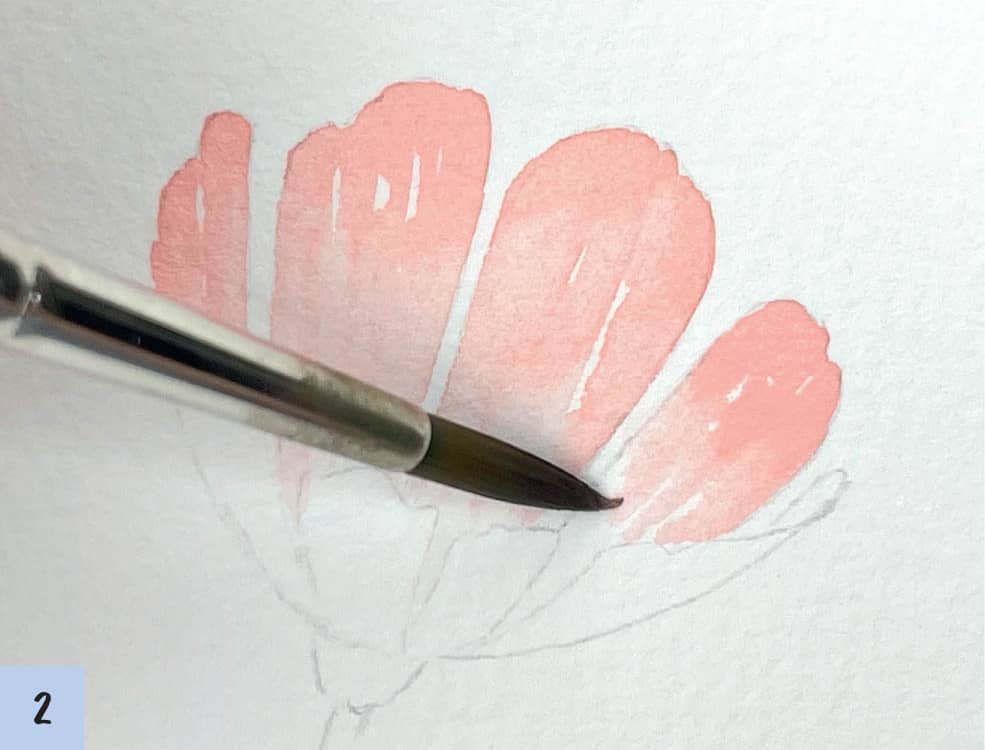
1Sketch the Angle A flower lightly on watercolor paper. Working wet-on-dry (see here), apply Level 4 density Shell Pink on the top portion of the flower petals. Instead of coloring the whole area, create streaked brush lines, leaving some portions of the petal uncolored (see “Gradient Techniques”).
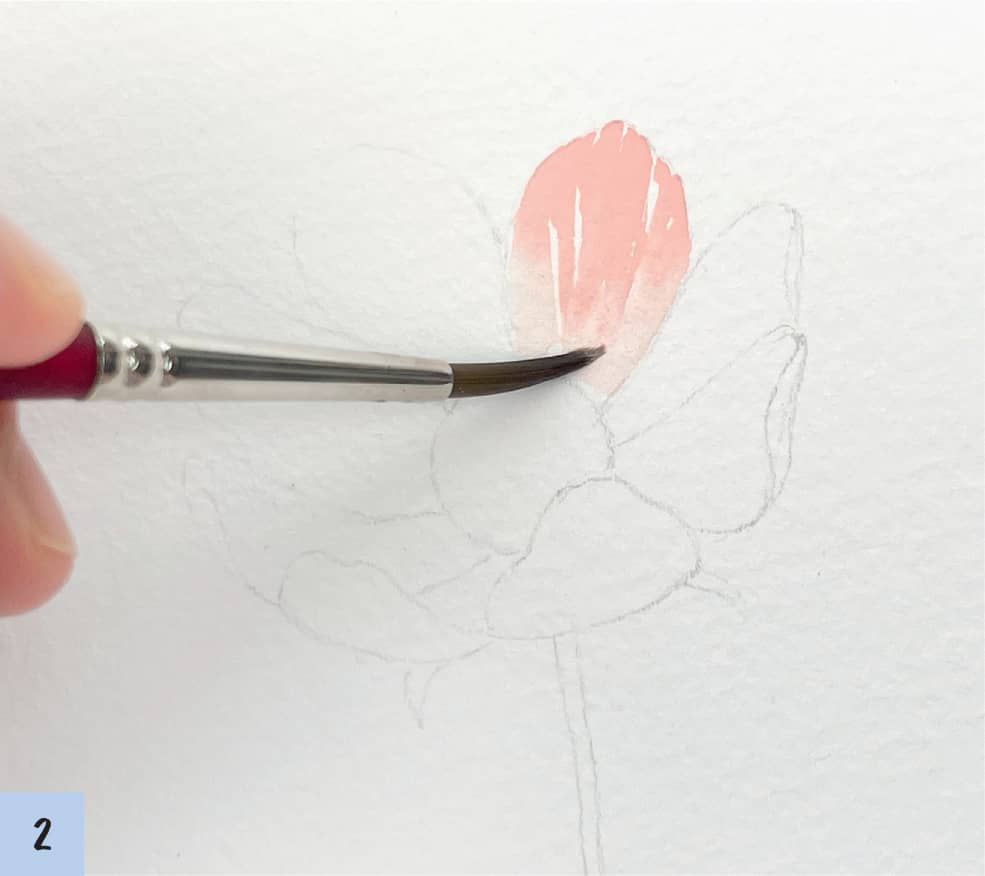
2Thoroughly wash the brush and absorb any surplus water with a paper towel. Don’t remove too much water, or the brush will be too dry; a gradient effect requires the brush to be somewhat wet. To create a gradient, drag the color down, moving the brush vertically. You should see the natural fading of the color. Leave some areas white.
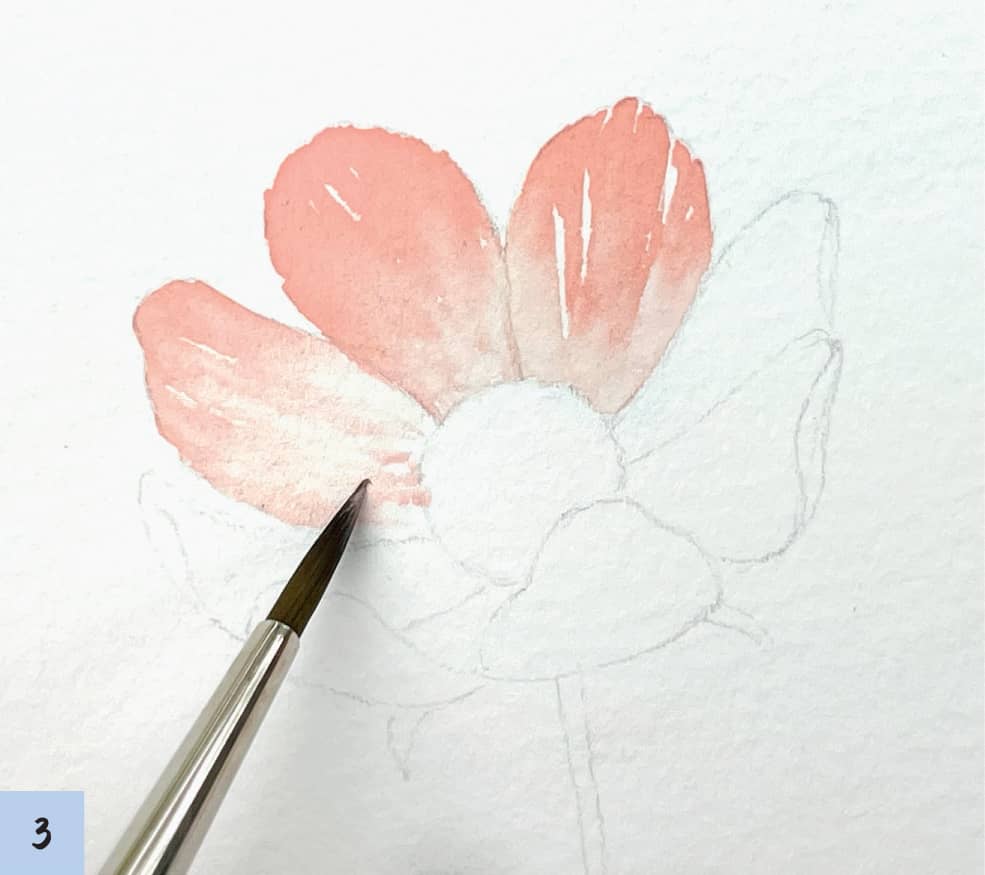
3Continue to use this gradient technique for all petals facing upward.
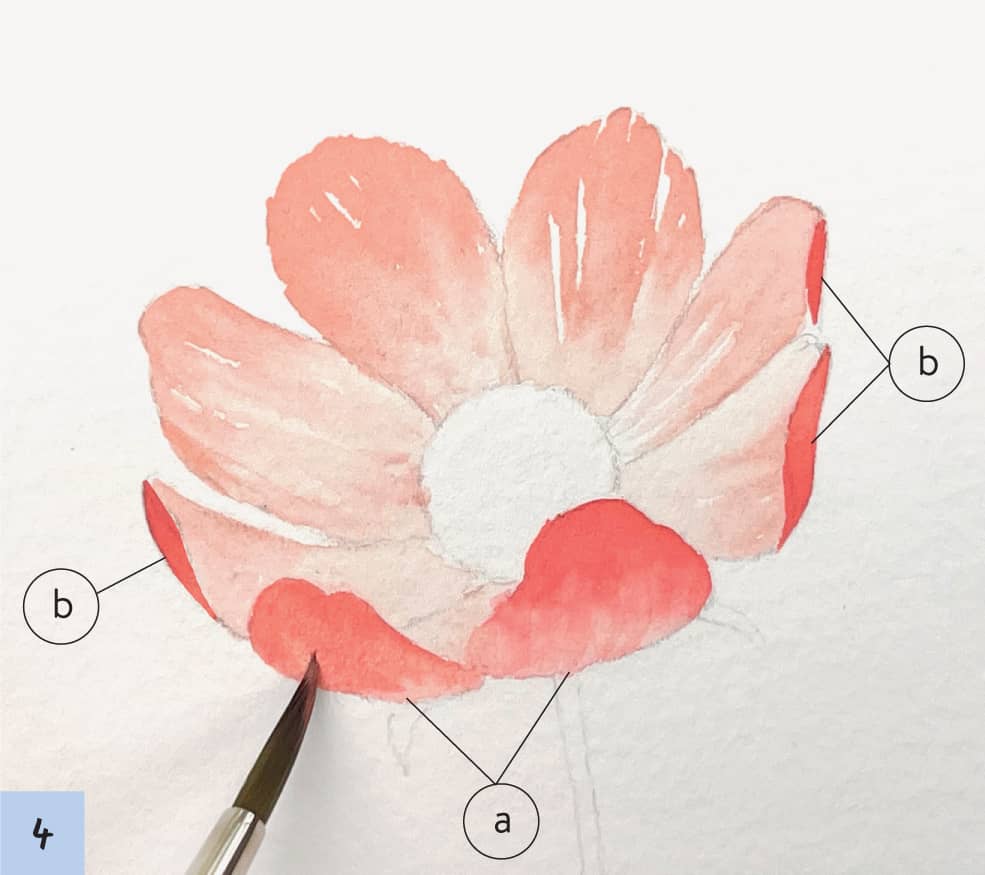
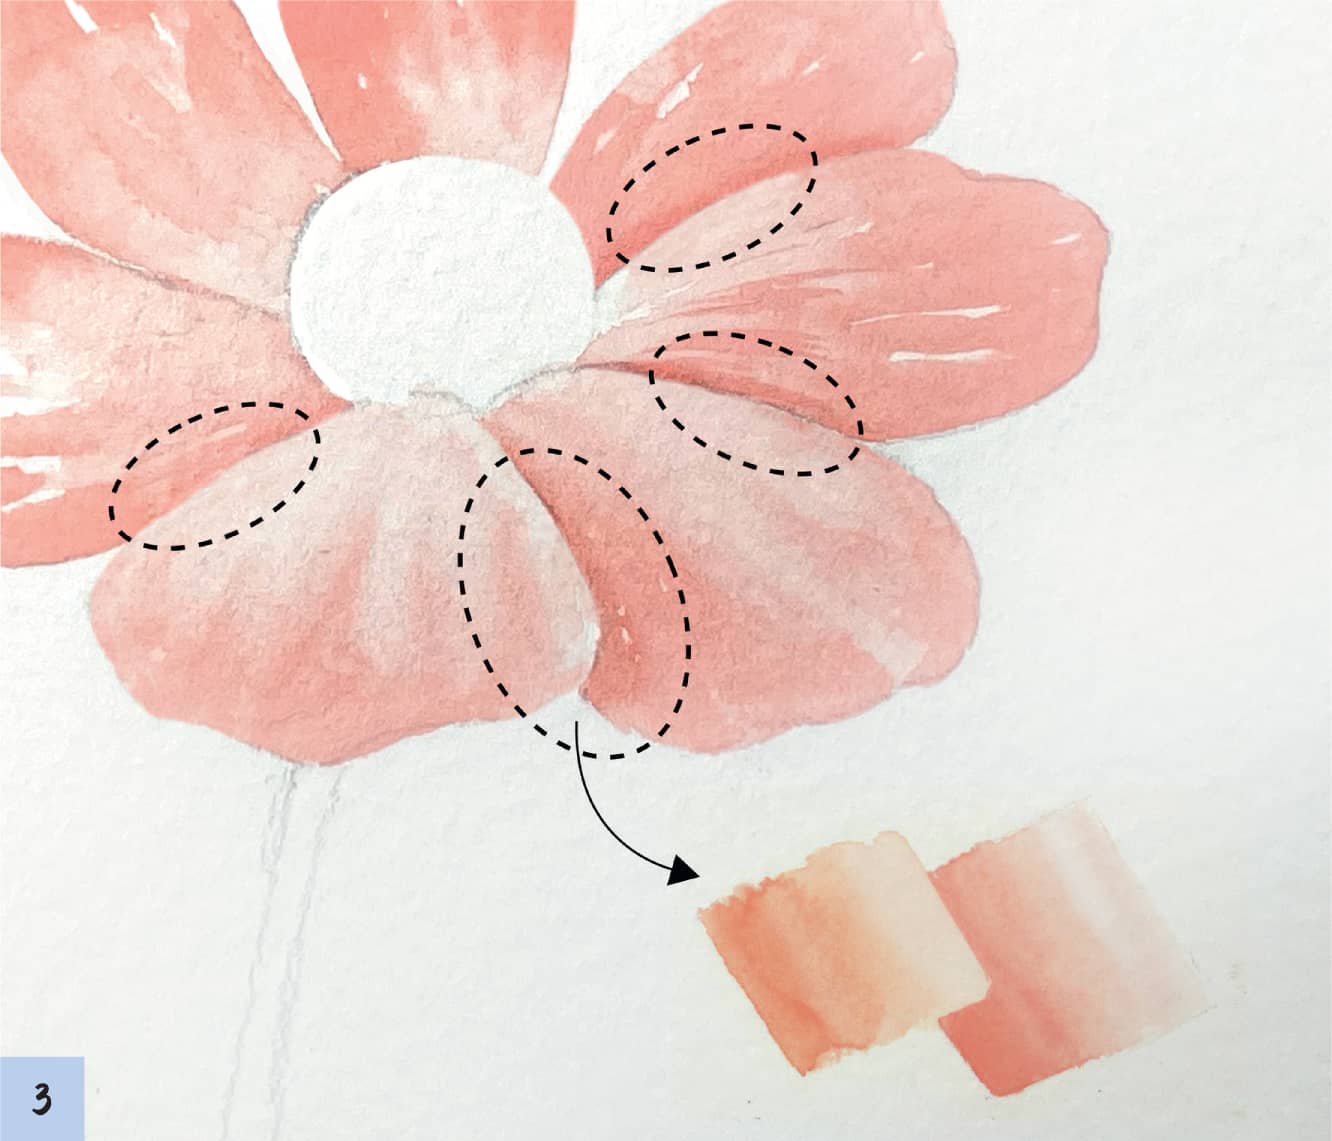
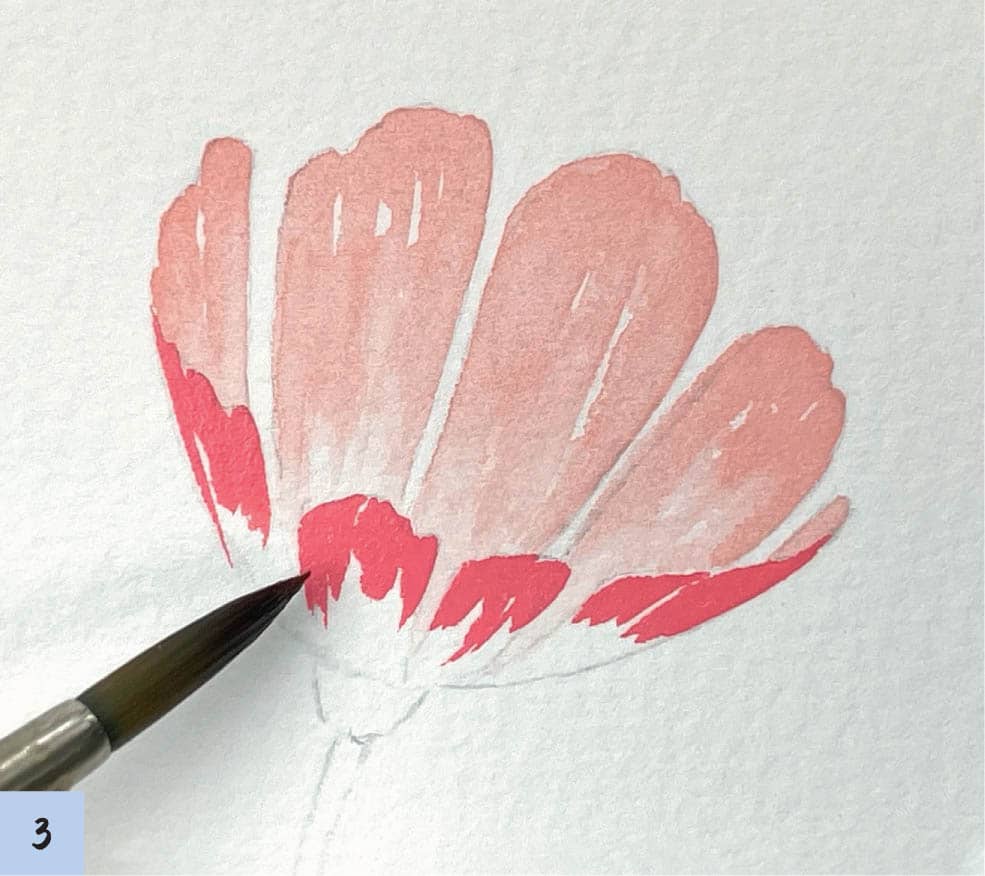
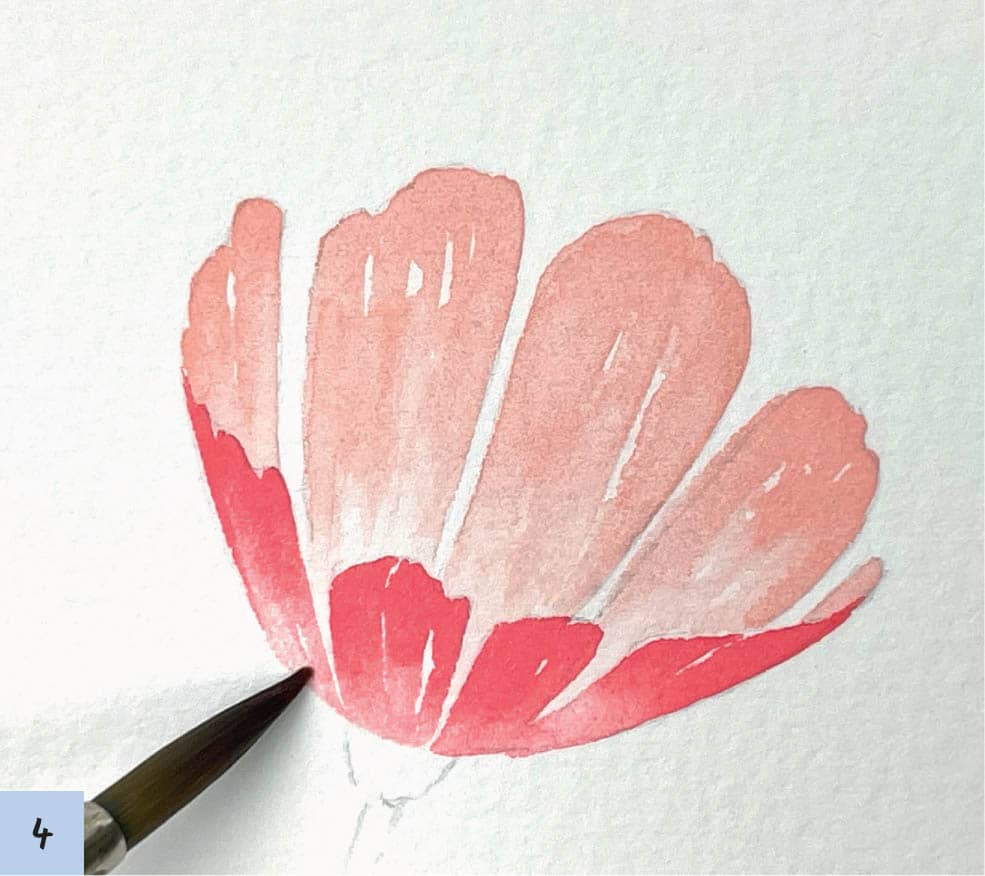
4For the back side of the flower petals, use a darker pink to distinguish them from the front side. Create a dark pink color by mixing these shades: Opera Pink (vivid, medium pink), Shell Pink (light peach-pink), and orange, in a 4:3:2 ratio. Using Level 5 density color, create a gradient for the largest reversed flower petals (a). Apply the color at the top of the petals, moving it down so it gradually becomes lighter toward the bottom. Apply Level 5 density dark pink on the other reversed petals (b) without creating a gradient.
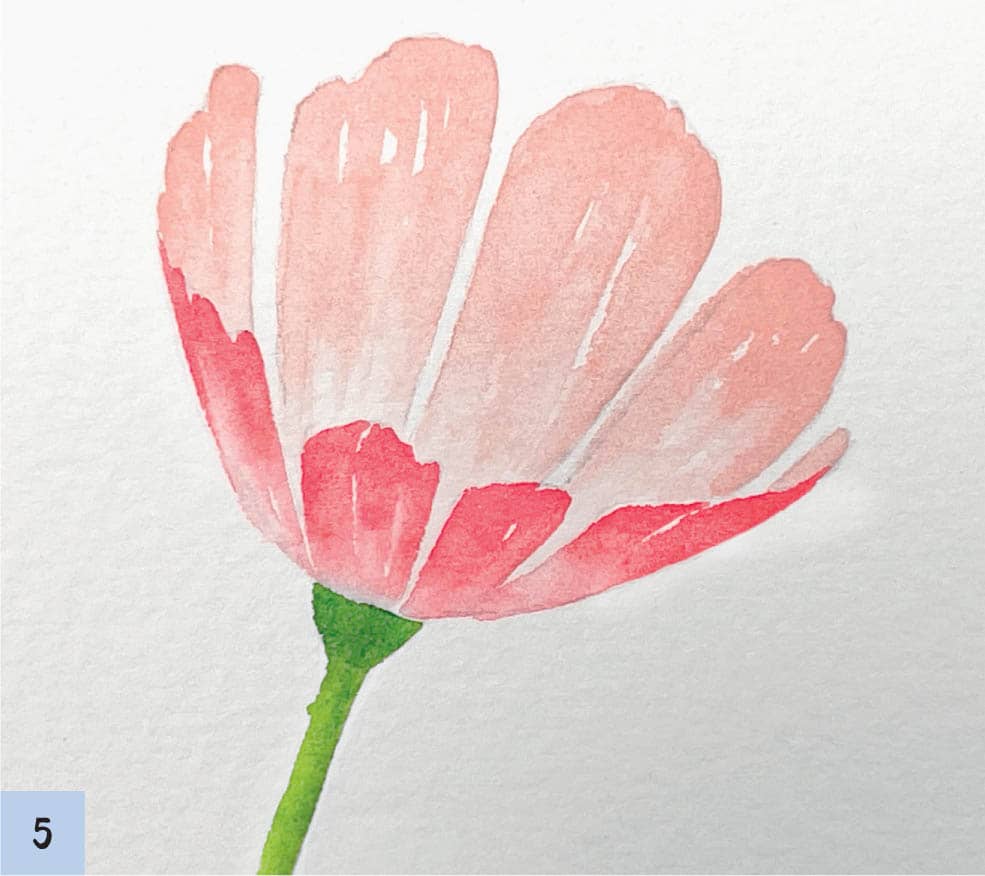
5Apply Level 5 density Permanent Yellow Light in the upper half of the circle and apply Level 3 density Light Red to the other half of the circle to make a gradient (see here). Before the color dries, add Level 5 density Light Red on the bottom edge of the circle (a). When the main color of the stamen is completely dry, use Level 5 density Light Red to fill the stamen, using short, random brushstrokes (b).
6Glaze the area around the stamen using Level 1 density Permanent Yellow Light (see “Glazing Technique”). Use the brush to blend the color out so there’s no definitive edge. Adding yellow to this area creates a warm mood.
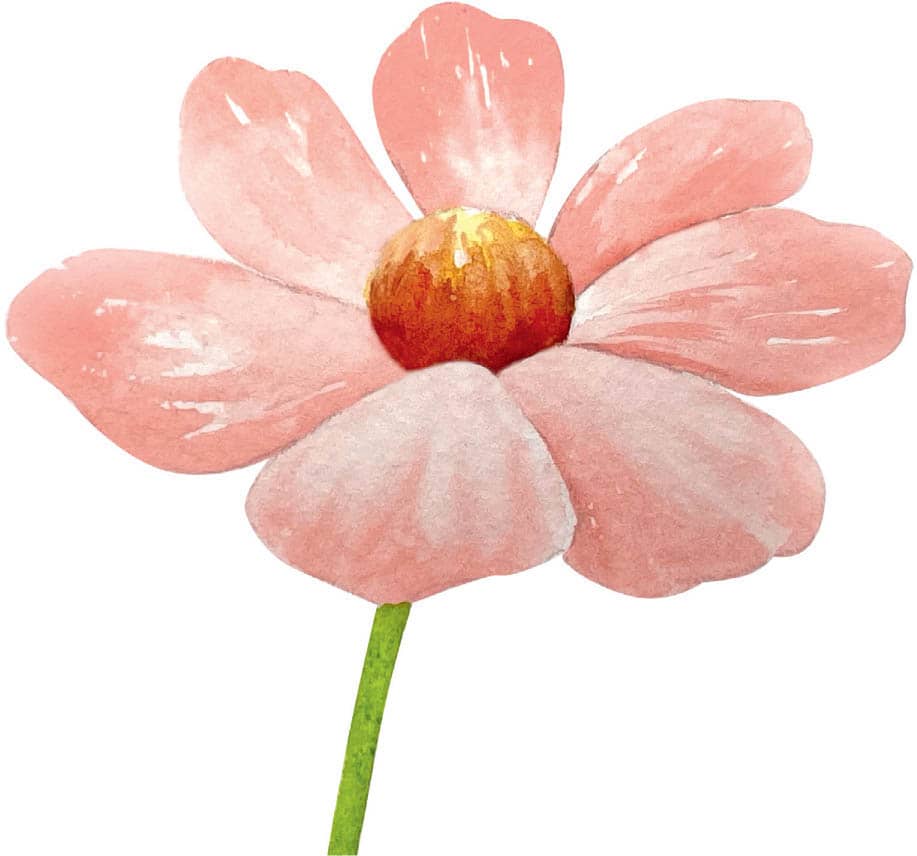
7Use Level 4 density Hooker’s Green on the stem and sepals to complete the flower (see the finished image, here).
Angle B
Sketch the Angle B flower lightly on watercolor paper. For the Angle B flower, the petals are flat and only show the front side. Here, you’ll learn how to shade two petals that overlap.
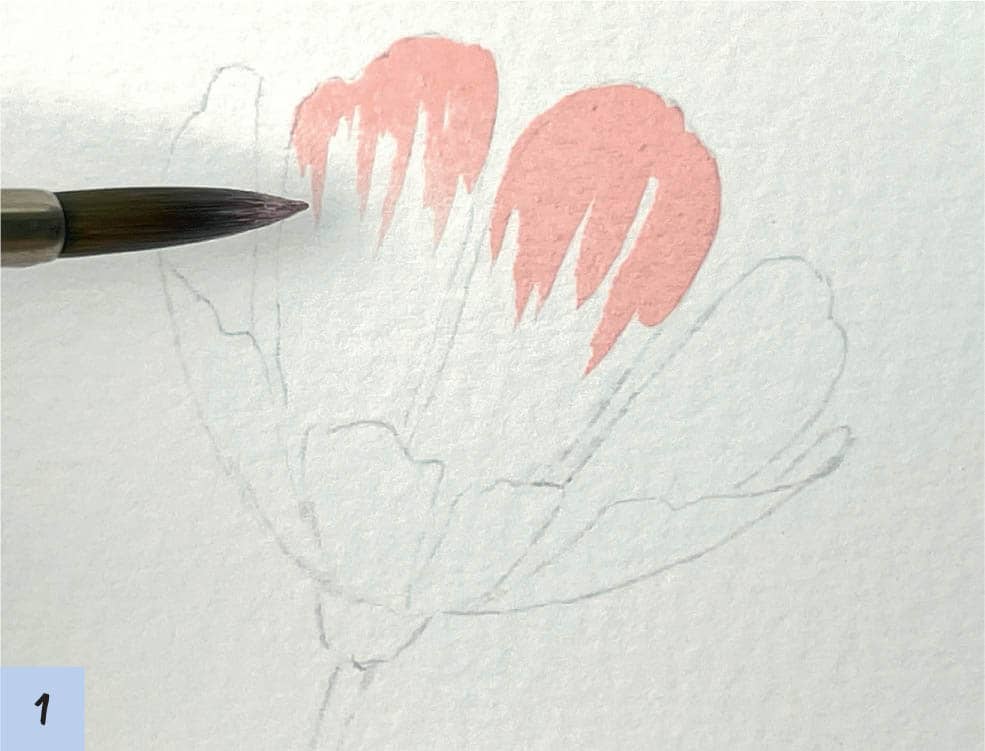
1The technique for coloring these petals is similar to the one used for creating the gradient for the Angle A flower. Working wet-on-dry, apply Level 4 density Shell Pink on the top half of petal. Create the same streaked effect as before, leaving some parts of the petal uncolored.
2Thoroughly wash the brush and absorb any excess water using a paper towel. As before, don’t remove too much water. Drag the color down by moving the brush vertically, fading the color toward the bottom.
3Notice where the petals overlap. Paint the top petal with Level 1 density Shell Pink, and paint the overlapped area on the bottom petal with Level 4 density Shell Pink. Refer to the gradient color swatch to see the differences in the values of the colors.
4Color the stem using Level 4 density Hooker’s Green.
Angles C and D
Sketch the Angle C and D flowers lightly on watercolor paper. Angles C and D show more of the backs of the petals, but the techniques are similar to what you’ve learned in Angles A and B. After painting the Angle C cosmos, try painting Angle D on your own.
1Color the top portion of the flower petal using Level 4 density Shell Pink, using the gradient technique. Once you get used to this method, you can color two or three petals together, as shown.
2Thoroughly wash the brush and absorb most of the water with a paper towel, as before. Move the brush down the petal vertically, dragging the color to create the gradient.
3Create the same dark pink shade as in Angle A, step 4. Color the top half of the backs of the flower petals using Level 4 density dark pink.
4Wash and semi-dry the brush as before and brush the color from the top of the petal down, creating a gradient. The color should begin to fade as you go toward the bottom of the petal.
5Color the stem and sepal using Level 4 density Hooker’s Green (see the finished image on opposite page).
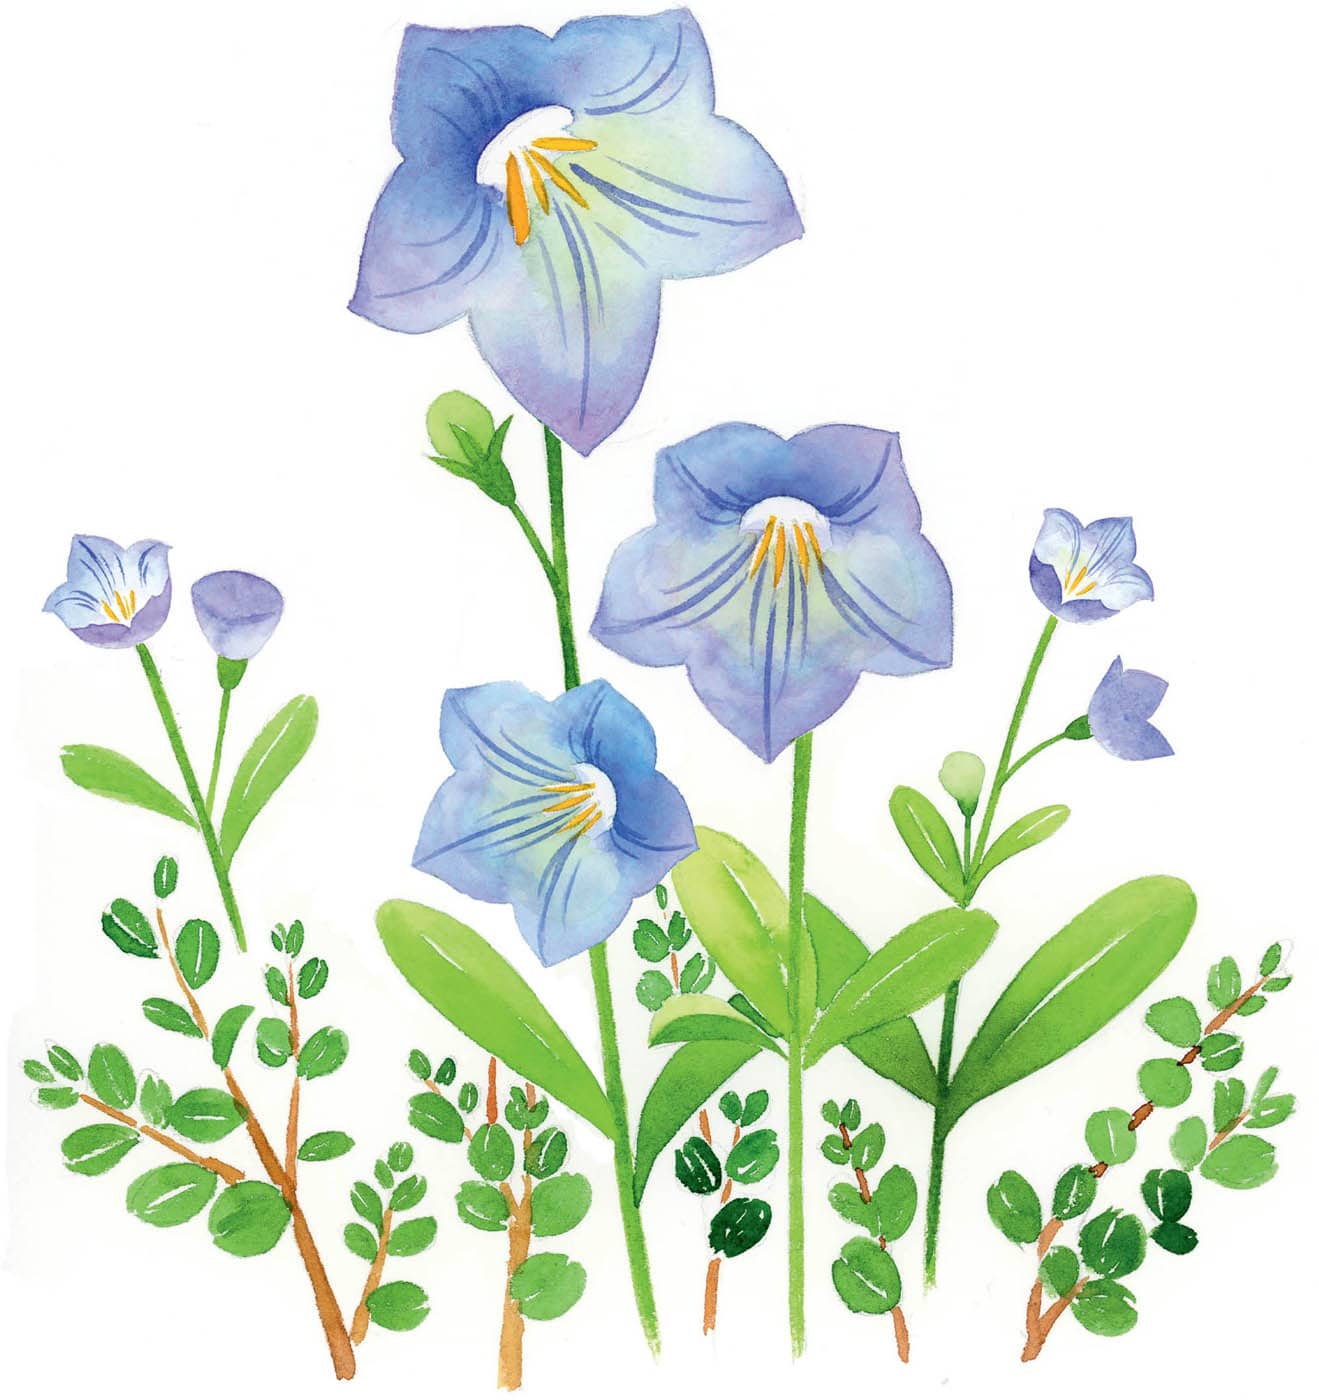
6After you’ve practiced painting the cosmos from different angles, add small leaves to the background and paint them together.
You can easily paint leaves using only brushstrokes without creating any initial sketches. Instead of using one color, use Hooker’s green, sap green, and olive green alternately (see “Brush Control”).
Lily
For the lily, you’ll paint a blossom that is slightly tilted, like the daffodil (see here). This best shows the characteristics of the trumpet shape, which is the basic form of the lily. Afterward, you’ll draw the front side of the lily.
SKETCH THE FLOWERS
You’ll learn how to sketch a lily in two different angles using the three-step method.
Angle A
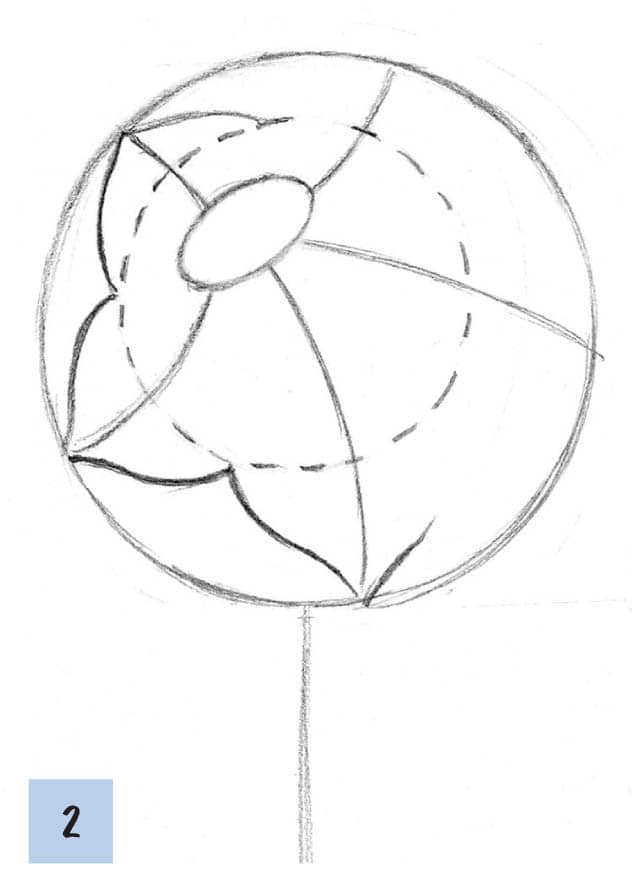
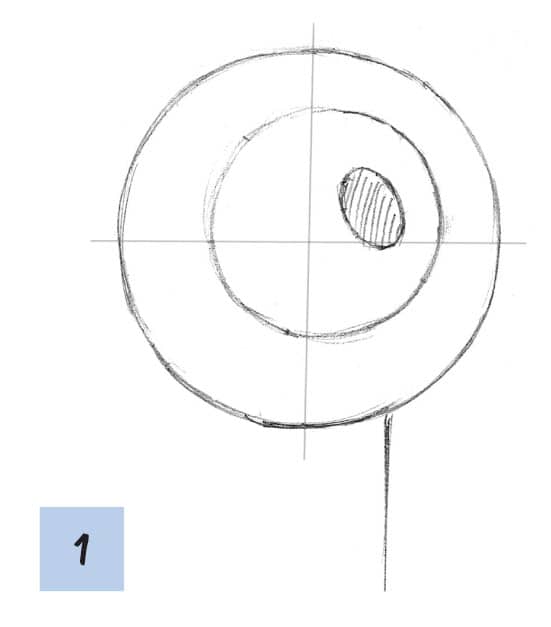
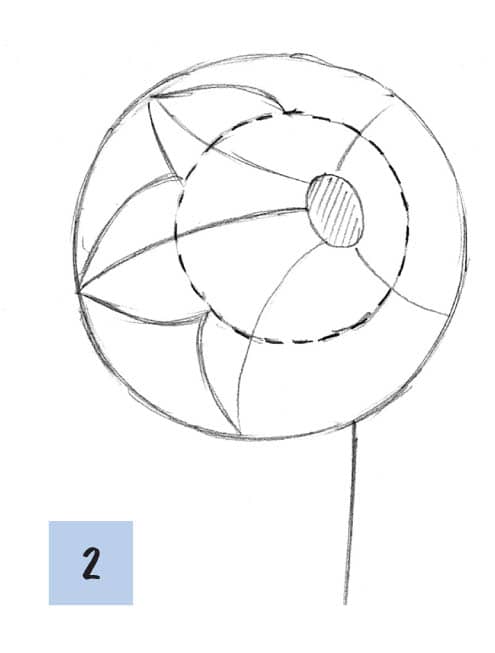
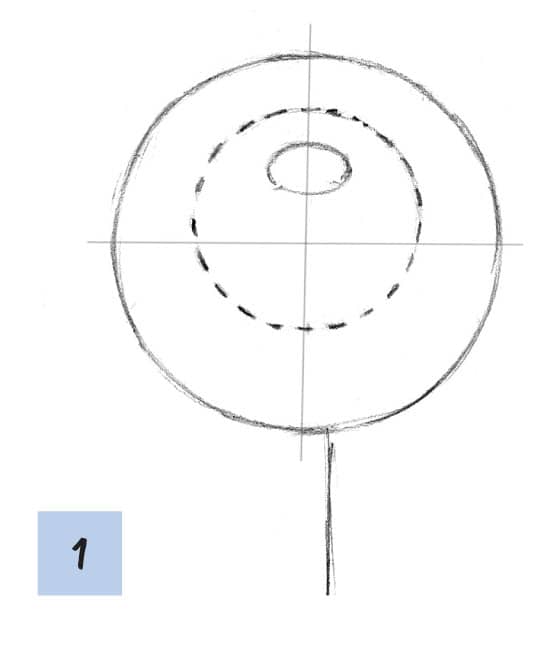
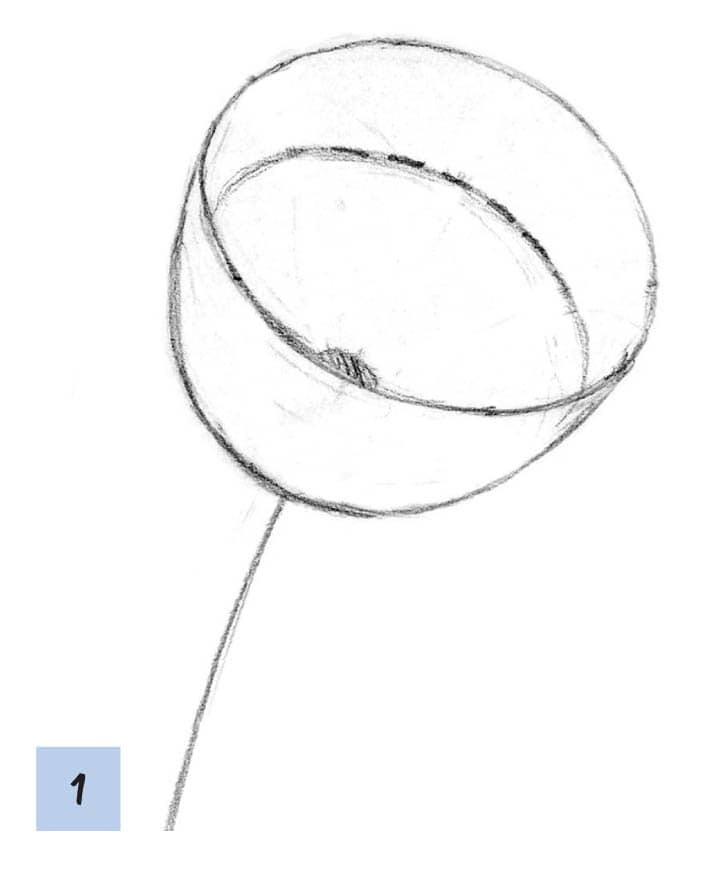
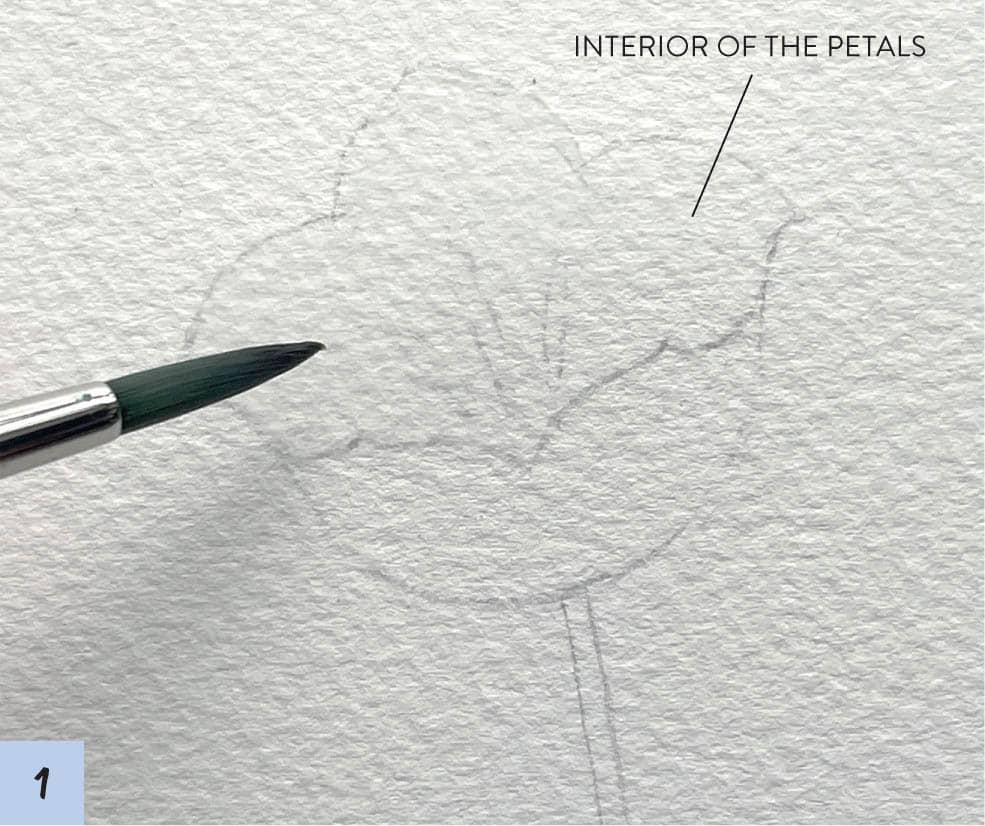
1The basic shape of a lily is a trumpet, so you’ll first need to draw an oval with an elongated cone. Draw a smaller oval inside the larger one, and draw six guidelines to mark the positions of the flower petals. Note that the guidelines alternate between solid and dotted lines, and that they curve outward. Draw a slightly curved stem that ends at the base of the cone.
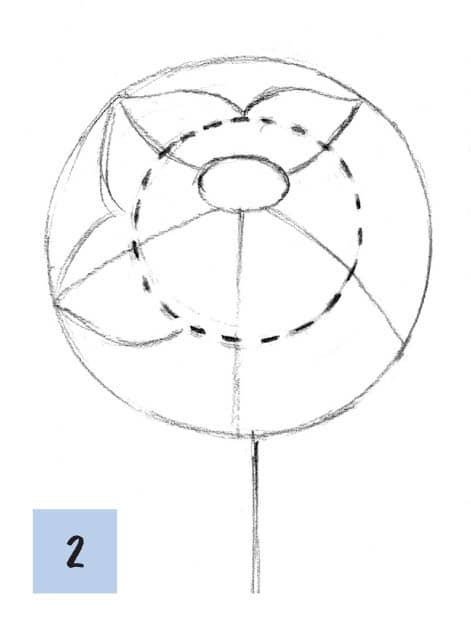
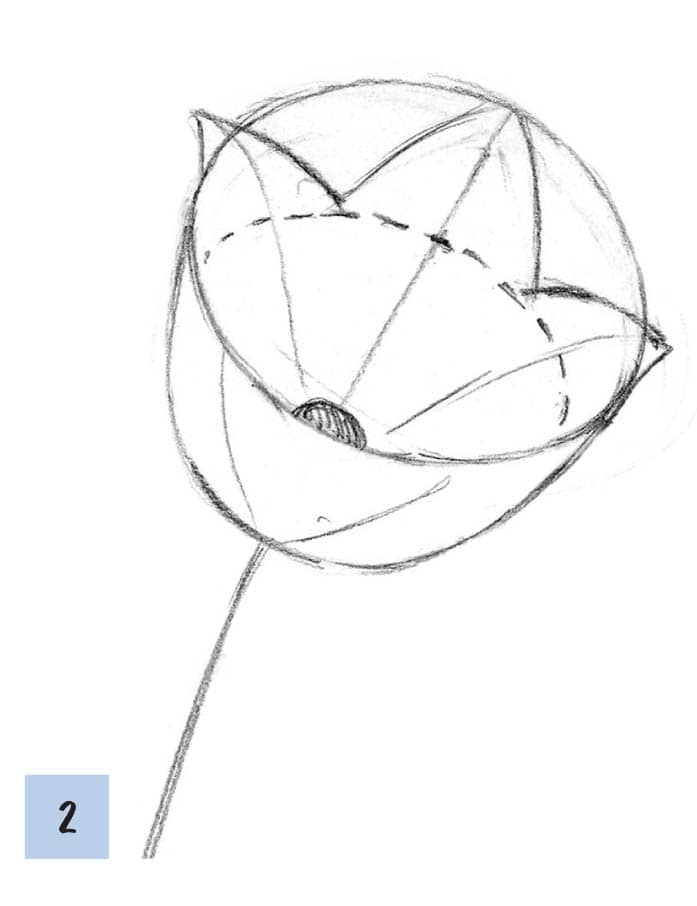
2Draw flower petals using the solid guidelines first, making note of the angles of the petals and the way they curve. Draw petals on the dotted lines the same way. This creates layered petals, with the top layer overlapping the bottom layer.
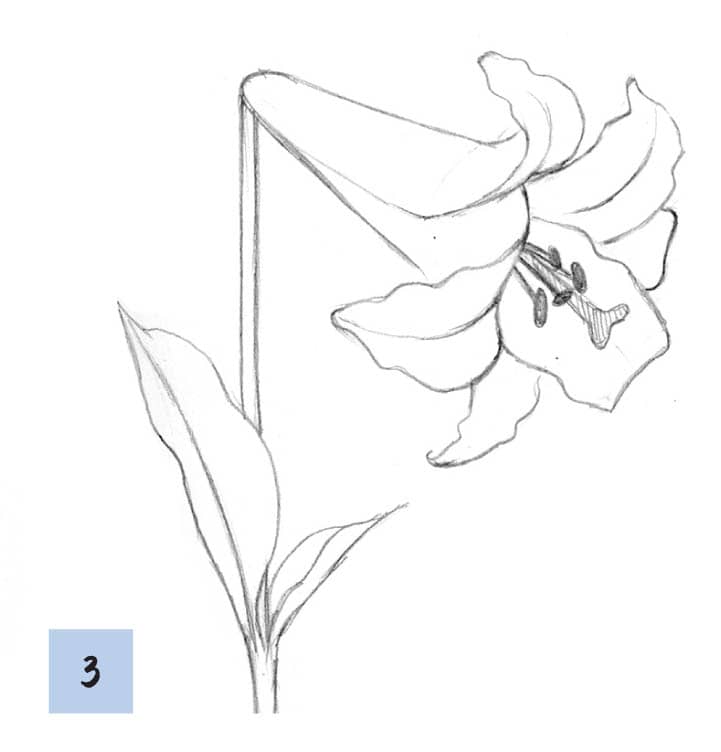
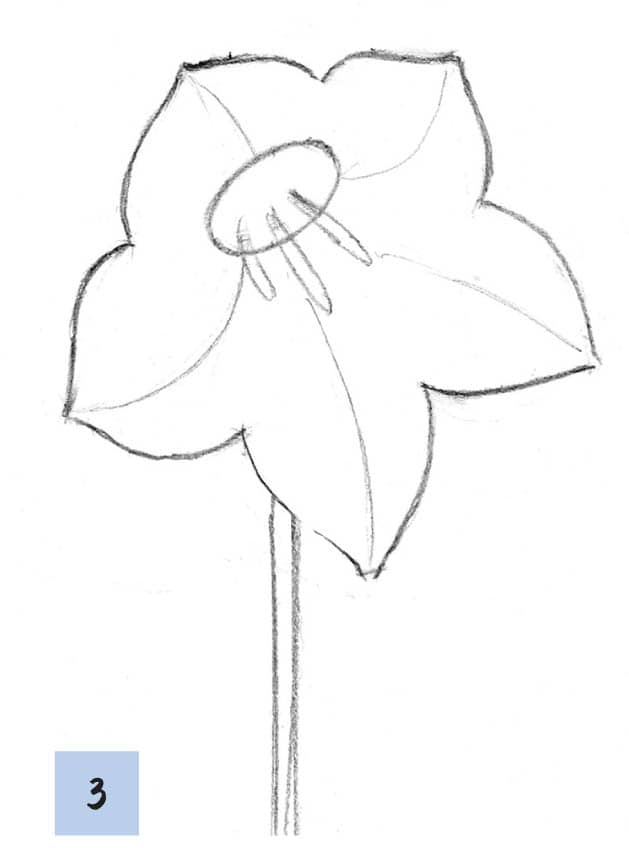
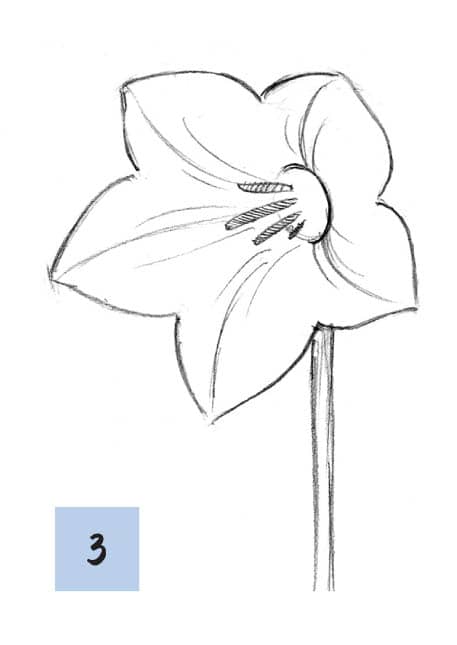
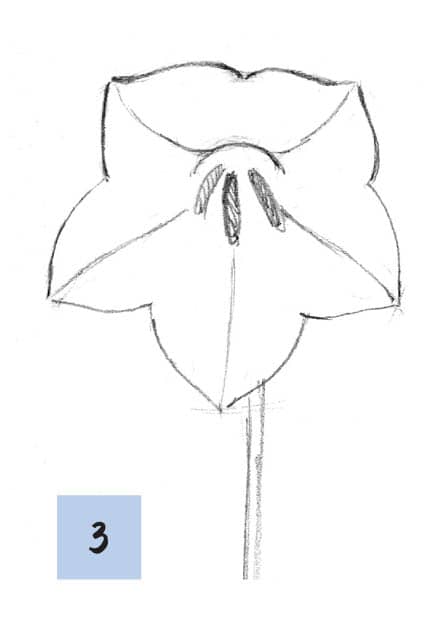
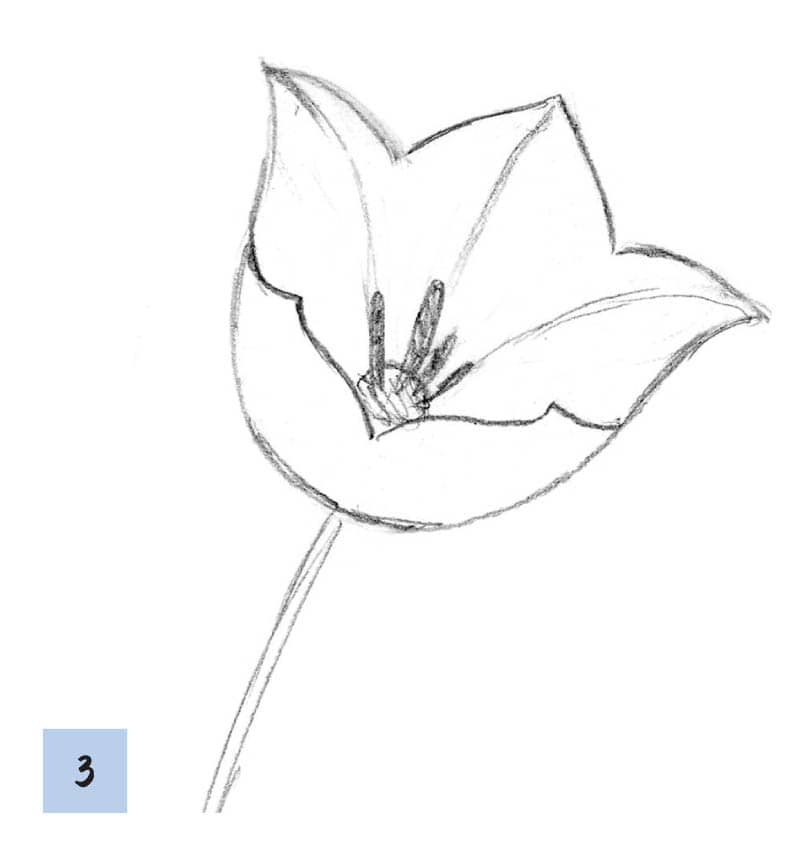
3Add details to the outlines of flower petals, creating wavy lines to indicate ruffles, and draw stamens. Next, add thickness to the stem and draw leaves to complete the lily. Erase the guidelines.
Angle B
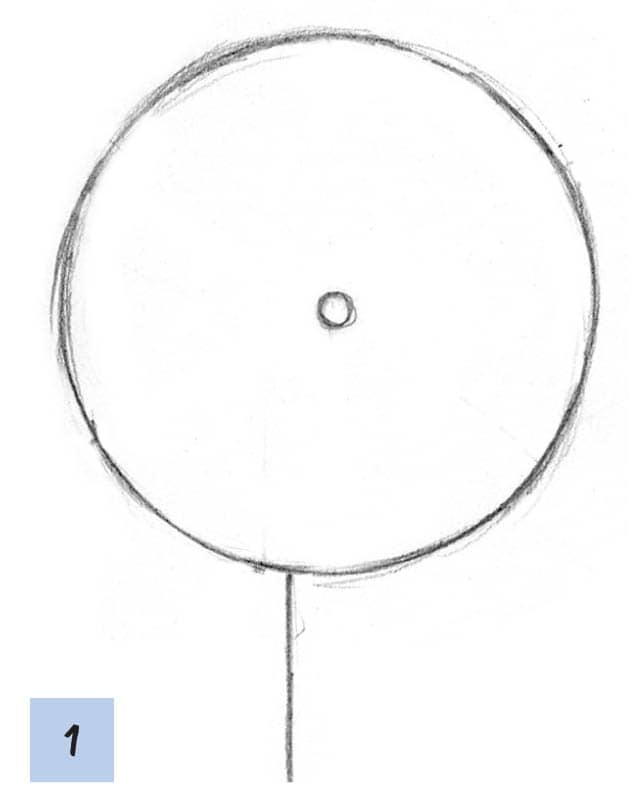
1For a lily viewed from the front, use a circle for the base, and draw a straight line for the stem.
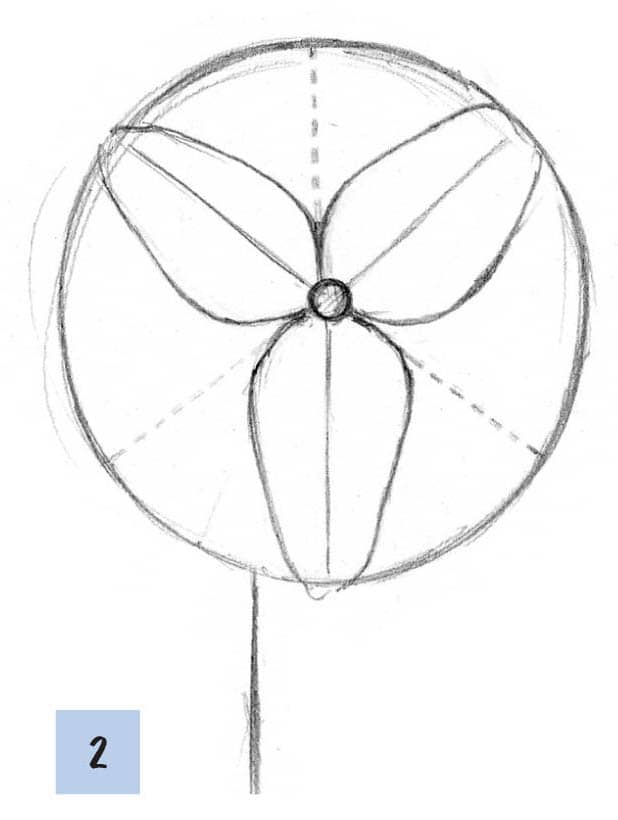
2Draw six guidelines, alternating solid and dotted, to mark the positions of the flower petals. Draw flower petals around the solid lines first. Draw flower petals on the dotted lines; these will appear to be underneath the first layer of petals.
3Add details to the outlines of the petals using wavy lines. Draw some flower petals with curved tips, indicating dimension. Draw small ovals to create stamens in the center of the flower. Add thickness to the stem.
PAINT THE FLOWERS
Angle A
Creating white flowers isn’t difficult when you mix subtle shades of gray and yellow that add vitality to the painting (see “Mixing Neutral Colors”).
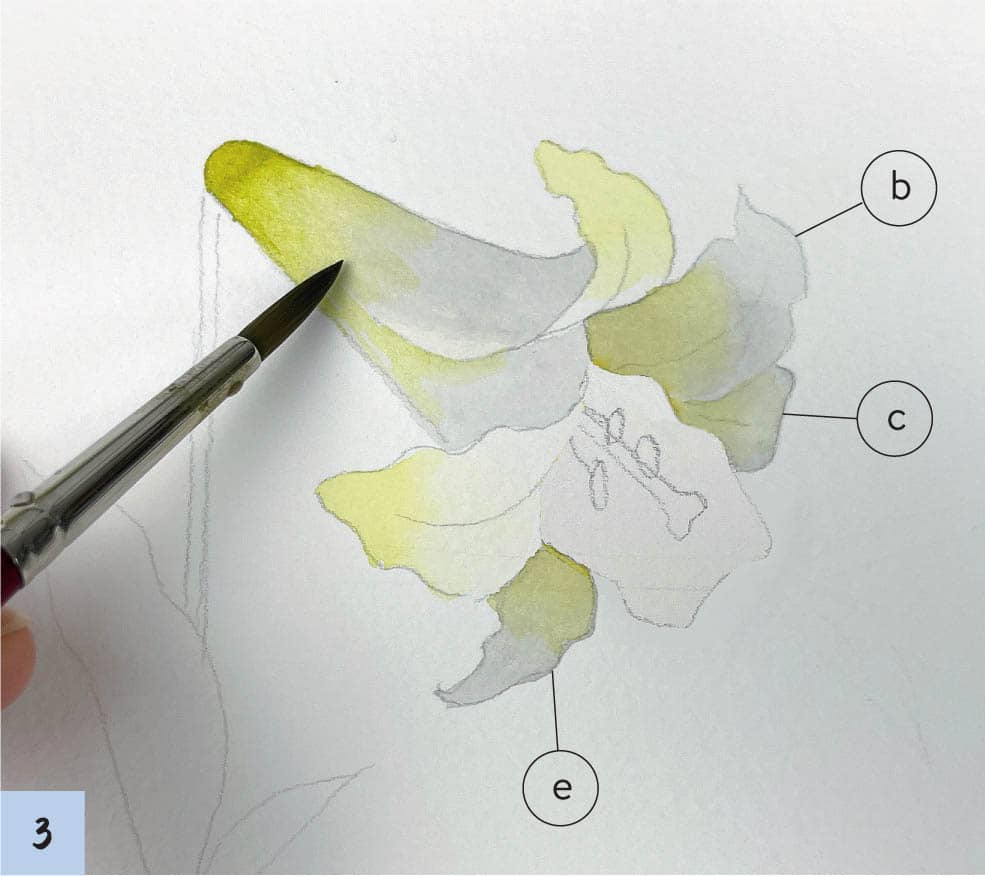
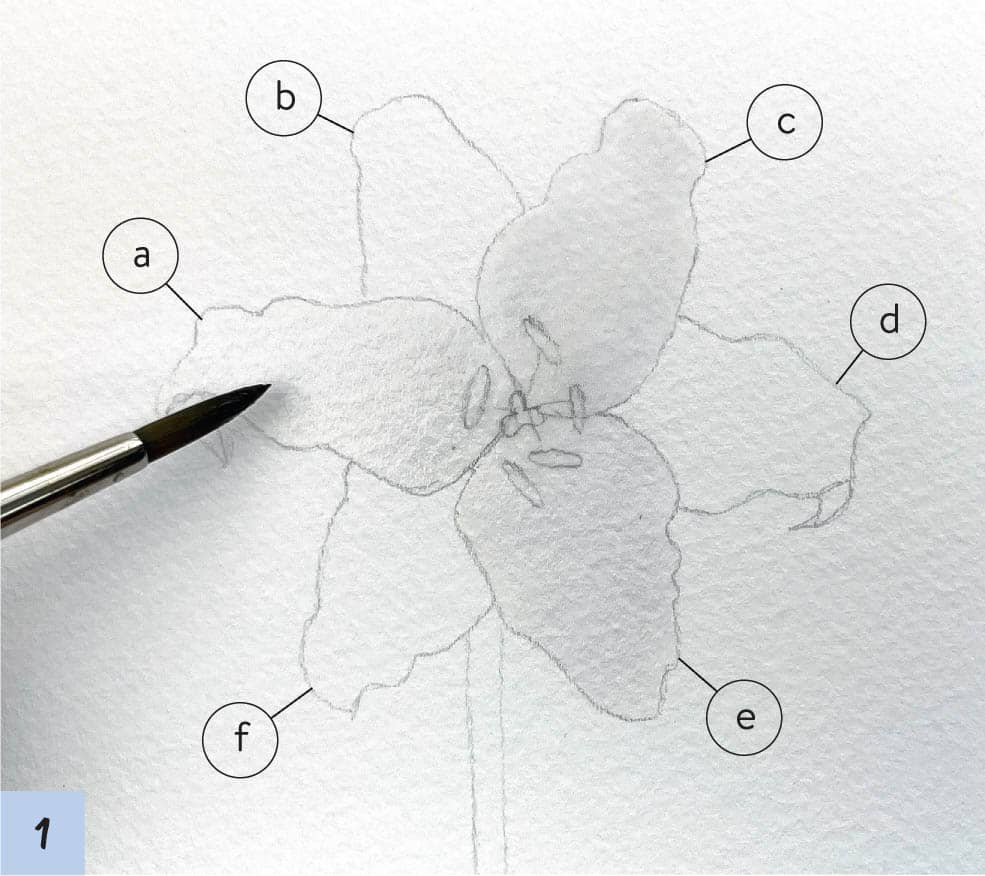
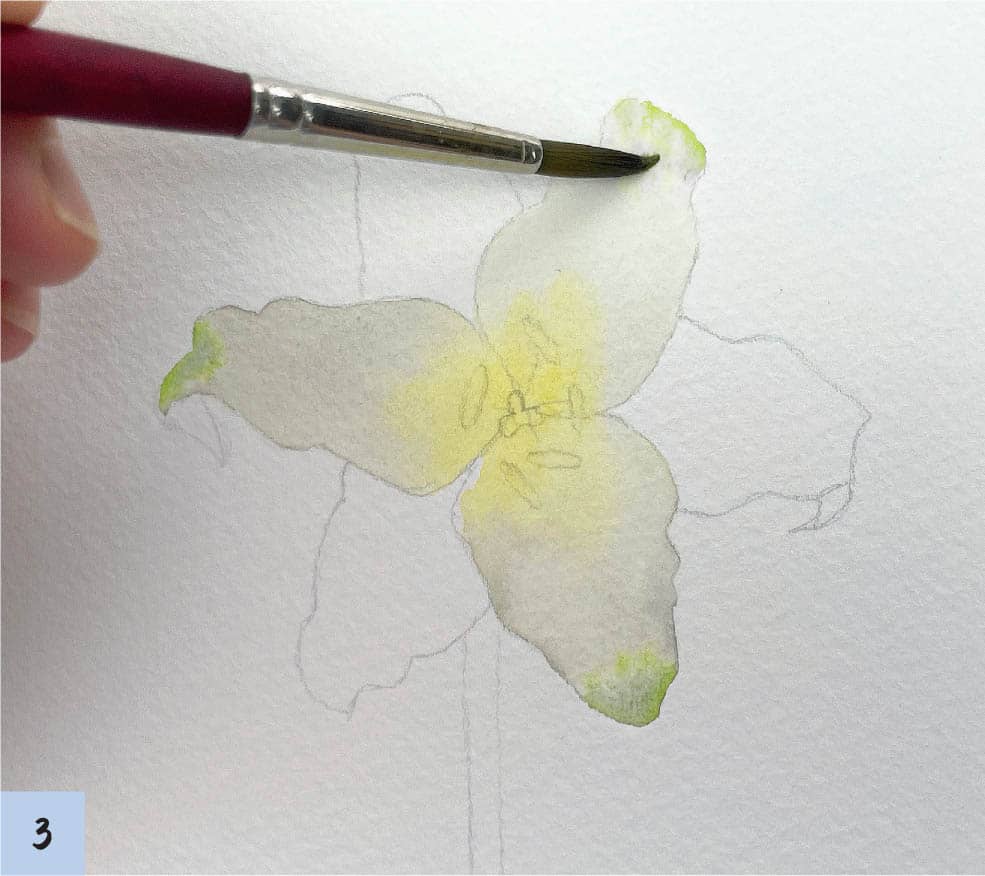
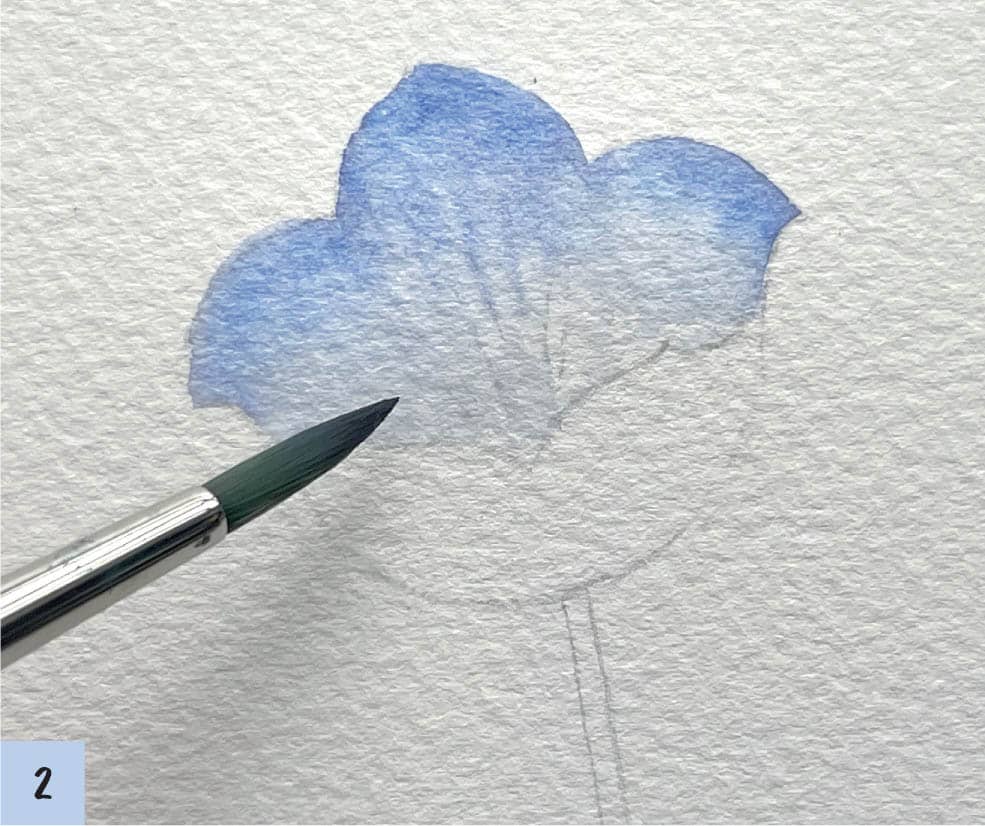
1Sketch the Angle A flower lightly on water-color paper. Working wet-on-dry, apply Level 2 density black to the cone and petals b, c, and e, using the flat wash technique (see here).
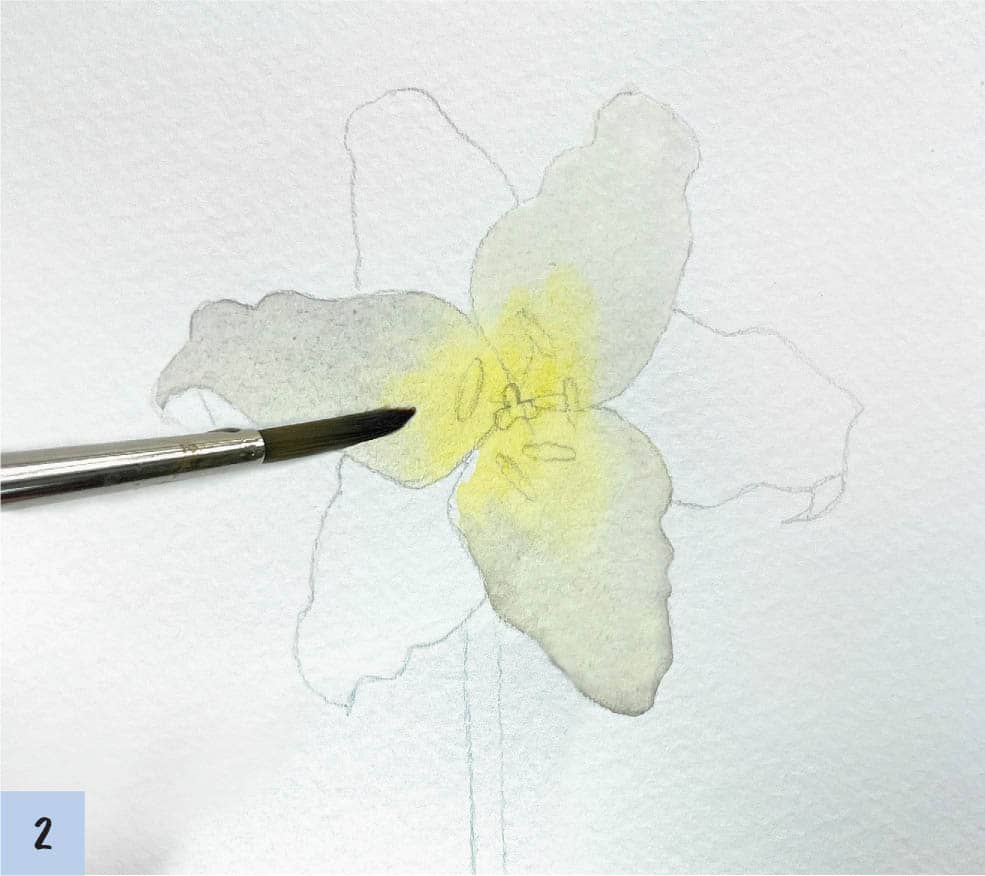
2Working wet-on-dry, apply Level 3 density greenish-yellow to the tips of petals a and f. Apply the paint at the tips of the petals and use the gradient technique so the petals have a lighter shade near the center. (See “Wet-on-Dry Gradient”.)
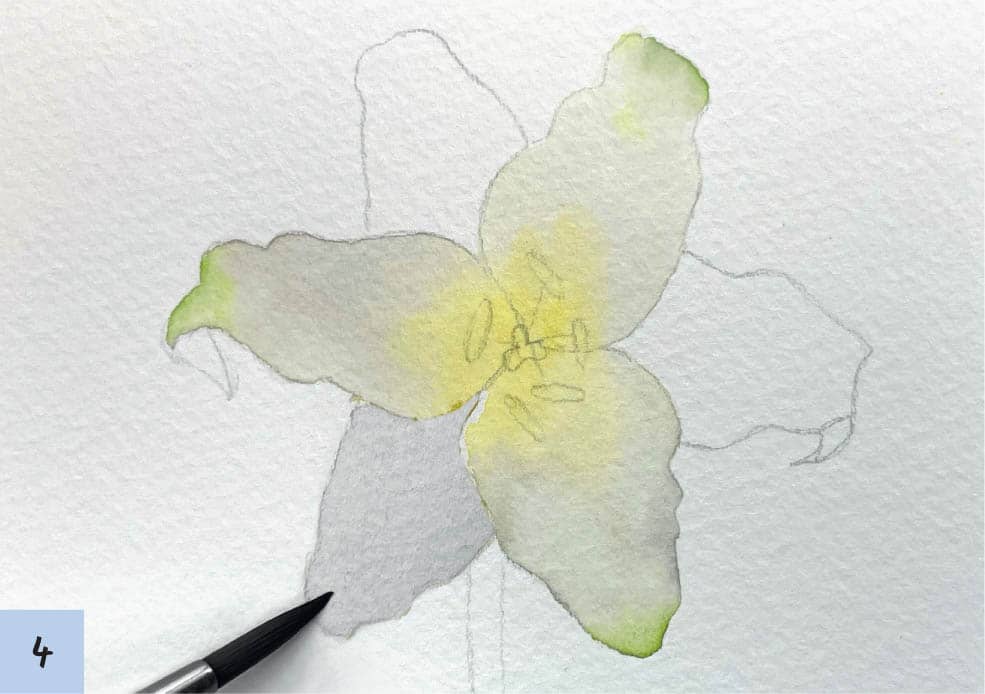
3Use Level 3 density greenish-yellow to glaze petals b, c, and e, and the left side of the cone (see “Glazing Technique”).
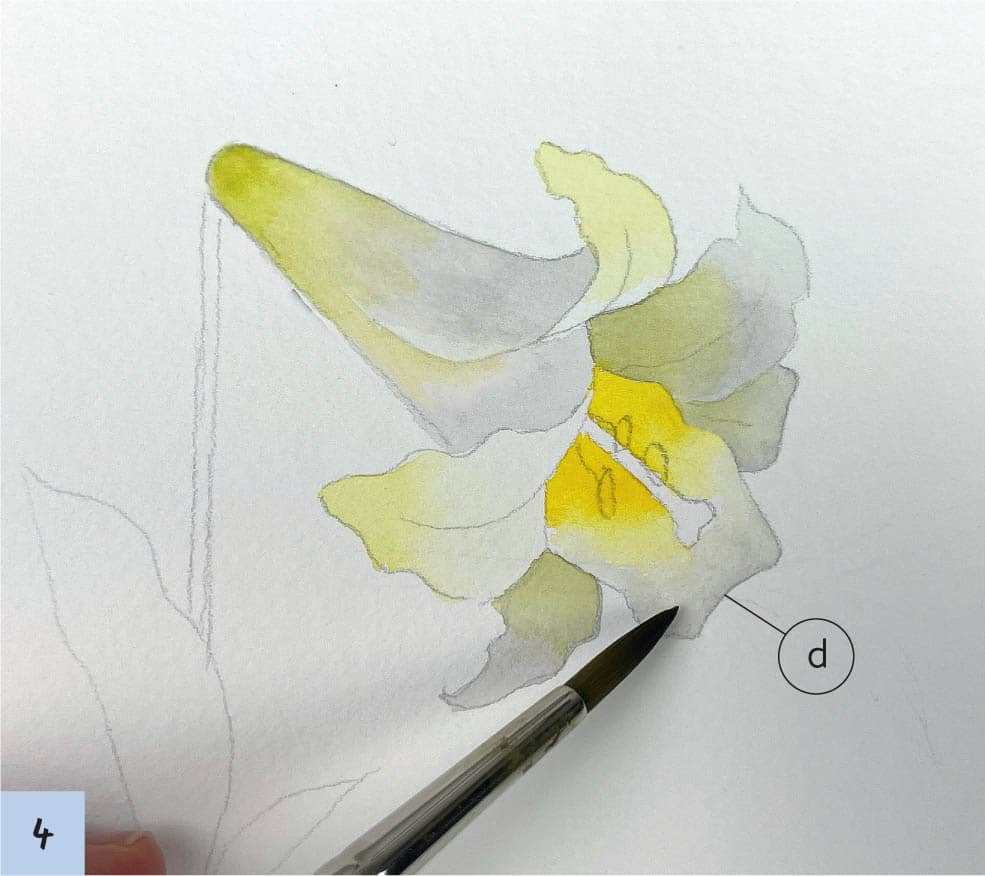
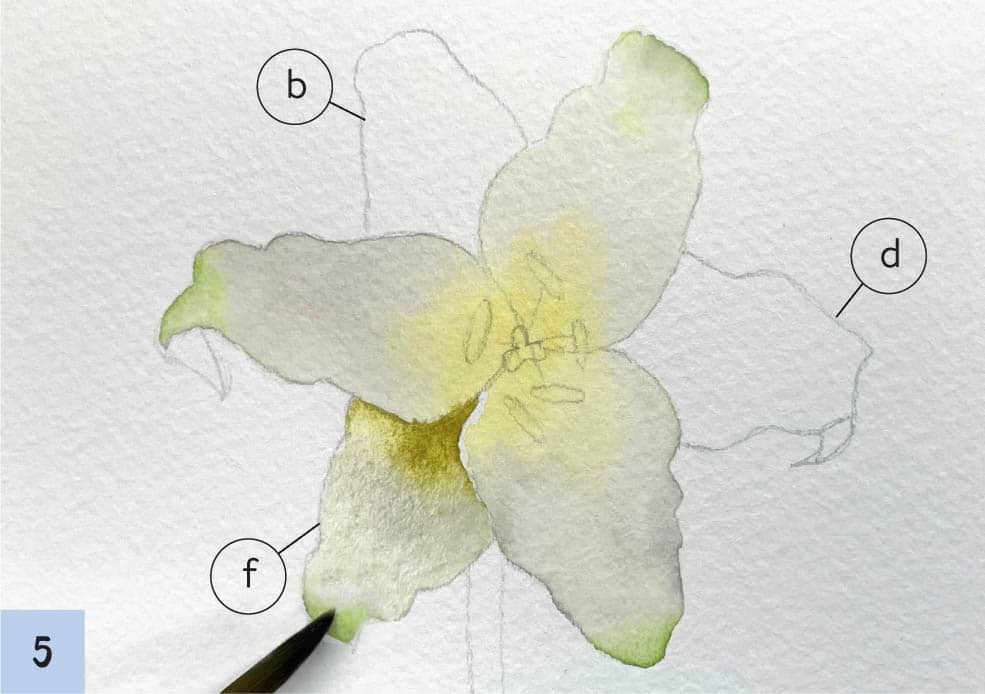
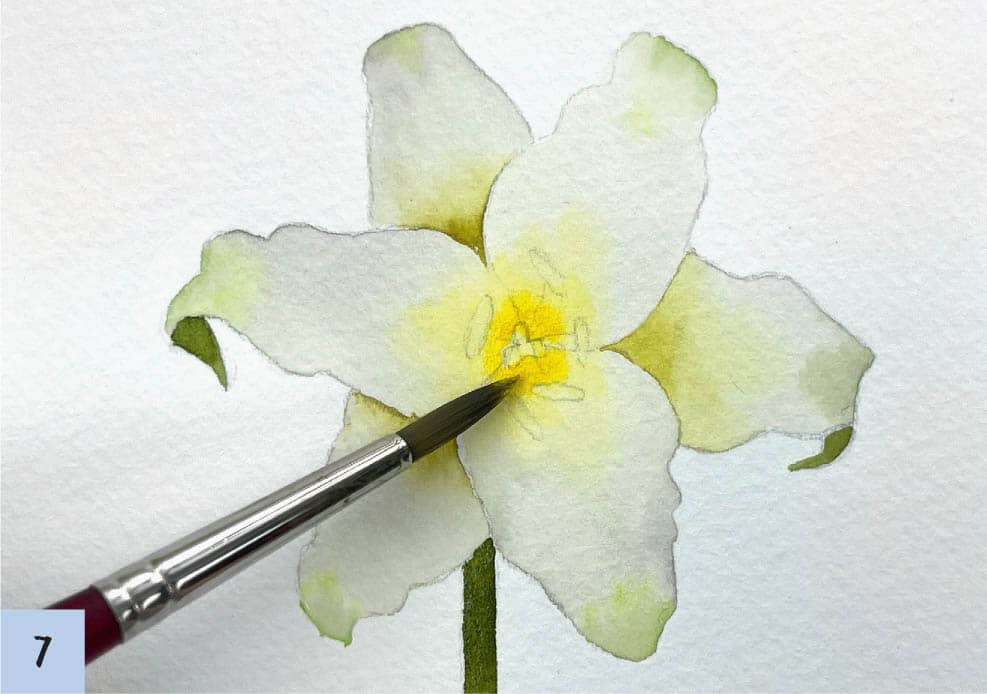
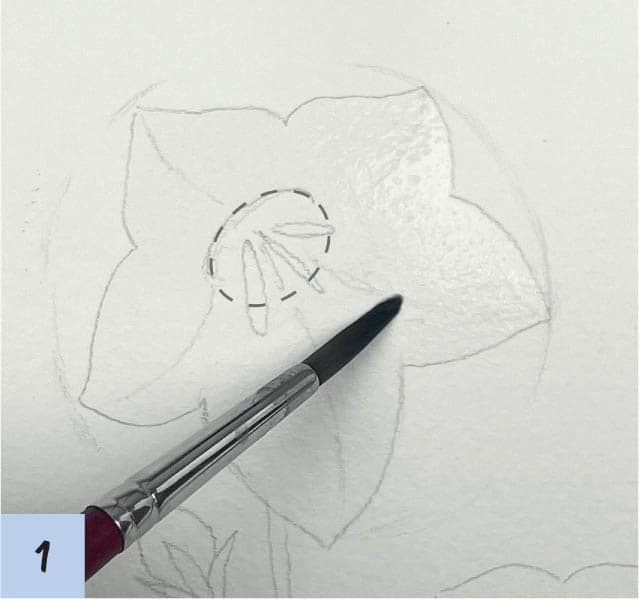
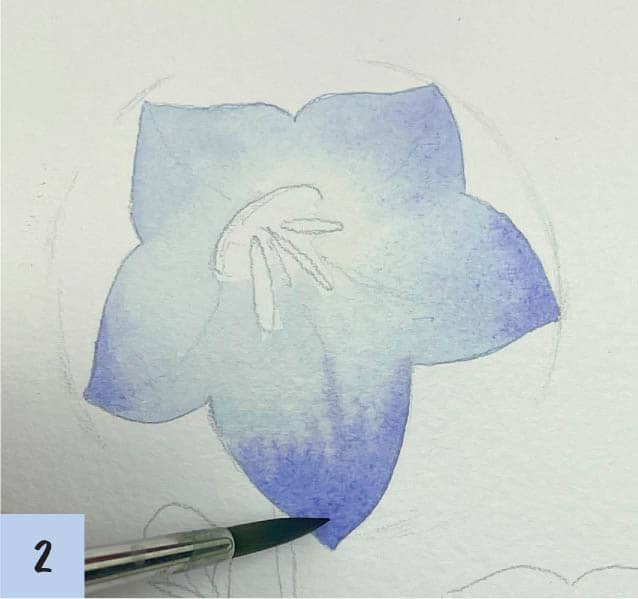
4Still working wet-on-dry, apply Level 3 density Permanent Yellow Light around the stamen area, but don’t paint the stigma, the tall spike in the middle of the flower. Paint Level 2 density black on the edge of the petals to create a two-color gradient with Permanent Yellow Light (see here, image B).
5To emphasize the contrast between bright and dark, use Level 5 density greenish-yellow to add extra glazing in the interior of flower petals b, c, and e. As indicated in the close-up, use the brush to blend the edge of those areas; there shouldn’t be a harsh line.
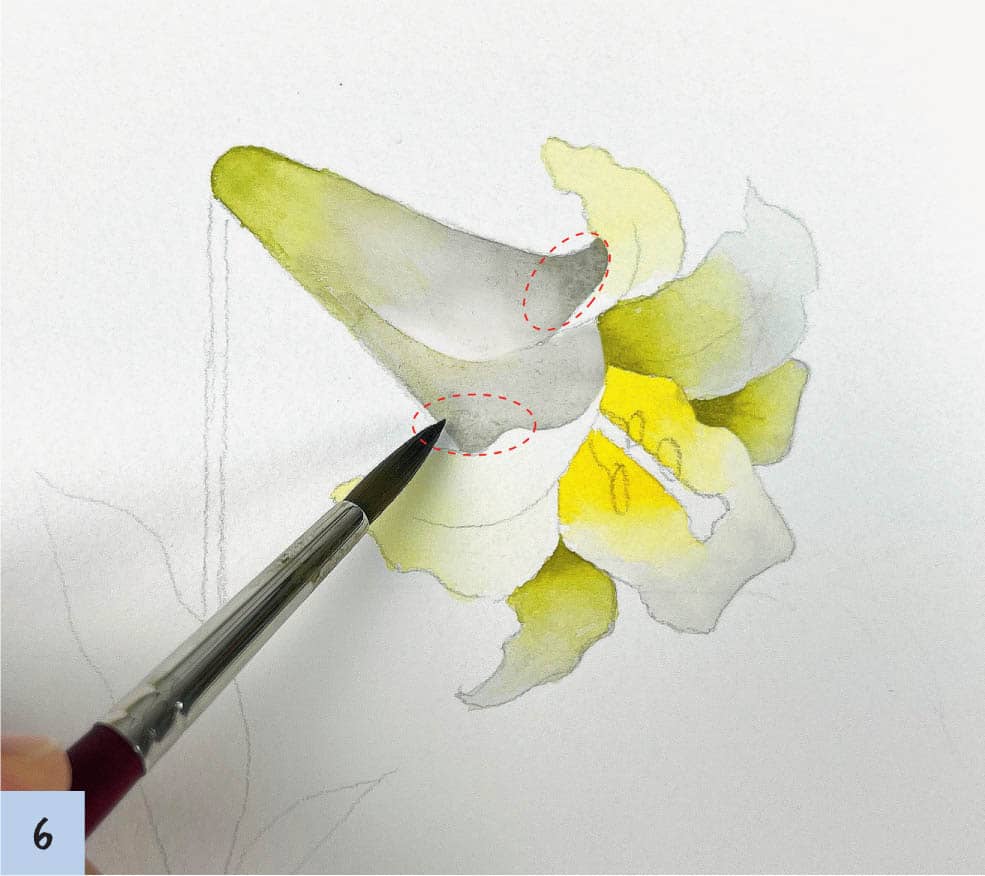
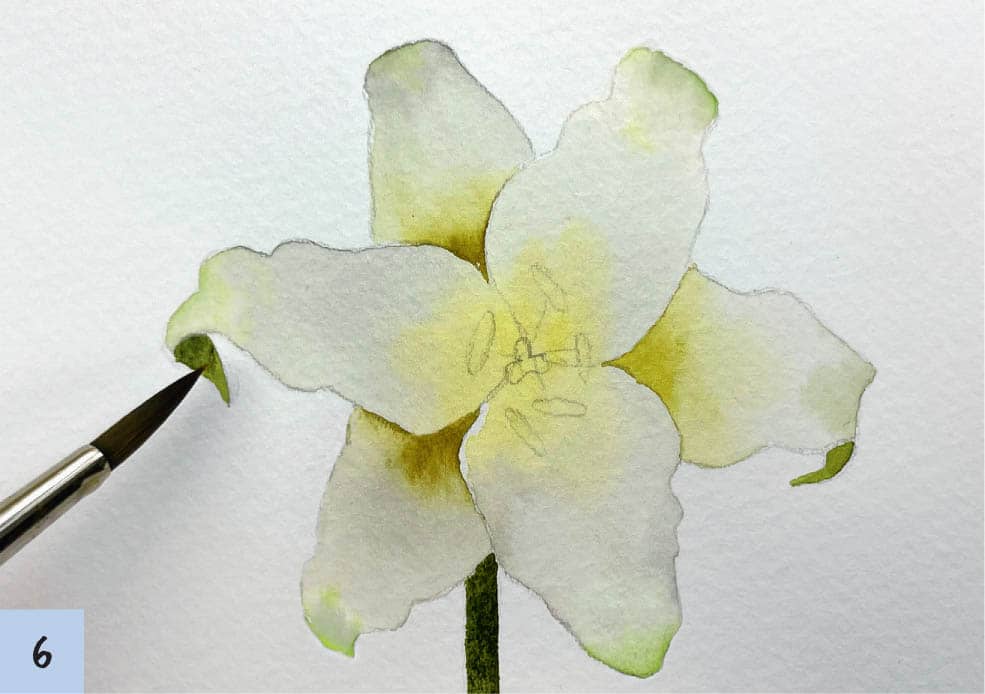
6Using the same method as in the previous step, glaze the red dotted area with Level 3 density black to add shading.
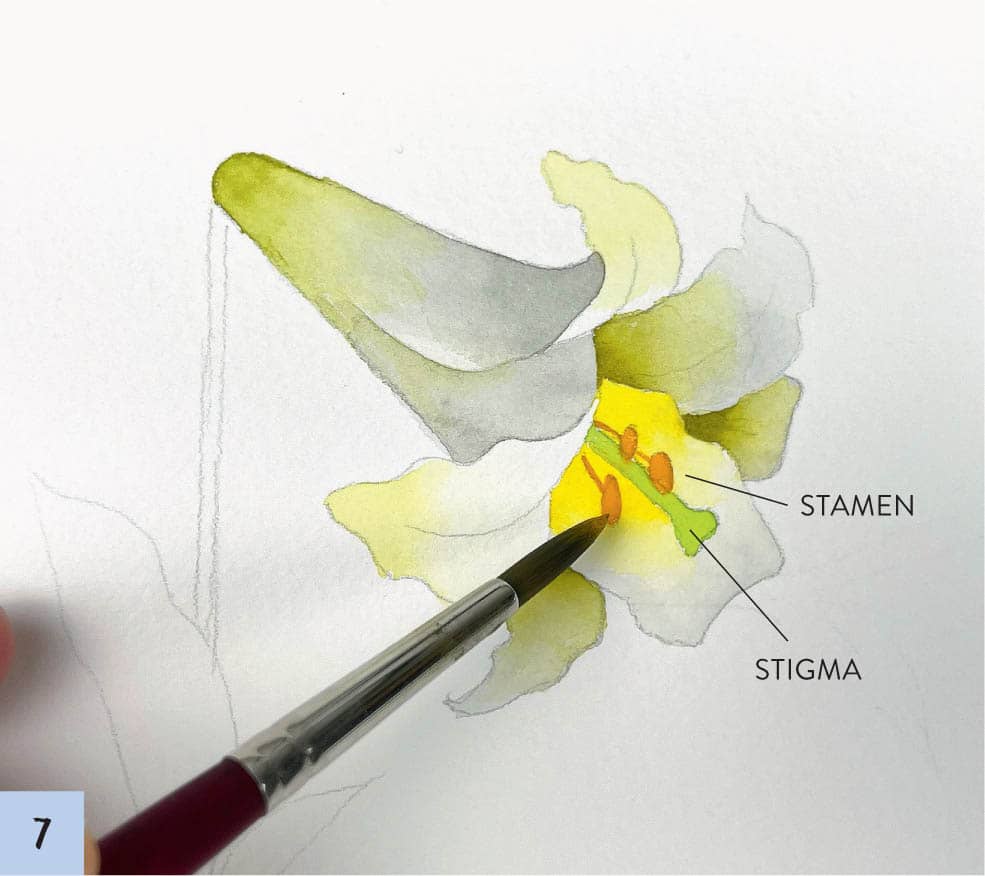
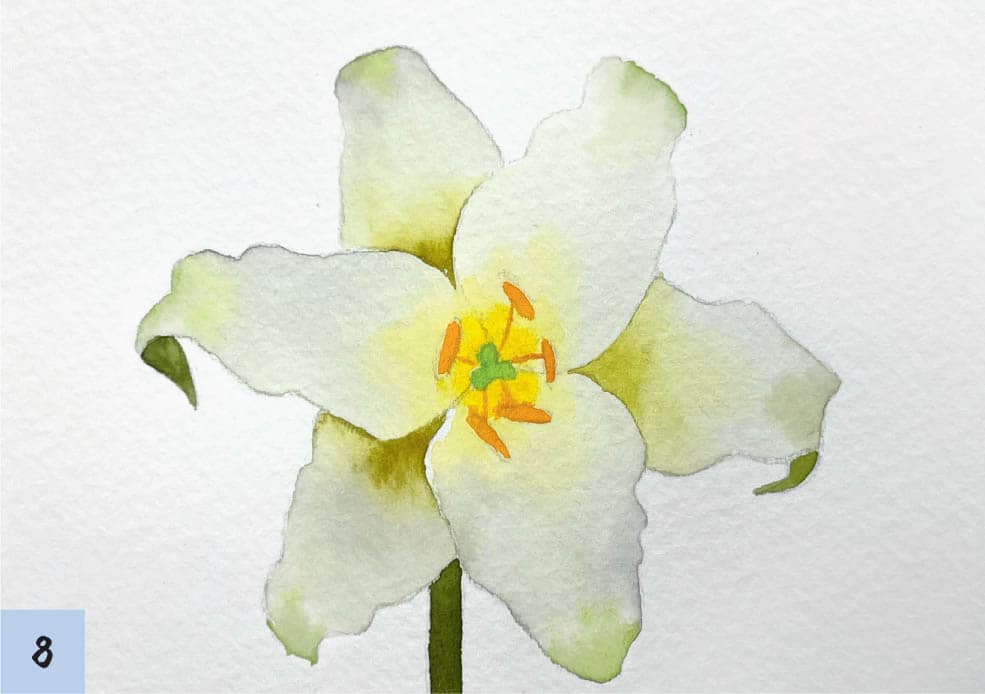
7Apply Level 5 density yellow-green on the stigma. Paint the stamens with Level 3 density yellow-orange.
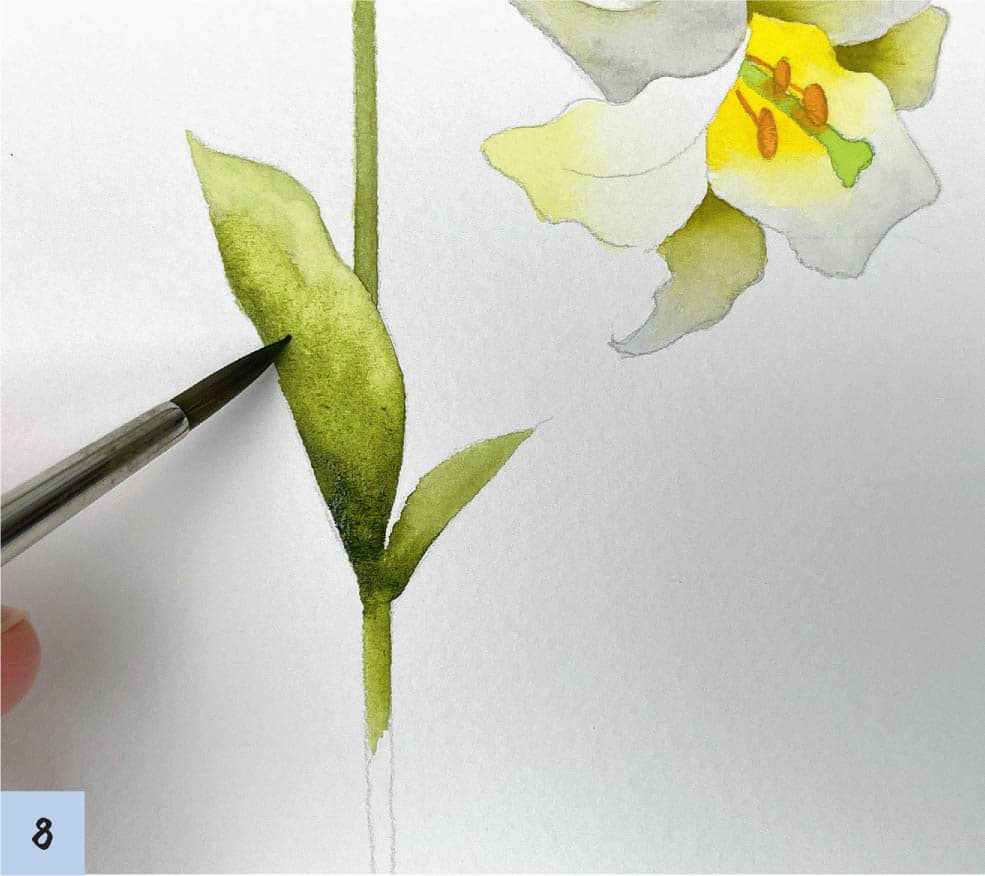
8Color the stem with Level 3 density olive green. Use the same color for the leaves. Create a gradient, with a lighter color at the top of the leaf and a darker shade toward the bottom.
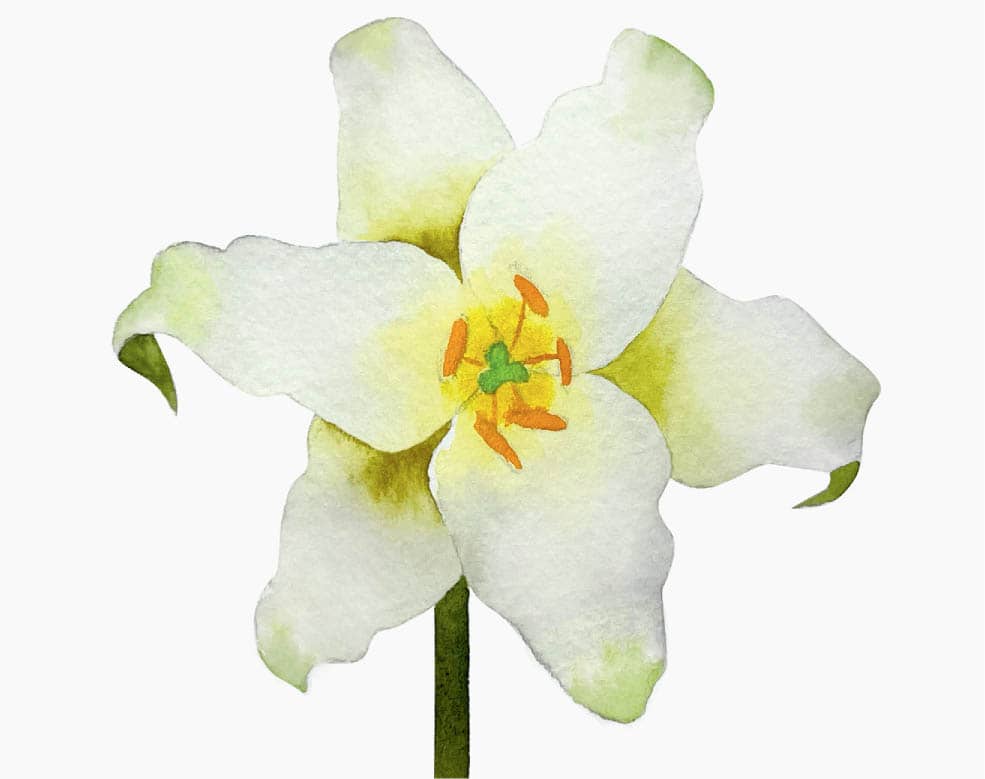
Angle B
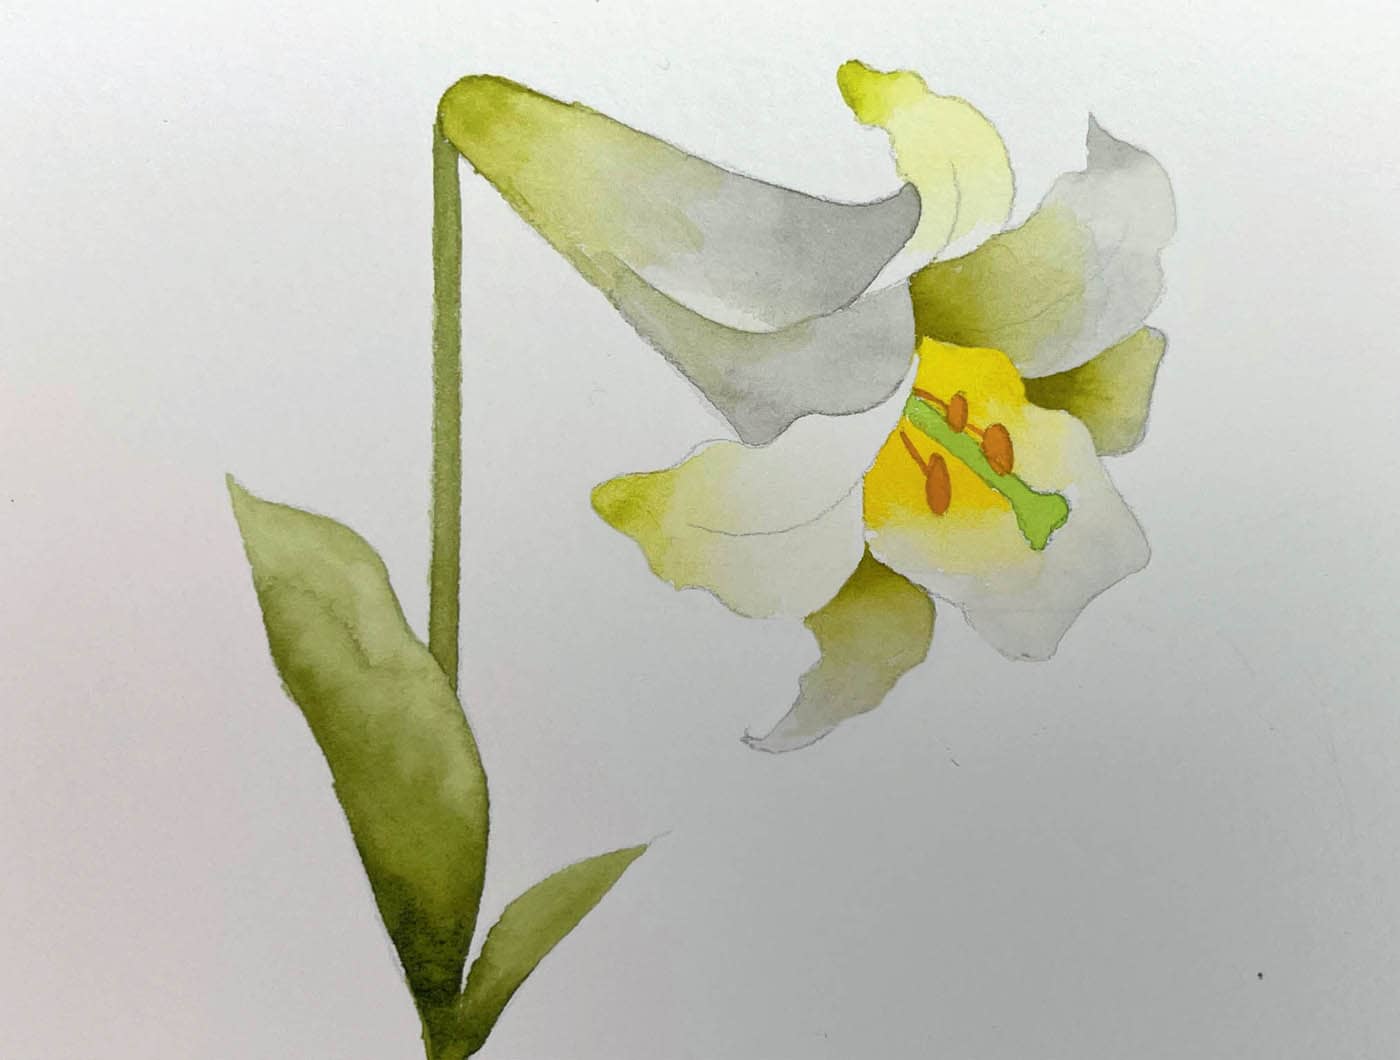
You’ll combine the wet-on-wet technique and the wet-on-dry technique to color the front of the lily using shades of yellow and green to indicate depth and dimension.
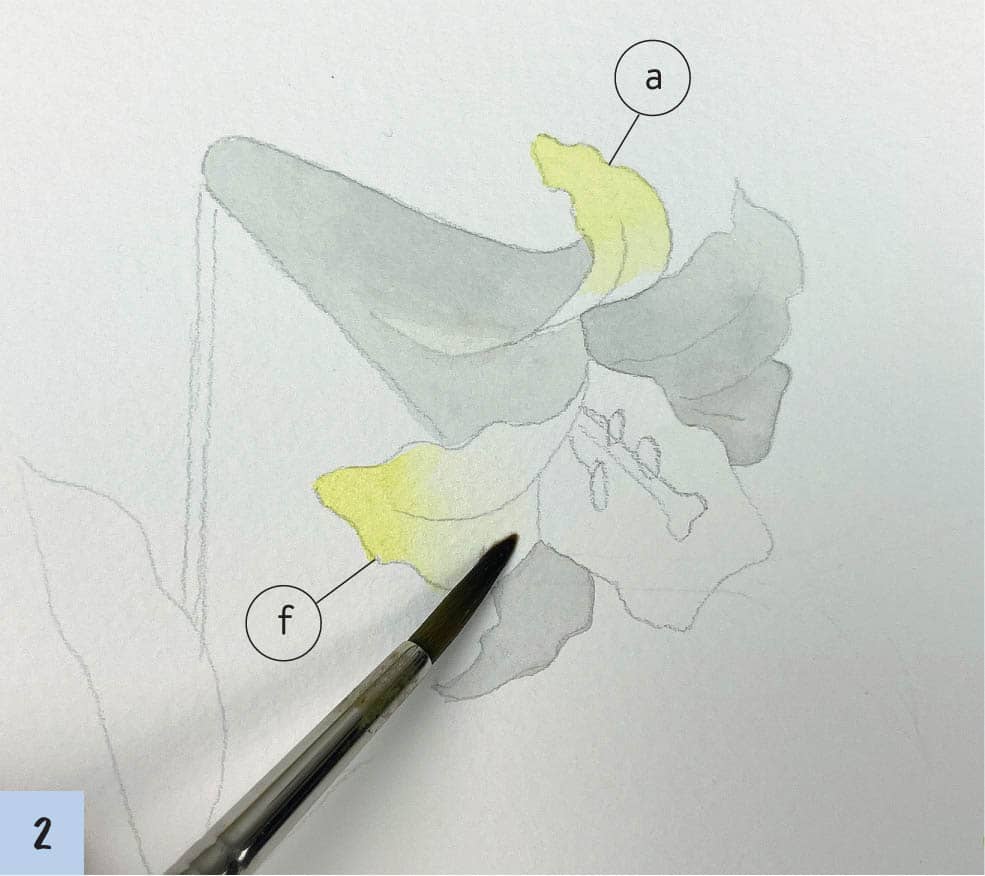
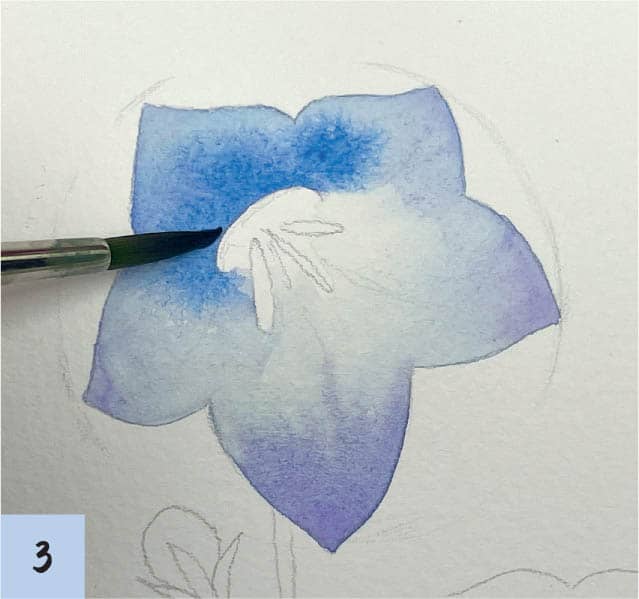
1Sketch the Angle B flower lightly on watercolor paper. Working wet-on-wet (see here), brush water on petals a, c, and e, and apply Level 1 density black to the petals, using a flat wash (see here).
2Before the water dries, apply Level 3 density Permanent Yellow Light in the center of the same three petals. Wash the brush, remove any excess water, and blend out the edge of the yellow area so there is no hard edge.
3While the paper is still wet, apply Level 3 density yellow-green on the tip of the same petals. If the paper has dried, add the paint, wash and semi-dry the brush, and blend the edge of the area so there is no hard edge.
4Working wet-on-dry (see here), apply Level 1 density black on petal f, using a flat wash (see here).
5Before the paint dries, apply Level 4 density greenish-yellow on the portion of the petal closest to the center of the flower. Apply Level 3 density yellow-green on the outer portion of the petal. Repeat for flower petals b and d.
6Apply Level 3 density olive green on the undersides of the petals and use the same color to paint the stem.
7At this stage, the center of the flower looks flat because paint lightens as it dries. Before painting the stamens, shade the flower center by glazing it with Level 3 density Permanent Yellow Light.
8Paint the stamens with Level 5 density yellow-orange. Paint the stigma with Level 5 density yellow-green.
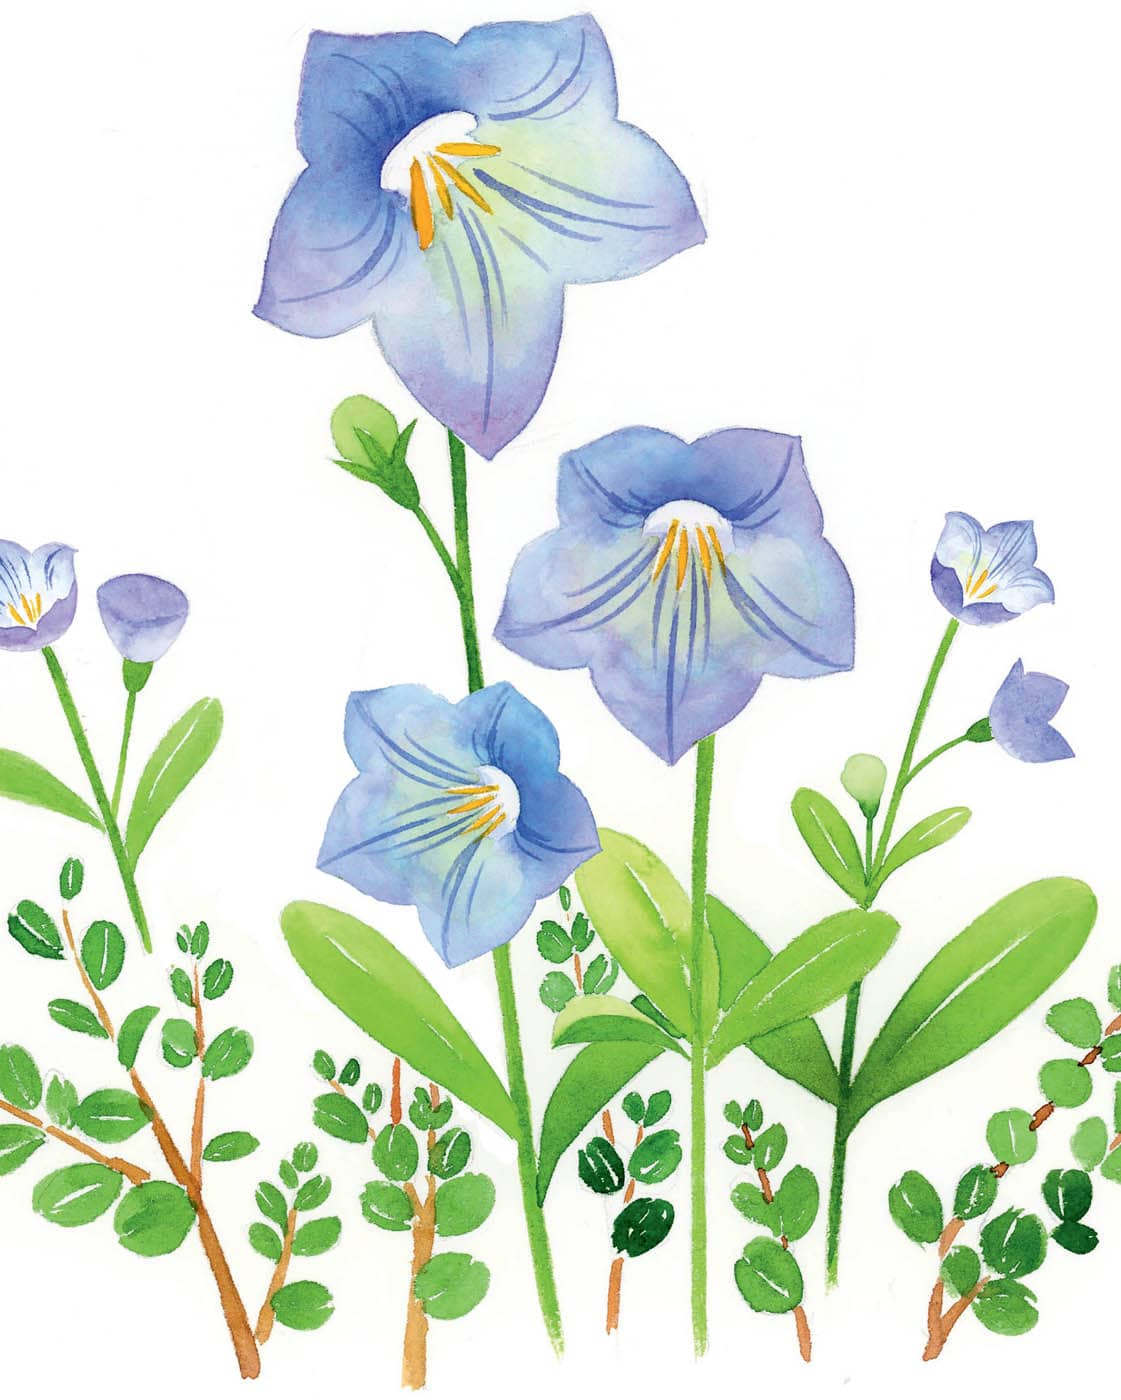
Balloon Flower
Balloon flowers have an interesting star shape. When drawing this flower, be mindful of the proportion of the shapes. The three-step sketching method makes it easy to render this attractive flower.
SKETCH THE FLOWERS
You’ll learn how to sketch a balloon flower in four different angles using the three-step method.
Angle A
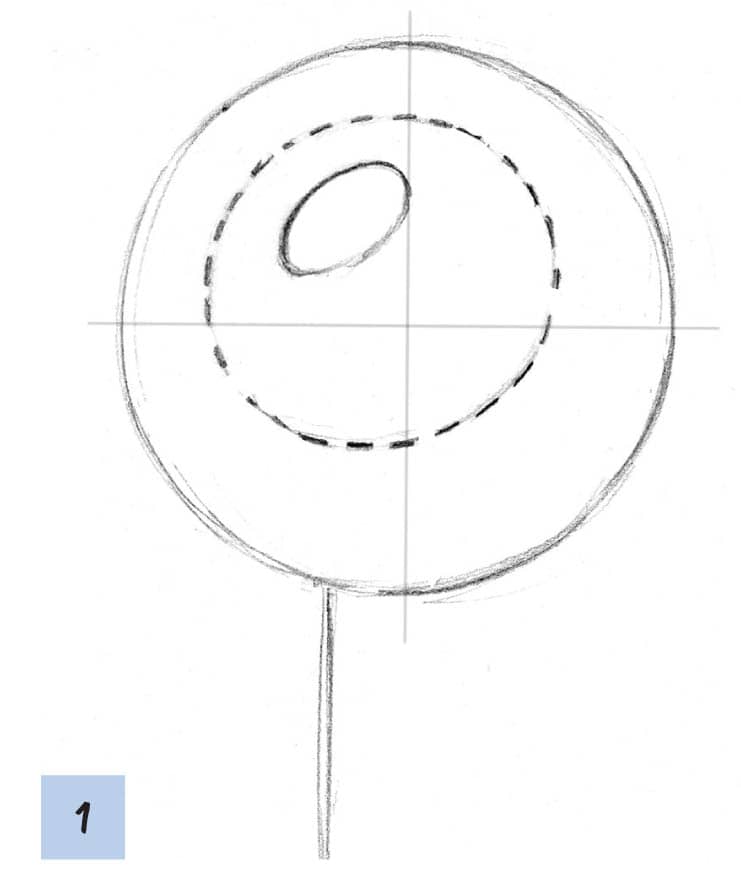
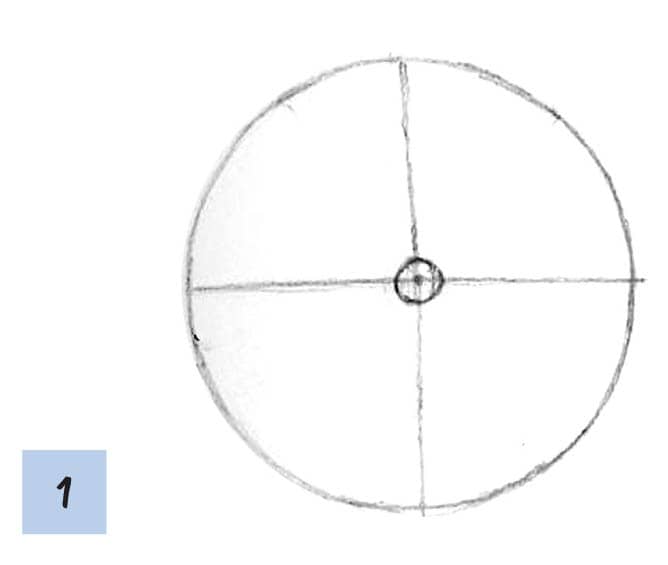
1Draw a large circle with vertical and horizontal guidelines that bisect the circle evenly. Draw a smaller circle within the larger one using a dotted line, making it off center. Draw an off-center oval within the smaller circle. This forms the base for a flower angled to the right. Draw a line indicating the stem.
2Draw five guidelines that radiate from the inner oval, noting how they curve outward. Create pointed, connected petals around the guidelines.
3Draw stamens in the center of the flower and thicken the stem. Erase the circular guidelines but leave the five petal guidelines; these will be useful when coloring the flower petals.
Angle B
1Repeat Angle A, step 1 to create the flower, but this time flip the positioning of the circles, oval, and petal guidelines so the flower faces left. Draw a line indicating the stem.
2Repeat Angle A, step 2 to create the five petal guidelines, and draw the curved, connected petals.
3Draw stamens in the center of the flower and add thickness to the stem to complete the sketch. Erase the circular guidelines but, as before, don’t erase the petal guidelines.
Angle C
1For a front-facing flower, draw a large circle and add horizontal and vertical guidelines that bisect the circle evenly. Draw a smaller, slightly offset circle with a dotted line inside the larger one. Draw an oval inside the smaller circle, also making it offset. Draw a line to create a stem.
2Draw five guidelines that radiate from the oval, noting how they curve. Draw the outlines of the pointed petals, connecting them.
3Draw tiny elongated ovals to indicate stamens in the center of the flower. Thicken the stem. As before, erase the circular guidelines but leave the five petal guidelines.
Angle D
1To sketch a flower facing upward and to the right, draw a basic cup shape. Start with an oval and add a curved line underneath. Draw a curved line underneath and parallel to the topmost oval line; this indicates volume. Draw a tiny mark at the bottom of the oval for the flower center. Add a stem by drawing a slightly curved line.
2Draw five petal guidelines, noticing the direction of each curved line. Connect the outlines of the pointed flower petals.
3Enlarge the flower center and add thickness to the stamens and the stem. Erase the circular guidelines but leave the flower petal guidelines.
PAINT THE FLOWERS
Angles A, B, and C
Practice changing colors in this lesson by using periwinkle, which is the combination of blue and violet. You’ll learn to convey brightness and darkness by glazing areas with purple tones. The coloring methods used in Angles A, B, and C are all the same. Practice Angle A first, then move on to Angles B and C.
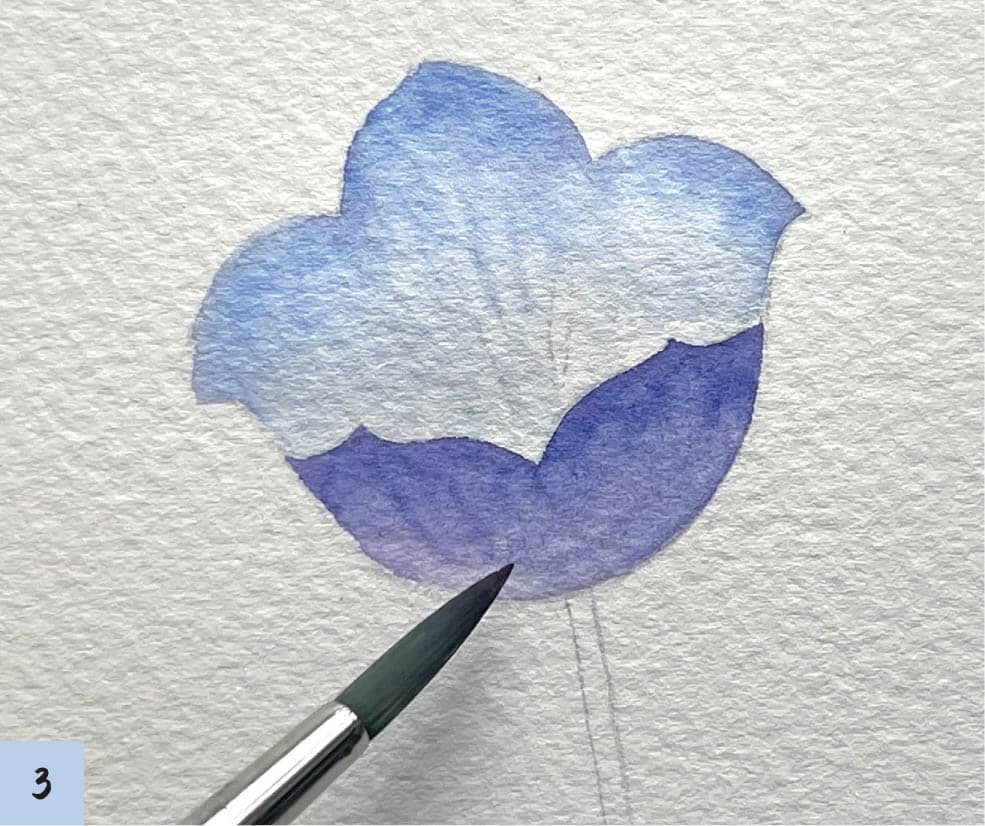
1Sketch the Angle A, B, and C flowers lightly on watercolor paper. Working wet-on-wet (see here), brush water on the petals but leave the stamens and the center oval dry (indicated by the dotted line). Leave the center oval unpainted for now, and paint the stamens last.
2Before the water dries, mix a vibrant pink (I used Opera Pink) and cobalt blue in an approximately 3:2 ratio to make a red-violet color. Apply Level 1 density paint on the petals, again avoiding the center oval. Mix the same colors in a Level 3 or 4 density and apply this shade on the edges of the petals.
3Brush Level 4 density cobalt blue on the innermost part of the top petals, along the top of the oval center. This creates a shadow effect. Make sure the paint doesn’t bleed into the center. The paper should still be wet enough at this stage to allow the colors to blend nicely.
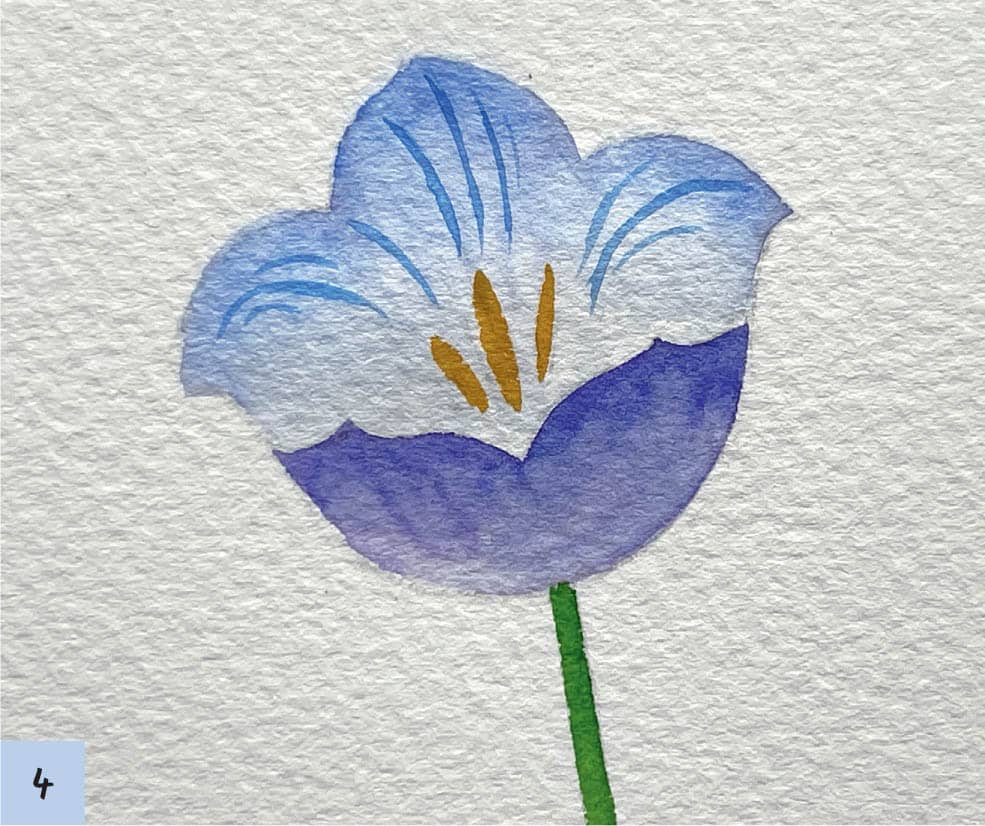
4While the paper is still wet, apply Level 1 density yellow-green paint to the area below the center oval. Allow the paint to dry. Paint the stamens with Permanent Yellow Deep (golden yellow). Create thin lines in the petals with Level 2 or 3 density cobalt blue, going from the center outward. Follow the curve of the individual petals, referring to the pencil drawing if necessary. Apply Level 5 density medium green on the stem.
Angle D
1Sketch the angle D flower lightly on watercolor paper. Working wet-on-wet, brush water on the interior of the petals only.
2Before the water dries, apply Level 3 density cobalt blue on the edge of the interior petals and create a gradient. Allow the paint to dry.
3Mix a vibrant pink (I used Opera Pink) and cobalt blue in an approximately 3:2 ratio to make a red-violet color. Apply Level 3 density paint on the upper edge of the outer petals. Working wet-on-dry, make a gradient.
4Paint the stamens with Permanent Yellow Deep. Create thin lines in the petals with Level 2 or 3 density cobalt blue, going from the center outward. Apply Level 5 density medium green on the stem.
Hibiscus
The hibiscus is a beautiful tropical flower characterized by its protruding stamen. This is an excellent flower to sketch because it’s easy to render from various angles.
SKETCH THE FLOWERS
You’ll learn how to sketch the hibiscus in three different angles using the three-step method.
Angle A
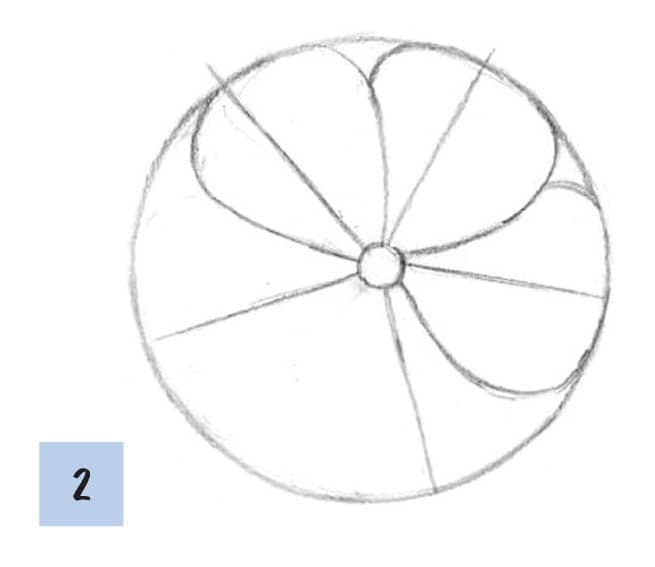
1For a front-facing flower, draw a large circle and create horizontal and vertical guidelines that evenly divide the circle. Draw a tiny circle at the intersection of the guidelines.
2Draw five evenly spaced straight lines for the petal guidelines. Draw each flower petal, making sure one overlaps the next.
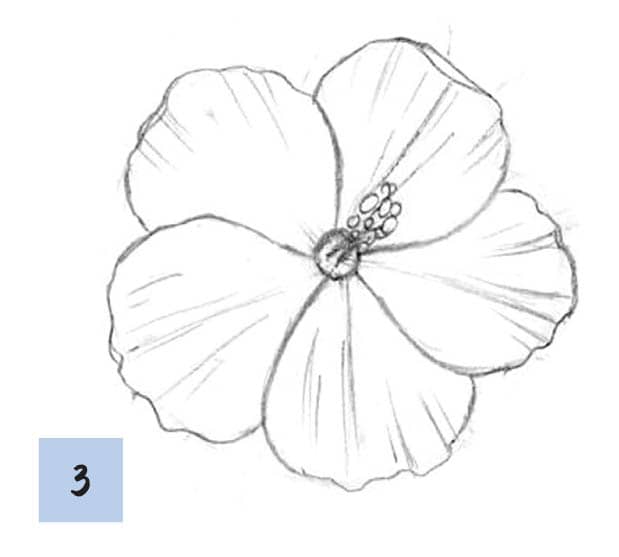
3Add details to the flower petals by sketching lines that indicate creases and wrinkles. Sketch the protruding stamen by drawing a short line from the middle circle that overlaps the top right flower petal. Create a cluster of small circles around the line to give the stamen some definition.
Angle B
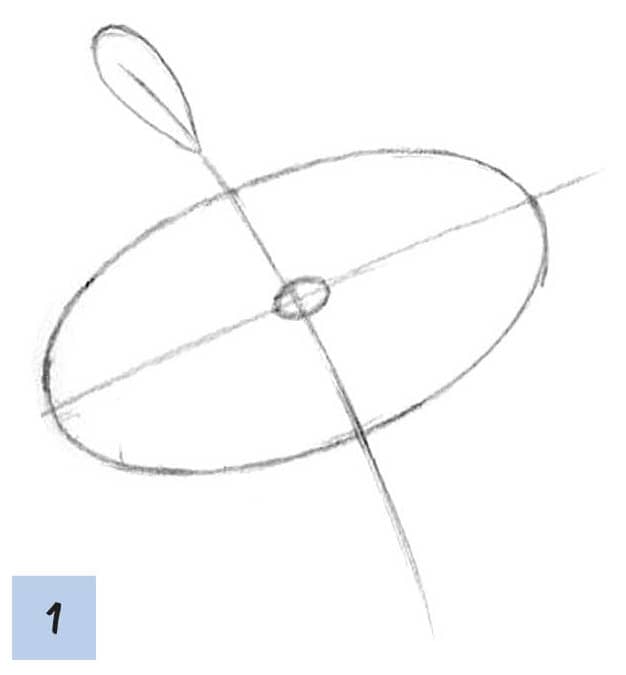
1Draw a vertical line slightly curving to the right. Draw a horizontal line perpendicular to the vertical line. Using these as guidelines, draw a larger oval with a smaller oval in the center. Sketch a teardrop shape on the top of the vertical line to mark the stamen.
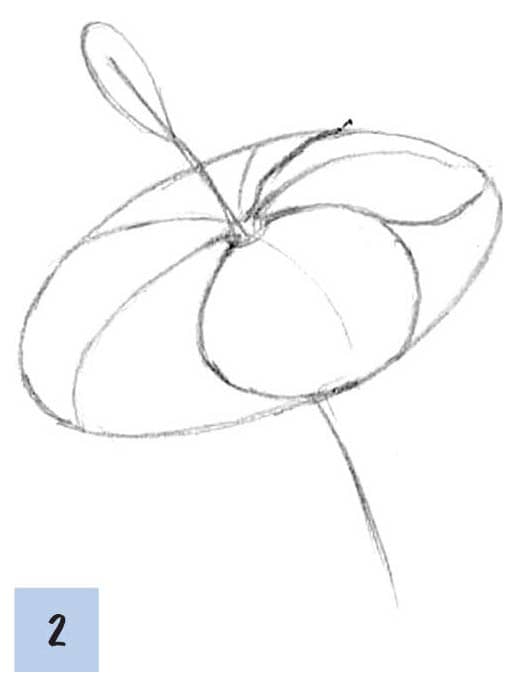
2Draw five curved guidelines to create the placement of the flower petals. Using the guidelines, draw each flower petal, noting how the petal shapes become wider or more narrow, or shorter or longer, according to the perspective. Also indicate how the petals overlap.
3Add details to the petals by sketching lines that indicate wrinkles. Add random small circles to the stamen. Thicken the stem and add jagged-edged leaves to complete the sketch.
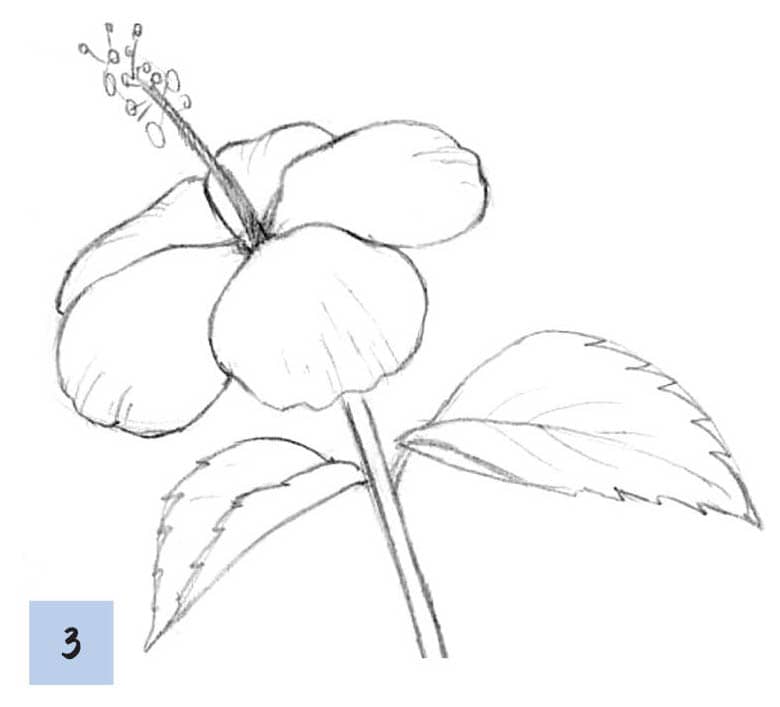
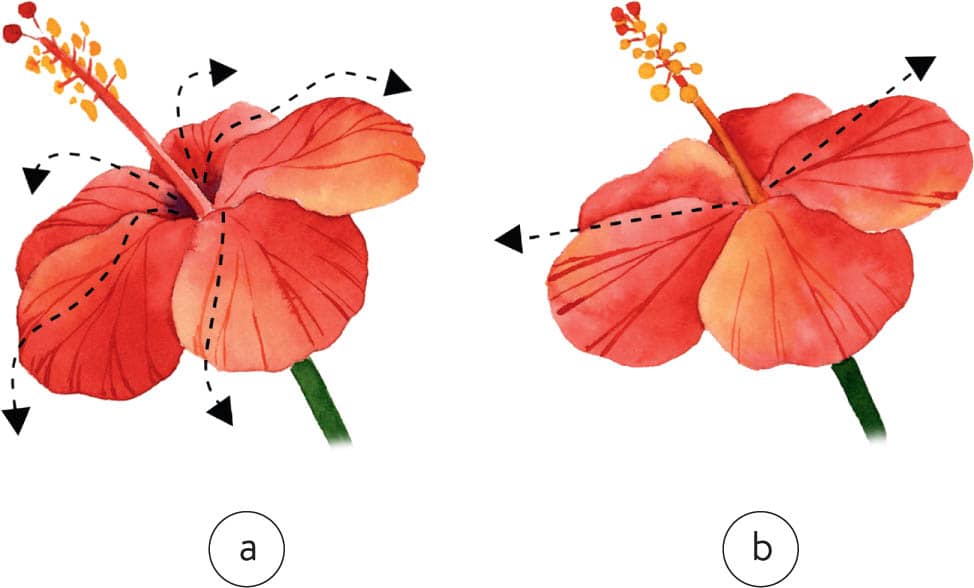
Angle C
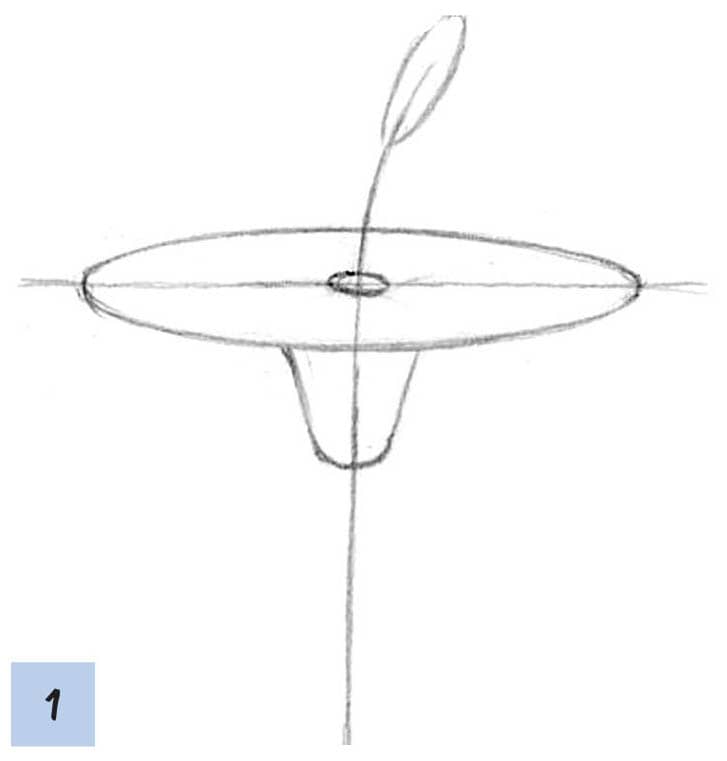
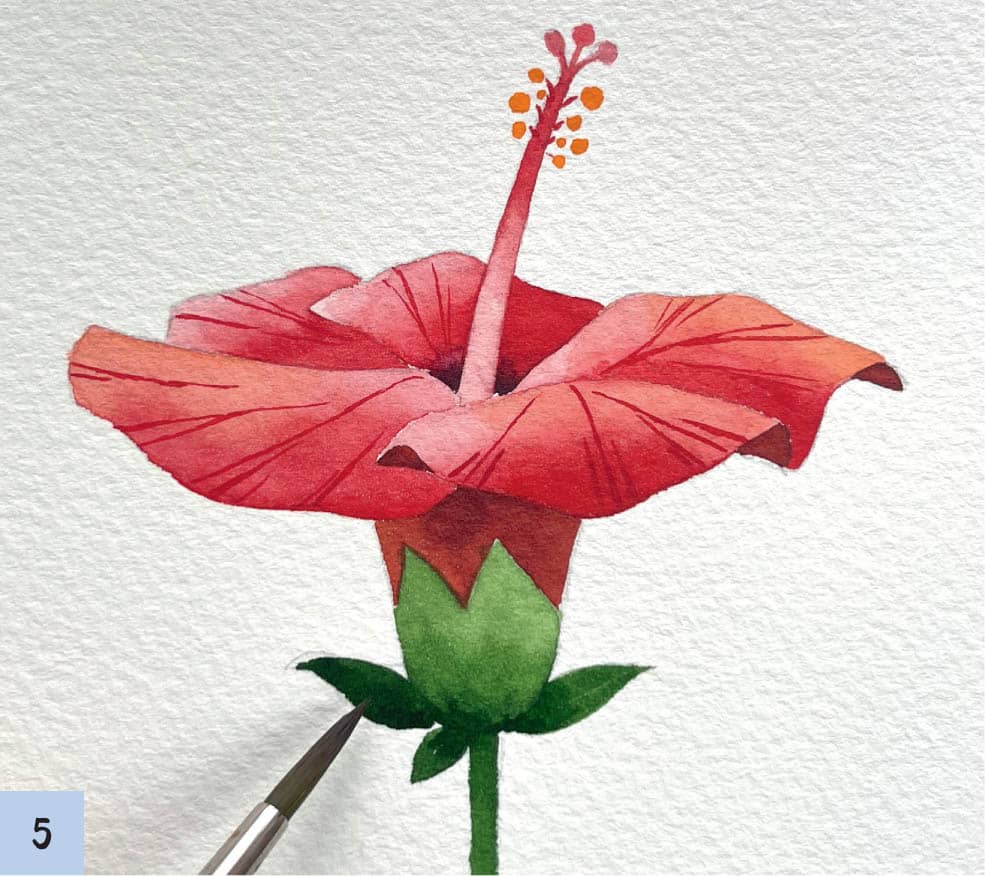
1Draw a vertical line slightly slanting to the right, and a perpendicular line intersecting it. Draw a narrow horizontal oval using the intersecting lines as guidelines. Create a tiny oval in the middle of the larger oval and draw a cone at the base. Sketch a teardrop shape at the top of the vertical line; this forms a side view of the hibiscus.
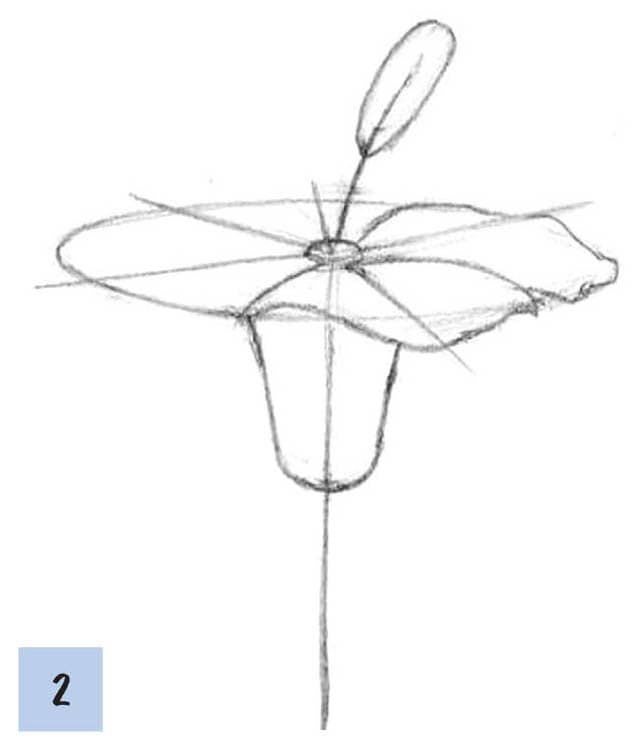
2Draw five guidelines indicating the positions of the flower petals. Use straight lines for the petal guidelines instead of the curved ones in Angle B. Draw flower petals one by one, following the guidelines. Here, the perspective flattens the petals, but they still overlap, with some petals curving.
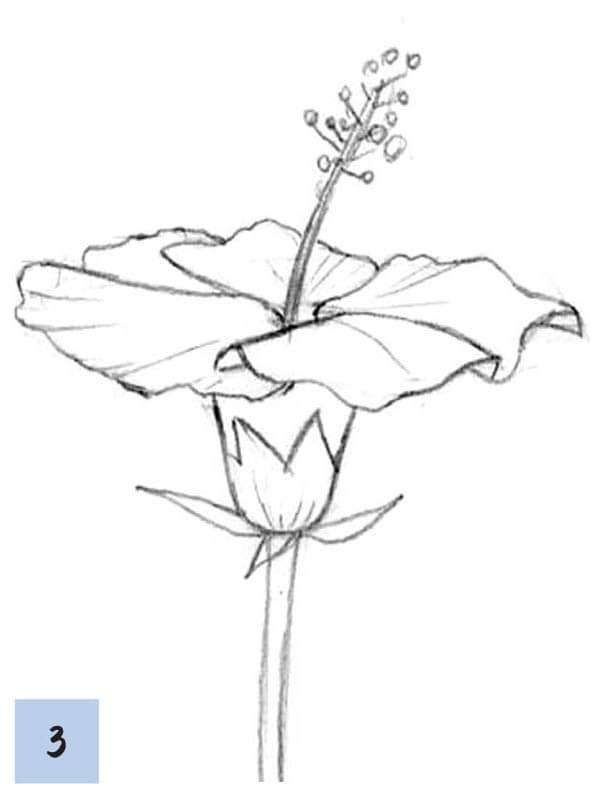
3Draw lines in the petals to create wrinkles and a cluster of random small circles for the stamen. Add a pointed layer to the base of the cone, draw a sepal, and thicken the stem to complete the flower.
PAINT THE FLOWERS
Painting hibiscus flowers is an excellent way to practice using the color red. In this lesson, you’ll learn how to provide enough contrast to express the intensity and the light texture of the flower petals.
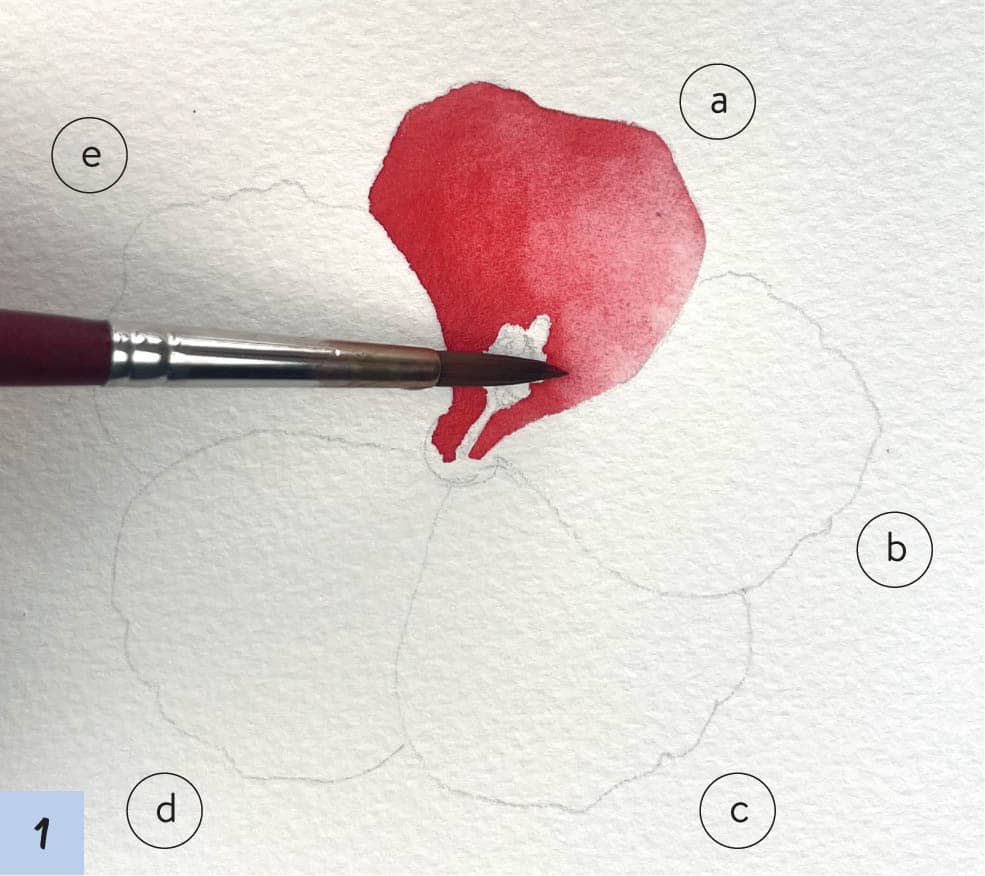
Angle A
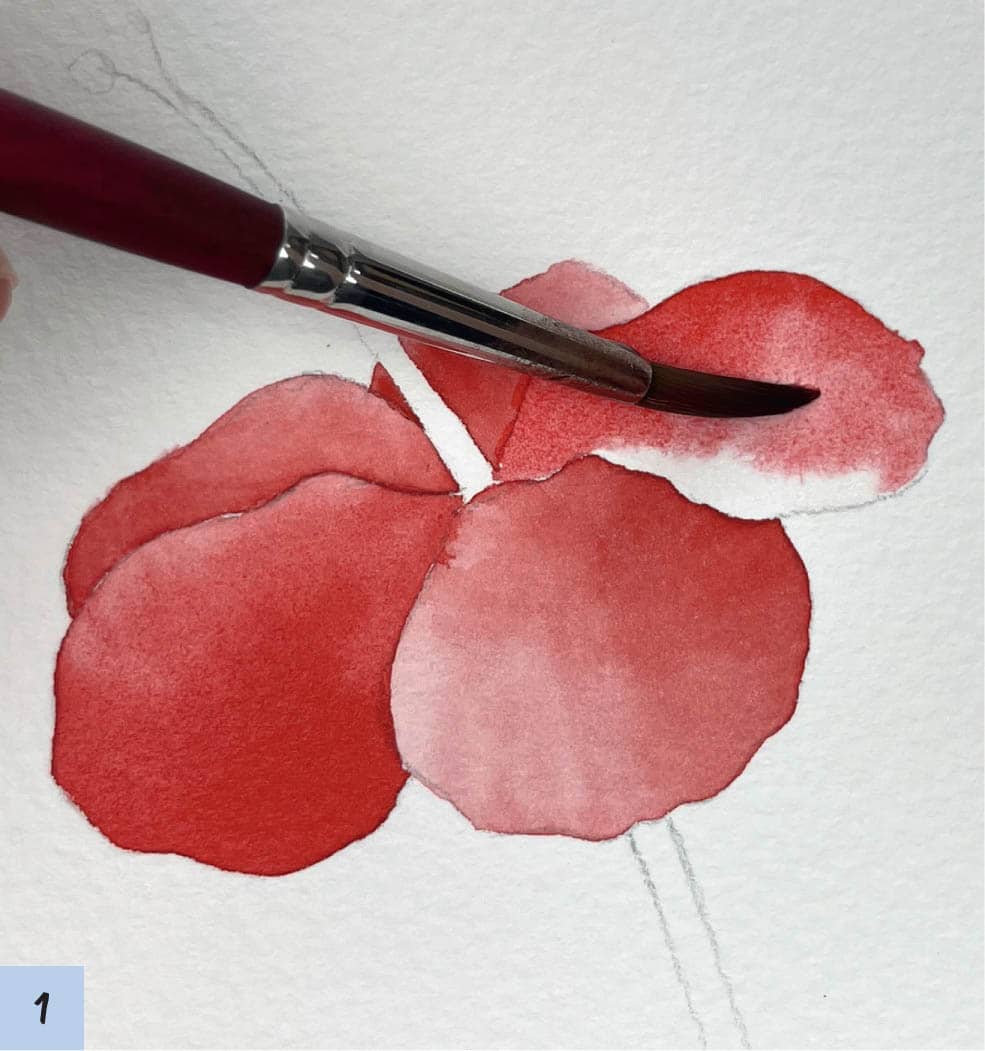
1Sketch the Angle A flower lightly on watercolor paper. For this flower, paint each petal separately. Working wet-on-dry (see here), use Level 5 Permanent Red (medium warm red) to paint the left portion of flower petal a. Create a gradient (see here) by moving the color horizontally with the brush so that it fades out on the right side of the petal.
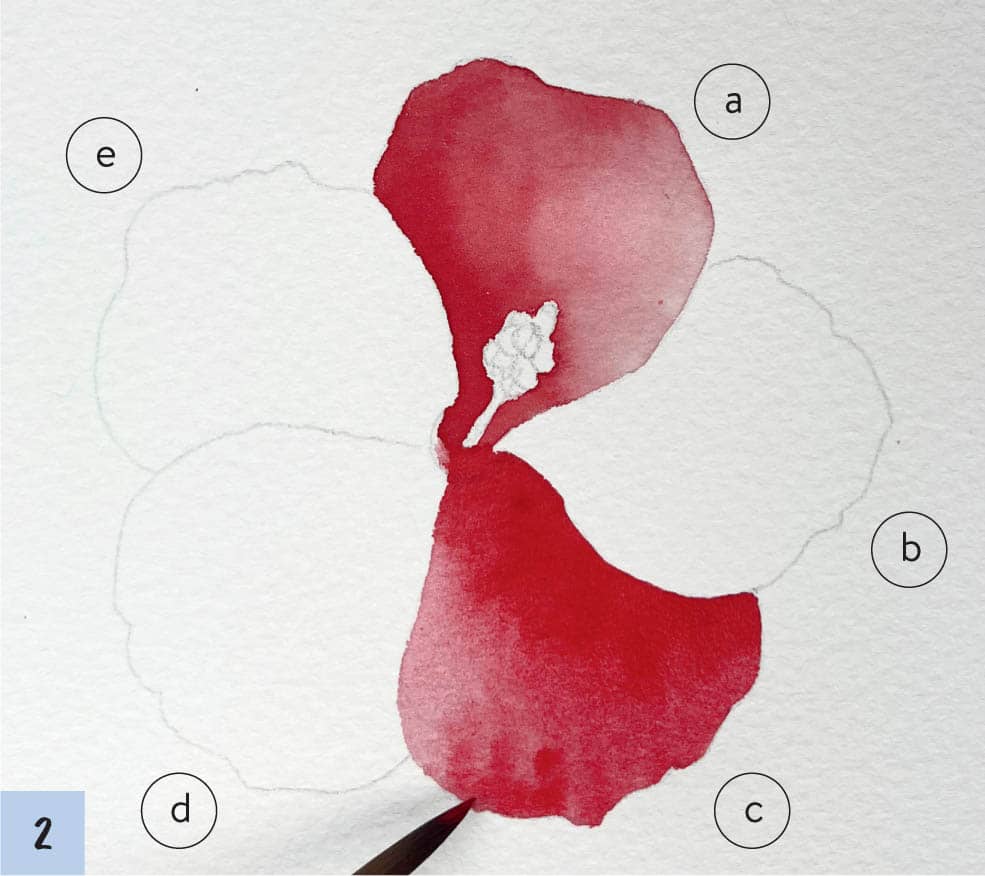
2Follow the instructions in step 1 to color flower petal c. I recommend you color alternate petals instead of consecutive ones; this way the colors won’t mix, and you’ll save time because you won’t have to wait for the previous petal to dry.
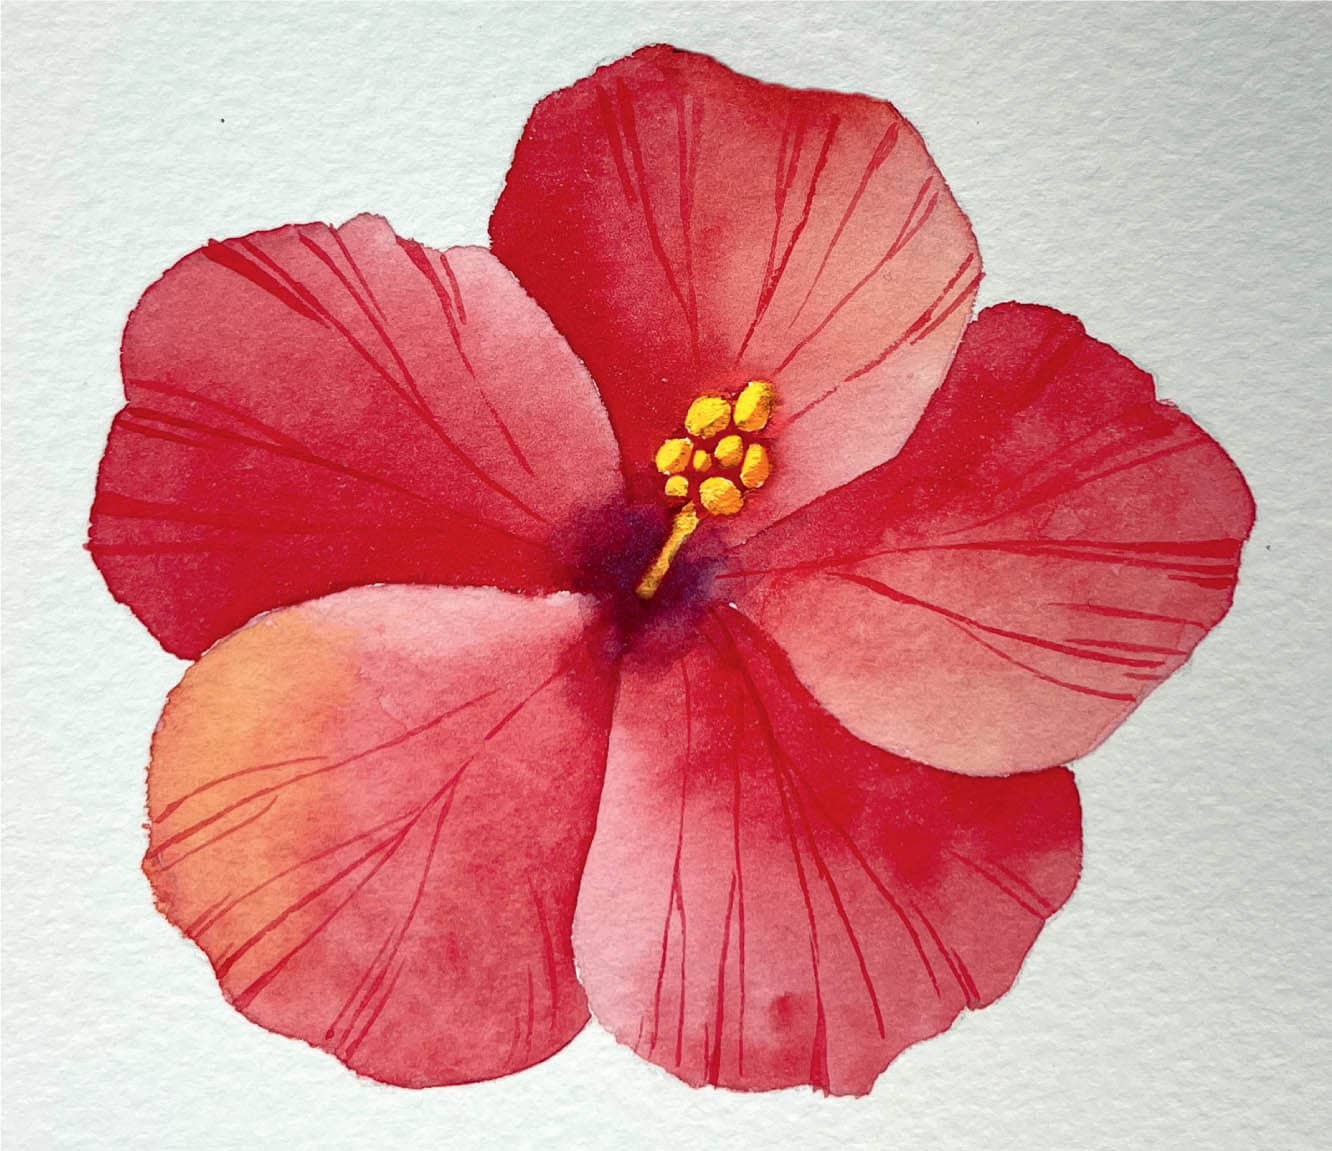
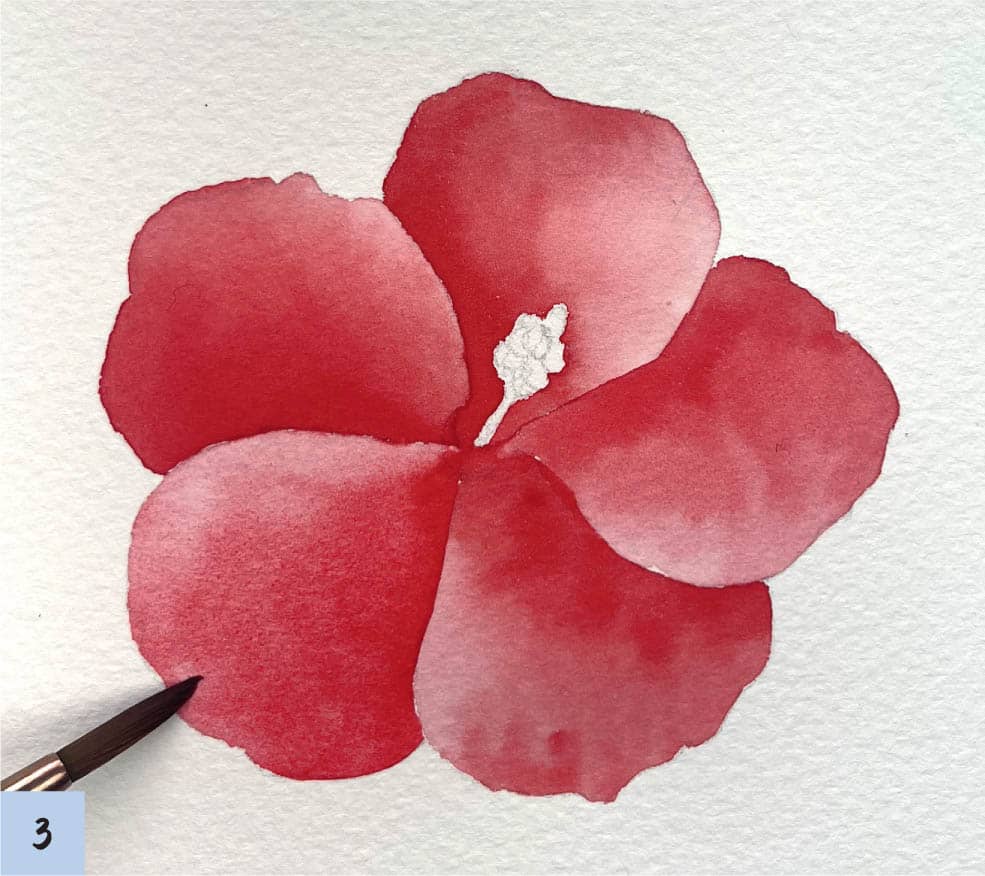
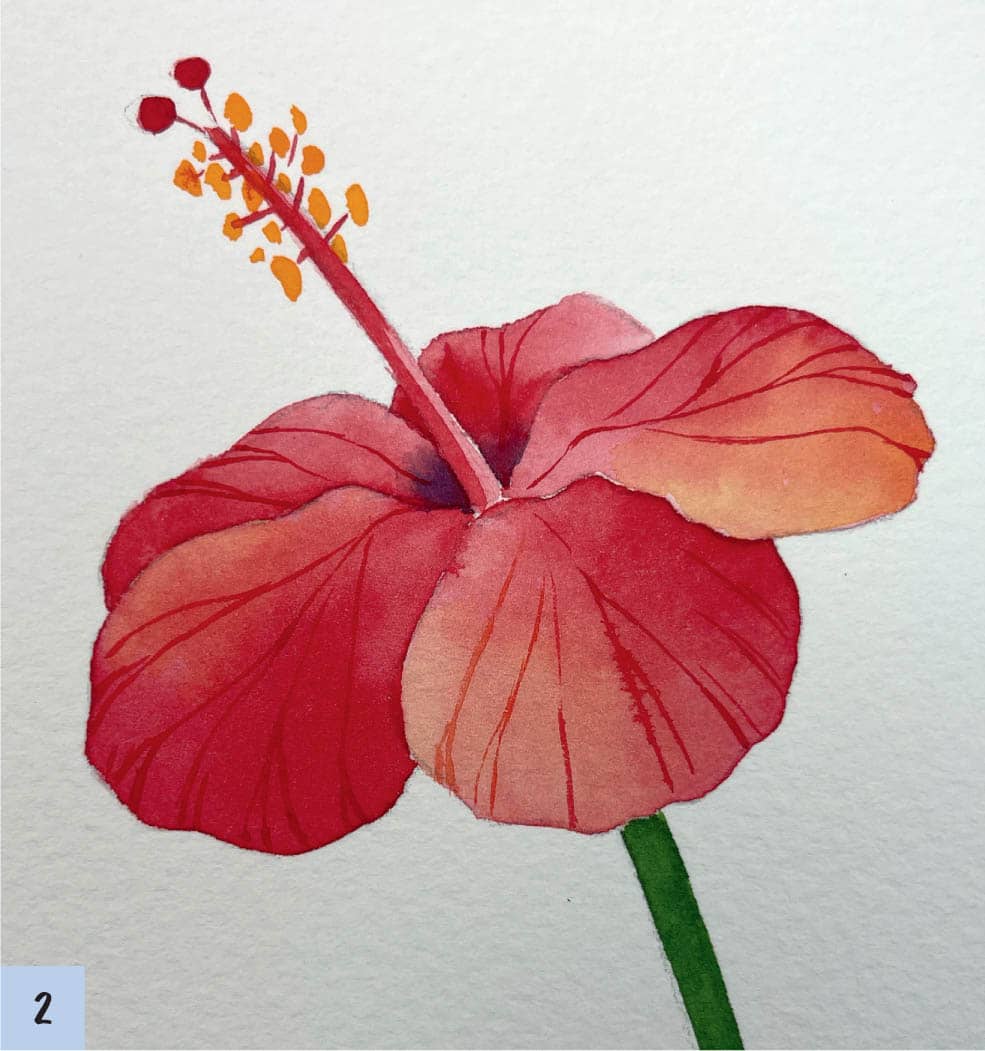
3Paint the remaining petals using the same technique (avoid painting the stamen). By doing this, you’ll notice that each flower petal includes dark and bright areas. Although the red is intense, the petals don’t look stuffy or heavy.
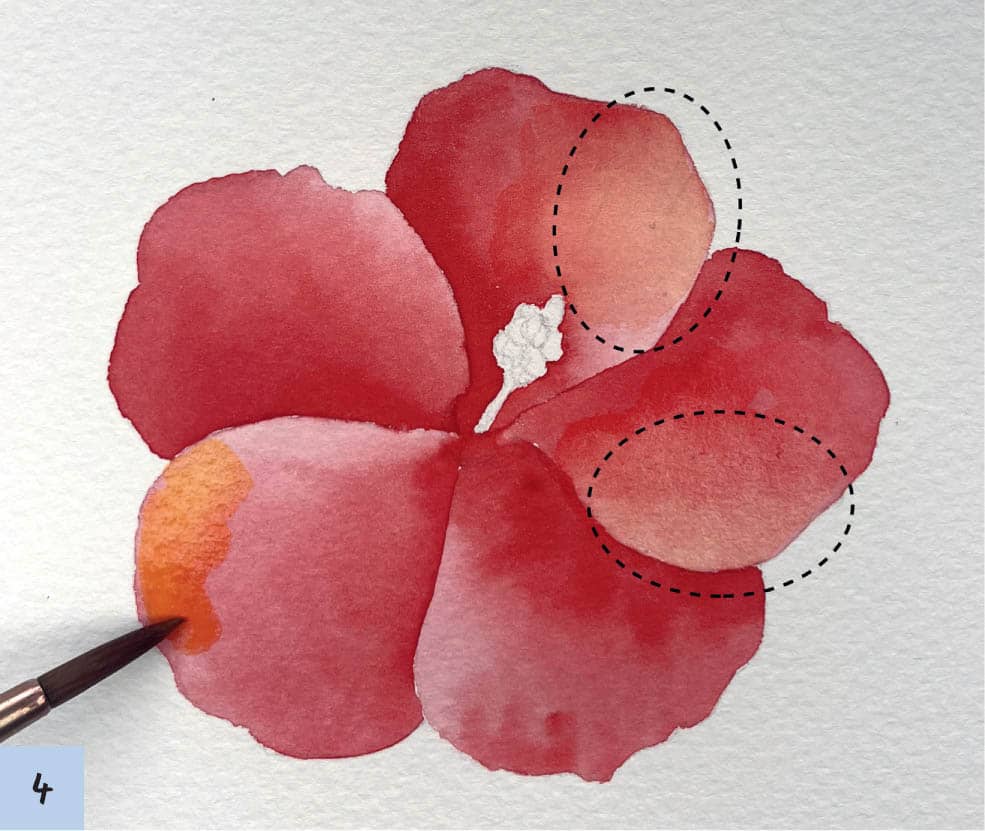
4Make the red hue even more dynamic by glazing (see here) the brighter portion of the flower petals with Level 1 density yellow-orange, indicated by the dotted lines. Glaze only a couple of the petals. If all petals are glazed, the dynamic effect will be lost.
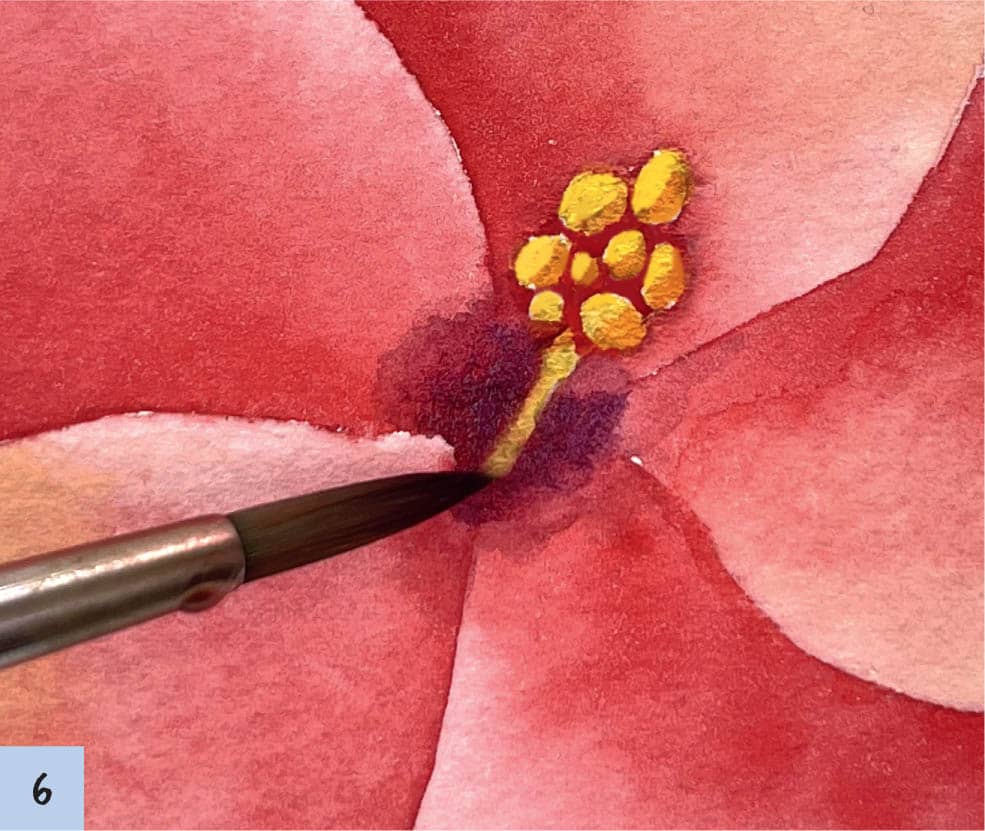
5Color the stamen by painting dots with Level 5 density yellow. Use just the tip of the brush to color the dots. Allow the paint to dry. Shade the stamen by brushing yellow-orange on one side of the dots. The area is relatively small, but these color details make a big difference.
6Create depth in the flower center by adding shading. Paint the area around the stamen using Level 4 density Bright Clear Violet (blue-purple). Avoid painting the stamen violet. Softly blend the edges with the brush.
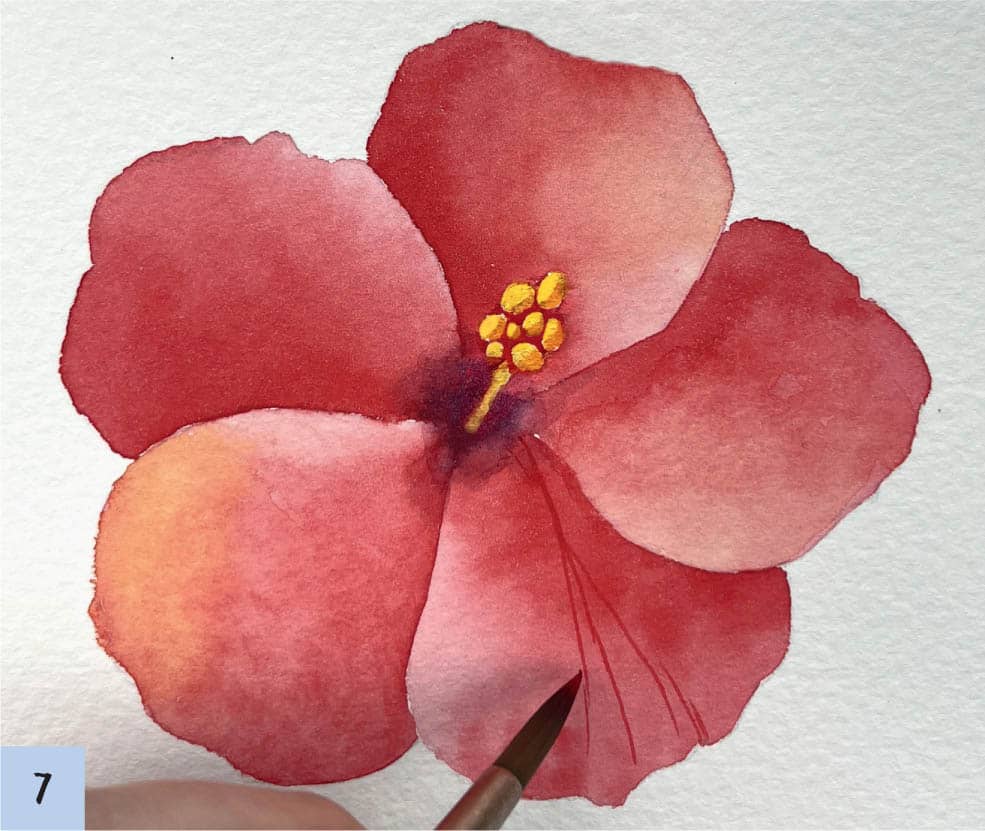
7Create patterns of thin lines on the petals with Level 5 Permanent Red. Hold the brush straight up and use just the tip to make the lines. Increase the amount of lines toward the outer part of the petals (see the finished image, here).
Angle B
1Sketch the Angle B flower lightly on watercolor paper and paint the petals following steps 1 to 4 for the Angle A flower.
2Color the stamen using the gradient technique (see here) and Level 5 density red. Apply the color near the upper part of the stamen, moving it down to make it fade. Use Level 5 density yellow to color the stamen dots, making random strokes with the brush tip. Add shading to the center of the flower petals by glazing the area with Level 3 density violet. Paint thin lines on each petal with Level 5 Permanent Red (warm, bright red). Complete the flower by coloring the stem with Level 4 density Hooker’s Green.
Angle C
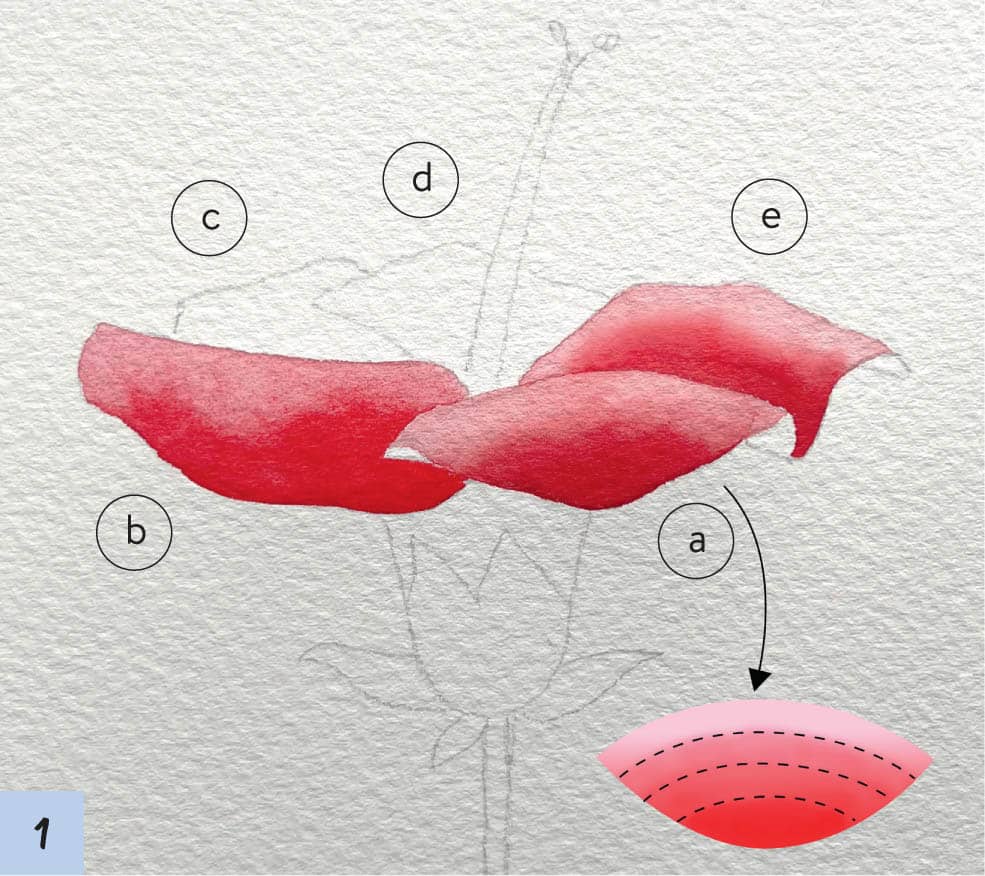
1Sketch the Angle C flower lightly on watercolor paper. Working wet-on-dry, paint Level 5 density Permanent Red (medium warm red) on the bottom edge of petal a. Wash the brush with clean water, then lightly blot it with a paper towel. Then create a curved gradient along the top edge of the petal as shown in the picture. Allow the paint to dry. Paint petal e in the same way. Paint petal c in the same way and create a horizontal gradient.
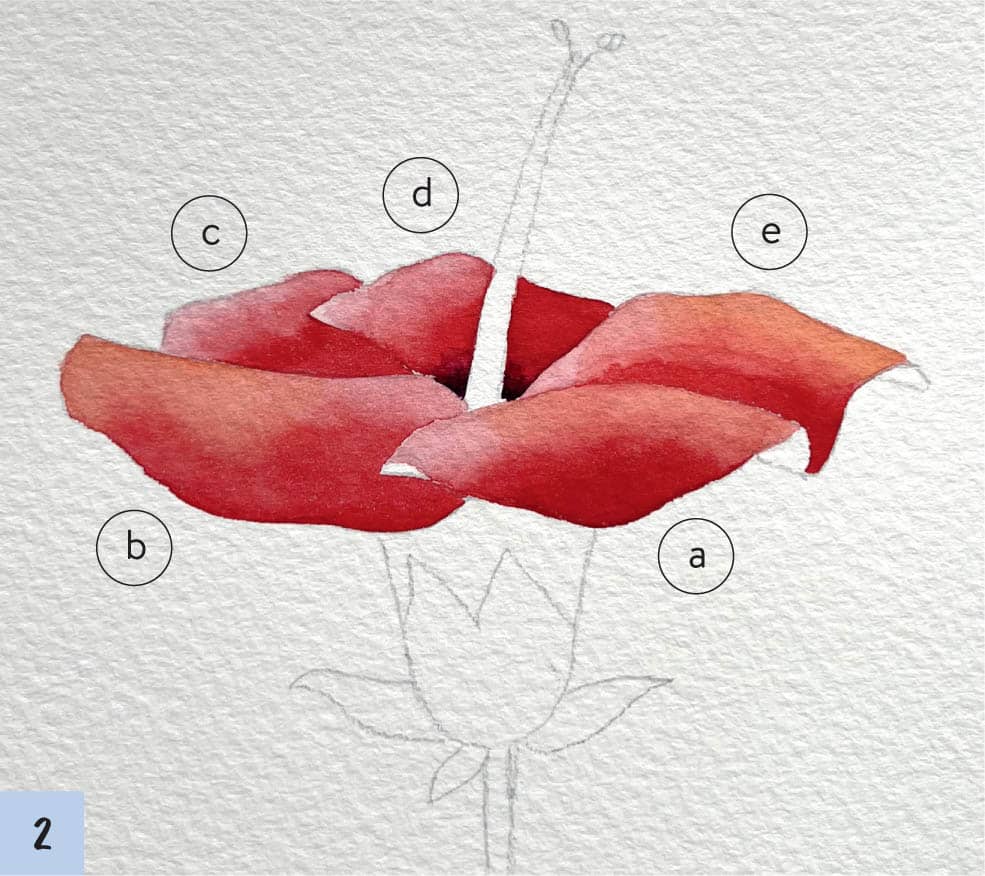
2Working wet-on-dry, paint Level 5 density Permanent Red (medium warm red) on the right side of the petal d and create a gradient as shown in the picture. Before the paint dries, add Level 4 density Bright Clear Violet (bluish-purple) around lower stamen of the petal d. Allow paint to dry. Paint petal c in the same way, but do not add purple shading. Add a glazing layer using Level 1 density yellow-orange on the right upper portion of the petal a and e. For petal b, add glazing in the upper left.
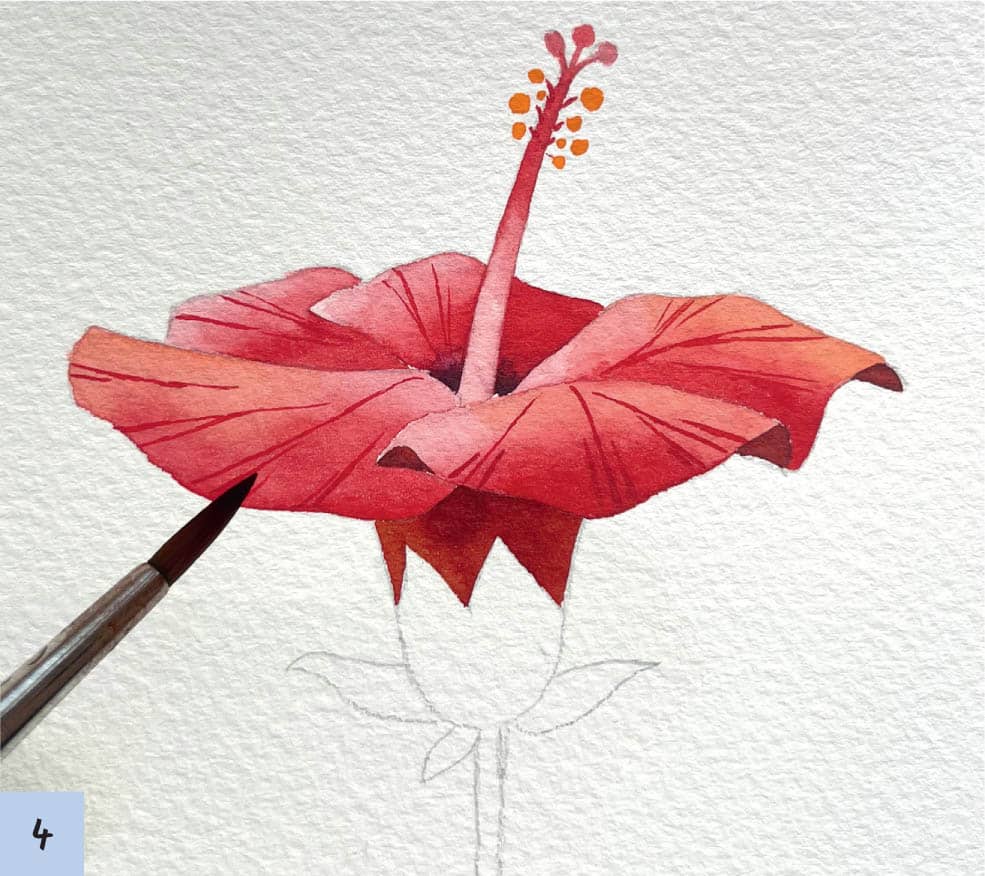
3Working wet-on-dry, use Level 5 density Permanent Red (medium warm red) to color the upper part of the stamen, then move it down to make it fade. Use the same color to paint the small dots at the top of the stamen. Use Level 5 density yellow to color the remainder of the circles on the stamen, using random brushstrokes. Color the underside of the petals and the cone-shaped petal with Level 5 density red-brown.
4Paint thin lines on each flower petal with Level 5 Permanent Red. For this perspective, the lines should be straight.
5Color the stem and the leaves with Level 4 Hooker’s Green. Create a gradient for the bottom of the sepal using Level 4 density Hooker’s Green. The color should be lighter near the top and darker at the base.
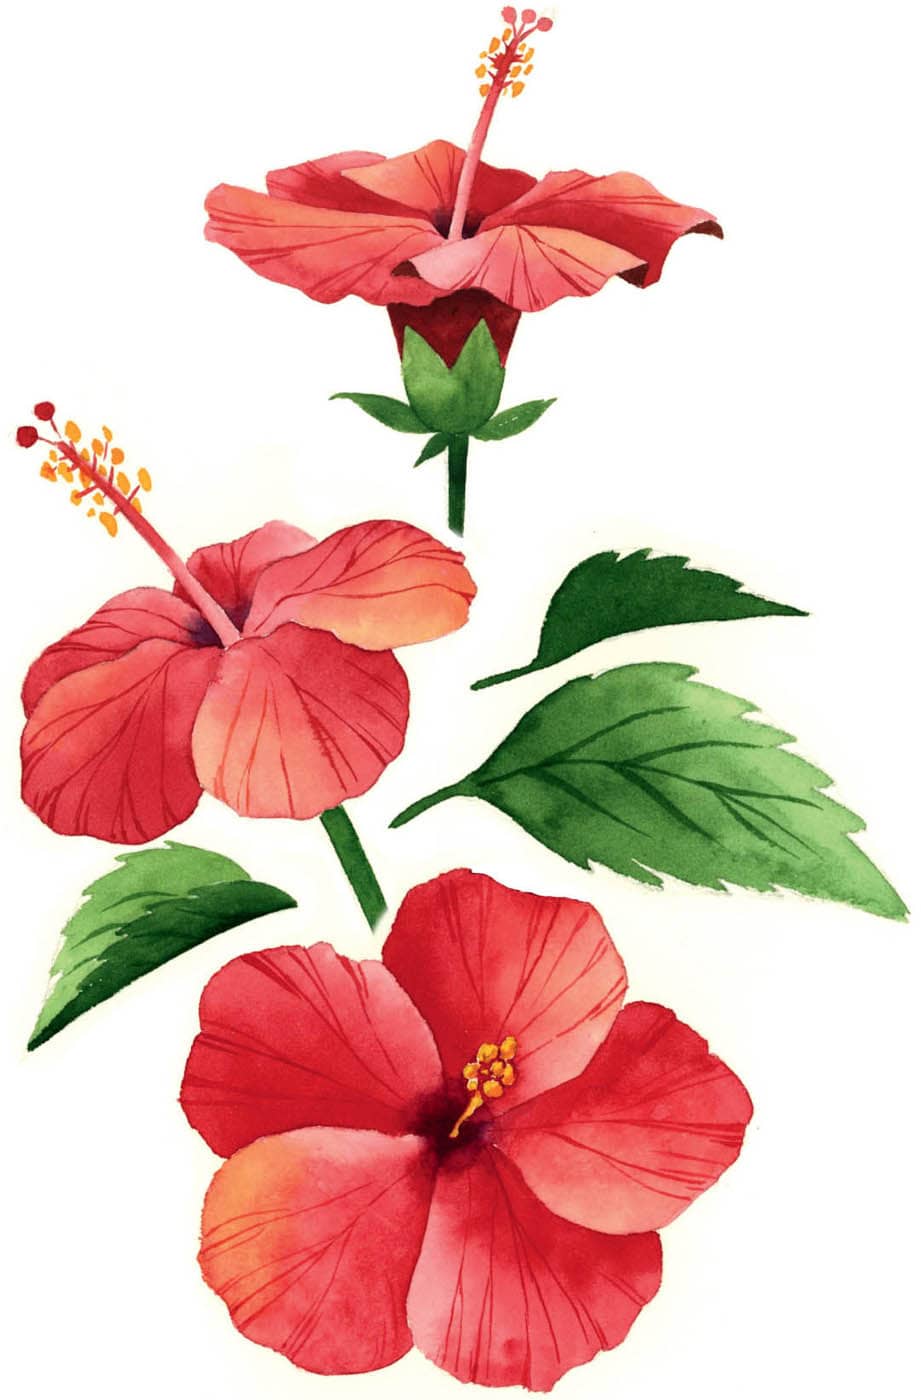
After sketching and painting the various angles of the hibiscus, create a painting that includes flowers at each angle. Arrange the flowers from small to large, and add leaves using Hooker’s Green.