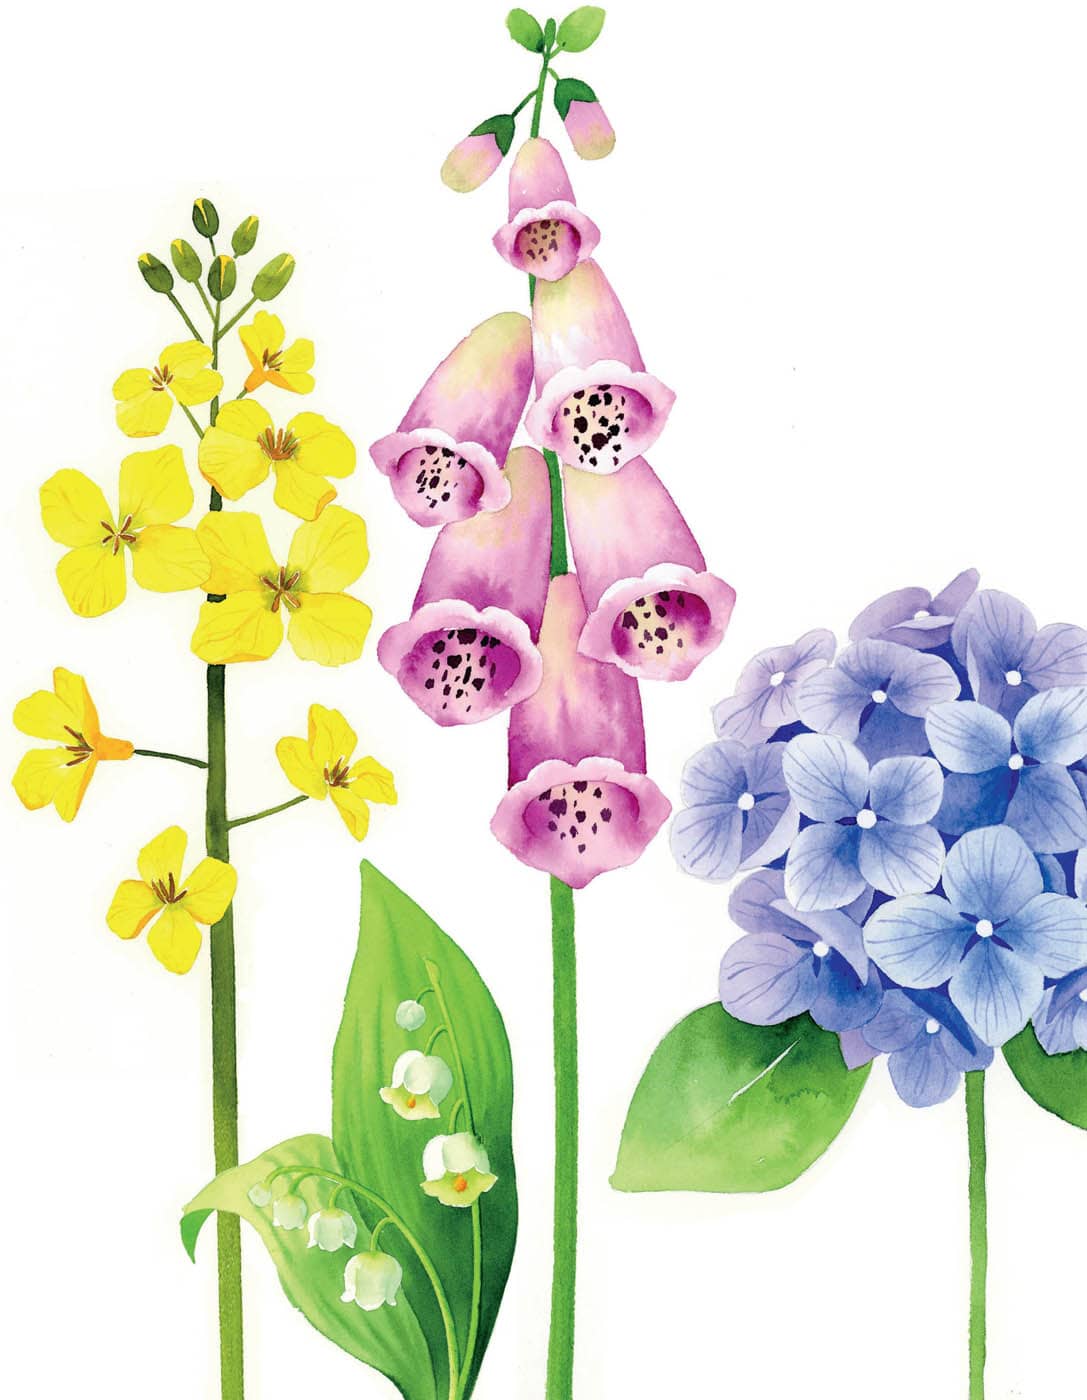
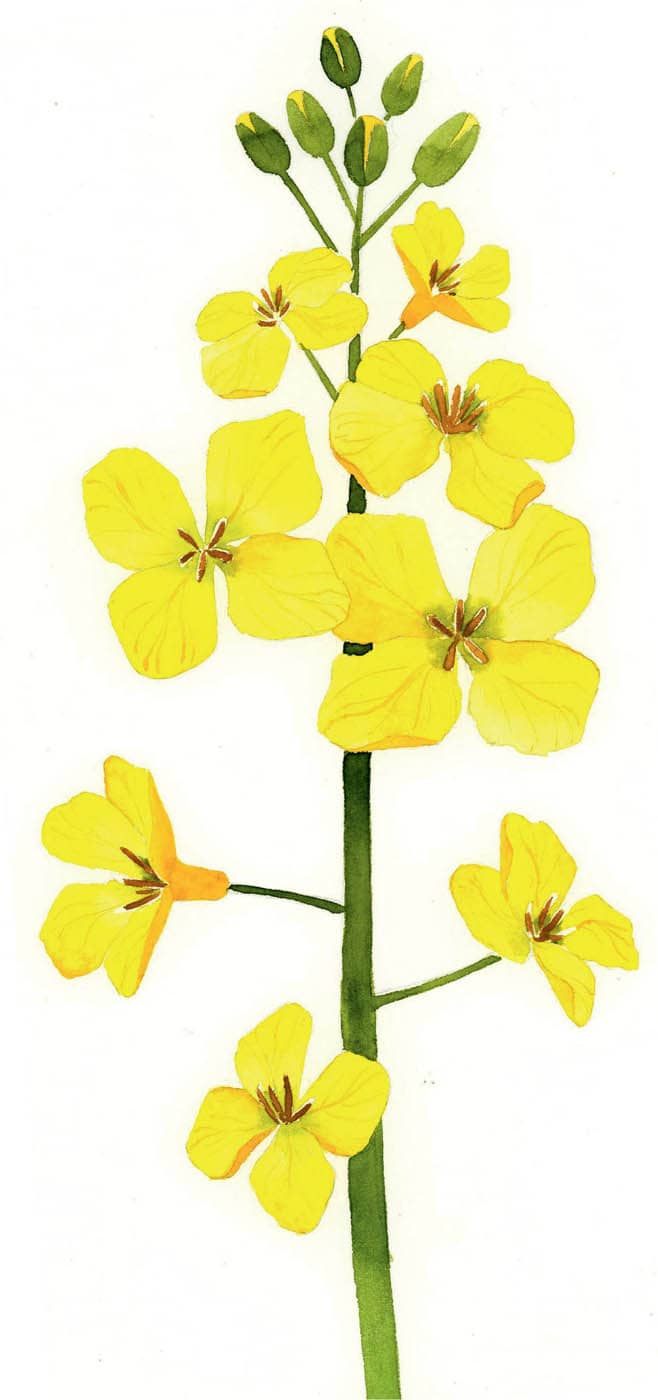
The bright yellow blossoms of canola flowers grow in clusters. This type of flower has a complex structure, and it would be challenging to draw all the features you see. In this lesson, you’ll learn how to remove the unnecessary parts and make the drawing simpler by realigning the structure. This method maintains the canola flower’s basic form. Remember, you’re realigning the structure, not creating a new flower.
SKETCH THE BLOSSOMS
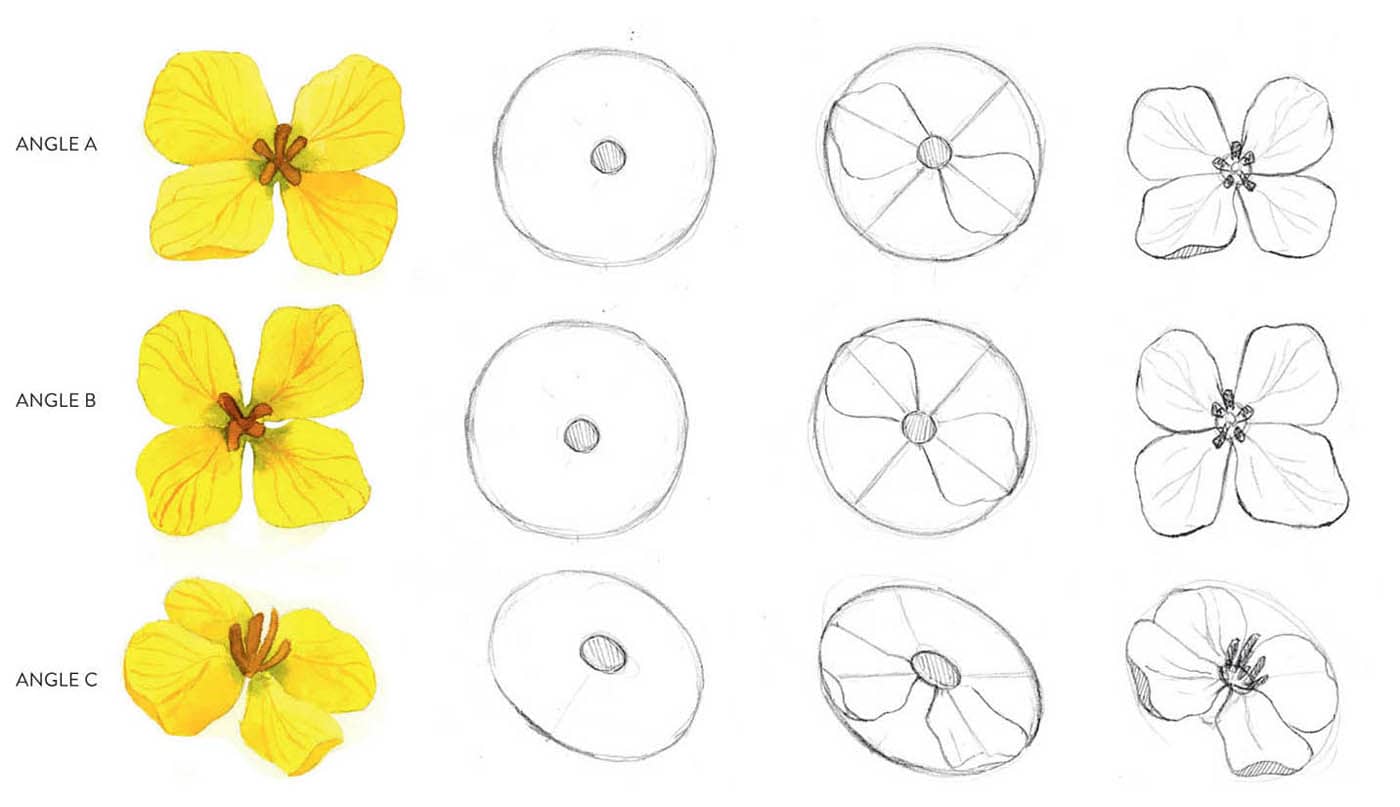
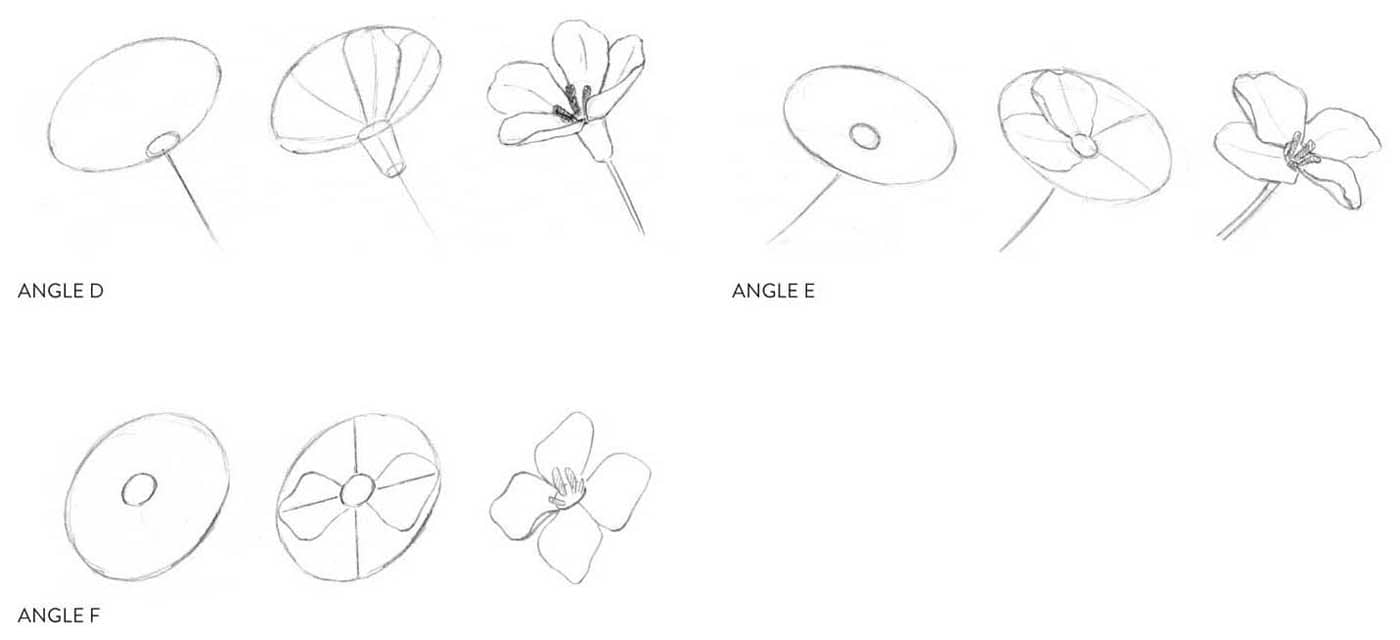
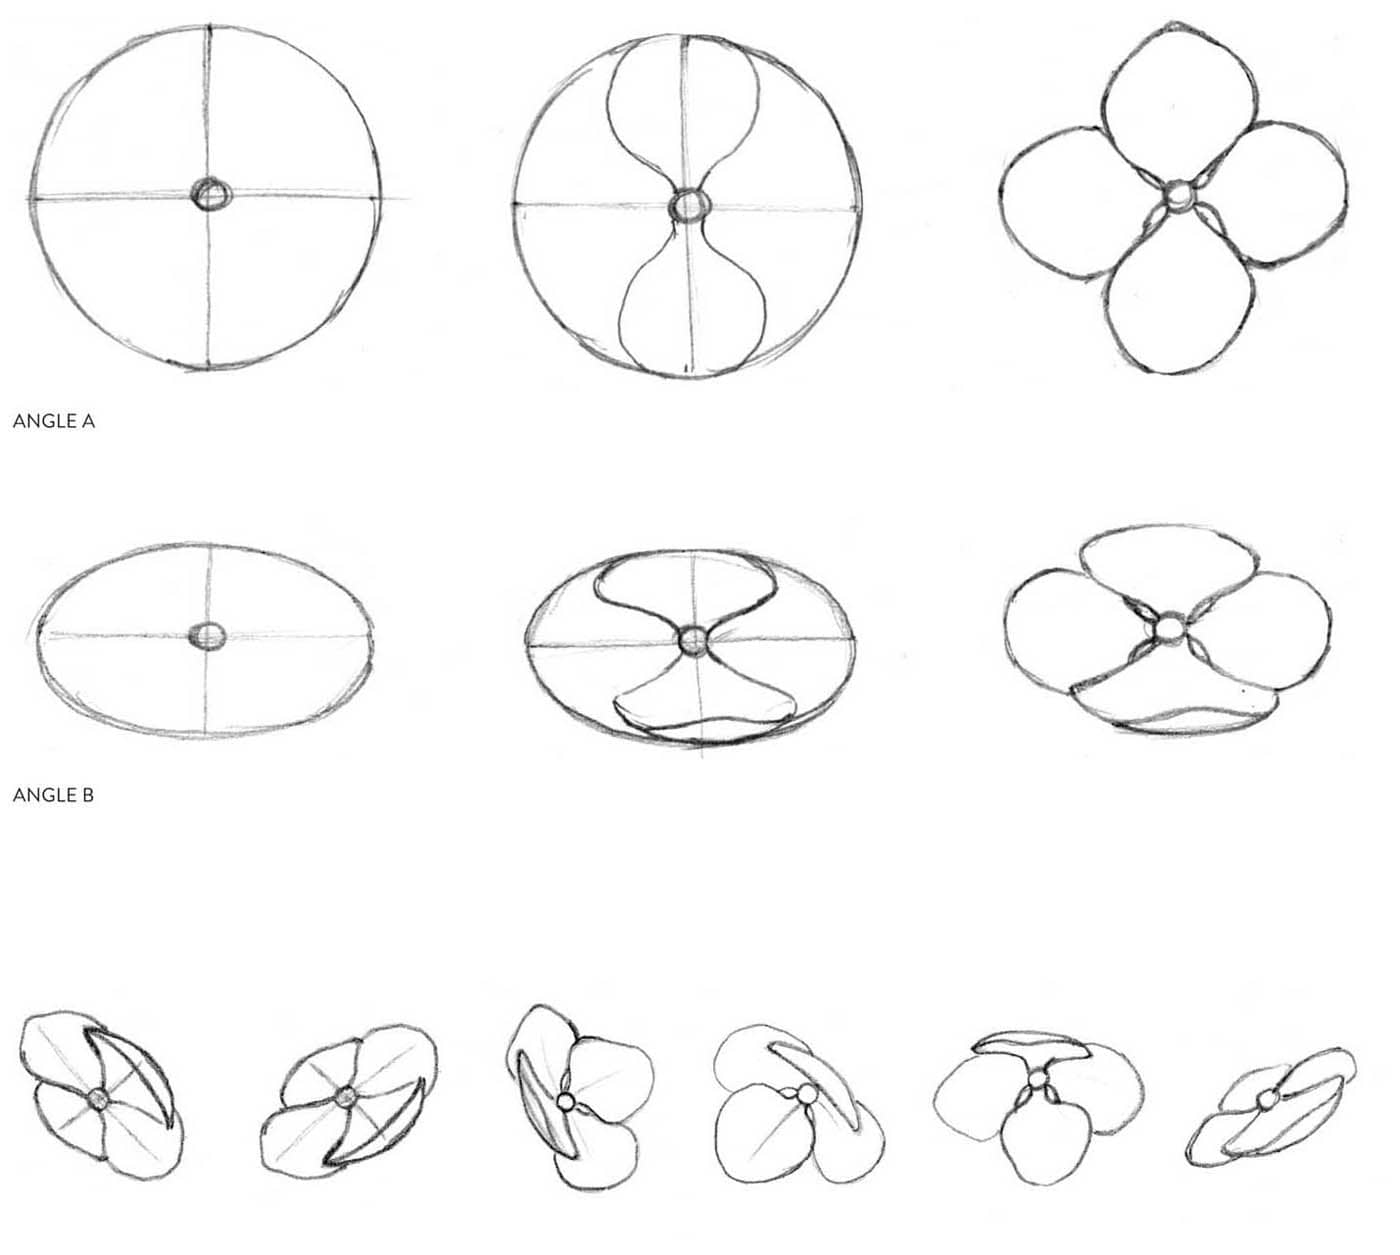
Use the three-step sketching method to practice drawing the four-petal blossoms from different angles. Notice the curve of the petals and how some turn upward at the edge. The stamens also point upward, which you can see in Angle C.
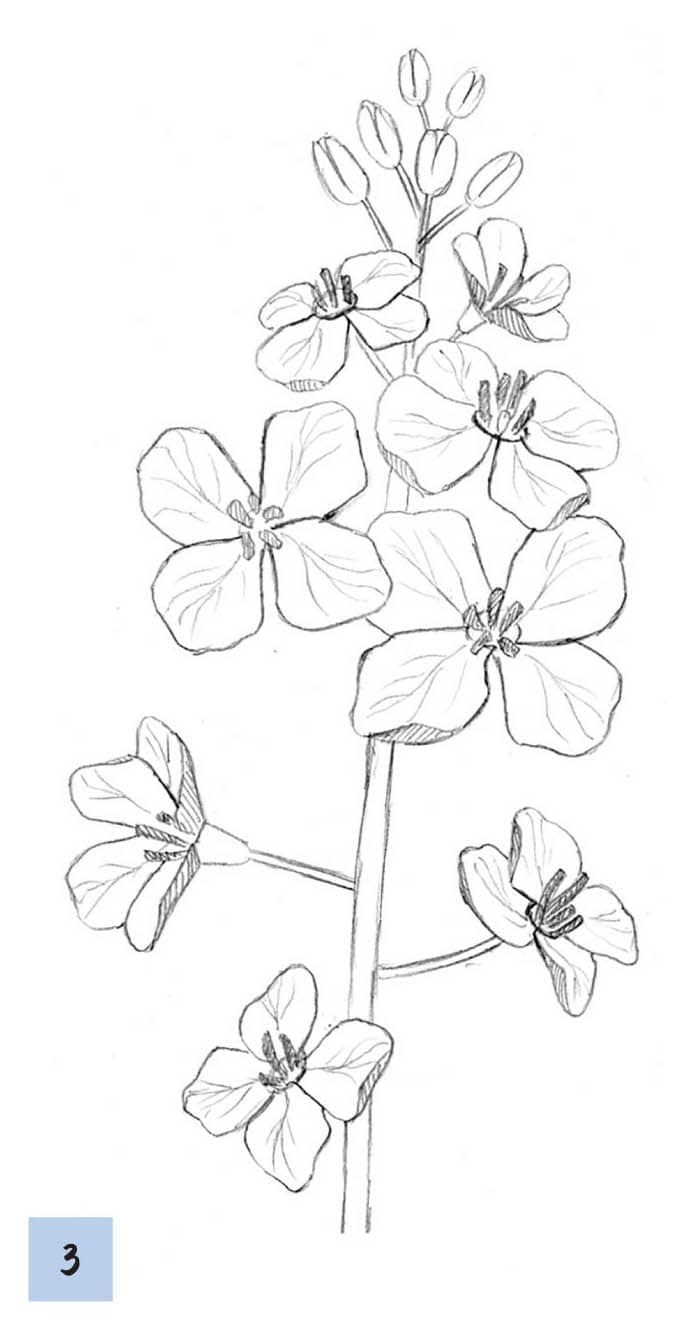
These sketching diagrams will help you draw the main blossoms of the flower.
More blossom variations
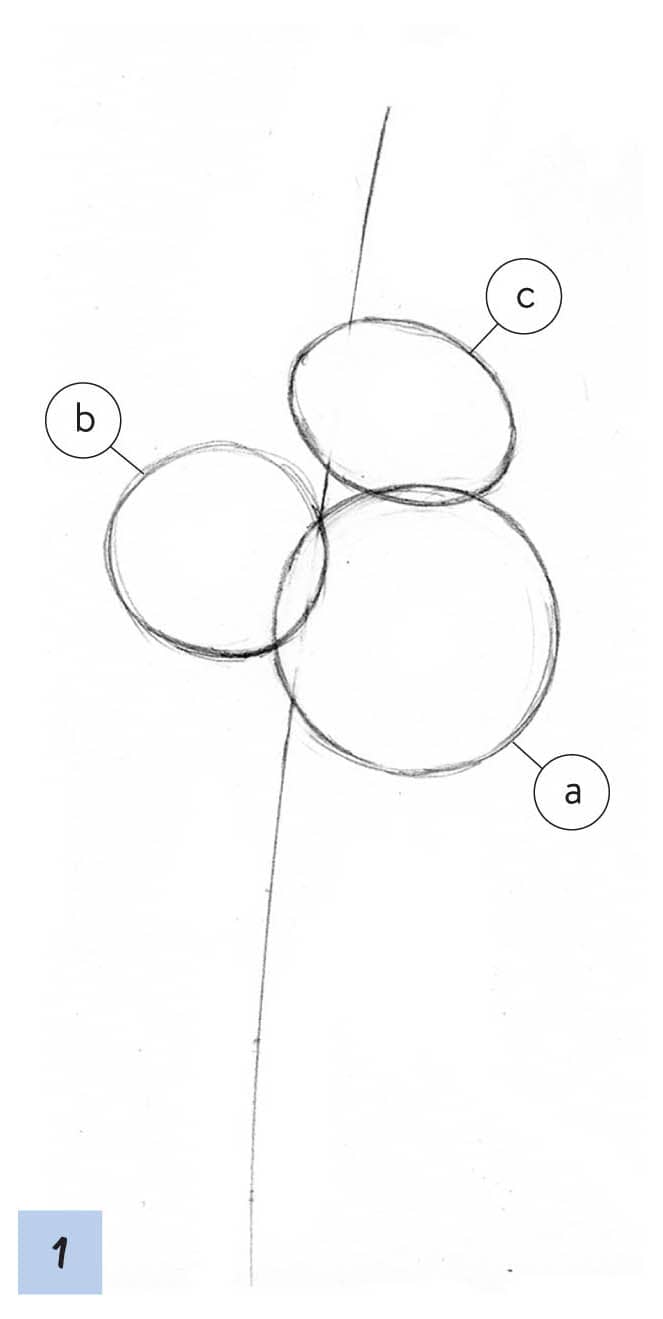
SKETCH THE FLOWER
1Draw a center stem for the three main blossoms. Draw circles and ovals for the blossom placement. Creating blossoms in different sizes and at different angles makes them more visually interesting. Remember that circles are bases for flowers viewed straight on, and ovals indicate flowers that are at an angle.
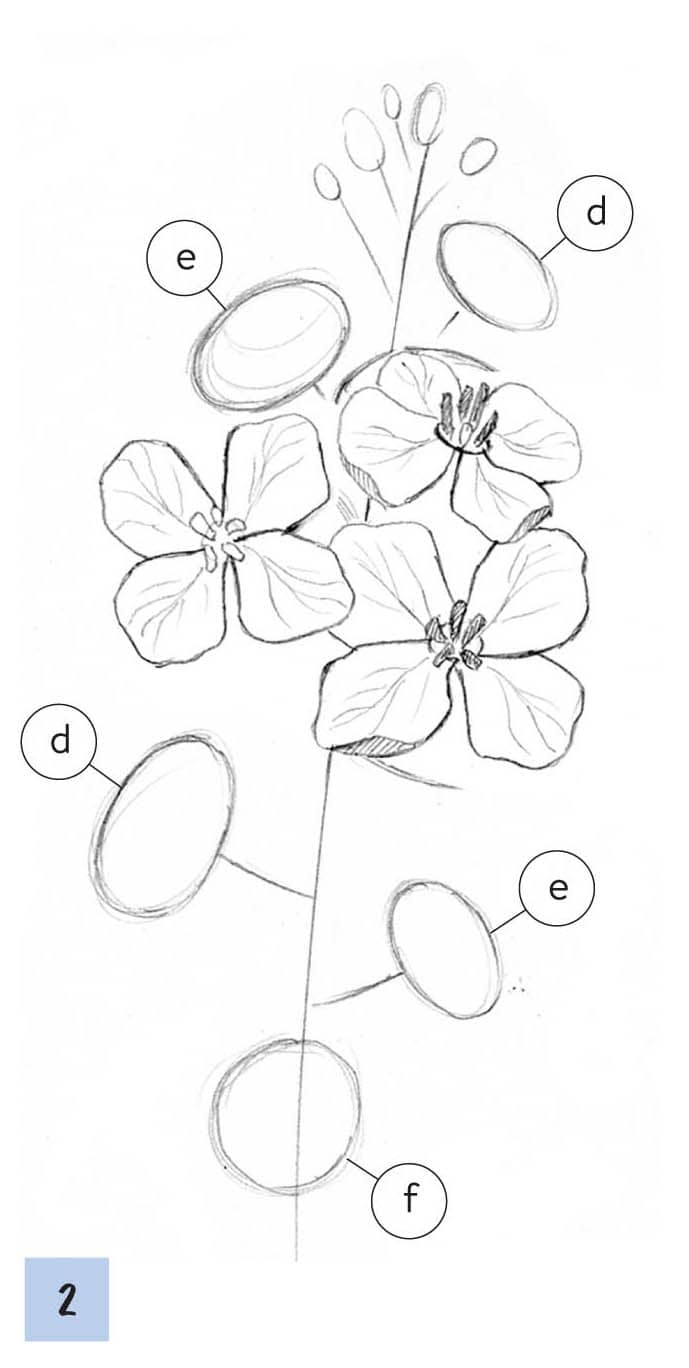
2Choose the placement of the other blossoms and buds, being aware of angles and positioning. As in step 1, draw them as circles or ovals first to determine the angle. The blossoms will appear more natural if you change the angles and have them face in different directions rather than having them all facing the same way. Use the three-step sketches (here) to draw the blossoms and their guidelines on the stem. Make sure some of the blossoms overlap, adding to the natural look.
3Continue to draw more blossoms, referring again to the three-step sketches. Draw some buds as well to complete the flower. Notice that from some angles you can see short stems attaching the blossoms to the main stem, as well as a cone-shaped blossom base.
PAINT THE FLOWER
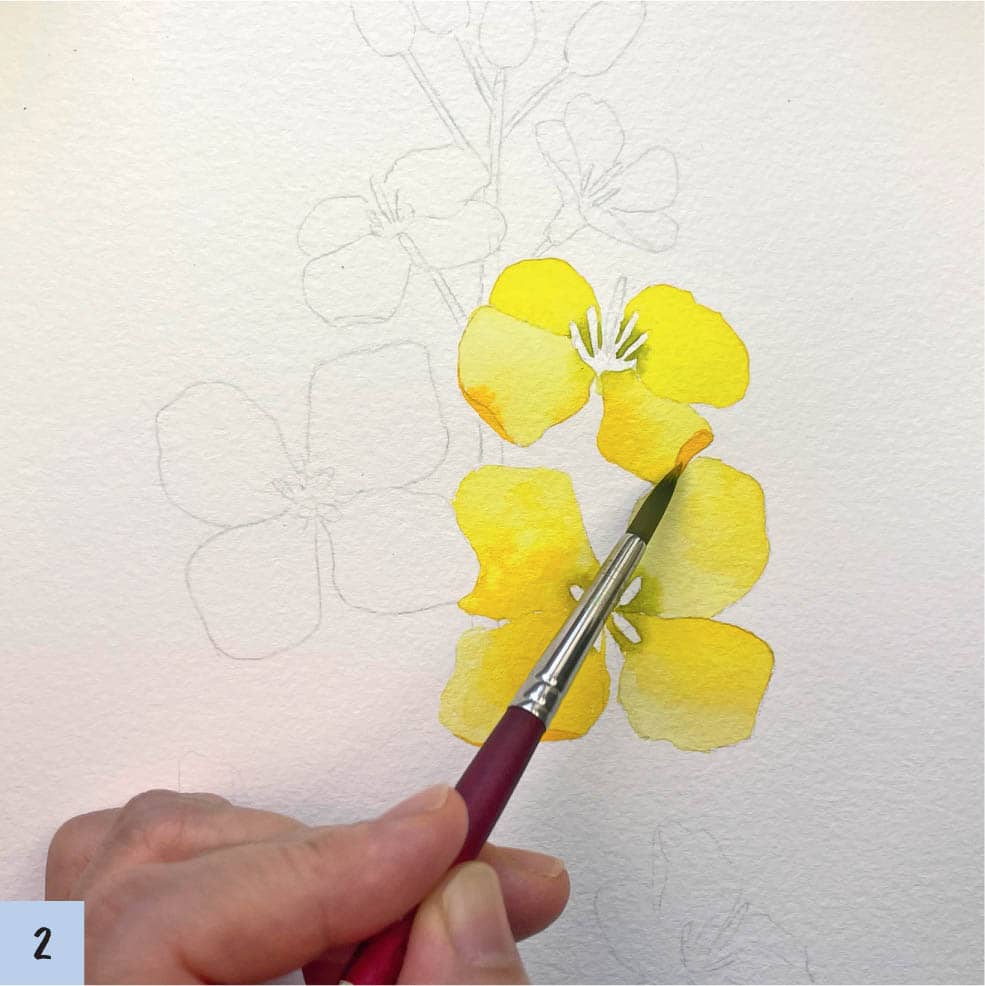
These flowers are painted in analogous shades of yellow, green, and gold, producing lovely gradations of color. To achieve the deep golden shade for the flowers, I used Permanent Yellow Light (bright yellow) as the base color, greenish-yellow for the flower centers, and Yellow Ochre (mustard yellow) for the stamens.
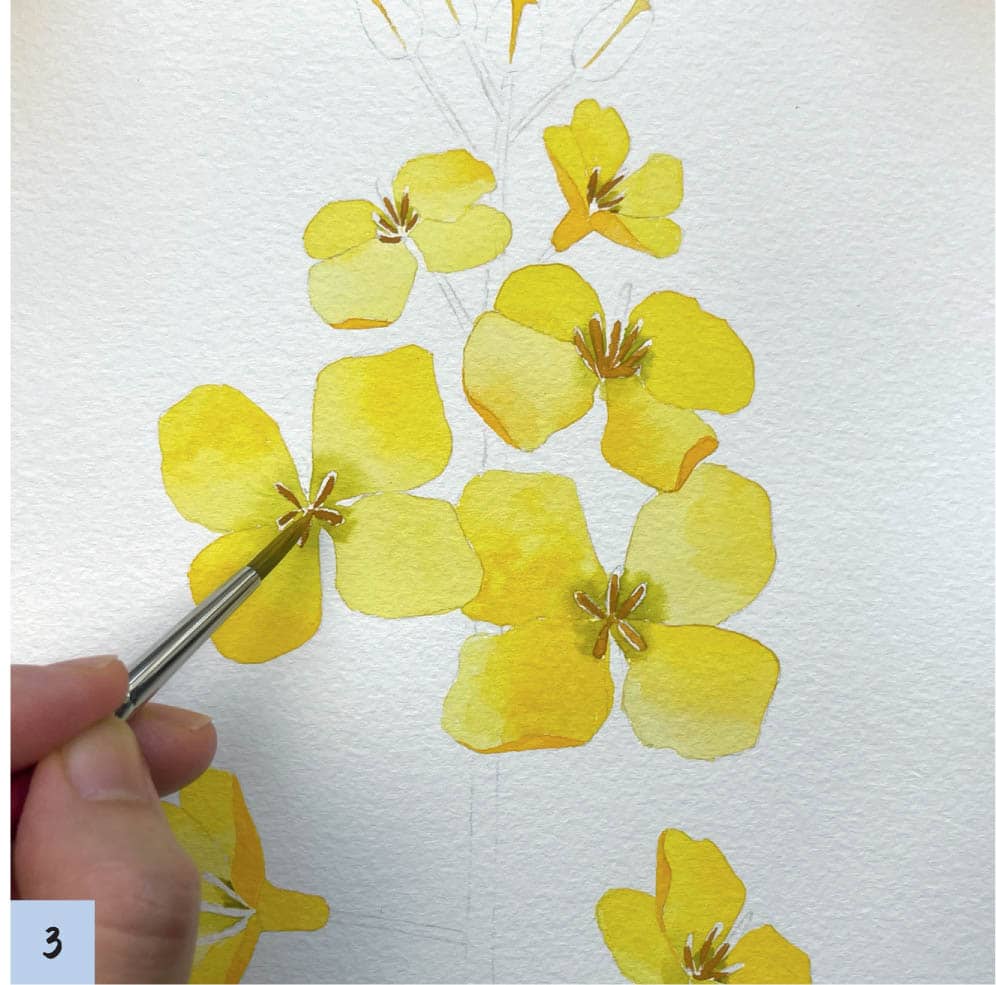
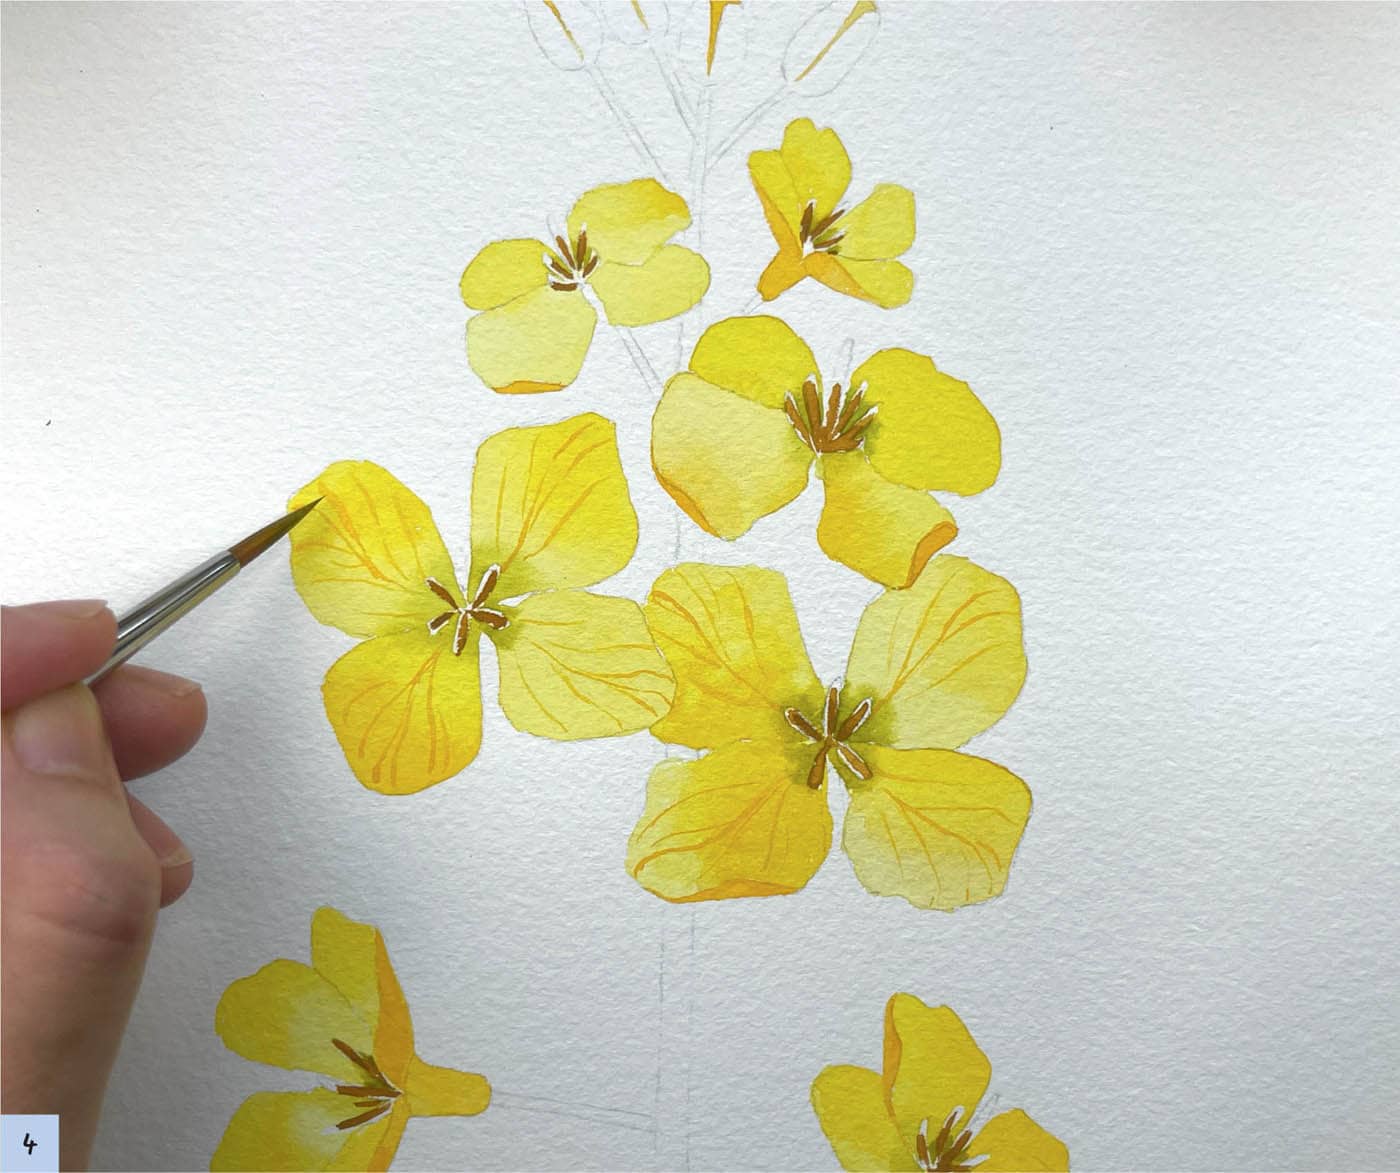
1Apply Level 3 density Permanent Yellow Light on four petals with a small round brush. Before the paint dries, apply greenish-yellow to the center where the petals begin. Avoid painting the stamens for now. Allow the paint to dry.
2Apply Level 4 density Permanent Yellow Deep to the back of petals that curl up. This adds dimension to the petals. Waiting until the previous layer of paint is dry allows you to color these areas more precisely. Allow the paint to dry.
3Color the stamens with Level 5 density Yellow Ochre. Allow the paint to thoroughly dry.
4Use Level 5 density Permanent Yellow Deep to paint the veins on each petal with the tip of the brush, following the petal’s natural curve. Make sure the color isn’t too dark, or it will stand out too much.
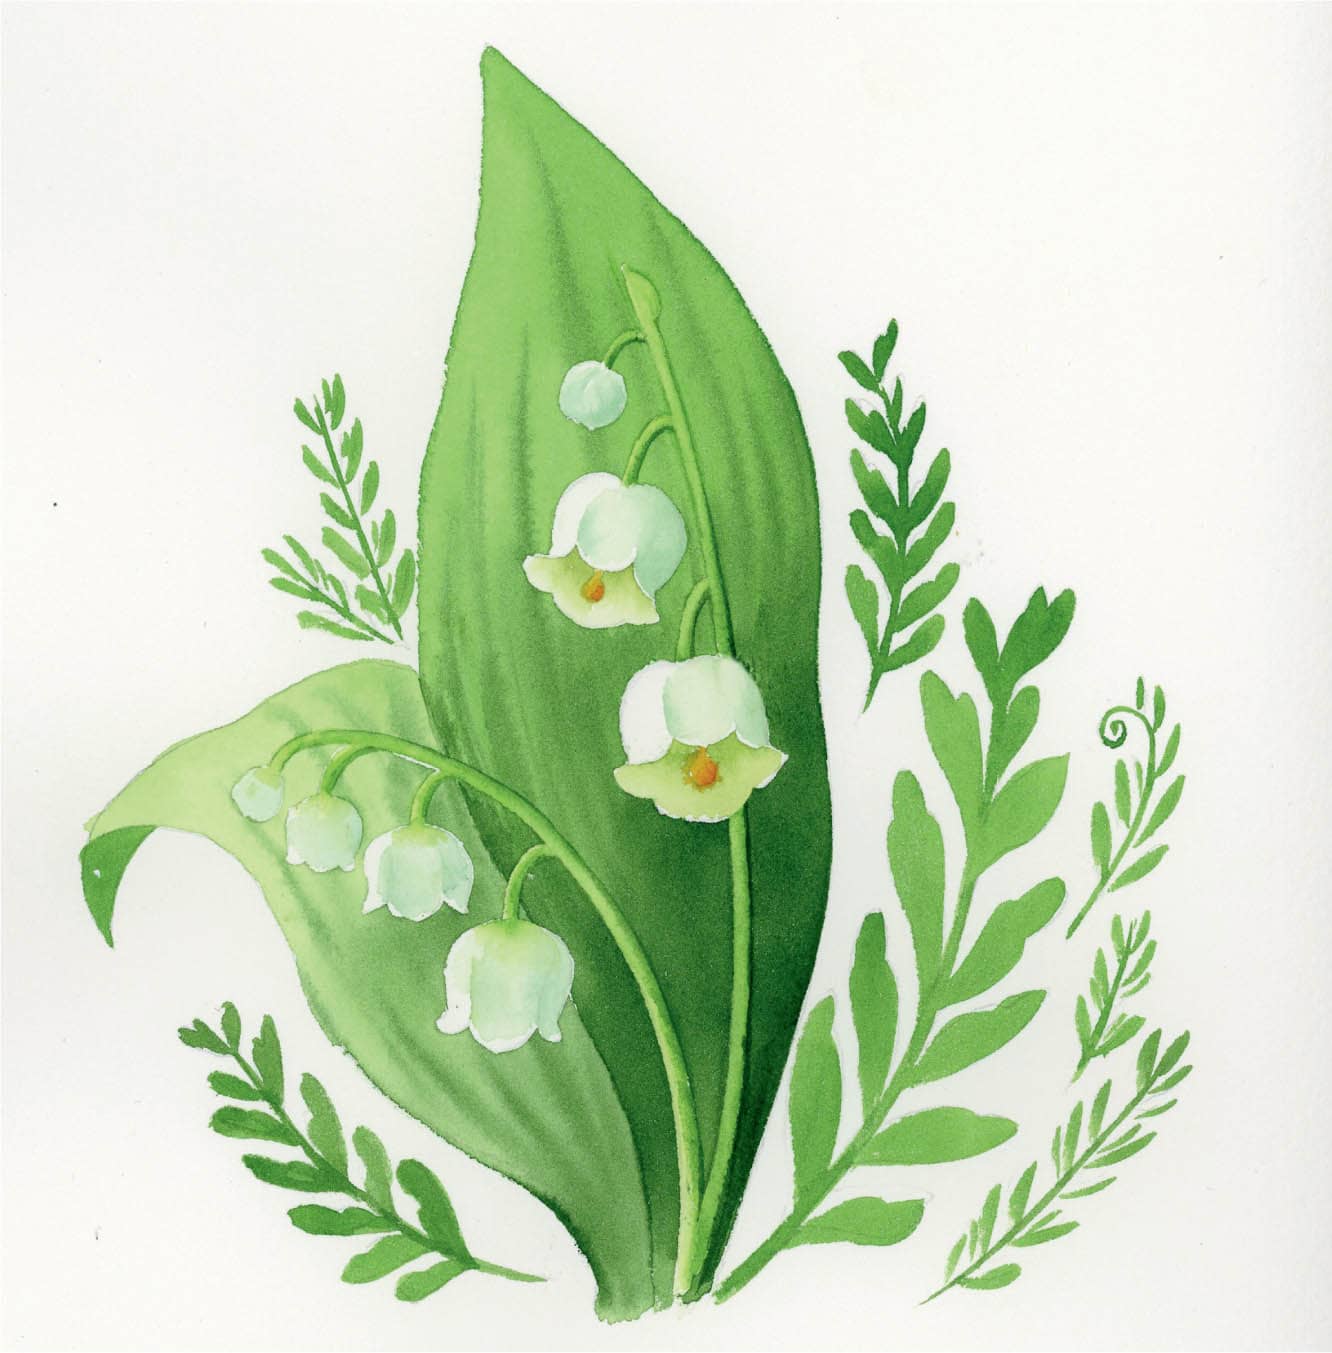
5Complete the flower by coloring the stem and the buds with Level 4 density olive green (see the finished image, here).
Lily of the Valley
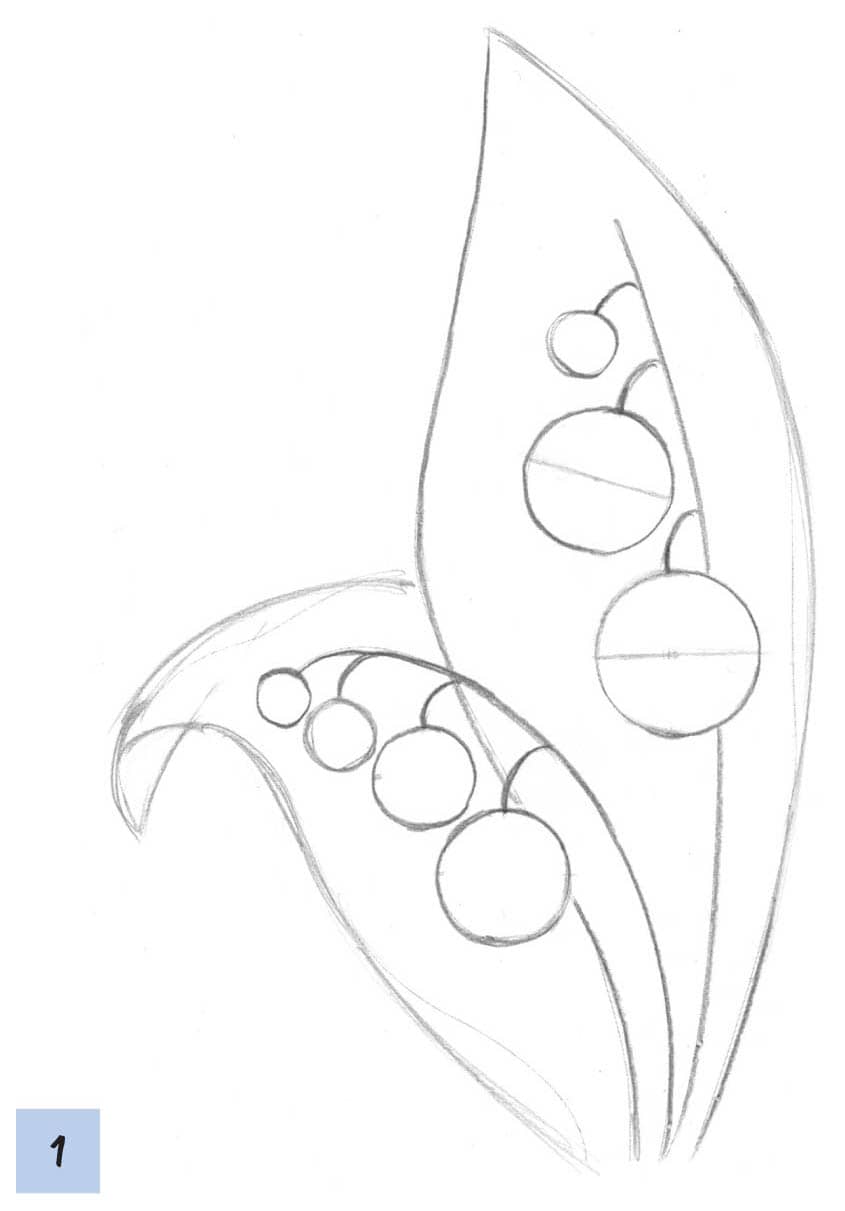
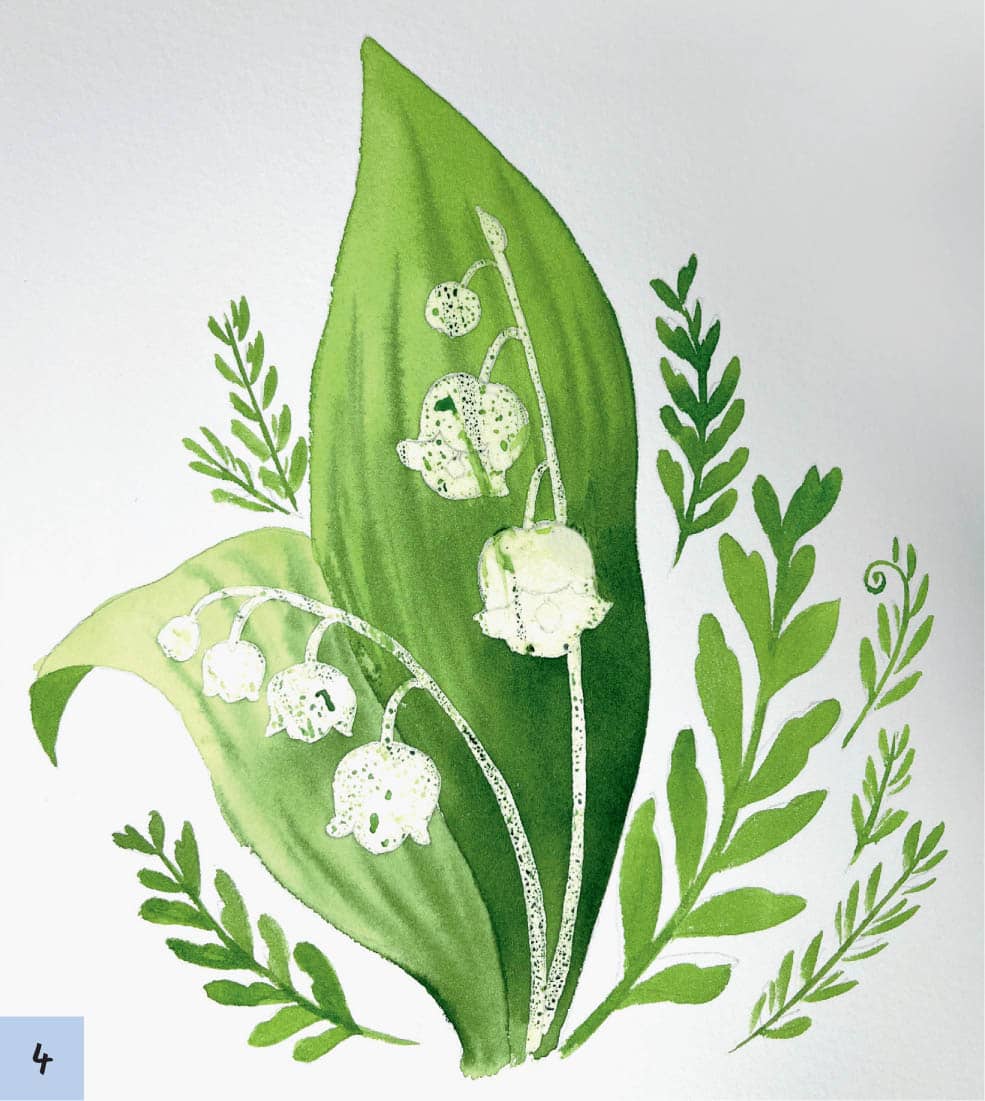
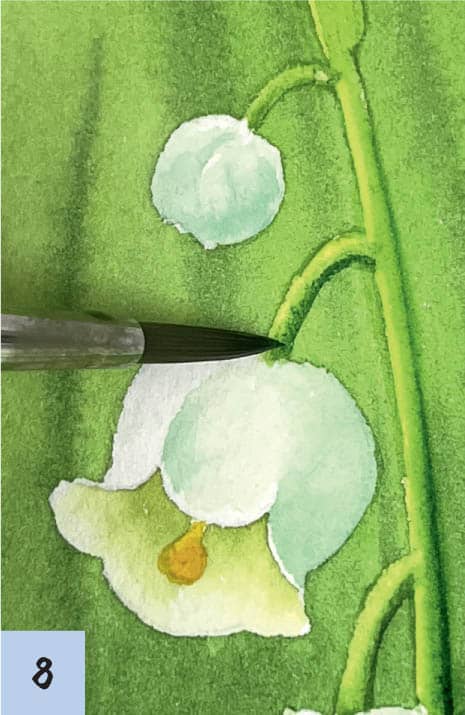
The lily of the valley’s rounded blossoms resemble little fruits, and they’re petite and cute. The flower also has an interesting structure, with groups of small blossoms that are surrounded by relatively large leaves. In this lesson, you’ll learn how to color white blossoms by using masking fluid to keep the paper white, then removing the dried fluid and adding pale layers of watercolor.
SKETCH THE BLOSSOMS
Use the three-step sketching method to draw the lily of the valley blossoms in two different positions. Angle A reveals the bottom of the blossom petals and some of the interior, while Angle B shows only a side view.
SKETCH THE FLOWER
1Draw two curved lines for the stems, making the left stem more curved than the right. On the right stem, draw three different-size circles to create Angle A blossoms. On the left stem, draw four circles to create Angle B blossoms. Draw two large leaves behind the stems, noting that the tip of the left leaf curls under.
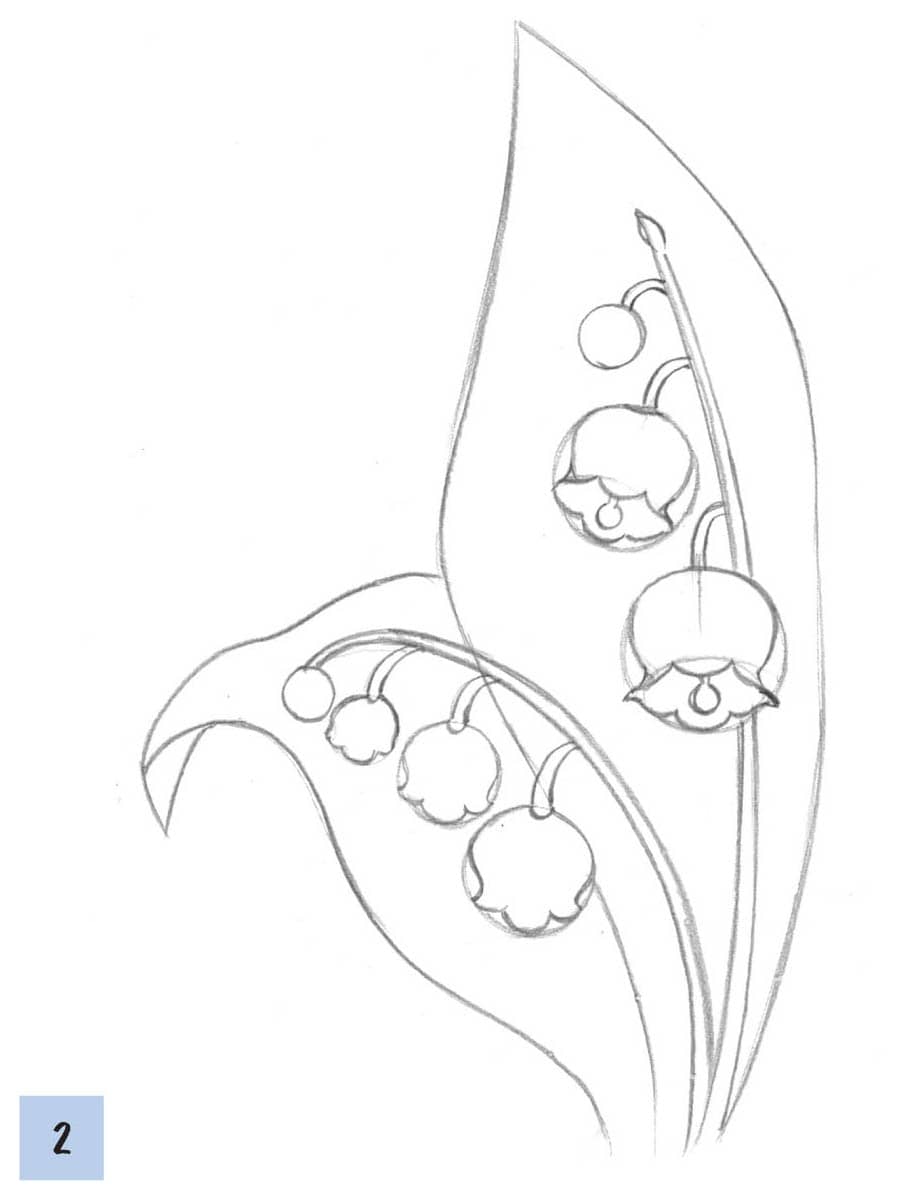
2Add details to the blossom petals as you did in the initial sketches, such as creating scalloped petals, stamens, and showing the interiors of the Angle A blossoms. Add thickness to the stems.
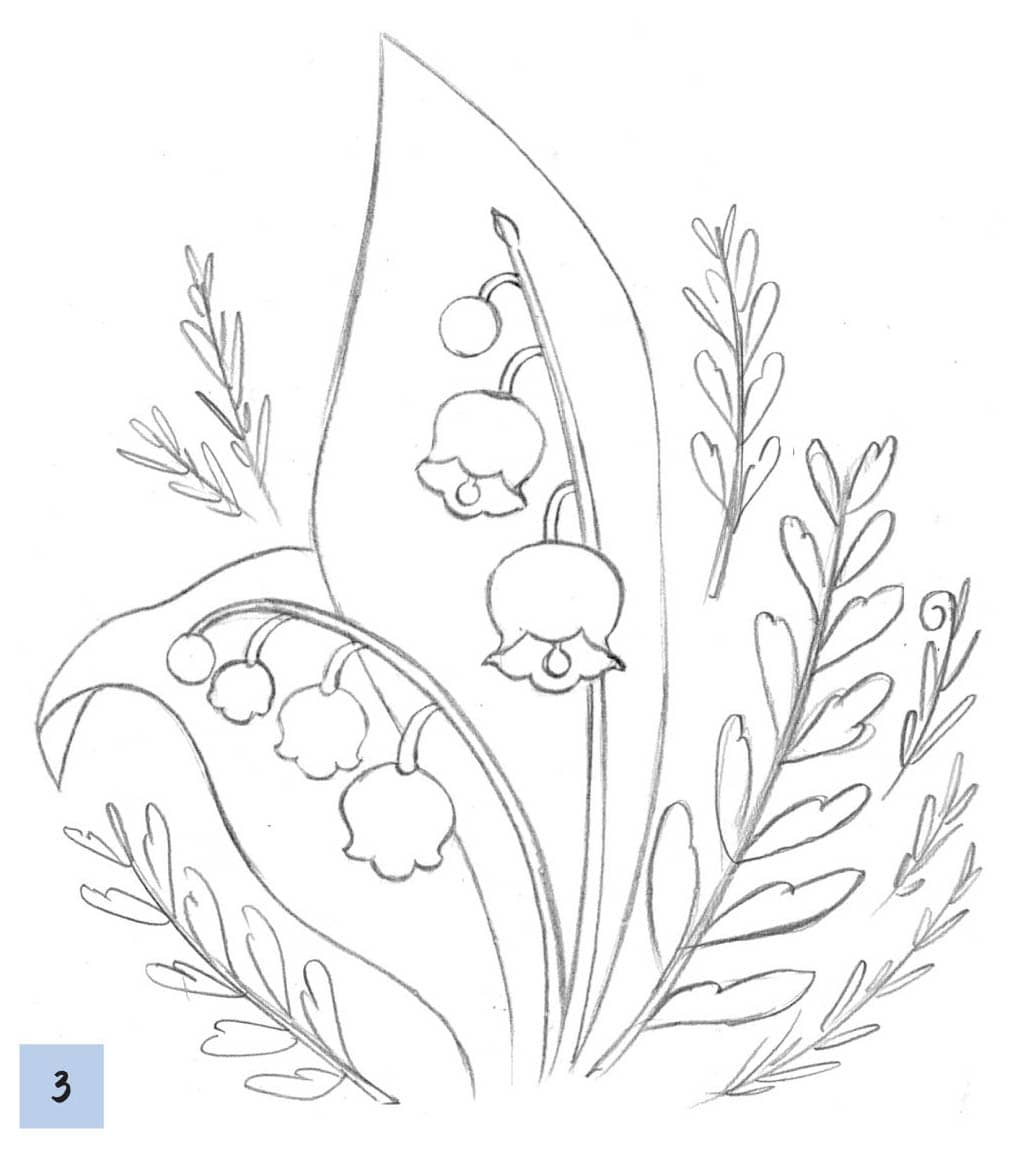
3Add leaves in various shapes surrounding the flowers to complete the drawing. Make sure your pencil lines are clear and precise so that it will be easier to apply the masking fluid.
PAINT THE FLOWER
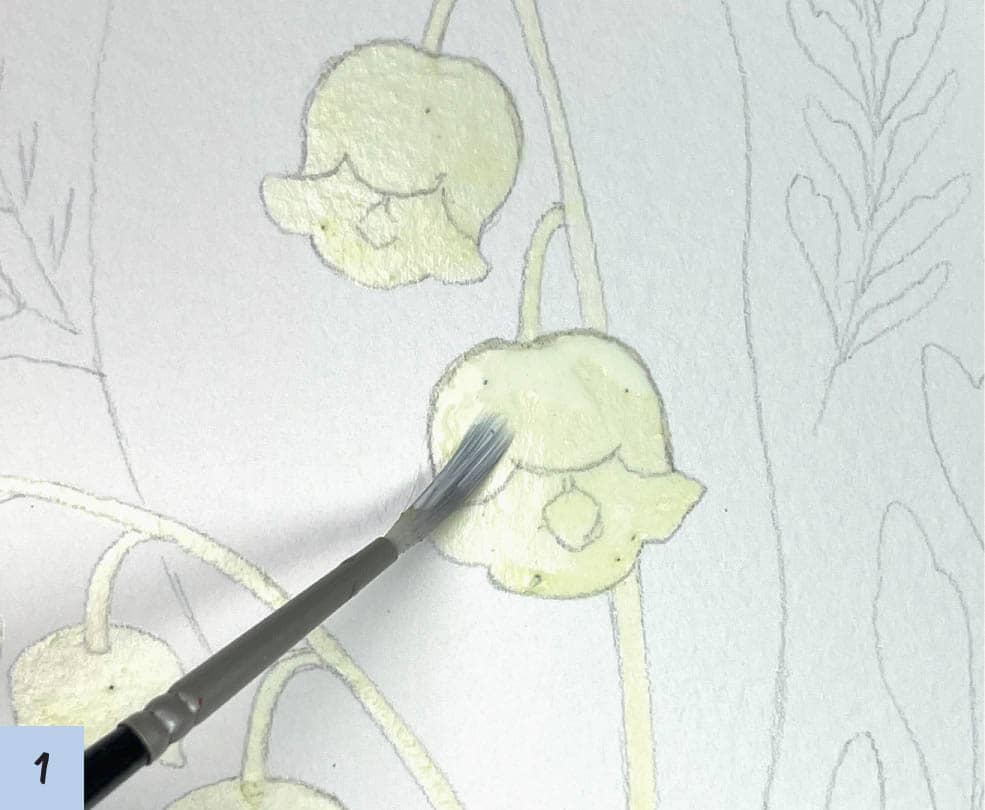
In this lesson, you’ll learn how to paint lily of the valley, small white cluster flowers surrounded by large leaves. In this case, using masking fluid is an effective way to paint white flowers quickly and easily. (For more information on masking fluid, see here.) I suggest drawing a delicate pencil line to sketch the area that will be brushed with masking fluid.
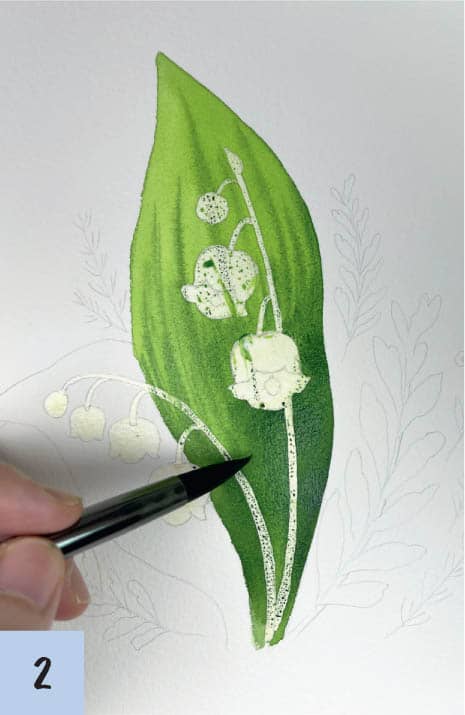
1Thoroughly apply the masking fluid on the blossoms and stems that will be left white. Apply the fluid lightly and allow it to dry completely. Aim for a delicate but thorough application, even if the masking fluid layer is thin.
2Working wet-on-wet (see here), brush water on the leaves and use Level 3 density sap green for the top part of the right-hand leaf. For the bottom of that leaf, use Level 5 density Hooker’s Green and create a gradient (see here). Before the colors dry, use Level 5 density Hooker’s Green to draw long vertical lines with the brush tip. Extend the lines into the top area to indicate the texture of the leaves.
3Repeat step 2 to color the left-hand leaf. When the paint is completely dry, color the underside of the curled leaf with a flat layer of Level 5 density sap green.
4Working wet-on-dry (see here), paint the background leaves using sap green or Hooker’s Green. Use a flat layer of color with no gradient.
5Remove the masking fluid with a rubber cement eraser by placing it on the masking fluid and gently pressing down. The masking fluid will come off when you lift the eraser.
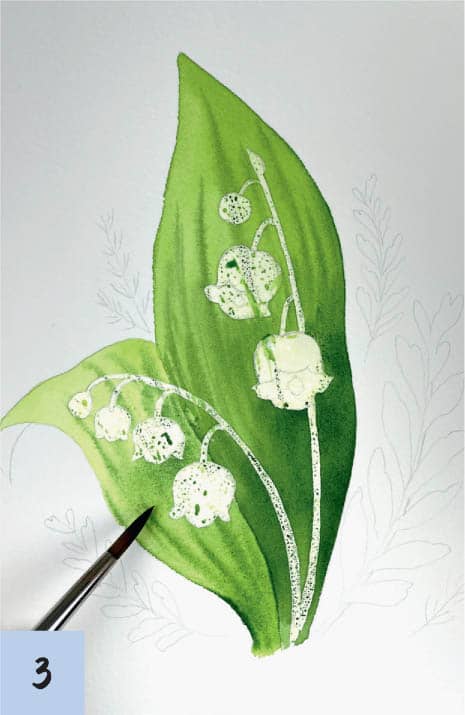
6Paint the interiors of the blossoms on the right. Working wet-on-dry, mix yellow-green and olive green in a ratio of 1:1. Use Level 3 density paint and work in a gradient, using the darkest value at the top of the interior area.
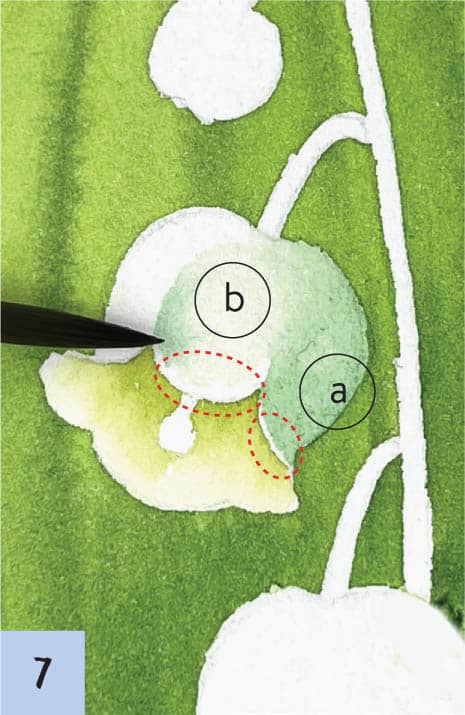
7Paint the blossom’s exterior. Mix yellow-green and Cerulean Blue (sky blue) in a 2:1 ratio to make green-blue. Use Level 1 density paint to create a flat layer on petal a. Leave the tip of petal a white, as seen in the area marked by dotted lines. Create a hard edge on the left side of petal b and let the color fade toward the right side, where it connects with petal a. As before, leave the dotted line area white.
8Color the stamens using Level 5 density Permanent Yellow Deep (golden yellow). Color the buds by working on a gradient with the green-blue, as shown.
Color the stem by painting it with Level 2 density yellow-green first, then create a gradient to shade it using Level 5 density Hooker’s Green.
9Color the blossoms on the left using the methods in step 7. Use yellow-green for the flower peak, fading the color where it connects to the stem.
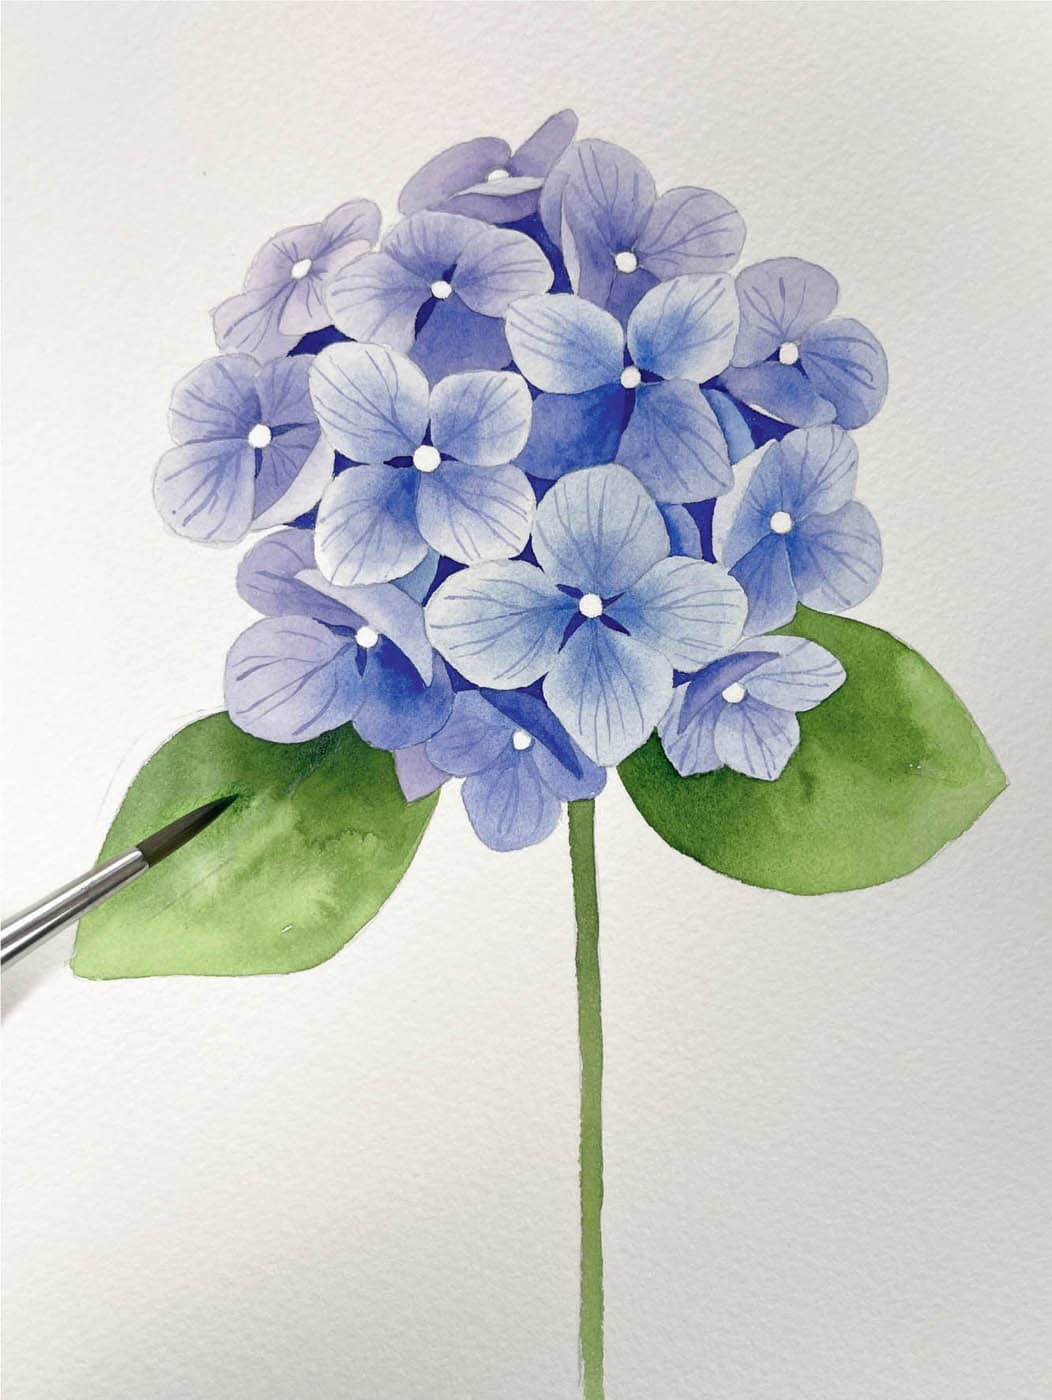
Hydrangea
Hydrangea flowers have a spherical shape made from a collection of many tiny blossoms. Because of its complex structure, many people consider this a challenging flower to draw. However, I rearranged and simplified the structure so beginners can sketch it easily.
SKETCH THE BLOSSOMS
Practice sketching the main Angle A blossoms in the center and the Angle B blossoms on the side by referring to the three-step sketch. Angle A blossoms face the front, and Angle B blossoms feature a flattened side view with petals in a variety of angles.
The angles and shapes of the petals may change a bit, but the sketching method is the same for all. Practice sketching blossoms in various side-view angles by referring to the illustrations.
SKETCH THE FLOWER
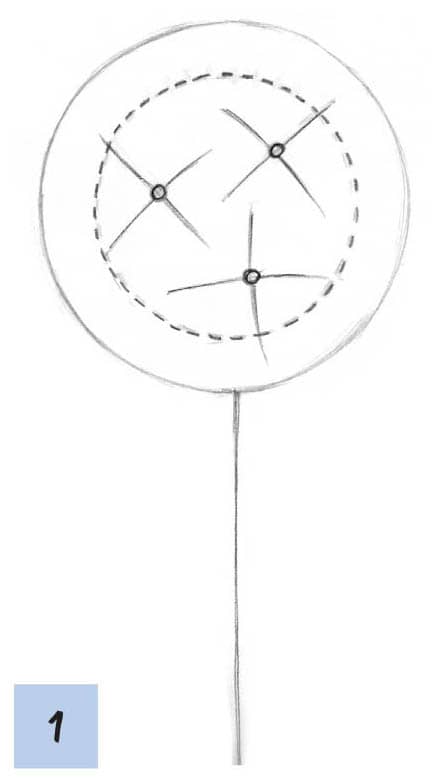
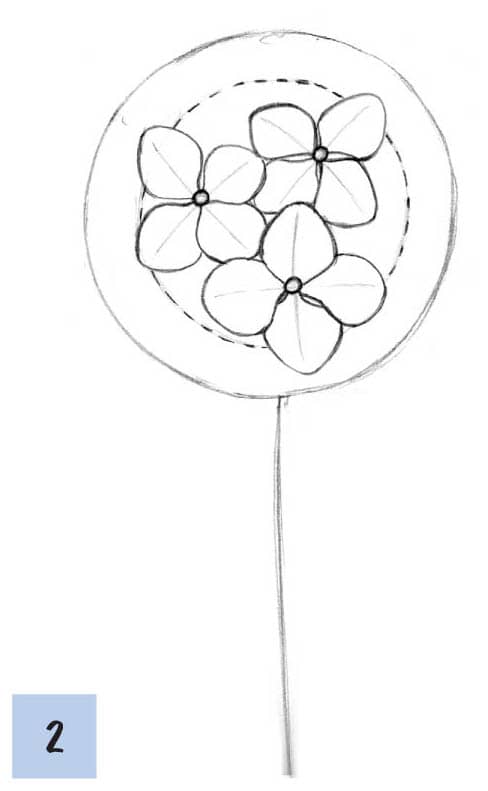
1Draw a large circle. Draw a smaller circle inside with a dotted line. Mark the placement of three main blossoms in the center and add very slightly curved perpendicular guidelines. Draw a line for the stem.
2Draw three Angle A blossoms inside the smaller circle, making them overlap a little.
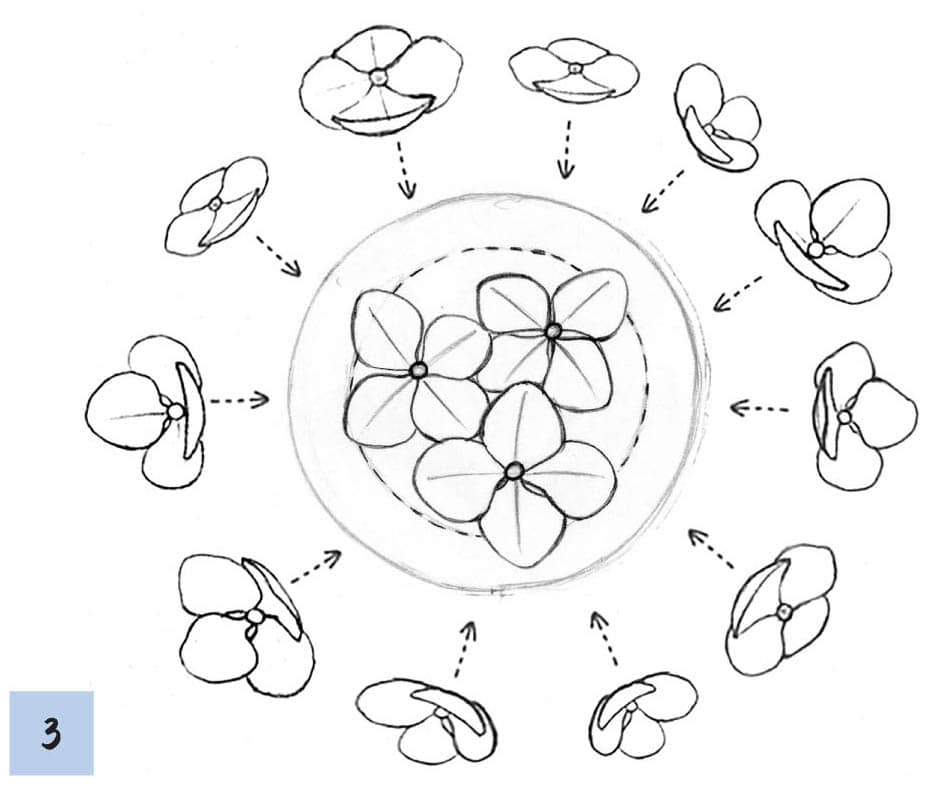
3Draw blossoms on the positions marked by arrows between the two circles and be aware of the angles. Notice how some of the petals overlap, lending a natural look.
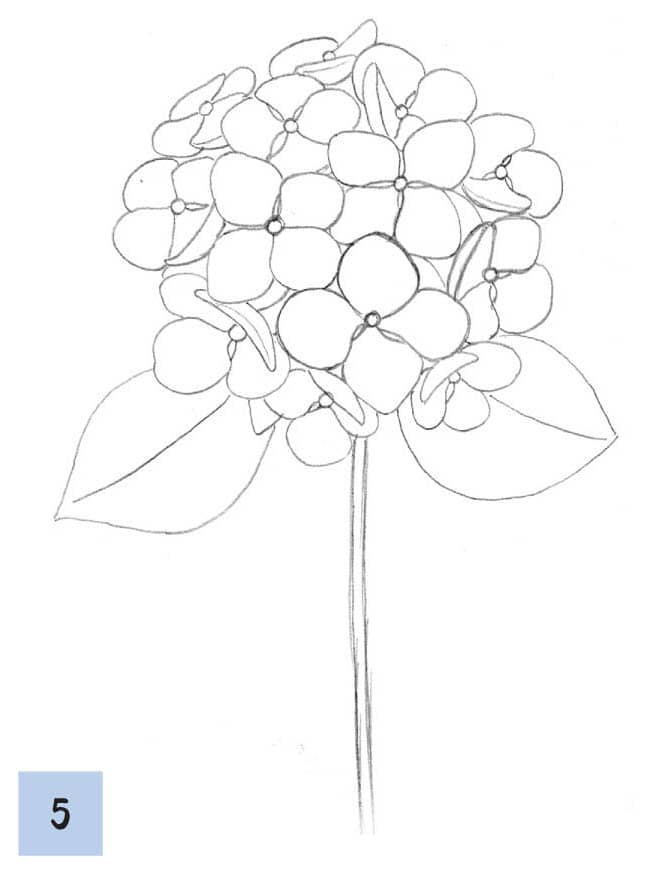
4You’ll see empty spaces between some of the blossoms. Draw single petals behind the blossoms to fill in the gaps.
5Add thickness to the stem and draw two leaves to complete the hydrangea.
PAINT THE FLOWER
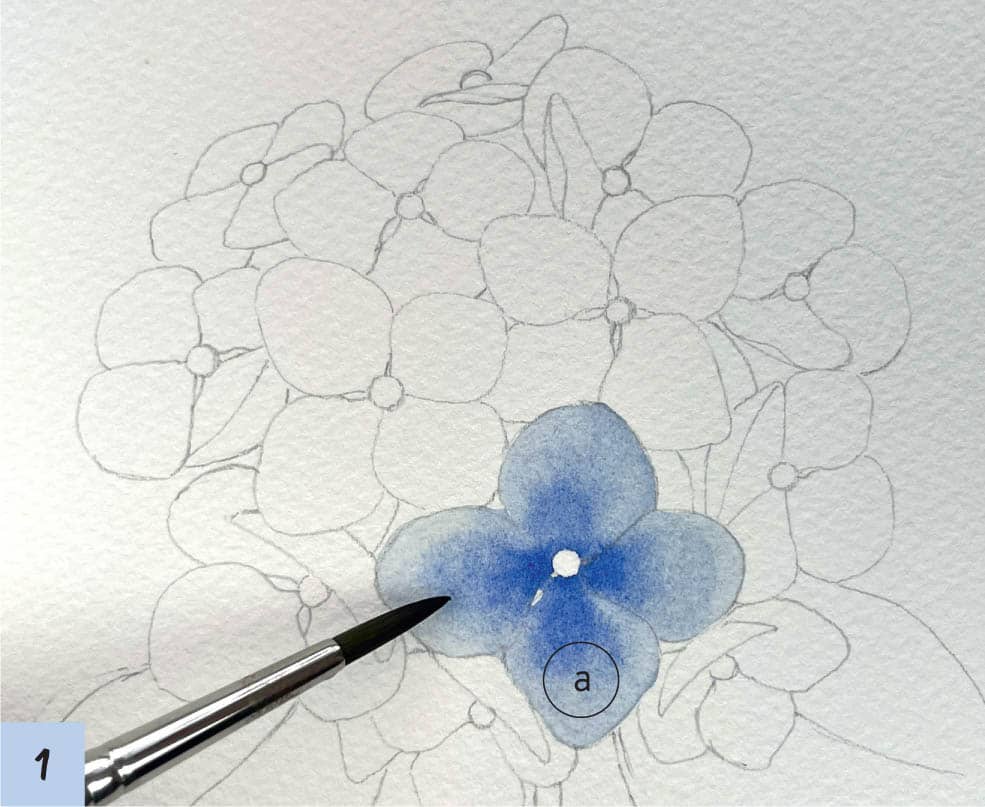
The simplified painting below represents the gradient of Ultramarine Deep (deep ocean blue) and Bright Clear Violet (medium purple) for the hydrangea. Refer to this color scheme when painting the flower.
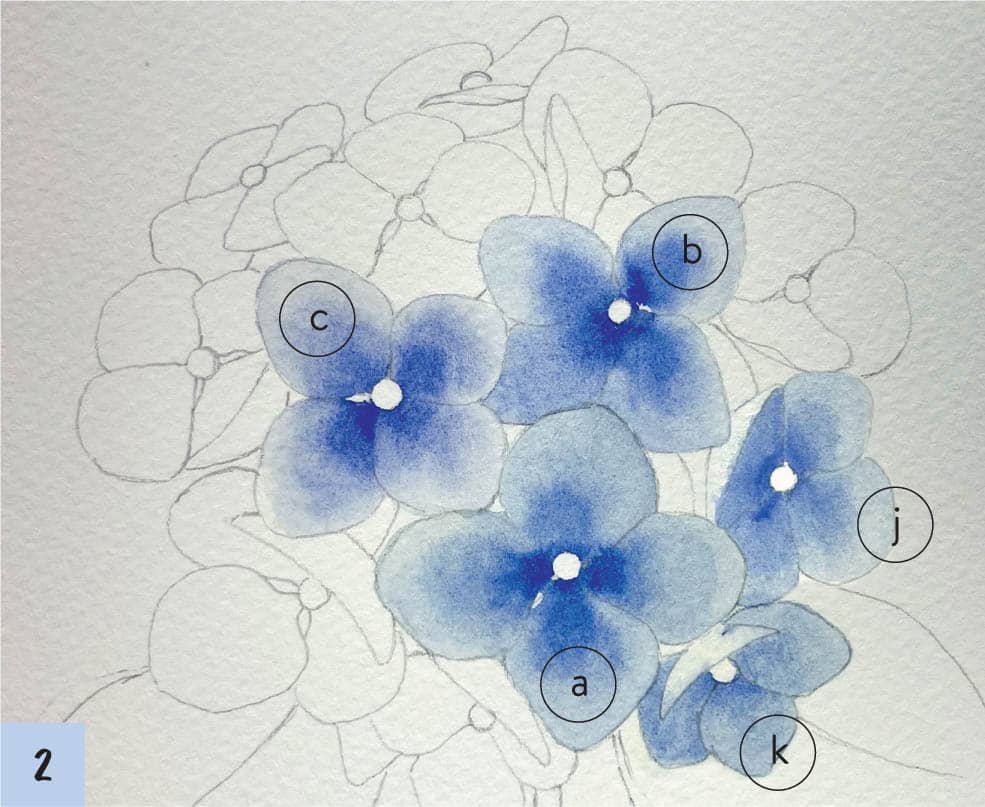
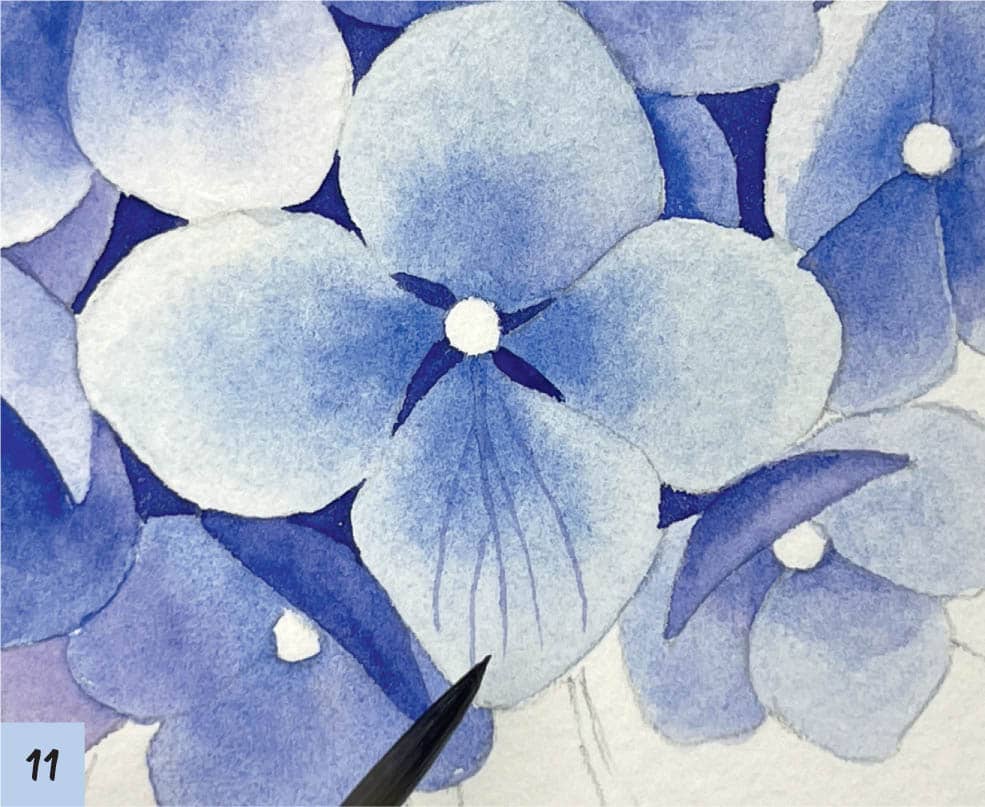
1Start painting with blossom a. Working weton-wet, brush water on the petals but leave the center circle dry. Apply Level 2 density Ultramarine Deep on all the petals. Color the interior of the petals with Level 3 density Ultramarine Deep. If edges form where the two areas meet, blend them with the brush.
2Color blossoms b, c, k, and j using the method in step 1.
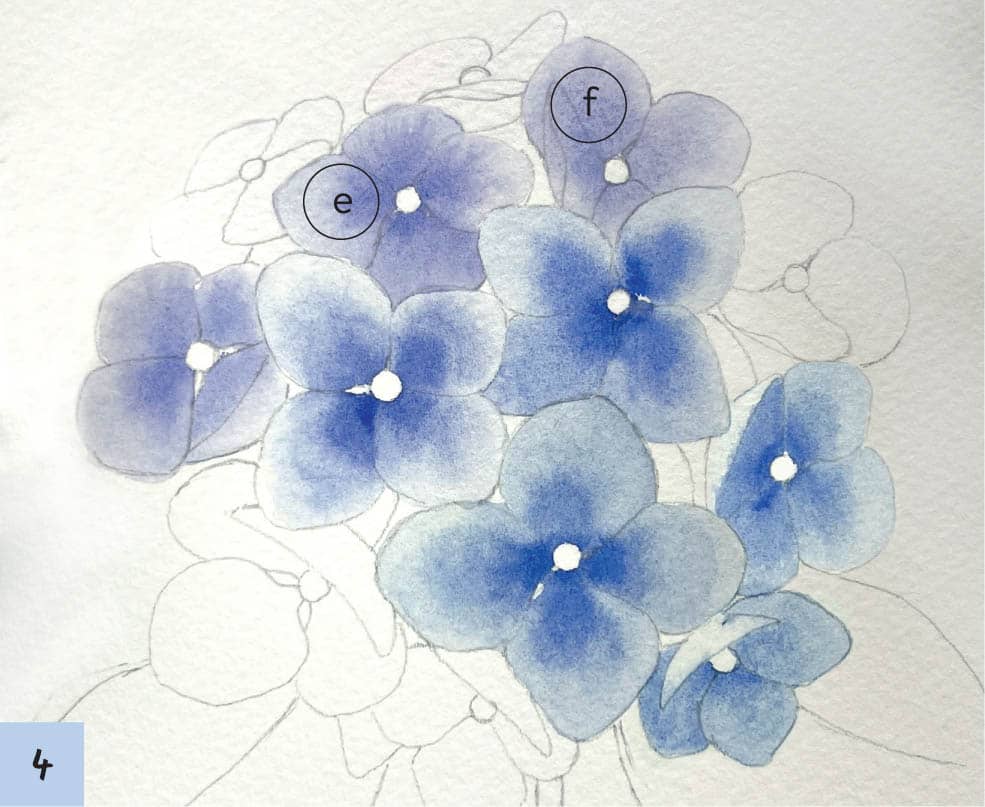
3Mix Ultramarine Deep and Bright Clear Violet in a ratio of 1:3 to create blue-violet. Working wet-on-wet, brush water on the petals of blossom d, leaving the center circle dry. Apply Level 2 density blue-violet evenly on the petals. Deepen the interior of the petals with Level 3 density blue-violet, again blending any edges that appear.
4Color blossoms e and f using the methods in step 3.
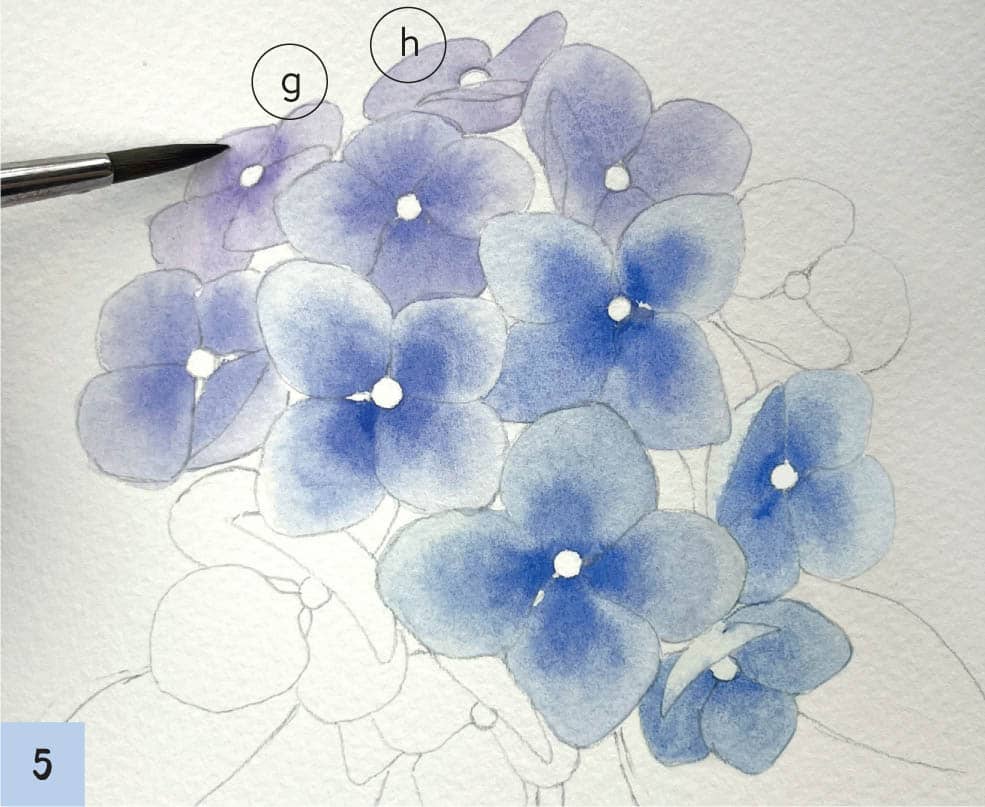
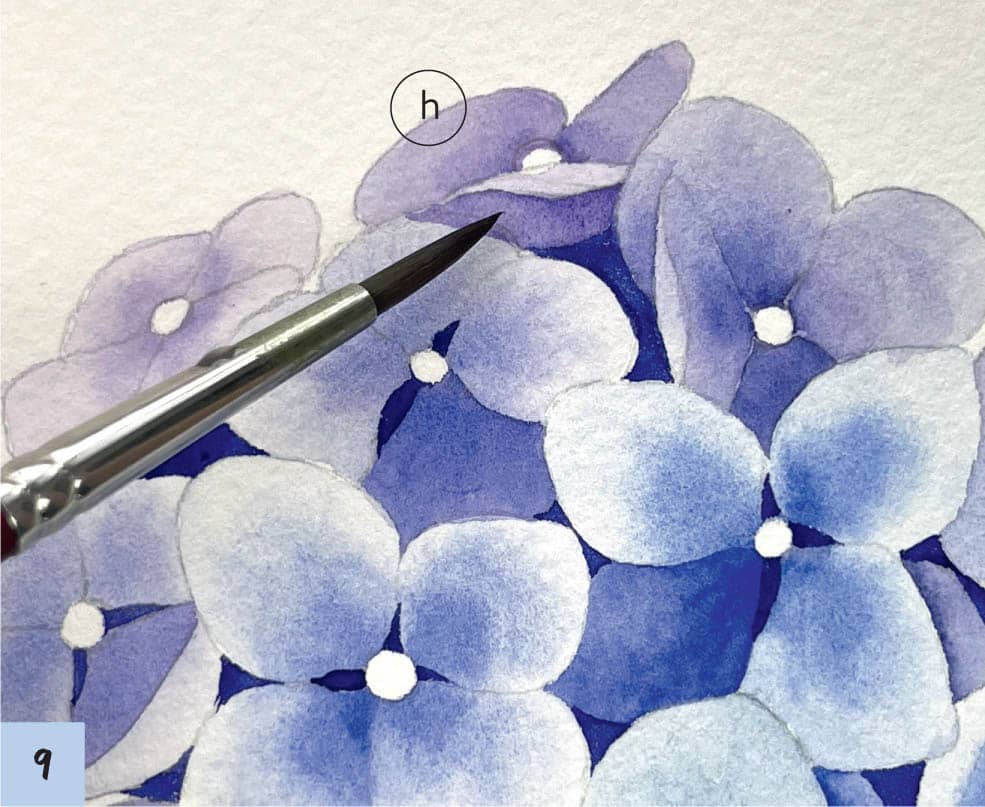
5Working wet-on-wet, brush water on the petals of blossoms g and h, except for the center circle. Apply Level 2 density Bright Clear Violet over the petals evenly. Color the interior of the petals with Level 3 density of the same color. Blend any edges.
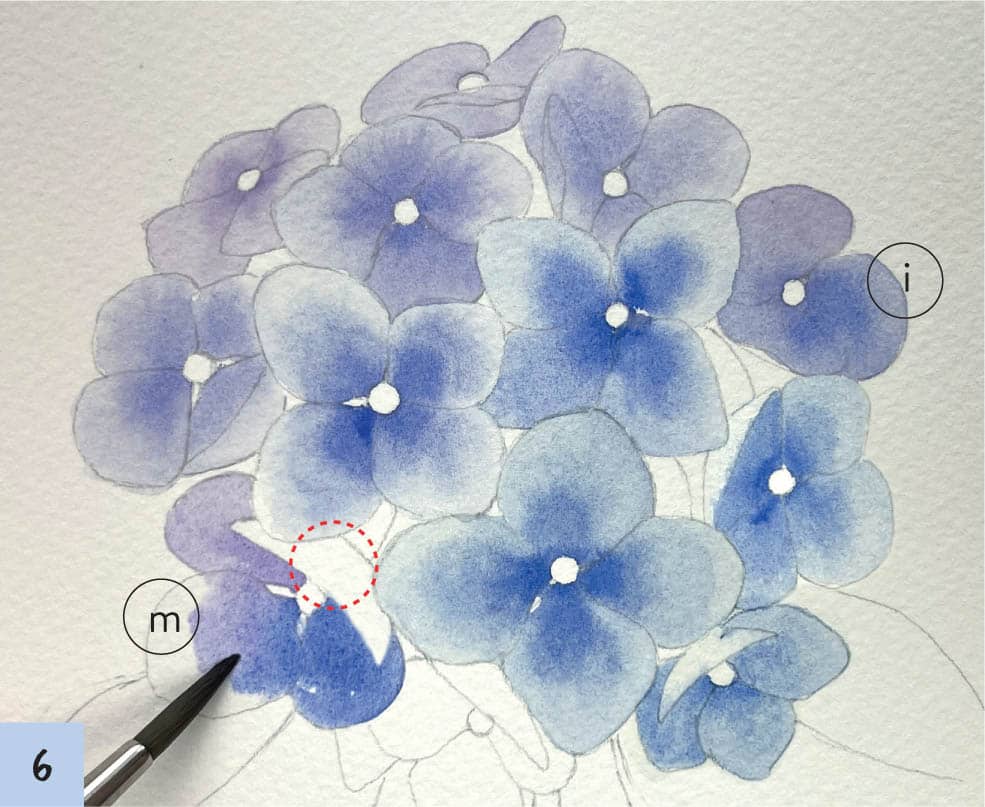
6Paint blossoms m and i, working wet-on-dry. Create a gradient on the three blossom petals except for those in the dotted lines. Use Level 2 density Bright Clear Violet for the top petals, and Level 3 density Ultramarine Deep for the petals at the bottom. Blend the edges in the center of the blossom. Allow the paint to dry. Apply Level 2 density Ultramarine Deep over the blossom petals within the dotted lines.
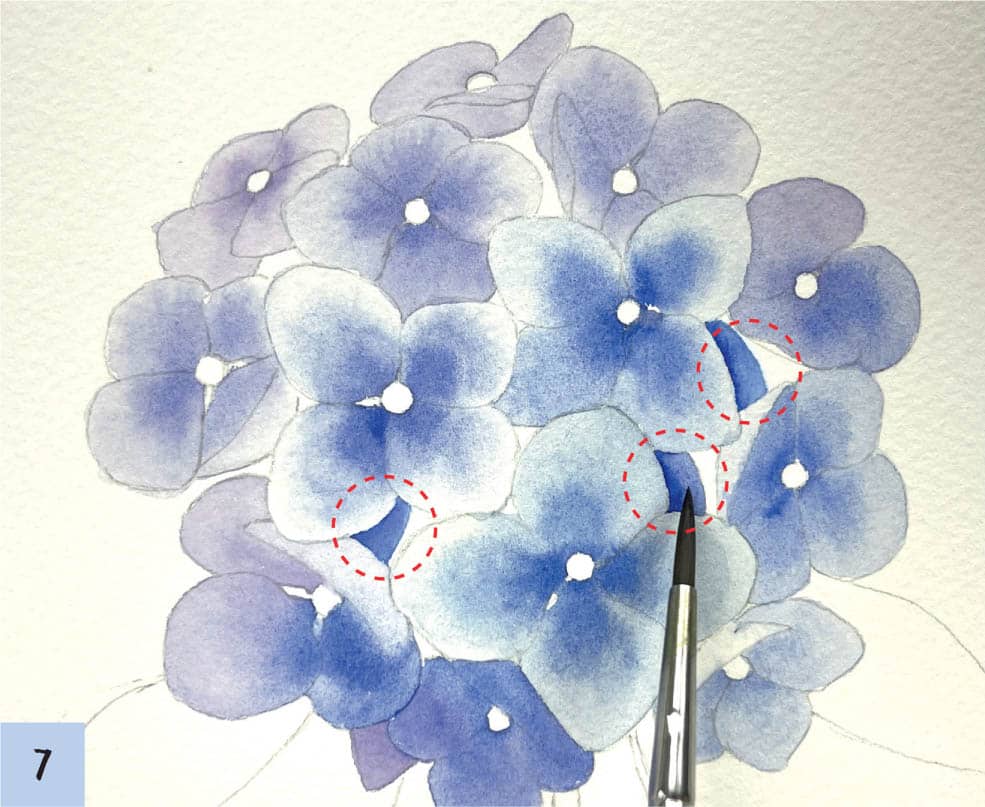
7Finish coloring the main components by painting the areas noted by the dotted circles. Work wet-on-dry, using Level 4 density Ultramarine Deep.
8Add depth by coloring the gaps between the petals. Mix Ultramarine Deep and Bright Clear Violet in a ratio of 1:1. Apply the color in Level 5 density in the white areas between the blossom petals. Add a glaze (see here) to some areas to adjust the color or shade the areas overlapped by the petals. Apply Level 3 density bluish-violet in the center of blossom f, softly fading the edges.
9Apply Level 3 density Bright Clear Violet on the underside of the petal of blossom h.
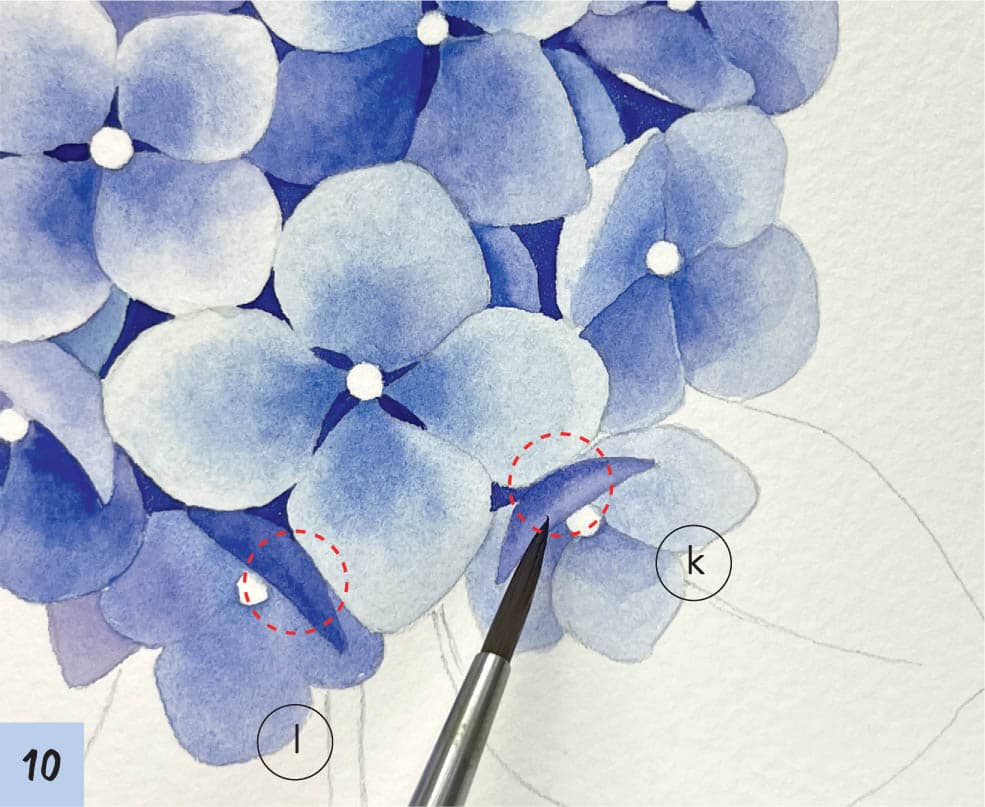
10Apply Level 4 density Ultramarine Deep on the petals of blossoms l and k, noted by the dotted circles.
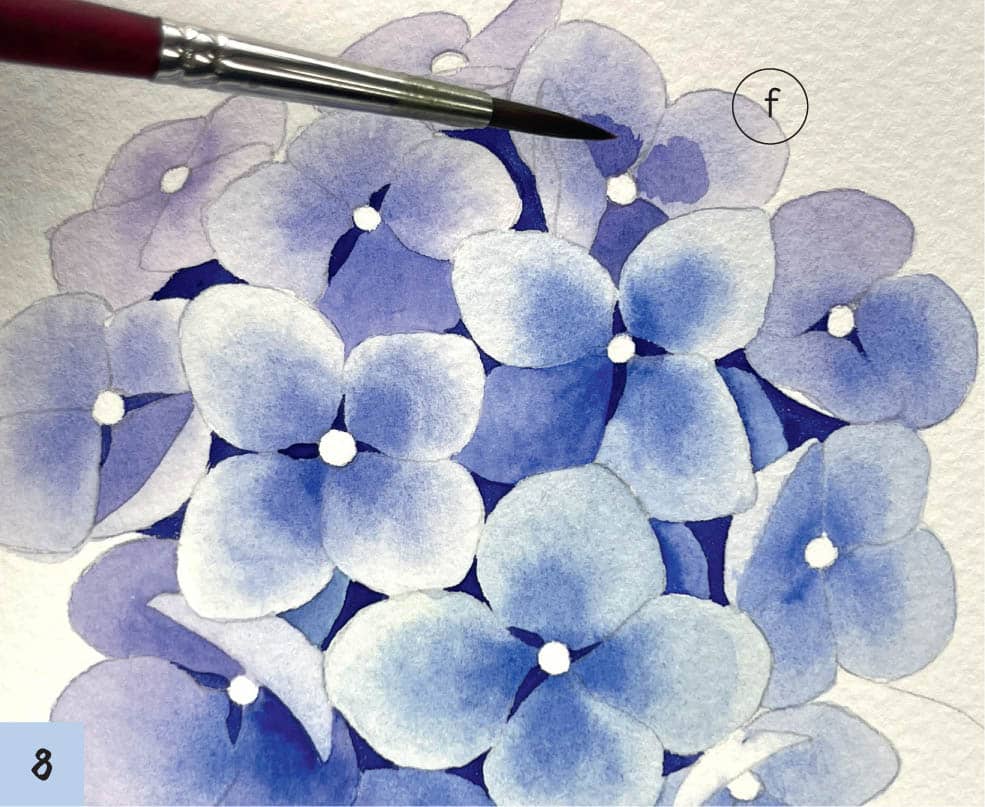
11Paint thin lines on each petal using Level 2 or 3 density Ultramarine Deep, as shown.
12Color the stem using the wet-on-dry technique with Level 3 density sap green. Paint the leaves with the same color. Create a gradient near the petals before the paint dries, using Level 5 density paint near the petals. Blend and fade the color as you move downward on the leaf (see finished image, here).
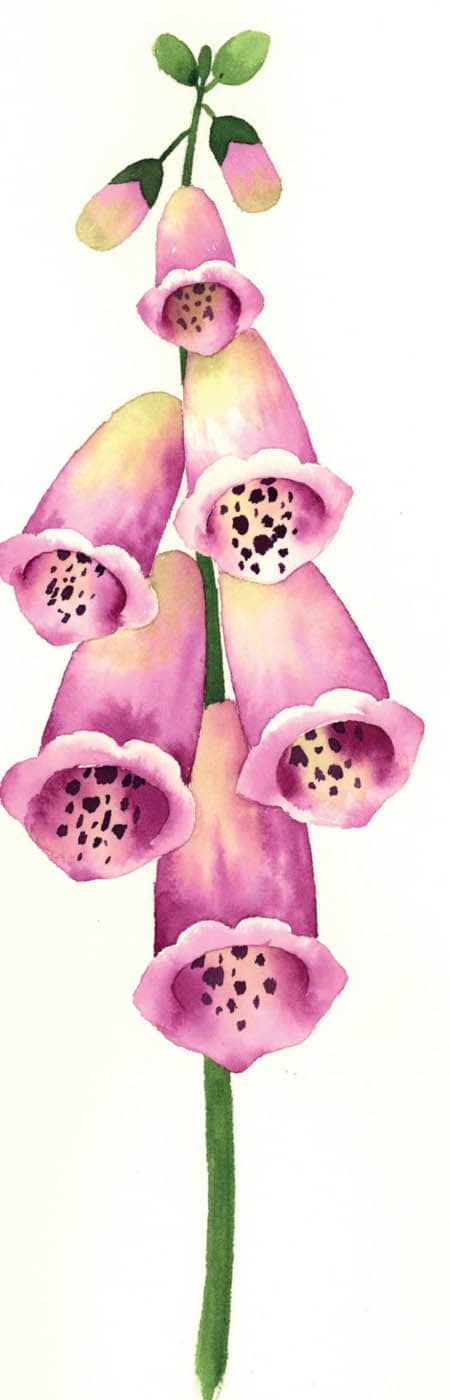
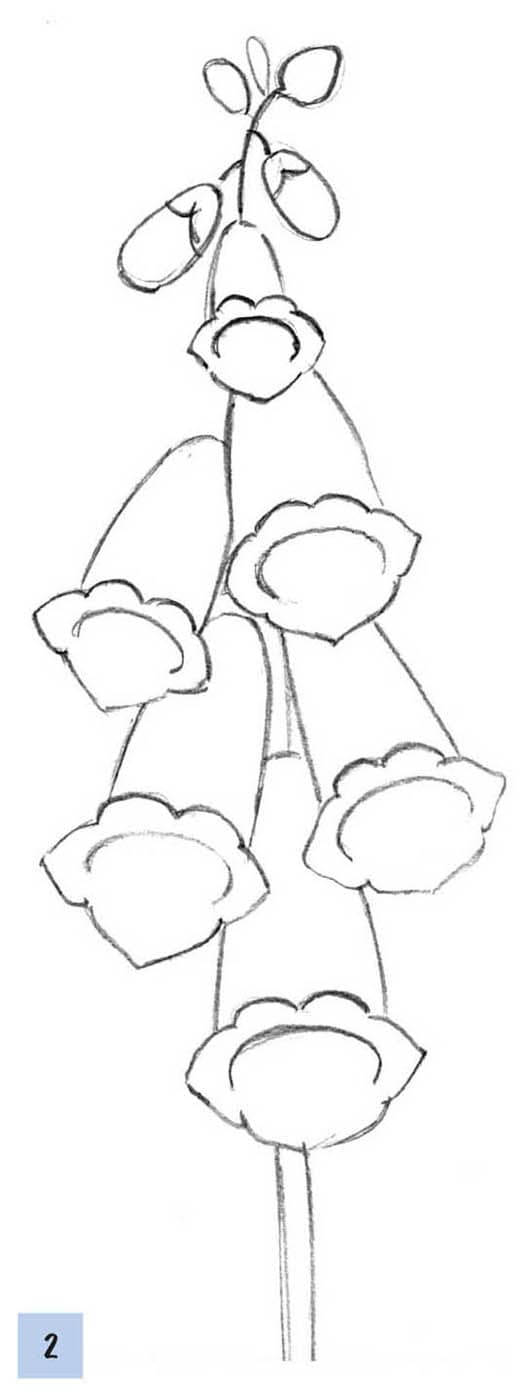
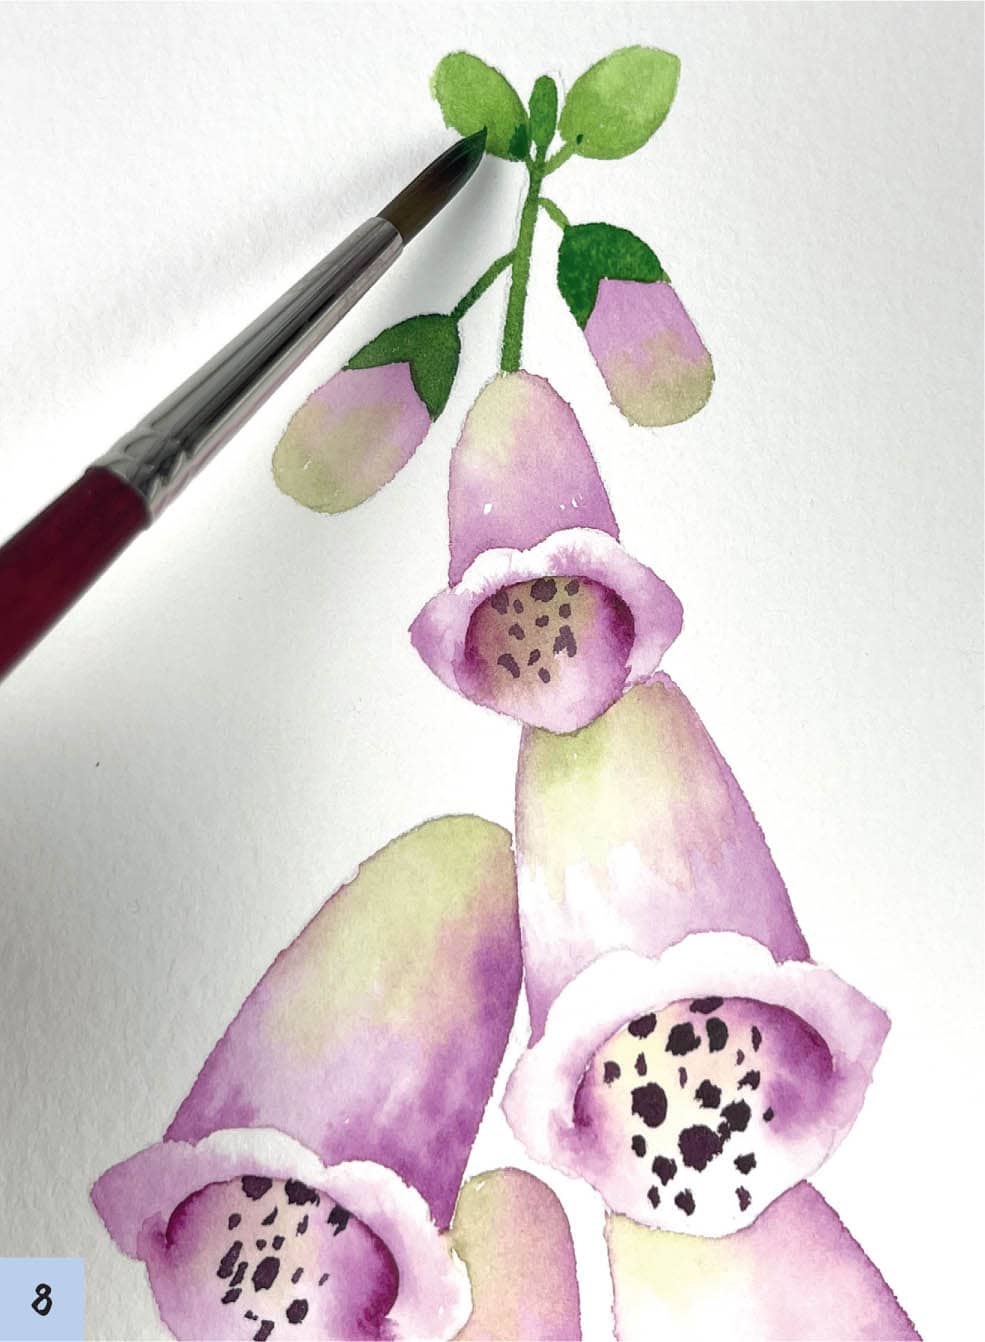
Foxglove
Sketching and painting a foxglove is easier than it seems, although its structure looks complex. This is a flower you’ll enjoy creating.
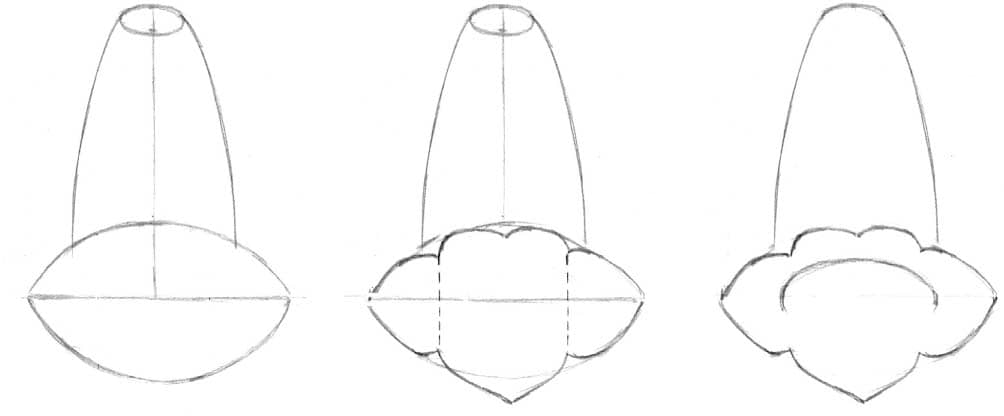
SKETCH THE BLOSSOMS
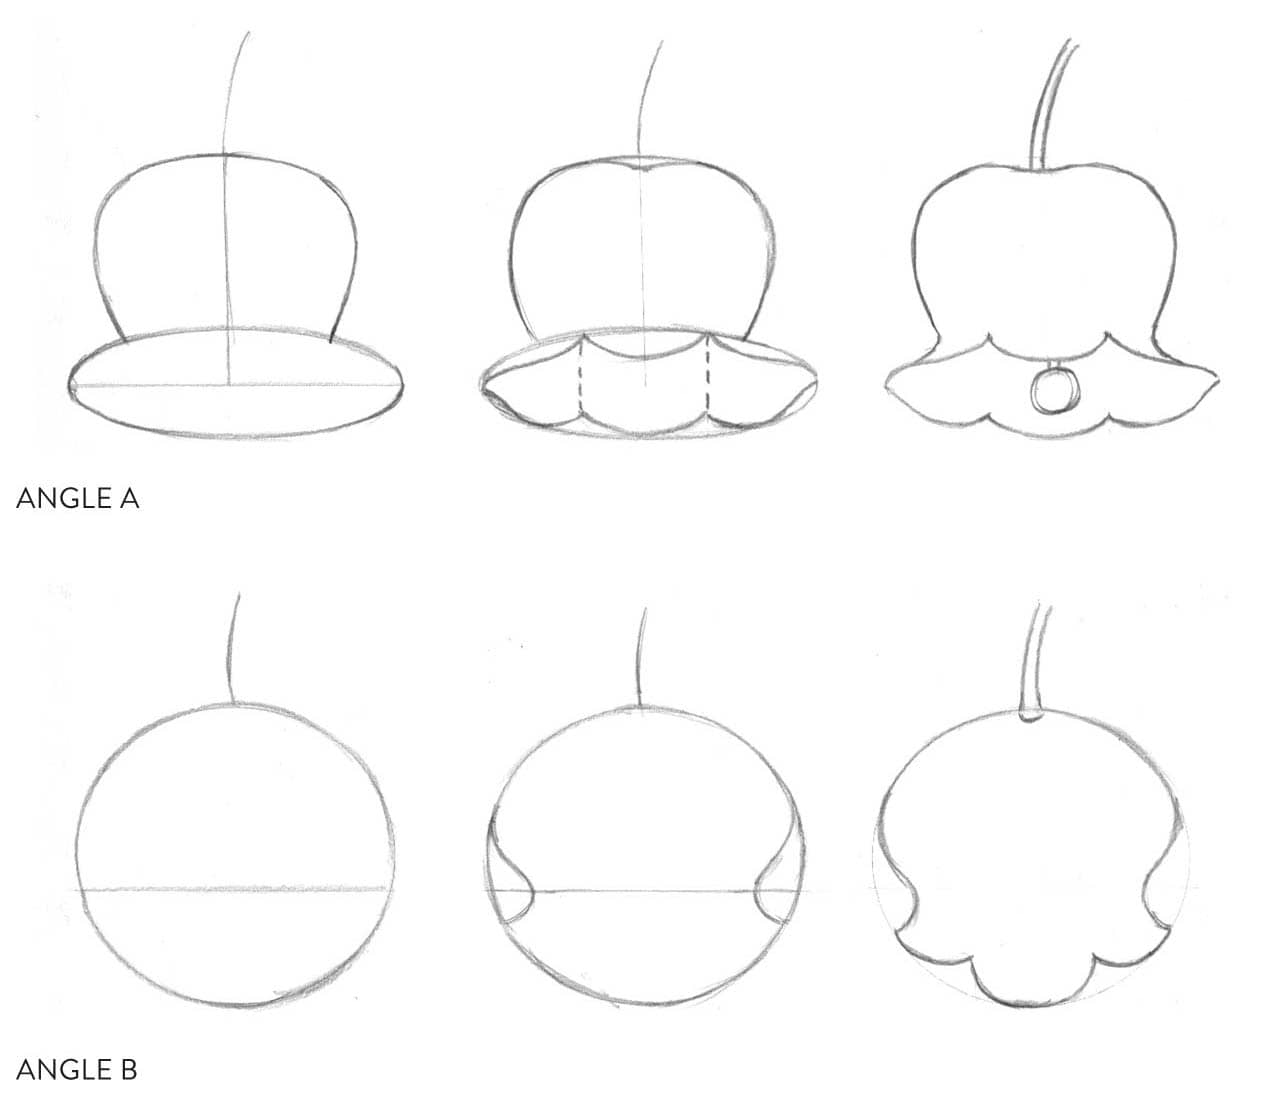
Draw a cone-shaped blossom using the three-step sketching method. Note that the end of the blossom has upturned, scalloped edges and that the angle shows some of the interior.
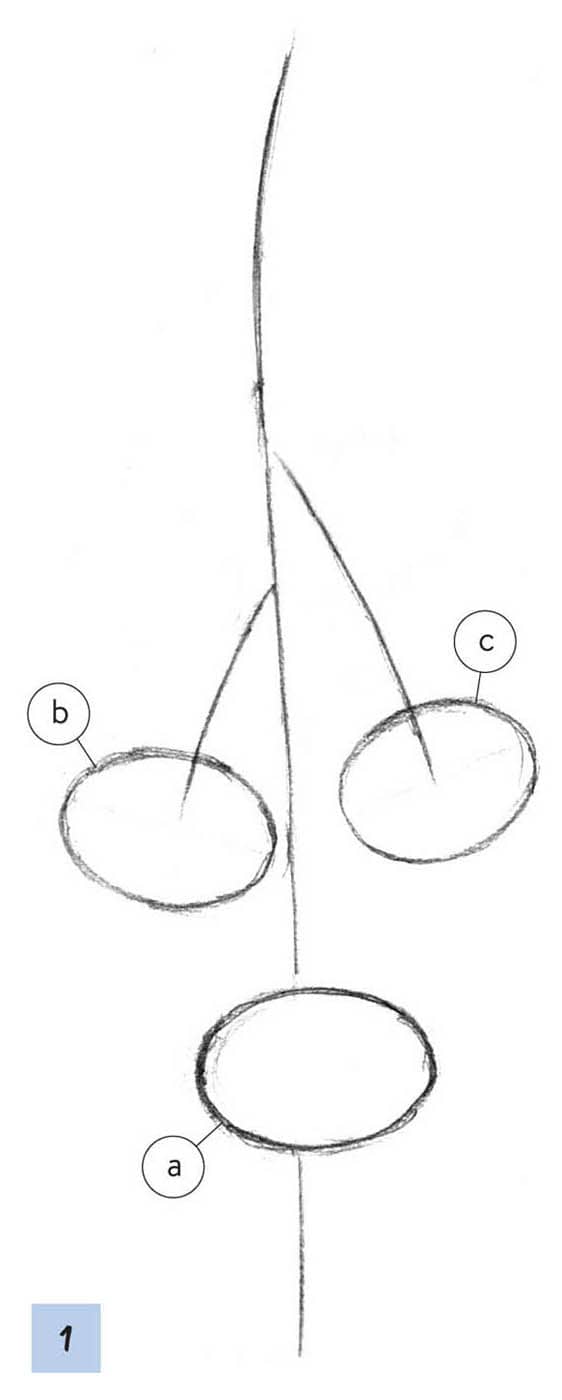
SKETCH THE FLOWER
1Draw a long, slightly curved line for the stem. Draw guidelines branching out on either side of the stem’s center. Draw three ovals (a, b, and c, as shown) to mark the placement of the blossoms. Blossom a will be the largest one, and b and c will be smaller.
2Draw the basic shape of two smaller blossoms on top of and overlapping blossoms b and c. Draw two more even smaller blossoms on top of those. Create oval-shaped buds with short stems at the top of the main stem. Add scalloped edges to the bottoms of blossoms a, b, and c. Draw curved lines at the openings of all of the blossoms. Thicken the stem to complete the sketch.
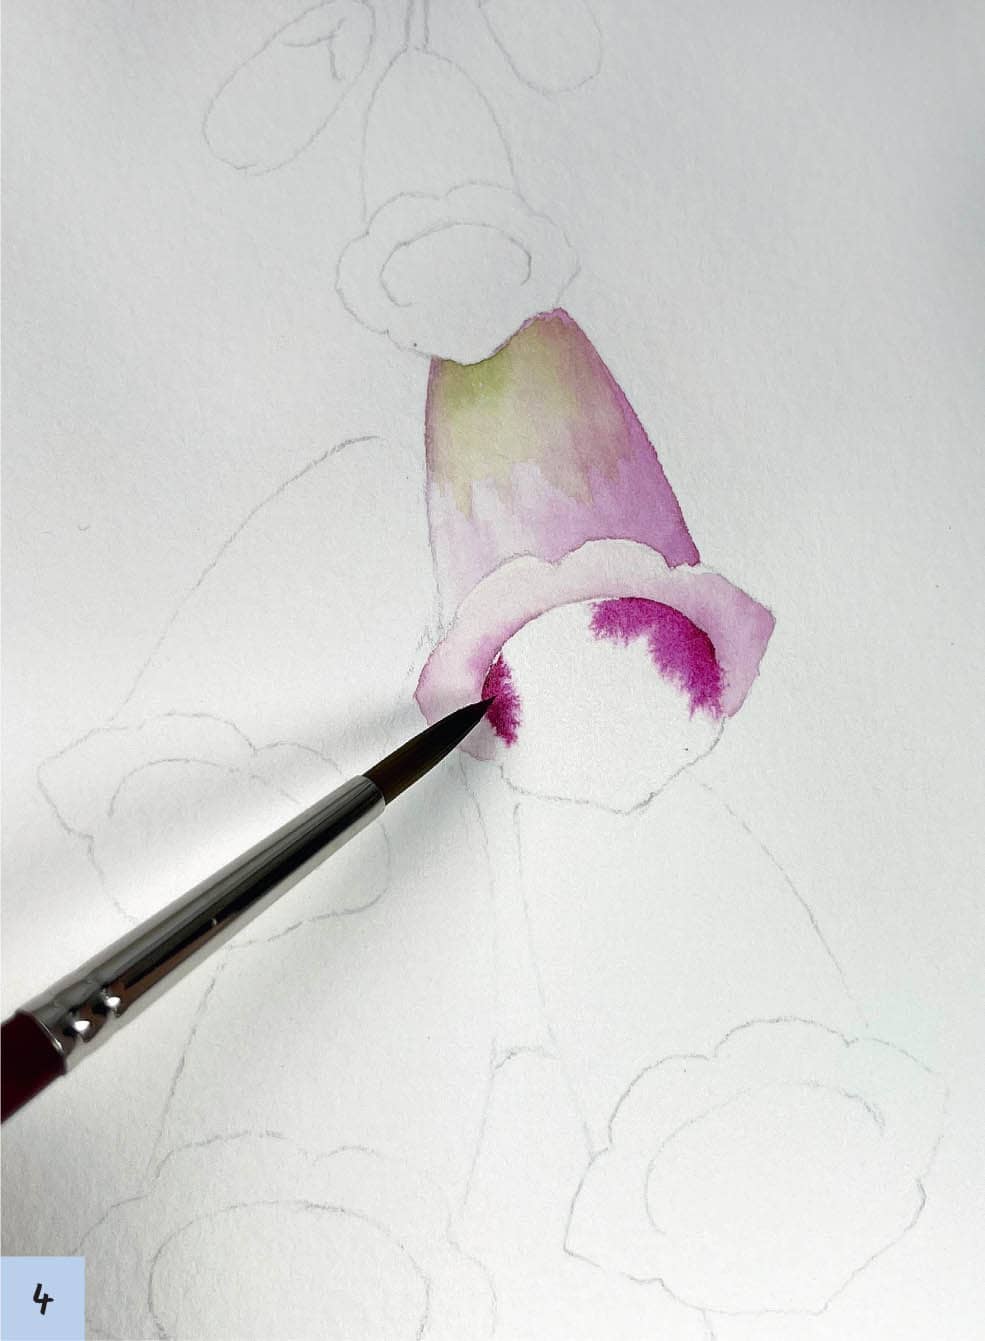
PAINT THE FLOWER
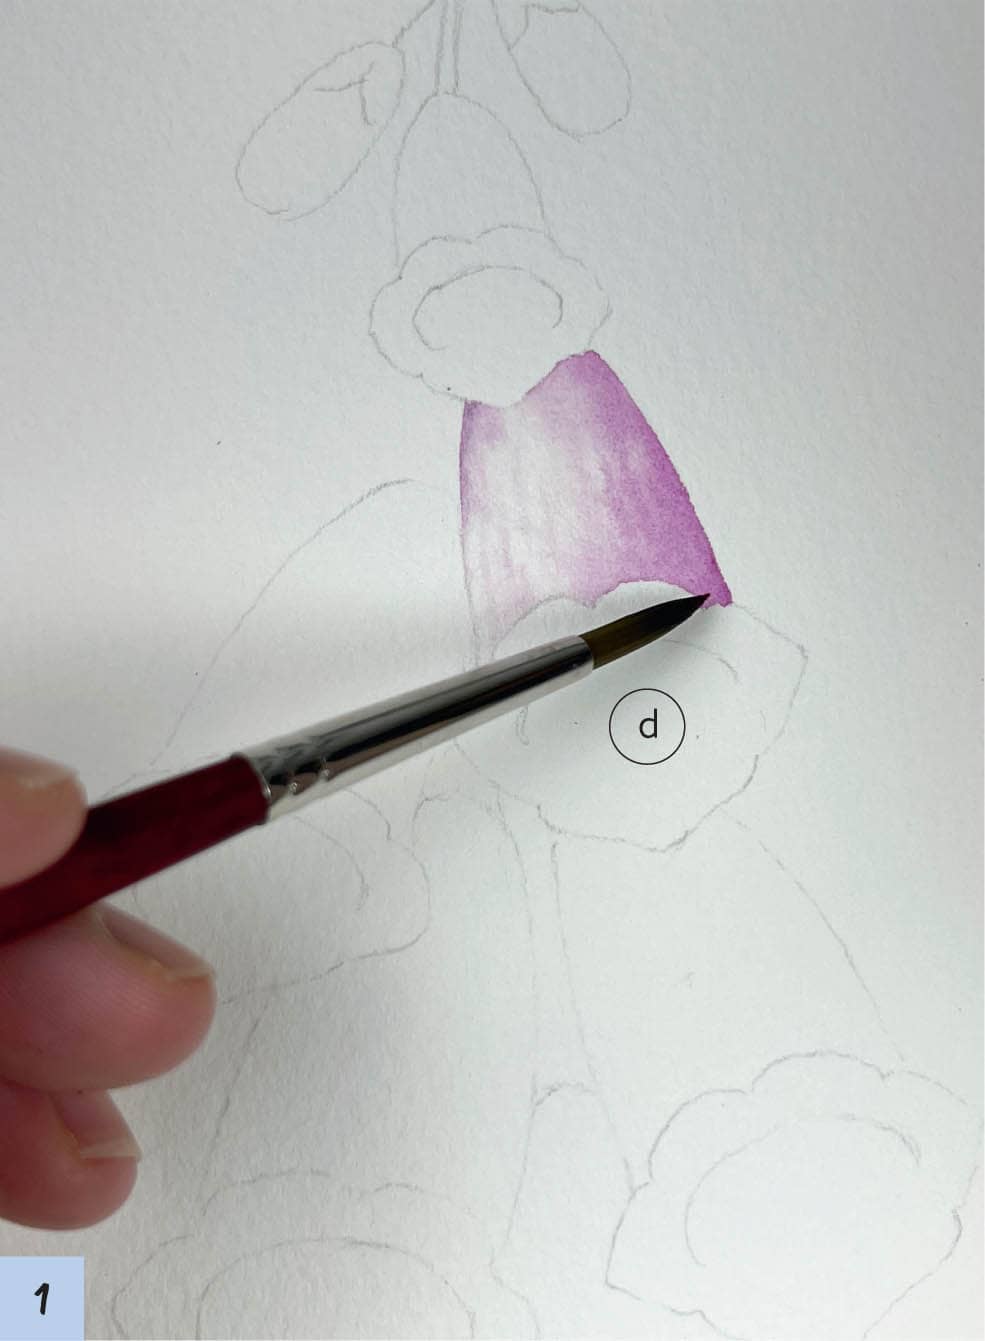
Foxglove features a variety of stunning colors. Red-violet, a shade introduced with this lesson, is the main color. In this lesson, you’ll learn how to use complementary colors to make hues more dynamic.
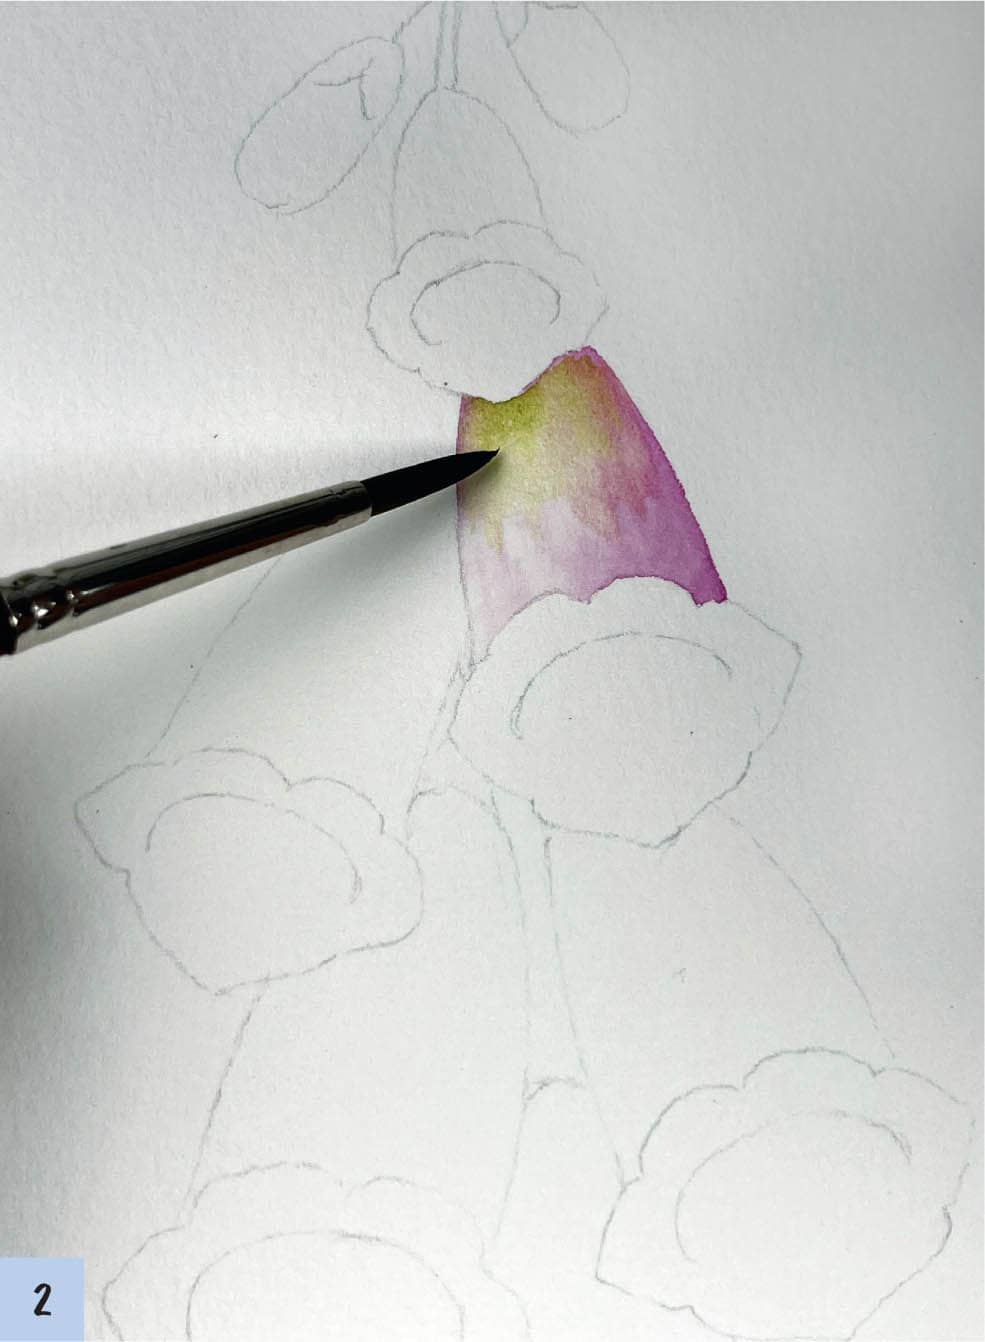
1Brush water on the cone of blossom e, using the wet-on-wet technique (see here). Use Level 3 density red-violet on the right side. Create a smooth, light gradient as you move the brush to the left side of the blossom. Apply a heavy layer of Level 3 density red-violet to the right edge.
2While the paint is still wet, apply a thin layer of Level 2 density Phthalo Yellow Green to the cone’s peak and the bright left-hand portion of the blossom.
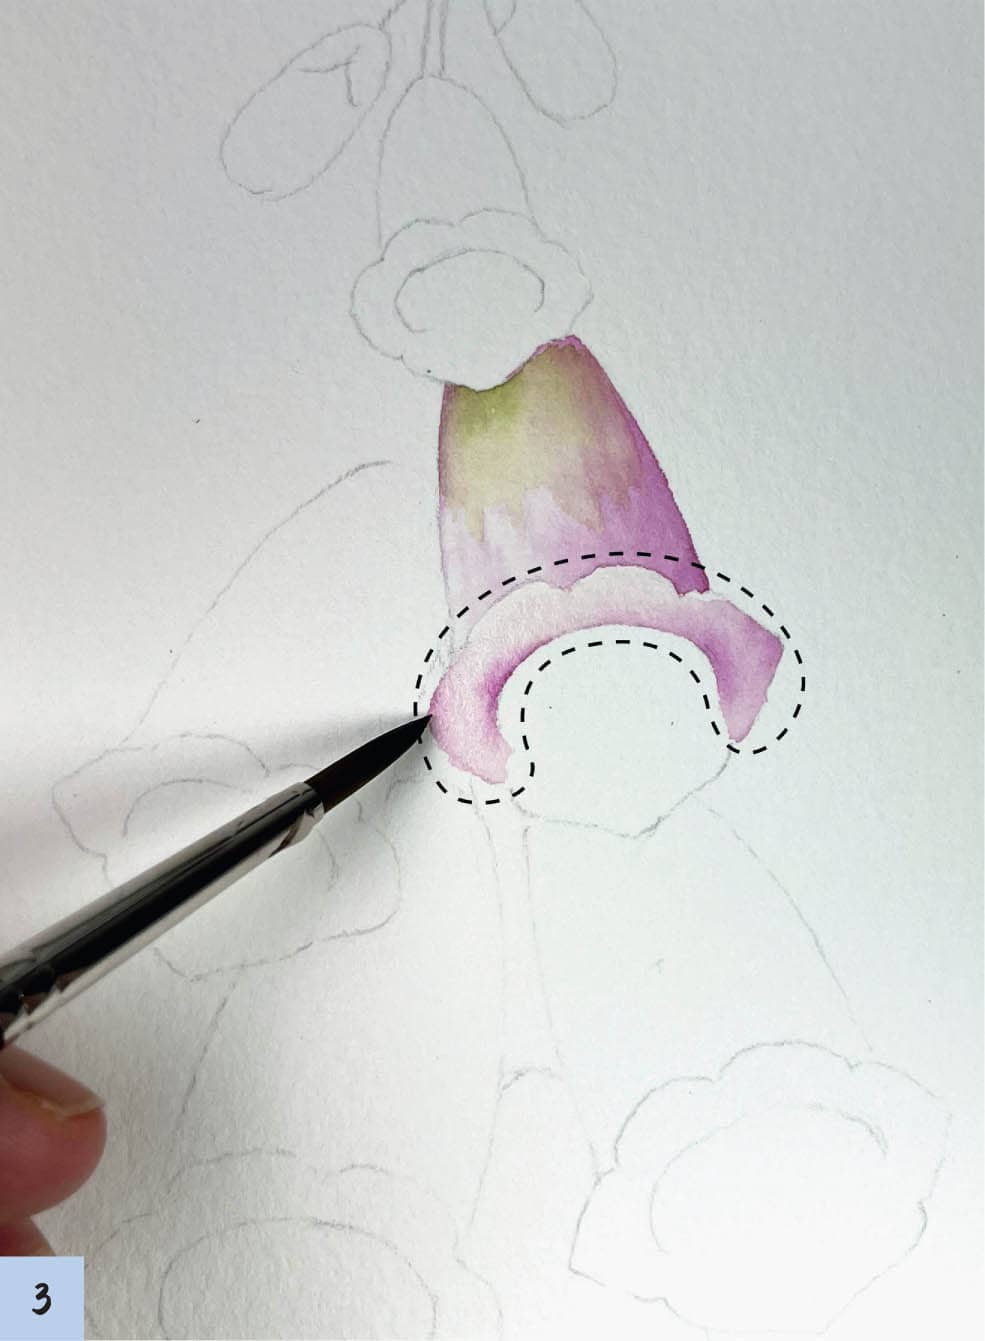
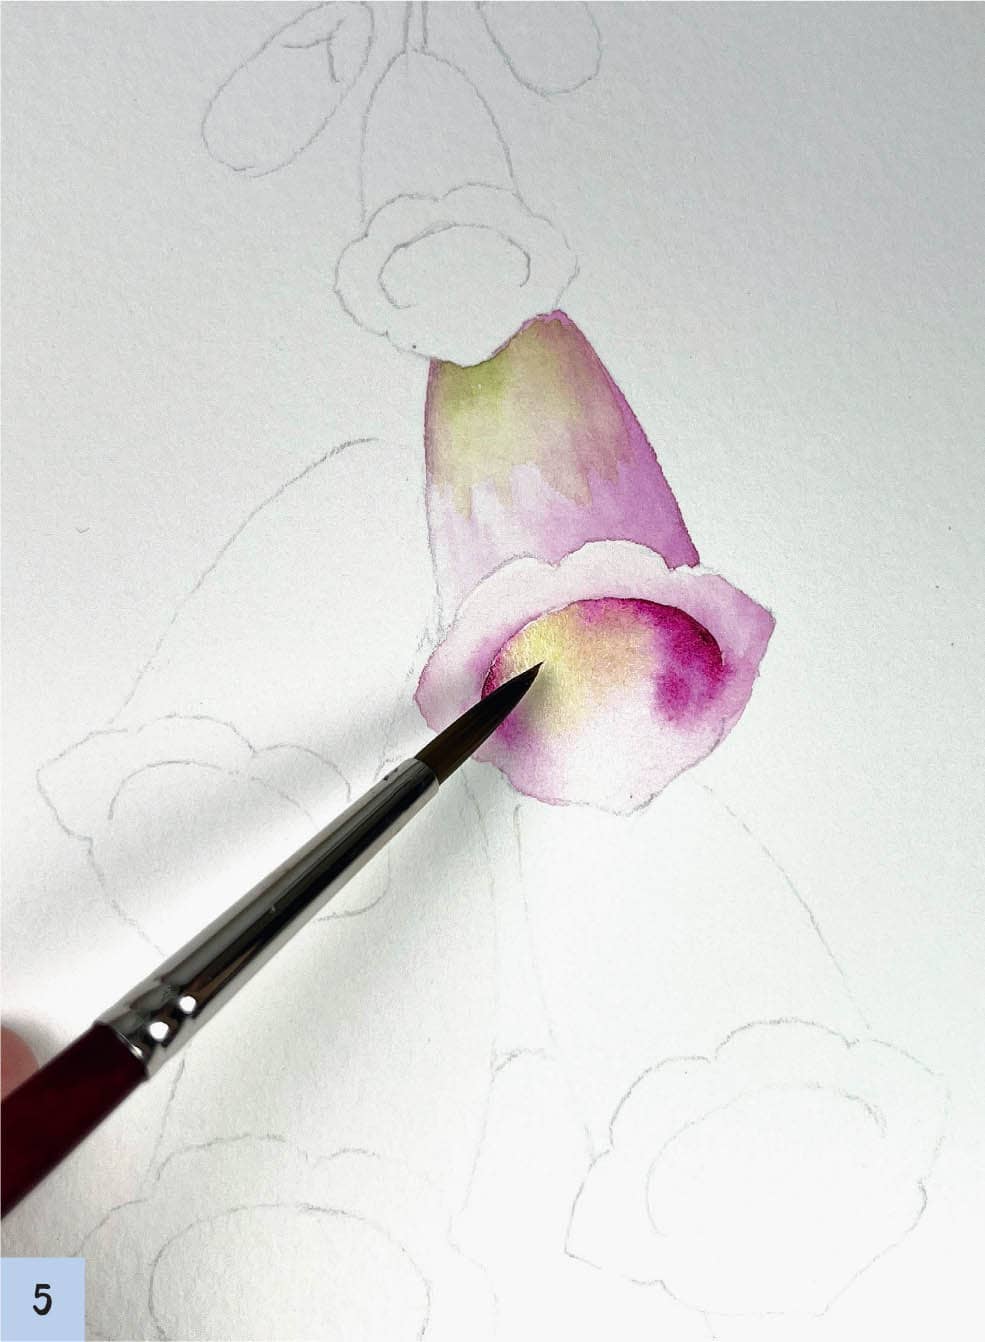
3Brush water in the upturned part of the blossom in the area marked with dotted lines. Color the area with Level 2 density red-violet. Apply another layer of the color on the edges of this area, as shown. Use the brush tip to apply the paint, moving it as if making small dots on the paper.
4Brush water over the interior of the blossom, using the wet-on-wet technique. Use Level 4 density red-violet to apply a little color on the right and left sides, as shown. Do not make strokes. After applying paint to the paper, leave the color to spread naturally.
5Add a thin layer of Level 2 density yellow-green over the bright portion of the interior, in the top left area.
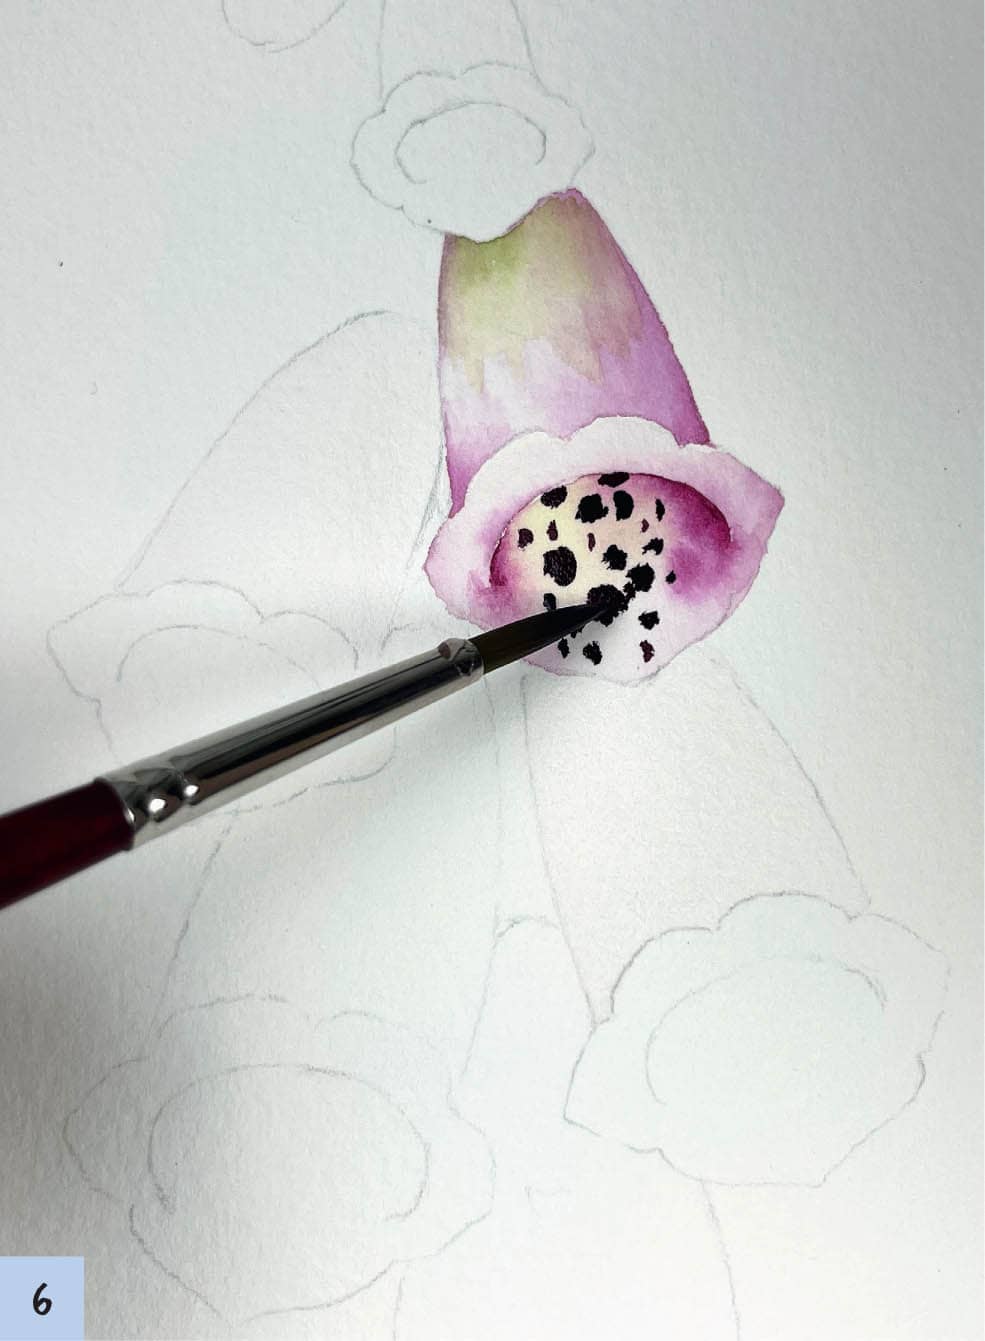
6Mix red-violet and black in an approximate ratio of 1:2. Working wet-on-wet, create random patterns inside the cone using Level 5 density paint. Repeat steps 1 to 5 to color the other blossoms on the stem.
7Use Level 2 density red-violet to color the interiors where the blossoms don’t overlap. Apply the paint and leave it to spread naturally.
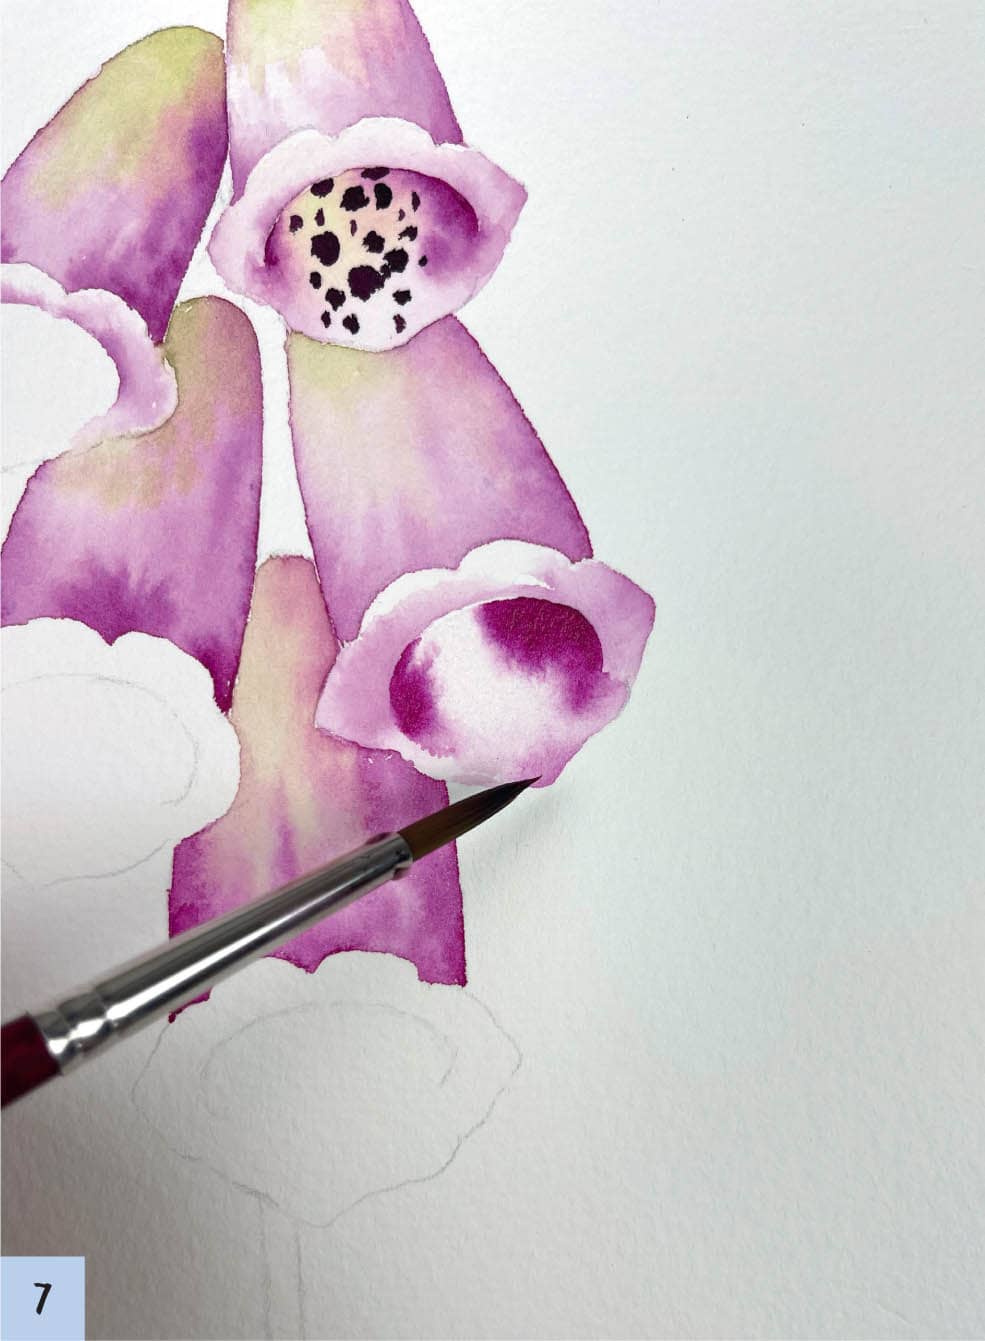
8Color the base of the buds (nearest the sepal) with Level 2 density red-violet. Create a gradient with Level 2 density yellow-green applied to the top of the buds. Color the sepal and stem of the flower with Level 3 density Hooker’s Green.