
Chapter 4
Creating Simple Scripts in JavaScript
What You’ll Learn in This Chapter:
![]() Tools for Scripting
Tools for Scripting
![]() Displaying Time with JavaScript
Displaying Time with JavaScript
![]() Beginning the Script
Beginning the Script
![]() Adding JavaScript Statements
Adding JavaScript Statements
![]() Creating Output
Creating Output
![]() Adding the Script to a Web Page
Adding the Script to a Web Page
![]() Testing the Script
Testing the Script
![]() JavaScript Syntax Rules
JavaScript Syntax Rules
![]() Using Comments
Using Comments
![]() Best Practices for JavaScript
Best Practices for JavaScript
As has already been discussed earlier in the book, JavaScript is a client-side scripting language for web pages. You can include JavaScript commands directly in the HTML document, and the script will be executed when the page is viewed in a browser.
During this chapter, you will create a simple script, edit it, and test it using a web browser. Along the way you’ll learn the basic tasks involved in creating and using scripts.
Tools for Scripting
Unlike many programming languages, you won’t need any special software to create JavaScript scripts. In fact, you probably already have everything you need.
Text Editors
The first tool you’ll need to work with JavaScript is a text editor. JavaScript scripts are stored in simple text files, usually as part of HTML documents. Any editor that can store ASCII text files will work. Our discussion of programmers’ editors in Chapter 2, “Writing and Styling Pages in HTML and CSS” is equally relevant to our work here in JavaScript (and, in fact, to the coding we carry out in PHP, later in the book).
![]()
The CD that accompanies the book contains versions of the jEdit programmer’s editor for use on Java, Macintosh, and Windows platforms. This editor will work just fine for coding your JavaScript programs. |
Browsers
You’ll need two other things to work with JavaScript: a web browser and a computer to run it on. I recommend that you use the latest version of Mozilla Firefox or Microsoft Internet Explorer. See the Mozilla (http://www.mozilla.com) or Microsoft (http://www.microsoft.com) website to download a copy.
At a minimum, you should have Firefox 1.0, Netscape 7.0, or Internet Explorer 6.0 or later. You can choose whichever browser you like for your web browsing, but for developing JavaScript you should have more than one browser—at a minimum, Firefox and Internet Explorer. This will allow you to test your scripts in the common browsers users will employ on your site.
![]()
If you plan on making your scripts available over the Internet, you’ll also need a web server, or access to one. However, you can use most of the JavaScript examples in this book directly from your computer’s hard disk. |
Displaying Time with JavaScript
One common and easy use for JavaScript is to display dates and times. Because JavaScript runs on the browser, the times it displays will be in the user’s current time zone. However, you can also use JavaScript to calculate “universal” (UTC) time.
![]()
UTC stands for Universal Time (Coordinated), and is the atomic time standard based on the old GMT (Greenwich Mean Time) standard. This is the time at the Prime Meridian, which runs through Greenwich, London, England. |
As a basic introduction to JavaScript, you will now create a simple script that displays the current time and the UTC time within a web page, starting with the next section.
Beginning the Script
Your script, like most JavaScript programs, begins with the HTML <script> tag. You use the <script> and </script> tags to enclose a script within the HTML document.
![]()
Remember to include only valid JavaScript statements between the starting and ending |
To begin creating the script, open your favorite text editor and type the beginning and ending <script> tags as shown.
<script LANGUAGE=”JavaScript” type=”text/javascript”> </script>
Because this script does not use any of the new features of JavaScript 1.1 or later, you won’t need to specify a version number in the <script> tag. This script should work with all browsers going back to Netscape 2.0 or Internet Explorer 3.0.
Adding JavaScript Statements
Your script now needs to determine the local and UTC times, and then display them to the browser. Fortunately, all of the hard parts, such as converting between date formats, are built in to the JavaScript interpreter.
Storing Data in Variables
To begin the script, you will use a variable to store the current date. You will learn more about variables in Chapter 6, “Using Variables, Strings, and Arrays.” A variable is a container that can hold a value—a number, some text, or in this case, a date.
To start writing the script, add the following line after the first <script> tag. Be sure to use the same combination of capital and lowercase letters in your version because JavaScript commands and variable names are case sensitive.
now = new Date();This statement creates a variable called now and stores the current date and time in it. This statement and the others you will use in this script use JavaScript’s built-in Date object, which enables you to conveniently handle dates and times. You’ll learn more about working with dates in Chapter 9, “Using Built-In Functions and Libraries.”
![]()
Notice the semicolon at the end of the previous statement. This tells the browser that it has reached the end of a statement. Semicolons are optional, but using them helps you avoid some common errors. We’ll use them throughout this book for clarity. |
Calculating the Results
Internally, JavaScript stores dates as the number of milliseconds since January 1, 1970. Fortunately, JavaScript includes a number of functions to convert dates and times in various ways, so you don’t have to figure out how to convert milliseconds to day, date, and time.
To continue your script, add the following two statements before the final </script> tag:
localtime = now.toString();
utctime = now.toGMTString();
These statements create two new variables: localtime, containing the current time and date in a nice readable format, and utctime, containing the UTC equivalent.
![]()
The |
Creating Output
You now have two variables—localtime and utctime—which contain the results we want from our script. Of course, these variables don’t do us much good unless we can see them. JavaScript includes a number of ways to display information, and one of the simplest is the document.write statement.
The document.write statement displays a text string, a number, or anything else you throw at it. Because your JavaScript program will be used within a web page, the output will be displayed as part of the page. To display the result, add these statements before the final </script> tag:
document.write(“<b>Local time:</b> “ + localtime + “<br>”);
document.write(“<b>UTC time:</b> “ + utctime);
These statements tell the browser to add some text to the web page containing your script. The output will include some brief strings introducing the results, and the contents of the localtime and utctime variables.
Notice the HTML tags, such as <b>, within the quotation marks—because JavaScript’s output appears within a web page, it needs to be formatted using HTML. The <br> tag in the first line ensures that the two times will be displayed on separate lines.
![]()
Notice the plus signs (+) used between the text and variables in the previous statements. In this case, it tells the browser to combine the values into one string of text. If you use the plus sign between two numbers, they are added together. |
Adding the Script to a Web Page
You should now have a complete script that calculates a result and displays it. Your listing should match Listing 4.1.
Listing 4.1 The Complete Date and Time Script
<script language=”JavaScript” type=”text/javascript”>
now = new Date();
localtime = now.toString();
utctime = now.toGMTString();
document.write(“<b>Local time:</b> “ + localtime + “<BR>”);
document.write(“<b>UTC time:</b> “ + utctime);
</script>
To use your script, you’ll need to add it to an HTML document. In its most basic form, the HTML document should include opening and closing <html> tags, <head> tags, and <body> tags.
If you add these tags to the document containing your script along with a descriptive heading, you should end up with something like Listing 4.2.
Listing 4.2 The Date and Time Script in an HTML Document
<html>
<head><title>Displaying Times and Dates</title></head>
<body>
<h1>Current Date and Time</h1>
<p>
<script language=”JavaScript” type=”text/javascript”>
now = new Date();
localtime = now.toString();
utctime = now.toGMTString();
document.write(“<b>Local time:</b> “ + localtime + “<BR>”);
document.write(“<b>UTC time:</b> “ + utctime);
</script>
</p>
</body>
</html>
Now that you have a complete HTML document, save it with the .htm or .html extension.
![]()
Notepad and other Windows text editors might try to be helpful and add the |
Testing the Script
To test your script, you simply need to load the HTML document you created in a web browser. Start Netscape or Internet Explorer and select Open from the File menu. Click the Choose File or Browse button, and then find your HTML file. After you’ve selected it, click the Open button to view the page.
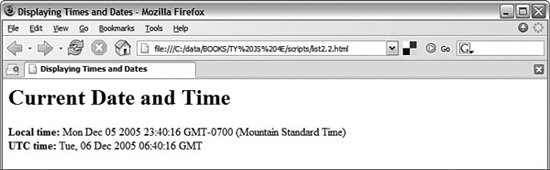
If you typed the script correctly, your browser should display the result of the script, as shown in Figure 4.1. (Of course, your result won’t be the same as mine, but it should be the same as the setting of your computer’s clock.)
A note about Internet Explorer 6.0 and above: Depending on your security settings, the script might not execute, and a yellow highlighted bar on the top of the browser might display a security warning. In this case, click the yellow bar and select Allow Blocked Content to allow your script to run. (This happens because the default security settings allow JavaScript in online documents, but not in local files.)
Figure 4.1 Firefox displays the results of the Date and Time script.
Modifying the Script
Although the current script does indeed display the current date and time, its display isn’t nearly as attractive as the clock on your wall or desk. To remedy that, you can use some additional JavaScript features and a bit of HTML to display a large clock.
To display a large clock, we need the hours, minutes, and seconds in separate variables. Once again, JavaScript has built-in functions to do most of the work:
hours = now.getHours();
mins = now.getMinutes();
secs = now.getSeconds();
These statements load the hours, mins, and secs variables with the components of the time using JavaScript’s built-in date functions.
After the hours, minutes, and seconds are in separate variables, you can create document.write statements to display them:
document.write(“<h1>”);
document.write(hours + “:” + mins + “:” + secs);
document.write(“</h1>”);
The first statement displays an HTML <h1> header tag to display the clock in a large typeface. The second statement displays the hours, mins, and secs variables, separated by colons, and the third adds the closing </font> tag.
You can add the preceding statements to the original date and time script to add the large clock display. Listing 4.3 shows the complete modified version of the script.
Listing 4.3 The Date and Time Script with Large Clock Display
<html>
<head><title>Displaying Times and Dates</title></head>
<body>
<h1>Current Date and Time</h1>
<p>
<script language=”JavaScript”>
now = new Date();
localtime = now.toString();
utctime = now.toGMTString();
document.write(“<b>Local time:</b> “ + localtime + “<BR>”);
document.write(“<b>UTC time:</b> “ + utctime);
hours = now.getHours();
mins = now.getMinutes();
secs = now.getSeconds();
document.write(“<h1>”);
document.write(hours + “:” + mins + “:” + secs);
document.write(“</h1>”);
</script>
</p>
</body>
</html>
Now that you have modified the script, save the HTML file and open the modified file in your browser. If you left the browser running, you can simply use the Reload button to load the new version of the script. Try it and verify that the same time is displayed in both the upper portion of the window and the new large clock. Figure 4.2 shows the results.
Figure 4.2 Internet Explorer displays the modified Date and Time script.

![]()
The time formatting produced by this script isn’t perfect: Hours after noon are in 24-hour time, and there are no leading zeroes, so 12:04 is displayed as 12:4. See Chapter 9 for solutions to these issues. |
Dealing with JavaScript Errors
As you develop more complex JavaScript applications, you’re going to run into errors from time to time. JavaScript errors are usually caused by mistyped JavaScript statements.
To see an example of a JavaScript error message, modify the statement you added in the previous section. We’ll use a common error: omitting one of the parentheses. Change the last document.write statement in Listing 4.3 to read
document.write(“</h1>”;
Save your HTML document again and load the document into the browser. Depending on the browser version you’re using, one of two things will happen: Either an error message will be displayed, or the script will simply fail to execute.
If an error message is displayed, you’re halfway to fixing the problem by adding the missing parenthesis. If no error was displayed, you should configure your browser to display error messages so that you can diagnose future problems:
![]() In Netscape or Firefox, type
In Netscape or Firefox, type javascript: into the browser’s Location field to display the JavaScript Console. In Firefox, you can also select Tools, JavaScript Console from the menu. The console is shown in Figure 4.3, displaying the error message you created in this example.
![]() In Internet Explorer, select Tools, Internet Options. On the Advanced page, uncheck the Disable Script Debugging box and check the Display a Notification About Every Script Error box. (If this is disabled, a yellow icon in the status bar will still notify you of errors.)
In Internet Explorer, select Tools, Internet Options. On the Advanced page, uncheck the Disable Script Debugging box and check the Display a Notification About Every Script Error box. (If this is disabled, a yellow icon in the status bar will still notify you of errors.)
![]()
Notice the field at the bottom of the JavaScript Console. This enables you to type a JavaScript statement, which will be executed immediately. This is a handy way to test JavaScript’s features. |
Figure 4.3 Firefox’s JavaScript Console displays an error message.
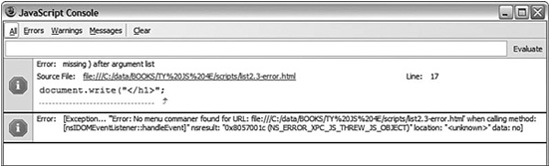
The error we get in this case is missing ) after argument list (Firefox) or Expected ‘)’ (Internet Explorer), which turns out to be exactly the problem. Be warned, however, that error messages aren’t always this enlightening.
While Internet Explorer displays error dialog boxes for each error, Firefox’s JavaScript Console displays a single list of errors and allows you to test commands. For this reason, you might find it useful to install Firefox for debugging and testing JavaScript, even if Internet Explorer is your primary browser.
Statements
Statements are the basic units of a JavaScript program. A statement is a section of code that performs a single action. For example, consider the following three statements, each of which return part of the current time:
hours = now.getHours();
mins = now.getMinutes();
secs = now.getSeconds();
Although a statement is typically a single line of JavaScript, this is not a rule—it’s possible to break a statement across multiple lines, or to include more than one statement in a single line.
A semicolon marks the end of a statement. You can also omit the semicolon if you start a new line after the statement. If you combine statements into a single line, you must use semicolons to separate them.
Combining Tasks with Functions
In the basic scripts you’ve examined so far, you’ve seen some JavaScript statements that have a section in parentheses, like this:
document.write(“Testing.”);
This is an example of a function. Functions provide a simple way to handle a task, such as adding output to a web page. JavaScript includes a wide variety of built-in functions, which you will learn about throughout this book. A statement that uses a function, as in the preceding example, is referred to as a function call.
Functions take parameters (the expression inside the parentheses) to tell them what to do. Additionally, a function can return a value to a waiting variable. For example, the following function call prompts the user for a response and stores it in the text variable:
text = prompt(“Enter some text.”)
You can also create your own functions. This is useful for two main reasons: First, you can separate logical portions of your script to make it easier to understand. Second, and more importantly, you can use the function several times or with different data to avoid repeating script statements.
![]()
You will learn how to define, call, and return values from your own functions in Chapter 7, “Using Functions and Objects.” |
Variables
Variables are containers that can store a number, a string of text, or another value. For example, the following statement creates a variable called fred and assigns it the value 27:
var fred = 27;
JavaScript variables can contain numbers, text strings, and other values. You’ll learn more about them in Chapter 6, “Using Variables, Strings, and Arrays.”
Conditionals
Although event handlers notify your script when something happens, you might want to check certain conditions yourself. For example, did the user enter a valid email address?
JavaScript supports conditional statements, which enable you to answer questions like this. A typical conditional uses the if statement, as in this example:
if (count==1) alert(“The countdown has reached 1.”);
This compares the variable count with the constant 1, and displays an alert message to the user if they are the same. You will use conditional statements like this in most of your scripts.
![]()
You’ll learn more about conditionals in Chapter 8, “Controlling Flow with Conditions and Loops.” |
Loops
Another useful feature of JavaScript—and most other programming languages—is the capability to create loops, or groups of statements that repeat a certain number of times. For example, these statements display the same alert 10 times, greatly annoying the user:
for (i=1; i<=10; i++) {
   Alert(“Yes, it’s yet another alert!”);
}
The for statement is one of several statements JavaScript uses for loops. This is the sort of thing computers are supposed to be good at: performing repetitive tasks. You will use loops in many of your scripts, in much more useful ways than this example.
![]()
Loops are covered in detail in Chapter 8. |
Event Handlers
As already mentioned, not all scripts are located within <script> tags. You can also use scripts as event handlers. Although this might sound like a complex programming term, it actually means exactly what it says: Event handlers are scripts that handle events.
In real life, an event is something that happens to you. For example, the things you write on your calendar are events: “Dentist appointment” or “Fred’s birthday.” You also encounter unscheduled events in your life: for example, a traffic ticket, an IRS audit, or an unexpected visit from relatives.
Whether events are scheduled or unscheduled, you probably have normal ways of handling them. Your event handlers might include things such as When Fred’s birthday arrives, send him a present or When relatives visit unexpectedly, turn out the lights and pretend nobody is home.
Event handlers in JavaScript are similar: They tell the browser what to do when a certain event occurs. The events JavaScript deals with aren’t as exciting as the ones you deal with—they include such events as When the mouse button clicks and When this page is finished loading. Nevertheless, they’re a very useful part of JavaScript.
Many JavaScript events (such as mouse clicks) are caused by the user. Rather than doing things in a set order, your script can respond to the user’s actions. Other events don’t involve the user directly—for example, an event is triggered when an HTML document finishes loading.
Each event handler is associated with a particular browser object, and you can specify the event handler in the tag that defines the object. For example, images and text links have an event, onMouseOver, that happens when the mouse pointer moves over the object. Here is a typical HTML image tag with an event handler:
<img src=”button.gif” onMouseOver=”highlight();”>
You specify the event handler as an attribute to the HTML tag and include the JavaScript statement to handle the event within the quotation marks. This is an ideal use for functions because function names are short and to the point and can refer to a whole series of statements.
See the Try It Yourself section at the end of this chapter for a complete example of an event handler within an HTML document.
Which Script Runs First?
You can actually have several scripts within a web document: one or more sets of <script> tags, external JavaScript files, and any number of event handlers. With all of these scripts, you might wonder how the browser knows which to execute first. Fortunately, this is done in a logical fashion:
![]() Sets of
Sets of <script> tags within the <head> section of an HTML document are handled first, whether they include embedded code or refer to a JavaScript file. Because these scripts cannot create output in the web page, it’s a good place to define functions for use later.
![]() Sets of
Sets of <script> tags within the <body> section of the HTML document are executed after those in the <head> section, while the web page loads and displays. If there is more than one script in the body, they are executed in order.
![]() Event handlers are executed when their events happen. For example, the
Event handlers are executed when their events happen. For example, the onLoad event handler is executed when the body of a web page loads. Because the <head> section is loaded before any events, you can define functions there and use them in event handlers.
JavaScript Syntax Rules
JavaScript is a simple language, but you do need to be careful to use its syntax—the rules that define how you use the language—correctly. The rest of this book covers many aspects of JavaScript syntax, but there are a few basic rules you should understand to avoid errors.
Case Sensitivity
Almost everything in JavaScript is case sensitive: you cannot use lowercase and capital letters interchangeably. Here are a few general rules:
![]() JavaScript keywords, such as
JavaScript keywords, such as for and if, are always lowercase.
![]() Built-in objects such as
Built-in objects such as Math and Date are capitalized.
![]() DOM object names are usually lowercase, but their methods are often a combination of capitals and lowercase. Usually capitals are used for all but the first word, as in
DOM object names are usually lowercase, but their methods are often a combination of capitals and lowercase. Usually capitals are used for all but the first word, as in toLowerCase and getElementById.
When in doubt, follow the exact case used in this book or another JavaScript reference. If you use the wrong case, the browser will usually display an error message.
Variable, Object, and Function Names
When you define your own variables, objects, or functions, you can choose their names. Names can include uppercase letters, lowercase letters, numbers, and the underscore (_) character. Names must begin with a letter or underscore.
You can choose whether to use capitals or lowercase in your variable names, but remember that JavaScript is case sensitive: score, Score, and SCORE would be considered three different variables. Be sure to use the same name each time you refer to a variable.
Reserved Words
One more rule for variable names—they must not be reserved words. These include the words that make up the JavaScript language, such as if and for, DOM object names such as window and document, and built-in object names such as Math and Date.
Spacing
Blank space (known as whitespace by programmers) is ignored by JavaScript. You can include spaces and tabs within a line, or blank lines, without causing an error. Blank space often makes the script more readable.
Using Comments
JavaScript comments enable you to include documentation within your script. This will be useful if someone else tries to understand the script, or even if you try to understand it after a long break. To include comments in a JavaScript program, begin a line with two slashes, as in this example:
//this is a comment.
You can also begin a comment with two slashes in the middle of a line, which is useful for documenting a script. In this case, everything on the line after the slashes is treated as a comment and ignored by the browser. For example,
a = a + 1; // add one to the value of a
JavaScript also supports C-style comments, which begin with /* and end with */. These comments can extend across more than one line, as the following example demonstrates:
/*This script includes a variety
of features, including this comment. */
Because JavaScript statements within a comment are ignored, C-style comments are often used for commenting out sections of code. If you have some lines of JavaScript that you want to temporarily take out of the picture while you debug a script, you can add /* at the beginning of the section and */ at the end.
![]()
Because these comments are part of JavaScript syntax, they are only valid inside |
Best Practices for JavaScript
You should now be familiar with the basic rules for writing valid JavaScript. Along with following the rules, it’s also a good idea to follow best practices. The following practices may not be required, but you’ll save yourself and others some headaches if you follow them.
![]() Use comments liberally—These make your code easier for others to understand, and also easier for you to understand when you edit them later. They are also useful for marking the major divisions of a script.
Use comments liberally—These make your code easier for others to understand, and also easier for you to understand when you edit them later. They are also useful for marking the major divisions of a script.
![]() Use a semicolon at the end of each statement, and only use one statement per line—This will make your scripts easier to debug.
Use a semicolon at the end of each statement, and only use one statement per line—This will make your scripts easier to debug.
![]() Use separate JavaScript files whenever possible—This separates JavaScript from HTML and makes debugging easier, and also encourages you to write modular scripts that can be reused.
Use separate JavaScript files whenever possible—This separates JavaScript from HTML and makes debugging easier, and also encourages you to write modular scripts that can be reused.
![]() Avoid being browser-specific—As you learn more about JavaScript, you’ll learn some features that only work in one browser. Avoid them unless absolutely necessary, and always test your code in more than one browser.
Avoid being browser-specific—As you learn more about JavaScript, you’ll learn some features that only work in one browser. Avoid them unless absolutely necessary, and always test your code in more than one browser.
![]() Keep JavaScript optional—Don’t use JavaScript to perform an essential function on your site—for example, the primary navigation links. Whenever possible, users without JavaScript should be able to use your site, although it may not be quite as attractive or convenient. This strategy is known as progressive enhancement.
Keep JavaScript optional—Don’t use JavaScript to perform an essential function on your site—for example, the primary navigation links. Whenever possible, users without JavaScript should be able to use your site, although it may not be quite as attractive or convenient. This strategy is known as progressive enhancement.
Try It Yourself
Using an Event Handler
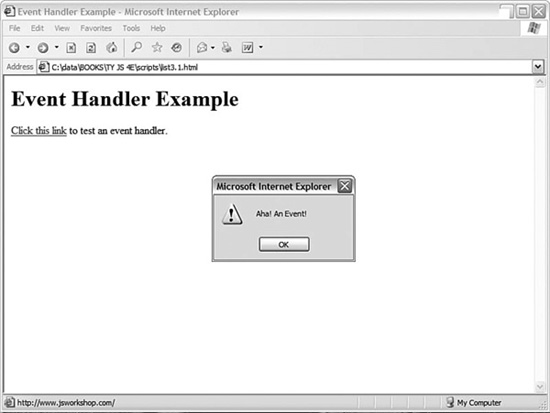
To conclude this chapter, here’s a simple example of an event handler. This will demonstrate how you set up an event, which you’ll use throughout this book, and how JavaScript works without <script> tags. Listing 4.6 shows an HTML document that includes a simple event handler.
Listing 4.6 An HTML Document with a Simple Event Handler
<html>
<head>
<title>Event Handler Example</title>
</head>
<body>
<h1>Event Handler Example</h1>
<p>
<a href=”http://www.jsworkshop.com/”
onClick=”alert(‘Aha! An Event!’);”>Click this link</a>
to test an event handler.
</p>
</body>
</html>
The event handler is defined with the following onClick attribute within the <a> tag that defines a link:
onClick=”alert(‘Aha! An Event!’);”
This event handler uses the built-in alert() function to display a message when you click on the link. In more complex scripts, you will usually define your own function to act as an event handler. Figure 4.4 shows this example in action.
Figure 4.4 The browser displays an alert when you click the link.
You’ll use other event handlers similar to this in the next chapter.
Summary
During this chapter, you wrote a simple JavaScript program and tested it using a browser. You learned about the tools you need to work with JavaScript—basically, an editor and a browser. You also learned how to modify and test scripts, and what happens when a JavaScript program runs into an error, and you learned how to use scripts in separate JavaScript files.
In the process of writing this script, you have used some of JavaScript’s basic features: variables, the document.write statement, and functions for working with dates and times.
You’ve also been introduced to several components of JavaScript programming and syntax: functions, objects, event handlers, conditions, and loops. You learned how to use JavaScript comments to make your script easier to read, and looked at a simple example of an event handler.
In the next chapter, you’ll look at the Document Object Model (DOM) and learn how you can use the objects within the DOM to work with web pages and interact with users.