
Chapter 4 Managing and Optimizing SQL Server 2008 Indexes
SQL Server 2008 uses indexes to structure and optimize access to data found within the tables of a database. Index design, maintenance, and optimization are key factors that contribute to how well a database performs. Although the lack of indexes or the use of poorly designed indexes, along with inadequate maintenance, can lead to performance degradation, well-designed and maintained indexes can significantly improve the overall performance of a database by reducing the cost associated with locating data.
When you are performing management and administrative tasks on indexes, it is important to understand the different options and powerful tools that help DBAs to make indexing management and optimization decisions.
![]() Filtered indexes have been introduced as a way of optimizing nonclustered indexes on a subset of data.
Filtered indexes have been introduced as a way of optimizing nonclustered indexes on a subset of data.
![]() The number of indexes that can be created per table has increased. Tables can now contain a total of 1,000 indexes per table, 1 clustered index, and up to 249 nonclustered indexes.
The number of indexes that can be created per table has increased. Tables can now contain a total of 1,000 indexes per table, 1 clustered index, and up to 249 nonclustered indexes.
![]() A maximum of 249 XML indexes can be created.
A maximum of 249 XML indexes can be created.
![]() Spatial data is a new feature introduced in SQL Server 2008 for storing coordinate information pertaining to physical locations and geometric objects. SQL Server 2008 allows indexes to be created on spatial data stored within a table.
Spatial data is a new feature introduced in SQL Server 2008 for storing coordinate information pertaining to physical locations and geometric objects. SQL Server 2008 allows indexes to be created on spatial data stored within a table.
A well-planned indexing strategy allows fast and efficient access to the underlying data. Indexes can be created on tables or views and ideally allow SQL Server to locate and manage data more efficiently. When efficiency is improved, the amount of time each operation takes is reduced, along with the cost associated with performing the operation.
Index design is typically performed during development of the database application. The reason is that the ability to create effective indexes is based on understanding how application queries are coded and how the data is stored in the database. However, indexes also require management after the database application is deployed and as usage patterns emerge or change.
Managing and optimizing indexes as an ongoing process allows potential performance improvements without requiring changes to the underlying schema. As data is queried, the SQL Server Query Optimizer automatically determines the best method to access the data based on the type of operation and the available indexes.
The data within a SQL Server 2008 database is stored within tables. The data within a table is grouped together into allocation units based on the column data type. The data within each allocation unit is physically stored in 8KB pages.
Note
For efficiency, groups of eight pages are physically managed together. This 64KB group of pages is referred to as an extent.
Pages within a table store the actual data rows along with the different structures to facilitate locating the data. When the rows of data associated with a table are not logically sorted, the table is referred to as a heap structure.
When an index is created, the data in the heap can be rearranged and becomes part of the index, as in the case of a clustered index. An index can also be created as a separate structure that simply points to the location of the data in the heap or clustered index, as in the case of a nonclustered index. A new type of index is also available in SQL Server 2008; this new index can be created on spatial data columns in the table to improve the efficiency of spatial queries. In addition, filtered indexes can be generated to improve queries that select from a well-defined subset of data.
The different types of indexes have advantages and disadvantages along with different characteristics that need to be considered as part of the ongoing indexing maintenance strategy.
Note
By default, an index with a single partition is comparable to the organizational structure of tables and indexes in previous versions of SQL Server as it is stored within a single filegroup. If multiple partitions are leveraged, the index will span the partitions horizontally and can ultimately be placed in multiple filegroups for increased performance.
Ultimately, a heap is a table without a clustered index where data is not stored in any particular order. A heap structure is often the least efficient method of querying data rows in a table because all rows in the table are scanned each time the data is queried, making it a laborious process. For example, when a specific row of data is needed or when a range of data is needed, all pages in the table are scanned to ensure the correct result is returned. A simile may help further explain heap structures. Searching for data on the heap structure would be like looking up a word in a dictionary that wasn’t presented in alphabetical order or looking for a particular topic in a book that didn’t contain an index. In any dictionary or book, an individual can look up the words “SQL Server” by scanning the words under the letter S—simple. On the other hand, if all words in a dictionary were stored based on a heap structure, the words would not be stored in a logical order, forcing people to search the dictionary page by page—ouch!
There are a few situations when the heap structure may be an efficient structure when dealing with small tables, infrequently accessed tables, or when large amounts of data are frequently written to or deleted from the table. The index maintenance cost can often outweigh any potential performance improvement on these types of tables. It is often recommended to avoid creating indexes on tables that fall into these categories.
Clustered indexes are tables that have been sorted based on one or more table columns. Only one clustered index can be created for a table, and it is commonly placed on key columns or columns used frequently, such as the ones referenced by the WHERE clause. When a clustered index is created, the table is sorted into a b-tree structure, allowing SQL Server to quickly locate the correct data. Figure 4.1 shows an example of a clustered index based on b-tree storage structure.
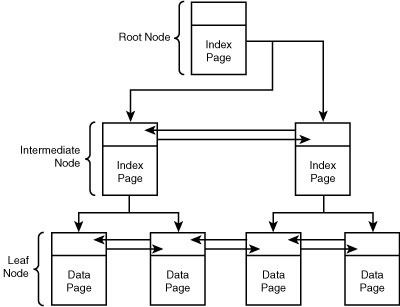
The top of the index contains the root node, the starting position for the index. The intermediate level contains the index key data; the index data can point to other intermediate pages or the data in the leaf level. The leaf level nodes located at the bottom of the b-tree contain the actual table data. When the data in the table is queried, the Database Engine can quickly navigate the b-tree structure and locate specific data without having to scan each page.
Nonclustered indexes are implemented as a separate b-tree structure that does not affect the pages in the underlying table. Unlike a clustered index, more than one nonclustered index can be placed on columns within a table. Figure 4.2 shows an example of a nonclustered index b-tree.
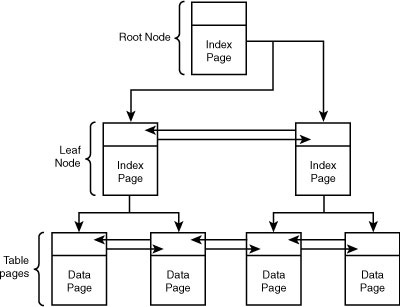
The top of the index contains the root node, the starting position for the index. However, unlike clustered indexes, a nonclustered index does not contain any data pages and does not modify the data in the source table. The index pages on the leaf node contain a row locator that references the data in the associated table.
If the underlying table is also clustered, as in a clustered index, leaf node pages in the nonclustered index point to the corresponding clustered index key. If the underlying table does not have a clustered index, the leaf node pages in the nonclustered index point to the corresponding row in the heap.
When a view is queried, the resulting data is materialized at runtime. Depending on the amount of data returned, a high cost can be associated with the materialization process. To reduce the cost of using complex views, you can create an index on a column in the view.
Note
The Query Optimizer may select a view index automatically, even if the view is not explicitly named in the FROM clause.
The data that would normally be materialized during runtime is stored are stored in the database based on the same format as the table. When the underlying data is changed, the related indexed views are automatically maintained just as clustered and nonclustered indexes are maintained.
Add filtered index to the list of new features introduced with SQL Server 2008. This new feature can be described as an optimized nonclustered index that essentially behaves like a normal index with one exception: It only covers a well-defined subset of data found in a column. It might help to think of a filtered index as a regular index with a WHERE clause that identifies and indexes specific pieces of data in a column. Some advantages of using filtered indexes over traditional nonclustered indexes include smaller indexes, which in turn improves performance and reduce storage costs. In addition, filtered indexes reduce maintenance costs because a filter index only needs to update the subset of data when changes take place. It is a best practice to include a small number of keys or included columns in a filtered index definition, and to incorporate only the columns that are necessary for the query optimizer to choose the filtered index for the query execution plan. The query optimizer can choose a filtered index for the query regardless of whether it does or does not cover the query. However, the query optimizer is more likely to choose a filtered index if it covers the query.
As mentioned earlier, one can create an index on spatial objects residing in a column associated with the spatial data types. The new spatial data types include the geography data type for storing geodetic data and the geometry data type to store planar data. As more and more businesses seek applications and devices that deliver location intelligence, storing spatial data directly in SQL Server relational tables will eventually become a very popular and regularly requested task. As such, database administrators should become familiar with creating indexes for spatial data as there will be a need to enhance queries associated with this new data type.
XML indexes can be created on XML table columns and should be considered when working with XML data types. The XML columns in a table are stored as binary large objects (BLOBs). Normally, when XML columns are queried, the data is shredded during runtime and placed into a relational table. The cost associated with this operation can be very high, depending on the size of the XML column. An XML index shreds the data when the index is created, eliminating the cost of this operation during runtime.
A single primary index and three different types of secondary indexes can exist on each XML column in a table for a total of 249 different XML indexes. Unlike traditional indexes, XML indexes cannot be created on views.
Whereas pages in a heap are not linked or related to each other, index pages are linked; this link type is typically referred to as a doubly linked list. This means one link points to the previous page, and one points to the next page. The doubly linked list effectively allows the Database Engine to quickly locate specific data or the starting and ending points of the range by moving through the index structure.
Both clustered and nonclustered indexes are stored as a b-tree structure. The b-tree structure logically sorts pages with the intention of reducing the amount of time needed to search for data. For example, when you’re querying a heap, the entire table must be scanned because the data is not sorted. However, when you’re querying a b-tree, the logical and physical organization of data allows the correct rows to be located quickly.
When creating an index, you must select one or more key columns. The index key can be any column with the exception of the varchar(max), nvarchar(max), varbinary(max), ntext, text, image, and XML data types. The combined length of the selected key column cannot exceed 900 bytes.
The effectiveness of an index is based on the key columns, so choosing the correct key columns is an important part of the clustered index design.
Constraints can be defined on columns to ensure data integrity. For example, a constraint can be configured on a column that contains phone numbers to make sure that only valid phone numbers are entered in the correct format with the correct number of digits.
When the primary key constraint is applied to a column, a unique clustered index is automatically created. If a clustered index already exists for the table, a nonclustered index is created.
A computed column uses an expression to generate its value. Unless the computed column is marked as PERSISTED, the value of the computed column is not stored in the table like other columns; it is calculated when the data is queried.
Indexes can be created that include these columns. However, because of the complexity associated with computed columns, specific prerequisites must be met. Following are the prerequisites for indexes on computed columns:
![]() Determinism— The computed column expression must be deterministic. For example, the computed column expression can’t use the
Determinism— The computed column expression must be deterministic. For example, the computed column expression can’t use the SUM, AVG, or GETDATE functions because the result may change. On the other hand, the DATEADD and DATEDIFF functions are considered deterministic as they will always produce the same result based on the dates being calculated.
![]() Precision— The computed column expression must use precise data types. For example, the computed column expression can’t normally use the float or real data types because the returned value may change slightly between queries. However, the float and real data types can be used if the column is also marked as
Precision— The computed column expression must use precise data types. For example, the computed column expression can’t normally use the float or real data types because the returned value may change slightly between queries. However, the float and real data types can be used if the column is also marked as PERSISTED because the imprecise data is calculated and stored in the table.
![]() Data Type— The computed column expression cannot evaluate to the
Data Type— The computed column expression cannot evaluate to the text, ntext, or image data types. However, these columns can be included as nonkey columns in a nonclustered index.
![]() Ownership— The table and all functions referenced by the computed column must have the same owner.
Ownership— The table and all functions referenced by the computed column must have the same owner.
![]() Set Options— The
Set Options— The ANSI_NULLS option must be ON when using the CREATE TABLE and ALTER TABLE statements. When you’re using the INSERT, UPDATE, and DELETE statements, the NUMERIC_ROUNDABORT option must be set to OFF, and the ANSI_NULLS, ANSI_PADDING, ANSI_WARNINGS, ARITHABORT, CONCAT_NULL_YIELDS_NULL, and QUOTED_IDENTIFIER options must be set to ON.
When a clustered index is created, the data in the table is actually sorted into the leaf nodes of a b-tree, essentially making the data in the table part of the index. Each table can contain only one clustered index because the data can be physically sorted only one time.
When a nonclustered index is created, the data in the table is not modified. Instead, the leaf nodes of the b-tree contain a pointer to the original data. This pointer can either reference a row of data in a heap or a clustered index key, depending on the structure of the underlying table. For example, if the underlying table has a clustered and nonclustered index defined, the leaf nodes of the nonclustered index point to the key location in the clustered index. Conversely, if the underlying table is a heap, because it does not have a clustered index defined, the nonclustered index simply points to rows in the heap to locate the queried data.
Just as with clustered indexes, the combined length of the selected key columns cannot exceed 900 bytes. However, nonclustered indexes are able to “include” columns in the index that are not counted as part of the key. This feature is important because it allows indexes designed to cover all columns used by queries while maintaining a key length below the 900-byte limit.
Also like clustered indexes, the index key can be any column with the exception of the ntext, text, image, varchar(max), nvarchar(max), varbinary(max), and XML data types. However, the varchar(max), nvarchar(max), varbinary(max), and XML data types can be selected as included columns.
An XML index should be used when dealing with XML column types. The first index on the XML column must be the primary index. The primary XML index shreds the XML data, allowing faster access to the data because the shredding operation does not need to be performed at runtime.
After a primary XML index is created, up to three secondary XML indexes can be created. Each secondary index is a different type and serves a different purpose. The different secondary indexes can be based on the path, value, or properties of the XML data.
Traditional indexes can be stored in different filegroups separate from the associated table. However, XML indexes are always stored in the same filegroup as the underlying table.
A filtered index may be useful when dealing with subsets of data. The storage format of a filtered index is not unlike the typical nonclustered indexes that are stored within the b-tree hierarchy. With a filtered index, however, only a subset of the data is indexed. When implementing filtered indexes, it is very important to understand the data stored within the table including the desired column to be indexed, so that the appropriate WHERE clauses can be selected correctly.
A common scenario for implementing a filtered index usually includes queries that contain many null values within a column. Take, for example, a column such as column X with 10,000 rows of data, but only 700 rows contain data within column X. Therefore, a filtered index can be applied for the non-null data rows within the column, which equates to 700 rows of data. As a result of using a filtered index, the index is slimmer and more efficient from a cost perspective. Another scenario would include creating a filtered index on a data column and only including days after a specific date value, such as May 7, 2008, in the subset of data.
Using the new geography and geometry data types, organizations can store and manipulate both geodetic and planar spatial data directly in the relational database. It will be necessary for DBAs to leverage spatial indexes to provide fast execution of queries involving spatial data. Fortunately, DBAs can make informed decisions when identifying the most suitable spatial index as the Query Optimizer has been enhanced to include spatial data. When making these decisions, it is still beneficial to understand the internals and characteristics of how spatial data is stored in the database.
Similar to clustered and nonclustered indexes, spatial indexes use the same b-tree method for storing the indexed data. However, SQL Server breaks down the spatial data into a grid hierarchy, therefore, the data can be stored based on two-dimensional spatial data in linear order. The index construction process consists of breaking down the space into a grid hierarchy based on four levels. Level 1 is the top level.
In a multilevel grid hierarchy, each level of the index subdivides the grid sector that is defined in the level above it. For example, each successive level further breaks down the level above it, so each upper-level cell contains a complete grid at the next level. On a given level, all the grids have the same number of cells along both axes (for example, 4×4 or 8×8), and the cells are all one size.
In addition, because spatial data and indexes are stored directly in the SQL Server Database Engine, the SQL Server Query Optimizer can make cost-based decisions on which spatial indexes to use for a given query. This process is similar to any other index within SQL Server 2008.
Data in a SQL Server 2008 database can be accessed and managed through a variety of methods depending on how the database application was developed. This can make the index design process relatively complicated because the correct indexes must be created for the correct scenario. The following sections provide guidance and strategy for the index design process.
You should select the smallest number of key columns within the 900-byte limit. The selected key column or columns should provide uniqueness that allows the data to be searched quickly.
It is recommended to avoid making clustered indexes on columns with few unique values because the Query Optimizer often skips the index and resorts to a table scan. This means the index is not used, yet the index still needs to be maintained by the Database Engine, causing unnecessary overhead. Following are some general guidelines and best practices for creating clustered indexes:
![]() A clustered index is often used when large amounts of data or a range of data is queried, such as the data spanning a single month from a table that contains data for an entire year.
A clustered index is often used when large amounts of data or a range of data is queried, such as the data spanning a single month from a table that contains data for an entire year.
![]() Queries that use the
Queries that use the ORDER BY or GROUP BY clauses generally benefit from a clustered query because the data is already sorted and doesn’t need to be re-sorted.
![]() A clustered index is effective when the data is accessed sequentially, the data is searched frequently, or the data would have to be sorted.
A clustered index is effective when the data is accessed sequentially, the data is searched frequently, or the data would have to be sorted.
The data in the table is sorted as the clustered index is built. From this point, the index is automatically maintained. One downside of a clustered index is the potential cost of index maintenance. Specific operations such as frequent inserts into the middle of the table or many delete operations cause the entire table to shift because the order of the data is automatically maintained. These types of operations also cause nonclustered queries to be updated because the nonclustered index relies on the location of index data within the clustered index.
Nonclustered indexes cover costly queries with the smallest number of key and included columns. Each nonclustered index introduces additional cost associated with maintaining the index; for this reason, it is important to select the key and include columns carefully. Following are some general guidelines and best practices for creating nonclustered indexes:
![]() A nonclustered index is often used when smaller data sets or exact matches are returned because the data page can be located quickly, and additional nonkey columns can be included to avoid exceeding the 900-byte key length limit.
A nonclustered index is often used when smaller data sets or exact matches are returned because the data page can be located quickly, and additional nonkey columns can be included to avoid exceeding the 900-byte key length limit.
![]() Nonclustered indexes should also be used to cover additional query scenarios the clustered index does not cover. As many as 249 nonclustered indexes can be created per table.
Nonclustered indexes should also be used to cover additional query scenarios the clustered index does not cover. As many as 249 nonclustered indexes can be created per table.
When the underlying table has a clustered index defined, all nonclustered indexes on that table depend on the clustered index. If the clustered index is disabled, the nonclustered indexes are also automatically disabled.
When creating new indexes or altering existing indexes, you can enable the unique option to force unique values across the key column rows. If the unique option is not selected, the SQL Server Database Engine appends a 4-byte uniqueifier column to the index key. This column is used to ensure uniqueness when nonunique data is included in the key. This column is maintained internally and cannot be changed.
When index creation and maintenance operations are performed, enough temporary space must exist in the filegroup the index will be created in; otherwise, the operation will fail.
When the index operation is performed, the sorting is done either in the same filegroup as the table or the filegroup where the index is located. However, the sort operation can also be done in the tempdb to potentially improve performance at the expense of temporary disk space. For additional information on how to use the tempdb with indexes, see the section “Sorting Indexes in the tempdb” later in this chapter.
The sum of space needed for both the old and new structure is the starting point to determine the approximate amount of free space needed to perform the index operation. For example, if a heap has 64,000 rows and each row is 1000 bytes, approximately 61MB of free space is required for the source data. This can be calculated with the following formula:
Current Number of Rows * Average Row Length in bytes = Source structure size
or
64000 * 1000 bytes = 61.0351562 megabytes
The size estimate should be rounded up for the calculation. In this case, the 61MB heap size is rounded to 70MB. To create a clustered index on this heap, you need a total of 70MB free space. When the new index has been created, the space used by the old structure is reclaimed.
When a new index is created or an existing index is rebuilt, a fill factor can be defined. The target structure requires additional space if the fill factor setting is configured.
Note
The fill factor index option allocates additional space in each index page to anticipate growth. This reduces the chance of page splits and fragmentation as data is changed but reduces the performance of the index as the index becomes larger.
For example, if an 80 percent fill factor is specified, the 70MB heap requires approximately 88MB free space because 20 percent additional space is allocated for each page. You can use the following calculation to determine additional space needed due to the fill factor:
Or
70 MB / 80% = 87.5 megabytes
Existing nonclustered indexes also have to be worked into the formula. When a new clustered index is created, existing nonclustered indexes must be rebuilt because the leaf nodes must now use the clustered key instead of the heap row indicator to find data.
For example, if an existing nonclustered index has 64,000 rows and each row is 100 bytes, approximately 8MB is used for the existing nonclustered index. The following formula can be used to calculate the size of the existing nonclustered index:
Rows in Index * Average Row Length in bytes / Current Fill Factor Percentage
or
(64000 * 100 bytes) / (80%) = 7.62939453 megabytes
The expected size of the nonclustered key can be estimated by adding the new clustered key size to the existing row length and then subtracting the existing 8-byte row indicator. For example, if the new clustered key size is 36 bytes, the expected space needed for the rebuilt nonclustered index is about 10MB. You can then use the following calculation to estimate the size of the new nonclustered index:
Rows in Index * (Average Row Length in bytes – 8 + Clustered Key Size in bytes) / Fill Factor Percentage
or
(64000 * ((100 bytes) – (8 bytes) + (36 bytes))) / (80%) = 9.765625 megabytes
The total source structure would then be 78MB (70MB heap + 8MB nonclustered index) and the total destination structure would be 98MB (88MB cluster + 10MB nonclustered index). A total of 98MB free space is required to complete the index operation with 78MB space reclaimed after the operation has completed.
If the option to sort the index in the tempdb is enabled, the tempdb must have enough space to hold the equivalent of the source table. In this example, the source table is about 70MB. The sort in tempdb option is ignored if the sort operation can be performed in memory.
The administration of SQL Server 2008 indexes can be performed through the SQL Server Management Studio interface or through Transact-SQL (TSQL) code. When you are performing administration of SQL Server indexes, it is important to understand the different options available in the different versions of SQL Server.
The code examples provided in the following sections can be executed through the Query Editor window in SQL Server Management Studio.
Transact-SQL code can be used to manage indexes on tables in a SQL Server database. The CREATE INDEX statement can be used to create new indexes, the modification of existing indexes can be performed through the ALTER INDEX statement, and the removal of indexes can be performed through the DROP INDEX statement. Examples that use each of these index-related TSQL statements are provided throughout this chapter.
The following code shows the complete syntax of the CREATE INDEX TSQL statement. You can use the CREATE INDEX statement to create a relational index on a table or view, or an XML index on an XML column.
CREATE [ UNIQUE ] [ CLUSTERED ¦ NONCLUSTERED ] INDEX index_name
ON <object> ( column [ ASC ¦ DESC ] [ ,...n ] )
[ INCLUDE ( column_name [ ,...n ] ) ]
[ WHERE <filter_predicate> ]
[ WITH ( <relational_index_option> [ ,...n ] ) ]
[ ON { partition_scheme_name ( column_name )
¦ filegroup_name
¦ default
}
]
[ FILESTREAM_ON { filestream_filegroup_name![]() ¦ partition_scheme_name ¦ "NULL" } ]
¦ partition_scheme_name ¦ "NULL" } ]
[ ; ]
<object> ::=
{
[ database_name. [ schema_name ] . ¦ schema_name. ]
table_or_view_name
}
<relational_index_option> ::=
{
PAD_INDEX = { ON ¦ OFF }
¦ FILLFACTOR = fillfactor
¦ SORT_IN_TEMPDB = { ON ¦ OFF }
¦ IGNORE_DUP_KEY = { ON ¦ OFF }
¦ STATISTICS_NORECOMPUTE = { ON ¦ OFF }
¦ DROP_EXISTING = { ON ¦ OFF }
¦ ONLINE = { ON ¦ OFF }
¦ ALLOW_ROW_LOCKS = { ON ¦ OFF }
¦ ALLOW_PAGE_LOCKS = { ON ¦ OFF }
¦ MAXDOP = max_degree_of_parallelism
¦ DATA_COMPRESSION = { NONE ¦ ROW ¦ PAGE}
[ ON PARTITIONS (![]() { <partition_number_expression> ¦ <range> }
{ <partition_number_expression> ¦ <range> }
[ , ...n ] ) ]
}
<filter_predicate> ::=
<conjunct> [ AND <conjunct> ]
<conjunct> ::=
<disjunct> ¦ <comparison>
<disjunct> ::=
column_name IN (constant ,...)
<comparison> ::=
column_name <comparison_op> constant
<comparison_op> ::=
{ IS ¦ IS NOT ¦ = ¦ <> ¦ != ¦ > ¦ >= ¦ !> ¦ < ¦ <= ¦ !< }
<range> ::=
<partition_number_expression> TO <partition_number_expression>
The following code shows the CREATE INDEX options used in previous versions of SQL Server. Backward compatibility is provided to allow easier transition to SQL Server 2008 from previous versions of SQL Server. You should not use these options when developing new code.
CREATE [ UNIQUE ] [ CLUSTERED ¦ NONCLUSTERED ] INDEX index_name
ON <object> ( column_name [ ASC ¦ DESC ] [ ,...n ] )
[ WITH <backward_compatible_index_option> [ ,...n ] ]
[ ON { filegroup_name ¦ "default " } ]
<object> ::=
{
[ database_name. [ owner_name ] . ¦ owner_name. ]
table_or_view_name
}
<backward_compatible_index_option> ::=
{
PAD_INDEX
¦ FILLFACTOR = fillfactor
¦ SORT_IN_TEMPDB
¦ IGNORE_DUP_KEY
¦ STATISTICS_NORECOMPUTE
¦ DROP_EXISTING
}
The following example shows the complete syntax of the ALTER INDEX TSQL statement. You can use this code to rebuild indexes, disable indexes, reorganize indexes, or modify or set options on existing relational indexes.
ALTER INDEX { index_name ¦ ALL }
ON <object>
{ REBUILD
[ [PARTITION = ALL]
[ WITH ( <rebuild_index_option>
[ ,...n ] ) ]
¦ [ PARTITION = partition_number
[ WITH ( <single_partition_rebuild_index_option>
[ ,...n ] )
]
]
]
¦ DISABLE
¦ REORGANIZE
[ PARTITION = partition_number ]
[ WITH ( LOB_COMPACTION = { ON ¦ OFF } ) ]
¦ SET ( <set_index_option> [ ,...n ] )
}
[ ; ]
<object> ::=
{
[ database_name. [ schema_name ] . ¦ schema_name. ]
table_or_view_name
}
<rebuild_index_option > ::=
{
PAD_INDEX = { ON ¦ OFF }
¦ FILLFACTOR = fillfactor
¦ SORT_IN_TEMPDB = { ON ¦ OFF }
¦ IGNORE_DUP_KEY = { ON ¦ OFF }
¦ STATISTICS_NORECOMPUTE = { ON ¦ OFF }
¦ ONLINE = { ON ¦ OFF }
¦ ALLOW_ROW_LOCKS = { ON ¦ OFF }
¦ ALLOW_PAGE_LOCKS = { ON ¦ OFF }
¦ MAXDOP = max_degree_of_parallelism
¦ DATA_COMPRESSION = { NONE ¦ ROW ¦ PAGE }
[ ON PARTITIONS (![]() { <partition_number_expression> ¦ <range> }
{ <partition_number_expression> ¦ <range> }
[ , ...n ] ) ]
}
<range> ::=
<partition_number_expression> TO <partition_number_expression>
}
<single_partition_rebuild_index_option> ::=
{
SORT_IN_TEMPDB = { ON ¦ OFF }
¦ MAXDOP = max_degree_of_parallelism
¦ DATA_COMPRESSION = { NONE ¦ ROW ¦ PAGE } }
}
<set_index_option>::=
{
ALLOW_ROW_LOCKS = { ON ¦ OFF }
¦ ALLOW_PAGE_LOCKS = { ON ¦ OFF }
¦ IGNORE_DUP_KEY = { ON ¦ OFF }
¦ STATISTICS_NORECOMPUTE = { ON ¦ OFF }
}
The following example shows the complete syntax of the DROP INDEX TSQL statement. You can use this code to remove a relational or XML index.
DROP INDEX
{ <drop_relational_or_xml_or_spatial_index> [ ,...n ]
¦ <drop_backward_compatible_index> [ ,...n ]
}
<drop_relational_or_xml_or_spatial_index> ::=
index_name ON <object>
[ WITH ( <drop_clustered_index_option> [ ,...n ] ) ]
<drop_backward_compatible_index> ::=
[ owner_name. ] table_or_view_name.index_name
<object> ::=
{
[ database_name. [ schema_name ] . ¦ schema_name. ]
table_or_view_name
}
<drop_clustered_index_option> ::=
{
MAXDOP = max_degree_of_parallelism
¦ ONLINE = { ON ¦ OFF }
¦ MOVE TO { partition_scheme_name ( column_name )
¦ filegroup_name
¦ "default "
}
[ FILESTREAM_ON { partition_scheme_name
¦ filestream_filegroup_name
¦ "default " } ]
}
The following code shows the complete syntax of the CREATE SPATIAL INDEX TSQL statement. You can use the CREATE SPATIAL INDEX statement to create a spatial index on a spatial column.
Create Spatial Index
CREATE SPATIAL INDEX index_name
ON <object> ( spatial_column_name )
{
[ USING <geometry_grid_tessellation> ]
WITH ( <bounding_box>
[ [,] <tesselation_parameters> [ ,...n ] ]
[ [,] <spatial_index_option> [ ,...n ] ] )
¦ [ USING <geography_grid_tessellation> ]
[ WITH ( [ <tesselation_parameters> [ ,...n ] ]
[ [,] <spatial_index_option> [ ,...n ] ] ) ]
}
[ ON { filegroup_name ¦ "default" } ]
;
<object> ::=
[ database_name. [ schema_name ] . ¦ schema_name. ]
table_name
<geometry_grid_tessellation> ::=
{ GEOMETRY_GRID }
<bounding_box> ::=
BOUNDING_BOX = ( {
xmin, ymin, xmax, ymax
¦ <named_bb_coordinate>, <named_bb_coordinate>,
<named_bb_coordinate>, <named_bb_coordinate>
} )
<named_bb_coordinate> ::= { XMIN = xmin ¦ YMIN = ymin
¦ XMAX = xmax ¦ YMAX=ymax }
<tesselation_parameters> ::=
{
GRIDS = ( { <grid_density> [ ,...n ] ¦ <density>, <density>,
<density>, <density> } )
¦ CELLS_PER_OBJECT = n
}
<grid_density> ::=
{
LEVEL_1 = <density>
¦ LEVEL_2 = <density>
¦ LEVEL_3 = <density>
¦ LEVEL_4 = <density>
}
<density> ::= { LOW ¦ MEDIUM ¦ HIGH }
<geography_grid_tessellation> ::=
{ GEOGRAPHY_GRID }
<spatial_index_option> ::=
{
PAD_INDEX = { ON ¦ OFF }
¦ FILLFACTOR = fillfactor
¦ SORT_IN_TEMPDB = { ON ¦ OFF }
¦ IGNORE_DUP_KEY = OFF
¦ STATISTICS_NORECOMPUTE = { ON ¦ OFF }
¦ DROP_EXISTING = { ON ¦ OFF }
¦ ONLINE = OFF
¦ ALLOW_ROW_LOCKS = { ON ¦ OFF }
¦ ALLOW_PAGE_LOCKS = { ON ¦ OFF }
¦ MAXDOP = max_degree_of_parallelism
}
The following code shows examples of the CREATE FILTERED INDEX TSQL statement. You can use the CREATE FILTERED INDEX statement to create a filtered index on a subset of data residing in a column. The first example displays a filtered index based on a subset of products subcategories in the product table in the AdventureWorks2008 database.
CREATE NONCLUSTERED INDEX AK_ProductSubCategory
ON Production.Product(ProductSubCategoryID)
WHERE (ProductSubcategoryID = 17)
The next example illustrates creating a filtered index on ComponentID and Start date columns in the Production.BillOfMaterials table in the AdventureWorks2008 database. The filtered criteria is based on the EndDate columns, which are not null.
CREATE NONCLUSTERED INDEX FIBillOfMaterialsWithEndDate
ON Production.BillOfMaterials (ComponentID, StartDate)
WHERE EndDate IS NOT NULL
When working with indexes, not only is it possible to create indexes with Transact-SQL, but indexes can also be created via SQL Server Management Studio. Use the following steps to create either a clustered, nonclustered, XML or spatial index with SQL Server Management Studio.
1. Launch SQL Server Management Studio and connect to a Database Engine instance.
2. Expand the SQL Server instance, the Database folder, and then select the database that contains the table on which the index will be generated.
3. Expand the desired table, right-click the Indexes folder, and then select new Index.
4. In the Index Name text box, enter a name for the new index.
5. Specify the type of index to use in the Index Type drop-down list. The options include Clustered, NonClustered Primary XML, and spatial.
6. To specify the index columns to be added, click Add.
7. Specify the column to be indexed in the Select Columns From dialog box, and then click OK.
8. On the New Index screen, either click OK to finalize the creation of the index or proceed to the next steps to enter advanced configuration settings for the index being created.
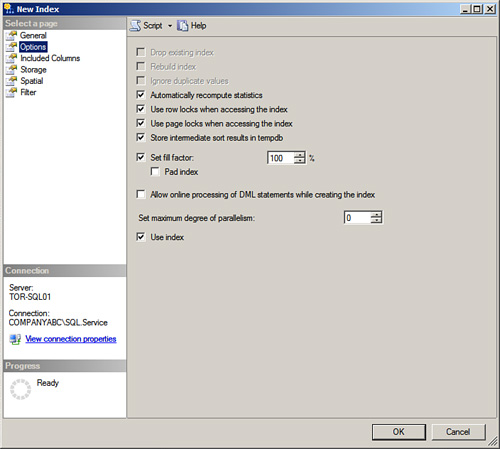
Some additional options are available when creating indexes with SQL Server Management Studio. The Options page includes the following configurable settings, as displayed in Figure 4.3:
![]() Drop Existing Index— This option is only available if the index already exists. If you select this option, the pre-existing index will be dropped and re-created.
Drop Existing Index— This option is only available if the index already exists. If you select this option, the pre-existing index will be dropped and re-created.
![]() Rebuild Index— Used to re-create a pre-existing index on a table.
Rebuild Index— Used to re-create a pre-existing index on a table.
![]() Ignore Duplicate Values— This option will specify whether a duplicate key value can be inserted into the indexed column.
Ignore Duplicate Values— This option will specify whether a duplicate key value can be inserted into the indexed column.
![]() Automatically Recompute Statistics— Enabled by default, this option will automatically update index statistics when the index is being generated.
Automatically Recompute Statistics— Enabled by default, this option will automatically update index statistics when the index is being generated.
![]() Use Row Locks When Accessing the Index— This setting performs row-level locking, which is also enabled by default. If this setting is cleared, index maintenance will be conducted faster; however, additional blocks on users may occur.
Use Row Locks When Accessing the Index— This setting performs row-level locking, which is also enabled by default. If this setting is cleared, index maintenance will be conducted faster; however, additional blocks on users may occur.
![]() Use Page Lock When Accessing the Index— SQL Server uses page-level, row-level, or table-level locking. When this option is enabled, page locking is implemented.
Use Page Lock When Accessing the Index— SQL Server uses page-level, row-level, or table-level locking. When this option is enabled, page locking is implemented.
![]() Store Immediate Sort Results in tempdb— This setting is not enabled by default, and if it is enabled, the intermediate sort results associated with building the index are conducted in tempdb.
Store Immediate Sort Results in tempdb— This setting is not enabled by default, and if it is enabled, the intermediate sort results associated with building the index are conducted in tempdb.
![]() Set Fill Factor— This setting controls how full the leaf level of each index should be during generation.
Set Fill Factor— This setting controls how full the leaf level of each index should be during generation.
![]() Allow Online Processing of DML Statements While Creating the Index— If this option is enabled, the setting permits concurrent users access to the underlying clustered or nonclustered index data during the index operation.
Allow Online Processing of DML Statements While Creating the Index— If this option is enabled, the setting permits concurrent users access to the underlying clustered or nonclustered index data during the index operation.
![]() Set Maximum Degree of Parallelism— Limits the number of processors that can be utilized when carrying out the index task. The default setting is 0, which represents the usage of all processors.
Set Maximum Degree of Parallelism— Limits the number of processors that can be utilized when carrying out the index task. The default setting is 0, which represents the usage of all processors.
![]() Use Index— The final setting on the Options page is Use Index. This setting, when selected, allows SQL Server to use the index.
Use Index— The final setting on the Options page is Use Index. This setting, when selected, allows SQL Server to use the index.
The next page in the New Index dialog box is known as Included Columns. In addition to the index key, extra nonkey columns can be added to the index by selecting the Add button. This invokes a new Select Columns dialog box where the DBA can specify the additional nonkey columns to add to the index. The advantages associated with creating Included Columns are; the 900 byte size limit for the indexes does not apply as the columns defined in the include statement, called non-key columns, are not counted in the number of columns by the Database Engine, also the index maintenance overhead associated with the actual composite index columns are reduced.
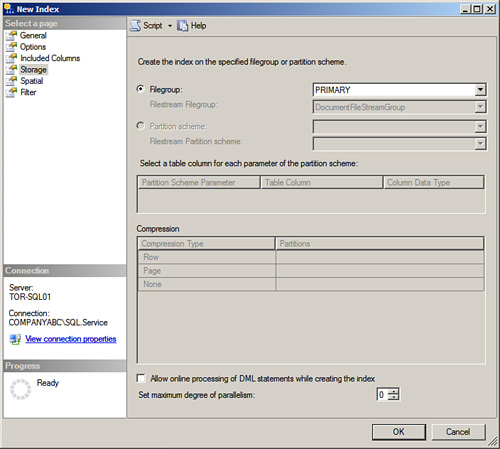
The Storage page, as illustrated in Figure 4.4, includes settings for the placement of the indexes and whether or not compression will be leveraged. Indexes can be placed on additional or specified filegroups in order to maximize performance. In addition, new settings include placement for FILESTREAM data and which logical partition should be used. If compression is enabled, compression type settings can be enabled on the row or page. Finally, it is possible to enable the Allow Online Processing of DML Statement setting to allow access to the underlying clustered and nonclustered index during the creation process.
First of all, options associated with the Spatial page are only available if an spatial index is being created. If a spatial index will be created, the values associated with the spatial properties must be entered in the following spatial page. The options on this page include
![]() Bounding box— The perimeter of the top-level grid of the geometric plane. The grid includes the X and Y minimum and maximum coordinates associated with the bounding box.
Bounding box— The perimeter of the top-level grid of the geometric plane. The grid includes the X and Y minimum and maximum coordinates associated with the bounding box.
![]() General— The General section includes the Geometry and Geography grid of the tessellation scheme of the associated index.
General— The General section includes the Geometry and Geography grid of the tessellation scheme of the associated index.
![]() Grids— The Final Grid section displays the density of the grid at each level of the tessellation scheme. Settings include Low, Medium and High.
Grids— The Final Grid section displays the density of the grid at each level of the tessellation scheme. Settings include Low, Medium and High.
The following procedure demonstrates the creation of a clustered index and shows the effect of creating a clustered index on a table. To begin the demonstration, run the following code within SQL Server Management Studio. This code creates a table called AllItems in the AdventureWorks2008 database. If an existing table called AllItems already exists, it is dropped. When the table is created, three rows of three columns of data are inserted.
Follow these steps to create the AllItems table in the AdventureWorks2008 database:
1. Launch SQL Server Management Studio and connect to the Database Engine.
2. Select the New Query button from the toolbar. Type the following code in the Query Editor window and then click the Execute button.
IF EXISTS (SELECT * FROM sys.objects
WHERE object_id = OBJECT_ID(N'[dbo].[Allitems]')
AND type in (N'U'))
USE AdventureWorks2008
DROP TABLE [dbo].[Allitems]
GO
USE [AdventureWorks2008]
GO
CREATE TABLE [dbo].[Allitems](
[ID] [int] NOT NULL,
[Item] [int] NOT NULL,
[Value] [int] NOT NULL
) ON [PRIMARY]
GO
INSERT INTO AllItems VALUES (4, 23, 66)
INSERT INTO AllItems VALUES (2, 27, 28)
INSERT INTO AllItems VALUES (3, 28, 93)
SELECT * FROM AllItems
When the code is executed, the results pane located below the Query Editor window displays the following data:
ID Item Value
4 23 66
2 27 28
3 28 93
When a clustered index is added to the table, the data is sorted into the clustered index b-tree. Follow these steps to add a clustered index to the AllItems table:
1. In SQL Server Management Studio, expand the AdventureWorks2008 database and then Tables.
2. Expand the dbo.AllItems table, which should be located near the top of the list. If the AllItems table is not displayed, click F5 to refresh the table list.
3. Right-click the Indexes folder located beneath the AllItems table and select New Index from the menu. The New Index Properties dialog box opens.
4. In the Index Name field, type IX_ID. In the Index Type field, select Clustered from the drop-down menu. Click the Add button, select the ID column, and then click OK. Click OK to create the index.
5. Select the New Query button from the toolbar. Type the following code in the Query Editor window and then click the Execute button.
SELECT * FROM AllItems
When the code is executed, the results pane located below the Query Editor window displays the following data:
ID Item Value
2 27 28
3 28 93
4 23 66
The results show that the data has been sorted based on the ID column in the table. The data has been sorted into a b-tree structure. The index nodes contain the ID, and the leaf nodes contain the Item and Value columns.
You can easily create a clustered index through the CREATE INDEX statement. The following code looks for an existing index called IX_ID, and if the index is found, it is dropped with the DROP INDEX statement. A new clustered index using the ID column as the index key is then created.
USE AdventureWorks2008
IF EXISTS (SELECT name FROM sys.indexes WHERE name = 'IX_ID')
DROP INDEX [IX_ID] ON [dbo].[AllItems]
USE [AdventureWorks2008]
GO
CREATE CLUSTERED INDEX [IX_ID] ON [dbo].[AllItems]
(
[ID] ASC
) ON [PRIMARY]
GO
The following procedure can be used to create a non-clustered index which includes the Item column as a nonkey column:
1. In SQL Server Management Studio, expand the AdventureWorks2008 database and then Tables.
2. Expand the dbo.AllItems table, right-click the Indexes folder located beneath the AllItems table, and select New Index from the menu. The New Index Properties dialog box opens.
3. In the Index Name field, type NX_ID_Item. In the Index Type field, select Nonclustered from the drop-down menu. Click the Add button, select the ID column, and then click OK.
4. Select the Included Columns page. Click the Add button, select the Item column, and then click OK. Click OK to create the index.
When you create a clustered index and include the Item column as a nonkey column, SQL Server can locate all the data required to support queries that include only the ID and Item columns. This can reduce the cost of executing queries that include these columns because all the data necessary to satisfy the query can be found in the index.
When a clustered index is disabled, the underlying data in the table is inaccessible. In addition, nonclustered indexes on the table are also disabled because nonclustered indexes rely on the clustered index key data to locate data in the table.
Follow these steps to disable the clustered index on the Person.Address table located in the AdventureWorks2008 database:
1. From within SQL Server Management Studio, expand a SQL Server instance, Databases, AdventureWorks2008, and then Tables. Expand the Person.Address table.
2. Expand the Indexes folder located beneath the Person.Address table. Right-click the PK_Address_AddressID index and select Disable.
3. When the Disable Index window opens, verify that the correct index is listed and then click OK.
4. The Disable Index information dialog box is displayed as a reminder that disabling the index prevents access to the underlying table. Click Yes.
When the clustered index has been disabled, data in the table cannot be accessed. The following code demonstrates using the ALTER INDEX statement to disable the index:
USE [AdventureWorks2008]
GO
ALTER INDEX [PK_Address_AddressID] ON [Person].[Address] DISABLE
GO
Use the following code to query the table. The results pane should state: “The query processor is unable to produce a plan because the index ‘PK_Address_AddressID’ on table or view ‘Address’ is disabled.” This shows that the table is inaccessible when the index is disabled.
USE [AdventureWorks2008]
SELECT *
FROM [Person].[Address]
GO
Disabling nonclustered indexes and indexed views does not prevent access to the underlying data. Disabling this type of index simply prevents the Query Optimizer from potentially selecting the index as part of the execution plan.
With nonclustered and view indexes, the b-tree structure is physically deleted when the index is disabled; only the index metadata is kept. You can use the same procedure used to disable a clustered index to disable a nonclustered index.
If all indexes on a table will be deleted, remove the clustered index last. If the clustered index is removed before nonclustered indexes, the nonclustered indexes have to be maintained when the clustered index is removed.
When an index is disabled, you can enable it by either rebuilding the index or re-creating the index. When a clustered index is disabled, nonclustered indexes for the table are automatically disabled, too. When the clustered index is rebuilt or re-created, the nonclustered indexes are not automatically enabled unless the option to rebuild all indexes is used.
Follow these steps to enable the clustered index on the Person.Address table located in the AdventureWorks2008 database:
1. From within SQL Server Management Studio, expand a SQL Server instance, Databases, AdventureWorks2008, and then Tables. Expand the Person.Address table.
2. Expand the Indexes folder located beneath the Person.Address table. Right-click the PK_Address_AddressID index and select Rebuild.
3. When the Rebuild Index window opens, verify that the correct index is listed and then click OK.
When the clustered index has been rebuilt, the data can once again be queried. However, the nonclustered indexes cannot be selected by the Query Optimizer because they need to be enabled individually. You can use the same procedure to enable each nonclustered index.
Alternatively, you can use the following code to rebuild all indexes on the table, effectively enabling each index as the rebuild is complete:
USE [AdventureWorks2008]
GO
ALTER INDEX ALL ON [Person].[Address] REBUILD
GO
A SQL Server 2008 maintenance plan allows different maintenance tasks to be performed automatically based on a customizable schedule. These tasks help reduce the administrative effort needed to keep the database healthy because the tasks are scheduled and executed automatically.
You can access maintenance plans through the SQL Server Management Studio by navigating to the ManagementMaintenance Plans folder in the Object Explorer pane. You can create a new maintenance plan by right-clicking the Maintenance Plans folder and selecting New Maintenance Plan. You also can access the Maintenance Plan Wizard by right-clicking the Maintenance Plans folder and selecting Maintenance Plan Wizard.
Use the following code to enable the Agent XPs component:
sp_configure 'show advanced options', 1;
GO
RECONFIGURE;
GO
sp_configure 'Agent XPs', 1;
GO
RECONFIGURE
GO
When a maintenance plan is created either manually or through the Maintenance Plan Wizard, several tasks are available to maintain indexes.
Following are the index-related maintenance plan options:
![]() Check Database Integrity— This task performs consistency checks on one or more databases. When you’re configuring this task, an option is available to include the indexes in the integrity verification process.
Check Database Integrity— This task performs consistency checks on one or more databases. When you’re configuring this task, an option is available to include the indexes in the integrity verification process.
![]() Rebuild Index— This task can be used to rebuild a specific index or all indexes in a database. This task can specify the fill factor and can sort the index results in tempdb to improve efficiency. This task can also use the online indexing option available in the SQL Server 2005 Enterprise and Developer Editions.
Rebuild Index— This task can be used to rebuild a specific index or all indexes in a database. This task can specify the fill factor and can sort the index results in tempdb to improve efficiency. This task can also use the online indexing option available in the SQL Server 2005 Enterprise and Developer Editions.
![]() Reorganize Index— This task can be used to reorganize a specific index or all indexes in a database. This task can also compact large objects during the reorganize process.
Reorganize Index— This task can be used to reorganize a specific index or all indexes in a database. This task can also compact large objects during the reorganize process.
For additional information on how to administer SQL Server 2008 maintenance plans, see Chapter 6, “SQL Server 2008 Maintenance Practices.”
SQL Server 2008 also provides the ability to back up indexes. For more information, see Chapter 7, “Backing Up and Restoring the Database Engine.
When you are administering indexes, several options are available and should be considered to improve the overall performance of the indexes and index management operations.
When an index is created, the option to recompute statistics is enabled by default. The Query Optimizer uses these statistics to determine the best method of accessing the data. Inaccurate statistics may cause the Query Optimizer to select a less than optimal execution plan.
The Database Engine periodically updates the statistics by testing them for accuracy. If necessary, the maintenance of statistics can be disabled. You can use the ALTER INDEX statement to disable collection of statistics. The following code demonstrates using the ALTER INDEX statement to disable statistics on the PK_Address_AddressID index on the Person.Address table:
USE [AdventureWorks2008]
GO
ALTER INDEX PK_Address_AddressID ON [Person].[Address]
SET(STATISTICS_NORECOMPUTE=ON);
GO
During the creation of an index through the SQL Server Management Studio, you can disable the collection of index statistics by deselecting the Automatically Recomputed Statistics option on the Option page.
When a row is added to a full index page, a page split occurs, and about half the rows are moved to a new page. This is a costly operation because additional I/O operations are necessary to move the data. Additional I/O operations are then needed each time the data is accessed because the data is no longer continuous. When an index is created or altered, the fill factor option can be used to address fragmentation issues. This option can reduce the amount of fragmentation as the index grows by preallocating free space in the index data pages.
Follow these steps to determine the amount of fragmentation for an index:
1. From within SQL Server Management Studio, expand a SQL Server instance, Databases, AdventureWorks2008, and then Tables. Expand the Person.Address table.
2. Expand the Indexes folder located beneath the Person.Address table. Right-click the PK_Address_AddressID index and select Properties.
3. When the Index Properties dialog box opens, select the Fragmentation page to view the total fragmentation percentage for the index.
The DBCC SHOWCONTIG command can also be used to determine index fragmentation. The following code shows how to use DBCC to show the fragmentation of all indexes in the Person.Address table:
DBCC SHOWCONTIG ('Person.Address')
WITH ALL_INDEXES, FAST;
GO
The results are as follows:
DBCC SHOWCONTIG scanning 'Address' table...
Table: 'Address' (85575343); index ID: 1, database ID: 5
TABLE level scan performed.
- Pages Scanned................................: 340
- Extent Switches..............................: 43
- Scan Density [Best Count:Actual Count].......: 97.73% [43:44]
- Logical Scan Fragmentation ..................: 0.29%
DBCC SHOWCONTIG scanning 'Address' table...
Table: 'Address' (85575343); index ID: 2, database ID: 5
LEAF level scan performed.
- Pages Scanned................................: 56
- Extent Switches..............................: 6
- Scan Density [Best Count:Actual Count].......: 100.00% [7:7]
- Logical Scan Fragmentation ..................: 0.00%
DBCC SHOWCONTIG scanning 'Address' table...
Table: 'Address' (85575343); index ID: 3, database ID: 5
LEAF level scan performed.
- Pages Scanned................................: 211
- Extent Switches..............................: 26
- Scan Density [Best Count:Actual Count].......: 100.00% [27:27]
- Logical Scan Fragmentation ..................: 0.00%
DBCC SHOWCONTIG scanning 'Address' table...
Table: 'Address' (85575343); index ID: 4, database ID: 5
LEAF level scan performed.
- Pages Scanned................................: 27
- Extent Switches..............................: 4
- Scan Density [Best Count:Actual Count].......: 80.00% [4:5]
- Logical Scan Fragmentation ..................: 7.41%
DBCC execution completed. If DBCC printed error messages, contact
your system administrator.
The DBCC command will be deprecated in future versions of SQL Server. It is recommended to use the management function sys.dm_db_index_physical_stats to replace the DBCC SHOWCONTIG command when checking index fragmentation. The upcoming example illustrates the management function alternative for checking fragmentation.
You also can use the following code to show the fragmentation. When this code is executed, the percentage of fragmentation for all indexes in the Person.Address table is returned.
USE AdventureWorks2008;
GO
SELECT
a.index_id,
b.name,
a.avg_fragmentation_in_percent
FROM sys.dm_db_index_physical_stats (DB_ID(),
OBJECT_ID(N'Person.Address'), NULL, NULL, NULL) AS a
JOIN sys.indexes AS b
ON a.object_id = b.object_id
AND a.index_id = b.index_id;
GO
1 PK_Address_AddressID 0
2 AK_Address_rowguid 0
3 IX_Address_AddressLine1_AddressLine2_City_StateProvinceID_![]() PostalCode 0
PostalCode 0
4 IX_Address_StateProvinceID 7.40740740740741
The fill factor can be configured so that each page in the leaf level allocates extra space for new rows. By default, the fill factor is set to 0, allowing only one additional row to be added to the page before a split operation is necessary. If the pages in the leaf level are expected to grow, you can use the Fill Factor setting to allocate extra space in each page. For example, set the Fill Factor setting to 80 percent to leave 20 percent room in each page for growth. The fill factor can be configured only when an index is created or rebuilt.
Note
Increasing the amount of free space in each page results in a larger index. A larger index increases the I/O cost when accessing the data and degrades performance.
You can use the ALTER INDEX statement to set an 80 percent fill factor on the PK_Address_AddressID index located on the Person.Address table in the AdventureWorks2008 database:
USE [AdventureWorks2008]
GO
ALTER INDEX PK_Address_AddressID ON [Person].[Address]
REBUILD WITH(FILLFACTOR=80);
GO
The fill factor can also be configured through the SQL Server Management Studio. For example, to set the fill factor, create a new index by right-clicking the Indexes folder located beneath the Person.Address table and select New Index. In the New Index window, select the Options page and set the fill factor to the desired level.
Figure 4.5 shows the Set Fill Factor option set to 80 percent, allowing 20 percent free space within the leaf node of the index. The Pad Index option can also be configured to provide the intermediate level with additional free space.

Note
The free space allocated by the fill factor setting is not maintained; the space is allocated once. When the additional space is filled, a split operation occurs. To reallocate the space again, you must rebuild the index.
To view the fill factor value of one or more indexes, use the sys.indexes catalog view. You can use the following code to determine the fill factor on the PK_Address_AddressID index. The fill factor number is located in the fill_factor column.
USE AdventureWorks2008
SELECT fill_factor FROM sys.indexes
WHERE name = 'PK_Address_AddressID'
When a split operation occurs, the data pages can become fragmented, and fragmentation can lead to performance-related issues. Two different options exist for dealing with fragmentation: The first is to reorganize the index, and the second is to rebuild the index.
When the level of fragmentation is greater than 5 percent but less than 30 percent, the reorganize option is recommended. When an index has 30 percent or greater fragmentation, a rebuild is recommended.
The reorganize process physically reorganizes the leaf nodes of the index, allowing more efficient access. The reorganize process is much lighter on the server and doesn’t block queries or updates, essentially minimizing the impact on people using the database. The rebuild process actually drops the existing index and re-creates it with the specified settings, such as fill factor. This option is more thorough but also uses more server resources, and if the Online option is not selected, the index is unavailable during the rebuild process. The sys.dm_db_index_physical_stats DMV is a great way for identifying size and fragmentation for data and indexes associated with a table or view.
Normally, when an index is created, the sorting of the index data is done within the same filegroup as the table or the filegroup where the index is stored. However, when you are rebuilding existing indexes or creating new indexes, you can sort the data in the tempdb.
If the tempdb is physically located on a different set of disks, performance improvement can be achieved because the reading of data from one set of disks can be separated from the writing of data to the tempdb.
You can use the ALTER INDEX statement to rebuild all indexes located on the Person.Address table in the AdventureWorks2008 database, using the tempdb to sort the data:
USE AdventureWorks2008;
GO
ALTER INDEX ALL ON Person.Address
REBUILD WITH (SORT_IN_TEMPDB = ON);
The Database Engine Tuning Advisor is an effective tool to analyze and report the indexing potential. This tool allows the selection of a single table, single database, or multiple databases for analysis. This is one of the key tools that you should use when attempting to determine the appropriate indexes and the effect of indexes.
This tool works by placing a load on the selected objects. The results of this load are evaluated, and a recommendation is provided, along with a potential improvement percentage. The recommended changes can then be implemented directly from within the tool.
This demonstration creates a sample workload file and then runs it against the Production.Product table in the AdventureWorks2008 database. Before you start, the existing clustered indexes on the table are dropped using the DROP INDEX statement. To drop the nonclustered indexes on the Production.Product table, run the following code:
USE [AdventureWorks2008]
GO
DROP INDEX [AK_Product_Name] ON [Production].[Product],
[AK_Product_ProductNumber]ON [Production].[Product],
[AK_Product_rowguid] ON [Production].[Product]
GO
After the nonclustered indexes have been deleted, the table can be more effectively analyzed for possible indexes. The next step is to create a workload file; this is SQL code that will be used in the analysis process of the table. Follow these steps to create the workload file:
1. Choose Start, All Programs, Microsoft SQL Server 2008, SQL Server Management Studio.
2. Type the name of a SQL Server instance in the Server Name field, select Windows Authentication from the Authentication drop-down menu, and then click the Connect button.
3. Select the New Query button from the toolbar. Then type the following code in the Query Editor window:
USE [AdventureWorks2008]
SELECT [Name],
[ProductNumber],
[StandardCost],
[ListPrice]
FROM Production.Product
WHERE [ListPrice] - [StandardCost] > 50
4. Select File, Save SQLQuery1.sql As. Then type Workload.sql in the File Name field and select a path to save the file.
After the workload file has been created, follow these steps to analyze a table for indexing purposes:
1. Choose Start, All Programs, Microsoft SQL Server 2008, Performance Tools, Database Engine Tuning Advisor.
2. Type the name of a SQL Server instance in the Server Name field, select Windows Authentication from the Authentication drop-down menu, and then click the Connect button.
3. On the General tab, select the File option and then browse for the Workload.SQL file created in the previous steps. Select AdventureWorks2008 from the Database for Workload Analysis drop-down menu.
4. Click the down arrow next to the AdventureWorks2008 database and select the Product table from the list, as shown in Figure 4.6.
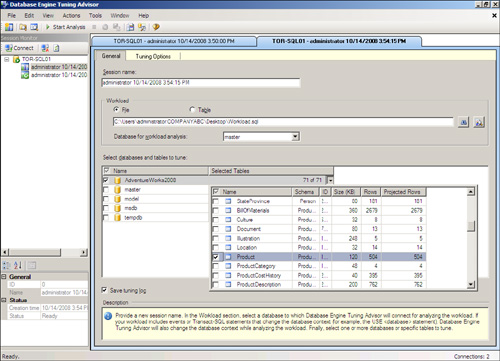
5. Select the Tuning Options tab and review the available options. Options include the ability to analyze different types of indexes and partitioning strategies. Click the Advanced button to specify space and online processing restrictions. The default options are acceptable for this demonstration.
6. The default options evaluate the table for nonclustered index potential and disable partitioning recommendations. Click the Start Analysis button.
The analysis of the table is performed. The results, shown in Figure 4.7, show a nonclustered index with ListPrice and StandardCost as key columns, and ProductNumber as an included nonkey column that would improve performance by 46 percent.

From within the Recommendation tab of the Database Engine Tuning Advisor, click the blue text in the Definition column to see the code necessary to create the recommended indexes. To apply all the recommendations, choose Actions, Apply Recommendation from the menu. The Apply Recommendations dialog box is displayed, allowing you to apply the recommendations immediately or schedule them for later.
This demonstration used a simple workload file to place a load on the database. This is often not appropriate or practical for large complex databases. As an alternative, you can use the information captured from the SQL Server profiler utility to place a more real-world load on the database.
When you’re creating new indexes or altering existing indexes, additional options are available. These options are listed on the General and Options pages found in the Index Properties dialog box. Follow these steps to access the Properties dialog box for the PK_Address_AddressID index on the Person.Address table in the AdventureWorks2008 database:
1. From within SQL Server Management Studio, expand a SQL Server instance, Databases, AdventureWorks2008, and then Tables. Expand the Person.Address table.
2. Expand the Indexes folder located beneath the Person.Address table. Right-click the PK_Address_AddressID index and select Properties.
The Index Properties dialog box opens. The General page contains the Unique option, and the Options page contains the other options available:
![]() Unique— When creating new indexes or altering existing indexes, you can enable the Unique option to force unique values across the key columns. When defined, this option forces uniqueness across all columns. For example, if a unique index is created and multiple columns are selected as index key columns, each column can have duplicate values as long as the entire row is unique.
Unique— When creating new indexes or altering existing indexes, you can enable the Unique option to force unique values across the key columns. When defined, this option forces uniqueness across all columns. For example, if a unique index is created and multiple columns are selected as index key columns, each column can have duplicate values as long as the entire row is unique.
![]() Ignore Duplicate Values— When the Unique option is selected on the General page, Ignore Duplicate Values on the Options page is available. This option changes how SQL Server reacts when a duplicate key is inserted into a unique column. When this option is disabled, the entire transaction fails; when this option is enabled, only the duplicate insert part of the transaction fails.
Ignore Duplicate Values— When the Unique option is selected on the General page, Ignore Duplicate Values on the Options page is available. This option changes how SQL Server reacts when a duplicate key is inserted into a unique column. When this option is disabled, the entire transaction fails; when this option is enabled, only the duplicate insert part of the transaction fails.
![]() Automatically Recompute Statistics— This option allows SQL Server to track statistics on indexes. This is important because the Query Optimizer uses statistics to calculate the best execution plan.
Automatically Recompute Statistics— This option allows SQL Server to track statistics on indexes. This is important because the Query Optimizer uses statistics to calculate the best execution plan.
![]() Use Row and Page Locks— This option allows the SQL Server granular control when altering and building indexes. A table lock is often necessary when the index is created or altered; however, this option allows single rows or individual pages to be locked, effectively reducing the possibility of blocking users. The result is that the index operation will take longer.
Use Row and Page Locks— This option allows the SQL Server granular control when altering and building indexes. A table lock is often necessary when the index is created or altered; however, this option allows single rows or individual pages to be locked, effectively reducing the possibility of blocking users. The result is that the index operation will take longer.
The Enterprise Edition of SQL Server 2008 offers additional features not available in the Standard Edition. Note that these features are also available in the Developer Edition of SQL Server 2008.
The table that holds data and the index pages, along with stand-alone index structures, can be partitioned. This physically divides the data into partitions that can reside in different filegroups across different physical disks. This feature allows large tables and indexes to be physically managed as smaller sets of data while maintaining one logical table.
When you create an index through the SQL Server Management Studio or through TSQL statements, you can set the partition scheme of the index. However, the partition scheme must already exist before the index can be configured to use the partition scheme.
If you create the index on a table that is already partitioned, the index automatically uses the same partition scheme as the parent table. Because of this, it is often easier to create the partition scheme for the underlying table first before creating the index. In this scenario, the table and index are “aligned” because they are using the same partition scheme.
However, if the index is stored away from the table in a different filegroup, the index partition scheme is not inherited from the underlying table and must be specified if necessary. In this scenario, the table and index can be “unaligned.”
When an index is created or rebuilt, the operation can be performed online. This allows the underlying table to be accessed during the operation. Use the following command to rebuild each of the indexes on the HumanResources. Shift table while keeping the data online:
USE [AdventureWorks2008]
GO
ALTER INDEX ALL ON HumanResources.Shift
REBUILD WITH(ONLINE = ON);
GO
You also can access the online indexing option through the SQL Server Management Studio as follows:
1. From within SQL Server Management Studio, expand a SQL Server instance, Databases, AdventureWorks2008, and then Tables. Expand the Production.Product table.
2. Right-click the Indexes folder located beneath this table and select new Index.
3. In the Name field, type IX_SellStartDate_SellEndDate, and in the Index Type field, select Nonclustered from the drop-down menu. Click the Add button and choose the SellStartDate and SellEndDate columns. Then click the OK button.
4. Click the Options page. Enable the option Allow Online Processing of DML Statements While Creating the Index option. Then click OK.
The index is then created online because the Allow Online Processing of DML Statements While Creating the Index option was selected.
When an index is created, altered, or dropped, the number of processors used can be limited. Use the following command to rebuild each of the indexes on the Person.Address table in the AdventureWorks2008 database, specifying that the maximum number of processors to use is four:
USE [AdventureWorks2008]
GO
ALTER INDEX ALL ON [Person].[Address]
REBUILD WITH(MAXDOP=4);
GO
By default, the MAXDOP is set to 0, allowing the Database Engine to configure the number of processors based on how busy the server is. When the MAXDOP option is used, additional memory is used on the server.
Index design needs to be tested because different indexes are used for different situations. Creating indexes on the correct key columns and including appropriate nonkey data can significantly improve the efficiency of database operations. Creating the wrong types of indexes, too many indexes, or even setting the wrong indexing options can increase the overhead of the index along with the associated maintenance cost, resulting in decreased database performance. For this reason, it is important to understand the characteristics of each type of index along with the limitations and advantages of each.
In addition, it is also important to understand how to use the different SQL Server 2008 tools available to assist with the index design and maintenance process.
The following best practices were demonstrated and discussed in this chapter:
![]() Managing and optimizing indexes is an ongoing process because performance can suffer both with the lack of indexes and poorly implemented and managed indexes.
Managing and optimizing indexes is an ongoing process because performance can suffer both with the lack of indexes and poorly implemented and managed indexes.
![]() Create clustered indexes on columns that are frequently used and are lean data types. For example, the clustered index could be an identity column. However, it is not uncommon to create the clustered index on a column used in
Create clustered indexes on columns that are frequently used and are lean data types. For example, the clustered index could be an identity column. However, it is not uncommon to create the clustered index on a column used in WHERE, ORDER BY, and GROUP BY clauses and in joins.
![]() Nonclustered indexes are dependent on the clustered index. Be careful when disabling a clustered index because the nonclustered indexes are also automatically disabled.
Nonclustered indexes are dependent on the clustered index. Be careful when disabling a clustered index because the nonclustered indexes are also automatically disabled.
![]() A table can have only one clustered index. Take care to ensure that the key length of the clustered index doesn’t exceed 900 bytes.
A table can have only one clustered index. Take care to ensure that the key length of the clustered index doesn’t exceed 900 bytes.
![]() Use nonclustered indexes to cover frequent or costly queries that are not covered by the clustered index. As many as 999 nonclustered indexes can be created on a table.
Use nonclustered indexes to cover frequent or costly queries that are not covered by the clustered index. As many as 999 nonclustered indexes can be created on a table.
![]() Take care to ensure the key length of the nonclustered index doesn’t exceed 900 bytes. Add columns as nonkey include columns to place additional data into the index.
Take care to ensure the key length of the nonclustered index doesn’t exceed 900 bytes. Add columns as nonkey include columns to place additional data into the index.
![]() In order to alleviate performance degradation caused by fragmentation, maintain indexes by either updating or rebuilding indexes.
In order to alleviate performance degradation caused by fragmentation, maintain indexes by either updating or rebuilding indexes.
![]() If the tempdb is stored in a different filegroup or on a different set of physical disks, use the option to sort the index in the tempdb for a performance improvement.
If the tempdb is stored in a different filegroup or on a different set of physical disks, use the option to sort the index in the tempdb for a performance improvement.
![]() Leverage the Enterprise Edition’s online indexing feature to eliminate downtime when removing fragmentation from indexes.
Leverage the Enterprise Edition’s online indexing feature to eliminate downtime when removing fragmentation from indexes.
![]() When deleting all indexes on a table, remember to remove the clustered index last. If the clustered index is removed first, any nonclustered indexes are unnecessarily maintained as part of the removal process.
When deleting all indexes on a table, remember to remove the clustered index last. If the clustered index is removed first, any nonclustered indexes are unnecessarily maintained as part of the removal process.
![]() Spatial indexes should be created to increase the response time of spatial queries.
Spatial indexes should be created to increase the response time of spatial queries.
![]() Leverage Filtered indexes to improve performance and reduce maintenance costs on columns that have nulls.
Leverage Filtered indexes to improve performance and reduce maintenance costs on columns that have nulls.