
Chapter 9 Administering SQL Server Security and Authorization
By maintaining a strategy that is secure by design, secure by default, and secure in deployment, SQL Server 2008 allows for a much more effective method of design, implementation, and administration of security across resources and services provided by the SQL environment. Security permissions can be defined on a wide range of objects, from network endpoints that facilitate client communication, to execute permissions on a stored procedure, even down to the column level within a table. Complex security implementations can be efficiently controlled with granular role-based authorization and database schemas.
Administering SQL security is a key database administrator task that normally begins immediately following the hardening of the system. Understanding the different components related to security is essential to effective SQL security administration. This chapter discusses and demonstrates common administrative security tasks, incorporating best practices and new features introduced with SQL Server 2008.
![]() In previous versions of SQL Server, the local Windows Group BUILTINAdministrators automatically had elevated privileges and full control of a SQL Server system as it was automatically placed in the sysadmin role. With SQL Server 2008, the BUILTINAdministrators group was stripped from the installation, and the group must be added explicitly, if needed.
In previous versions of SQL Server, the local Windows Group BUILTINAdministrators automatically had elevated privileges and full control of a SQL Server system as it was automatically placed in the sysadmin role. With SQL Server 2008, the BUILTINAdministrators group was stripped from the installation, and the group must be added explicitly, if needed.
![]() SQL Server 2008 still creates and leverages Windows local groups, but they are no longer granted rights in SQL Server. These groups are strictly used to provide operating-system rights to a SQL Server via Access Control List (ACL). Only accounts provisioned during the installation process are granted rights within SQL Server 2008.
SQL Server 2008 still creates and leverages Windows local groups, but they are no longer granted rights in SQL Server. These groups are strictly used to provide operating-system rights to a SQL Server via Access Control List (ACL). Only accounts provisioned during the installation process are granted rights within SQL Server 2008.
SQL Server 2008 continues to support two modes for validating connections and authenticating access to database resources: Windows Authentication mode and SQL Server authentication mode. Both modes provide the ability for users to authenticate to SQL Server and access database resources.
Note
It is important to understand that security can be most effectively managed when the environment has been prepared and hardened. See Chapter 8, “Hardening a SQL Server Implementation,” for additional information.
When you’re administering SQL Server security, it is important to follow the principle of least privilege. This basically means that only the permissions necessary to accomplish the task should be granted to the different user and service accounts. The principle of least privilege ensures that only the required resources are exposed to the client, while other resources are inaccessible and locked down. This improves the environment in multiple ways, including lowering the probability of accidental or intentional damage, increasing system scalability, and simplifying administration and deployment.
SQL Server 2008 facilitates flexible and scalable management of object permissions by allowing database users to be added to roles. Database roles serve a purpose similar to that of groups in the Windows operating system—they allow you to group accounts with common permission requirements and grant those permissions to a role instead of individual users. Figure 9.1 depicts at a high level how database objects are accessed by clients.
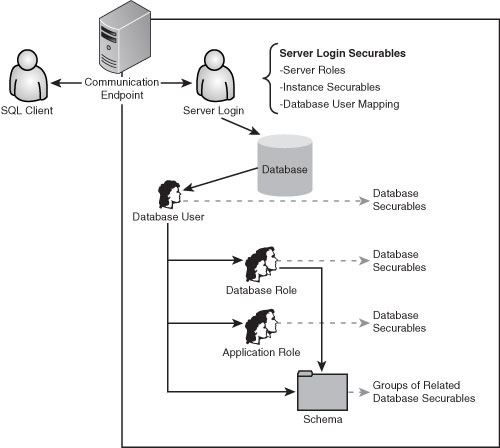
In Figure 9.1 the client communicates to SQL Server through an endpoint. The client provides credentials used for authentication either by explicitly entering them in SQL authentication mode or with pass-through Windows-based authentication. Server logins can be assigned permissions—to server-level securable objects including the SQL Server, endpoints, and other logins.
Note
A SQL Server login cannot be given permissions for database securable objects directly.
A login must be mapped to a database user; the database user then can be given permissions on database-scoped securable objects either directly or through database roles and schemas.
To grant permissions on database securable objects, you map the server login to a database user. Permissions for database objects can be granted directly to the database user; however, it is a best practice to add the database user to a database role or roles and then grant the appropriate permissions to those roles. Review the section on Role-Based Access best practices on granting access to SQL Server.
To communicate and access resources provided by a SQL Server, you must establish a connection to a server endpoint. In most cases, Tabular Data Stream (TDS) () endpoints are used for communication with SQL Server. TDS packets sent by the client to the endpoint are encapsulated with a standard network protocol by way of the SQL Server Network Interface (SNI) protocol layer. The SNI layer used for TDS encapsulation is common to both the SQL Server and SQL client.
Endpoints for several common network protocols supported by SQL Server are created by default. In addition, an endpoint is created by default for the Dedicated Administrator Connection (DAC); this endpoint can be used only by members of the sysadmin fixed server role to establish an administrative connection to the server. Following are the default endpoints and protocols:
![]() Dedicated Administrator Connection (TCP)
Dedicated Administrator Connection (TCP)
![]() TSQL Local Machine (Shared Memory)
TSQL Local Machine (Shared Memory)
![]() TSQL Named Pipes (Named Pipes)
TSQL Named Pipes (Named Pipes)
![]() TSQL Default TCP (TCP)
TSQL Default TCP (TCP)
![]() TSQL Default VIA (VIA)
TSQL Default VIA (VIA)
Default system endpoints cannot be dropped or disabled. However, they can be stopped and started, and the permissions for the endpoints can be altered as necessary. For each SQL Server instance, only a single named pipe and shared memory endpoint are supported. User-defined endpoints can have multiple instances per SQL Server instance; the protocol for user-defined endpoints is always HTTP or TCP.
The default system endpoints are all configured for the TSQL payload type. This means they communicate with the endpoint using Transact-SQL. When a user defines an endpoint, the payload type can be configured as TSQL, SOAP, Service Broker, or Database Mirroring. For example, a database that is using database mirroring communicates with its partners through endpoints configured with the Database Mirroring payload type.
Note
The Dedicated Administrator Connection (DAC) allows you to connect to a server when the Database Engine does not respond to regular connections. By default, the DAC endpoint cannot be accessed remotely and is available only from the local computer. To allow remote access to DAC, you can enable the remote admin connections option through the sp_configure system stored procedure.
With the exception of HTTP, the protocols for each of the default endpoints are listed and can be configured in the SQL Server Configuration Manager. In addition, all endpoints are listed in Object Explorer in SQL Server Management Studio, under Server Objects > Endpoints.
When a protocol is disabled, the endpoint that implements the protocol cannot be used, although the endpoint may still be in the started state. In SQL Server 2008 Enterprise, Standard, and Workgroup Editions, only TCP/IP is enabled by default. In the Developer and Evaluation Editions, TCP/IP is disabled by default.
You can use the sys.endpoints catalog view to see the status of all endpoints on the server. The following query returns all the endpoints configured on the server:
USE MASTER
SELECT * FROM sys.endpoints
The sys.http_endpoints, sys.soap_endpoints, and sys.endpoint_webmethods catalog views can be used to get additional information about specific types of endpoints.
The sys.server_permissions catalog view can be used to see the permissions on server-level securable objects, including endpoints. You can use the sys.server_principals catalog view to retrieve the name of the server principal listed in the grantee_principal_id column.
For example, the following query returns the grantee permissions and grantee name for all endpoints on a server. Note that endpoints have a value of 105 in the class column:
USE MASTER
SELECT
p.class_desc,
p.major_id,
p.minor_id,
p.grantee_principal_id,
sp.name as grantee_name,
p.permission_name,
p.state_desc
FROM sys.server_permissions p
INNER JOIN sys.server_principals sp
ON p.grantee_principal_id = sp.principal_id
WHERE class = 105
The result set of the query shows that the principal public has been granted CONNECT permission on each of the endpoints by default. This essentially allows all logins to connect to any of the default endpoints, if the underlying protocol has also been enabled.
Note
It is a best practice to enable only communication protocols that are necessary and to allow only specific CONNECT permissions on endpoints.
You can administer existing protocols and endpoints through the SQL Server Configuration Manager Policy Based Management, the database mirroring wizard and by using data definition language (DDL). However, you can create new endpoints only through the CREATE ENDPOINT DDL.
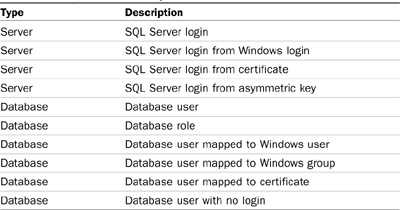
Server logins and database users are both principals—logins are principals on the server level, and database users are principals on the database level. SQL Server permissions on securable objects can be granted to principals at the appropriate level. Logins can be granted permissions on server-level securable objects and database users can be granted permissions on database-level securable objects, but logins cannot be granted permission to database-level objects and database users cannot be granted permissions to server-level objects.
Table 9.1 shows all the SQL Server principals.
Note
Principals are also securable objects; for example, users can be granted control permissions on other users, database roles, and so on.
Clients authenticate to the server using a login. The authentication used for the login can be either Windows-based or SQL-based. Windows authentication logins are recommended over SQL authentication logins because Windows logins can leverage Active Directory security, native authentication encryption, and pass-through (transparent) authentication.
When you’re using Windows Authentication mode, the account can be either a local or domain-based user account, or an account that is a member of a group (local or domain) that has been added as a login to SQL Server. When you’re using SQL authentication, the account information, including hashed password, is stored in the master database of your SQL Server instance.
Both SQL- and Windows-based logins provide access to server instance objects but not to database objects. The following securable objects can have permissions assigned to server logins:
![]() Servers
Servers
![]() Endpoints
Endpoints
![]() Logins
Logins
SQL logins can be mapped to database users. Database users are then granted permissions on securable objects in the database. Following are database-level securable objects:
|
|
|
|
|
|
|
|
|
|
|
|
|
|
|
|
|
|
|
Both SQL logins and users are considered securable objects and can have permissions assigned in the same fashion as any other object in the database.
Although database users can be granted permissions on objects directly, this is generally considered a bad practice when dealing with complex security scenarios. It is much more effective to create roles for each type of user, assign the correct permissions to the role, and make individual user accounts members of that role. Role-based access reduces the cost of ongoing security administration because users can be added and removed from roles without having to re-create complex permissions for each user.
Role-based access can be established at both the SQL Server level and in Active Directory. It is common to establish role-based access for all network services through Active Directory with the added benefit of organization-wide control of data services.
Using Active Directory for role-based access follows the standard of placing user accounts into domain global role groups and the role groups into domain local access groups. The access groups are then added to the SQL instance as logins and mapped to database users. The database users can then be added to the correct database role and/or security schemas. As a result, users added to role groups in Active Directory automatically obtain the correct permissions. Security management for the environment is transferred from SQL Server into Active Directory, where it can be controlled centrally.
Note
Active Directory can be leveraged to establish access and role-based security groups for accessing SQL Server resources. However, a limitation exists using this security model because a default schema cannot be assigned to a database user that maps to a server login that in turn maps to a Windows group. The reason for this limitation is quite obvious: because a single user can be a member of multiple Windows groups and each of those groups can be granted access to SQL Server, this could lead to irresolvable ambiguities when such groups have different default schemas.
This is typically not an issue as long as the security design accounts for this limitation. Role-based access through Active Directory is still highly recommended and effective.
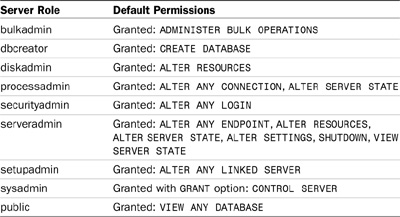
Several server-level roles exist in each SQL Server instance. Server roles are used to grant administrative permissions on the server and are not used to grant permission to normal user accounts. Table 9.2 lists each server-level role and the permissions associated with each role.
Note
All logins belong to the public server role by default. The public role is granted VIEW ANY DATABASE by default.
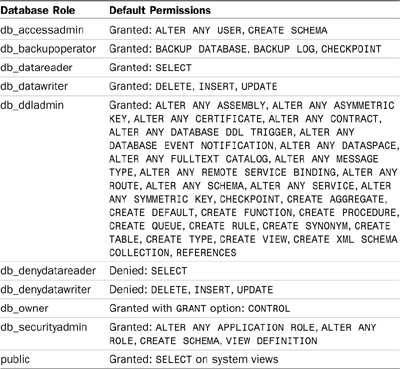
Several fixed database-level roles exist in each SQL Server database. Those predefined roles are used to grant a predefined set of permissions to database users and, with the exception of the public role, they are not used to assign permissions to individual objects. Table 9.3 lists each fixed database-level role and the permissions associated with each role.
The database schemas were first introduced in SQL Server 2005 and provide several improvements when compared to previous versions of SQL Server. The schema is a key part of establishing flexible database security administration.
When objects are accessed in SQL Server 2005 or 2008, they are referenced by a four-part identifier, where parts have the following meaning:
[DatabaseServer].[DatabaseName].[DatabaseSchema].[DatabaseObject]
For example, the following query can be used to access the Employee table created as part of the HumanResources schema in the AdventureWorks2008 database. The AdventureWorks2008 database is hosted on INSTANCE01 on the server TOR-SQL01.
SELECT *
FROM [TOR-SQL01INSTANCE01].[AdventureWorks2008].![]() [HumanResources].[Employee]
[HumanResources].[Employee]
The database schema is a namespace used to reference objects in the database. The schema provides a way to manage security on groups of objects as a unit. As new database objects are defined, they must be associated with a schema and automatically inherit the permissions granted on the schema.
The principal defined as the schema owner effectively owns all objects in the schema. When the owner of a schema is changed, all objects in the schema are owned by the new principal, with the exception of objects for which a different owner was explicitly defined.
This is a significant improvement over SQL Server 2000 because the schema takes the place of the user account that owned the database objects, allowing much easier transfer of object ownership. When the ownership of the object changes, there is no need to change your queries, as the fully qualified name of the object is not changed.
Domain policies and local security policies provide the password and account lockout configuration that affects users’ ability to authenticate and access SQL Server resources.
When Windows Authentication mode is used, these settings govern all users according to the defined password policy.
When SQL Server authentication is used, a SQL login can be configured to be subject to the password and lockout policies of the underlying local security or domain group policy. This functionality is supported only with the Windows Server 2003 or later operating systems, such as Windows Server 2008.
Note
If SQL authentication is used, it is highly recommended to enable these options to enforce the local security policies in order to increase the level of security for SQL logins.
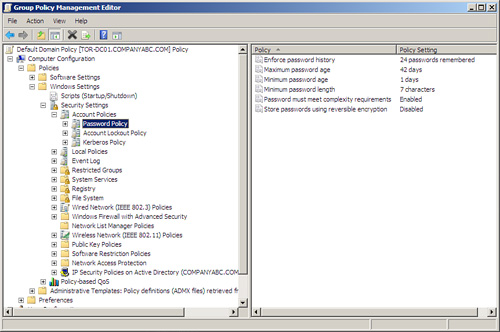
The following password policies can be used to help secure Windows and SQL Server authentication:
![]() Enforce Password History— This security setting determines the number of unique new passwords that have to be associated with a user account before an old password can be reused.
Enforce Password History— This security setting determines the number of unique new passwords that have to be associated with a user account before an old password can be reused.
![]() Maximum Password Age— This security setting determines the period of time (in days) that a password can be used before the system requires the user to change it.
Maximum Password Age— This security setting determines the period of time (in days) that a password can be used before the system requires the user to change it.
![]() Minimum Password Age— This security setting determines the period of time (in days) that a password must be used before the user can change it.
Minimum Password Age— This security setting determines the period of time (in days) that a password must be used before the user can change it.
![]() Minimum Password Length— This security setting determines the least number of characters that a password for a user account may contain.
Minimum Password Length— This security setting determines the least number of characters that a password for a user account may contain.
![]() Password Must Meet Complexity Requirements— This security setting determines whether passwords must meet complexity requirements. Complex passwords cannot contain the user’s login name, must be at least six characters in length, and must contain characters from three of the four available character categories. Character categories include uppercase, lowercase, base 10 digits, and non-alphabetic characters.
Password Must Meet Complexity Requirements— This security setting determines whether passwords must meet complexity requirements. Complex passwords cannot contain the user’s login name, must be at least six characters in length, and must contain characters from three of the four available character categories. Character categories include uppercase, lowercase, base 10 digits, and non-alphabetic characters.
![]() Store Passwords Using Reversible Encryption— This security setting determines whether the operating system stores passwords using reversible encryption. This setting affects only Windows authentication and has no effect on SQL Server logons.
Store Passwords Using Reversible Encryption— This security setting determines whether the operating system stores passwords using reversible encryption. This setting affects only Windows authentication and has no effect on SQL Server logons.
Note
In Windows Server 2003, there can be only a single password policy for each Active Directory domain. Password policy settings for the domain must be defined in the root node for the domain.
This limitation was lifted in Windows Server 2008, as password policies can now be defined on a per-group and per-user basis.
These security policies can be accessed through the Windows SettingsSecurity SettingsAccount PoliciesPassword Policies node in the Default Domain Policy. Figure 9.2 shows the default Active Directory password policies.
The following account lockout policies can be used to help secure Windows and SQL Server authentication:
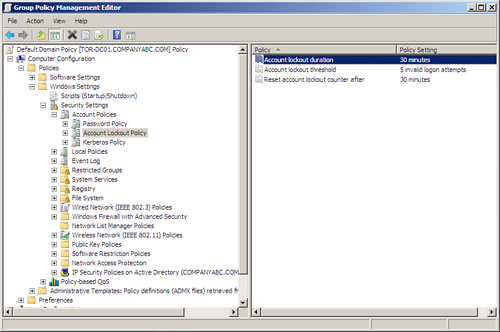
![]() Account Lockout Threshold— This security setting determines the number of minutes a locked-out account remains locked out before automatically becoming unlocked. The available range is from 0 minutes through 99,999 minutes. If you set the account lockout duration to 0, the account is locked out until an administrator explicitly unlocks it.
Account Lockout Threshold— This security setting determines the number of minutes a locked-out account remains locked out before automatically becoming unlocked. The available range is from 0 minutes through 99,999 minutes. If you set the account lockout duration to 0, the account is locked out until an administrator explicitly unlocks it.
![]() Account Lockout Duration— This security setting determines the number of failed logon attempts that causes a user account to be locked out. A locked-out account cannot be used until it is reset by an administrator or until the lockout duration for the account has expired. You can set a value between 0 and 999 failed logon attempts. If you set the value to 0, the account is never locked out.
Account Lockout Duration— This security setting determines the number of failed logon attempts that causes a user account to be locked out. A locked-out account cannot be used until it is reset by an administrator or until the lockout duration for the account has expired. You can set a value between 0 and 999 failed logon attempts. If you set the value to 0, the account is never locked out.
![]() Reset Lockout Counter After— This security setting determines the number of minutes that must elapse after a failed logon attempt before the failed logon attempt counter is reset to 0 bad logon attempts. The available range is 1 minute to 99,999 minutes.
Reset Lockout Counter After— This security setting determines the number of minutes that must elapse after a failed logon attempt before the failed logon attempt counter is reset to 0 bad logon attempts. The available range is 1 minute to 99,999 minutes.
These security policies can be accessed through the Windows SettingsSecurity SettingsAccount PoliciesAccount Lockout Policy node in the Default Domain Policy. Figure 9.3 shows the default Active Directory account lockout policies.
When these policies are configured, the resulting domain-level group policy or the local security policy helps secure the environment by preventing low-security passwords.
Logon triggers were first introduced in SQL Server 2005 Service Pack 2 and this functionality is also included in SQL Server 2008. Logon triggers allow you to handle logon events on the server and enforce your own authentication policies based on logic implemented in the trigger. This enables you to create flexible logon policies, based on multiple criteria.
The following code listing gives an example of a trigger that disallows login attempts from user Bob between 6 p.m. and 6 a.m.
CREATE TRIGGER trg_after_hours_logins
ON ALL SERVER
FOR LOGON
AS
BEGIN
IF SUSER_SNAME()= 'Bob' AND
((SELECT DATEPART(hh, GETDATE())) >= 18
OR (SELECT DATEPART(hh, GETDATE())) < 6)
ROLLBACK;
END;
The data definition language (DDL) statements used to administer SQL Server 2008 security is provided in the following sections as a reference. The Transact-SQL (TSQL) statements shown here are demonstrated in the section “Administering SQL Server Security” later in this chapter.
The CREATE LOGIN statement can be used to define new SQL Server logins. The SQL Server login can be a Windows user account, a Windows security group, or a SQL Server account. The CREATE LOGIN statement replaces the sp_addlogin system stored procedure used in previous versions of SQL Server.
CREATE LOGIN login_name { WITH <option_list1> ¦ FROM <sources> }
<sources> ::=
WINDOWS [ WITH <windows_options> [ ,... ] ]
¦ CERTIFICATE certname
¦ ASYMMETRIC KEY asym_key_name
<option_list1> ::=
PASSWORD = 'password' [ HASHED ] [ MUST_CHANGE ]
[ , <option_list2> [ ,... ] ]
<option_list2> ::=
SID = sid
¦ DEFAULT_DATABASE = database
¦ DEFAULT_LANGUAGE = language
¦ CHECK_EXPIRATION = { ON ¦ OFF}
¦ CHECK_POLICY = { ON ¦ OFF}
¦ CREDENTIAL = credential_name
<windows_options> ::=
DEFAULT_DATABASE = database
¦ DEFAULT_LANGUAGE = language
The ALTER LOGIN statement can be used to modify existing SQL Server logins. For example, if the password policy of a SQL user causes the account to become locked out, the security administrator can use the ALTER LOGIN statement to unlock the account.
ALTER LOGIN login_name
{
<status_option>
¦ WITH <set_option> [ ,... ]
}
<status_option> ::=
ENABLE ¦ DISABLE
<set_option> ::=
PASSWORD = 'password' [HASHED]
[
OLD_PASSWORD = 'oldpassword'
¦ <password_option> [ <password_option> ]
]
¦ DEFAULT_DATABASE = database
¦ DEFAULT_LANGUAGE = language
¦ NAME = login_name
¦ CHECK_POLICY = { ON ¦ OFF }
¦ CHECK_EXPIRATION = { ON ¦ OFF }
¦ CREDENTIAL = credential_name
¦ NO CREDENTIAL
<password_option> ::=
MUST_CHANGE ¦ UNLOCK
The DROP LOGIN statement can be used to remove logins from the server:
DROP LOGIN login_name
The preceding DDL statements replace their older counterparts in the form of system stored procedures. The following stored procedures are still available; however, these stored procedures are considered deprecated and should not be used:
![]()
sp_addlogin
![]()
sp_grantlogin
![]()
sp_denylogin
![]()
sp_revokelogin
The CREATE USER statement can be used to define a new database user. After the SQL Server login is created, the login can be mapped to a database as a user; from this point, permissions for the database can be assigned.
CREATE USER user_name
[ { { FOR ¦ FROM }
{
LOGIN login_name
¦ CERTIFICATE cert_name
¦ ASYMMETRIC KEY asym_key_name
}
¦ WITHOUT LOGIN
]
[ WITH DEFAULT_SCHEMA = schema_name ]
The ALTER USER statement can be used to modify existing database users. For example, if you need to update the default schema for a user, you can use this statement.
ALTER USER user_name
WITH <set_item> [ ,...n ]
<set_item> ::=
NAME = new_user_name
¦ DEFAULT_SCHEMA = schema_name
Note
It is possible to create a database user without mapping it to a login. This allows you to create such a login, grant necessary permissions, and map it to a login at a later stage. Such logins can also be used inside the database to provide impersonated security context while executing code modules, such as stored procedures or functions.
The DROP USER statement can be used to remove a database user from a database. Removing a database user does not remove an associated login and, conversely, when the login is removed, the mapped database user account is not automatically removed; this step must be done manually to complete the removal.
DROP USER user_name
The CREATE ROLE and ALTER ROLE statements can be used to define and modify database roles. Users should be assigned to database roles instead of being assigned to objects directly to get the appropriate permissions.
CREATE ROLE role_name [ AUTHORIZATION owner_name ]
ALTER ROLE role_name WITH NAME = new_name
The sp_addrolemember statement can be used to add principals to database roles. If a login is specified, a database user is automatically created for the login and added to the role.
sp_addrolemember [ @rolename = ] 'role',
[ @membername = ] 'security_account'
The sp_droprolemember statement can be used to remove database users from database roles:
sp_droprolemember [ @rolename = ] 'role' ,
[ @membername = ] 'security_account'
The sp_addsrvrolemember statement can be used to add logins to fixed server roles. Note that role membership for login sa and public server role cannot be changed.
sp_addsrvrolemember [ @loginame= ] 'login'
, [ @rolename = ] 'role'
The sp_dropsrvrolemember statement can be used to remove logins from fixed server roles.
sp_dropsrvrolemember [ @loginame = ] 'login' ,
[ @rolename = ] 'role'
The CREATE SCHEMA statement can be used to define a new database schema. Database roles and users can be granted permissions on a schema level. The schema is used to group database objects together, so permissions don’t need to be assigned to individual objects.
CREATE SCHEMA schema_name_clause [ <schema_element> [ ...n ] ]
<schema_name_clause> ::=
{
schema_name
¦ AUTHORIZATION owner_name
¦ schema_name AUTHORIZATION owner_name
}
<schema_element> ::=
{
table_definition ¦ view_definition ¦ grant_statement ¦
revoke_statement ¦ deny_statement
}
The ALTER SCHEMA statement can be used to transfer ownership to another database user or role. This statement cannot be used to add or remove securable items from the schema. To add or remove securable objects from the schema, you use the ALTER SCHEMA statement:
ALTER SCHEMA schema_name TRANSFER securable_name
The statements shown in this section can be used to grant, deny, or revoke permissions on objects to principals. Only the basic syntax is shown; you can find additional object-specific syntax in SQL Server 2008 Books Online.
Note
Normally, deny permissions take precedence over grant permissions. However, for backward compatibility, column-level permissions take precedence over object permissions.
The GRANT statement gives principals such as database roles, users, and logins permissions to securable objects such as databases and tables. The WITH GRANT option essentially allows the grantee principal to give other principals the same permissions on the object.
GRANT { ALL [ PRIVILEGES ] }
¦ permission [ ( column [ ,...n ] ) ] [ ,...n ]
[ ON [ class :: ] securable ] TO principal [ ,...n ]
[ WITH GRANT OPTION ] [ AS principal ]
The DENY statement prevents principals from accessing objects and inheriting permissions through membership in database roles:
DENY { ALL [ PRIVILEGES ] }
¦ permission [ ( column [ ,...n ] ) ] [ ,...n ]
[ ON [ class :: ] securable ] TO principal [ ,...n ]
[ CASCADE] [ AS principal ]
The REVOKE statement removes any existing permissions, either granted or denied:
REVOKE [ GRANT OPTION FOR ]
{
[ ALL [ PRIVILEGES ] ]
¦
permission [ ( column [ ,...n ] ) ] [ ,...n ]
}
[ ON [ class :: ] securable ]
{ TO ¦ FROM } principal [ ,...n ]
[ CASCADE] [ AS principal ]
The following sections provide detailed instructions for administering SQL Server permissions and authorizing access to SQL Server resources. The demonstrations are shown using logins configured for either SQL Server or Windows Authentication mode because both can be added to roles and are given permissions the same way.
Note
Using Windows authentication is considered a more secure choice and is recommended over SQL logins because Windows authentication protocols such as NT LAN Manager (NTLM) and Kerberos can be leveraged.
Using Windows authentication provides several advantages over SQL Server authentication, including enterprise-wide control of access accounts governed by domain security policies. In addition, Windows authentication can leverage Active Directory authentication protocols such as NTLM and Kerberos when SQL Server is located in an Active Directory domain.
If SQL authentication is used, it is recommended that you leverage password and lockout policies in addition to login encryption to further bolster security.
The section “Password Policies” earlier in this chapter contains additional information on how to configure password policies.
The SQL login is the basic method of authenticating to the SQL Server. When Windows accounts are used, either NTLM or Kerberos authentication is used to authenticate the user. Kerberos will be the first preference, and then it will fall back to NTLM if Kerberos is not available. The user’s credentials are sent in an encrypted form, making it difficult to discover them as they travel across the network.
SQL Server can be configured for Windows Authentication mode only or SQL Server and Windows Authentication mode. For simplicity, some of the demonstrations use SQL authentication and require the server to support both authentication modes.
Follow these steps to enable both Windows Authentication mode and SQL Server and Windows Authentication mode:
1. Launch SQL Server Management Studio, and then connect to a SQL Server Instance.
2. In Object Explorer, right-click on a desired SQL Server and then click Properties.
3. On the Security page, under Server Authentication, select SQL Server and Windows Authentication mode, and then click OK.
4. In the SQL Server Management Studio dialog box, click OK to acknowledge the need to restart SQL Server.
5. In Object Explorer, right-click on a desired server and then click Restart. If the SQL Server Agent is running, it also requires a restart.
Note
If Windows Authentication mode is selected during installation, the sa login is disabled by default. If the authentication mode is switched to SQL Server mixed mode after the installation, the sa account is still disabled and must be manually enabled. It is a best practice to reset the password when the mode is switched.
The Logins node holds all the Windows and SQL logins for the server. From this node, the different server logins can be managed. The following procedure can be used to create a new SQL login within SQL Server Management Studio:
1. Launch SQL Server Management Studio, and then connect to a SQL Server Instance.
2. In Object Explorer, expand Security and select the Logins node
3. Right-click the Logins node and select New Login. The Login—New window opens.
The following relevant login options are located on the General configuration page:
![]() Login Name— When Windows authentication is used, this is the name of the existing Windows user or Windows security group. When SQL authentication is used, this is the name selected for the login.
Login Name— When Windows authentication is used, this is the name of the existing Windows user or Windows security group. When SQL authentication is used, this is the name selected for the login.
![]() Windows Authentication— This option allows the selection of a Windows user account or security group for the logon. The Windows user account or security group can reside in Active Directory or the local server.
Windows Authentication— This option allows the selection of a Windows user account or security group for the logon. The Windows user account or security group can reside in Active Directory or the local server.
![]() SQL Server Authentication— This option allows the creation of an account where the account information including the account password is stored in the SQL database.
SQL Server Authentication— This option allows the creation of an account where the account information including the account password is stored in the SQL database.
The following additional options are available on the General tab when you use SQL Server authentication:
![]() Enforce Password Policy— This option configures the SQL Server to enforce domain or local server password policies. If SQL Server authentication is used, this option is highly recommended to help improve security.
Enforce Password Policy— This option configures the SQL Server to enforce domain or local server password policies. If SQL Server authentication is used, this option is highly recommended to help improve security.
![]() Enforce Password Expiration— This option configures the SQL Server to enforce domain or local server password expiration policies. This option should be enabled if the database application provides a way for the user to change the password.
Enforce Password Expiration— This option configures the SQL Server to enforce domain or local server password expiration policies. This option should be enabled if the database application provides a way for the user to change the password.
![]() User Must Change Password— When this option is enabled, the user must change the password during the first authentication. This option should be enabled if the database application provides a way for the user to change the password.
User Must Change Password— When this option is enabled, the user must change the password during the first authentication. This option should be enabled if the database application provides a way for the user to change the password.
Follow these steps to create the SQL Server login and complete the configuration page:
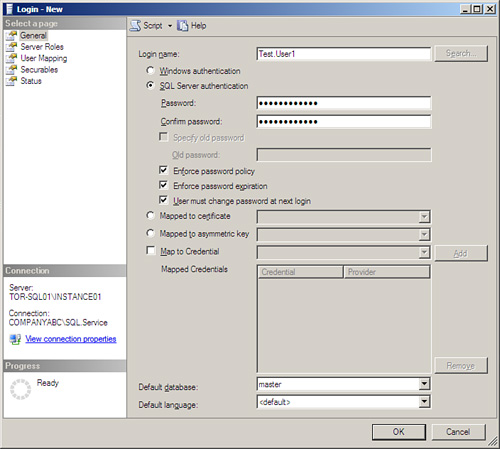
1. Enter Test.User1 in the Login Name field.
2. Select SQL Server authentication.
3. Enter the password.
4. Confirm the password.
5. Select Enforce Password Policy.
6. Select Enforce Password Expiration.
7. Select User Must Change Password at Next Login.
8. Leave Master as the Default database.
9. Leave <default> as the Default language.
10. Figure 9.4 shows how the Logon Properties window should look. Click OK to complete the page and create the login.
The SQL login Test.User1 is created but currently has only a limited set of permissions. By default, all users are members of the public fixed server role.
You can use the following TSQL code to accomplish the same task. This code creates a user called Test.User2 with Password!! set as the default password for the account:
USE [master]
GO
CREATE LOGIN [Test.User2] WITH
PASSWORD=N'Password!!'
MUST_CHANGE,
DEFAULT_DATABASE=[master],
CHECK_EXPIRATION=ON,
CHECK_POLICY=ON
GO
After the account is created, the next step is to verify the account can authenticate to the server. Configuring permissions for the login is described later in this chapter. To continue, do the following:
1. Launch a new instance of SQL Server Management Studio.
2. Select Database Engine from the Server Type drop-down; then enter the server and instance name.
3. Select SQL Server Authentication from the Authentication drop-down list.
4. Enter Test.User1 in the Login field and enter the password assigned to the logon. Then click the Connect button.
5. A change password prompt is displayed because the User Must Change Password policy was enabled when the login was defined.
6. Enter and confirm the new password; then click OK.
7. A connection to the database engine is made. If the Object Explorer pane is not visible, press the F8 key.
8. From within the Object Explorer pane, expand Databases and select the AdventureWorks2008 database.
9. An error message is displayed, notifying the login that the database is inaccessible.
Although the account cannot access any of the databases, the authentication should be successful.
Creating a Windows login is similar to creating a SQL Server login. Another one of the many advantages to using Windows authentication includes the ability to add domain security groups as the login instead of just the user account.
Note
One of the drawbacks to using Windows security groups for logins is that you cannot assign a default schema.
Before you add a Windows account or security group as a SQL Server login, it must exist in Active Directory or on the local computer. Follow these steps to create a Windows user account in Active Directory:
1. On the SQL Server system, select Start, Run.
2. Type DSA.MSC and then click OK.
3. Create a domain user account called Test.Domain1.
After creating the Active Directory user account, you can add the account as a login. Follow these steps:
1. In Object Explorer, expand the Security node.
2. Right-click the Logins node and select New Login.
3. Click the Search button.
4. Click Locations and select Entire Directory, and then click OK.
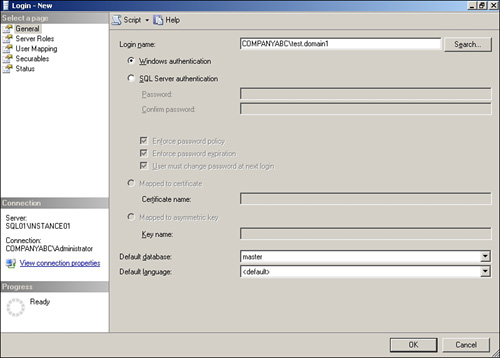
5. Type Test.Domain1 in the Object field.
6. Click the Check Name button to confirm the account name.
7. Click OK to return to the Login Properties window.
8. Select Master as the Default database.
9. Select <default> as the Default language.
10. Figure 9.5 shows how the Logon Properties window should look. Click OK to complete the page and create the login.
The user account is listed in the Logins folder. Perform the following steps to verify that the account can authenticate to the server. The SQL Server Management Studio can be executed as a different user account through the Run As command.
1. Add Choose, Start, All Programs, Microsoft SQL Server 2008. Then right-click on SQL Server Management Studio and select Run As.
2. In the Run As window, enter COMPANYABCTest.Domain1 in the User Name field.
3. Enter the associated account password and click OK. The SQL Server Management Studio opens under the Test.Domain1 account.
4. Select Database Engine from the Server Type drop-down list; then enter the server and instance name.
5. Select Windows Authentication from the Authentication drop-down list and then click the Connect button.
6. A connection to the database engine is made. If the Object Explorer pane is not visible, press the F8 key.
7. From within the Object Explorer pane, expand Databases and select the AdventureWorks2008 database.
8. An error message is displayed, notifying the login that the database is inaccessible.
The authentication should be successful because the default database was set to Master and the login is a member of the public server role. The public role has limited access to the master database. If you set the default database to something else, such as AdventureWorks2008, the authentication would fail because the public role does not have access to this database by default.
You can use the following TSQL code to add the Test.Domain1 user as a SQL login:
USE [master]
GO
CREATE LOGIN [COMPANYABCTest.Domain1] FROM WINDOWS WITH
DEFAULT_DATABASE=[master]
GO
After adding a login to the server, you can create a database user. The database user is essentially mapped back to the original login; this means the login is normally required before access to database resources can be authorized.
Follow these steps to manage database users. This procedure adds the login Test.User1 to the AdventureWorks2008 database in a SQL Server instance.
1. In Object Explorer, expand the AdventureWorks2008, Security, and select Users.
2. Right-click Users and select New User.
3. Click the ellipsis button next to the Login Name field.
4. On the Select Login page, click Browse.
5. Select Test.User1 and then click OK.
6. Click OK to return to the Database User page.
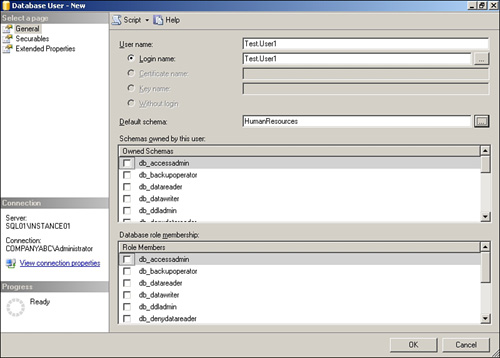
7. Enter Test.User1 in the User Name field.
8. Click the ellipsis button next to the Default Schema field.
9. On the Select Schema window, click Browse.
10. Select Human Resources and then click OK.
11. Click OK to return to the Database User properties window.
12. The Database User properties window should look similar to Figure 9.6. Click OK to create the database user.
A user called Test.User1 is added to the database. You can use the following TSQL code to add a login and an associated database user:
USE [AdventureWorks2008]
CREATE LOGIN [Test.User2]
WITH PASSWORD=N'Password!'
MUST_CHANGE,
DEFAULT_DATABASE=[master],
CHECK_EXPIRATION=ON, CHECK_POLICY=ON
GO
CREATE USER [Test.User2]
FOR LOGIN [Test.User2]
WITH DEFAULT_SCHEMA=[HumanResources]
GO
Now that you’ve added the login to the database, you can assign the correct permissions. Although permissions to objects can be assigned directly to users, it is recommended to create roles and database schemas to control access to database objects.
Windows-based logins can be mapped to database users using the exact same method. Database mapping for logins can also be configured on the Mapping Options page of the Login Properties window.
For efficient and effective management of data, users should be added to database roles. Each database role can be assigned permissions on a different object found in SQL Server.
The following procedure creates a new database role called Human Resources Reporting, the Test.User1 database user is added to this new role, and the role is given SELECT permissions to the HumanResources schema. Just follow these steps:
1. In Object Explorer, expand AdventureWorks2008, Security, Roles, and select Database Roles.
2. Right-click Database Roles and select New Database Role.
3. Type Human Resources Reporting in the Name field.
4. Click the Add button.
5. On the Select Database User or Role page, click Browse.
6. Select Test.User1 and click OK.
7. Click OK to return to the Database Role properties window.
8. Select the Securables properties page.
9. Click the Search button.
10. Select All Objects of Type and then click OK.
11. Select Schemas and click OK.
12. From the Securables list, select HumanResources.
13. In the Explicit Permissions list, enable Grant on the Select permission.
14. Click OK to complete the new role.
You can use the following TSQL code to create and configure the Human Resources Reporting database role in the AdventureWorks2008 database:
USE [AdventureWorks2008]
GO
CREATE ROLE [Human Resources Reporting]
GO
USE [AdventureWorks2008]
GO
EXEC sp_addrolemember N'Human Resources Reporting',
N'Test.User1'
GO
use [AdventureWorks2008]
GO
GRANT SELECT ON SCHEMA::[HumanResources]
TO [Human Resources Reporting]
GO
The code example first creates the database role and then adds the user Test.User1 to the role. Finally, the role is given permissions to the schema object named HumanResources.
The sys.database_role_members and sys.database_principals catalog views can be used to display database roles.
The security schema for a database essentially provides a container for a group of objects in the database. Besides the default schemas found in all databases, the AdventureWorks2008 database has several different schemas defined, including HumanResources, Person, Production, Purchasing, and Sales.
Follow these steps to establish a new schema called Test Schema for the AdventureWorks2008 database:
1. In Object Explorer, expand AdventureWorks2008, Security, and select Schemas.
2. Expand the Schemas node. Each of the default schemas for the AdventureWorks2008 database is listed.
3. Right-click the Schemas node and select New Schema. The new Schema Properties window opens.
4. In the Schema Name field, type Test Schema.
5. Click the Search button.
6. Click the Browse button.
7. Select Test.User1 and click OK.
8. Click OK to return to the Schema properties page.
On the Permissions page of the schema, you can define the permissions for each database user and role. These permissions can also be defined on the Database User or Role Property pages.
The permissions configured on the schema are applied to each object created in the schema for each principal given rights on the schema. This is very important when managing security because new objects can now inherit the correct permissions automatically.
An application role is another type of principal that can be created in a SQL Server database. Like the database role, the application role is given permissions to database objects, can be added to other roles, and granted permissions through schemas. However, unlike the database role, the application role does not contain database users. The application role is designed to allow applications to obtain permissions on database objects.
When a user runs a database application, the application executes a specific stored procedure designed to activate the application role. The database application must be configured to provide the correct password for the role. If the authentication is successful, the user’s security context changes completely to that of the application role. The only way to revert to the original context is through disconnecting and connecting again. The following syntax is used to define a new application role:
CREATE APPLICATION ROLE application_role_name
WITH PASSWORD = 'password' [ , DEFAULT_SCHEMA = schema_name ]
You can also configure application roles through the SQL Server Management studio by selecting the Application Roles node in the SecurityRoles node of a database.
The sp_setapprole stored procedure must be executed by the application to activate the application role. Here’s the syntax of the stored procedure:
sp_setapprole [ @rolename = ] 'role',
[ @password = ] { encrypt N'password' }
¦
'password' [ , [ @encrypt = ] { 'none' ¦ 'odbc' } ]
[ , [ @fCreateCookie = ] true ¦ false ]
[ , [ @cookie = ] @cookie OUTPUT ]
The sp_unsetapprole stored procedure must be executed by the application to change the user’s context back to the original settings. Following is the syntax of this stored procedure. Note that the cookie option must be used in the sp_setapprole for this stored procedure to work.
sp_unsetapprole @cookie
As an alternative to application roles, database users can be created without explicit logins. Applications can then be configured to execute database code under the security context of this database user instead of the application role.
Server endpoints allow communication with the SQL Server through one or more of the supported protocols. All endpoints for a SQL Server instance can be viewed through the SQL Server Management Studio. Follow these steps to view endpoints on a SQL Server instance:
1. In Object Explorer, expand Server Objects, Endpoints, Systems Endpoints, TSQL.
2. The default TSQL endpoints are listed.
If database mirroring or SOAP web services user-defined endpoints have been created, they are listed under the corresponding nodes within the Endpoints node.
The SQL Server Management Studio offers limited management of endpoints, allowing only the administration of permissions for endpoints and providing the ability to drop user-defined endpoints.
Note
System default endpoints cannot be dropped. However, you can start and stop these endpoints and change the permission on system default endpoints.
Endpoint security is important because it controls the different aspects of the endpoint, such as who can connect and who can administer an endpoint for a specific instance or application.
Follow these steps to change the permissions on the default system TSQL Local Machine endpoint:
1. In Object Explorer, expand Security and select the Logins node.
2. Double-click the Test.User1 login created previously in the section “Creating SQL Authentication Logins.”
3. Select the Securables page; then click the Add button.
4. Select All Objects of the Type; then click OK.
5. Enable Endpoints and then click OK.
6. Select TSQL Local Machine from the Securables list.
7. Select the Deny column for the Connect permission.
8. Figure 9.7 shows how the Securables option page should look for the login. Click OK to change the permissions.
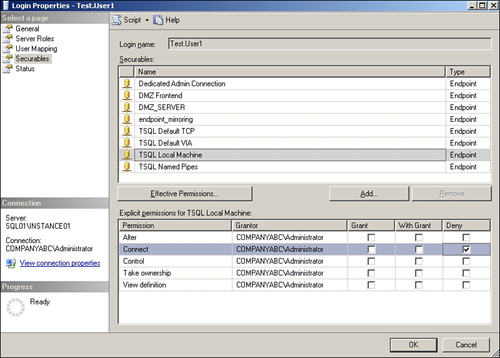
Open another instance of the SQL Server Management Studio from the test server TOR-SQL01 and attempt to authenticate as Test.User1. Because of the deny permission created, an attempt to authenticate as Test.User1 should fail even though the login is active.
Note
Endpoint permissions are associated with the actual name of the endpoint. This can be a problem when an endpoint is configured for dynamic ports because the name changes when the port changes. As a result, the security associated with the endpoint is lost.
As a best practice, avoid using endpoints with dynamic ports, specifically when endpoint permissions are used.
You can create a new endpoint only through TSQL statements. The CREATE, ALTER, and DROP ENDPOINT statements have many options; for additional information, see SQL Server 2008 Books Online.
The following code shows how to create a TCP endpoint called DMZ Frontend that listens on port 48620:
CREATE ENDPOINT [DMZ Frontend]
AS TCP (LISTENER_PORT=48620) FOR TSQL()
GO
The following warning message is displayed when the endpoint is created:
Creation of a TSQL endpoint will result in the revocation of any
'Public' connect permissions on the 'TSQL Default TCP' endpoint.
If 'Public' access is desired on this endpoint, reapply this
permission using 'GRANT CONNECT ON ENDPOINT::[TSQL Default TCP]
to [public]'.
If necessary, you must add the public role to the default endpoint by running the command identified in the warning message.
You can use the following TSQL statement to allow the user Test.User1 to connect to the newly created endpoint:
Administering SQL Server security is a key task bestowed upon database administrators. Understanding and leveraging the different security features associated with the SQL Server 2008 Database Engine and the different SQL Server 2008 components is essential to ensuring the integrity of the environment.
A properly implemented and well-maintained security model helps reduce the likelihood of sensitive data exposure, while increasing the overall scalability and reliability of the environment.
The following best practices can be taken from this chapter:
![]() To manage security most effectively, prepare and harden the environment. See Chapter 8 for additional information.
To manage security most effectively, prepare and harden the environment. See Chapter 8 for additional information.
![]() When administering SQL Server security, follow the principle of least privilege. This basically means giving only the necessary permissions to the different user and service accounts needed to accomplish the task.
When administering SQL Server security, follow the principle of least privilege. This basically means giving only the necessary permissions to the different user and service accounts needed to accomplish the task.
![]() Enable only communication protocols that are necessary and allow only specific
Enable only communication protocols that are necessary and allow only specific CONNECT permissions on endpoints.
![]() Leverage Active Directory, specifically running Windows Server 2008 to establish access and role-based security groups for accessing SQL Server resources.
Leverage Active Directory, specifically running Windows Server 2008 to establish access and role-based security groups for accessing SQL Server resources.
![]() When you are using Active Directory for role-based access, you cannot assign a default schema to the user accounts. Ensure that the security model accounts for this limitation.
When you are using Active Directory for role-based access, you cannot assign a default schema to the user accounts. Ensure that the security model accounts for this limitation.
![]() All database users belong to the public database role by default. Avoid using the public database role when assigning permissions unless absolutely necessary.
All database users belong to the public database role by default. Avoid using the public database role when assigning permissions unless absolutely necessary.
![]() The schema provides a way to manage security on groups of objects with a granular level of control. Use the schema to group related objects together—that is, objects that can have the same permissions given to the same principals.
The schema provides a way to manage security on groups of objects with a granular level of control. Use the schema to group related objects together—that is, objects that can have the same permissions given to the same principals.
![]() If possible, always use Windows Authentication mode to leverage Windows Server 2008 authentication protocols, such as Kerberos, along with domain-level password policies.
If possible, always use Windows Authentication mode to leverage Windows Server 2008 authentication protocols, such as Kerberos, along with domain-level password policies.
![]() If you use SQL authentication, enable the options to enforce the local security policies and implement encrypted authentication.
If you use SQL authentication, enable the options to enforce the local security policies and implement encrypted authentication.
![]() Create database users without logins in SQL Server 2008. This approach can be used as an alternative to application roles in the database.
Create database users without logins in SQL Server 2008. This approach can be used as an alternative to application roles in the database.
![]() Endpoint permissions are associated with the actual name of the endpoint. This can be a problem when an endpoint is configured for dynamic ports because the name changes when the port changes. As a result, the security associated with the endpoint is lost. Avoid using endpoints with dynamic ports, specifically when endpoint permissions are used.
Endpoint permissions are associated with the actual name of the endpoint. This can be a problem when an endpoint is configured for dynamic ports because the name changes when the port changes. As a result, the security associated with the endpoint is lost. Avoid using endpoints with dynamic ports, specifically when endpoint permissions are used.