
Chapter 11 Encrypting SQL Server Data and Communications
The data stored in Microsoft SQL Server 2008 can be both valuable and confidential. The information stored in databases in SQL Server could be medical histories, income data, or company trade secrets. This information needs to be protected against unauthorized access. In many cases, government and industry regulations require that this data be stored in an encrypted format.
Many of the controls presented in this book have been access controls—that is, controls that determine who has authorization to access what. A determined hacker can circumvent these controls through various means, such as sniffing network traffic, going dumpster diving for backup tapes, or making inference attacks.
A more sophisticated approach to data protection is to use an in-depth defense strategy, where there are multiple layers of defense. If a hacker breaches one layer, other layers underneath provide protection. In addition to the access-based controls, encryption provides another layer of protection.
Ultimately, there isn’t just one encryption technology included with SQL Server 2008 or Windows Server 2008 that will provide end-to-end encryption of a SQL Server implementation from a holistic perspective. However, by combining the encryption technologies included with SQL Server 2008 and Windows Server 2008, it is possible to achieve the goal of end-to-end encryption.
This chapter shows how to encrypt data in the database, at the disk level, and over the wire to prevent a hacker from obtaining valuable data.
SQL Server 2008 introduces new features and functionality when it comes to encrypting SQL Server data. Moreover, when running SQL Server 2008 on Windows Server 2008, organizations can also reap additional benefits. The new encryption elements associated with SQL Server 2008 and Windows Server 2008 consist of
![]() Transparent Data Encryption— Encryption can be enabled on an entire database, which includes data files and log files without the need for application changes.
Transparent Data Encryption— Encryption can be enabled on an entire database, which includes data files and log files without the need for application changes.
![]() Extensible Key Management— Using a newly introduced interface driver, encryption key management and storage can be handled by external devices such as a Hardware Security Module (HSM). The HSM performs encryption and decryption of keys, resulting in heightened security of key management and key storage utilized by the encryption infrastructure.
Extensible Key Management— Using a newly introduced interface driver, encryption key management and storage can be handled by external devices such as a Hardware Security Module (HSM). The HSM performs encryption and decryption of keys, resulting in heightened security of key management and key storage utilized by the encryption infrastructure.
![]() BitLocker— BitLocker can be leveraged to encrypt the volumes associated with the SQL Server system. This can be achieved when running any version of the latest Windows Server 2008 operating system.
BitLocker— BitLocker can be leveraged to encrypt the volumes associated with the SQL Server system. This can be achieved when running any version of the latest Windows Server 2008 operating system.
The confidentiality of the data stored in your SQL Server system or transmitted between the server and the client application can be compromised. A hacker can eavesdrop on communications between the client and server, as shown in Figure 11.1. The hacker might also obtain a database file or a backup media of the database.

To protect against these potential attacks, SQL Server 2008 allows you, as database administrator, to encrypt the data in the database and the network communications. Encryption allows you to protect the confidentiality of data during storage and transmission, as shown in Figure 11.2.

Encryption does not prevent an attacker from capturing the data. Rather, it prevents the attacker from understanding what that data means. For example, if confidential salary information is stored in a database, it is open to potential discovery by a hacker. If the hacker can capture the value 100000, it is reasonably clear what the salary is. Suppose, instead, the hacker captures this value:
0x00057978740EBC4882D182DE0BC8943401000000B0D2747903102AD4696BC980
217970DAD5B4C38314DB45D065079C9B43F922D0A04517C38EC8CA9B5CD19702DE
E0A042
This binary string makes it much more difficult to understand what the salary figure is. In this case, it is the encrypted version of the value 100000.
This chapter shows how to encrypt data both while stored in the database and while in transit over the network between the client and server.
In terms of the data stored in the database, there are two main methods to protect it with encryption: either using column encryption (first introduced in SQL Server 2005) or using Transparent Data Encryption (TDE, new in SQL Server 2008). Those two features are independent of each other and quite different in the way they work. We will look into both of them—let’s start with column encryption.
The column encryption feature was first introduced in SQL Server 2005. It is based on a simple principle: You create encryption keys and certificates within the database and use them, through special functions, to encrypt and decrypt your data as it is stored and read from a table column.
SQL Server 2008 has an encryption hierarchy to protect the data and the encryption keys. The various levels are
![]() Windows level— The highest level of the hierarchy is the Windows operating system. This level uses Windows Data Protection (DP) API to encrypt and protect the next level.
Windows level— The highest level of the hierarchy is the Windows operating system. This level uses Windows Data Protection (DP) API to encrypt and protect the next level.
![]() SQL Server level— This level contains the Service Master Key (SMK), which is protected by the Windows level. The Service Master Key is used to protect the next level.
SQL Server level— This level contains the Service Master Key (SMK), which is protected by the Windows level. The Service Master Key is used to protect the next level.
![]() Database level— This level contains the Database Master Key (DMK) and the remaining keys and certificates. The Database Master Key encrypts and protects the certificates, symmetric keys, and asymmetric keys within the database.
Database level— This level contains the Database Master Key (DMK) and the remaining keys and certificates. The Database Master Key encrypts and protects the certificates, symmetric keys, and asymmetric keys within the database.
The encryption hierarchy provides a scalable and granular mechanism for protecting the data within the server and databases. It allows for multiple database owners to coexist on the same server without compromising security of other databases.
The Service Master Key is the root of all encryption within SQL Server 2008. This key is generated during the first time it is needed to encrypt a linked password, credential or database master key.
This key is accessible only by the Windows account used by the SQL Server service.
The Database Master Key is used to secure the keys and certificates used to encrypt data. This key is manually created for each database.
If you don’t want a Database Master Key, you can encrypt the keys and certificates with a password rather than the Database Master Key. This can be a useful alternative to prevent the owner of a database from gaining access to encrypted data in highly secure environments. However, when the key is encrypted with a password instead of the Database Master Key, a weaker algorithm is used.
Asymmetric and symmetric keys are used to encrypt keys, certificates, and data. Each has its own specific uses and pros and cons.
Symmetric keys are relatively straightforward. The keys are used to both encrypt and decrypt. The encryption is relatively fast, so symmetric keys are useful for encrypting large quantities of data. However, symmetric keys need to be shared, and this can make them difficult to use.
Asymmetric keys are composed of a public and private key pair. These pairs of keys are used to both encrypt and decrypt, but with a twist. Each key can decrypt what the other key encrypted, but not its own. Asymmetric encryption is resource intensive, so it is not suitable for encrypting large volumes of data. However, it is uniquely suited for encrypting symmetric keys for the purpose of sharing them.
Certificates are used to vouch for the identity of an entity presenting the public key contained in the certificate. In effect, a certificate authority (CA) issues a certificate that presents a public key and an identity that a third party can trust. Certificates can be issued by well-known third-party CAs such as VeriSign, by private CAs on Windows Server 2003 and 2008 servers, or they can be self-signed certificates issued by SQL Server instances.
Third-party certificates are typically expensive, private certificates require additional configuration, and self-signed certificates provide a lower level of protection.
SQL Server 2008 supports a variety of encryption algorithms. These algorithms are used to secure the data, keys, and certificates.
The algorithms supported by SQL Server 2008 are
![]() Data Encryption Standard (DES)
Data Encryption Standard (DES)
![]() Triple DES
Triple DES
![]() Rivest Cipher (RC2)
Rivest Cipher (RC2)
![]() RC4
RC4
![]() 128-bit RC4
128-bit RC4
![]() DESX
DESX
![]() 128-bit Advanced Encryption Standard (AES)
128-bit Advanced Encryption Standard (AES)
![]() 192-bit AES
192-bit AES
![]() 256-bit AES
256-bit AES
Choosing an algorithm can be a complex undertaking because it requires balancing the strength of the algorithm, the resources required to use the algorithm, and the potential weaknesses of the algorithm.
Although these are all very valid considerations for choosing an algorithm, most organizations are, in reality, not encrypting data at all. Thus, using any of the preceding algorithms is a tremendous improvement in the level of security. Which particular algorithm is chosen matters less than just the fact of using any of them.
In the examples in this book, we used the tried-and-true Triple DES algorithm. It provides a good balance between performance and security.
Unencrypted data residing in SQL Server, it is vulnerable to being read by a hacker who can elevate his privileges or gain access to backup tapes. To secure the data that is stored in the database, you can encrypt the values to provide an additional layer of security.
To facilitate running these examples, these exercises use data from the SQL samples found on Microsoft’s sample website. The customer.txt file can be downloaded at http://www.codeplex.com/MSFTISProdSamples/ under the Package Samples “Execute SQL Statements in a Loop Sample SS2008.” Before starting, you need to create the customer database and import the customer data that is located in the customer.txt file.
Note
If the Customer database already exists from previous exercises, delete the database prior to completing the exercises in this chapter.
To create the database, first download the Customers.txt file from http://www.codeplex.com/MSFTISProdSamples/ and follow these steps:
1. Open SQL Server Management Studio.
2. Connect to the Database Engine of the SQL Server.
3. Expand the Databases folder in the Object Explorer.
4. In the SQL Server Management Studio, create a new database named Customer.
5. Right-click the Customer database and select Tasks, Import Data.
6. Click Next.
7. Select Flat File Source as the data source.
8. Click the Browse button and select the Customers.txt file.
9. Click Open.
10. Check the Column names in the first data row check box.
11. Click Next.
12. Select the Customer database if not selected already and click Next.
13. Click Next to accept tables and views.
14. Click Next to execute immediately and not save the package.
15. Click Finish to run the import.
16. Click Close.
The basic database is now ready for the encryption exercises in this chapter.
When the database is created, there is no database master key initially. You need to create this key for each database.
To create a Database Master Key, open a query window and execute the following query:
USE Customer;
GO
CREATE MASTER KEY ENCRYPTION BY
PASSWORD = 'The secret password.';
GO
This query prepares the database for encrypting the data. Clearly, the secret password could use some additional complexity.
Now you need to create a certificate to protect the keys that will actually be used to encrypt the data itself.
To create the certificate, execute the following query:
USE Customer;
GO
CREATE CERTIFICATE Customer01
WITH SUBJECT = 'Customer';
GO
After creating the certificate, you can create and protect the symmetric key. This key will be used to encrypt the data. Using a symmetric key allows the data to be encrypted rapidly, whereas encrypting it with a certificate provides strong protection.
To create the symmetric key, execute the following query:
USE Customer;
GO
CREATE SYMMETRIC KEY YearlyIncome_Key_01
WITH ALGORITHM = TRIPLE_DES
ENCRYPTION BY CERTIFICATE Customer01;
GO
We chose the Triple DES algorithm because of its security and compatibility.
With the database now prepared, the next step is to encrypt a column of data. In this case, the data to be protected is the YearlyIncome column.
To encrypt the YearlyIncome column, execute the following query:
USE [Customer];
GO
ALTER TABLE dbo.Customers
ADD EncryptedYearlyIncome varbinary(128);
GO
OPEN SYMMETRIC KEY YearlyIncome_Key_01
DECRYPTION BY CERTIFICATE Customer01;
UPDATE dbo.Customers
SET EncryptedYearlyIncome = EncryptByKey
(Key_GUID('YearlyIncome_Key_01'), YearlyIncome);
CLOSE SYMMETRIC KEY YearlyIncome_Key_01;
GO
Note that the query adds a new column named EncryptedYearlyIncome of type varbinary to hold the encrypted values.
Note
The Customers table still retains the original column named YearlyIncome with the unencrypted data. In a real-world situation, you would need to drop the column to protect the data. The query to do this is ALTER TABLE Customer.dbo.Customers DROP COLUMN YearlyIncome;.
We did not drop this column in the examples, to allow comparisons and to allow the column to be re-encrypted.
The encrypted data is protected but can’t be used directly. To select the data with no decryption, execute the following query:
SELECT EncryptedYearlyIncome
FROM Customer.dbo.Customers;
GO
Rather than a nice set of Yearly Income numbers, the SELECT query returns a list of hexadecimal characters, as shown in Figure 11.3.
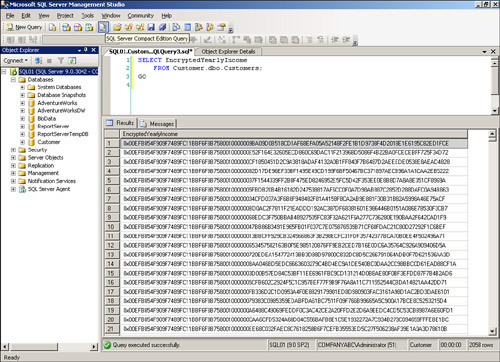
This result is good because it means that a hacker would not be able to discern the customer’s yearly incomes. However, valid users need a way to see the actual values and cannot use the column of data directly. To actually use the data, you must decrypt it when selecting it.
To select the data with decryption, execute the following query:
OPEN SYMMETRIC KEY YearlyIncome_Key_01
DECRYPTION BY CERTIFICATE Customer01;
GO
SELECT CONVERT(varchar, DecryptByKey(EncryptedYearlyIncome))
AS 'Decrypted Yearly Income' FROM Customer.dbo.Customers;
CLOSE SYMMETRIC KEY YearlyIncome_Key_01;
GO
This query shows the actual values of the Yearly Income in unencrypted form, as shown in Figure 11.4.
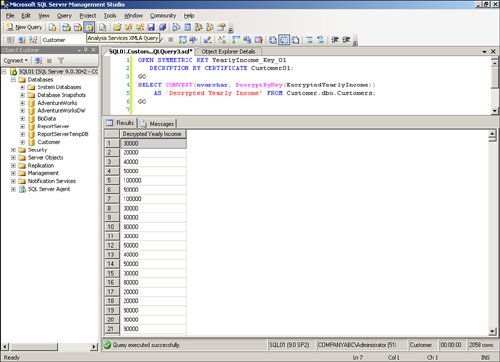
The data is now secured while stored in the database and would be protected in backups.
Although the data is protected against being viewed, a hacker might be able to subvert the control of the data. One way to accomplish this is to replace the encrypted value with another encrypted value. This is referred to as an inference attack.
Consider the two rows in the Customer database shown in Table 11.1.

The Yearly Income values are encrypted, so a hacker who subverts the access controls might be able to gather the information about the rows shown in Table 11.2.

Although the hacker cannot determine the yearly income of either customer, he can make some assumptions based on their occupations. Without any prior knowledge, a hacker could safely assume that Mr. Dominguez earns more than Ms. Gomez. Using that basic assumption, the hacker can elevate the yearly income of Ms. Gomez simply by moving the encrypted value from Mr. Dominguez without ever needing to know what the value is. In effect, the hacker can elevate the yearly income to $100,000.
To demonstrate this hack, execute the following query to hack the database:
USE Customer;
GO
UPDATE Customer.dbo.Customers
SET EncryptedYearlyIncome =
(SELECT EncryptedYearlyIncome FROM Customer.dbo.Customers
WHERE EmailAddress = '[email protected]')
WHERE EmailAddress = '[email protected]';
GO
This query copies the Encrypted Value 1 in Table 11.2 over Encrypted Value 2 in the table, in effect replacing Ms. Gomez’s income with Mr. Dominguez’s income. To verify that the hack was successful, execute the following query:
USE Customer;
Go
OPEN SYMMETRIC KEY YearlyIncome_Key_01
DECRYPTION BY CERTIFICATE Customer01;
GO
SELECT CONVERT(varchar, DecryptByKey(EncryptedYearlyIncome))
AS 'Decrypted Yearly Income'
FROM dbo.Customers where EmailAddress =
'[email protected]';
CLOSE SYMMETRIC KEY YearlyIncome_Key_01;
GO
The result returned is 100000, indicating that the yearly income for Ms. Gomez was elevated to management-level pay. Good for Ms. Gomez, but bad for the company!
You can foil these types of attacks by using an authenticator when encrypting and decrypting the data.
An authenticator, also known as a “salt value” in cryptography, is another column value that is unique to the row that is used in conjunction with the key to secure the data being encrypted. This prevents a hacker from moving an encrypted value between rows.
It is worth mentioning that the Authenticator selected is one that is not likely to change and if it ever does you have lost your ability to decrypt the data.
To encrypt the YearlyIncome column with an authenticator (in this case, the EmailAddress), execute the following query:
USE Customer;
GO
OPEN SYMMETRIC KEY YearlyIncome_Key_01
DECRYPTION BY CERTIFICATE Customer01;
UPDATE dbo.Customers
SET EncryptedYearlyIncome = EncryptByKey(Key_GUID
('YearlyIncome_Key_01'),
YearlyIncome, 1, convert (varbinary, EmailAddress));
CLOSE SYMMETRIC KEY YearlyIncome_Key_01;
GO
Note that the preceding query overwrites the data in the EncryptedYearlyIncome column with freshly encrypted data from the YearlyIncome column.
Verify that the EncryptedYearlyIncome column is still encrypted. To view the results, execute the following query:
The values should be displayed as long hexadecimal numbers, similar to those shown in Figure 11.3. The next step is to see whether the hacker substitution will succeed. Execute the hack again using the following query:
USE Customer;
GO
UPDATE Customer.dbo.Customers
SET EncryptedYearlyIncome =
(SELECT EncryptedYearlyIncome FROM Customer.dbo.Customers
WHERE EmailAddress = '[email protected]')
WHERE EmailAddress = '[email protected]';
GO
The preceding query is the same query that was executed before and successfully hacked the database. Note that the value is still replaced. The question is whether the value will be accepted by the application or the hack will be foiled.
To verify that the hacker was foiled, execute the following query:
USE Customer;
GO
OPEN SYMMETRIC KEY YearlyIncome_Key_01
DECRYPTION BY CERTIFICATE Customer01;
GO
SELECT CONVERT(nvarchar, DecryptByKey(EncryptedYearlyIncome))
AS 'Decrypted Yearly Income'
FROM dbo.Customers where EmailAddress =
'[email protected]';
CLOSE SYMMETRIC KEY YearlyIncome_Key_01;
GO
Now the decrypted Yearly Income value displays NULL, indicating that the decryption failed and the hacker was not successful in replacing Ms. Gomez’s yearly income.
To verify that an authorized user can still access the data correctly, execute the following query:
USE Customer;
GO
OPEN SYMMETRIC KEY YearlyIncome_Key_01
DECRYPTION BY CERTIFICATE Customer01;
GO
SELECT CONVERT(varchar, DecryptByKey(EncryptedYearlyIncome, 1,
convert (varbinary, EmailAddress)))
AS 'Decrypted Yearly Income'
FROM dbo.Customers;
CLOSE SYMMETRIC KEY YearlyIncome_Key_01;
GO
The Yearly Income values should be displayed for all, but Ms. Gomez.
The service master keys and database keys are critical values that need to be preserved. Losing these keys can result in the loss of any data that is encrypted. Backing up the service master and database master keys allows you to recover the data in case of problems.
To back up the Service Master Key, execute the following query:
BACKUP SERVICE MASTER KEY
TO FILE = 'c:ServiceMasterKeyBackup.dat'
ENCRYPTION BY PASSWORD = 'SecretPassword'; GO
To back up the Database Master Key, execute the following query for the Customer database:
USE Customer;
GO
BACKUP MASTER KEY
TO FILE = 'c:CustomerDatabaseMasterKeyBackup.dat'
ENCRYPTION BY PASSWORD = 'SecretPassword';GO
You repeat this query for each database master key that you need to back up.
You should store both key backup files offsite in case of server problems. In the event of a problem with the keys, the Service Master Key and Database Master Key can be restored from the files.
SQL Server 2008 adds a new functionality called Extensible Key Management (EKM) that allows you to store your encryption keys outside of the Database Engine, using Hardware Security Modules (HSM). It allows you to store the encryption keys separately from the data being encrypted and provides additional level of security. This functionality is available only in the Enterprise and Developer editions of SQL Server 2008.
EKM works by allowing integration of SQL Server data encryption with third-party solutions for key generation, key storage, key management, and hardware acceleration of the encryption process. The main part of this solution is the cryptographic provider DLL that allows access from SQL Server to the Hardware Security Module. This DLL is provided by the vendor of your HSM and is written using a common interface allowing SQL Server to access the key stored on the HSM. This DLL must be signed by a trusted source in order to be accepted by SQL Server engine.
In order to use the EKM you need to follow this procedure.
First, you must enable the use of EKM providers on the database instance level by changing the configuration option 'EKM provider enabled':
sp_configure 'show advanced', 1
GO
RECONFIGURE
GO
sp_configure 'EKM provider enabled', 1
GO
RECONFIGURE
GO
This will allow you to create and use the cryptographic providers in SQL Server.
Next, you need to create the cryptographic provider using the DLL obtained from your HSM vendor. This DLL will provide SQL Server with access to the encryption keys stored on the HSM.
CREATE CRYPTOGRAPHIC PROVIDER MyHSM
FROM FILE='C:MyHSMHSMProvider.dll'
GO
Please note that this example is fictional and assumes that you have the provider DLL file stored in file C:MyHSMHSMProvider.dll.
Most of the HSMs require additional authentication in order to access the keys stored on them. Depending on your HSM and cryptographic provider, it may or may not support basic authentication using username and password. If the basic authentication is supported, you should create the credential for the login that will be using the key stored in the HSM. Otherwise, the authentication to the HSM must be performed independently of SQL Server.
To create a credential that allows access to the keys stored on the HSM created in the previous step and assign it to SQL Server login Bob, you would use the following code:
CREATE CREDENTIAL CredentialForMyHSM
WITH IDENTITY='HSMUser',
SECRET='StrongP@ssw0rd'
FOR CRYPTOGRAPHIC PROVIDER MyHSM;
GO
ALTER LOGIN Bob
ADD CREDENTIAL CredentialForMyHSM;
GO
After the preceding steps are completed, you can use your HSM to create and store the encryption keys that you want to use to encrypt the data in the database engine.
To create a symmetric key based on the existing encryption key stored on your HSM, you can use the following syntax:
CREATE SYMMETRIC KEY MyEKMKey
AUTHORIZATION Bob
FROM PROVIDER MyHSM
WITH PROVIDER_KEY_NAME='MyHSMKey',
CREATION_DISPOSITION=OPEN_EXISTING;
GO
This would allow you to use the key for data encryption within SQL Server. After the key is created and mapped to a key stored on the HSM, the usage of the encryption functions is analogous to the one described in the previous section of this chapter.
Storing of encryption keys outside of the database engine and on the HSM provides several security benefits, namely:
![]() Encryption keys stored independently if the data encrypted with them
Encryption keys stored independently if the data encrypted with them
![]() Additional authorization checks for key retrieval
Additional authorization checks for key retrieval
![]() Easier and more flexible key management for key generation, distribution, backup, recovery and disposal
Easier and more flexible key management for key generation, distribution, backup, recovery and disposal
![]() Higher performance in case of the HSM supporting hardware encryption and decryption
Higher performance in case of the HSM supporting hardware encryption and decryption
Transparent Data Encryption (TDE) is a new feature, available in SQL Server 2008 Enterprise and Developer editions. It allows you to encrypt and protect the data in your database files, without having to change anything in your application and data access code (hence the name transparent). Using Transparent Data Encryption will allow you to meet regulatory requirements of having your data encrypted “at rest” with a minimal administrative effort. It can also protect your data in case the media containing your database files or database backup is lost or stolen.
Note
When TDE is implemented, the entire database is encrypted; however, TDE does not provide encryption across communication channels. In addition, the backups associated with the database are also encrypted.
Transparent Data Encryption works by encrypting data pages and log pages stored on disk. Encryption and decryption happens during I/O operations—data is encrypted as it is written to disk and decrypted as it is read from disk into memory. The performance overhead of TDE is relatively small as the data is only encrypted during I/O operations and remains decrypted while in memory. When you enable TDE, the entire database, including all data file and log files, is encrypted on disk. Such an encrypted database cannot be restored or attached to a different server without access to the server certificate from the original server.
As with column encryption, there is an encryption hierarchy that protects the keys used by Transparent Data Encryption. The hierarchy is slightly different from the one used by the column encryption, but it serves the same purpose: to protect the key used for direct data encryption with some other, higher-level keys. In case of Transparent Data Encryption, the levels are
![]() Windows level— The highest level of the hierarchy is the Windows operating system. This level uses the Windows DP API to encrypt and protect the next level.
Windows level— The highest level of the hierarchy is the Windows operating system. This level uses the Windows DP API to encrypt and protect the next level.
![]() SQL Server level— This level contains the Service Master Key (SMK), which is protected by the Windows level. The Service Master Key is used to protect the next level.
SQL Server level— This level contains the Service Master Key (SMK), which is protected by the Windows level. The Service Master Key is used to protect the next level.
![]() Master database level— This level contains the Database Master Key (DMK) in the master database, which is protected by the Service Master Key. It also contains a server certificate, or asymmetric key stored in the master database and encrypted with DMK. The server certificate or asymmetric key is used to protect the Database Encryption Key on the next level.
Master database level— This level contains the Database Master Key (DMK) in the master database, which is protected by the Service Master Key. It also contains a server certificate, or asymmetric key stored in the master database and encrypted with DMK. The server certificate or asymmetric key is used to protect the Database Encryption Key on the next level.
![]() Database level— This level contains the Database Encryption Key (DEK) used by the server to encrypt that particular database with TDE.
Database level— This level contains the Database Encryption Key (DEK) used by the server to encrypt that particular database with TDE.
The following example illustrates the steps required to enable TDE on the sample database AdventureWorks2008. To be able to use TDE, you need to create all the necessary encryption keys on all the appropriate levels before you enable TDE for your database.
The first key we need to create is Database Master Key in the master database. In some scenarios, you might have already created it (there can be only one DMK per database). Otherwise, you need to create it by running code similar to this:
USE master;
GO
CREATE MASTER KEY ENCRYPTION BY
PASSWORD = 'MakeSureYouUseAStr0ngP@ssw0rd';
GO
The next step is to create a server certificate or asymmetric key in the master database. From a TDE perspective, it does not matter if you choose to create a certificate or an asymmetric key—both are functionally equivalent and their respective private keys are encrypted by the Database Master Key.
You can create a server certificate using the following code:
USE master;
GO
CREATE CERTIFICATE ServerCert WITH
SUBJECT = 'Certificate for use with TDE';
GO
Note
After you create the server certificate or asymmetric key, you should immediately take a backup of it, containing the private key. This backup copy of the key will be necessary in order to restore the encrypted databases in cases when you are restoring to another server or when the original key is no longer available for any reason. Make sure to protect the backup file containing the private key by using a strong password and storing it on an offline media.
Next step is to create the Database Encryption Key (DEK) in the database you plan to use TDE on. This key is protected by the server certificate or asymmetric key and cannot be opened without it. Under normal operation, this ensures that the database can only be opened (and decrypted) by the server instance that “owns” the database.
You can create the Database Encryption Key using the following code:
USE AdventureWorks2008;
GO
CREATE DATABASE ENCRYPTION KEY
WITH ALGORITHM = AES_256
ENCRYPTION BY SERVER CERTIFICATE ServerCert;
GO
While creating your Database Encryption Key, you should consider the choice of the encryption algorithm used. For performance and security reasons, only certain symmetric algorithms are available for use with TDE:
![]() Triple DES
Triple DES
![]() 128-bit AES
128-bit AES
![]() 192-bit AES
192-bit AES
![]() 256-bit AES
256-bit AES
From those, the best choice in terms of protection provided is Advanced Encryption Standard (AES) in its 256-bit form, but it is also the one that requires most processing power during encryption.
After you have created the necessary encryption key hierarchy, you are ready to enable TDE on your database. To enable it, just run the following code:
USE master;
GO
ALTER DATABASE AdventureWorks2008
SET ENCRYPTION ON;
GO
Enabling TDE is a metadata operation and happens very quickly. The actual encryption process takes place in the background and, depending on the size of your database and the load on the server, can take several hours to finish. You can check the status of TDE on your database by querying the sys.dm_database_encryption_keys DMV:
The encryption_state column of that DMV shows you the status of TDE for that particular database. Possible values are:
![]() 0—No database encryption key present, no encryption
0—No database encryption key present, no encryption
![]() 1—Unencrypted
1—Unencrypted
![]() 2—Encryption in progress
2—Encryption in progress
![]() 3—Encrypted
3—Encrypted
![]() 4—Key change in progress
4—Key change in progress
![]() 5—Decryption in progress
5—Decryption in progress
Note
After you enable TDE for any database on the SQL Server instance, the tempdb database is encrypted as well, in order to protect data stored in any temporary objects. This can have a performance impact on other databases and applications running on the same instance.
After the backup thread finishes encrypting your database, both data files and log files are fully encrypted. Any database, file, or log backups you take from this point forward will contain encrypted data, and such backups can only be restored if you have access to the server certificate protecting the Database Encryption Key.
Should you ever decide that you no longer want your database to use TDE, disabling it is as simple as enabling:
USE master;
GO
ALTER DATABASE AdventureWorks2008
SET ENCRYPTION OFF;
GO
As with enabling, when you disable TDE, the actual decryption process takes place in the background and can take a considerable amount of time to finish. Again, you can check the status of this process by querying the sys.dm_database_encryption_keys DMV.
When you use cell-level or TDE encryption, the data is encrypted while in the database. However, when the client selects the data, it is unencrypted. The data needs to be protected while being transmitted as well as while being stored. SQL Server 2008 can use SSL certificate-based encryption to encrypt all communications between the client and server.
To understand the problem, you can use Network Monitor tools for this example to view the contents of the network traffic between the SQL Server and client. This tool is available for Windows Server 2008 as an out-of-band download directly from Microsoft, http://www.microsoft.com/downloads/results.aspx?pocId=&freetext=network%20monitor%203&DisplayLang=en. The examples in this section assume that the SQL Server Workstation Components are installed on the client.
Start the Network Monitor on the server and then execute the following query from SQL Server Management Studio on the client:
USE Customer;
Go
OPEN SYMMETRIC KEY YearlyIncome_Key_01
DECRYPTION BY CERTIFICATE Customer01;
GO
SELECT FirstName, LastName, BirthDate,
CONVERT(nvarchar, DecryptByKey(EncryptedYearlyIncome, 1,
convert (varbinary, EmailAddress)))
AS 'Decrypted Yearly Income'
FROM dbo.Customers where EmailAddress =
'[email protected]';
GO
The query returns the information shown in Table 11.3.
This result is clearly confidential information that should be protected from the prying eyes of a hacker. It even includes the yearly income information that was encrypted in the Customer database to prevent unauthorized disclosure.
Figure 11.5 shows the results of the network capture of the preceding query. The highlighted frame in the figure contains the data sent from SQL Server (TOR-SQL01) to the client (172.16.2.1). The circled section of the figure shows the information that a hacker was able to capture simply by listening in on the network transmission. The information includes the name, birth date, and yearly income. Although the information is not formatted in a pretty manner, it is all there for the hacker to see.
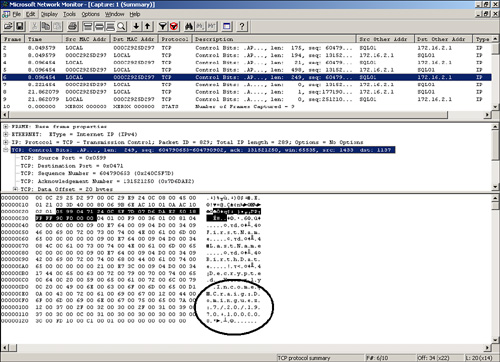
Most troubling is the fact that the information that was encrypted in the database is transmitted unencrypted over the wire. The reason is that the query decrypts the information at the server side prior to transmission. The bottom line is that encrypting the columns in the database does nothing to protect the data while it is being transmitted over the network.
To protect data transmissions, you need to encrypt the connections.
SQL Server 2008 can be configured to require SSL-based encryption. Configuring the ForceEncryption setting of SQL Server to Yes forces all client/server communications to be encrypted. By default, the ForceEncryption setting is set to No, so SQL Server client/server communications are not protected.
Note
The SQL Server 2008 login process is always encrypted, regardless of the ForceEncryption setting of the server. This ensures that login and password combinations are not compromised.
To configure the server to require encrypted connections, follow these steps:
1. Launch the SQL Server Configuration Manager.
2. Expand the SQL Server Network Configuration.
3. Right-click on Protocols for a SQL Server instance and select Properties.
4. On the Flags tab, change the ForceEncryption drop-down to Yes.
5. Click OK to save the setting.
6. Click OK on the dialog box indicating the service needs to be restarted.
7. Select the SQL Server Services folder.
8. Select the SQL Server (MSSQLSERVER) service.
9. Restart the SQL Server service.
The connections to your SQL Server 2008 server are now encrypted.
Now that the server has been configured to force encryption of the network transmissions, the hacker should not be able to see the contents of the network transmissions.
To verify that the transmissions are protected, start the Network Monitor on the server and then execute the following query from the SQL Server Management Studio on the client:
USE Customer;
Go
OPEN SYMMETRIC KEY YearlyIncome_Key_01
DECRYPTION BY CERTIFICATE Customer01;
GO
SELECT FirstName, LastName, BirthDate,
CONVERT(nvarchar, DecryptByKey(EncryptedYearlyIncome, 1,
convert (varbinary, EmailAddress)))
AS 'Decrypted Yearly Income'
FROM dbo.Customers where EmailAddress =
'[email protected]';
GO
Figure 11.6 shows the results of the network capture of the preceding query. The highlighted frame in the figure is the frame that contains the data sent from SQL Server (SQL01) to the client (172.16.2.1). The circled section of the figure shows the information that a hacker was able to capture. The information is now a jumble of strange characters and protected from the hacker’s prying eyes.
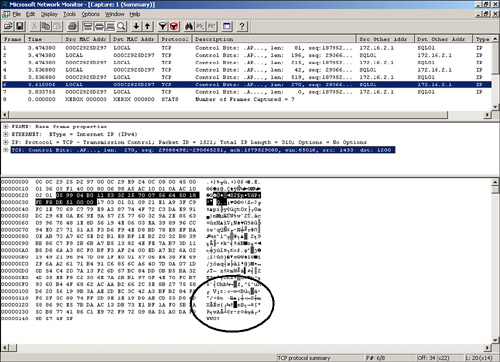
Notice that the frames are a bit different. The encrypted frame length is 270 versus 249 for the unencrypted frame. Encryption carries some overhead both in the size of the frames and in the effort that the server and client have to make in processing the encryption.
The encryption used until now in the chapter has been based on self-signed certificates. These certificates are generated when SQL Server does not have a certificate provisioned.
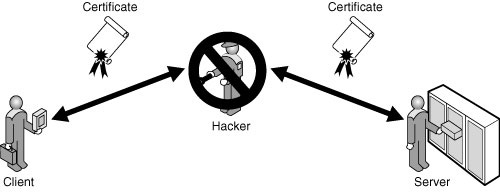
Self-signed certificates are vulnerable to certain attacks, most critically man-in-the-middle attacks. This means that without an independent verification of the identity of the SQL Server, there is no way to be sure that the communication is not really between a nefarious third party posing as the server to the client. Note that the communication is encrypted, as shown in Figure 11.7, but the encryption is between the hacker and the client and server.

Neither the client nor the server detects the ruse because there is no independent third-party certificate authority to confirm that the certificate used to encrypt the transmission is trusted.
This attack is thwarted by using a third-party certificate to verify the identity of the SQL Server. When the hacker attempts to insert himself between the client and server, as shown in Figure 11.8, the attack is detected by both the client and server.
The following sections detail how to configure a certificate server, and to provision and configure certificates for SQL Server 2008.
The first step when implementing certificates is to request a certificate from a trusted certificate authority. The certificate authority can be a third-party vendor such as VeriSign, or it can be an internal Active Directory or stand-alone CA residing on the corporate Windows infrastructure. For this example, the first step will include setting up a certificate server on a Windows Server 2008 system, so that it can issue certificates for the SQL Server infrastructure. The example uses Microsoft Certificate Services, but a third-party CA and certificates could be used as well. If you already have a certificate or a certificate server within your infrastructure, proceed to the next step, “Provisioning a Server Certificate.”
The TOR-DC01.companyabc.com server was chosen for this example. The procedure assumes that the Windows 2008 operating system has been installed and that the TOR-DC01 server has joined the companyabc.com domain.
Install the Certificate Services role on the TOR-SQL01 server using the following steps:
1. Launch Server Manager.
2. In the Roles Summary pane, select Add Roles to start the wizard.
3. Click Next.
4. Select Active Directory Certificate Services, and click Next.
5. Click Next.
6. Check the Certification Authority Web Enrollment.
7. A window opens with an additional set of role services and features required to support web enrollment. Click Add Required Role Services to add these prerequisites.
8. Click Next.
9. Select Enterprise or Standalone option to create a stand-alone CA, and click Next.
Note
The Enterprise option should be used if the server is part of a domain and there is need to leverage the Directory Services for issuing and managing certificates. The Standalone option is used when Directory Services will not issue and manage certificates.
10. Leave the Root CA option selected, and click Next.
12. Click Next to accept the cryptography options for the CA.
13. Click Next to accept the CA name.
14. Click Next to accept the default validity period of five years.
15. Click Next to accept the default directories.
16. Click Next to accept the default web server role services.
17. Click Install to install the roles.
18. When the installation finishes, click Close to close the wizard.
Note
In order to complete certificate enrollments, the Website hosting the CA must be configured to use HTTPs authentication. This can be achieved on the default website in Internet Information Services by first adding HTTPs as a secure binding and then requiring SSL in the SSL settings.
This certificate server will be used on each of the components for the SQL Server infrastructure.
The next step in protecting the data transmissions with a third-party certificate is to provision the certificate, which entails obtaining and installing a certificate form a third-party vendor or an internal Windows Certificate Authority that was created in the previous steps. The certificate requirements for SQL Server 2008 SSL encryption are as follows?
![]() The certificate must be in the local computer certificate store or the current user certificate store.
The certificate must be in the local computer certificate store or the current user certificate store.
![]() The current system time must be in the certificate valid range of dates.
The current system time must be in the certificate valid range of dates.
![]() The certificate must be meant for server authentication; that is, the Enhanced Key Usage property of the certificate specifies Server Authentication (1.3.6.1.5.5.7.3.1).
The certificate must be meant for server authentication; that is, the Enhanced Key Usage property of the certificate specifies Server Authentication (1.3.6.1.5.5.7.3.1).
![]() The common name (CN) must be the same as the fully qualified domain name (FQDN) of the server computer.
The common name (CN) must be the same as the fully qualified domain name (FQDN) of the server computer.
To provision (install) a certificate on the server from a Windows certificate authority, follow these steps:
1. Launch Microsoft Internet Explorer on the SQL Server system, in this sample Tor-SQL01.
2. Enter the uniform resource locator (URL) for the Certification Authority Web Enrollment, which in this example is https://tor-dc01.companyabc.com/certsrv.
3. Click Request a Certificate to request a new certificate.
4. Click Advanced Certificate Request to request a certificate.
5. Click Create and Submit a Request to This CA.
Note
You might need to add the site to the trusted sites in Internet Explorer to allow ActiveX controls to run.
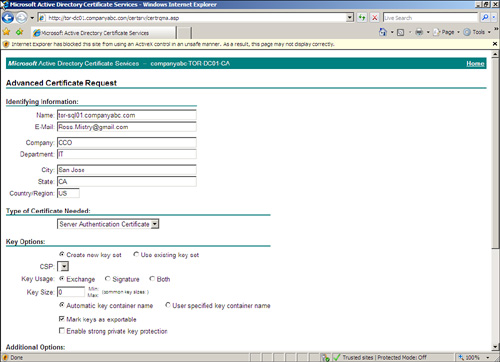
6. Enter the fully qualified domain name of the computer in the Name field, which, in this example, is tor-sql01.companyabc.com.
Note
The name must match the FQDN name of the computer exactly or the certificate will fail later on.
7. Enter email, company, department, city, state, and country.
8. Select Server for the type of certificate needed.
9. Check the Mark Keys as Exportable option.
10. Enter the FQDN for the friendly name, in this example tor-sql01.companyabc.com.
11. The request should look like the example shown in Figure 11.9. Click Submit to complete the request.
12. Click Yes to allow the website to request the certificate.
13. The website will show a Certificate Pending page. The page will have a Request ID number for the certificate request.
14. On the Certificate Authority server, launch the Certification Authority MMC from the Administrative Tools.
15. Expand the Certificate Authority name, and select the Pending Requests folder.
16. Locate the matching Request ID number in the Details pane.
17. Right-click on the request and select All Tasks, Issue.
18. Go back to the Internet Explorer window.
19. Enter the URL for the Certification Authority Web Enrollment, which in this example is http://tor-sql01.companyabc.com/certsrv.
20. Select View the Status of a Pending Certificate Request.
21. Click on the certificate request.
22. Click on Install This Certificate to add the certificate to the local computer store.
23. Click Yes to allow the certificate to be installed.
After a certificate has been obtained and configured on the SQL Server system, you can configure SQL Server 2008 to use it. You do this with the SQL Server Configuration Manager tool.
The steps to configure SQL Server to use the certificate are
1. Launch the SQL Server Configuration Manager.
2. Expand the SQL Server Network Configuration.
3. Right-click Protocols for the SQL Server instance, such as TORSQL01Instance01 and select Properties.
4. Select the Certificate tab.
5. Select the certificate from the drop-down list for the Certificate box.
6. Click OK to save the settings.
7. Click OK to acknowledge that the service needs to be restarted.
8. Restart the SQL Server service to use the certificate.
The SQL Server is now protected against man-in-the-middle attacks with the CA certificate. However, the clients need to be configured to use the server certificate and trust the CA if an internal CA was used.
The certificate is stored in the SQL Server certificate store and needs to be exported so that it can be shared. To export the server certificate, follow these steps:
1. Click Start, Run, and in the Open box, type MMC; and click OK.
2. In the MMC, on the File menu, click Add/Remove Snap-in.
3. In the Add/Remove Snap-in dialog box, click Add.
4. In the Add Standalone Snap-in dialog box, click Certificates and then click Add.
5. In the Certificates Snap-in dialog box, click Computer Account and then click Finish.
6. In the Add Standalone Snap-in dialog box, click Close.
7. In the Add/Remove Snap-in dialog box, click OK.
8. From the Certificates MMC snap-in, locate the certificate in the CertificatesPersonal folder.
9. Right-click the Certificate, select All Tasks, and click Export.
10. Complete the Certificate Export Wizard, saving the certificate file in a convenient location.
The certificate, stored in the file, is now ready to be used by the client. To import the certificate into the client computer store, follow these steps:
1. Copy the exported certificate file to the client computer.
2. In the Certificates snap-in on the client, expand Certificates.
3. Expand the Personal folder.
4. Right-click on Personal, select All Tasks, and click Import.
5. Complete the Certificate Import Wizard.
The certificate is now ready to use. However, if you used a private CA to issue the certificate, you need to add the CA to the trusted CA list. For a Windows CA, use the following steps to do that:
1. On the client, launch Internet Explorer.
2. Enter the address http://TOR-SQL01.companyabc.com/certsrv to access the Certificate Service Web Request site. This assumes that the certificate services were installed on the dc1.companyabc.com server.
3. Click on the Download a CA Certificate link.
4. Click on the Install This CA Certificate Chain link to configure the SQL Server to trust the CA.
6. Click Yes to install the CA certificate.
The Windows Certificate Authority is now trusted by the client.
In some cases, there might not be the need or the option to configure the server to force encryption for all clients. Perhaps only a few connections need to be encrypted, or there is no administrative control over the configuration of SQL Server.
To configure the client to request encrypted connections using the ODBC, follow these steps:
1. Select Start, Control Panel.
2. Double-click on Administrative Tools to open the folder.
3. Double-click on the Data Sources (ODBC) applet.
4. Select the System DSN tab.
5. Click Add to add a new data source.
6. Select either SQL Server or SQL Native Client.
7. Click Finish to launch the configuration of the data source.
8. Enter a name for the data source, in this case Customer Database.
9. Enter the name of the SQL Server, in this case TOR-SQL01Instance01.
10. Click Next.
11. Click Next to leave the default authentication.
12. Check the Change the Default Database box.
13. Select the Customer database from the drop-down list.
14. Click Next.
15. Check the Use Strong Encryption for Data box to encrypt the client/server traffic.
16. Click Finish.
17. Click Test Data Source to verify the settings.
18. Click OK three times to close out the settings.
The connection now forces itself to use strong encryption regardless of the SQL Server setting. This option does require that a certificate issued by a trusted third party be used.
The SQL Server Management Studio is a potential source of exploits itself. Given the level of communications with data, code, and passwords, a hacker can discover a ton of information from the traffic generated by the SQL Server Management Studio tool. This is the case when the tool is loaded on a client computer rather than the server itself.
Fortunately, the communications from the SQL Server Management Studio on a client to SQL Server can easily be encrypted as well. The steps to do this are
1. On the Object Explorer toolbar, click Connect.
2. Select a service, in this case the Database Engine.
3. Select a server, in this case TOR-SQL01.
4. Click on the Options button.
5. Check the Encrypt Connection box.
6. Click Connect to connect.
Now all communications between the SQL Server Management Studio and SQL Server are protected with encryption.
Microsoft added Windows BitLocker Drive Encryption to Windows 2008 mostly as a result of organizations demanding protection not only for their operating systems, but also for the vital data stored on the system volume and data storage volumes housing both the SQL Server Database and Transaction Logs. BitLocker Drive Encryption, commonly referred to as just BitLocker, is a hardware-enhanced, data-protection security feature included in all versions of the Windows 2008 family of operating systems. It is an optional component that you must install if you choose to use it.
BitLocker increases data protection for an operating system by merging two concepts together: encrypting a volume and guaranteeing the integrity of the operating system’s boot components. The first component, drive encryption, safeguards data residing on the system volume and configured data volumes by preventing unauthorized users from compromising Windows system files encrypted with BitLocker. Encryption at the volume level is achieved by leveraging the new features available with BitLocker such as a Trusted Platform Module (TPM), which is discussed in the following section. The second component provides integrity verifications of the early boot components, which essentially refers to components used during the startup process, by validating that the hard disk has not been tampered with or removed from its original server. Equally important, when you use BitLocker, confidential data on a protected server cannot be viewed even if the hard disks are transferred to another operating system. If these two conditions are met, only then will data on a BitLocker volume be decrypted and the system allowed to boot.
If you have worked with previous versions of Windows Server, you will recognize immediately that BitLocker is a great addition to Windows 2008 as it protects all of the data residing on a server’s hard disks because everything written to the disk including the operating system is encrypted. In previous versions of Windows Server, encryption based on integration with TPM hardware was not supported, which meant personal information could be compromised. In addition, with BitLocker now on the map, branch offices concerned over the physical security and theft of their domain controllers stand to benefit the most from leveraging BitLocker because this feature further bolsters security and ensures that confidential data is not disclosed without authorization.
NOTE
Many professionals are posing questions as they wonder about the differences between BitLocker and Encrypting File System (EFS). Both technologies offer tools for encryption; however, BitLocker is intended to protect all personal and system files on a system and after it is enabled, it is transparent as well as automatic. EFS, on the other hand, encrypts individual files based on an administrator’s judgment call.
BitLocker was first introduced with the release of Windows Vista. Since entering the Windows 2008 family of operating systems, Microsoft has improved BitLocker by adding three new features: data volumes; three-factor authentication that includes TPM, USB, and PIN; and Unified Extensible Firmware Interface (UEFI). Furthermore, BitLocker Drive Encryption is designed to offer a seamless user experience.
You will recognize when first attempting to use BitLocker that there are different ways to deploy it. To ensure that your installation receives the highest level of security and protection, you need to remember that the server requires the Trusted Platform Module (TPM) microchip and BIOS based on version 1.2 or higher. Also required is the Static Root of Trust Measurement, which is defined by the Trusted Computing Group (TCG).
TPM is a component that provides enhanced protection of data and ensures boot integrity by validating the computer’s boot manager integrity and boot files at startup. This hardware component confirms that the encrypted drive in a computer actually belongs to that computer.
TPM also runs a check of the hard disk to ensure it has not been subjected to unauthorized viewing while in an offline state by encrypting the entire Windows volume. This includes system and user files as well as swap files and hibernation files. In addition, BitLocker saves measurement details related to core operating system files in TPM, creating a sort of system fingerprint. The fingerprint remains the same unless someone tampers with the boot system.
BitLocker Drive Encryption provides seamless protection at system startup. Because this is transparent to the user, the user logon experience is unchanged. However, if the TPM is changed or missing, or if startup information has changed, BitLocker enters Recovery mode and the user must provide a recovery password to regain access to the data.
Two new major improvements to BitLocker on Windows Server 2008 include data volumes and a new authenticator. Both of these are discussed in the following sections.
BitLocker extends the functionality included in Windows Vista by supporting encryption beyond the functionality of just the boot drive. All data volumes associated with a server can be encrypted by BitLocker, so SQL Server volumes associated with the database and transaction logs can be protected. A data volume is defined as any plug-and-play internal volume that does not contain the operating system files that are currently running. Typically, these could be volumes that store user data, such as Microsoft Office files, music, or other downloads. To enable data volumes on an operating system volume, you must have BitLocker enabled.
Like many other security products in the industry that handle authentication, the IT security community requested Microsoft to include a multifactor form of authentication built into BitLocker. BitLocker on Windows 2008 supports three-factor authentication. For example, it is possible to configure BitLocker to use TPM, USB, and PIN to maximize security authentication.
Configuring BitLocker Drive Encryption is not as simple as clicking through a few screens on a Windows 2008 wizard. A number of prerequisite steps must be fulfilled before BitLocker can be configured and implemented.
Before you implement BitLocker Drive Encryption, make certain the following hardware requirements and prerequisites are met and understood:
![]() The system should have a Trusted Platform Module (TPM) version 1.2 or higher.
The system should have a Trusted Platform Module (TPM) version 1.2 or higher.
![]() If the system does not have TPM, a removable USB memory device can be used to store the encryption key.
If the system does not have TPM, a removable USB memory device can be used to store the encryption key.
![]() There must be a minimum of at least two partitions on the system.
There must be a minimum of at least two partitions on the system.
![]() One partition must be dedicated for the Windows operating system files.
One partition must be dedicated for the Windows operating system files.
![]() There must be an active system partition that is not encrypted. Therefore, the computer can be booted and/or started. The system volume must differ from the operating system volume and should be at least 1.5GB.
There must be an active system partition that is not encrypted. Therefore, the computer can be booted and/or started. The system volume must differ from the operating system volume and should be at least 1.5GB.
![]() All drives and partitions must be formatted with the NTFS file system.
All drives and partitions must be formatted with the NTFS file system.
![]() The system BIOS must support TPM and USB devices during startup.
The system BIOS must support TPM and USB devices during startup.
The following sections cover step-by-step procedures on how to implement BitLocker by first configuring the system partitions, installing the BitLocker feature, and then enabling BitLocker Drive Encryption. The enabling section includes steps for enabling BitLocker when using TPM hardware, when not using TPM hardware, and enabling BitLocker on additional volumes beyond the scope of the volume hosting the operating system. The final step-by-step procedures include how to utilize the BitLocker recovery password in the event of an issue and how to remove BitLocker after it has been installed and configured.
As mentioned earlier, one of the prerequisite tasks when configuring an operating system for BitLocker is configuring a nonencrypted active partition also referred to as a system partition. Complete the following steps to configure this partition on a new server:
1. Insert the Windows Server 2008 media. The Install Windows screen should automatically launch; otherwise, click on Setup.exe.
2. Input the appropriate Language, Time, Currency, and Keyboard preferences, and then click Next.
3. Click Repair Your Computer on the Install Now page.
4. Select Command Prompt on the System Recovery Options page.
5. Click Next on the System Recovery Options page.
6. In the Command Prompt window, type Diskpart to create prerequisite partitions.
7. Type select Disk 0 and press Enter. A message stating that Disk 0 is now the selected disk should appear.
8. Type Clean and then press Enter to erase the current partition table. A confirmation message stating that DiskPart succeeded in cleaning the disk message will be displayed.
9. Create the initial partition to boot the system by typing create partition primary size=1500.
10. Assign a drive letter to the partition by typing the following: assign letter=z. For this example, the letter Z was used to assign the drive letter to the partition. Another letter of your choice can be substituted.
11. Next, type Active to mark the newly created partition as an active partition for the system.
12. The next steps are used to create an additional partition for the Windows 2008 system files. This is accomplished by typing the words create partition primary.
13. Assign the new partition a drive letter such as C by typing the following: assign letter=C.
NOTE
It is possible to view the newly created volumes by typing the words list volume at the command prompt.
14. Now that the partitions have been created, type Exit to leave the DiskPart utility.
15. The final step requires both partitions to be formatted with NTFS. This can be done by typing format X: /y /q /fs:NTFS. Replace the letter X with the drive letters assigned in the previous steps. Repeat this step for both partitions created.
16. Type Exit to close the command prompt.
17. Close the System Recovery Options page by clicking the X icon in the upper-right corner or by pressing Alt+F4.
18. Now that the partitions have been created and formatted, click Install Now to proceed with the remainder of the Windows 2008 installation. Ensure that you install Windows on the larger partition, which was created in steps 12 and 13.
Now that the system partition has been configured, there are different ways to install BitLocker. Install it during the initial configuration through Server Manager or through a command prompt. The following sections illustrate how to execute both of these installations.
To install the BitLocker server role using Server Manager, follow these steps:
1. Click Start, Administrative Tools, and Server Manager. The Server Manager tools appear.
2. Right-click on features in the left pane of Server Manager, and then select Add Features.
3. On the Select Features page, install BitLocker by selecting BitLocker Drive Encryption in the Features section, as shown in Figure 11.10, and then click Next.
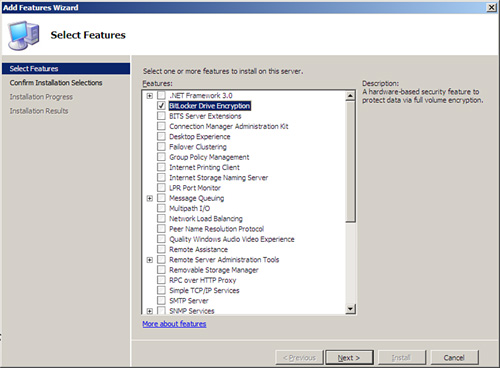
4. On the Confirm Installation Selections page, review the roles, services, and features selected for installation, and then click Install to initiate the installation process.
5. Ensure the installation succeeded by reviewing the messages on the Installation Results page, and then click Close.
Another alternative to installing BitLocker is via the command prompt. This methodology should be reserved for branch office implementations using Windows 2008 Server Core installation because a graphical interface to manage the server does not exist. To install the BitLocker feature using the command prompt, follow these steps:
By default, BitLocker is configured to use a Trusted Platform Module. To recap, however, BitLocker’s full functionality will not be witnessed unless the system being used is compatible with the TPM microchip and BIOS.
Now that the system partition and BitLocker are installed, it is time to look at ways to enable BitLocker. The next section looks at how to enable BitLocker Drive Encryption with TPM hardware. Microsoft recognizes that many laptops and computers do not have TPM chips (or are not “TPM enabled”). If you are in this situation, don’t despair because you can use BitLocker without a compatible TPM chip and BIOS. As such, this section also covers information on how to enable BitLocker without TPM hardware.
1. Click Start, Control Panel, and double-click BitLocker Drive Encryption.
2. Enable BitLocker Drive Encryption for the operating system volume by clicking Turn On BitLocker on the BitLocker Drive Encryption page. This will display the page shown in Figure 11.11.

NOTE
The Initialize TPM Security Hardware screen will be displayed if the TPM is not initialized. Launch the wizard to initialize the hardware and then restart your computer. In addition, if the drive configuration is not suitable for BitLocker, repartition the hard disk based on the prerequisite tasks and then start over from step 1.
3. Review the message on the BitLocker Drive Encryption Platform Check page, and then click Continue with BitLocker Drive Encryption to start the BitLocker process.
4. Because TPM hardware is present on this system, select the option Use BitLocker Without Additional Keys, and then click Next. This option can be found on the Set BitLocker Startup Preferences page, as displayed in Figure 11.12. Additional keys such as a PIN or USB are not required as BitLocker stores both encryption and decryption keys within the TPM chip.
5. The Save the Recovery Password page is invoked. The administrator has the ability to save the BitLocker recovery password on a USB drive or to a folder on the system. In addition, the third option allows for printing of the password. Choose the desired storage alternative for saving the recovery password, and then click Next to continue.
6. On the Encrypt the Volume page, ensure that the Run BitLocker System Check option is enabled, and then click Continue. The system check guarantees that BitLocker can access and read the recovery and encryption keys before encrypting the volume.
7. The Encryption in Progress status bar is displayed. Restart the system when the encryption process is finalized.
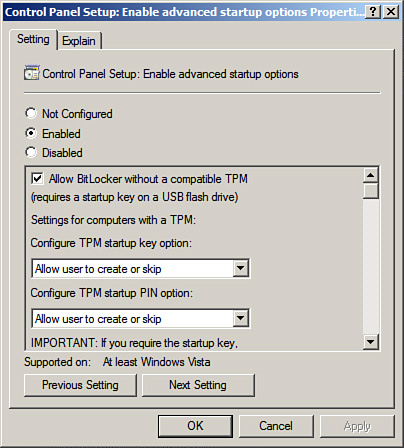
If TPM hardware is not available on the system, BitLocker must be configured to leverage a USB key at startup. The following example configures a local group policy for the group policy object titled “Enabling Advanced Startup Options: Control Panel Setup.”
1. Click Start, Run, and then type gpedit.msc. Click OK and the Local Group Policy Object Editor is invoked.
2. In the Local Group Policy Object Editor, expand Local Computer Policy, Computer Configuration, Administrative Templates, Windows Components, and then select BitLocker Drive Encryption.
3. In the right pane, double-click Control Panel Setup: Enable Advanced Startup Options.
4. Enable the BitLocker group policy settings by selecting the Enabled option, and then click OK, as displayed in Figure 11.13.
5. Apply the new group policy settings by typing gpupdate.exe /force at the command prompt.
BitLocker Drive Encryption utilizing a USB device can now be configured by completing the following steps:
1. Click Start, Control Panel, and double-click BitLocker Drive Encryption.
2. Enable BitLocker Drive Encryption by clicking Turn On BitLocker on the BitLocker Drive Encryption page.
3. Review the message on the BitLocker Drive Encryption Platform Check page, and then click Continue with BitLocker Drive Encryption to start the BitLocker process.
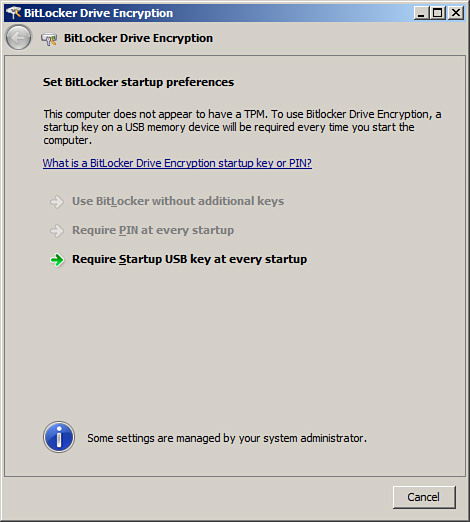
4. Because a TPM does not exist in this example, select the option Require Startup USB Key at Every Startup, and then click Next. This option can be found on the Set BitLocker Startup Preferences page.
5. Ensure that a USB memory device has been inserted into the system. Then on the Save Your Startup Key page, specify the removable drive to which the startup key will be saved, and then click Save.
6. The Save the Recovery Password page is then invoked. The administrator has the ability to save the BitLocker recovery password on a USB drive or to a folder on the system. In addition, the third option allows for printing of the password. Choose the desired storage alternative for saving the recovery password, and then click Next to continue.
NOTE
It is a best practice to make additional copies of the recovery password and store them in a secure location like a vault. For maximum security, the recovery password should not be stored on the local system nor should the password be printed on paper. In addition, do not store the recovery password and the startup key on the same media.
7. On the Encrypt the Volume page, ensure that the Run BitLocker System Check option is enabled, and then click Continue. The system check guarantees BitLocker can access and read the recovery and encryption keys before encrypting the volume.
Note
Do not bypass the option to run a system check before encrypting the volume. Data loss can occur if there is an error reading the encryption or recovery key.
8. Insert the USB memory device containing the startup key into the system, and then click Restart Now. The Encryption in Progress status bar is displayed showing the completion status of the disk volume encryption.
There might be situations when BitLocker Drive Encryption is warranted not only on the volume containing the operating system files, but also on the data volumes. This is especially common with domain controllers in branch offices where a lack of physical security and theft is a concern.
When encrypting data volumes with BitLocker, the keys generated for the operating system volume are independent of the drive volume. However, encryption of a data volume is similar to the encryption process of the operating system volume.
Follow these steps to enable BitLocker Drive Encryption for server data volumes:
1. Click Start, Run, and then type Cmd. Click OK to launch a command prompt.
2. From within the command prompt, type manage-bde -on <volume>: -rp -rk <removable drive>:.
NOTE
Replace the <volume> argument with the desired volume drive letter that you want to encrypt. In addition, replace the <removable drive> argument with the drive letter of a USB device. The USB device is utilized to store the recovery key.
The data volume must be unlocked each time the server is rebooted. This can be accomplished through a manual or automatic process. The syntax to manually unlock a data volume after every restart consists of the following two options:
manage-bde -unlock <volume>: -rp <recovery password>
manage-bde -unlock <volume>: -rk U:<recovery-key-file name>
The first option uses the recovery password, whereas the second options takes advantage of passing the recovery key to decrypt the data volume. As mentioned in the previous paragraph, it is possible to enable automatic unlocking of a data volume by utilizing the following syntax at the command prompt:
manage-bde -autounlock -enable <volume>:
This command creates a recovery key and stores it on the operating system volume. The data volume is automatically unlocked after each system reboot.
NOTE
After the Windows Server 2008 operating system has been successfully installed, the next step is to install SQL Server 2008. For more information on installing SQL Server 2008, see Chapter 1, “Installing or Upgrading to the SQL Server 2008 Database Engine.”
There might be situations when you need to leverage the recovery password to gain access to a volume that is encrypted with BitLocker. This situation might occur when there is an error related to the TPM hardware, one of the boot files becomes corrupt or modified, or TPM is unintentionally cleared or disabled. The following instructions outline the recovery steps:
1. Restart the system and the BitLocker Drive Encryption console will come into view.
2. Insert the USB device containing the recovery password, and then press Esc. If the USB device is not available, bypass step 2 and proceed to step 3.
3. Press Enter. You will be prompted to enter the recovery password manually.
4. Type the recovery password, press Enter, and then restart the system.
The course of action for turning off BitLocker Drive Encryption is the same for both TPM-based hardware configurations and USB devices. When you’re turning off BitLocker, two options exist. You can either remove BitLocker entirely and decrypt a volume or you can temporarily disable BitLocker so that changes can still be made. The following steps depict the process for removing and disabling BitLocker:
1. Click Start, Control Panel, and double-click BitLocker Drive Encryption.
2. Turn off BitLocker Drive Encryption by clicking Turn Off BitLocker on the BitLocker Drive Encryption page.
3. The What Level of Decryption Do You Want dialog box will be invoked. Choose either Disable BitLocker Drive Encryption or Decrypt the Volume.
Confidential data is at risk if not protected by the appropriate measures. Access controls are not enough to secure confidential data, and an in-depth defense strategy is needed. A critical layer in this strategy is encryption.
Encryption is an effective method of protecting Microsoft SQL Server 2008 data, both while stored in the database and while on the wire. Encrypting data is an easy and straightforward process in SQL Server 2008, especially when you use Transparent Data Encryption.
The sections in this chapter illustrate how to encrypt data while in the database and how to encrypt data during transmission. Given the ease with which data can be compromised by a determined hacker, it is important to protect the data with encryption using the methods outlined in this chapter.
Some important best practices from the chapter include
![]() Encrypt client/server data transmissions.
Encrypt client/server data transmissions.
![]() Use a third-party certificate to prevent man-in-the-middle attacks.
Use a third-party certificate to prevent man-in-the-middle attacks.
![]() Encrypt confidential data in the database to protect the data on disk and in backups.
Encrypt confidential data in the database to protect the data on disk and in backups.
![]() Encrypt entire databases by using Transparent Data Encryption for easy protection of data files and backups.
Encrypt entire databases by using Transparent Data Encryption for easy protection of data files and backups.
![]() Use an authenticator when encrypting data to protect against inference hacking.
Use an authenticator when encrypting data to protect against inference hacking.
![]() Force the clients to use strong encryption when SQL Server cannot be configured to always require encryption.
Force the clients to use strong encryption when SQL Server cannot be configured to always require encryption.
![]() Use self-signed certificates rather than nothing at all to secure data.
Use self-signed certificates rather than nothing at all to secure data.
![]() Configure SQL Server Management Studio to use encryption when connecting to servers over the network.
Configure SQL Server Management Studio to use encryption when connecting to servers over the network.
![]() Leverage BitLocker in order to protect the operating system and data volumes associated with a SQL Server system.
Leverage BitLocker in order to protect the operating system and data volumes associated with a SQL Server system.