
Chapter 10 Administering Policy Based Management
Policy Based Management, formerly known as Declarative Management Framework in the Community Technology Previews (CTPs), is one of the most sought-after new management features in SQL Server 2008. Policy Based Management gives an organization the potential to create policies to manage one or more SQL Server instances, databases, or objects within the enterprise. In addition, policies can be evaluated against target systems to ensure that the standard configuration settings are not out of compliance. Policy Based Management was developed in response to the following industry trends:
![]() Increasing amounts of data being stored
Increasing amounts of data being stored
![]() Data center consolidation and virtualization
Data center consolidation and virtualization
![]() Growing product capabilities
Growing product capabilities
![]() Proliferation of SQL Server systems within the enterprise
Proliferation of SQL Server systems within the enterprise
![]() Need for a way to manage SQL Server settings from a holistic perspective
Need for a way to manage SQL Server settings from a holistic perspective
![]() Regulatory compliance demanding secure and standardized settings
Regulatory compliance demanding secure and standardized settings
Policy Based Management is a new feature in SQL Server 2008. Essentially DBAs are being required to do more, frequently with less. There has been a data explosion over the past several years. In a 2006 study IDC (International Data Corporation—http://www.idc.com) reported that 5 exabytes of digital media (5 billion gigabytes) were stored in 2003, and in 2006 this had ballooned to 161 exabytes. Not only is more data being stored, but users are accessing more data than before.
Business Intelligence delivering actionable insights is becoming more critical in the enterprise, and these insights require large data volumes for trending and forecasting. Data warehouses are becoming more critical in every enterprise.
Frequently this data explosion means a proliferation of SQL Servers, and distributed data is now often consolidated from distributed servers to data centers.
SQL Servers are increasingly being consolidated in data centers. Rising power and cooling costs, the increasing per-square-foot cost of data centers, and physical space shortages are forcing IT management to move to SQL Server consolidation and even virtualization. Complexities of the SQL Server product set are forcing DBAs to focus on efficient, scalable management and standardization. Due to the large numbers of SQL Servers involved, management by automation becomes critical as well to lessen the administrative burden. Monitoring also becomes more important to provide proactive support.
A well-managed SQL Server enterprise that follows best practices offers the following advantages:
![]() Standardization— Every SQL Server will have a common disk layout and settings. As a result, DBAs moving from one SQL Server to another will not be surprised by different disk layouts or unusual settings that could account for a performance problem.
Standardization— Every SQL Server will have a common disk layout and settings. As a result, DBAs moving from one SQL Server to another will not be surprised by different disk layouts or unusual settings that could account for a performance problem.
![]() Best practices— Microsoft internal studies have shown that 80 percent of the support calls to their Customer Service and Support (CSS) could have been avoided if the customer had been following best practices. Best practices not only offer performance advantages but also lead to fewer failure events caused by poorly configured SQL Servers, and security breaches due to SQL Servers that have not been hardened (security holes not locked down).
Best practices— Microsoft internal studies have shown that 80 percent of the support calls to their Customer Service and Support (CSS) could have been avoided if the customer had been following best practices. Best practices not only offer performance advantages but also lead to fewer failure events caused by poorly configured SQL Servers, and security breaches due to SQL Servers that have not been hardened (security holes not locked down).
![]() Ease of deployment— A well-managed data center will have automated procedures for building SQL Servers (that is, unattended installations using the
Ease of deployment— A well-managed data center will have automated procedures for building SQL Servers (that is, unattended installations using the template.ini file) that require less time to build and minimal administrative interaction, resulting in fewer mistakes in a build and a reduction in administrative tasks.
![]() Regulatory compliance— By maintaining controlled and standardized settings, organizations can easily adhere to the demanding requirements of regulations such as Sarbanes-Oxley, HIPPA, and PCI.
Regulatory compliance— By maintaining controlled and standardized settings, organizations can easily adhere to the demanding requirements of regulations such as Sarbanes-Oxley, HIPPA, and PCI.
The intent of Policy Based Management is to provide a management framework that allows DBAs to automate management in their enterprise according to their own set of predefined standards. By implementing Policy Based Management within a SQL Server infrastructure, organizations will reap the following benefits: Total cost of ownership associated with managing SQL Server systems will be reduced, configuration changes to the SQL Server system can be monitored, unwanted system configuration changes can be prevented, and policies will ensure compliance.
The stated goals of Policy Based Management fall into three categories:
![]() Management by intent— Allows DBAs to enforce standards and best practices from the start rather in response to a performance problem or failure event
Management by intent— Allows DBAs to enforce standards and best practices from the start rather in response to a performance problem or failure event
![]() Intelligent monitoring— Allows DBAs to detect changes that have been made to their SQL Server environments that deviate from the desired configuration
Intelligent monitoring— Allows DBAs to detect changes that have been made to their SQL Server environments that deviate from the desired configuration
![]() Virtualized management— Provides a scalable framework that allows for establishment management across the enterprise
Virtualized management— Provides a scalable framework that allows for establishment management across the enterprise
Microsoft SQL Server 2008 also ships with several policies that are not imported into a default installation of SQL Server 2008. These can be found in C:Program FilesMicrosoft SQL Server100ToolsPoliciesDatabaseEngine1033. Note that there are also policies for Reporting Services and Analysis Services, which can be found in the ReportingServices and AnalysisServices subdirectories of the Policies directory. Also note that Policy Based Management can also be used to manage SQL 2005 and 2000 servers.
Note
Microsoft has a blog focusing on Policy Based Management (http://blogs.msdn.com/sqlpbm/) where they will be publishing scripts that can be used to enforce Microsoft best practices for SQL Server.
Before we start learning about enforcing Policy Based Management, there are a few key concepts DBAs must understand. These concepts include
|
|
|
|
|
|
|
|
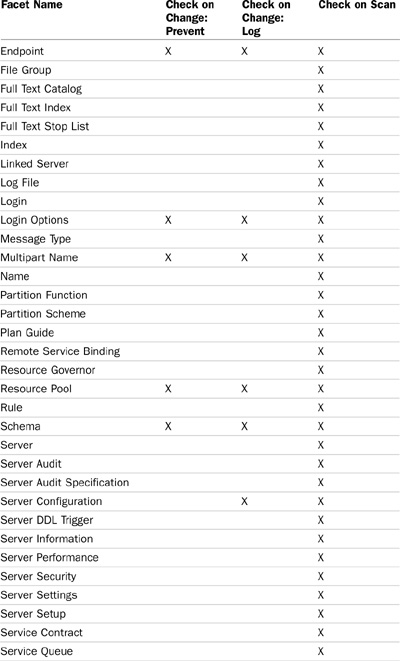
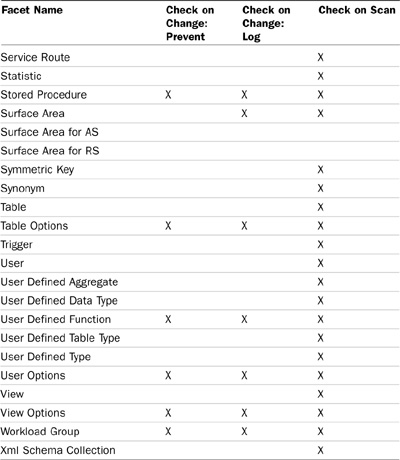
A facet is a logical grouping of predefined SQL Server 2008 configuration settings. When a facet is coupled with a condition, a policy is formed and can be applied to one or more SQL Server instances and systems. Common facets include: Surface Area Configuration, Server Audit, Database File, and Databases. Table 10.1 illustrates the complete list of predefined facets that can be selected. Facets are included with SQL Server 2008 and cannot be modified.
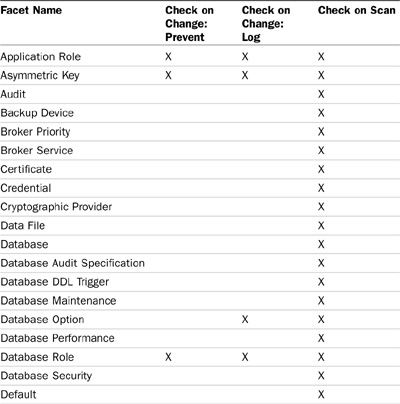
The complete list of facets can be viewed in SQL Server 2008 Management Studio by expanding the Management folder, the Policy Based Management node, and then the Facets folder. Alternatively, to view facets applied to a specific database, right-click the database and select Facets.
A condition is a Boolean expression that dictates an outcome or desired state of a specific management condition, also known as a facet. Condition settings are based on properties, comparative operators, and values such as String, equal, not equal, LIKE, NOT LIKE, IN, or NOT IN. For example, a check condition could verify that data and log files reside on separate drives, that the state of the database recovery model is set to Full Recovery, that database file sizes are not larger than a predefined value, and that database mail is disabled.
A policy is a standard for a single setting of an object. It ultimately acts as a verification mechanism of one or more conditions of the required state of SQL Server targets. Typical scenarios for creating policies include: imposing Surface Area Configuration settings, enforcing naming conventions on database objects, enforcing database and transaction log placement, and controlling recovery models. As mentioned earlier, a tremendous number of policies can be created against SQL Server 2008 systems. Surface Area Configurations are a very common policy, especially since the SQL Server 2005 Surface Area Configuration tool has been deprecated in SQL Server 2008.
Microsoft recognized that although you may want to implement a set of rigid standards for your internal SQL Server development or deployments, your enterprise may have to host third-party software that does not follow your standards. Although your internally developed user databases will subscribe to your own policies, the third-party user applications will subscribe to their own categories. To provide flexibility you can select which policies you want a table, database, or server to subscribe to and group them into groups called categories, and then have a database subscribe to a category and unsubscribe from a group of other policies.
A target is one or more SQL Server instances, databases, or database objects that you want to apply your categories or policies to. Targets can only be SQL Server 2008, 2005, or 2000 systems. Due to the changes with the Database Engine in 2008, Policy Based Management does not support full functionality with SQL Server 2005 or earlier systems. If necessary, it is still possible to create system configuration policies with the Security Configuration Wizard, which is included with Windows Server 2008.
Note
The use of the Security Configuration Wizard is covered in Chapter 8, “Hardening a SQL Server Implementation.”
When implementing policies, there are three types of execution modes. The On Change mode has two variations:
![]() On demand— The On Demand policy ensures that a target or targets are in compliance. This task is invoked manually by right-clicking on the policy in the Management folder, Policy Management folder, Policy folder, and selecting Evaluate. The policy will not be enforced, and will only be verified against all targets that have been subscribed to that policy. You can evaluate a policy also by right clicking on the database and selecting Policies and Evaluate.
On demand— The On Demand policy ensures that a target or targets are in compliance. This task is invoked manually by right-clicking on the policy in the Management folder, Policy Management folder, Policy folder, and selecting Evaluate. The policy will not be enforced, and will only be verified against all targets that have been subscribed to that policy. You can evaluate a policy also by right clicking on the database and selecting Policies and Evaluate.
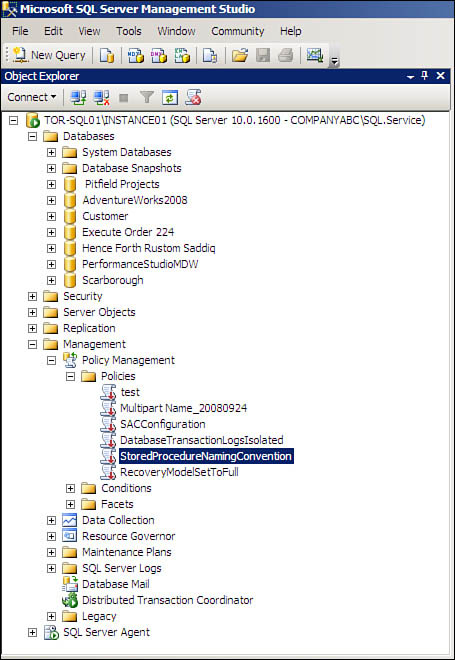
![]() On schedule— Policies can be evaluated on a schedule. For example, a policy can be scheduled to check all SQL Server 2008 systems once a day. If any anomalies arise, these out-of-compliance policies will be logged to a file. This file should be reviewed on a periodic basis. In addition, whenever a policy fails, the complete tree in SQL Server Management Studio would display a red downward pointing arrow next to the policy as illustrated in Figure 10.1.
On schedule— Policies can be evaluated on a schedule. For example, a policy can be scheduled to check all SQL Server 2008 systems once a day. If any anomalies arise, these out-of-compliance policies will be logged to a file. This file should be reviewed on a periodic basis. In addition, whenever a policy fails, the complete tree in SQL Server Management Studio would display a red downward pointing arrow next to the policy as illustrated in Figure 10.1.
![]() On Change Prevent— The On Change Prevent execution mode prevents changes to server, server object, database, or database objects which would make them out of compliance. For example, if you select a policy that restricts table names that to begin with the prefix
On Change Prevent— The On Change Prevent execution mode prevents changes to server, server object, database, or database objects which would make them out of compliance. For example, if you select a policy that restricts table names that to begin with the prefix tbl, and you attempt to create a table called MyTable, you will get the following error message, and your table will not be created.
Policy 'table name' has been violated by
'/Server/(local)/Database/iFTS/Table/dbo.mytable'.
This transaction will be rolled back.
Policy description: ''
Additional help: '' : ''.
Msg 3609, Level 16, State 1, Procedure sp_syspolicy_
dispatch_event, Line 50
The transaction ended in the trigger.
The batch has been aborted.
![]() On Change Log Only— If you select On Change Log Only, a policy condition that is evaluated as failed will be logged in the SQL Server Error log. The change does not prevent out-of-compliance changes.
On Change Log Only— If you select On Change Log Only, a policy condition that is evaluated as failed will be logged in the SQL Server Error log. The change does not prevent out-of-compliance changes.
In large enterprises, organizations will most likely have more than one SQL Server system they want to effectively manage from a Policy Based Management perspective. Therefore, if DBAs want to implement policies to multiple servers, they have two options. The first option includes exporting the policy and then importing it into different SQL Server systems. After the policy is imported, it must be configured to be evaluated on demand, on schedule, or on change.
The second option includes creating one or more Central Management Servers. Central Management Servers are a new philosophy with SQL Server 2008. Basically, by registering one or more SQL Servers with a Central Management Server, a DBA can deploy multi-server policies and administration from a central system.
For example, you could create two Central Management Servers, one called OLAP and another called OLTP, and then register servers into each Central Management Server, import the different policies into each Central Management Server, and then evaluate the polices on each different Central Management Server. So, on your OLTP Central Management Server, the servers OLTP1, OLTP2, OLTP3, which are registered in the OLTP Central Management Server, would have the OLTP policies evaluated on them.
Follow these procedures to register a Central Management Server.
1. In SQL Server Management Studio, click Registered Servers from the View menu.
2. In Registered Servers, expand the Database Engine, right-click Central Management Servers, and then select Register Central Management Server.
3. In the New Server Registration dialog box, specify the name of the desired Central Management Server.
4. If needed, specify additional connection properties on the Connection Properties tab or click Save.
The next step registers SQL Server instances to be associated with a Central Management Server. The following procedures outline these tasks:
1. Right click on the Central Management Server you wish to associate your SQL Server instance with.
2. Select New Server Registration.
3. In the New Server Registration dialog box, specify the name of the desired Central Management Server.
4. Repeat step 4 for all SQL Server instances that you want to register with this Central Management Server.
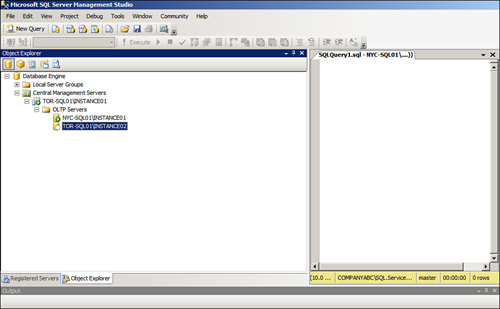
Figure 10.2 illustrates a Central Management Server with one Server Group and two SQL Server instances registered.
After the Central Management Server has been established, the Server Group has been created, and the desired SQL Server instances registered, it is time to import and evaluate policies. Importing policies for multiple instances can be done by right-clicking the Central Management Server or Server Group and selecting Import Policies. After the policies have been imported, the next step is to evaluate the policies by right-clicking the Central Management Server or Server Group and selecting Evaluate. The output will indicate the status of policies associated with all the SQL Server instances associated with the Central Management Server or Server Group.
Now that you understand the basic purpose and concepts behind Policy Based Management, let’s look at how to administer Policy Based Management, then how to apply it to a server, and then a group of servers.
There are essentially five steps to implementing and administering Policy Based Management:
![]() Creating a condition based on a facet
Creating a condition based on a facet
![]() Creating a policy based on that condition
Creating a policy based on that condition
![]() Creating a category
Creating a category
![]() Creating a Central Management Server
Creating a Central Management Server
![]() Subscribing to a category
Subscribing to a category
![]() Exporting or importing a policy
Exporting or importing a policy
Let’s look at each of these in turn. The upcoming sections explain each step in its entirety.
When creating conditions, the general principle includes three elements: selecting a property, an operator, and then a value. Follow the steps to create a condition based on a facet. This example will enforce a naming standard on a table.
1. To create a condition, connect to a SQL Server 2008 instance on which you want to create a policy.
2. Launch SQL Server Management Studio. In Object Explorer, expand the Management folder, expand the Policy Management Folder, and then expand the Facets folder.
3. Within the Facets folder, browse to the desired facet on which you want to create the policy.
4. To invoke the Create New Condition window, right-click the facet, such as Table, and select New Condition.
5. In the Create New Condition dialog box, type a name for the condition and ensure that the facet selected is correct.
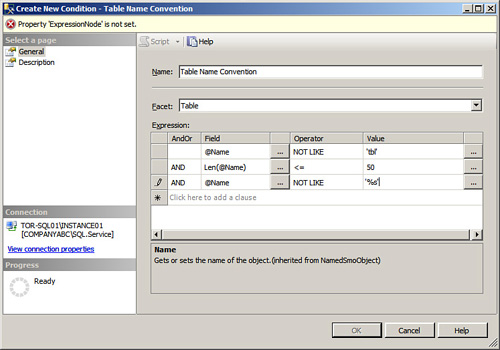
6. In the Expression section, perform the following tasks:
a. Select the property on which you want to create your condition. For this example, the Name property will be used.
b. In the Operator drop-down box, select the NOT LIKE operator
c. In the value text box enter 'tbl%'.
6. Repeat step 6 for any additional expressions. For this example the following expressions were entered, as displayed in Figure 10.3.

Note
You can create conditions that query Windows Management Instrumentation (WMI) (using the ExecuteWSQL function) or SQL Server (using the (ExecuteSQL function). For example you can do this to check on available disk space, or number of processors on the server. WMI allows you to issue SQL like queries against Management Objects which can return information on the physical machine hosting SQL Server; configuration and performance information which is not accessible from within SQL Server itself.
7. Click OK to finalize the creation of the condition. You may have to click on the Field text box again for the OK button to be enabled.
After the condition or conditions have been created, it is necessary to create the policy. The policy is a standard that can be enforced on one or more SQL Server instances, systems, server objects, databases, or database objects. This procedure includes the step-by-step instructions for creating a policy with SQL Server Management Studio.
1. In Object Explorer, expand the Management folder, expand the Policy Management Folder, and then click on Policies.
2. Right-click on the Policies folder and select New Policy.
3. On the General tab in the Create New Policy dialog box, enter a name for the new policy, such as Stored Proc Naming.
4. In the Check Condition drop-down box, select a condition, such as the one created in the previous example, or select New to generate a new condition from scratch.
5. The Against Targets section indicates which objects the policy should be evaluated against. For example, you could create a new condition that applies to a specific database, all databases, a specific table, all tables, or to databases created after a specific date. In the Action Targets section, indicate which targets this condition should apply to.
6. Specify the Evaluation Mode by selecting one of the options in the drop-down menu. The options include On Demand, On Schedule, On Change Log Only, and On Change Prevent.
Note
If On Schedule is selected, specify a schedule from the predefined list or enter a new schedule.
7. The final drop-down box is Server Restrictions. You can restrict which servers you do not want the policy to be evaluated against or enforced on by creating a server condition. Create a server restriction or leave the default setting None. The policy settings are displayed in Figure 10.4.

8. Before you close the Create New Policy dialog, ensure that the policy is Enabled, and then click on the Description page. The description page allows you to categorize your policy, but it also allows you to display a custom text message when a policy is violated and a hyperlink where the DBA/developer can go for more information about the policy.
9. Click OK to finalize the creation of the new policy.
As you can imagine, for complex policies you may need to create many conditions. In some cases it may be easier to create a table, database, or server that is configured to conform to the policy you want to create, and then right-click on the specific object, select Facets, and then click the New Policy from Facets button.
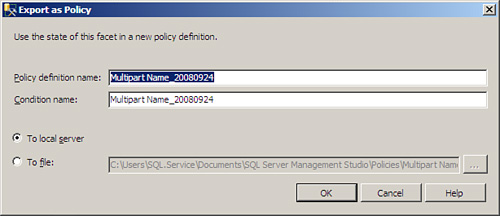
This will export a policy and a single condition to which the existing object will conform. Figure 10.5 illustrates the dialog that prompts you for a name for your policy and dialog as well as where you want to store the policy. You can store it in the file system and then import it to a Central Management Server or other servers where you want the policy to be evaluated, or you can import it directly to a server. Note that this policy will contain conditions specific to the object you use as a template; for example, if you use the AdventureWorks database, the policy will test for the condition where the database name is equal to AdventureWorks. For this to be useful, you will likely need to edit the conditions to ensure that they are generic and will evaluate exceptions correctly.
After you have created a policy, it should be categorized. Categorization allows you to group policies into administrative or logical units, and then allow database objects to subscribe to specific categories. It is worth mentioning that server objects can’t subscribe to policies.
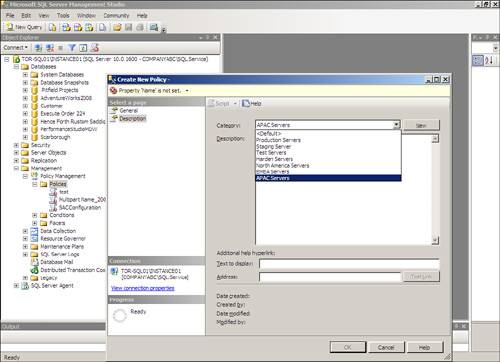
To create a category, click on the Description page in the Create New Policy Dialog box. Policies can be placed in the default category, or a specific category, or you can create a new category. Specifying a category is illustrated in Figure 10.6.
You can also create categories by right clicking on Policy Management and selecting Manage Categories.
If you choose to create a new category, click on the New button. This will present a dialog that allows you to name the category. By default this policy will be parked in the new category.
You can also select which category you want policies to belong to by selecting a specific category in the drop-down box. After you have categorized your policies, you can select which categories you want your database to subscribe to. Right-click on the Policy Management folder and select Manage Categories. The Manage Policy Categories dialog box (illustrated in Figure 10.7) will appear. Check the categories to which you want all databases on your server to subscribe, and deselect the ones that you do not want your server database to be subscribed to by default.
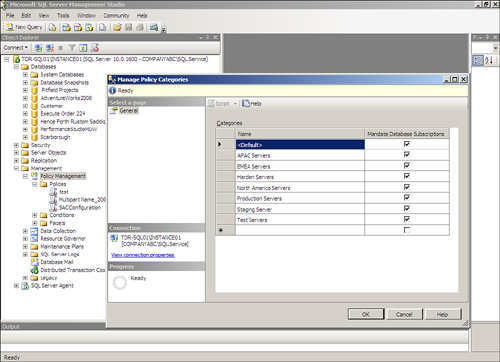
Other than the default category, DBAs can select which category (and policies belonging to that category) they want their databases to subscribe to. For example, if you have third-party software that does not follow your naming standards, you should ensure that the policies that enforce your naming standards are not in the default category. Then selectively have each of your user databases on your server subscribe to these database.
After you have created an organization’s policies and categories, you will want to evaluate them to determine which of your servers and databases are out of compliance. There are three management points that can be leveraged in order to evaluate policies.
![]() For the first alternative, right-click on a server, server object, database, or database object in SQL Server Management Studio 2008, and select Policies and then Evaluate.
For the first alternative, right-click on a server, server object, database, or database object in SQL Server Management Studio 2008, and select Policies and then Evaluate.
![]() For the second alternative, expand the Management Folder, expand Policy Management, right-click on Policies, and select Evaluate. It is also possible to select an individual policy, in the Policy folder, right-click on it, and select Evaluate.
For the second alternative, expand the Management Folder, expand Policy Management, right-click on Policies, and select Evaluate. It is also possible to select an individual policy, in the Policy folder, right-click on it, and select Evaluate.
![]() Finally, the preferred way to evaluate all of your servers, or a group of your servers, is to connect to a SQL Server in SQL Server Management Studio 2008 and select View Registered Servers, and then select a Central Management Server If you select a Central Management Server, the policies you select to evaluate will be evaluated on all SQL Servers defined on that Central Management Server, for example, all member servers in all Server Groups. If you select a Server Group, all member servers in that Server Group will be evaluated. To evaluate the policies, you will need to right-click on the Central Management Server, or Server Group, or even Member Server and select Evaluate Policies.
Finally, the preferred way to evaluate all of your servers, or a group of your servers, is to connect to a SQL Server in SQL Server Management Studio 2008 and select View Registered Servers, and then select a Central Management Server If you select a Central Management Server, the policies you select to evaluate will be evaluated on all SQL Servers defined on that Central Management Server, for example, all member servers in all Server Groups. If you select a Server Group, all member servers in that Server Group will be evaluated. To evaluate the policies, you will need to right-click on the Central Management Server, or Server Group, or even Member Server and select Evaluate Policies.
When you right click on the Central Management Server or Server Group, and select Evaluate Polices you will be presented with a dialog which prompts you for a Source, with a Choose Source prompt. For select source enter the server name into which you have imported your policies, or browse to a file share. Then highlight all the policies you want to import and click on the close button to close the dialog.
After the policies are imported, you can select the individual policies you want to run and click Evaluate. The policies will be evaluated on the member servers and the results will be displayed in the Evaluation Results pane, as illustrated in Figure 10.8.
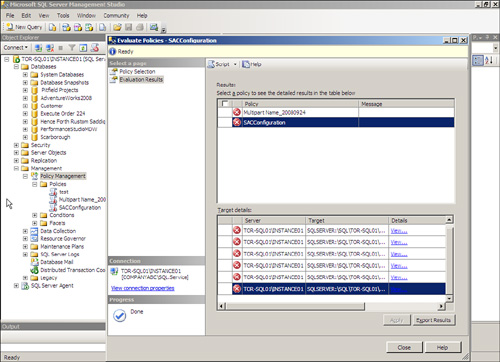
The Evaluation Results pane will display servers where a policy has failed. You will notice that in the target details there is a View hyperlink, which will allow you to browse to get more details on why the individual target server failed compliance to the policy you evaluated.
There may be situations when a DBA wants to export one or many policies with their conditions from one or many SQL Server systems and import them to another SQL Server instance or system. Fortunately, this can be easily done with an export and import wizard as the policies fully integrate with XML files.
Follow these steps to export a policy with SQL Server Management Studio:
1. In Object Explorer, expand the Management folder, expand the Policy Management Folder, and then click on Policies.
2. Right-click a desired policy to export and then click Export Policy.
3. In the Export Policy dialog box, specify a name and path for the policy and click Save.
Importing a policy from an XML file is just as simple. Follow these steps to import a policy with SQL Server Management Studio:
1. In Object Explorer, expand the Management folder, expand the Policy Management Folder, and then select Policies.
2. Right-click on the Policy Folder and click Import.
3. The import screen has three options to be aware of:
a. First, provide the path to the file to import.
b. Second, enable the option to Replace Duplicate Items When Imported.
c. Finally, in the Policy State drop-down box, specify the state of the policy being imported. The options include Preserve Policy State on Import, Enable All Policies on Import, and Disable All Policies on Import.
The following sections illustrate the sample policy templates included with SQL Server 2008 and real world examples for using Policy Based Management.
SQL Server 2008 includes a plethora of predefined sample policies, which can be leveraged by importing them into a SQL Server 2008 system. The policies available for import are located in the default installation drive at C:Program FilesMicrosoft SQL Server100ToolsPolicies. As mentioned earlier, import the desired policies by right-clicking the Policies node and selecting Import. The sample templates are categorized by SQL Server feature such as Database Engine, Reporting Services, and Analysis Services.
Recovery models determine how SQL Server uses the transaction log. On OLTP systems, the most appropriate recovery model is generally the Full Recovery model. For OLAP systems the most appropriate recovery model is generally the simple recovery model. For most development environments the most appropriate recovery model is also the simple recovery model.
For mission critical databases, or databases where point in time recovery is important, having a transaction logged backed up every five minutes may be required. Policy Based Management can be used to determine if the appropriate recovery model is in place for each user database for each server type. Central Management Servers could be created for each server type and a policy can be created to ensure that the appropriate recovery model is in place.
SQL Server 2005 shipped with the SQL Server Surface Area Configuration tool (SAC). This tool allowed you to enable or disable various components and services on individual SQL 2005 Servers. This feature was deprecated in SQL Server 2008, as the Microsoft team felt that the better way to handle these configuration tasks was through Policy Based Management.
If you want to implement the Surface Area Configuration feature in SQL Server 2008 to configure components and services, import the following policies:
![]()
Surface Area Configuration for Database Engine 2005 and 2000 Features.xml
![]()
Surface Area Configuration for Database Engine 2008 Features.xml
![]()
Surface Area Configuration for Service Broker Endpoints.xml
![]()
Surface Area Configuration for SOAP Endpoints.xml
One of the SQL Server Support Engineers has blogged on how to do server health checks using PBM. You can access his blog using this URL. http://blogs.msdn.com/bartd/archive/2008/09/11/defining-complex-server-health-policies-in-sql-2008.aspx
The main part of the SQL Server health check revolves around ensuring the disk response times are less than 100 ms. The Policy uses ExecuteSQL to query the DMV sys.dm_io_virtual_file_stats to ensure that the disk response time is within this limit. You can extend this policy to query other DMVs for other health checks, for example the use of excessive parallelism or checking to ensure that cumulative wait stats have not exceeded predefined boundaries.
Your company may have standards for naming objects. For example, stored procedures must start with the prefix usp, tables must start with the prefix tbl, and functions must start with the prefix ufnc. Policy based management can be used to ensure that all objects are compliant with this policy. This policy can be implemented on change, which will prevent the creation of such noncompliant objects.
You can implement policies which check for best practices. For example, databases can be configured with the auto-close and auto-shrink options. Although these options have their place on production systems, they are not recommended as the auto-close option will cause a time delay while the database is opened by a connection trying to access it. This can lead to timeouts. The auto-shrink option can lead to fragmentation and is in general not recommended. A policy can check for these settings and other settings to ensure that all your databases are following best practices.
Policy Based Management is a new component in SQL Server 2008 that allows you to manage your SQL 2000, 2005, and 2008 servers by creating policies that can be used to enforce compliance to best practices, or to report on out-of-compliance servers. It provides a highly granular, flexible, and extensible toolset that allows you to manage all aspects of your SQL Server. Properly used, it is a great tool to enforce standardization in your environment and to ease the management burden.
![]() When deploying Policy Based Management in your environment, be very careful about using On Change Prevent. For example, a policy that prevents stored procedure creation with the
When deploying Policy Based Management in your environment, be very careful about using On Change Prevent. For example, a policy that prevents stored procedure creation with the sp_ prefix will prevent the enabling of replication on a SQL Server.
![]() When you create a policy that you want enforced on all user databases, place this policy in the default category and it will be subscribed to all databases. Otherwise, you will need to manually subscribe all databases to the categories that contain the policies you want enforced.
When you create a policy that you want enforced on all user databases, place this policy in the default category and it will be subscribed to all databases. Otherwise, you will need to manually subscribe all databases to the categories that contain the policies you want enforced.
![]() Make use of multiple Configuration Servers or Server Groups to group your SQL Servers according to logical groupings on which you want to group your policies.
Make use of multiple Configuration Servers or Server Groups to group your SQL Servers according to logical groupings on which you want to group your policies.
![]() Importing policies into centralized SQL Server 2008 servers makes it easier to deploy groups of policies against groups of servers using Central Management Servers, for example, to store data warehouse policies on Server A. Use this server as a source when selecting policies to evaluate against your data warehouse servers registered in the Data Warehousing Central Management Server.
Importing policies into centralized SQL Server 2008 servers makes it easier to deploy groups of policies against groups of servers using Central Management Servers, for example, to store data warehouse policies on Server A. Use this server as a source when selecting policies to evaluate against your data warehouse servers registered in the Data Warehousing Central Management Server.
![]() You may find that your environment may contain 3rd party user applications/databases which are not in compliance with the policies you have created for your enterprise. Policy Based Management uses the opt in metaphor were all policies are enforced by default. For servers you do not wish the policy to be enforced on you will need tag the database, perhaps with an extended property or a specially named table which the server exception category or the target will detect and exempt that server or database from the policy.
You may find that your environment may contain 3rd party user applications/databases which are not in compliance with the policies you have created for your enterprise. Policy Based Management uses the opt in metaphor were all policies are enforced by default. For servers you do not wish the policy to be enforced on you will need tag the database, perhaps with an extended property or a specially named table which the server exception category or the target will detect and exempt that server or database from the policy.
![]() Use the
Use the ExecuteWSQL task to issue WMI queries to extend conditions and policies beyond the SQL Server environment, for example, to check what other services may be running on a server hosting SQL Server.