Chapter 18. The Role of Templates in the Scribe Solution
Templates represent a starting point toward creating an integration solution and play a major role within Scribe. The template model is based on the premise that although each integration problem is different, many customers will require similar integration needs as some part of the integration solution. Therefore, templates maximize reuse by allowing integration solution designers to capture core integration needs into a reusable starting point.
Templates should be designed to balance both breadth and depth. If you are consistently solving the same integration problem over and over, that is a good candidate for a template solution. On the other hand, if you find that you are continuously removing or reworking parts of a template to redo at each client, you should consider how that part of the template is implemented.
Introduction to Templates
Scribe does have many free templates available for download, many of which leverage the full set of tools available in Scribe outlined in the preceding chapter. Templates can be created by anyone, however, and the process of doing so is really not that much different from creating integrations, as described in Chapter 16, “Scribe Integration.”
Templates in Scribe can consolidate all parts of the integration solution that work together (integration definitions, data views, monitors, publishers, and so on) to enable integration between two applications. Many Scribe consultants use the import/export utility (as described later in this chapter) to move an integration solution from one server to another at a specific client. For example, when moving from a test server to a production server, many Scribe consultants create a “template” that contains all the various parts of the integration solution. Importing that “template” will redeploy the solution on a brand new system. Although not necessarily conforming to the “maximize reuse” message of templates, this is an efficient use of the tool to automate what could be a large manual process.
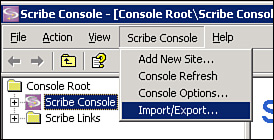
After all these various Scribe items that are going to be included in the template have been created, you can engage the Scribe Import/Export utility, via Scribe Console, Import/Export (see Figure 18.1).
Figure 18.1 Import/Export from the Scribe Console menu item.
This utility asks which items you want to include in the template (for example, which integration definitions, data views, monitors, publishers). In addition, you can choose to non-Scribe items (such as text files on your file system). The utility then creates a single file that includes all the selected items and a list of the various connections that are required to support the selected items. This file can be easily transported/downloaded and “imported” on a system.
Implementing Templates
If creating a template involves “exporting,” then implementing a template involves “importing” the template. You can initiate the import by double-clicking the exported file or using the same Scribe Import/Export utility you used to create the template (Scribe Console, Import/Export).
The import process prompts you for connection information between the two applications (among other things) and then deploys the various parts throughout the Scribe system. Any non-Scribe items (such as text files) are copied into the relative location they were exported from.
To run the Import Wizard, complete the following steps:
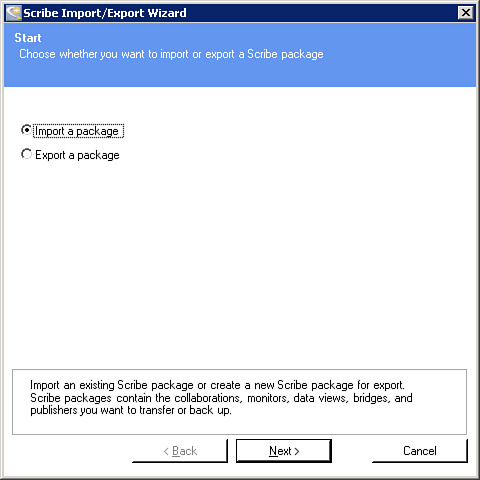
1. Select the Import option from the first screen of this wizard, as shown in Figure 18.2.
2. Browse to the template file (*.spkz extension), as shown in Figure 18.3. The Backup option on this screen enables you to create a copy of this template. Because templates are meant to be customized, this second copy can be used to revert parts of the template (so that if a customization did not go the way you intended, you don’t have to reimport the whole template and start over).

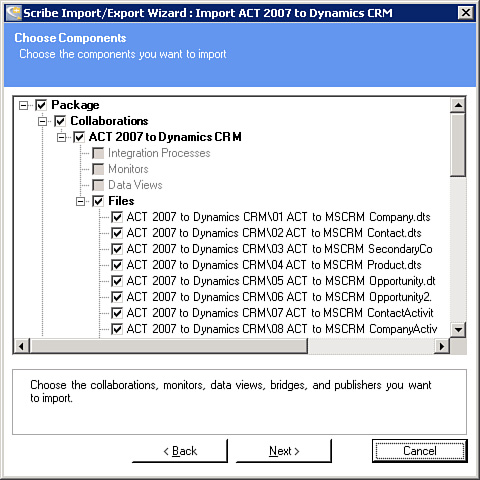
3. Select which parts of the template you want to import (you may only want the DTS files or just the data views), as shown in Figure 18.4. By default, all artifacts of the template are selected to be imported.
Figure 18.4 Choose components.
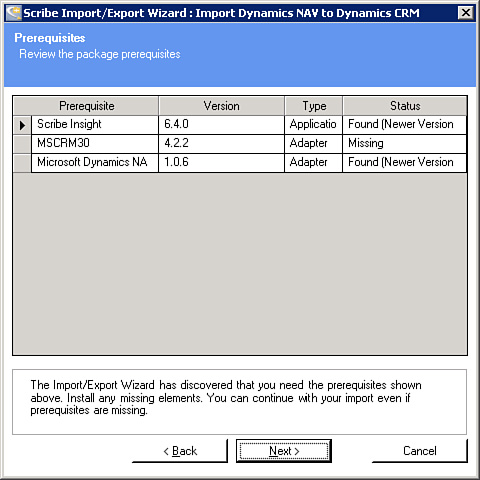
4. Acknowledge any missing prerequisites (for example, if you are importing a template for MS CRM to MS NAV, you will probably want the Scribe NAV adapter installed), as shown in Figure 18.5.
Figure 18.5 Package prerequisites.
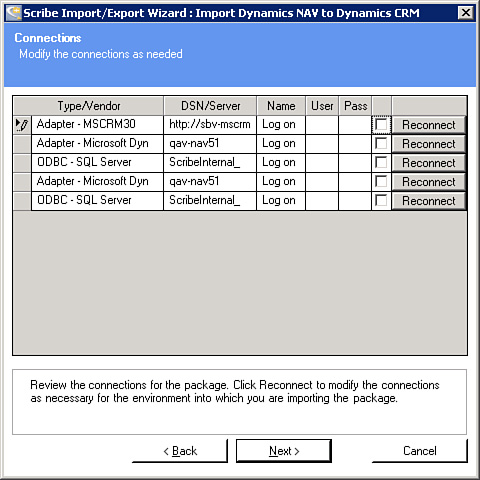
5. Define required connections, as shown in Figure 18.6. For example, the MS NAV to MS CRM template has DTS files that require a connection to MS NAV and MS CRM. It is at this point that you define your connections to each application. Scribe often includes “hints” as to what this connection is for in the Name column. (For example if there is an additional connection to SQL Server for whatever reason, it will give additional information as to the purpose of that connection.)
Figure 18.6 Define the required connections.
Note
Although the username and password information is not required at this point in time, if you opt to not supply the username and password information during “import,” you will be prompted for this information at the time you open a DTS and the connection information is missing. This goes for publishers, views, and other parts of the template that require connection information.
6. Click the Commit button on the final screen to perform the import.
More often than not, however, the import of the template is only the first step in solving the integration problem. If the customer has customized either of the applications the template was designed to support, the template will most likely need to be modified to accommodate this customization.
Customizations
Once deployed, a template is meant to be changed to meet the unique needs of each different customer, which is why they are referred to as templates versus solutions unto themselves. For templates created and deployed by Scribe, the goal is to get the two out-of-the-box systems communicating, leaving any customizations to either application to be accommodated by the implementing consultant.
Customizations for the template can be as varied as types of customizations that one can do to one of the applications supported by the template. Common examples include adding custom fields to integration points already supported by the template, changing the frequency at which polls are taken to look for net change, and even adding additional integration points that the template does not offer.
See Chapter 16 for more information about how to perform these customizations.
Go-Live Pipeline
Deploying an integration solution often has three stages to it: a preparation phase, an initial synchronization of data between the discrete systems, and a test run of the real-time portion of the solution.
If you are basing your solution on a Scribe-created template, you can find information about performing both of these stages in the template Help (usually found near the end of the chapter titled “Implementing the Template”). However, if you have grown your own solution, these stages are outlined here (albeit more generically).
Preparation
When getting ready to deploy and stabilize the integration solution, you should attend to a few things (depending on your integration needs and the business applications involved) before running integrations:
• Ensure consistent use of codes (currency codes, country codes, price lists, and so forth) between the systems involved. These are usually few in number and can often be manually modified/added to systems (instead of creating an integration to handle this). You should work with the application users for this (so that they understand the new codes and can validate that changing any existing codes will not break reports or processes they currently have in place).
• If using time-based triggers, be sure to set the default date-/timestamp. For instance, if you are using a Query-based publisher, the filter will (usually) be tied to a timestamp variable. You need to ensure that timestamp has the correct value before running your integrations for the first time.
Note
If you did not develop the solution on the production system (best practice is to use a development or test server), be sure to make any changes to the production applications required for your integration to run. For Microsoft CRM, you may need to enable integration mode (which is a Registry hack for Microsoft CRM v4.x and earlier) so that CRM users can submit orders to a back-office system. Note that you can start and stop integration mode in Microsoft Dynamics CRM 4.x by running the following DTS files:
EnableIntegrationMode.dts (starts integration mode)
DisableIntegrationMode.dts (stops integration mode)
These files are installed in C:Program FilesScribeSamplesMicrosoftDynamicsCRM.
Initial Synchronization
The initial sync is mainly a migration event. Before actually executing, you need to understand the entities that your solution has dependencies on. (For example, if your integration solution synchronizes customers, you may need currency codes in both systems to match.) Once you have a list of these entities and have ensured that they are consistent between the systems in question, the sync event itself is much like a data migration.
Often the sync event involves many hundreds if not thousands (or tens of thousands) of rows. Therefore, Scribe recommends using the Rejected Source Rows feature of the Scribe Workbench (outlined in the preceding chapter) to make debugging/resolving failed records easier.
Upon completion of the initial synchronizations, Scribe recommends that you have the application users review the synchronization before putting the real-time elements of the solution into place.
Note
Each Scribe-created integration template has different initial synchronization steps, and the template Help outlines these steps. These steps vary based on which integration template you are using.
Test Run
When the initial synchronization is complete, you can start deploying the real-time elements of your integration solution. To do that, Scribe recommends enabling each step of the integration process/pipeline individually to confirm each step is working before enabling the next step. This approach should be done for each integration process used by the solution.
This example extends the examples you worked with in Chapter 17, “Scribe Integration Components”:
1. Pause both the Microsoft CRM publisher and integration process you created in the preceding chapter, as shown in Figure 18.7.
Figure 18.7 Paused integration process.

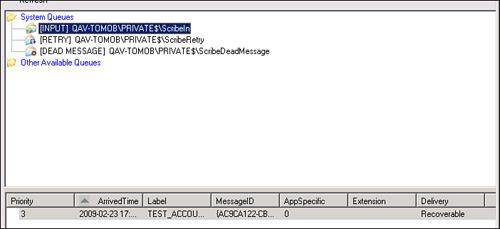
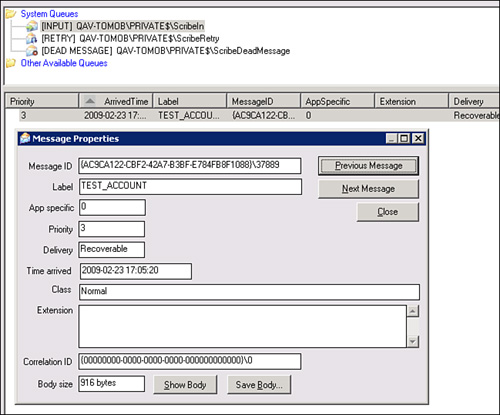
2. Create an account in Microsoft CRM. After a pause (no longer than a minute or two), you should have an MSMQ message in the applicable PubIn queue similar to the one shown in Figure 18.8.
Figure 18.8 Message in the ScribeIn queue (message shown at the bottom of the figure).
If you don’t see a message in the PubIn queue:
a. Check that the Scribe CRM adapter plug-in publisher (or workflow, depending on the version of CRM you are using) is installed and configured.
Or
b. From the CRM server, send a message to the PubIn queue outside of Scribe. (A utility in the Scribe Install folder called TestMessageQueueUtility.exe enables you to do this; you can copy this EXE to your CRM server and use it to send a test message to a message queue.) To use this utility, specify the target queue and click the Send Test Message button. You should see a simple test message in the target queue.
3. Once the message is visible in the PubIn queue, resume the Microsoft CRM publisher. You should see that message disappear from the PubIn queue and a related message show up in the ScribeIn queue.
If the message doesn’t leave the PubIn queue:
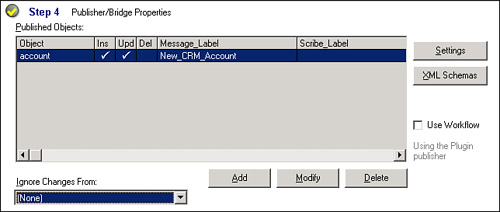
a. Make sure you resumed the correct Microsoft CRM publisher. Clicking the Settings button (as shown in Figure 18.9) on step 4 of the publisher properties view will show the connection settings in use by the selected publisher.
Figure 18.9 Publisher/bridge properties.
b. On this connection dialog, double-check the MSMQ names at the bottom of the connection dialog.
Note
If you don’t see the message show up in the ScribeIn queue:
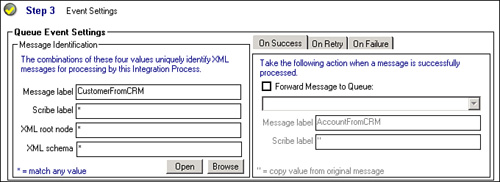
a. Check to see whether the message moved to the ScribeDeadMessage queue. If it did, you probably have another integration process that is not paused and is catching the message. (As explained previously, all integration processes monitor the same ScribeIn queue.) To remedy this, change the event settings of the active integration process so that it filters on something unique in step 3 of the Integration Process Configuration screen, as shown in Figure 18.10.
b. Check to see whether the message went into the PubFailed queue. If it did, the body of the message in the PubFailed queue will outline why it failed. You review contents of a message by double-clicking the message in the Scribe Console, as shown in Figure 18.11.
Figure 18.11 Message properties of a failed message in the queue.
4. Once the message is in the ScribeIn queue, enable the integration process associated with this integration. You should see the message disappear and the associated DTS run. Once completed, there will be an entry in the execution log (under the Administration node in the Scribe Console), as shown in Figure 18.12.

If the integration did not run:
Check the execution log. The integration may have failed to run for some reason (and the log entry will give you additional information).
5. Have users of the target system validate that the integration meets their needs. Having the target system owners’ review will often uncover previously undefined use cases, which may or may not affect the integration solution.
Tips and Tricks
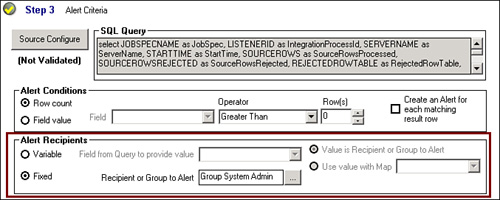
• Use monitors to alert when messages go in PubFailed and other queues. Scribe will divert messages to PubFailed or ScribeFailed queues when appropriate. Associate a monitor with these queues so that someone is notified in these cases (you can automatically notify someone by associating a recipient group or name in step 3 of the monitor properties dialog), as shown in Figure 18.13.
• Use source field and target field properties to ensure you are mapped to the correct field. When creating an integration in the Scribe Workbench, it isn’t always obvious which fields in the Workbench represent a specific field in the source/target application. You can use the target field properties to cross reference the “label” of a CRM field, as shown in the Workbench for the label in the CRM user interface. The CRM field label can be found by right-clicking a field and selecting Field Properties (see Figure 18.14).
Figure 18.14 Field properties. The values shown on the right are the values from the drop-down list.

• If the CRM field is a drop-down list, you can cross reference the drop-down list values on the Field Properties dialog, too. Clicking the Show Picklist button will list the name-value pairs for the drop-down list. To accommodate internationalization scenarios, it is best to use the numeric “value” versus the text “name” of the pair.
• Figure 18.15 shows the corresponding value in Microsoft Dynamics CRM.
Figure 18.15 Microsoft Dynamics CRM Category drop-down.

• Use the Test dialog. To verify that you are using the appropriate source fields and any functions you may have used, you can use the Test window in the Scribe Workbench. This will show the source value, the ultimate value pushed to the target (including the formula associated with the link), and the step control flow for the particular integration document (so that you can review what step control logic path was traveled based on how you configured the step control for the target application).
• Create custom functions or use Scribe variables to encapsulate complex logic. When linking between source and target in the Scribe Workbench, you may be required to create a relatively complex formula to represent the data transformation between two systems. Although you could do this in the formula on the link itself, the formula would be executed each invocation of the mapping logic (for example, each source row to target). Alternatively, you should create a compiled function in Visual Basic 6.0 or use a calculated variable in Scribe. Using a calculated variable will allow you to reuse the complex formula without having to re-create it; and creating the function in VB will bring greater flexibility to your approach and will have the added benefit of being compiled rather than interpreted (thereby having a marginal increase in performance).
• A document in the %SCRIBE%SamplesVBFunctions folder outlines how to create and register VB 6.0 functions.
• Extend fuzzy logic. A few “fuzzy” logic type functions that ship with Scribe enable you to avoid creating duplicate entries For example, source data collected from various places may refer to the same logical organization as The Jones Group, Inc., The Jones Group, and Jones Group (and so on). As they are shown here, they would be integrated as three different organizations.
• By using the STRIPCOMPANY([...]) formula, you can strip out some of the extraneous parts of this (for example, the “The” and “, Inc.” if they exist) to remove some of these duplicates. Furthermore, you can extend the behavior of the STRIPCOMPANY([...]) function by adding rows in the STRIPCOMPANY table in the SCRIBEINTERNAL database. You can add/modify the behavior of this function to suit any specific needs you have.
• Periodically purge the execution log and alert log. Over time, these logs can grow fairly large. You can periodically run a SQL script that ships with the Scribe product (%SCRIBE%ScribeMaintenance.sql) to purge older entries. The SQL script enables you to define the term (for example, how long you want to keep entries around).
• This script can be run manually, or you can set up a SQL job to run it periodically.
Scribe Templates
Scribe has a few templates specific to Microsoft Dynamics CRM. The most popular templates include the following:
• Scribe ERP to Microsoft Dynamics CRM
• Microsoft Dynamics GP to Microsoft Dynamics CRM
• Microsoft Dynamics NAV to Microsoft Dynamics CRM
Scribe ERP to Microsoft Dynamics CRM
The Scribe ERP (Enterprise Resource Planning) to Microsoft Dynamics CRM template provides a working integration between the ScribeERP sample application and Microsoft Dynamics CRM that integrates customer, product, order, and invoice data.
The template can be used for demonstration purposes or as a framework for building an integration between Microsoft Dynamics CRM and another ERP system.
You can create a simple working integration by using the sample elements and then modifying them as necessary to work with your target application. After using the sample application to build and test your framework, you can strip out the ScribeERP sample elements and swap in your target ERP application.
To use this framework, you can strip out the ScribeERP application and swap in a different ERP application. You need to create two components to make the new integration work. One component needs to capture the changes in the ERP application to put them into a message queue where Scribe will integrate that data with Microsoft Dynamics CRM. The other component needs to take changes from Microsoft Dynamics CRM that Scribe provides as XML messages and put them into the ERP system.
Information about swapping another ERP system for the ScribeERP is provided as you create your integration.
The goals of this template are as follows:
1. Provide the interactive ERP user with order and invoice history for customers.
2. Enable users to create and submit orders that originate in Microsoft Dynamics CRM.
3. Provide for the creation of reports that key off of the relationship between products ordered or invoiced and customers. By extension, this supports reporting on product purchase trends and detail by items related to account such as region/territory and sales representative.
4. Provide business activity monitors that notify key business users of events related to their customers’ purchases of the company’s products (for example, orders over certain dollar value, orders shipping late).
5. Keep customer data in sync.
6. Synchronize the master products in the ERP system into Microsoft Dynamics CRM.
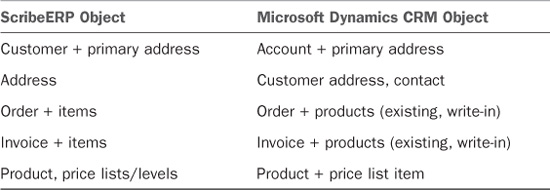
To support these objectives, the template provides two-way data integration from ScribeERP to Microsoft Dynamics CRM for the touch points listed in Table 18.1.
Table 18.1 ScribeERP to Microsoft Dynamics CRM Integration Touch Points
Process Flow
The template is designed to support the following business processes and flow of data between the ERP system and Microsoft Dynamics CRM (see Figure 18.16). The framework is in place for you to use this as a starting point for building an integration with another ERP system. With a new integration, the business processes and the data flow supported depends on the capability of your ERP system and your ability to adapt this template for your purposes.
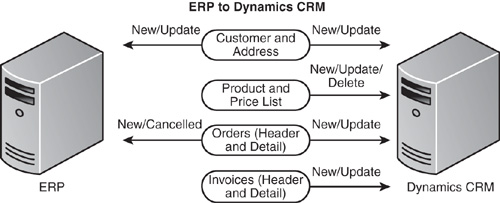
• Customer and address: This data can be created or modified in either the ERP system or Microsoft Dynamics CRM (except for certain fields owned by a system, such as credit limit or credit authorization), and the additions or changes will be synchronized with the other application. The company matching components provide fuzzy account matching to avoid the creation of duplicate accounts and to facilitate an initial synchronization of the existing ERP and CRM environments.
• Items and price list (master product schedule): This data is mastered in the ERP system and replicated to Microsoft Dynamics CRM to support the order process needs in Microsoft Dynamics CRM.
• Orders: Orders are created in Microsoft Dynamics CRM and may be modified in Microsoft Dynamics CRM until that order is submitted to the ERP system. Updated information about the order is provided to Microsoft Dynamics CRM from the ERP system. Orders that originate in the ERP system are provided to Microsoft Dynamics CRM in a submitted state. Orders that are canceled in Microsoft Dynamics CRM are voided in the ERP system and vice versa. Transferred orders in the ERP system are also included.
• Invoices: Invoices are created in the ERP system and replicated to Microsoft Dynamics CRM. Updates can only be made from the ERP system. Posted invoices in the ERP system are also included.
ERP to CRM Integration Processes
Integration processes automate the processing of the DTS files by detecting events such as a message in a queue, the results of a query, a file placed in a folder, or a specific time. The events are the trigger for the integration process to run its associated DTS file.
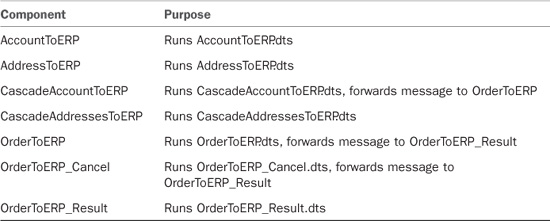
Some integration processes in this template are set up to forward the message back into the ScribeIn message queue with a different message label so that the message can be processed by another integration process. This technique enables an integration designer to trigger multiple integrations off of one event. For example, when an order is created in CRM, a message is added to the ScribeIn queue and routed to a DTS, which circles back to CRM to ensure that the account associated with the order exists in the ERP system. When that is completed, the same message is then resubmitted back into the ScribeIn queue with a different message label. This second message label causes the message to be routed to a different DTS, which actually integrates the relevant order data into the ERP system.
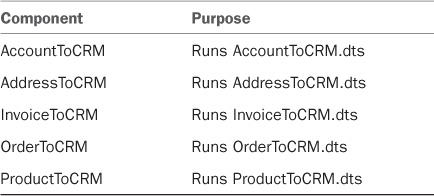
CRM to ERP Integration Processes
The integration processes automate the processing of the DTS files.
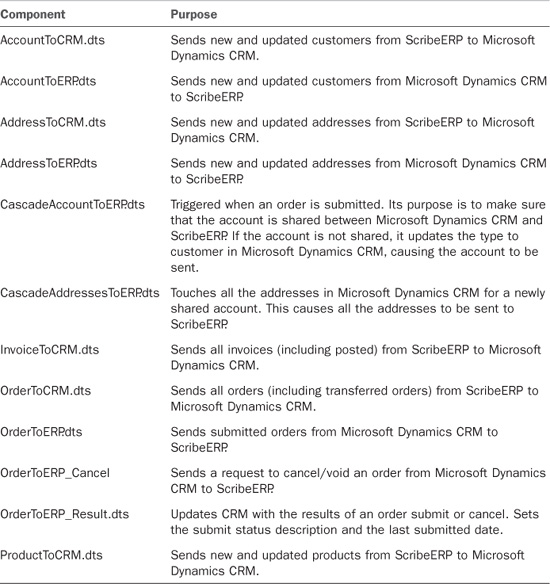
DTS Files
The DTS files contain the field mappings, data transformation formulas, and data processing rules used to integrate data from the source to the target. Table 18.4 lists the DTS files used in the template.
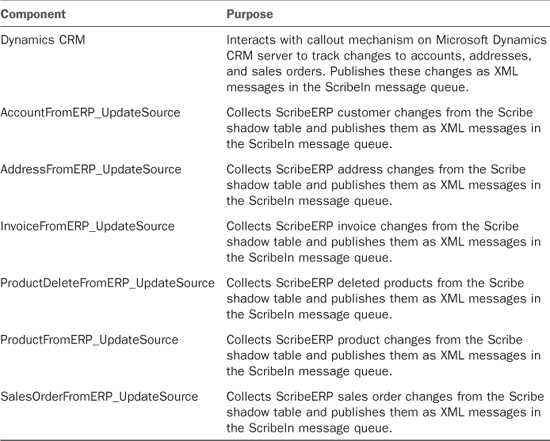
Publishers
The publishers are responsible for gathering changes in the ScribeERP and Microsoft Dynamics CRM systems and publishing those changes as XML messages in the ScribeIn message queue (see Table 18.5).
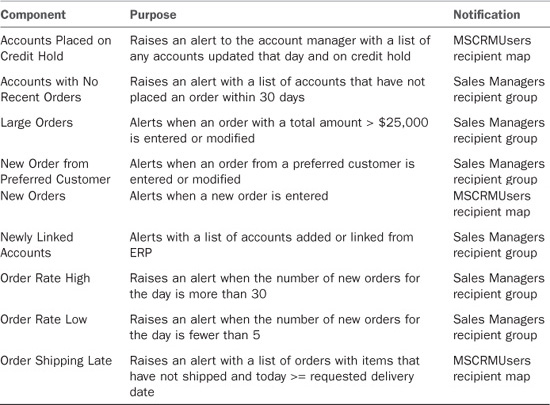
Order-History Monitors
The order-history monitors create alerts based on business activity in the Microsoft Dynamics CRM database. When you add alert recipients to the Sales Managers group, these alerts can be sent to individuals by the Scribe Insight server (see Table 18.6).
Table 18.6 Order-History Monitors
Order-History Data Views
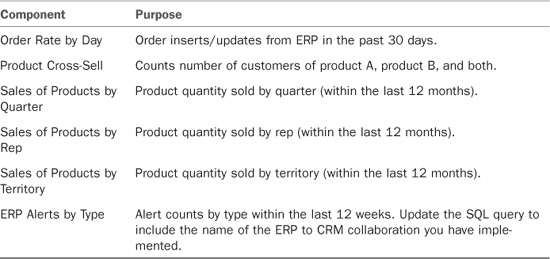
The order-history data views report on information about orders and summarize them in different ways, including by time period, salesperson, and territory.
Table 18.7 Order-History Data Views
Audit Data Views
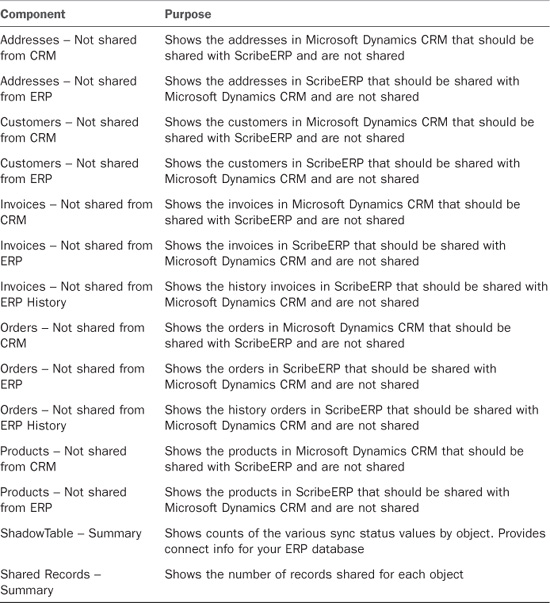
The audit data views show data that is not shared that should be shared. The SQL queries for the data views use outer joins between the Scribe internal database, the ScribeERP database, and the Microsoft Dynamics CRM database to determine whether a record should be shared. A record is shared when it exists in ScribeERP, Microsoft Dynamics CRM, and in the Scribe internal database in the KEYCROSSREFERENCETWOWAY table.
These views can be helpful initially setting up the template to make sure that the initial synchronization process was successful. These views are also a good resource for monitoring the status of the data being integrated and for troubleshooting.
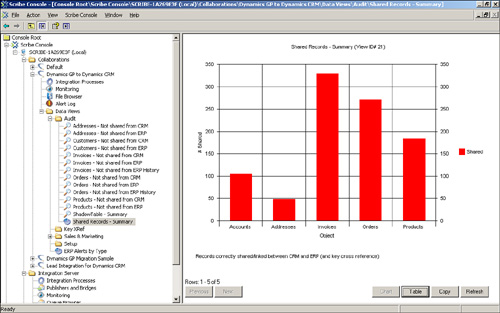
Figure 18.17 shows a listing of the products in the ERP that have not been shared with CRM, and Figure 18.18 shows a chart representing the number of each type of object that is shared between CRM and ERP.
Figure 18.17 Products not shared.
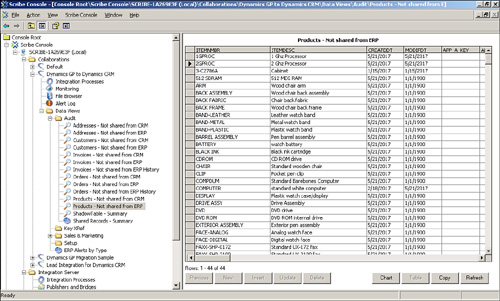
Figure 18.18 Chart showing shared objects.
If a record shows up in one of the audit data views and it has no data in the APP_A_KEY and APP_B_KEY columns, it means that the record was never sent from the source system, or the record was sent from the source system, but it failed to be inserted into the target system.
If a record shows up in one of the audit data views and it has data in the APP_A_KEY and APP_B_KEY columns, it means that the record used to be shared and is now not in both systems.
Key XRef Data Views
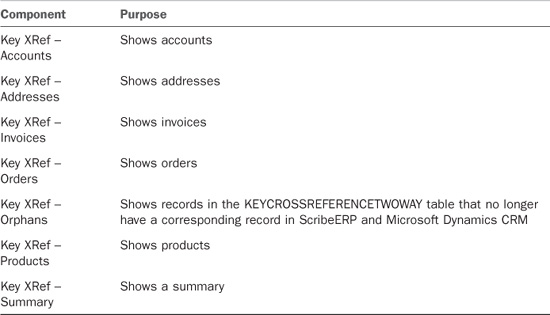
The key XRef data views show you what is in the KEYCROSSREFERENCETWOWAY table in the Scribe internal database. Records in this table indicate that a record is shared or was once shared. The KEYCROSSREFERENCETWOWAY table stores the primary ID of the shared records from ScribeERP and Dynamics CRM.
For example, for a ScribeERP customer who is shared with Microsoft Dynamics CRM, the table stores the customer number from ScribeERP and the accountid from Microsoft Dynamics CRM.
Table 18.9 Key XRef Data Views
Setup Data Views
The setup data views provide lists of data from ScribeERP as an aid to help you entering those values in your Dynamics CRM setup (see Table 18.10).

Microsoft Dynamics GP to Microsoft Dynamics CRM
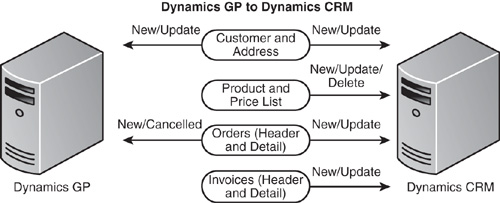
The Scribe Microsoft Dynamics GP to Microsoft Dynamics CRM template provides a working integration between Microsoft Dynamics GP and Microsoft Dynamics CRM that integrates customer, address, product, order, and invoice data (see Figure 18.19).
The template can be used for demonstration purposes or as a framework for building an integration between Microsoft Dynamics GP and Microsoft Dynamics CRM.
The goals of this template are as follows:
1. Provide interactive Microsoft Dynamics CRM users with customer order and invoice histories.
2. Let users create and submit orders that originate in Microsoft Dynamics CRM.
3. Provide data for creating reports that key off of the relationship between products ordered or invoiced and customers. By extension, this supports reporting on product purchase trends and detail by items related to account such as region, territory, or sales representative.
4. Provide business activity monitors that notify key business users of events related to their customers’ purchases of the company’s products (for example, orders over certain dollar value, orders shipping late).
5. Keep customer data in sync.
6. Synchronize the master products in Microsoft Dynamics GP into Microsoft Dynamics CRM.
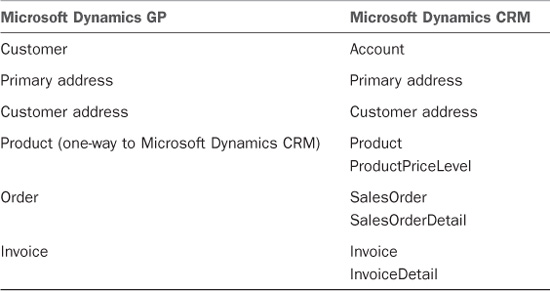
To support these objectives, the template provides two-way data integration from Microsoft Dynamics GP to Microsoft Dynamics CRM for the touch points listed in Table 18.11.
Table 18.11 Integration Touch Points
Process Flow
• Customer and address: This data can be created or modified in either Microsoft Dynamics GP or Microsoft Dynamics CRM (except for certain fields owned by a system, such as credit limit or credit authorization), and the additions or changes will be synchronized with the other application. The company matching components provide fuzzy account matching to avoid the creation of duplicate accounts and to facilitate an initial synchronization of existing Microsoft Dynamics GP and CRM environments.
• Products and price list (master product schedule): This data is mastered in Microsoft Dynamics GP and replicated to Microsoft Dynamics CRM to support the order process needs in Microsoft Dynamics CRM.
• Orders (header and detail): Orders are created in Microsoft Dynamics CRM and may be modified in Microsoft Dynamics CRM until that order is submitted to Microsoft Dynamics GP. Updated information about the order is provided to Microsoft Dynamics CRM from Microsoft Dynamics GP. Orders that originate in Microsoft Dynamics GP are provided to Microsoft Dynamics CRM in a submitted state. Orders that are canceled in Microsoft Dynamics CRM are voided in Microsoft Dynamics GP and vice versa. Transferred orders in Microsoft Dynamics GP are also included.
• Invoices (header and detail): Invoices are created in Microsoft Dynamics GP and replicated to Microsoft Dynamics CRM. Updates can only be made from Microsoft Dynamics GP. Posted invoices in Microsoft Dynamics GP are also included.
GP to CRM Integration Processes
Integration processes automate the processing of the DTS files by detecting events such as a message in a queue, the results of a query, a file placed in a folder, or a specific time. The events are the trigger for the integration process to run its associated DTS file.
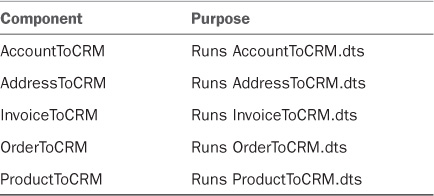
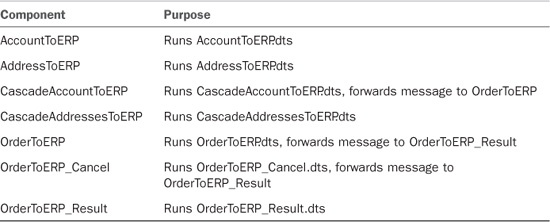
CRM to GP Integration Processes
The integration processes automate the processing of the DTS files (see Table 18.13).
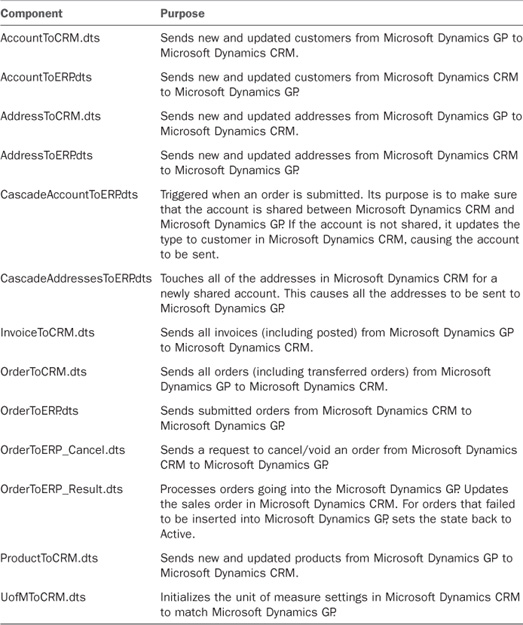
DTS Files
The DTS files contain the field mappings, data transformation formulas, and data processing rules used to integrate data from the source to the target. Table 18.14 lists the DTS files used in the template.
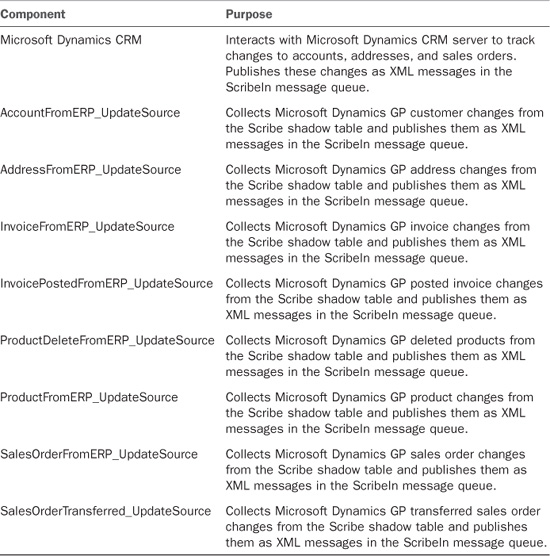
Publishers
The publishers are responsible for gathering changes in the Microsoft Dynamics GP and Microsoft Dynamics CRM systems and publishing those changes as XML messages in the ScribeIn message queue (see Table 18.15).
Order-History Monitors
The order-history monitors create alerts based on business activity in the Microsoft Dynamics CRM database. When you add alert recipients to the Sales Managers group, these alerts can be sent to individuals by the Scribe Insight server (see Table 18.16).
Table 18.16 Order-History Monitors
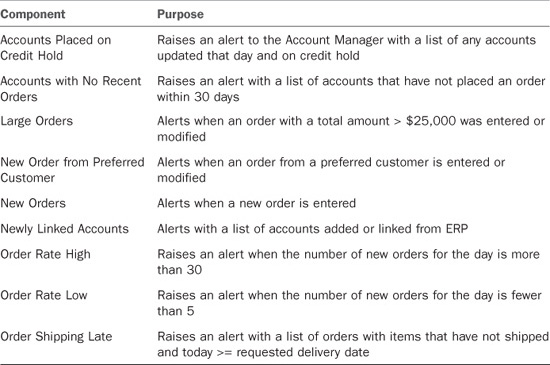
Order-History Data Views
The order-history data views report on information about orders and summarize them by different ways including time period, salesperson, and territory (see Table 18.17).
Table 18.17 Order-History Data Views
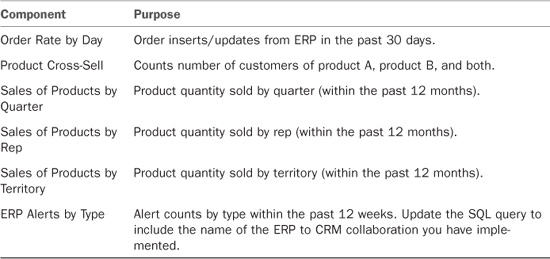
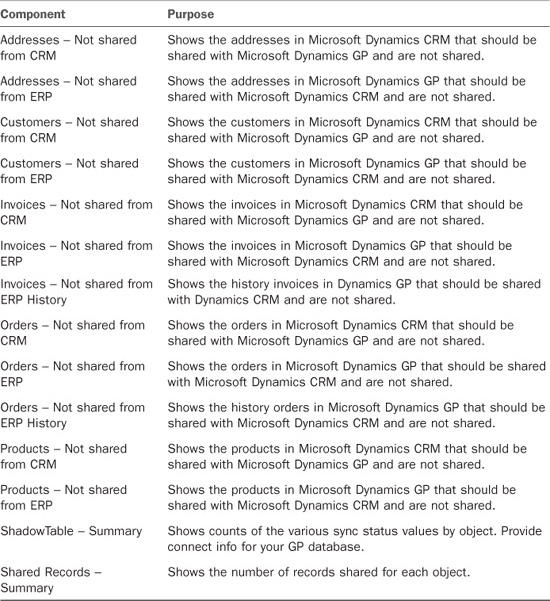
Audit Data Views
The audit data views show data that should be shared but is not shared. The SQL queries for the data views use outer joins between the Scribe internal database, the Microsoft Dynamics GP database, and the Microsoft Dynamics CRM database to determine whether a record should be shared. A record is shared when it exists in the Microsoft Dynamics GP, the Microsoft Dynamics CRM, and in the Scribe internal database in the KEYCROSSREFERENCETWOWAY table.
These views can be helpful when initially setting up the template to make sure that the initial synchronization process was successful. These views are also a good resource for monitoring the status of the data being integrated and for troubleshooting.
If a record shows up in one of the audit data views and it has no data in the APP_A_KEY and APP_B_KEY columns, it means that the record was never sent from the source system, or the record was sent from the source system, but it failed to be inserted into the target system.
If a record shows up in one of the audit data views and it has data in the APP_A_KEY and APP_B_KEY columns, it means that the record used to be shared and is now not in both systems.
Because audit data views require direct access to the database in order to run queries, audit data views cannot be used with Microsoft Dynamics CRM Online.
Reconfiguring the Default Views
The template includes a set of data views. Some of these views perform joins across databases. By default, these views use the database names of the standard CRM sample databases that ship with Microsoft Dynamics CRM (Microsoft_CRM_MSCRM) and Microsoft Dynamics GP (TWO) in their join clauses. You’ll want to reconfigure these views to connect to the databases in your system.
In the Scribe Console, replace the default CRM database names in the SQL query (on the Configure Source tab of the view in the list shown in Table 18.18) with the database names used in your system.
Table 18.18 Default CRM Database Names
Key XRef Data Views
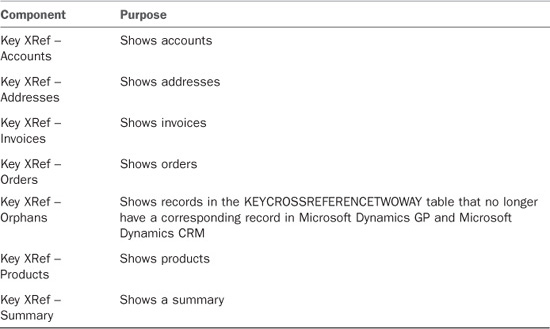
The key XRef data views show you what is in the KEYCROSSREFERENCETWOWAY table in the Scribe internal database. Records in this table indicate that a record is shared or was once shared. The KEYCROSSREFERENCETWOWAY table stores the primary ID of the shared records from Dynamics GP and Dynamics CRM.
For example, for a Microsoft Dynamics GP customer who is shared with Microsoft Dynamics CRM, the table stores the customer number from Microsoft Dynamics GP and the accountid from Microsoft Dynamics CRM (see Table 18.19).
Table 18.19 Key XRef Data Views
Setup Data Views
The setup data views provide lists of data from Microsoft Dynamics GP as an aid to help you entering those values in your Microsoft Dynamics CRM setup (see Table 18.20).

Microsoft Dynamics NAV to Microsoft Dynamics CRM
The Scribe Microsoft Dynamics NAV to Microsoft Dynamics CRM template provides a working integration between Microsoft Dynamics NAV and Microsoft Dynamics CRM that integrates customer, address, product, order, and invoice data.
The template can be used for demonstration purposes or configured to meet your business requirements.
The goals of this template are as follows:
1. Provide interactive Microsoft Dynamics CRM users with customer order and invoice histories.
2. Let users create and submit orders that originate in Microsoft Dynamics CRM.
3. Provide data for creating reports that key off of the relationship between products ordered or invoiced and customers. By extension, this supports reporting on product purchase trends and detail by items related to account such as region, territory, or sales representative.
4. Provide business activity monitors that notify business users of events related to their customers’ purchases of the company’s products (for example, orders over certain dollar value, orders shipping late).
5. Keep customer data in sync.
6. Synchronize the Microsoft Dynamics NAV master product list and prices with Microsoft Dynamics CRM.
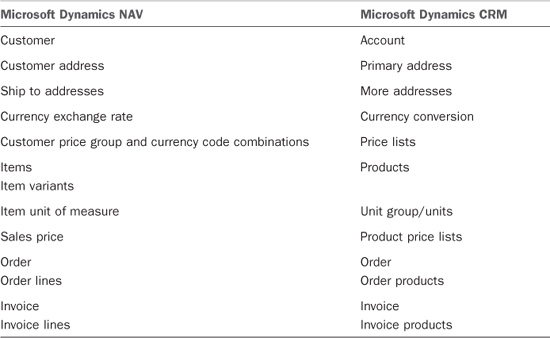
To support these objectives, the template provides data integration between Microsoft Dynamics NAV and Microsoft Dynamics CRM for the types of data listed in Table 18.21.
Table 18.21 Data Integration Points
Process Flow
The Scribe Microsoft Dynamics NAV to Microsoft Dynamics CRM template provides the high-level functionality shown in Figure 18.20.
Figure 18.20 NAV to CRM process flow.
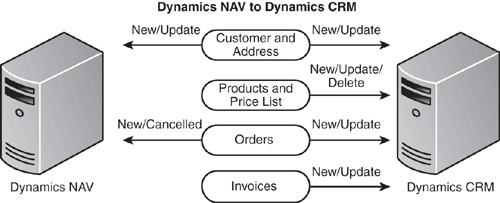
• Customer and address: This data can be created or modified in either Microsoft Dynamics NAV or Microsoft Dynamics CRM (except for certain fields owned by a system, such as credit limit or credit authorization), and the additions or changes will be synchronized with the other application. The company matching components provide fuzzy account matching to avoid the creation of duplicate accounts and to facilitate an initial synchronization of existing Microsoft Dynamics NAV and Microsoft Dynamics CRM environments.
• Products and price list (master product schedule): This data is mastered in Microsoft Dynamics NAV and replicated to Microsoft Dynamics CRM to support the order process needs in Microsoft Dynamics CRM.
• Orders (header and detail): Orders are created in Microsoft Dynamics CRM and may be modified in Microsoft Dynamics CRM until that order is submitted to Microsoft Dynamics NAV. Updated information about the order is provided to Microsoft Dynamics CRM from Microsoft Dynamics NAV. Orders that originate in Microsoft Dynamics NAV are provided to Microsoft Dynamics CRM in a submitted state.
• Invoices (header and detail): Invoices are created in Microsoft Dynamics NAV and replicated to Microsoft Dynamics CRM. Updates can only be made from Microsoft Dynamics NAV. Posted invoices in Microsoft Dynamics NAV are also included.
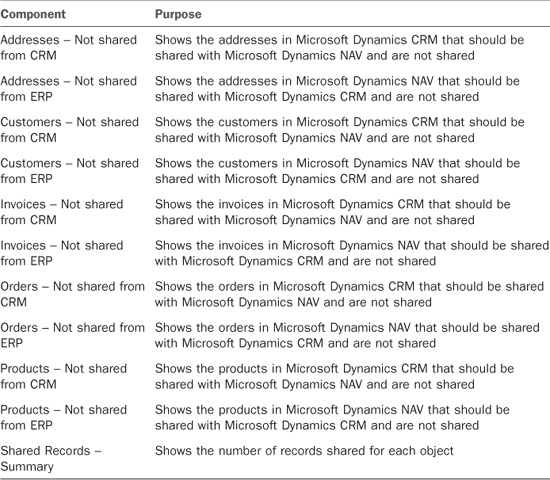
Audit Data Views
Audit data views show data that should be shared but is not shared. The SQL queries for the data views use outer joins between the Scribe internal database, the Microsoft Dynamics NAV database, and the Microsoft Dynamics CRM database to determine whether a record should be shared. A record is shared when it exists in the Microsoft Dynamics NAV, the Microsoft Dynamics CRM, and in the Scribe internal database in the KEYCROSSREFERENCETWOWAY table.
These views can be helpful when initially setting up the template to make sure that the initial synchronization process was successful. These views are also a good resource for monitoring the status of the data being integrated and for troubleshooting.
If a record shows up in one of the audit data views and it has no data in the APP_A_KEY and APP_B_KEY columns, it means that the record was never sent from the source system, or the record was sent from the source system, but it failed to be inserted into the target system.
If a record shows up in one of the audit data views and it has data in the APP_A_KEY and APP_B_KEY columns, it means that the record used to be shared and is now not in both systems.
Reconfiguring the Default Views
The template includes a set of data views. Some of these views perform joins across databases. By default, these views use the database names of the standard CRM sample databases that ship with Microsoft Dynamics CRM and Microsoft Dynamics NAV in their join clauses. You must reconfigure these views to connect to the databases in your system.
In the Scribe Console, replace the database names listed in Table 18.22 with the database names used in your system.
Key XRef Data Views
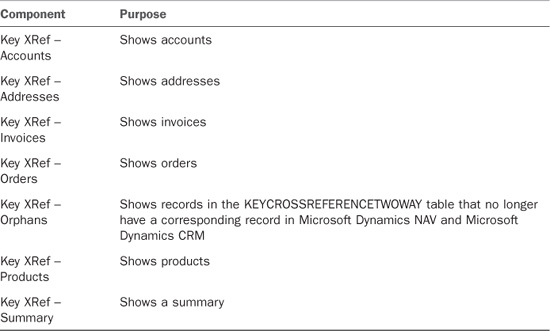
The key XRef data views show you what is in the KEYCROSSREFERENCETWOWAY table in the Scribe internal database. Records in this table indicate that a record is shared or was once shared. The KEYCROSSREFERENCETWOWAY table stores the primary ID of the shared records from Dynamics NAV and Dynamics CRM.
For example, for a Microsoft Dynamics NAV customer who is shared with Microsoft Dynamics CRM, the table stores the customer number from Microsoft Dynamics NAV and the accountid from Microsoft Dynamics CRM (see Table 18.23).
Table 18.23 Key XRef Data Views
Summary
In this chapter, we explained what templates are and how they work. It is critical to realize that templates represent a starting point and are then often modified to fit the needs of particular integrations.
It is important to note that while there are specific adapters for products such as GP and NAV, the base Scribe ERP template is the source of these templates. They have been modified to the predefined requirements for the particular system.
Scribe continues to add new functionality and define new templates, so be sure to check their resource center for new versions.
