
Drupal is built on the very stable and flexible base of a modern relational database (most frequently, it is MySQL, but others are also supported). Relational databases store, retrieve, and manipulate data with remarkable speed and efficiency. However, a challenge for the nearly half-century of database use has been how to make the creation and manipulation of database structures (schemas) accessible to nonprogrammer types. A companion challenge over the same span of decades has been how to make it easy for end users to construct queries and reports from these powerful data engines.
Along with other Content Management Systems (CMS), Drupal has been addressing these issues aggressively. The Content Construction Kit (CCK) in effect implements a mechanism that allows users to create fields in the database that support their content. (From the user’s point of view, that is what happens; the reality is more complex and is not of concern to the user who is building a Drupal site.)
Over the last few releases of Drupal, the Views module has been developed and refined. Whereas CCK makes it possible for users to create fields that can be reused from node to node, the Views module implements a combined query and display mechanism to complement CCK. You need not use the combination of Views and CCK, but that is common practice today, and it is increasingly evident that it will be even more common in the future.
This hour introduces you to the Views module and its basic features. As you will see during this hour and in those that follow (particularly Hour 15, “Using Events and Calendars”), the basic features of the Views module are often hidden from end users because sophisticated displays are driven by the Views module and the underlying database.
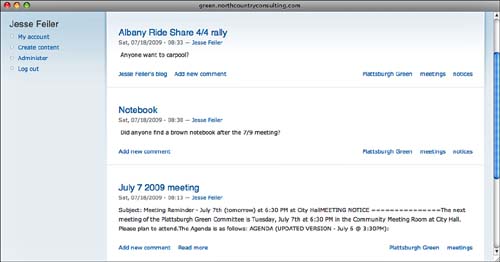
The best place to start is with out-of-the-box Drupal. With the default settings, new content is published to the front page; it is displayed in reverse chronological order (newest first), as shown in Figure 14.1.
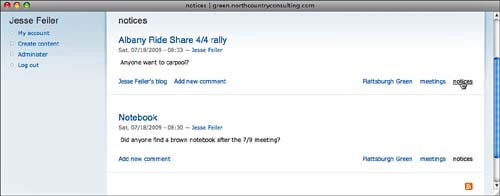
If you have used tags or other taxonomy features to categorize your content, the taxonomy terms are shown in the lower right of each node. As you can see in Figure 14.2, clicking a taxonomy term retrieves the entries for that term and displays them, too, in reverse chronological order. On these dynamically constructed pages, an RSS feed icon is provided so that users can subscribe to the feed of new content for the specified term.
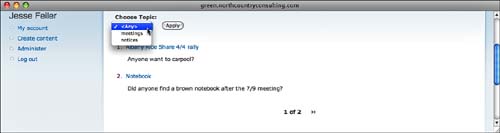
The Views module can provide much more specific selection of data. As you can see in Figure 14.3, it can allow the end user to select from various categories. Furthermore, its visualization features allow you to customize the display of data, to number or otherwise organize the various items retrieved, and to use a pager (you have a choice of two) so that lengthy lists of results are manageable by users. (The pager in Figure 14.3 is in the lower-right; it displays information [“1 of 2”], and provides relevant controls to go forward and back.)
By the Way: Explore the Riches of Views
The Views module is incredibly powerful. This hour provides an overview of its features and functionality. There is more to the module that will be explored in other hours and that you can experiment with on your own. This hour just gets you started with some of the most frequently used aspects of the Views module.
The Views module has had two major incarnations, and with Drupal 7 a third one is approaching. In old documentation and discussions, you will find references to Views 1 and Views 2. The current version for Drupal 6 is Views 2.
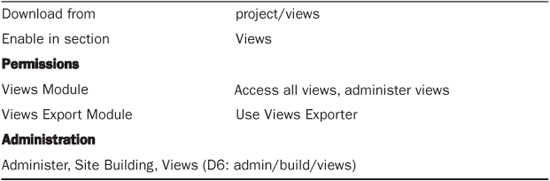
The documentation for Views is provided with the Advanced Help Module. To get started with views, you need to download, install, and enable both Views and the Advanced Help module, as shown in Tables 14.1 and 14.2. (The Views module will function without Advanced Help, but it will be more difficult to use.)
By the Way: Take Your Time
The Views module is large. If you need to download it from the Drupal site and then upload it to your server, you may need to set aside as much as an hour, depending on the speed of your connection.

Out of the box, the Views module provides a number of default views that you can use. Every view can be enabled or disabled; the default views are disabled until you enable them. Most of them simulate standard Drupal displays such as the front page or recent comments. You can use enable and use the views so that you can customize the displays in ways that previously would have required code.
View the list of view at Administer, Site Building, Views (admin/build/views), as shown in Figure 14.4.
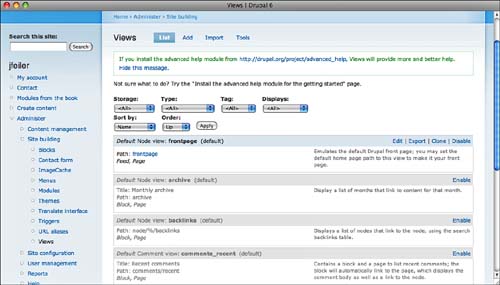
This is the page you use to manage your views. If the Advanced Help module is not installed, instead of the link to the Getting Started page, you will have a link to the Advanced Help module page. In addition, the Help links next to each default view will go to Advanced Help documentation if that module is installed.
The format of each view’s entry is consistent. The only differences among entries are for enabled or disabled views: enabled views give you links at the right to Edit, Export, Clone, or Disable the view, whereas disabled views simply give you an Enable link. Exporting, cloning, and importing views are discussed later in this hour; this section is devoted to editing views.
Each view listing has a title bar followed by several descriptive fields. These are the components that are shown in the title bar for each view. At the top of the list are four pop-up menus that let you select values for one or more of the view components. Below them, two other pop-up menus let you sort the list in ascending or descending order. Click the Apply button to perform the selection and the sort. If your list of views is not lengthy, you need not worry about selecting or sorting your list of views.
• Storage— Views can be implemented in code; these are default views. You can also create views using the Add button at the top of the Views list shown in Figure 14.4. Views that you create in this way are Normal views; they are stored in your Drupal database. You can also create Overridden views that are based on default views; overridden views are stored in the database. You can revert an overridden view; if you do so, the database version is removed and the view implemented in code is used again.
• Type— A view contains data drawn from a specific type of Drupal data, such as nodes or comments (more on this in the section, “Adding Views”). You set a view’s type when you create it; you cannot change it thereafter.
• Name— Each view must have a name that consists of alphanumeric characters and underscores. In Figure 14.4, the name of the first three views are frontpage, archive, backlinks, and comments_recent.
• Tag— Like so many other objects in Drupal, views can have tags. This helps you organize them. The tag is shown in parentheses after the view’s name. In Figure 14.4, the first four views have the default tag.
Views combine a query with one or more displays for the data that has been retrieved. Displays can be full pages, blocks, content panes (for panels), attachments (which let you combine views) or RSS feeds. Contributed modules can provide you with other displays for the data types that they implement. The capability to have multiple displays for a view is a major part of the power of views.
Below the title bar are several additional fields for each view:
• Title— A view may have a title that can include spaces; it is used for readability.
• Path— If present, this is the Drupal path to a page or feed display for this view.
• Displays— Below the title and path, you will find a list of the types of displays supported by each view.
• Description— The description of the view that is shown at the right of each listing. As always, it is a good idea to document your work and describe what you have done (or what you intend to do) with a view. This description applies to the entire view and not just to an individual display of the view. The description is entered in the tag section of the view.
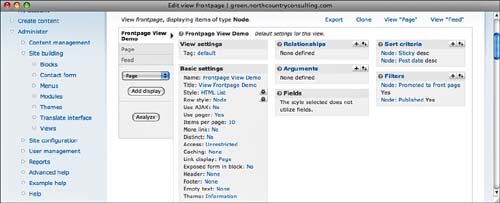
Most of your work with views consists of editing them. After a view is created or enabled, you can click Edit at the right of its title bar to open the editor, as shown in Figure 14.5.
By the Way: Experiment Safely with the Front Page View
This section uses the front page view that is distributed with the Views module. It mimics the behavior of the default front page in Drupal; however, because it is a view, you can build on it and modify that behavior. Although it is distributed with the Views module, as you can see from the list of views it is disabled by default. Enable it to begin editing.
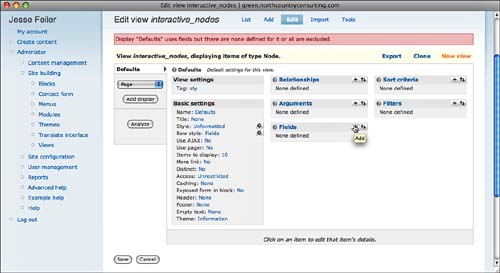
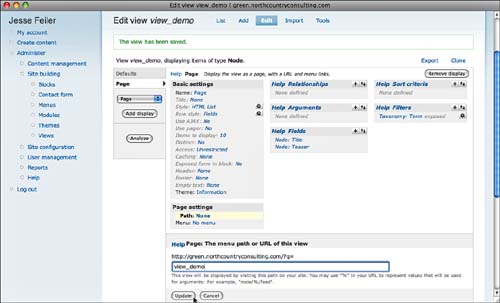
This editor has three major sections. At the left are the various displays. You always have a set of default settings, but you can choose from the pop-up menu to add a display. In Figure 14.5, in addition to the default settings, you see that a Page and a Feed have been created.
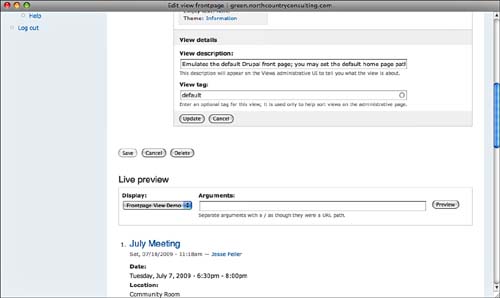
The second column contains the major settings for the view. These settings change depending on whether you are editing the default settings or a specific display; the default settings carry through to each display, but additional settings may exist for specific displays. Click a highlighted link to edit a setting. For example, in Figure 14.5, the first links in the second column are default (for Tag settings), Defaults (for Name settings), and None (for Title settings). When you click a link, data entry fields appear below the main section of the view, as shown in Figure 14.6.
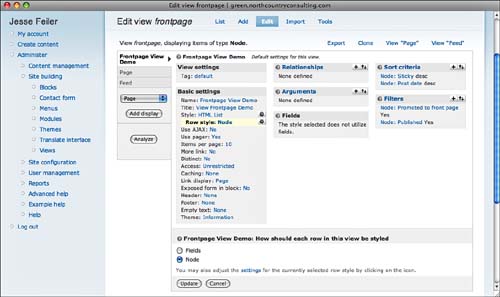
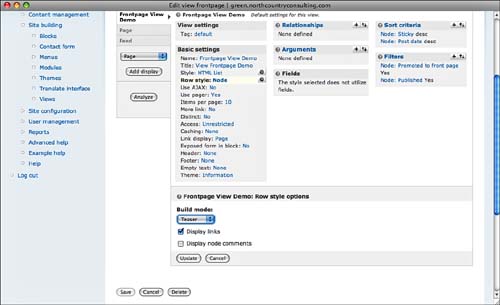
When you enter the value you want, click Update (or Cancel if you do not want to set the value). Some of the items in the view editor require not just values, but settings that are dependent on the selected value. For example, choosing the Node option button in Figure 14.6 and then clicking Update opens the settings shown in Figure 14.7. (The icons next to some settings also open these displays.)
Remember to click the Update button when you have finished.
As you work with the view editor, you will soon get into the swing of things:
• Update the various settings in the view editor as you go along.
• Save all of your changes with the Save button after you have done the individual updates.
As you proceed, you will often find a live preview of the view at the bottom of the page. You can choose which display you want to preview by using the pop-up menu, as shown in Figure 14.8.
Remember that a Drupal view combines a database query with the displays that present the data. The two columns at the left of the view editor help you build the displays; the two columns at the right are devoted to building the query.
There are five sets of inputs for the query: Relationships, Arguments, Fields, Sort Criteria, and Filters. Each starts out with nothing defined for it. Two icons next to the section name let you add to the query that you are building. The plus icon lets you add to the section so that, for example, clicking the plus icon in the Fields section lets you add a field. The companion icon with up- and down-pointing arrows lets you rearrange the items in the list.
Anatomy of a Database Query
If you are familiar with relational databases and their access language (SQL), you are used to the structure of queries, and you can map the view editor to an SQL query. If you are not familiar with SQL, do not think that you need to study up on SQL syntax, and you can skip this sidebar.
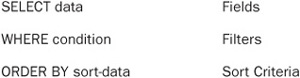
The basic form of an SQL query is
SELECT data FROM table WHERE condition ORDER BY sort-data
Capitalization can vary by SQL implementation. However, in Drupal the db abstraction commands that insulate Drupal itself from the idiosyncrasies of the supported databases require that SQL reserved words be capitalized (drupal.org/node/2497). That convention is adopted in this book as it is in many other places.
The sections of the view editor that map to the query are the following:
As is the case with most Drupal objects, you first create a view. That process includes setting basic values (such as an internal name) that cannot be changed. After you create the view, you customize it by editing it. Editing a new view (or any Drupal object) is the same whether you have just created the view or if you or someone else created it several months ago.
From Administer, Site Building, Views (admin/build/views), click Add at the top of the views list to open the page shown in Figure 14.9.
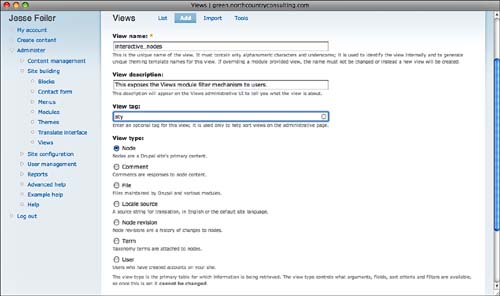
The view name contains alphanumeric characters and, possibly, an underscore. No spaces are allowed. You will be able to create and change the title of the view to a more accessible title for users. The view name cannot be changed.
You also must specify what the data for the view will be—this is the view type. The view type cannot be changed after you have created the view. Some of the possible view types are listed here. You might have other view types if you have installed and enabled various modules; for example, enabling the Aggregator module in Core - optional will add the Aggregator Item view type to the list. Some of the views are used in default and disabled views that are installed as part of the Views module.
• Node— As noted in Hour 5, “Using Drupal Nodes,” almost everything in Drupal is a node. Selecting this view type means that articles and stories, blog entries, forum discussion topics, and custom content types can all be displayed in the view. This is the most common view type. You can filter certain node types in or out of the view so that if you want only blog entries, for example, you select the Node view type and then apply a filter so that blog entries are omitted or included.
• Comment— Lets you view comments regardless of the node to which they are attached. A default but disabled view that is part of the Views module installation demonstrates this view type in the comments_recent view.
• File— Files managed by Drupal.
• Locale source— Helps support language translation if the Core-optional module Locale is enabled.
• Node revision— Lets you access revisions to nodes directly (rather than just the most recent revision by going to the node itself).
• Term— Use this view type if the content of the view is to consist of taxonomy terms as in the taxonomy_term default view. The most common use of taxonomy terms with views is to use them as filters; thus, in the example shown in this section, you will see a view that displays nodes tagged with taxonomy terms. At runtime, the end user can select which taxonomy term is used.
• User— Drupal users.
The tag and description for the view are useful for organizing your views. Fill them in when you create the view so that you do not forget. Both fields can be modified later, so you lose nothing by setting them now.
Having created a new view (or choosing to edit an existing view), proceed to the view editor, as shown in Figure 14.10.
The view that is created here is the view shown at the beginning of this hour. It displays fields from nodes, and it filters the data based on criteria. The criteria are taxonomy terms; you can do this filtering by specifying it in the view, but you can also expose the filtering to make the view dynamic. This example uses dynamic filtering by the end user to demonstrate how the view works. The first three tasks are those identified in the sidebar “Anatomy of a Database Query:”
• Adding fields— The SELECT part of the query
• Filtering data— The WHERE part of the query
• Sorting data— The ORDER BY part of the query
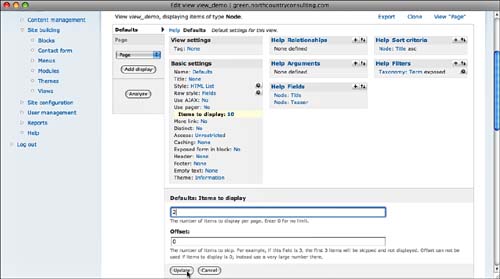
A final task is to refine the interface to the view. You can perform these tasks in any order that you want; you can also modify them as you go along so that you do part of one task, part of another, and so forth. Until you have added at least one field, Drupal warns you that no data will be displayed in the view, as shown in the error message at the top of Figure 14.10. As long as you add fields before you finish, there is no urgency to add them.
It is common as you develop view and work with the data that you get a better understanding of the data that you are working with. You, and your users, should stop periodically and review the view-in-progress. New presentation techniques and new ways of sorting and filtering data may come up as you work with the data; fortunately, Drupal makes it easy to change views as you go along.
Try It Yourself: Adding Fields to the View
When you want to add fields to the view, click the Add Field icon in the Fields section, as shown previously in Figure 14.10.
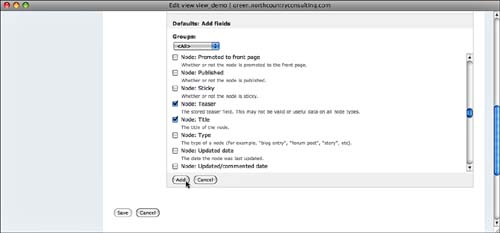
- When you click Add Fields, the scrolling list of fields shown in Figure 14.11 will appear below the main part of the view editor. These fields are grouped into the same types as the view type fields shown previously in Figure 14.8; in addition, CCK fields are part of the list. CCK fields are shown in the Content group. If a field is chosen that does not happen to exist in a given node that is selected for a view, no error occurs. There is no field, no data, and no problem. But, if you select a field that is part of a selected content type, it will be displayed where appropriate. Click Add when you have selected your fields.
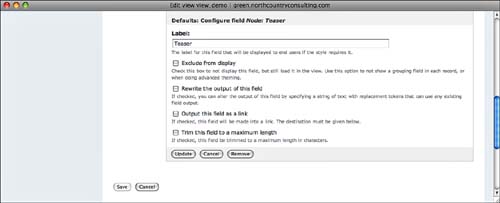
- The view editor will then cycle through the selected fields. For each one, you can specify the title and various display options, as shown in Figure 14.12. Many people immediately remove the default field label. The reason is that a number of common fields require no labels. A node teaser, for example, simply presents information and does not need to be identified as a teaser, so you can remove its label. Remember to click Update.
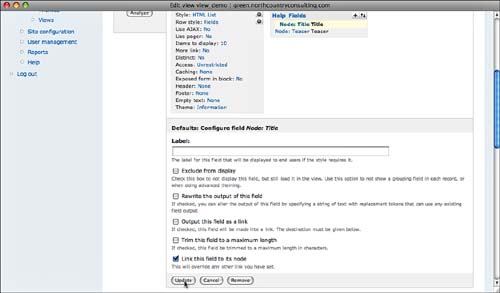
- You can configure links for any field; the most common is to turn the title of an entry into a link to the node itself, as shown in Figure 14.13.
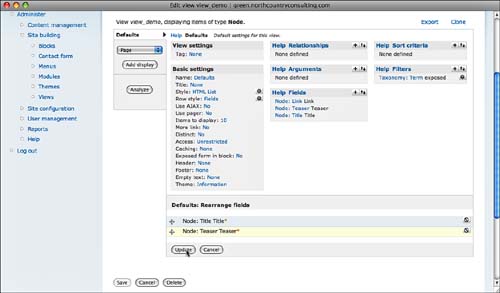
- If you want, you can use the up- and down-pointing arrows to rearrange the order of the fields in the view. The arrows open the section shown in Figure 14.14. You can drag fields up and down or you can use the icon at the far right to remove a field. Remember to click Update when you are finished with the rearrangement and to click Save when you are finished editing the view. (If your Internet connection is unreliable, click Save periodically so that you do not lose a great deal of work if the connection fails.)
Try It Yourself: Adding Filters
Add a filter to only retrieve wanted data. In this section, you will also see how to allow end users to modify the filter.
- Click Add in the Filters section. A scrolling list of fields like that shown previously in Figure 14.11 is shown; select the fields you want to use as filters. Note that filter fields need not be fields that are chosen for content. In this case, Taxonomy: Term is chosen so that you can filter on a taxonomy value. Click Add when you have made your choice.
- Drupal will cycle through each selected filter so that you can set the appropriate interface, as shown in Figure 14.15. In the case of a taxonomy term, you often want a drop-down menu rather than an autocomplete selection, but it depends on how many terms exist and how good your end users are at spelling. Click Update when you are finished.
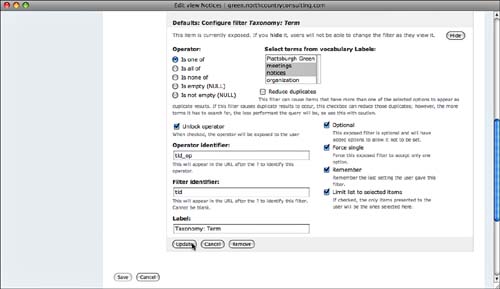
- After you click Update, Drupal prompts you to configure the filter, as shown in Figure 14.16. For each filter, you can decide to expose its inner workings to end users. If you decide not to expose the filter, the choices that you make here are applied when the view is run, and the lower portion of this area (five check boxes and three text fields) is not shown.
If you do expose the choices, your settings are used as the default settings, but end users can change them. You can also choose the Limit List to Selected Items check box. In that case, if you have a dropdown list of choices, as is the case in Figure 14.16, you can select one or more of the choices. The drop-down list that the user sees will consist only of your selections. Also, note that you can change the label of the choice. As shown previously in Figure 14.3,
Choose Topicis a more user-friendly label than the defaultTaxonomy: Term. Figure 14.3 also shows how the end-user drop-down menu consists only of the choices made in this step.

Try It Yourself: Set the Sort Order and Finish the Display
The View module can sort the data. You also can control how data is paged. Together, these settings can convert a possibly unmanageable list to a usable resource for end users.
Drupal supports two types of pagers. Figure 14.3 showed a minipager. A full pager lets you go to specific pages forward or back from the page you are on rather than just the next and previous page.
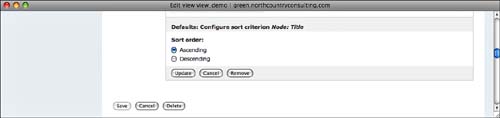
- Add a sort order to the Sort Criteria using the Add button. New input areas are shown beneath the main view editor, like other settings. First, you are presented with the same scrolling list you used for fields and filters. Select the check box (or boxes) for the fields you want to use for sorting. When you finish, Drupal cycles through each one, asking you to pick a sort order, as shown in Figure 14.17. Click Update.
- So far, the view settings have been for the default display rather than for any specific display. To finish, add a Page display by selecting Page from the pop-up menu at the left and clicking Add Display. You can add other displays, but for now, it is a good idea to do them one at a time so that you can troubleshoot any issues.
When you have added a Page display, it will appear in the list at the left of the view editor. In addition, new settings are available in the second column that reflect settings specifically for the Page display. One setting you should set is the path to the page, as shown in Figure 14.18. After it is set, a user needs only to type in the path (or click a button or menu item linked to the path). Drupal and the view do the rest.
Note that when you are in a specific display’s settings, some of the settings are shown in italics. These are the default settings; nonitalicized settings are specific to the display.
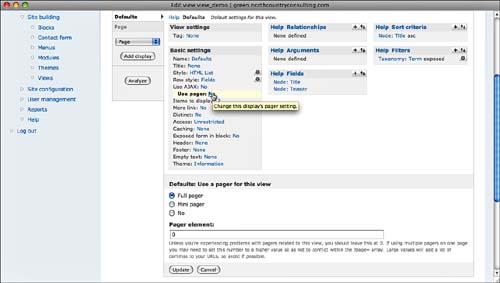
- Turn the pager on and configure the number of items per page, as shown in Figure 14.19. (For testing, use a small number of items so that you do not have to enter a lot of data.)
- Select the type of pager you want to use, as shown in Figure 14.20.
Views are incredibly powerful; they can easily become your major interface development tool if you want. They support methods for reusing your work. You can clone a view; doing so creates a copy (with _clone at the end of the name). You can then work in the clone to experiment with new features or to change it into a slightly different view.
The Export command exports the code for a view. You can then use the Import command to open a window into which you can paste the exported code. In a single Drupal environment, the clone command is usually more effective. But, you can export a view in one Drupal environment and then email it to another environment and paste it into a new view.
Views combine database queries and sophisticated displays for end users. For many Drupal sites, views are the primary tool for presenting data.
Default views are provided as part of Drupal; in addition, some modules add their own views to the list. You can use these default views as-is, or you can override them.
Q. Should the user always have access to the exposed view controls?
A. This depends on your users and your data. It is not a Drupal question, because it comes up on every database-driven website. The fundamental question is how “computer-y” do you want your website to be (and how computer savvy do you want your users to be)? Fortunately, Drupal’s role-based permissions let you expose pages to only certain roles. Thus, you can make exposed view controls available only to advanced users.
Q. My users all want different types of views for the same data. Is there much overhead in views?
A. The main overhead is in maintenance: Maintaining 20 views is more expensive than maintaining two views. One strategy is to build a view that combines the common features of the requests. (Perhaps you will have two or three basic views.) Then, put them aside and create clones; the clones can be simple variations (perhaps a change of title or a different type of pager for navigation). This may make your users happy, but may not create a maintenance nightmare. Just remember that a change to the underlying view will require that you recreate the clones.
Q. What is a good way to test views?
A. Because views combine a database query with a display of the returned data, you have to be careful that you know what should be displayed (and what should not be). If you are using a field as a filter for the view, you do not have to display that field. But, for testing, it makes sense to display all the filters as regular fields—as well as just about anything else to which you have access. Make certain that you know what is in the database so that you can verify that nothing is missing from the view’s display.
Experiment with views and show the options to your users. Discuss what the choices are. For many websites, it is easier for the users and designers (not to mention the end users) to limit the options and features to a constrained set. Use and reuse familiar components rather than throwing a whole range of options at your users (and yourself).
Designing the interface (which is what views are), is not really a technical or even aesthetic activity. Many database and interface designers believe in the adage that “the data doesn’t lie.” Do not use test data, and avoid making up data. Use real data to experience firsthand the oddities that users may have gotten used to. If you do not understand the data, you are well on the road to being able to develop a usable interface, not least so that you can make sense of the data.