
In 2000, Dries Buytaert and Hans Snijder set up a wireless bridge to share Hans’s ADSL Internet connection. After graduation, they and their friends put their simple new site onto the web where, according to Drupal’s own history (drupal.org/node/769), members began talking about new web technologies, such as moderation, syndication, ratings, and distributed authentication. Dries envisioned this as a small village, and attempted to register dorp.org as a domain name (dorp is Dutch for village). A typo resulted in the registration of drop.org. Drop.org slowly turned into a personal experimentation environment, driven by the discussions and flow of ideas. The discussions about these web technologies were tried out on drop.org itself as new additions to the software running the site. The software behind drop.org was released in 2001 as Drupal.
Over the past decade, Drupal has evolved, but its roots in what is now called social networking remain critical to its structure and its success. The original technologies of moderation, syndication, and ratings have been joined by formal constructs for user-contributed content, blogs, comments, and forums. This evolution has occurred for many reasons, including the rapid and successful rise of social networking in general.
In the first part of this book, you saw Drupal’s basic structure, including the key building block (the node) and the more recent Content Construction Kit (CCK), which allows users to create new fields and content types without writing code or modifying database tables.
This part explores a wide range of Drupal features, including blogs, newsletters, calendars, discussions, and e-commerce. What ties all these features together is that they are inherently social: They cannot exist without more than one person, and often, it takes more than a few people to reach a critical mass in a forum discussion and various other social activities.
Drupal’s social features build on its infrastructure and its history; they also are built on an extraordinarily robust set of security and other safety features. Security is one of the aspects of a system that is difficult to retrofit. (Version control is another such issue.) Without a secure environment in which people feel (and are) safe, no significant interaction can take place—at least not for long. It is much like planning a wonderful party: You may have the greatest music and the best refreshments, but without enough chairs, plates, and glasses, not even the finest herring will prevent your guests from wandering off.
Thus, this hour launches the socializing and communicating section of this book with what you need to do—and what Drupal has done for you—to create a secure, safe, and reliable environment for you and your guests.
Drupal implements a number of security components; you may not use all of them, but they are there if you want them. When you first start to think about your Drupal site (whether it is a new site or a conversion from another environment), security should be one of the first things you consider. The amount of time it takes to lay out your security strategy at the beginning is much less than the time it takes to devise it later on. (And the worst case is implementing security after the site is up and running.) There are three primary components to Drupal’s security model:
• Roles— Like many security systems today, Drupal relies on a role-based model. This means that, instead of granting or denying access to specific areas of the site for specific users, you create roles. A role is identified by a name that you specify (such as webmaster), and you grant or deny access to that role and thereby to all the users assigned to that role.
• Users— User accounts are created with a user ID and a password. As you will see, Drupal implements state-of-the-art security protections at the user level. Users are assigned to one or more roles, sometimes automatically during the registration process. A user who is assigned to a role can use any of the resources available to that role. Users have an ID and password that they select; they also have an email address that can be automatically authenticated by Drupal.
• Permissions— The actual settings for what an individual role is allowed to access. Permissions generally apply to the ability to view, edit, or delete various types of content as well as to access certain commands.
In addition to the security mechanism of roles, users, and permissions, there is the primary user, which is the user account that you created when you created the Drupal website. This cannot be deleted, and it has total access to the Drupal environment. As is the case with any superuser account, you should not use it in day-to-day work. As you will see, it is far better to create a highly privileged role, such as a webmaster that works within the Drupal security structure.
Drupal has two built-in roles. You cannot delete them, but, as with all roles, if you do not grant permissions to them, they will not be able to do much of anything. Drupal implements a mechanism for letting users log in; these roles are related to that mechanism.
• Anonymous— Users who visit your website and do not log in. They are anonymous because you do not know who they are if they have not logged in. You can change the term for anonymous users in Admin, Site Configuration, Site Information (D6: admin/settings/site-information D7: admin/settings/user). Common replacements for “anonymous” are “visitors” and “guests.”
• Authenticated— Users who have logged in with a password. You can use various options to confirm their authenticity, but the basic point is that you know who they are.
Roles interact with permissions. You may be tempted to mimic your organizational structure in roles, but that may not be the best solution. You need to create a role if people assigned to that role will have different permissions from people assigned to other roles. In a typical organization, managers and supervisors may occur in many different parts of the organization, and many of their roles are similar no matter where they work.
One strategy is to add two new roles to your Drupal website. Together with the default roles, these allow you the flexibility to manage a large website with user contributions and distributed management. You can use any names you want for these roles; their functions are what matters. These are the additional roles:
• Webmaster— This role has access to almost everything. A few built-in permissions are dangerous to grant (such as the ability to insert PHP), and you may want to reserve these for the primary user. By creating a webmaster role in addition to the primary user, people in that role will go through the security mechanism rather than totally bypassing it as the primary user does.
• Trusted user or Coordinator— This role is for a user who has an intermediate privilege set between authenticated users and webmasters. For example, a webmaster may be able to create new menus, whereas a trusted user or coordinator may be able to edit and moderate comments and forum discussions. If you use Drupal’s features that allow people to create accounts for themselves (thus becoming authenticated users), this role allows you to designate only specific people for this trusted status. The authenticated user can be self-authenticated, but a trusted user or coordinator is authenticated by someone else in the organization.
A single user can be assigned to multiple roles, with one exception. The anonymous role applies to people who are not logged in, so no one can simultaneously be assigned to the anonymous role and any other role (because the other roles are based on login information).
To create or edit a role, go to Administer, User Management, Roles (D6: admin/user/roles D7: admin/settings/roles), as shown in Figure 8.1.
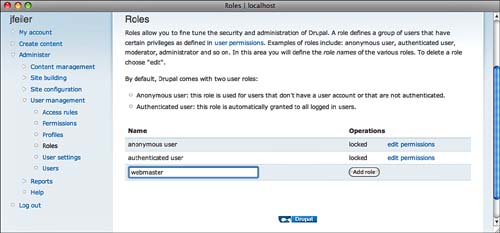
Click Edit Permissions to set the permissions for that role. The two default roles are locked. The only editing you can do to them is to change their name. You cannot delete them, although you can delete roles you have created. There is always a blank line at the bottom; to create a new role, type a name for it and click Add Role.
Set permissions at Administer, User Management, Permissions (D6: admin/user/permissions D7: admin/settings/permissions), as shown in Figure 8.2.
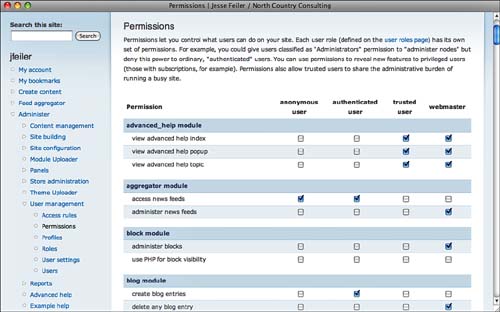
If you have added the two roles described previously, your permissions may look something like the page shown in Figure 8.2. You can add or remove permissions with a check box for the permission and role.
The role to which a user is assigned is based on that user’s login information. This means that any user who is assigned to a role, with the exception of the anonymous (not logged in) role, is an authenticated user. In the example shown in Figure 8.2, every webmaster and every trusted user must, therefore, also be an authenticated user. (This is reflected more clearly in the Drupal 7 interface where checkboxes that are irrelevant are disabled.)
If any of a user’s roles grant a permission, the user can use it. For example, the webmaster role may have permission to access news feeds because, although that permission is not granted to the webmaster role, it is granted to the authenticated role, and the webmaster automatically is authenticated as a result of having logged in.
After they are set up, roles are usually not updated often, although users can frequently be assigned and reassigned to different roles. However, permissions frequently are updated. They may be updated because of the needs of the website and the organization, but they also may need to be updated because new modules are added to the website. Often, when a module is added, it will add permissions.
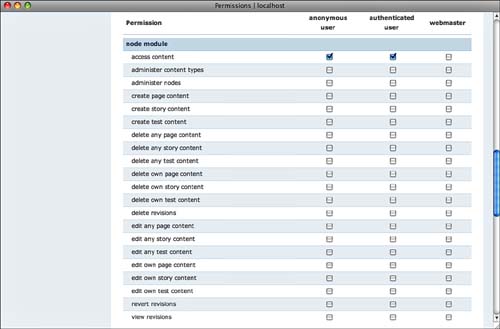
Figure 8.3 shows how new content types that you create also add their own permissions. Remember that, in your basic Drupal installation, there are only story and page content types (story and article content types in Drupal 7). Thus, the only available permissions are those for stories and pages. After a content type titled test has been created, Figure 8.3 shows what the node section of permissions looks like.
Did you Know?: Check Permissions as Your First Troubleshooting Strategy
If you add a new module to Drupal and it does not work, check permissions right away. It may need to be enabled on the Modules list and for permissions to be granted on the Permissions page.
For each node type, three basic sets of permissions refer to the actions involved:
• Create
• Delete
• Edit
Each one is further specified by ownership of the node:
• Own
• Any
As you can see in Figure 8.3, the permissions are grouped by actions in Drupal 6, so when you add a new node type (directly or as part of a module), you may have to jump around the node module section to find all the permissions you want to adjust. In Drupal 7, the permissions are grouped by content type.
If you are creating new CCK fields, you will find a section of permissions for each one of them, and that list is updated each time you add a CCK field.
Did you Know?: Use Webmaster to Spot New Permissions
If you have a role such as webmaster, you can consider whether to enable all permissions (except the most dangerous ones) for that role. That way, when you add new permissions via new modules or in any other way, a quick scan down the webmaster column shows you the new permissions because they will be unchecked. This quickly lets you adjust those permissions for all roles.
There are three aspects relating to users that you need to configure:
• Rules determining domains, hosts, and email addresses that will be allowed or denied access to the website.
• Settings for users, including automated emails to be sent on account creation, confirmation, and so forth.
• User accounts. You can let Drupal provide email authorization and screening of accounts based on the access rules so that most accounts can be created by the users themselves.
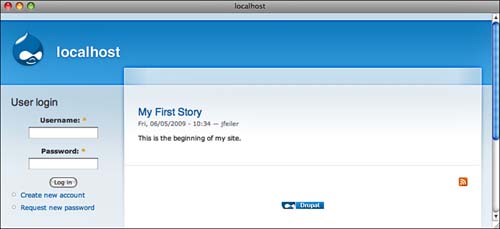
The user tools all rely on a user ID and password; the default interface, shown in Figure 8.4, allows users to enter their own ID and password, create a new account, or request a new password.
Access rules can be managed at Administer, User Management, Access Rules (admin/user/rules), as shown in Figure 8.5.
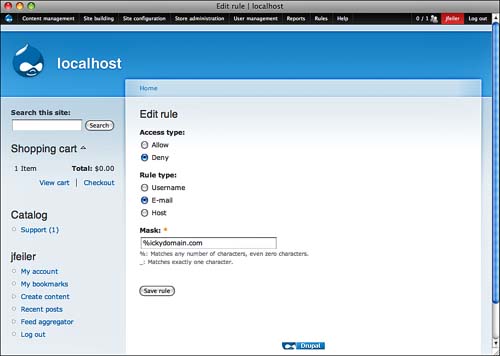
This is a powerful screening mechanism that is all the more powerful because, after it is set up, you do not have to worry about it again.
The example shown in Figure 8.5 will deny access to anyone who attempts to register with an email address from ickydomain.com. There are many examples of internal websites where you want to reverse the process and allow access only from a specific domain—your own company or school, for example.
After you save an access rule, you can test it with the Check Rules page, shown in Figure 8.6.
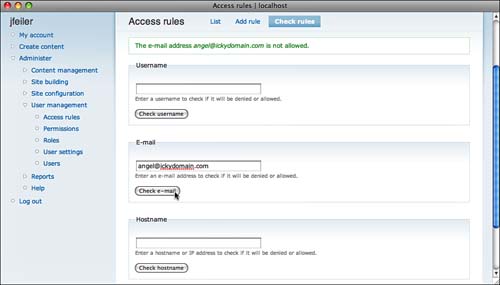
By default, no access rules are created or enabled. Do not skip this step lightly: It can dramatically improve your site’s security.
As with so much of Drupal, spending a little time up front can save a great deal of time later. The user registration process can be completely automated, and to get the most out of it (for you and your users), set up the registration process thoroughly.
Did you Know?: Make Sure You can Send Email
Much of Drupal’s automated user management relies on email. If your Drupal installation cannot send email through an SMTP server, these tools will not work. Most hosting and shared hosting environments provide outgoing email. You are most likely to encounter difficulties on test installations using localhost.
Begin by setting up Access Rules as described in the previous section. They will provide a basic filter for your users. Then, adjust the registration settings in Administer, User Management, User Settings (D6: admin/user/settings D7: admin/settings/user), as shown in Figure 8.7.
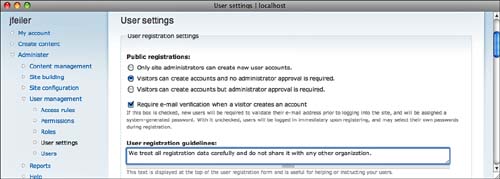
The set of radio buttons at the beginning is the key to the entire user registration system. You have to decide which of the three settings you want:
• No public registration—all accounts created by administrators.
• Public registration allowed but held in limbo until approved by an administrator.
• Public registration subject to the access rules.
Your choices obviously depend on your website and its sponsoring organization. One way of eating your cake and having it is to use a role, such as the trusted user role suggested earlier in this hour. You can allow public registration with only the access rules limits, and an administrator can then manually move selected users to a new role, such as trusted user.
It makes sense to check the box so that Drupal sends an email message that must be responded to. This verifies the email address in a basic way—it exists and is somehow associated with the person submitting it. (In other words, if someone registers with an email address at the domain mickeymouse.gov, chances are that the required response from the mickeymouse.gov domain will not be received and the user account will not be created.)
The remaining options on this page are all designed to customize the user registration experience and answer many of the questions that new users may have. For example, the guidelines you are asked to provide are shown on the registration page, and they let users know that you will safeguard their data if you use text such as this. You can also let people know that, after they have registered, they can apply for an upgrade to another status level (if you provide that). Think of every question that might be raised, and attempt to answer it in advance.
By the Way: Reassure Users About Security
For example, you might mention that passwords can always be reset by the user, but they are stored in an unreadable (hashed) format so people need not worry that their passwords will be exposed through Drupal.
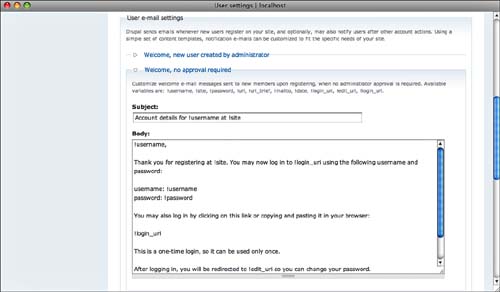
As you can see in Figure 8.8, you then provide the text for email messages that will be sent automatically when a new account is created by an administrator or when one is created by a user. Note that the message can contain placeholders, such as !username for the username that a user has selected or been given.
Did you Know?: Prepare for Future Messages
Although you can leave the defaults in place, it makes sense to go through every option on this page, even if you are not using it (for example, if you do not think you will use the option to block accounts). By reviewing the texts, you can make certain that if you do decide in the future to use additional functionality, the email messages that are sent will be appropriate.
Feel free to add whatever information is relevant and specific to your organization and website.
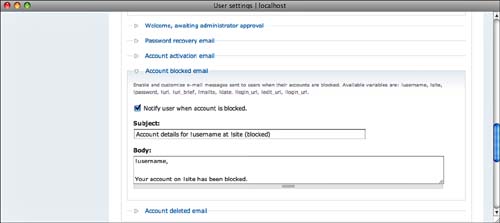
Further down the page, you can provide text for other messages, such as the message a user receives when attempting to reset a password or when a user’s account has been blocked, as shown in Figure 8.9.
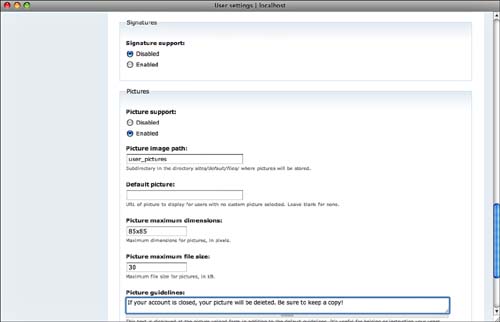
Finally, as shown in Figure 8.10, you can specify whether users can provide a signature and whether they can upload pictures.
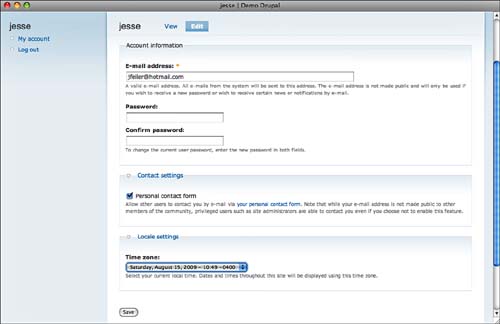
Depending on how you have set up user registration settings, you may now be ready to add users to your site. If you allow self-registration, users can edit their own settings under My Account, as shown in Figure 8.11.
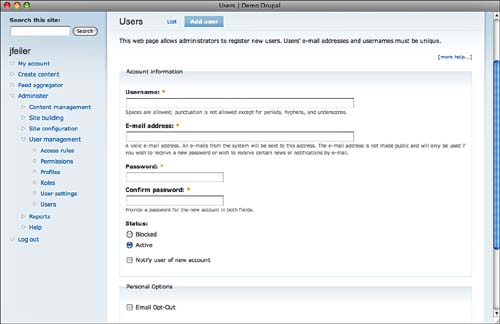
If you (or another administrator) create user accounts, a similar page is used under User Management, Users, with the Add User button (D6: admin/user/user/create D7: admin/people/create), as shown in Figure 8.12.
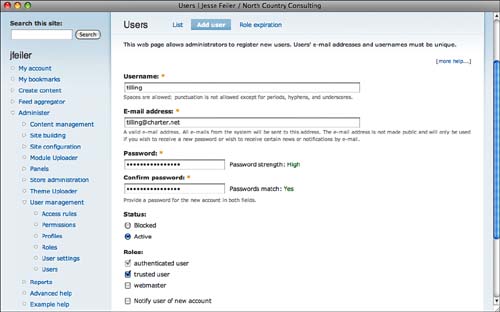
Note that this is where an administrator can assign a user to specific roles.
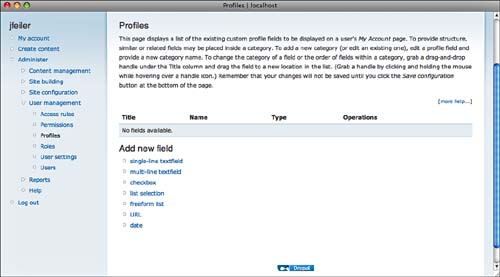
The Profile module, located in Core—Optional, lets you add fields to user profiles. After you enable it, a Profiles section is added to User Management, as you can see in Figure 8.13.
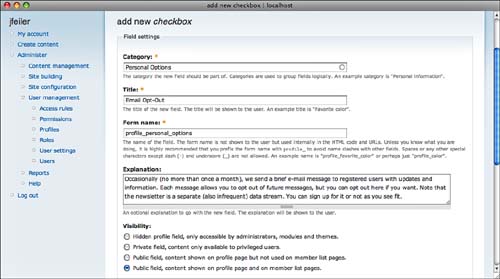
Because you are collecting verified email addresses for your users, you may want to use them for your bulk email database. If you do so, you may need to allow people to opt out of email messages. Depending on the laws that govern you, you may need to disclose with an opt-out choice that email addresses will be used. In the United States, certain types of email messages are allowed without consent. If, for example, your users are customers or active students in your school, you can legitimately email them on those matters. For general websites open to the public, however, you may want to add the email opt-out option so that you can use the email addresses. (Even if you do not anticipate doing so now, you can set it up so that you can use it in the future.)
Figure 8.14 shows how you can add an email opt-out button to a user profile.
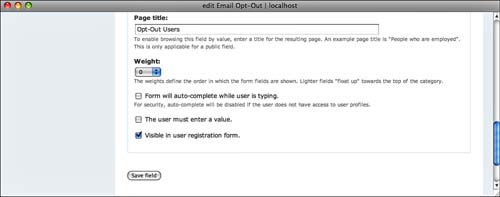
At the bottom of the page are more settings for the field you are adding as shown in Figure 8.15. Perhaps the most important is the check box that indicates whether the field is required.
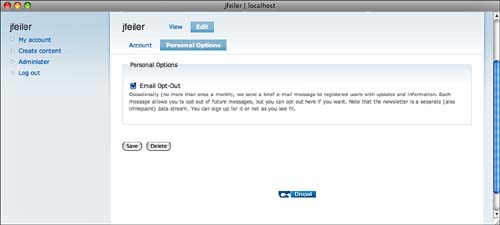
After you add the button, users who edit their accounts (using My Account from the Navigation menu) see the personal options shown in Figure 8.16.
When a new user account is being created, these fields are displayed, and, if you have required them, Drupal will make sure that they are filled in before the account is accepted. Figure 8.17 shows the page for creating an account by an administrator; the self-creation field for users is similar.
There is a small contributed module called Profile CSV that provides the link between Drupal and a bulk mail system, such as Constant Contact or Vertical Response. It produces a comma-separated-value (CSV) file that you can upload to your bulk email account. (You must review the terms of your bulk email account so that the text in your user account registration form and emails reflects any disclosure you must make. The email opt-out button is one type of implementation, but it is not correct for all situations.)
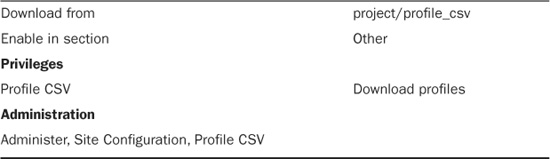
Download, install, and enable Profile CSV as described in Table 8.1.
You configure Profile CSV using Administer, Site Configuration, Profile CSV (admin/settings/profile_csv), as shown in Figure 8.18.
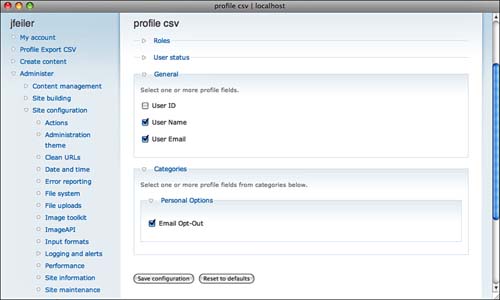
You do not select which records to export here. Everything will be exported; you will need to select the records to upload by selecting on the export opt-out field. If you are using the logic shown here, remember that opt-out will have a value of 1, so you want to select all records that are not equal to 1.
Profile Export CSV appears in the Navigation menu for users who have the Administer Users permission. A file will be created and opened. You can import it into a spreadsheet to select the appropriate values of your check box or other fields before you upload it to your bulk email system.
This hour showed you Drupal’s basic security mechanism, which is a role-based model in which users are assigned to roles, and the roles have (or do not have) permission to access various resources. The structure is simple yet powerful.
You can automate the entire process of user authentication with the default Drupal settings. Many sites augment the two default roles (anonymous and authenticated users) with one or two other roles that have more permissions than authenticated users but fewer than the primary user, who has total access to the site.
Q. Is it possible to create conditional permissions so that permission is contingent on content?
A. Permissions are specified with check boxes and are assigned to roles. You can change the roles to which a user is assigned at runtime, but the structure is not designed for the conditional conditions described here.
Q. Other than writing code, is there any way to extend Drupal’s permissions structure?
A. Permissions control access to functionality and content types. It is perfectly legitimate to create a content type that is identical to another content type and use one of them with different permissions. Just remember that they are different content types and the data is stored separately for each one.
Q. Can two people share an account?
A. This is up to you and the project on which you are working. An account is associated with a single email address; usually, it is associated with one person. If several people need to share an account, you may be describing something that should be a role.
1. What is the difference between an authenticated user and an anonymous user?
2. How can you remove the Create Account link in the login box?
3. How are passwords stored?
Quiz Answers
1. Authenticated users have logged in with a user ID and password. Anonymous users have not.
2. In Access Rules, use the No Public Registration radio button.
3. They are stored in an encrypted hash and are generally not readable. “Generally” is key because the hash used in Drupal 6 was considered secure at the time; it is being changed in Drupal 7 to another hash that is now considered secure (but it, too, in time, will fail).