
Part 1. Getting Started
Mac OS X 10.5 Leopard is the latest big cat in a line that started with version 10.0 (Cheetah) and also included 10.1 (Puma), 10.2 (Jaguar), 10.3 (Panther), and 10.4 (Tiger). So has the leopard changed its spots?
Yes and no. Mac OS X 10.5 is still many times more powerful than older systems, completely modern, capable of handling the latest innovations in hardware, and as easy to use as any Mac system that has gone before. But there are definitely some new spots in Leopard that users are going to love.
The starting point for any exploration of Mac OS X is the desktop: what you see when your Mac has finished starting up. The desktop is operated by a program called the Finder, and it’s a central location where you’ll gain access to your disks and their contents, move files around, and keep track of what your computer’s up to—sort of like a hotel or office building lobby. This section covers the basics of working with the Finder, as well as other functions that work the same no matter what program you’re using.
Mac OS X’s Desktop

Touring the Desktop
If you’ve used a Mac before, Mac OS X’s desktop won’t look completely new to you—just a bit unfamiliar. On the other hand, if you’re new to computers, concepts like windows, icons, and menus might need a little explanation. Either way, this tour of the Mac OS X desktop should set you on your way.

Note: It’s Okay to Explore
If you’re not sure what something on the desktop does, try clicking or double-clicking it—it’s safe to explore and experiment. If something does go wrong, you can usually undo the last thing you did by pressing ![]() +Z or choosing Edit>Undo.
+Z or choosing Edit>Undo.
Note: Making the Desktop Your Own
Turn to the task called “Changing Your Desktop Picture” in Part 5, “Customizing the Mac,” to learn how to change the desktop picture so you’ll truly feel at home when you sit down in front of your Mac.
![]()
![]()
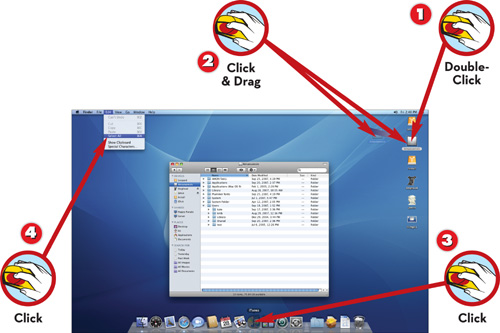
![]() Double-click to view a window showing the contents of a drive or folder.
Double-click to view a window showing the contents of a drive or folder.
![]() Click and drag to move icons on the desktop.
Click and drag to move icons on the desktop.
![]() Click objects in the Dock to activate them.
Click objects in the Dock to activate them.
![]() Click a menu name, drag the mouse down, and release the mouse button on the menu item you want to use.
Click a menu name, drag the mouse down, and release the mouse button on the menu item you want to use.
![]() Click the Apple icon in the left corner of the screen to access the Apple menu where you can perform tasks that affect your whole computer.
Click the Apple icon in the left corner of the screen to access the Apple menu where you can perform tasks that affect your whole computer.
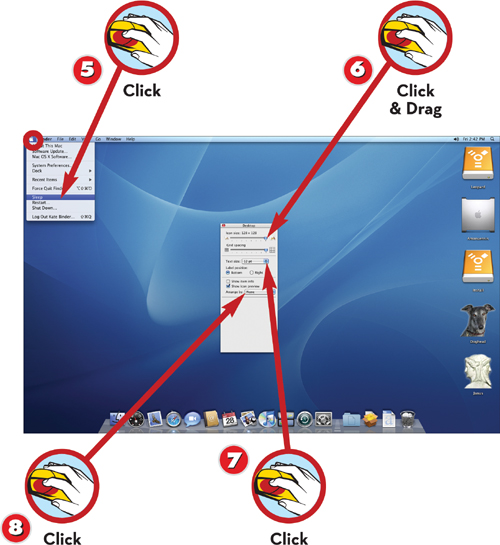
![]() Choose View, Show View Options to open the View Options dialog box. Drag the Icon size slider to change the size of desktop icons.
Choose View, Show View Options to open the View Options dialog box. Drag the Icon size slider to change the size of desktop icons.
![]() Change the Text size and Label position settings to change the appearance of icon labels.
Change the Text size and Label position settings to change the appearance of icon labels.
![]() Check any of the other options or choose an option from the Arrange By pop-up menu to set other options for files, folders, and drives on the desktop.
Check any of the other options or choose an option from the Arrange By pop-up menu to set other options for files, folders, and drives on the desktop.
Note: Where’s the Trash?
If you’ve used pre-OS X Macs, you’re probably looking for the Trash, which used to live on the desktop. It’s in the Dock now, but you can put it back on the desktop if you like by using a little program called iCan (www.kanzu.com).
![]()
Tip: Cleaning Up the Place
When your desktop gets cluttered files and folders so that it’s impossible for you to find anything, choose View, Clean Up to line up all the icons on the desktop in neat rows, so you can see what you’ve got.
Using the Dock
The Dock serves more than one function. First, it’s where you can see which programs are running and switch among them. The Dock contains an icon for each active program at any given time. Second, it’s a good place to store things you use often, whether they’re programs, folders, or documents. And finally, it’s where you’ll find the Trash. The Dock has a vertical line dividing its two sides. Program icons are stored on the left side, whether the programs are running or not, and folders and documents you add to the Dock yourself are stored on the right side.
![]()
![]()
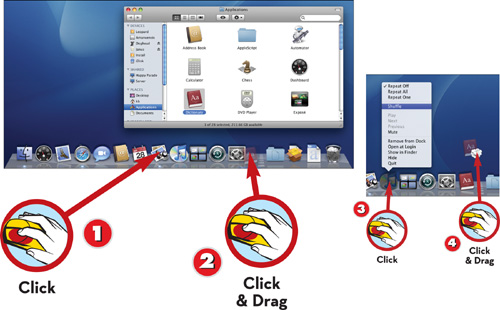
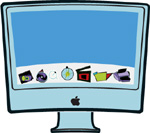
![]() Click a program icon in the Dock to switch to that program (if it’s running) or to start it up (if it’s not running). Running programs are indicated by glowing dots under their icons.
Click a program icon in the Dock to switch to that program (if it’s running) or to start it up (if it’s not running). Running programs are indicated by glowing dots under their icons.
![]() Drag programs from the desktop into the Dock’s left side and documents or folders from the desktop into the Dock’s right side to store them for easy access.
Drag programs from the desktop into the Dock’s left side and documents or folders from the desktop into the Dock’s right side to store them for easy access.
![]() Click and hold an icon in the Dock to see a menu of actions you can perform on that object or a list of folder contents.
Click and hold an icon in the Dock to see a menu of actions you can perform on that object or a list of folder contents.
![]() Drag icons of files, folders, and inactive programs off the edge to remove them from the Dock in a puff of virtual smoke.
Drag icons of files, folders, and inactive programs off the edge to remove them from the Dock in a puff of virtual smoke.
Note: Disappearing Act
When you drag programs or documents off the Dock, they disappear in a puff of smoke. But don’t worry about the original files—they’re still on your hard drive. Dock icons are just pointers to the files, not the files themselves.
![]()
Tip: Moving Day
If you don’t like the order of the icons in the Dock, you can drag and drop them into an order that suits you better.
Moving and Resizing Windows
Mac OS X is full of windows: document windows, folder windows, more windows than you can count. The Finder shows you the contents of each folder or disk in a window. Each of your open documents—a picture, a text file, a web page, and so on—appears in a window, too. All these windows, whether they belong to the Finder or to the program in which you’re viewing or editing a document, have certain features in common. Knowing how to get windows to go where you want them is an important skill you’ll use every hour of your Mac’s life.
![]()
![]()
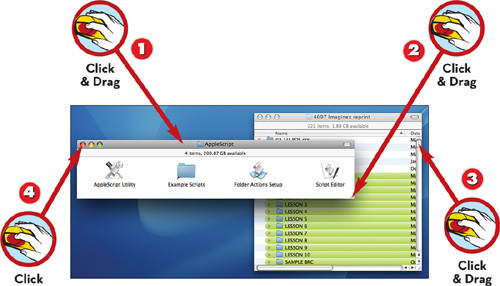
![]() To move a window so you can see what’s underneath it, click its title bar and drag the window to a new position.
To move a window so you can see what’s underneath it, click its title bar and drag the window to a new position.
![]() Click and drag the lower-right corner of a window to change the window’s size.
Click and drag the lower-right corner of a window to change the window’s size.
![]() View the remaining contents of a window by clicking and dragging the scrollbars.
View the remaining contents of a window by clicking and dragging the scrollbars.
![]() To close a window, click the red button at the left end of the window’s title bar.
To close a window, click the red button at the left end of the window’s title bar.
Note: More to Windows Than Meets the Eye
Keep reading for more about wrangling windows. The next task shows you how to mainimize and maximize your windows—the results might not be quite what you’re expecting.
Minimizing and Maximizing Windows
Although windows are a great way to look inside folders, they never seem to open at just the right size for what you’re trying to see. Getting the most from your windows requires learning to maximize their size and minimize them out of sight.
![]()
![]()
![]() Click the green button at the left end of a window’s title bar to size the window so that it shows its entire contents—or as much as will fit on the screen.
Click the green button at the left end of a window’s title bar to size the window so that it shows its entire contents—or as much as will fit on the screen.
![]() Click the green button again to return the window to its previous size.
Click the green button again to return the window to its previous size.
![]() Click the yellow button at the left end of a window’s title bar to shrink the window downward into the right side of the Dock.
Click the yellow button at the left end of a window’s title bar to shrink the window downward into the right side of the Dock.
![]() Click the window’s thumbnail image in the Dock to put it back onto the desktop.
Click the window’s thumbnail image in the Dock to put it back onto the desktop.
Note: Window Identification
Each minimized window in the right side of the Dock has a small icon attached to its lower-right corner that identifies the program to which the window belongs. Folder and disk windows belong to the Finder, so they have a Finder logo.
Note: The Wonders of Windows
The Dock continuously updates the appearance of minimized document windows. For example, if you minimize a movie window while the movie’s playing, you can monitor the movie’s progress while its window is in the Dock.
Managing Multiple Windows
Exposé is a handy way to cut through window clutter instantly, no matter what program you’re using. And if you tend to use a lot of programs at the same time, you’ll definitely find Exposé’s three functions very useful. They use the function keys, the row of “F” keys at the top of your keyboard.
![]()
![]()
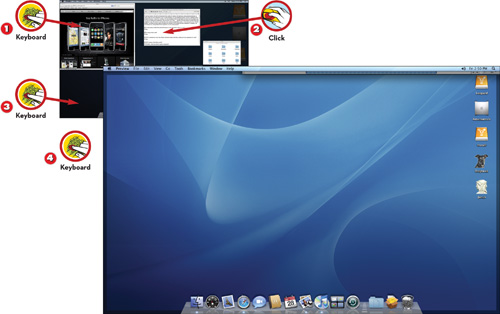
![]() Press F9 to scale down and tile all open windows.
Press F9 to scale down and tile all open windows.
![]() Click to select the window you’re looking for and return all the windows to their normal size.
Click to select the window you’re looking for and return all the windows to their normal size.
![]() Press F10 to tile all the windows in the current program and shade other windows.
Press F10 to tile all the windows in the current program and shade other windows.
![]() Press F11 to hide all windows so you can see the desktop.
Press F11 to hide all windows so you can see the desktop.
![]()
Tip: For Those Who Prefer the Mouse
Choose Apple menu, System Preferences, and click Exposé & Spaces to assign the Exposé functions the screen’s corners. Then perform any of these magical actions by simply positioning your mouse in the appropriate corner.
![]()
Tip: One Window at a Time
Any time you’ve used Exposé to tile windows, either by pressing F9 or F10, you can highlight each window in turn by pressing
![]() -’ repeatedly. When you reach the window you want, click to activate it.
-’ repeatedly. When you reach the window you want, click to activate it.
Using Custom Spaces
Time to quit work and take a break! But wait—if you close all your Finder and document windows, you’ll have to open them all back up again when you return to work. There’s a better way—change Spaces. You can set up custom configurations of programs and documents that appear when you switch to the appropriate Space and slide neatly off the side of the screen when you switch to another Space. Switch back to the first Space, and there are all your windows, just waiting for you.
![]()
Tip: Making More Spaces
To add more Spaces, go to the Spaces preferences in System Preferences and click the Rows and Columns icons in the display window. You can create up to 16 Spaces, in four columns and four rows. For efficiency’s sake, don’t set up more spaces than you’re actually going to use, however.
![]()
Tip: A Spacey Shortcut
Flip back and forth among your different Spaces by holding down Control and pressing the arrow keys.
![]()
![]()
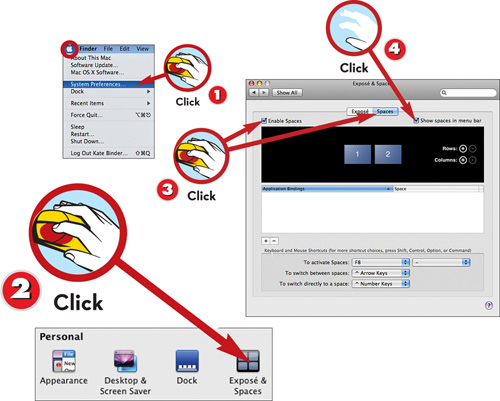
![]() Choose Apple menu, System Preferences.
Choose Apple menu, System Preferences.
![]() Click Exposé & Spaces to display the Exposé & Spaces preferences.
Click Exposé & Spaces to display the Exposé & Spaces preferences.
![]() Click the Spaces tab, and then click the check box labeled Enable Spaces to turn Spaces on.
Click the Spaces tab, and then click the check box labeled Enable Spaces to turn Spaces on.
![]() Click the check box labeled Show spaces in menu bar to add a Spaces menu to your menu bar.
Click the check box labeled Show spaces in menu bar to add a Spaces menu to your menu bar.
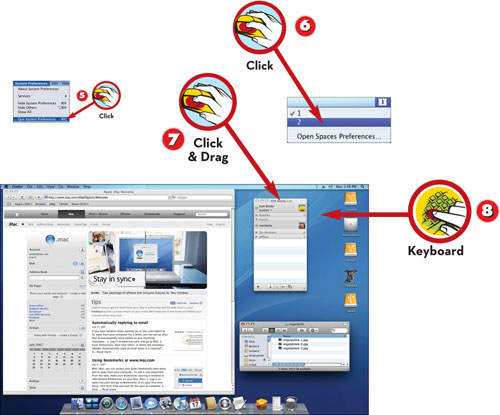
![]() Choose System Preferences, Quit System Preferences to apply your changes.
Choose System Preferences, Quit System Preferences to apply your changes.
![]() Choose a Space from the menu bar by clicking its number.
Choose a Space from the menu bar by clicking its number.
![]() Open programs and documents and arrange windows to set up your custom workspace.
Open programs and documents and arrange windows to set up your custom workspace.
![]() Switch out of this Space and into another by choosing a different number from the menu bar or by pressing Control and a different Space’s number.
Switch out of this Space and into another by choosing a different number from the menu bar or by pressing Control and a different Space’s number.
![]()
Tip: Check ’Em Out
To see previews of all your Spaces, click the Spaces icon in the Dock or press F8. Click the Space to which you want to switch. (You can change the keyboard shortcut to a different key if you prefer.)
Note: Blast Off with Spaces
How about a space for work, with project folders open and Mail running? Or one for web surfing, with your browser and iChat open? Or even a minimalist Space with nothing at all open?
Using Contextual Menus
The more you use your Mac, the more you’ll appreciate time-saving techniques. Contextual menus pop up right where you’re working, instead of requiring you to mouse up to the menu bar or take your hands off the mouse to use the keyboard. Their contents vary depending on what you’re doing at the time.
![]()
![]()
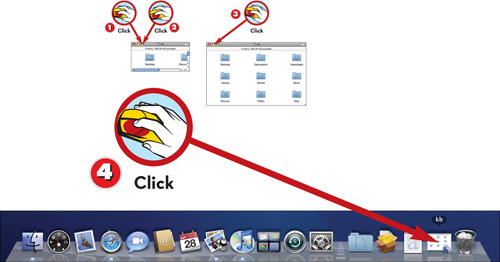
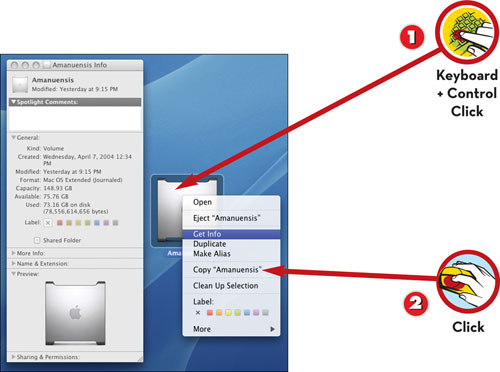
![]() Press Control and click any object on the desktop.
Press Control and click any object on the desktop.
![]() Click the contextual menu command you want to perform.
Click the contextual menu command you want to perform.
![]()
Tip: Remember the Context
Contextual menus contain different options depending on what you click to see them. Try Control-clicking the desktop itself, and don’t forget to Control-click objects in document windows, such as pictures or misspelled words.
Note: The Easy Way
If you have a multibutton mouse, you can use the software that came with it to program one of the buttons to perform a Control-click.
Restarting or Shutting Down the Mac
As commands that affect the entire system, Restart and Shut Down are located in the Apple menu, so you can access them from any program rather than having to switch to the Finder, as in pre-OS X versions of the Mac OS. You’ll use Restart most often after installing new software, and you’ll use Shut Down when you want to turn off your computer.
![]()
![]()
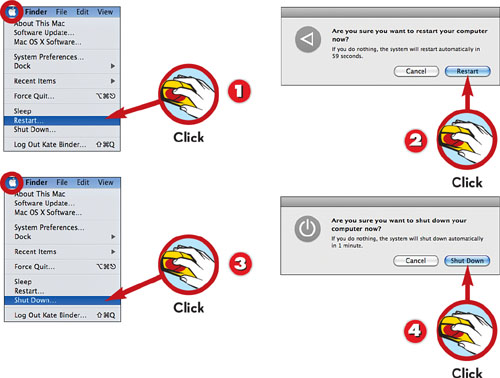
![]() To restart the Mac, choose Apple menu, Restart.
To restart the Mac, choose Apple menu, Restart.
![]() In the dialog box, click Restart. Click Cancel to exit the dialog box without restarting.
In the dialog box, click Restart. Click Cancel to exit the dialog box without restarting.
![]() To shut down the Mac, choose Apple menu, Shut Down.
To shut down the Mac, choose Apple menu, Shut Down.
![]() In the dialog box, click Shut Down. Click Cancel to exit the dialog box without shutting down.
In the dialog box, click Shut Down. Click Cancel to exit the dialog box without shutting down.
![]()
Tip: No Fresh Start Needed
You don’t have to restart the Mac if you only want to switch users. Choose Apple menu, Log Out instead; this command quits all running programs and presents you with the login screen, but it doesn’t require the computer to completely reboot.
![]()
Tip: As Easy as Pressing a Button
On a Mac laptop, press the Power key briefly to bring up a dialog asking you whether you want to restart, shut down, or sleep your Mac.
Setting Basic System Preferences
You can’t customize everything about your Mac, but you can get darn close (for more customization techniques, turn to Part 5). Here’s a look at the most basic preferences you’ll want to set on a new Mac.
Note: Blue Versus Graphite
Your Appearance color preference starts out set to Blue. If you switch it to Graphite, all your dialog box buttons, menu highlights, and window components turn graphite gray. The only problem you might encounter with that setting is that the Close, Minimize, and Maximize buttons—normally red, yellow, and green, respectively—also turn gray. You can still tell them apart by placing the cursor over them; an X appears in the Close button, a minus sign in the Minimize button, and a plus sign in the Maximize button.
![]()
![]()
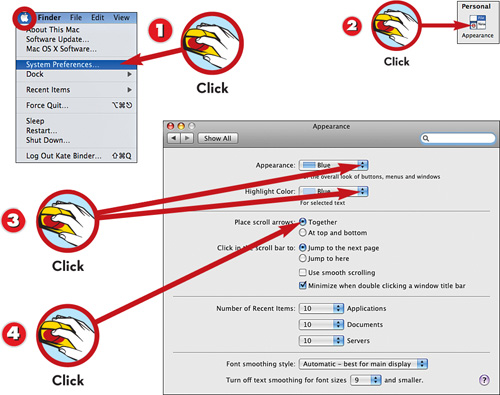
![]() Choose Apple menu, System Preferences.
Choose Apple menu, System Preferences.
![]() Click Appearance to display the Appearance preferences.
Click Appearance to display the Appearance preferences.
![]() Choose colors from the Appearance pop-up menu (for scrollbars, buttons, and menus) and the Highlight Color pop-up menu (for selected text and objects in list view).
Choose colors from the Appearance pop-up menu (for scrollbars, buttons, and menus) and the Highlight Color pop-up menu (for selected text and objects in list view).
![]() Click a radio button to put scrollbar arrows together or at the top and bottom of each window.
Click a radio button to put scrollbar arrows together or at the top and bottom of each window.
![]() Click a radio button to choose how far clicking in the scrollbar scrolls the window.
Click a radio button to choose how far clicking in the scrollbar scrolls the window.
![]() Choose the number of recently used applications and documents that will appear in the Apple menu.
Choose the number of recently used applications and documents that will appear in the Apple menu.
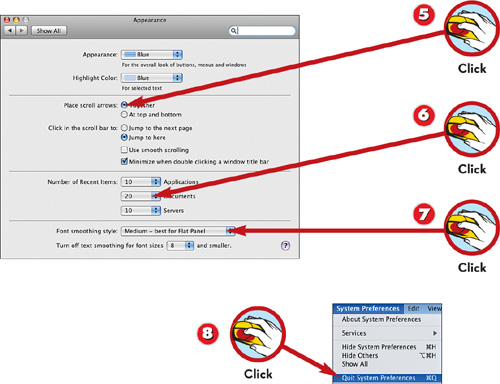
![]() Choose a font smoothing style and size from the pop-up menus.
Choose a font smoothing style and size from the pop-up menus.
![]() Choose System Preferences, Quit System Preferences to apply your changes.
Choose System Preferences, Quit System Preferences to apply your changes.
![]()
Tip: Scroll, Scroll, Scroll Your Window
Here’s how the scrollbar settings work: Jump to the next page moves the view up or down one screenful when you click in the scrollbar. With long documents, you might prefer Jump to here, which moves the view to the location within the document that approximates the location of your click. In other words, click halfway down the scrollbar to see the document’s midpoint. These settings apply within both application windows and folder windows in the Finder.
Using Universal Access
Universal Access provides alternative ways of viewing the Mac’s screen, hearing the sounds it makes, using the keyboard, and using the mouse. For example, if you can’t hear alert sounds, you can set the screen to flash instead, calling your attention to what’s happening just as clearly as an alert sound would.
![]()
Tip: Shortcuts to Access
No matter which Universal Access settings you want to use, you should click Allow Universal Access Shortcuts. This option activates the keyboard shortcuts shown on each tab of the Universal Access preferences pane.
Note: Yakkety Yak
VoiceOver is the first setting in the Seeing section of the Universal Access preferences. This feature enables you to control your Mac with voice commands. Turn to the next task to learn more.
![]()
![]()
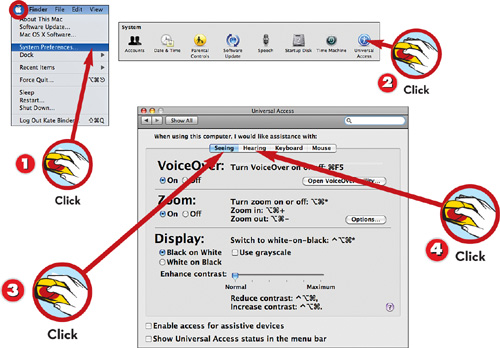
![]() Choose Apple menu, System Preferences.
Choose Apple menu, System Preferences.
![]() Click Universal Access.
Click Universal Access.
![]() Click the Seeing tab and click the buttons to turn on the Zoom feature or switch to white text on a black background.
Click the Seeing tab and click the buttons to turn on the Zoom feature or switch to white text on a black background.
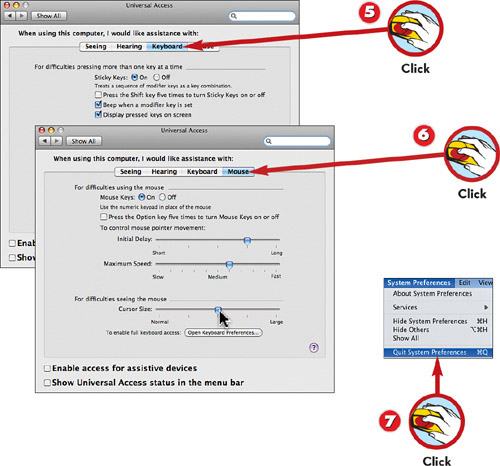
![]() Click the Hearing tab and click the check box to flash the screen when an alert sound is played.
Click the Hearing tab and click the check box to flash the screen when an alert sound is played.
![]() Click the Keyboard tab and choose from the various keyboard options.
Click the Keyboard tab and choose from the various keyboard options.
![]() Click the Mouse tab and choose from the various mouse options.
Click the Mouse tab and choose from the various mouse options.
![]() Choose System Preferences, Quit System Preferences to apply your changes.
Choose System Preferences, Quit System Preferences to apply your changes.
Note: Special Assistance
The Enable access for assistive devices setting at the bottom of the Universal Access preferences pane enables you to use special equipment to control your Mac, such as head tracking devices with which you can move the cursor by moving your head.
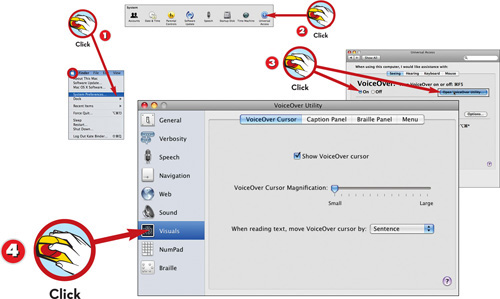
Setting Up VoiceOver
With VoiceOver, you can use the keyboard and Mac speech features to control your computer. Standard keyboard commands are augmented by special commands to enable you to start up, switch, and control programs, and to move around your hard drive.
Note: More or Less
The Display settings determine how evident VoiceOver is as you use your Mac. For example, you can turn on the VoiceOver cursor to hear spoken descriptions of the objects and dialog boxes under your cursor, or you can turn off the cursor to hide this feature.
![]()
![]()
![]() Choose Apple menu, System Preferences.
Choose Apple menu, System Preferences.
![]() Click Universal Access.
Click Universal Access.
![]() Click On to enable VoiceOver, and then click Open VoiceOver Utility to configure VoiceOver settings.
Click On to enable VoiceOver, and then click Open VoiceOver Utility to configure VoiceOver settings.
![]() Click Visuals to control when and how the VoiceOver feature is invoked.
Click Visuals to control when and how the VoiceOver feature is invoked.
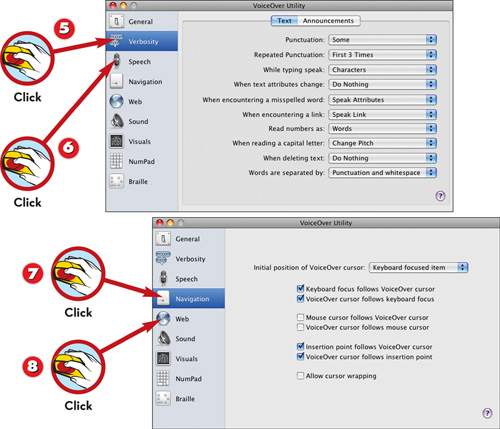
![]() Click Verbosity to control how much VoiceOver talks.
Click Verbosity to control how much VoiceOver talks.
![]() Click Speech to change the voice VoiceOver uses.
Click Speech to change the voice VoiceOver uses.
![]() Click Navigation to control how VoiceOver moves around your screen.
Click Navigation to control how VoiceOver moves around your screen.
![]() Click Web to set how VoiceOver interprets web pages for you.
Click Web to set how VoiceOver interprets web pages for you.
![]()
Tip: PatienceOver
The level of your Verbosity settings should be inversely proportional to your patience. If you want to get moving without listening for very long, turn down the Item Description and Punctuation settings.