
Part 6. Organizing Your Life
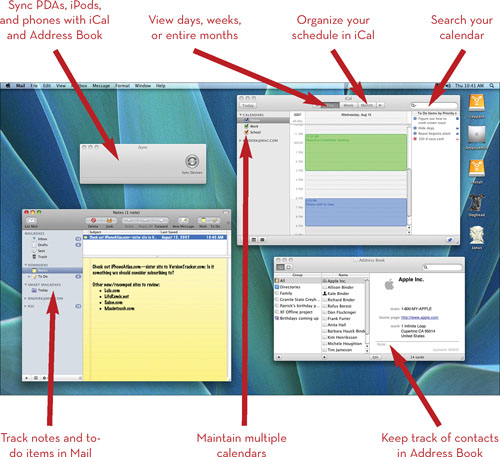
Mac OS X includes several programs that work together to keep you organized: Address Book, iCal, and iSync. Address Book is a contact manager where you can store your friends’, family members’, and colleagues’ names, addresses, and phone numbers along with their instant messaging IDs, websites, and email addresses. iCal keeps track of your appointments and a to-do list, and it can both publish and subscribe to calendars so you can share them with others. And iSync makes sure that all the data in Address Book and iCal is available to your PDA, phone, or other device so you’re never without it.
In this Part you’ll learn how to create and organize contacts in Address Book and how to use the program to view a map of a contact’s address. iCal Tasks show how to create appointments and to-do lists and how to invite Address Book contacts to events; how to search calendars; and how to publish, subscribe to, and print calendars. Finally, you’ll learn how to use iSync to keep all your information straight across devices and how to find essential information on the Net with Sherlock.
Working with Contacts and Schedules
Adding Contacts to Address Book
Mac OS X’s Address Book is accessible systemwide, meaning its information can be used by other programs such as iChat, Mail, and even Microsoft Word. Adding contacts and sorting them into groups is easy, and Address Book has an up-to-date selection of information fields, including places to stash online messaging IDs.
![]()
![]()
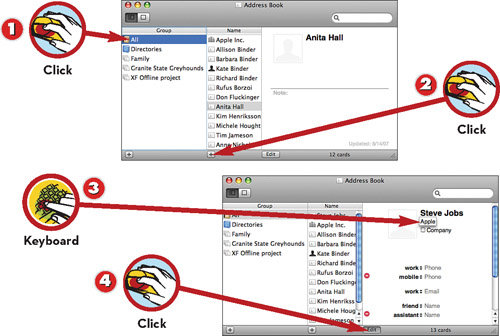
![]() Click the group name to which you want to add the contact.
Click the group name to which you want to add the contact.
![]() Click the + button below the list of contacts in that group.
Click the + button below the list of contacts in that group.
![]() Type the person or company’s name and other information.
Type the person or company’s name and other information.
![]() Click Edit to complete the contact.
Click Edit to complete the contact.
![]()
Tip: Edit This
The Edit button is also where you should head (or, more specifically, click) when you want to make changes to an existing Address Book entry. To apply your changes, click Edit again, or you can just click another contact or group instead.
Creating Groups of Contacts
You can use Address Book’s groups many ways. For example, you can create a group of people working on a current project so you can email them all at once. Or you can create a group of addresses for holiday cards so you can print address labels. Each contact can be in as many groups as you want to put it in.
![]()

![]()
![]() Click the + button under the list of groups.
Click the + button under the list of groups.
![]() Give the new group a name.
Give the new group a name.
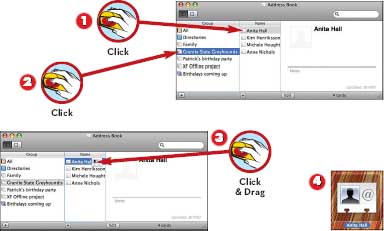
![]() Click All or another group that contains the contacts you want to add to the new group.
Click All or another group that contains the contacts you want to add to the new group.
![]() Drag the contacts into the new group.
Drag the contacts into the new group.
![]()
Tip: A Two-Way Street
Creating a new group can work backward, too. First,
![]() -click to select the contacts you want to put in the group; then choose File, New Group from Selection.
-click to select the contacts you want to put in the group; then choose File, New Group from Selection.

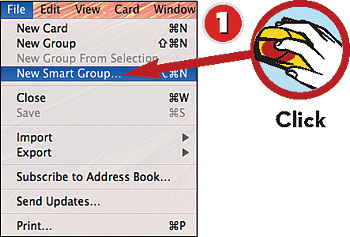
Creating a Smart Group
You create smart groups in the Address Book, but your Mac maintains them. After you determine the criteria for a contact’s inclusion in a smart group, the Mac makes sure that the right contacts are sorted into that group at all times, even after you’ve changed contact information or added new contacts.

Note: What’s It Good For?
Use smart groups to track contacts’ birthdays, anniversaries, or other important dates; collect all contacts from a particular company into a single group; or look up which friends and family members live near your next vacation spot.

![]()
![]()
![]() Choose File, New Smart Group.
Choose File, New Smart Group.
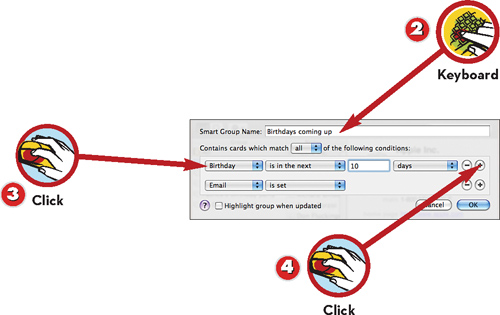
![]() Type a name for the group.
Type a name for the group.
![]() Choose criteria for the group’s members.
Choose criteria for the group’s members.
![]() Click + to add criteria.
Click + to add criteria.
![]() Click the box labeled Highlight group when updated to have Address Book highlight the group’s name when it contains new members.
Click the box labeled Highlight group when updated to have Address Book highlight the group’s name when it contains new members.
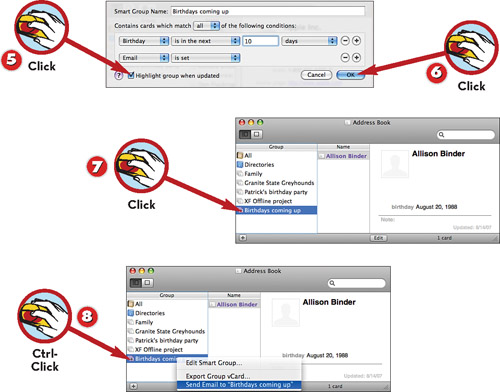
![]() Click OK to create the group.
Click OK to create the group.
![]() Click the group’s name to see its members in the Name column.
Click the group’s name to see its members in the Name column.
![]() Control-click the group’s name to email its members or export their contact data.
Control-click the group’s name to email its members or export their contact data.
Note: Setting Conditions
You’re not limited to just one criterion when creating a smart group. You can set as many conditions for inclusion as you like, and you can choose whether group members must satisfy all the conditions or just
Note: Going Negative
Don’t forget that you can set most smart group criteria to negative values—meaning you can choose to include everyone in your Address Book who doesn’t match a particular criterion.
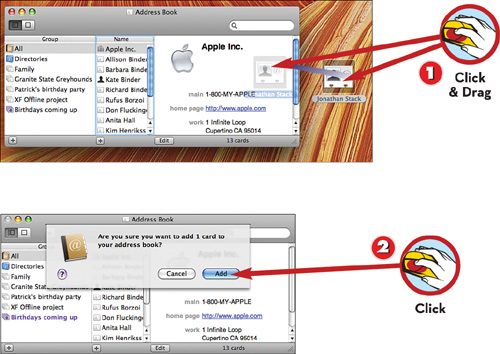
Exporting Contacts as vCards
Apple has chosen the vCard as its standard method of exchanging contact information among Address Book users as well as between Address Book and other programs. vCards are very small files that you can attach to email messages. Most contact management programs can read them, so they’re a good way to send contact information to just about anyone, including Windows users.
![]()
![]()
![]() Click a name in the contacts column to select a single person, or
Click a name in the contacts column to select a single person, or
![]() -click to select more than one person.
-click to select more than one person.
![]() To create a vCard for an entire group, click the group’s name in the first column.
To create a vCard for an entire group, click the group’s name in the first column.
![]() Drag the group, contact, or contacts onto the desktop to create the vCard file.
Drag the group, contact, or contacts onto the desktop to create the vCard file.
![]() The vCard appears on the desktop and can now be attached and sent via email.
The vCard appears on the desktop and can now be attached and sent via email.
Note: The Express Route
You can find contacts quickly in Address Book by clicking the All group and typing a name, city, or other information into the Search entry field at the upper-left corner of the Address Book window.
Importing a vCard into Address Book
Getting vCards into the Address Book is just as easy as getting them out of the Address Book. When you receive a vCard attached to an email as a sort of electronic business card, you need to locate the file in your attachments folder—you’ll recognize it because of its .vcf filename extension.
![]()
![]()
![]() Drag the vCard file from the desktop into the Address Book window.
Drag the vCard file from the desktop into the Address Book window.
![]() Click OK in the confirmation dialog box.
Click OK in the confirmation dialog box.
Note: The Case of the Missing Attachment
vCard files typically end up in your email attachments folder—the location and name can vary depending on which email program you use. To get at these files easily, try clicking their names or icons in the email window and dragging them onto the desktop.
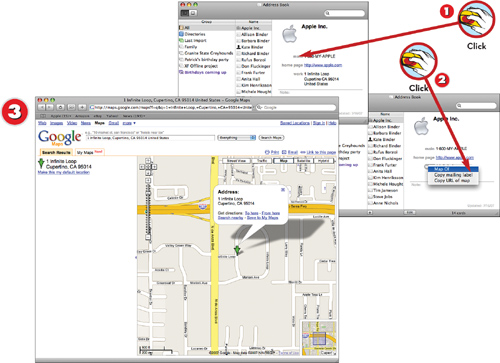
Mapping a Contact’s Address
If you have an instant-on or constant Internet connection, you’re going to love this Address Book feature. You can view a map (and from there, driving directions) for an address in your contact list. It all starts with a simple click to a pop-up menu. Just remember, it won’t work if you’re not online.
![]()
![]()
![]() Click the address label next to the address to display a pop-up menu.
Click the address label next to the address to display a pop-up menu.
![]() Click Map Of.
Click Map Of.
![]() The map is displayed in your web browser.
The map is displayed in your web browser.
Note: Just the URL, Please
If you want to pass a map along to a friend, rather than just use it yourself, take advantage of another choice in the address pop-up menu: Copy URL of Map. After you choose this command, click in any text document or email window and press
![]() -V to paste the map’s URL so the reader can click it to see the map.
-V to paste the map’s URL so the reader can click it to see the map.
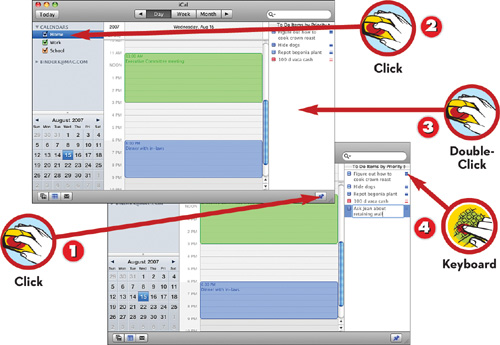
Adding a To-Do in iCal
Using a calendar to keep track of events is very important (turn to the next task to see how it works in iCal), but for many people, tracking a to-do list is an even more vital function. In iCal, you can assign each to-do item to a specific calendar, so you can distinguish among work, home, and hobby- or club-related tasks.
![]()
![]()
![]() Click the Show/Hide To-Do List button to display to-do items to the right of the calendar.
Click the Show/Hide To-Do List button to display to-do items to the right of the calendar.
![]() Click the calendar to which you want to add the to-do item.
Click the calendar to which you want to add the to-do item.
![]() Double-click in the blank space in the To Do items area.
Double-click in the blank space in the To Do items area.
![]() Enter the to-do text.
Enter the to-do text.
![]()
Tip: Making To-Do Items Disappear
Choose iCal, Preferences to change how long items stay on your calendar after they’re completed and to determine how to-do items are sorted: by priority, by due date, or alphabetically.
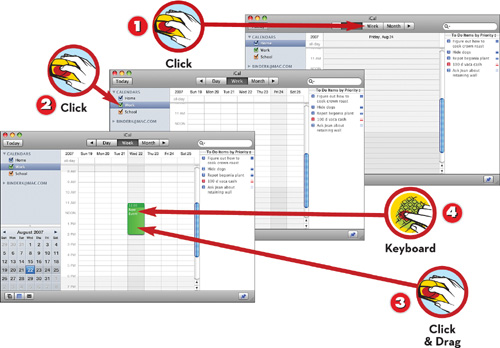
Adding an Appointment in iCal
iCal is easy to use and compact, but don’t underestimate it. This little calendar program has a surprising amount of power. Its primary purpose, of course, is keeping track of your appointments. Adding new ones couldn’t be simpler, and reading iCal’s neatly color-coded calendar is as easy as it gets.
![]()
![]()
![]() Click the Day or Week button to switch to Day or Week view.
Click the Day or Week button to switch to Day or Week view.
![]() Click the calendar to which you want to add the appointment.
Click the calendar to which you want to add the appointment.
![]() Click and drag on the hour grid for the day of the appointment to define the time the appointment will last.
Click and drag on the hour grid for the day of the appointment to define the time the appointment will last.
![]() Type in the appointment text.
Type in the appointment text.
![]()
Tip: Filling in the Details
To refine your appointment entry, click the Show Info (i) button at the bottom-right corner of the iCal window. Enter a location, add an alarm notification, set the appointment to repeat regularly, and more. You can also change the event’s calendar here.
Modifying an Event in iCal
The more things change, well, the more confused you get. Unless you have iCal, that is—Leopard makes it easier than ever before to make changes to events you’ve scheduled previously. You can, of course, change an event’s day and time by simply dragging it to another place on your calendar. Here you’ll learn how to make other changes.
![]()
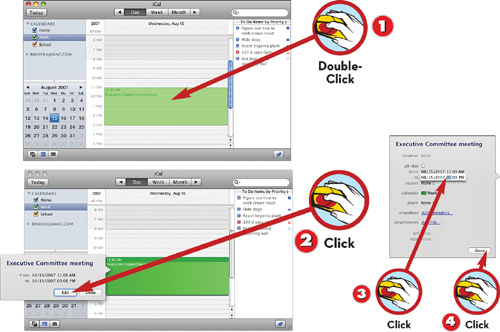
![]()
![]() Double-click the event you want to change.
Double-click the event you want to change.
![]() Click the Edit button.
Click the Edit button.
![]() Make changes to the event’s time or other attributes.
Make changes to the event’s time or other attributes.
![]() Click Done.
Click Done.
![]()
Tip: Update on New Date
If you’ve invited guests to your event using iCal, the Done button in Step 4 will instead be an Update button. Click it to send an email to all the guests informing them of the change.

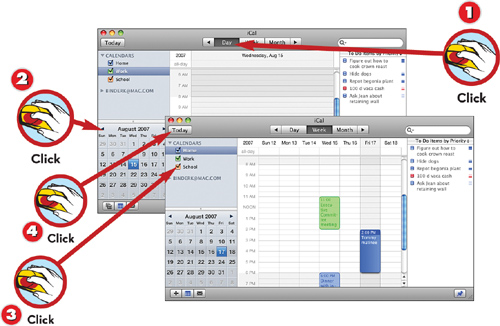
Switching Calendar Views in iCal
Whether you want to zero in on each hour of the day or back off and take in a month at a time, iCal can accommodate you. You can view your calendar by the day, week, or month. Meanwhile, mini-months off to the side enable you to keep track of the months surrounding today’s date.
![]()
![]()
![]() Click the Day, Week, or Month button at the top of the iCal window to switch views.
Click the Day, Week, or Month button at the top of the iCal window to switch views.
![]() Click the up and down arrows to view different mini-months at the left side of the iCal window.
Click the up and down arrows to view different mini-months at the left side of the iCal window.
![]() Click the check box next to each calendar to show or hide its appointments and to-do items.
Click the check box next to each calendar to show or hide its appointments and to-do items.
![]() Click the Today button to return to viewing today.
Click the Today button to return to viewing today.
![]()
Tip: Customizing Day and Week Views
Choose iCal, Preferences to set the number of days displayed in Week view and choose on which day the week should start. You can also choose how many hours are shown in Day view and set start and end times for each day.
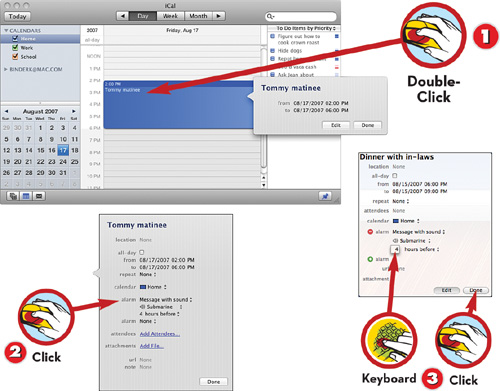
Setting Up an Alarm in iCal
If you want to be reminded before an appointment, you can set up an alarm that will get your attention to let you know the appointment is coming up. iCal alarms take several forms: displaying a dialog box, displaying a dialog box and playing a sound, sending an email, or opening a specified file.
![]()
![]()
![]() Double-click the appointment to which you want to add an alarm.
Double-click the appointment to which you want to add an alarm.
![]() Click the alarm pop-up menu and choose an alarm type; then specify a sound, a file, or an email address to use, if necessary.
Click the alarm pop-up menu and choose an alarm type; then specify a sound, a file, or an email address to use, if necessary.
![]() Set the time for the alarm to appear, then click Done.
Set the time for the alarm to appear, then click Done.
![]()
Tip: Hitting the Snooze Button
iCal alarms do have a snooze button—click the small button with the circular arrow in the alarm dialog box and choose a time interval to snooze the alarm. You can snooze an alarm for as little as a minute, a couple of hours, or a day.
Note: The Missing Drawer
If your iCal window is maximized so it takes up the entire screen, you can’t see the Info drawer when it pops out. Reduce the size of the window and move it to the left to see the Info drawer on the right.
Inviting Contacts to Events in iCal
Don’t get too excited about this feature; it only works if you are using Apple’s Mail for your email program, and you must have the email addresses of the contacts you want to invite. But if you do meet these two requirements, you can use this feature to let your contacts know about an event you’ve scheduled.
![]()

![]()
![]() Double-click the appointment to which you want to invite others.
Double-click the appointment to which you want to invite others.
![]() Click Add Attendees.
Click Add Attendees.
![]() Click next to attendees and type the names or email addresses of the people you want to invite; iCal email addresses for names that are in the Address Book.
Click next to attendees and type the names or email addresses of the people you want to invite; iCal email addresses for names that are in the Address Book.
![]() Click Send to send email invitations.
Click Send to send email invitations.
![]()
Tip: Getting People in the Door
Another way to add people to the attendees list for an event is to choose Window, Address Panel and drag names from the list to the event’s listing in the calendar.
Note: Separate Names
To invite more than one person to an event, type a comma after each name before you type the next name. Otherwise, iCal isn’t sure where one name ends and the next begins.
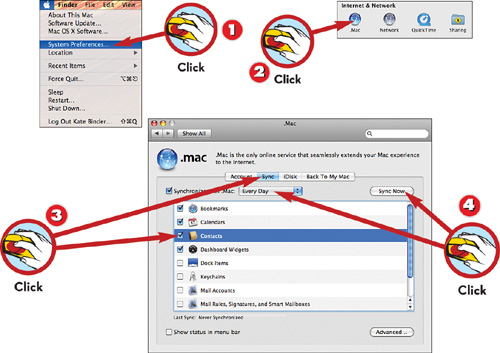
Putting Contacts, Bookmarks, and Calendars Online
If you have a .Mac membership, you can sync your contact information, web bookmarks, calendars, and other information between two computers—or more. You can also access this information from the web when you’re using a computer that’s not synced up, such as a public terminal or a friend’s PC.
![]()
![]()
![]() Choose Apple menu, System Preferences.
Choose Apple menu, System Preferences.
![]() In System Preferences, click .Mac.
In System Preferences, click .Mac.
![]() Click the Sync tab and check the boxes for the items you want to sync.
Click the Sync tab and check the boxes for the items you want to sync.
![]() Choose a frequency option from the pop-up menu and click Sync Now.
Choose a frequency option from the pop-up menu and click Sync Now.
![]()
Tip: In Touch Anywhere
To see your information using a web browser on any computer, go to www.mac.com and log in using your .Mac name and password. Then click one of the links on the left side of the page, such as Address Book.
Note: Seeing Double
If you’re using the same iCal calendar on two or more Macs, you’ll receive duplicate event reminders. That’s fine if the reminder is a simple dialog box. But if you use duplicate email reminders, it can be a bit annoying to neatniks.
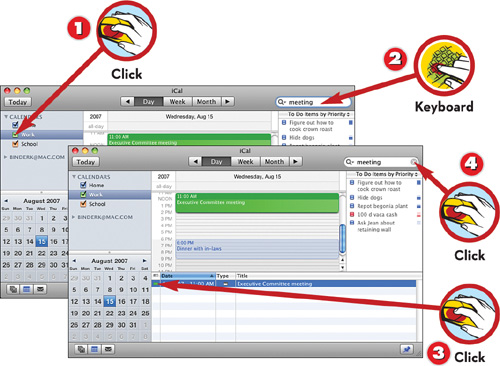
Searching Calendars in iCal
You know you put Aunt Blanche’s birthday in iCal, but you can’t even remember the month, much less the day. Never fear: iCal will find the date for you. Just search for “Blanche,” and your trusty calendar will offer you a list of every event containing her name, including that elusive birthday.
![]()
![]()
![]() Click the check boxes next to the calendars you want to search.
Click the check boxes next to the calendars you want to search.
![]() Type the text you want to search for in the search field.
Type the text you want to search for in the search field.
![]() Click an event or to-do in the Search Result list to go to it.
Click an event or to-do in the Search Result list to go to it.
![]() To clear the search field and get rid of the Search Result list, click the X.
To clear the search field and get rid of the Search Result list, click the X.
![]()
Tip: Searching On-the-Fly
Click Show/Hide Search Results (just to the right of the search field) in the lower-right corner of the iCal window to see the current results, which, if you haven’t entered a search term, is all your entries. Then enter search terms and watch the results filter down to what you’re looking for.
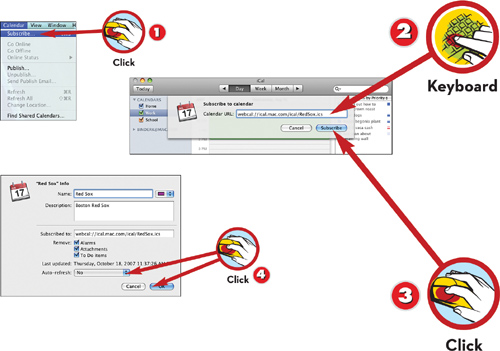
Subscribing to an iCal Calendar
Perhaps iCal’s coolest feature is its capability to share calendars online. This means you can subscribe to calendars created by other people, whether their day-to-day events (your spouse’s schedule, perhaps) or special events (your favorite football team’s season schedule, maybe).
![]()
![]()
![]() Choose Calendar, Subscribe.
Choose Calendar, Subscribe.
![]() Enter the URL for the calendar to which you want to subscribe. The calendar’s owner provides this information.
Enter the URL for the calendar to which you want to subscribe. The calendar’s owner provides this information.
![]() Click Subscribe.
Click Subscribe.
![]() Choose a frequency in the Auto-Refresh pop-up menu for iCal to check the calendar for changes, and click OK.
Choose a frequency in the Auto-Refresh pop-up menu for iCal to check the calendar for changes, and click OK.
![]()
Tip: Where to Find Calendars
Apple has compiled a list of carefully selected public iCal calendars on its website (www.apple.com/ical/library/). Another great site for finding public calendars is iCalShare.com (www.icalshare.com).
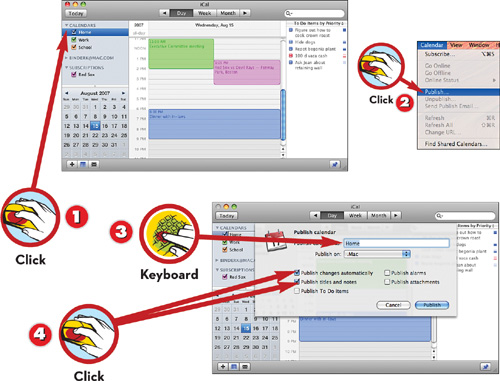
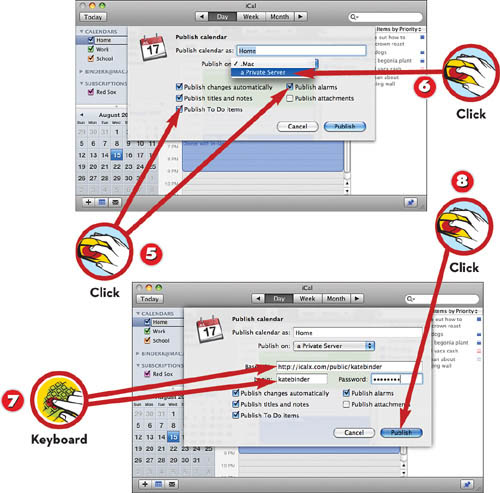
Publishing an iCal Calendar
What can you publish? Well, you can choose to share your home or work calendar with your family or colleagues. Or you might decide to be the keeper of the birthdays among your friends and publish a calendar showing everyone’s special days. You can use your .Mac account or a free web service to publish calendars, as you prefer.
Note: Automatic Updates or Not?
Publishing calendar changes automatically requires a constant online connection. Don’t choose this option if you use a dial-up account because you might find your computer dialing in unexpectedly.
![]()
![]()
![]() Click the calendar you want to publish.
Click the calendar you want to publish.
![]() Choose Calendar, Publish.
Choose Calendar, Publish.
![]() Type a name for the published calendar.
Type a name for the published calendar.
![]() Click the check boxes to publish changes automatically and to publish both the title and notes for an event (rather than just its title).
Click the check boxes to publish changes automatically and to publish both the title and notes for an event (rather than just its title).
![]() Click the check boxes to publish alarms and to-do items.
Click the check boxes to publish alarms and to-do items.
![]() Choose an option from the Publish on pop-up menu for where you’re publishing the calendar: using .Mac or using an independent server.
Choose an option from the Publish on pop-up menu for where you’re publishing the calendar: using .Mac or using an independent server.
![]() If you’re using an independent server, enter its URL and your login name and password.
If you’re using an independent server, enter its URL and your login name and password.
![]() Click Publish.
Click Publish.
Note: Becoming a Publisher
If you want to publish your own calendars but don’t have a .Mac account, go to iCalExchange.com (icalexchange.com). It offers free access to the WebDAV servers you need to publish calendars.
![]()
Tip: Changing Your Mind
If you decide to stop publishing a calendar, click its name in the Calendars list, choose Calendar, Unpublish. iCal warns you that people will no longer be able to subscribe to the calendar; just click Unpublish to take your calendar offline.
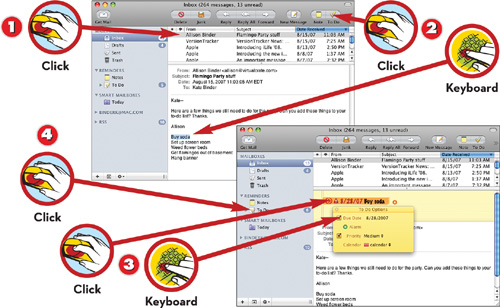
Making Notes in Mail
For a lot of people, their email is the most organized thing about them. It’s in folders! Sorted by date! Labeled! How many of us can say that about our random notes—lists of movies to see, recipes to try, gift ideas for Grandma? Now Leopard makes it possible for you to organize your notes right alongside your email.
![]()
![]()
![]() Click to view the email about which you want to make notes.
Click to view the email about which you want to make notes.
![]() Click the Note button.
Click the Note button.
![]() Enter your notes and close the Note window to save the note.
Enter your notes and close the Note window to save the note.
![]() To view notes, click arrow next to the Notes entry in the Mailboxes column.
To view notes, click arrow next to the Notes entry in the Mailboxes column.
Note: Take Your Notes with You
A note is really just a specially formatted email message, which means it can be stored online with the rest of your mail. That, in turn, means that you’ll be able to check your Mail notes from any computer with a web connection, as long as your email account has web mail access.
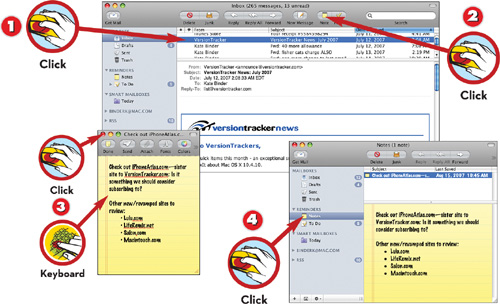
Turning an Email into a To-Do List
If you’re anything like me, many of the items on your to-do list are based on emails. Your boss wants you to do this, your mom says you should remember that, you really need to call your girlfriend. Now you can create a new to-do right in Mail, based on the content of an email message, and it’s automatically added to iCal as well as being accessible in Mail.
![]()
![]()
![]() Click to view the email containing your to-do items.
Click to view the email containing your to-do items.
![]() Select the text you want to turn into a to-do, then click the To Do button.
Select the text you want to turn into a to-do, then click the To Do button.
![]() To set options such as a deadline, click the Options button and make your changes.
To set options such as a deadline, click the Options button and make your changes.
![]() To view to-dos, click the To Do entry in the Mailboxes column.
To view to-dos, click the To Do entry in the Mailboxes column.
![]()
Tip: Step by Step
Mail makes one to-do item per click on the To Do button, so be sure to select just one item on your list to convert at a time.
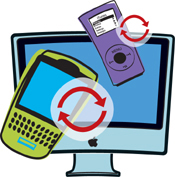
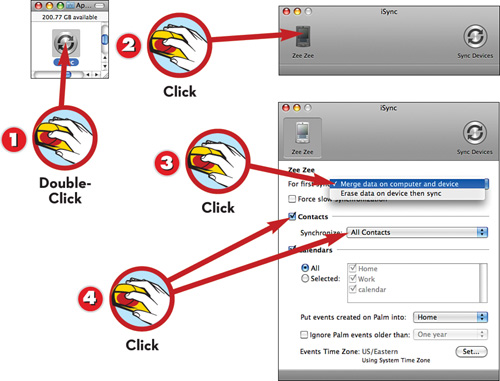
Syncing a PDA, an iPod, or a Phone with Your Mac
If you use an iPhone, a Palm, or another device that can interact with your Mac, you’re definitely going to want to sync that device with iCal and Address Book. The procedure is a bit different for Palms than it is for other devices, but in either case it takes only a few steps. Here’s how to get started.
![]()
Tip: Getting Hooked Up with iSync
You can download iSync at www.apple.com/isync/. To add a device to iSync, hook it up to your Mac and start iSync. Choose Devices, Add Device. Double-click the new device when it appears in the Add Device window.
![]()
![]()
![]() Start up iSync (located in the Applications folder).
Start up iSync (located in the Applications folder).
![]() Click the icon for the device you want to sync.
Click the icon for the device you want to sync.
![]() If this is the first time you’re syncing, click each device icon and choose an option from the For first sync pop-up menu.
If this is the first time you’re syncing, click each device icon and choose an option from the For first sync pop-up menu.
![]() Click the Contacts check box to include contacts in the sync, and choose which groups to include from the Synchronize pop-up menu.
Click the Contacts check box to include contacts in the sync, and choose which groups to include from the Synchronize pop-up menu.
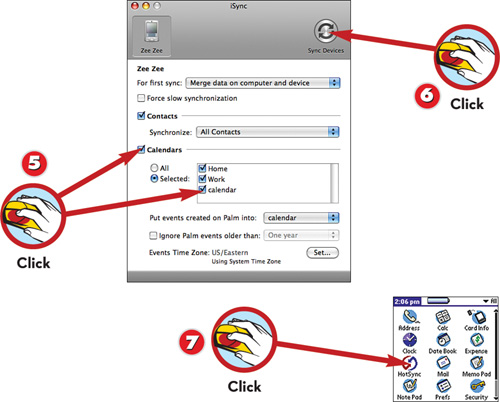
![]() Click the Calendars check box to include calendars in the sync, and choose which calendars to include.
Click the Calendars check box to include calendars in the sync, and choose which calendars to include.
![]() To sync all devices other than a Palm device, click Sync Devices to begin the sync process.
To sync all devices other than a Palm device, click Sync Devices to begin the sync process.
![]() To sync all devices, including a Palm PDA, start a HotSync by tapping the Palm’s HotSync button.
To sync all devices, including a Palm PDA, start a HotSync by tapping the Palm’s HotSync button.
![]()
Tip: When Little Changes Add Up
If more than 5% of your data is going to be modified by the sync process, iSync lets you know what the percentage of change is and offers you the option of canceling the sync. Choose iSync, Preferences to change the percentage that triggers this warning.