
Part 3. Installing and Using Applications
It’s the programs that make using your Mac worthwhile, whether they’re the applications that come with Mac OS X (such as Preview, TextEdit, and Safari) or the ones you buy and install yourself (such as Microsoft Word, Adobe Photoshop, or your favorite games). Apple even sells two collections of programs designed just for home and business users, called iLife (with iMovie, iTunes, and the like) and iWork (featuring Pages, for page layout, Numbers for spreadsheets, and so on).
Some programs come with a special installer program that puts all their pieces in the right places. Other programs are so simple that you can just drag and drop them into your Applications or Utilities folder. You can store programs in other folders, too, but it’s easier to find everything if you stick to the designated folders.
Some applications are, of course, commercially produced, with thick manuals and lots of shrinkwrap. But you may find your favorites turn out to be freeware or shareware—programs you download, try out, and then pay for if you keep using them. Be sure to pay your shareware fees, and check out www.versiontracker.com for the most comprehensive listing of downloadable software anywhere on the web.

Mac OS X’s Programs
Installing Programs
Some Mac programs are small enough that you can drag them off their disks right into the Applications folder, but others require an installer program to make sure all their pieces get to the right places. When you run Apple’s Installer, you have to enter an admin password to authorize the installation.

Note: Applications in the Applications Folder
You can install programs anywhere you want, but it’s best to put them in the Applications folder on your startup drive. That way all users of your Mac can run the programs.
![]()
![]()
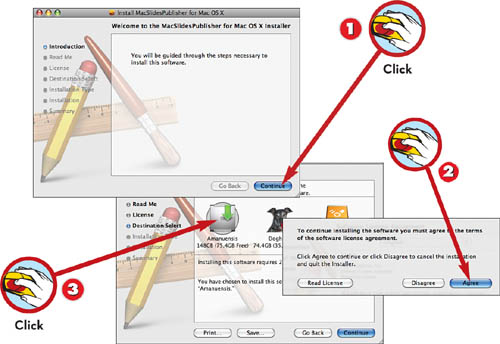
![]() After you read each screen of the installer, click the Continue button at the bottom of the window to move to the next screen.
After you read each screen of the installer, click the Continue button at the bottom of the window to move to the next screen.
![]() Read the program information and the license agreement; then click Agree to agree to the license terms (or Disagree if you don’t want to install the program after all).
Read the program information and the license agreement; then click Agree to agree to the license terms (or Disagree if you don’t want to install the program after all).
![]() If you have more than one hard drive, choose the drive where you want to install the software.
If you have more than one hard drive, choose the drive where you want to install the software.
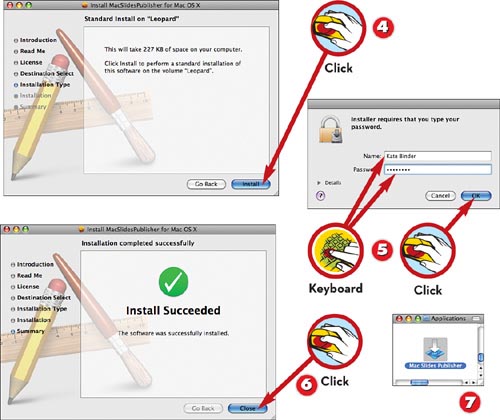
![]() Click Install to begin the installation process.
Click Install to begin the installation process.
![]() Enter an admin username and password to authorize the installation and click OK.
Enter an admin username and password to authorize the installation and click OK.
![]() When the installation is complete, click Close to quit Installer.
When the installation is complete, click Close to quit Installer.
![]() The application’s icon now appears in the Applications folder (or whatever folder you chose).
The application’s icon now appears in the Applications folder (or whatever folder you chose).
Note: Installation Options
Many installer scripts ask you to choose whether to install optional software such as sample files, fonts, or bonus features. The Easy Install or Full Install option usually installs everything that’s available.
Note: Easy Uninstalling
Some installer programs have an Uninstall option in case you decide you no longer want the software installed on your Mac. Using an installer to uninstall programs ensures that all the extra pieces scattered through your system are uninstalled.
Finding and Starting Up Programs
Mac OS X is a very structured operating system, with a place for everything and everything in its place. Applications are no exception to this rule; all your programs live in the Applications folder where you and other users of your Mac can find them easily.
![]()
![]()
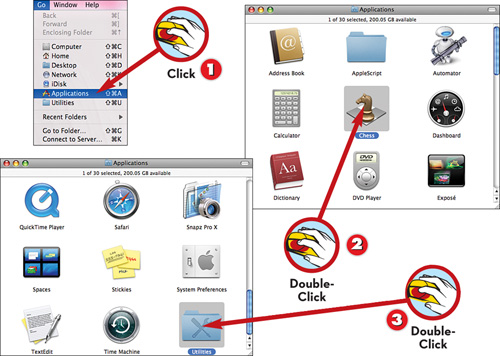
![]() In the Finder, either press
In the Finder, either press
![]() -Shift-A or choose Go, Applications to open the Applications folder.
-Shift-A or choose Go, Applications to open the Applications folder.
![]() Locate the program you want to use and double-click its icon to start it up.
Locate the program you want to use and double-click its icon to start it up.
![]() If you can’t find a program, look in the Utilities folder within the Applications folder.
If you can’t find a program, look in the Utilities folder within the Applications folder.
![]()
Tip: Control Your Programs
If the wrong program starts up when you double-click a document in the Finder, you need to specify a different program to open that type of document. Press
![]() -I to see the document’s information and select an application in the Open with section of the Info window. Click Change All if you want the new program to open all documents of this type.
-I to see the document’s information and select an application in the Open with section of the Info window. Click Change All if you want the new program to open all documents of this type.
Saving Files
Every program is different, of course, but some operations work almost the same no matter which program you’re using. One of those is saving a file. Each program saves files in different formats, depending on which type of data that program works with, but the general process is the same no matter what. Here’s how it goes.
![]()
![]()
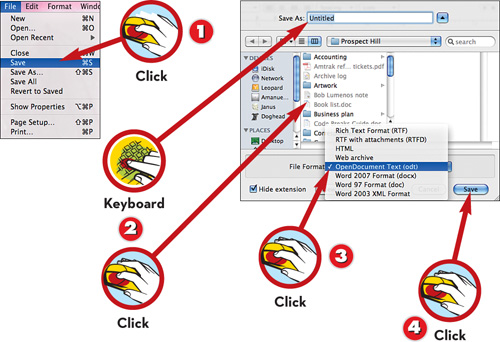
![]() In the application in which you want to save a file, either choose File, Save or press
In the application in which you want to save a file, either choose File, Save or press
![]() -S.
-S.
![]() Give the file a name and choose a location in the pick list. If you don’t see the pick list, click the blue arrow button next to the Save As field.
Give the file a name and choose a location in the pick list. If you don’t see the pick list, click the blue arrow button next to the Save As field.
![]() Choose file options such as format and compression (the available options vary depending on the program).
Choose file options such as format and compression (the available options vary depending on the program).
![]() Click Save.
Click Save.
![]()
Tip: Pay Attention!
Save dialog boxes usually open to the last place you saved a file in that program, which is unlikely to be the same place you want now. To save to the desktop, press
![]() -D—you’ll have to put the file away later, but you’ll be able to find it for the moment.
-D—you’ll have to put the file away later, but you’ll be able to find it for the moment.
Note: Save Early, Save Often
Don’t wait until you’re done working on a file to save it—start early and keep clicking the Save command as you continue to work. That way the file will be stored on your hard drive in case of a drive crash or power outage.
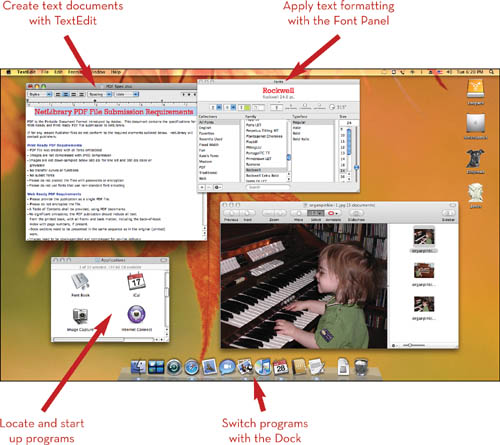
Writing with TextEdit
Successor to TeachText and SimpleText, is Mac OS X’s TextEdit program that can do a lot more than either of its ancestors. It’s really a very compact, fast word processor with a lot of formatting options and tools as well as the capability to read and write Microsoft Word documents.
![]()
Tip: Learning How to Spell
TextEdit gives questionable words a red underline; Control-click each and choose an option from the contextual menu. The Learn Spelling command adds the word to a system-wide dictionary.
Note: What’s Not in There
TextEdit is capable, especially with new features such as automatic bulleted lists, but it’s not a full-featured word processor. If you need to use outlining or HTML conversion, you should use a program such as Microsoft Word.
![]()
![]()
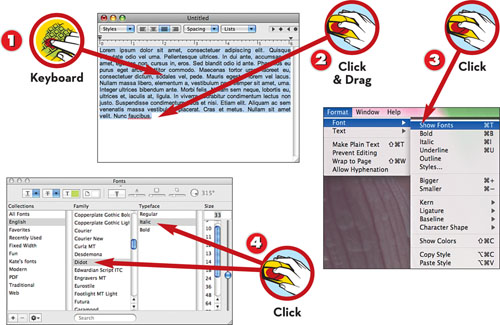
![]() Start TextEdit (located in the Applications folder) and begin typing in the new document window.
Start TextEdit (located in the Applications folder) and begin typing in the new document window.
![]() To copy text to another location, click and drag to select the text and press
To copy text to another location, click and drag to select the text and press
![]() -C; place the cursor where you want the text to appear and press
-C; place the cursor where you want the text to appear and press
![]() -V to paste it.
-V to paste it.
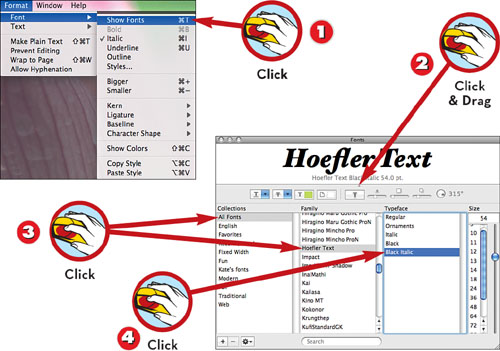
![]() To change the font, select the text and choose Format, Font, Show Fonts.
To change the font, select the text and choose Format, Font, Show Fonts.
![]() Choose a new font, typeface, and size in the Fonts panel. The change is applied immediately.
Choose a new font, typeface, and size in the Fonts panel. The change is applied immediately.
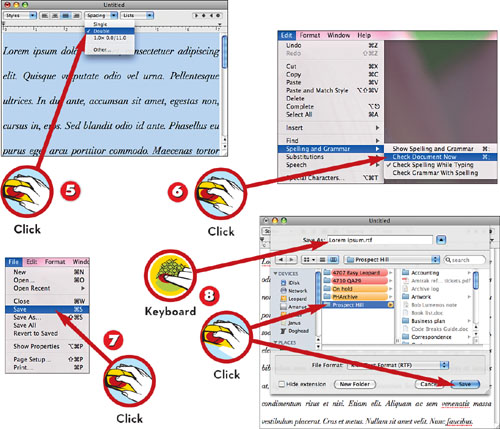
![]() To change the text alignment or spacing, click and drag to select the text and choose an option from the controls at the top of the document window.
To change the text alignment or spacing, click and drag to select the text and choose an option from the controls at the top of the document window.
![]() To run a spell check, choose Edit, Spelling and Grammar, Check Document Now.
To run a spell check, choose Edit, Spelling and Grammar, Check Document Now.
![]() Choose File, Save to save the file.
Choose File, Save to save the file.
![]() Give the file a name and choose a location to save it in; then click Save.
Give the file a name and choose a location to save it in; then click Save.
Note: Getting What You Pay For
TextEdit’s capability to open and save files in Microsoft Word format could keep you from having to invest in Word. Some advanced features such as tables and hyperlinks can be lost when you edit a Word file in TextEdit, though.
Note: Word Compatibility
When you’re saving your document in step 8, you can choose RTF (Rich Text Format) or Word format. Either way, your document can be opened in Microsoft Word and retains all its formatting.
Using the Font Panel
Mac OS X handles fonts very well. A lot of thought went into designing ways to make excellent typography more accessible to the average Mac user. The Fonts panel, which is the same in all the built-in applications, is part of that effort—it contains a wide variety of settings, from basic to advanced, for modifying the way text is formatted.
![]()
Tip: Favorite Type Styles
If you create a combination of type settings you plan to use again, click the Action menu at the bottom of the Fonts panel and choose Add to Favorites. Then you can apply this style to other text selections by choosing Font, Styles from the menu bar.

![]()
![]()
![]() In TextEdit, choose Format, Font, Show Fonts to display the Fonts panel.
In TextEdit, choose Format, Font, Show Fonts to display the Fonts panel.
![]() Click the dot below the window’s title bar and drag downward to reveal the preview area.
Click the dot below the window’s title bar and drag downward to reveal the preview area.
![]() Click All Fonts in the Collections column and choose a font family from the Family column.
Click All Fonts in the Collections column and choose a font family from the Family column.
![]() Choose a style from the Typeface column.
Choose a style from the Typeface column.
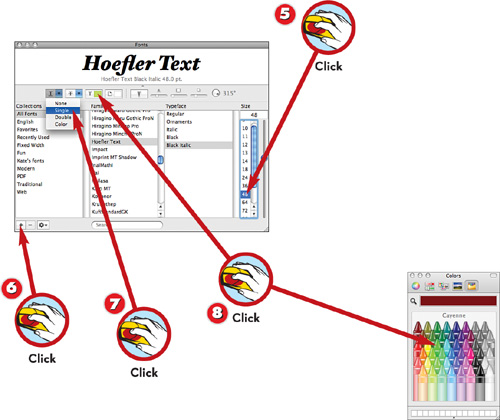
![]() Choose a size from the Size column, or enter a value above the column.
Choose a size from the Size column, or enter a value above the column.
![]() Click the Add button to create a new font collection.
Click the Add button to create a new font collection.
![]() Click the Strikethrough or Underline button and choose an option to add strikethrough or underline style to the selected text.
Click the Strikethrough or Underline button and choose an option to add strikethrough or underline style to the selected text.
![]() Click the Text Color and Paper Color buttons to open the Colors panel; then choose a color for the text or the background.
Click the Text Color and Paper Color buttons to open the Colors panel; then choose a color for the text or the background.
Note: Beyond the Font Basics
If you’re interested in working more specifically with type, check out the Font Book program (located in the Utilities folder within Applications). This utility helps you install and manage fonts.
Note: Collectible Fonts
Collections of your corporate fonts or the fonts for a particular project enable you to access those fonts without digging through a long list of fonts. To add a font to a collection, just drag its name from the Family column on top of the collection name.
Watching DVDs
Who needs a TV to watch DVDs? Not you! If you’re looking for some entertainment while you work in the office, or if you just don’t feel like getting up and moving to the living room, you can play DVDs right on your Mac. Mac OS X includes a full-featured DVD Player program that can do at least as much as your living room DVD player.
![]()
Tip: Size Matters
Use the Video menu to control the size of the virtual TV screen. Select Half Size, Normal Size, Maximum Size, or Enter Full Screen (to get rid of the window and hide the desktop entirely).
![]()
Tip: Zoom, Zoom, Zoom
Choose Window, Video Zoom to zoom in on an area of the screen as the video plays or while it’s paused. Click Auto Zoom to resize the window to hold the video image at the current zoom level.
![]()

![]()
![]() Insert a DVD disc; DVD Player automatically starts up.
Insert a DVD disc; DVD Player automatically starts up.
![]() Click the navigation buttons on the remote control to make choices in the DVD’s menus.
Click the navigation buttons on the remote control to make choices in the DVD’s menus.
![]() Click Pause on the remote control to stop playing the DVD.
Click Pause on the remote control to stop playing the DVD.
![]() Click Eject on the remote control to eject the disk.
Click Eject on the remote control to eject the disk.
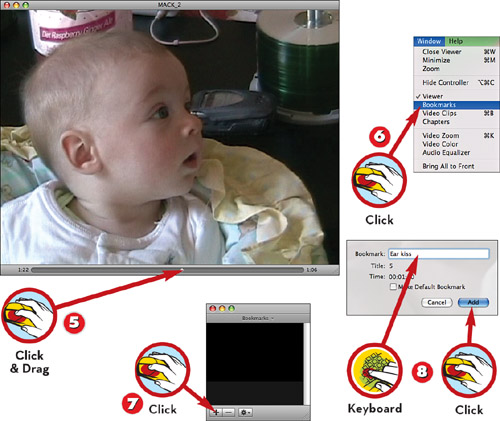
![]() Place the cursor over the bottom edge of the player window and drag the Time slider to skip to any part of the video.
Place the cursor over the bottom edge of the player window and drag the Time slider to skip to any part of the video.
![]() To add a bookmark so you can skip right to a particular moment in the video any time you play it, choose Window, Bookmarks.
To add a bookmark so you can skip right to a particular moment in the video any time you play it, choose Window, Bookmarks.
![]() Click the Add Bookmark button
Click the Add Bookmark button
![]() Enter a name for the bookmark and click Add.
Enter a name for the bookmark and click Add.
![]()
Tip: Clip Me, Baby
In addition to bookmarks, you can save video clips so that you can play just the highlights from any DVD. While the video is playing, choose Window, Video Clips. Click the Add Video Clip button and use the controls in the New Video Clip window to set the start and end points of your clip.
Playing Music and Video with Front Row
Note: I’ve Seen This Before
If Front Row looks familiar, there may be a very good reason for that: It’s based on the software that runs Apple TVs. These handy boxes hook up to your TV and stereo so that you can pipe all your audio and video right to the big screen.
![]()
Tip: We Want the Airwaves
Add your favorite Internet radio stations to Front Row easily. Locate a station in iTunes and drag it into your Library. Create a smart playlist of files whose kind is “’MPEG audio stream.” Now just pull up that playlist in Front Row.
![]()
![]()
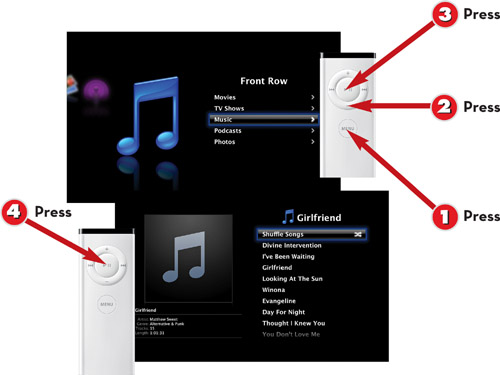
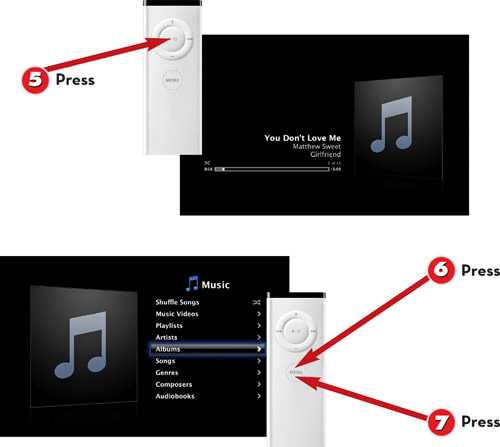
![]() Press the Apple Remote’s Menu button to bring up Front Row.
Press the Apple Remote’s Menu button to bring up Front Row.
![]() Use the up and down buttons to scroll through the media types: Movies, TV Shows, Music, Podcasts, and Photos.
Use the up and down buttons to scroll through the media types: Movies, TV Shows, Music, Podcasts, and Photos.
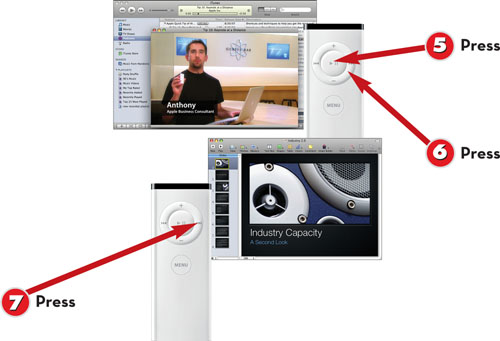
![]() Click the Play button on the remote to choose the media type you want to play.
Click the Play button on the remote to choose the media type you want to play.
![]() On each menu screen, use the arrows to scroll through the options, and then press the Play button to select the option you want.
On each menu screen, use the arrows to scroll through the options, and then press the Play button to select the option you want.
![]() When a song or video is playing, press the Play button on the remote to pause.
When a song or video is playing, press the Play button on the remote to pause.
![]() Press the Menu button on the remote to back up one screen.
Press the Menu button on the remote to back up one screen.
![]() On the main Front Row screen, press the Menu button on the remote to exit Front Row.
On the main Front Row screen, press the Menu button on the remote to exit Front Row.
![]()
Tip: Lost in a Remote Location
If you’ve lost or broken your Apple Remote, you can also access Front Row by pressing
![]() +Esc or F1 (depending on the computer).
+Esc or F1 (depending on the computer).
Using the Apple Remote
As you saw in the previous task, “Playing Music and Video with Front Row,” the Apple Remote is how you make Front Row work for you. But you can do much more with the Apple Remote. It comes with iPods, Apple TV, iMacs, the Mac Mini, and MacBooks, so if you’ve bought any of those items since October 2005, you should be good to go.
![]()
Tip: When a Pair Beats Three of a Kind
If you have more than one device that responds to an Apple Remote, or more than one remote, you can pair a particular remote with a particular device. Point the remote at your Mac or other device, then hold down both the Menu and Next buttons for five seconds. If you’re working with a Mac, you’ll see a screen showing a remote and linked chain, indicating that the remote is now linked only to this Mac. The same technique works with Apple’s Universal Dock for iPods and with the iPod Hi-Fi.
![]()

![]()
![]() Press the up and down arrows to control your Mac’s volume.
Press the up and down arrows to control your Mac’s volume.
![]() Press the Play button and hold it down till you see a snoring remote on your screen to put your Mac to sleep.
Press the Play button and hold it down till you see a snoring remote on your screen to put your Mac to sleep.
![]() Press any button on the remote to wake up your Mac when it’s sleeping.
Press any button on the remote to wake up your Mac when it’s sleeping.
![]() In iPhoto, press Play to begin a slide show of the images in the currently selected album.
In iPhoto, press Play to begin a slide show of the images in the currently selected album.
![]() In iTunes, press Play to begin playing the currently selected song or video.
In iTunes, press Play to begin playing the currently selected song or video.
![]() In iTunes, press the Next and Previous buttons to move among songs or videos.
In iTunes, press the Next and Previous buttons to move among songs or videos.
![]() In Keynote, press the Next and Previous buttons to move among slides in a presentation.
In Keynote, press the Next and Previous buttons to move among slides in a presentation.
Note: So Remote It Be
Naturally, you can also use your Apple Remote to control your iPod, but you’ll need either a Universal Dock (not the dock that came with your iPod) or an iPod Hi-Fi—Apple’s combination of a Universal Dock and powered speakers.
![]()
Tip: For the Older Crowd
If you want to use an Apple remote with older Macs that don’t have built-in infrared receivers, you can buy a third-party IR receiver such as the Manta TR1 USB Infrared Transceiver (www.twistedmelon.com).
Switching Programs with the Dock
The Dock acts as central storage for running programs and frequently used programs, but it has other functions, too. One of those is as an application switcher—a method of bringing different programs to the foreground so you can use them in turn. The Dock’s location at the bottom or side of the screen makes it the most convenient way to switch applications.
![]()
![]()
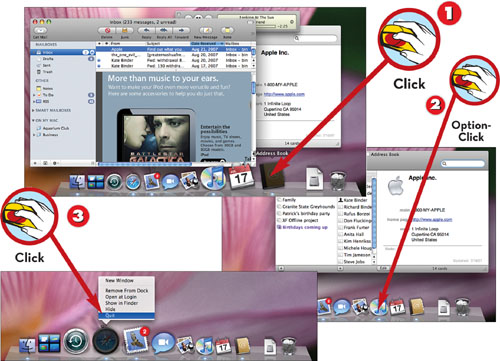
![]() Move your cursor to the bottom of the screen and click a program icon on the Dock.
Move your cursor to the bottom of the screen and click a program icon on the Dock.
![]() To hide windows belonging to the current program when you switch to the new program, press Option as you click.
To hide windows belonging to the current program when you switch to the new program, press Option as you click.
![]() To quit a program you’re not using, click and hold its Dock icon (or Control-click) and choose Quit from the contextual menu.
To quit a program you’re not using, click and hold its Dock icon (or Control-click) and choose Quit from the contextual menu.
![]()
Tip: Don’t Touch That Mouse!
If you prefer to use the keyboard to switch programs, press
![]() -Tab to see a list of the currently running programs in the center of the screen. Press
-Tab to see a list of the currently running programs in the center of the screen. Press
![]() -Tab as many times as needed to cycle through the list to the program you want.
-Tab as many times as needed to cycle through the list to the program you want.
Hiding Programs
Mac OS X enables you to run many programs at the same time because it hands over memory to each program as it’s needed. But if you do like to run multiple programs, your screen can get pretty cluttered. Hiding program windows and palettes is a lifesaver for people who never quit programs until they shut down their Macs.
![]()
![]()
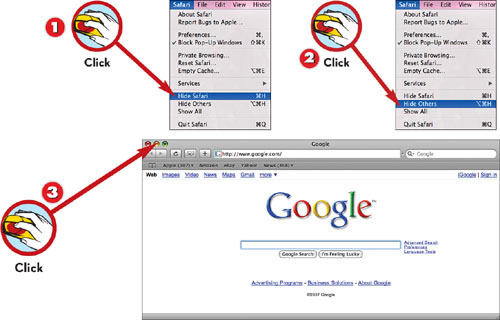
![]() In the Application menu, choose Hide (or press
In the Application menu, choose Hide (or press
![]() -H) to hide the program you’re currently using.
-H) to hide the program you’re currently using.
![]() In the Application menu, choose Hide Others (or press
In the Application menu, choose Hide Others (or press
![]() -Option-H) to hide all other programs that are currently running.
-Option-H) to hide all other programs that are currently running.
![]() To get one window out of the way instead of hiding the program, double-click its title bar or click the yellow Minimize button to send it to the Dock.
To get one window out of the way instead of hiding the program, double-click its title bar or click the yellow Minimize button to send it to the Dock.
![]()
Tip: Another Way to Hide
Another way to hide programs is to Option-click the desktop or a window from another program to simultaneously switch to the Finder or the other program, respectively, and hide the previous program.
Note: A Window Exposé
Yet another way to maneuver among running programs and open windows is to use Exposé. Turn to “Managing Multiple Windows” in Part 1, “Getting Started."
Running Windows on Your Mac
If you’re reading this book, you probably love your Mac a lot. But sometimes you may need to use Windows—maybe your employer requires it, or perhaps you have a piece of hardware that doesn’t have any Mac drivers. With Apple’s current generation of Macs, you can have the best of both worlds by running both Mac OS X and Windows on your Mac using a little program called Boot Camp.
![]()
Tip: Intel Inside
Only Apple’s current generation of Intel Macs can run Windows, because they have the same kind of processor that PCs have. To see whether your Mac is one of these, choose Apple menu, About This Mac.
![]()
Tip: Power Up
If your Mac is a MacBook or MacBook Pro, be sure to connect the power adapter before you begin setting up your Windows installation. If the battery power runs out while the installation is taking place, you could lose data.
![]()
![]()
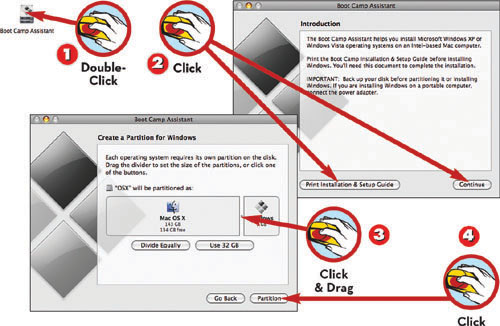
![]() Start up Boot Camp Assistant (located in the Utilities folder within your Applications folder).
Start up Boot Camp Assistant (located in the Utilities folder within your Applications folder).
![]() Click Print Installation & Setup Guide to print out a copy of of the important information you’ll need to run Boot Camp, then click Continue.
Click Print Installation & Setup Guide to print out a copy of of the important information you’ll need to run Boot Camp, then click Continue.
![]() Drag the divider between the partitions to determine the size of your Windows partition.
Drag the divider between the partitions to determine the size of your Windows partition.
![]() Click Partition.
Click Partition.
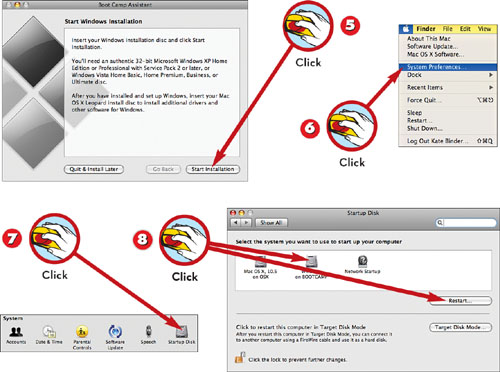
![]() Insert your Windows disc, click Start Installation, and follow the instructions on the screen to install your Windows system.
Insert your Windows disc, click Start Installation, and follow the instructions on the screen to install your Windows system.
![]() To restart your Mac using your new Windows system, choose Apple menu, System Preferences.
To restart your Mac using your new Windows system, choose Apple menu, System Preferences.
![]() Click the Startup Disk button to display startup disk preferences.
Click the Startup Disk button to display startup disk preferences.
![]() Click to choose your Windows partition, and then click Restart.
Click to choose your Windows partition, and then click Restart.
Note: Standard Precautions
Before starting your Boot Camp installation, be sure you have a Windows XP or Vista system disc ready, and make sure you note the size of your Boot Camp partition so you will be able to recognize it when you’re choosing a partition.
![]()
Tip: The Choice Is Yours
If your computer is turned off, you can choose to start it up in either Windows or Mac OS X by holding down the Option key as you press the power button. Don’t release the Option key until you see the Open Firmware screen.