1
GETTING STARTED

The name PowerShell refers to two things. One is a command line shell, installed by default on all recent versions of Windows (starting with Windows 7) and most recently available on Linux and macOS operating systems via PowerShell Core. The other is a scripting language. Together they refer to one framework that can be used to automate everything from rebooting 100 servers at once to building a complete automation system that controls your entire data center.
In the first chapters of this book, you’ll use the PowerShell console to become familiar with the basics of PowerShell. Once you’ve covered the basics, you’ll graduate to more advanced topics including writing scripts, functions, and custom modules.
This chapter covers the basics: some fundamental commands, and how to find and read help pages.
Opening the PowerShell Console
The examples in this book use PowerShell v5.1, the version that comes with Windows 10. Newer versions of PowerShell have more features and bug fixes, but the basic syntax and core functionality of PowerShell hasn’t changed dramatically since version 2.
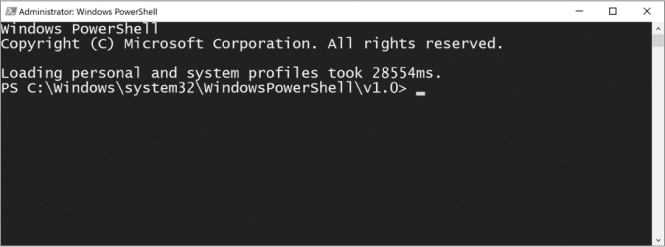
To open PowerShell in Windows 10, enter PowerShell in the Start menu. You should immediately see a Windows PowerShell option front and center. Clicking that option should bring up a blue console and a flashing cursor, as in Figure 1-1.

Figure 1-1: A PowerShell console
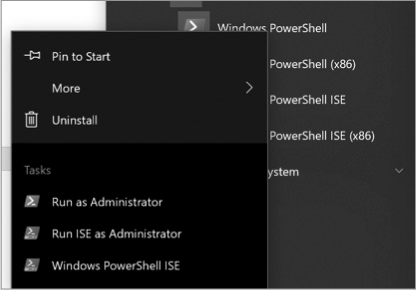
The flashing cursor indicates that PowerShell is ready for your input. Note that your prompt—the line beginning with PS>—will probably look different from mine; the file path in the prompt indicates your current location in the system. As you can see in my console’s title, I’ve right-clicked the PowerShell icon and run it as administrator. This gives me full rights, and starts me in the C:Windowssystem32WindowsPowerShellv1.0 directory.
Using DOS Commands
Once PowerShell is open, you can start exploring. If you’ve previously used the Windows command line, cmd.exe, you’ll be glad to know that all the commands you’re used to (for example, cd, dir, and cls) also work in PowerShell. Under the covers, these DOS “commands” aren’t really commands, but command aliases, or pseudonyms, that translate from commands you know to commands PowerShell knows. But for now, you don’t need to understand the difference—just consider them your familiar DOS friends!
Let’s try some of these commands. If you’re sitting at the PS> prompt and want to check out a specific directory’s contents, first navigate to that directory with cd, short for change directory. Here you’ll go to the Windows directory:
PS> cd .Windows
PS C:Windows>
Once in the C:Windows folder, you can use the dir command to list the contents of your current directory, as shown in Listing 1-1.
PS C:Windows> dir


    Directory: C:Windows


Mode                LastWriteTime         Length Name
----                -------------         ------ ----
d-----        3/18/2019   4:03 PM                addins
d-----         8/9/2019  10:28 AM                ADFS
d-----        7/24/2019   5:39 PM                appcompat
d-----        8/19/2019  12:33 AM                AppPatch
d-----        9/16/2019  10:25 AM                AppReadiness
--snip--
Listing 1-1: Displaying the content of the current directory with the dir command
Entering cls will clear your screen and give you a fresh console again. If you’re familiar with cmd.exe, try some of the other cmd.exe commands you know to see if they work. Note that although the majority do, not all will. If you’re curious about which cmd.exe commands exist in PowerShell, once you have the PowerShell console up, you can enter Get-Alias in the PowerShell console to return many of the old-school cmd.exe commands you’re used to, like so:
PS> Get-Alias
This will allow you to see all the built-in aliases and which PowerShell commands they map to.
Exploring PowerShell Commands
Like nearly all languages, PowerShell has commands, the generic term for named executable expressions. A command can be just about anything—from the legacy ping.exe tool to the Get-Alias command I referred to earlier. You can even build your own commands. However, if you try to use a nonexistent command, you’ll get the infamous red error text, as shown in Listing 1-2.
PS> foo
foo : The term 'foo' is not recognized as the name of a cmdlet, function,
script file, or operable program. Check the spelling of the name, or if a
path was included, verify that the path is correct and try again.
At line:1 char:1
+ foo
+ ~~~
    + CategoryInfo          : ObjectNotFound: (foo:String) [], CommandNotFoundException
    + FullyQualifiedErrorId : CommandNotFoundException
Listing 1-2: An error is displayed when an unrecognized command is entered.
You can execute Get-Command to see a list of every command PowerShell is aware of by default. You might notice a common pattern. Most commands’ names follow the same scheme: Verb-Noun. This is a unique trait of PowerShell. To keep the language as intuitive as possible, Microsoft has set guidelines for command names. Although following this naming convention is optional, it is highly recommended for creating your own commands.
PowerShell commands come in a few flavors: cmdlets, functions, aliases, and sometimes external scripts. Most of the built-in commands from Microsoft are cmdlets, which are typically commands written in other languages like C#. By running the Get-Command command, as in Listing 1-3, you’ll see a CommandType field.
PS> Get-Command -Name Get-Alias

CommandType     Name                Version    Source
-----------     ----                -------    ------
Cmdlet          Get-Alias           3.1.0.0    Microsoft.PowerShell.Utility
Listing 1-3: Displaying the Get-Alias command’s type
Functions, on the other hand, are commands written in PowerShell. You write functions to get things done; you can leave the cmdlets to the software developers. Cmdlets and functions are the most common command types you’ll be working with in PowerShell.
You’ll use the Get-Command command to explore the plethora of cmdlets and functions available in PowerShell. But as you may have just seen, entering Get-Command with no parameters will leave you tapping your finger for a few seconds as your console scrolls through all the commands available.
A lot of commands in PowerShell have parameters, which are values you give (or pass) to a command to customize its behavior. For instance, Get-Command has various parameters that allow you to return only specific commands instead of all of them. Looking through Get-Command, you may have noticed common verbs such as Get, Set, Update, and Remove. If you guessed that all of the Get commands get information and the others modify information, you’d be right. In PowerShell, what you see is what you get. Commands are named intuitively and generally do what you’d expect.
Since you’re just starting out, you don’t want to change anything on your system. You do want to retrieve information from various sources. Using the Verb parameter on Get-Command, you can limit that huge list of commands to only those that use the Get verb, for example. To do this, enter the following command at the prompt:
PS> Get-Command -Verb Get
You’ll probably agree that a few too many commands are still displayed, so you can limit the results even further by adding the Noun parameter to specify the Content noun, as in Listing 1-4.
PS> Get-Command -Verb Get -Noun Content

CommandType     Name                Version    Source
-----------     ----                -------    ------
Cmdlet          Get-Content         3.1.0.0    Microsoft.PowerShell.Management
Listing 1-4: Displaying only commands that contain the verb Get and the noun Content
If these results are too narrow for you, you also can use Noun without the Verb parameter, as shown in Listing 1-5.
PS> Get-Command -Noun Content

CommandType     Name                Version    Source
-----------     ----                -------    ------
Cmdlet          Add-Content         3.1.0.0    Microsoft.PowerShell.Management
Cmdlet          Clear-Content       3.1.0.0    Microsoft.PowerShell.Management
Cmdlet          Get-Content         3.1.0.0    Microsoft.PowerShell.Management
Cmdlet          Set-Content         3.1.0.0    Microsoft.PowerShell.Management
Listing 1-5: Displaying only commands that contain the noun Content
You can see that Get-Command allows you to separate out the verb and noun. If you’d rather define the entire command as one unit, you can use the Name parameter instead and specify the entire command name, as shown in Listing 1-6.
PS> Get-Command -Name Get-Content

CommandType     Name                Version    Source
-----------     ----                -------    ------
Cmdlet          Get-Content         3.1.0.0    Microsoft.PowerShell.Management
Listing 1-6: Finding the Get-Content cmdlet by command name
As I said previously, lots of commands in PowerShell have parameters that customize their behavior. You can learn a command’s parameters by using the robust PowerShell help system.
Getting Help
PowerShell’s documentation isn’t unique by any means, but the way the documentation and help content is integrated into the language is truly a work of art. In this section, you’ll learn how to display command help pages in the prompt window, get more general information on the language via About topics, and update your documentation with Update-Help.
Displaying the Docs
Similar to the man command in Linux, PowerShell has the help command and the Get-Help cmdlet. If you’re interested in seeing what one of those Content cmdlets does, you can pass that command name to the Get-Help command to retrieve the standard SYNOPSIS, SYNTAX, DESCRIPTION, RELATED LINKS, and REMARKS help sections. These sections provide a breakdown of what the command does, where you can find more information about the command, and even some related commands. Listing 1-7 displays the documentation for the Add-Content command.
PS> Get-Help Add-Content

NAME
    Add-Content

SYNOPSIS
    Appends content, such as words or data, to a file.

--snip--
Listing 1-7: The Add-Content command’s help page
Providing just the command name to Get-Help is useful, but the most helpful part of this content is the Examples parameter. This parameter shows examples of real-world uses of the command in a variety of scenarios. Try Get-Help CommmandName -Examples on any command and notice that nearly all built-in commands have examples to help you understand what they do. For example, you can run the command on the Add-Content cmdlet, as in Listing 1-8.
PS> Get-Help Add-Content -Examples

NAME
    Add-Content
SYNOPSIS
    Appends content, such as words or data, to a file.


    -------------------------- EXAMPLE 1 --------------------------

    C:PS>Add-Content -Path *.txt -Exclude help* -Value "END"

    Description

    -----------

    This command adds "END" to all text files in the current directory,
    except for those with file names that begin with "help."
--snip--
Listing 1-8: Getting sample usages of the Add-Content command
If you want more information, the Get-Help cmdlet also has the Detailed and Full parameters, which give you a complete rundown on what that command does.
Learning About General Topics
In addition to help content for individual commands, the PowerShell help system provides About topics, which are help snippets for broader subjects and specific commands. For example, in this chapter you’re learning about some of PowerShell’s core commands. Microsoft has created an About topic that gives an overall explanation of these commands. To see it, you run Get-Help about_Core_Commands, as shown in Listing 1-9.
PS> Get-Help about_Core_Commands
TOPIC
    about_Core_Commands

SHORT DESCRIPTION
    Lists the cmdlets that are designed for use with Windows PowerShell
    providers.


LONG DESCRIPTION
    Windows PowerShell includes a set of cmdlets that are specifically
    designed to manage the items in the data stores that are exposed by Windows
    PowerShell providers. You can use these cmdlets in the same ways to manage
    all the different types of data that the providers make available to you.
    For more information about providers, type "get-help about_providers".


    For example, you can use the Get-ChildItem cmdlet to list the files in a
    file system directory, the keys under a registry key, or the items that
    are exposed by a provider that you write or download.
    The following is a list of the Windows PowerShell cmdlets that are designed
    for use with providers:

--snip--
Listing 1-9: About topic for PowerShell’s core commands
To get a complete list of all the About topics available, use a wildcard for the Name parameter. In PowerShell, the wildcard character, an asterisk (*), can be used as a placeholder for zero or more characters. You can use a wildcard with the Get-Help command’s Name parameter, as in Listing 1-10.
PS> Get-Help -Name About*
Listing 1-10: Using a wildcard on the Get-Help command’s Name parameter
By appending the wildcard to About, you’re asking PowerShell to search for all possible topics that start with About. If there are multiple matches, PowerShell will display a list, with brief information about each. To get the full information about one of the matches, you’ll have to pass it into Get-Help directly, as shown previously in Listing 1-9.
Although the Get-Help command has a Name parameter, you can pass the parameter argument directly to it by entering -Name, as shown in Listing 1-10. This is known as using a positional parameter, which determines the value you’re passing in based on its (you guessed it) position in the command. Positional parameters are a shortcut that many PowerShell commands have, allowing you to reduce the number of keystrokes.
Updating the Docs
The help system in PowerShell is a great asset for anyone who wants to learn more about the language, but one key feature makes this help system much better: it’s dynamic! Documentation tends to get stale after a while. A product ships with documentation, bugs creep in, new features get released, but the documentation on the system stays the same. PowerShell addresses this problem with updatable help, which allows the built-in PowerShell cmdlets and any other cmdlets—or functions built by others—to point to an internet URI in order to host up-to-date documentation. Simply enter Update-Help, and PowerShell will begin reading the help on your system and checking it against the various online locations.
Note that although updatable help is included with all built-in PowerShell cmdlets, it isn’t required for any third-party commands. Also, documentation is only as recent as the developer makes it. PowerShell provides the tools for developers to write better help content, but they still have to keep the repository containing their help files current. Finally, you may occasionally receive an error when running Update-Help if the location where the help is stored is not available anymore. In short, don’t expect Update-Help to always show the latest help content for every command in PowerShell.
Summary
In this chapter, you learned a few commands that will help you get started. When starting anything new, you’re not going to know what you don’t know. You just need a seed of knowledge that enables you to explore more by yourself. By understanding the basics of PowerShell commands and how to use Get-Command and Get-Help, you now have the tools you need to begin learning PowerShell. A big, exciting journey lies ahead of you!

