5
infrared message transmitters
Infrared light exists outside the range of human vision. It can be especially useful if you need to communicate stealthily or if you’re moving around at night and want to avoid detection. Or maybe you’re interested in countering the actions of other stealthy people. Either way, using it offers advantages. In this chapter, you’ll create two LEGO-based devices that work with infrared light: an infrared version of the automated Morse code transmitter you built in Chapter 4, to keep your messages secret, and an infrared receiver, which converts invisible infrared signals from the MINDSTORMS EV3 Infrared Beacon into visible ones.
working with infrared light
Infrared light is a range of colors that exist beyond the color red in the electromagnetic spectrum, shown in Figure 5-1.
Your eye can’t see those colors, but certain electronic devices can make them visible. For example, the silicon-based photodetectors found in common digital cameras can capture infrared wavelengths. However, camera manufacturers usually put a glass filter inside the camera to block infrared light and avoid making images that look different from what people see. For the project in this chapter, you’ll need an imaging device with no filter or a filter that is removable. Here are a few options:
Some smartphones Some phones have cameras with infrared filters, and some don’t. Some phones even have two cameras—a front-facing camera and a back-facing camera—one with an infrared sensor and the other without. For example, an iPhone SE will capture infrared light on the front-facing camera but not on the back-facing camera. Test your phone camera by shining the EV3 Infrared Beacon at the camera. Infrared light likely shows up as purple on a phone without an infrared filter.
Night vision equipment These days, you can get night vision monoculars (Figure 5-2) for as little as $100. The infrared light will be much brighter when viewed through a device like this than through a smartphone.

FIGURE 5-1: Infrared light has a wavelength longer than wavelengths in the spectrum of visible light.
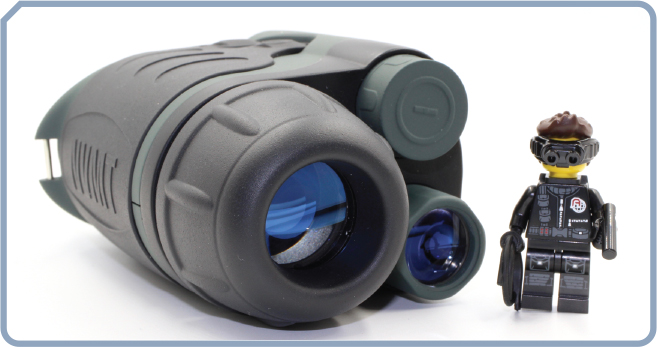
FIGURE 5-2: A night vision monocular allows you to view infrared wavelengths that are invisible to the unaided eye.
Camcorders Some camcorders have an IR mode or night mode setting, which, when activated, either engages a mechanism inside the camcorder to pull the infrared-blocking filter out of the way or uses software processing to let the infrared appear in the recorded images.
Some single-lens reflex cameras Some of these cameras have removable infrared-blocking filters in front of the reflex mirrors.
what you’ll need
To build the projects in this chapter, you’ll need the following:
Any infrared viewer, like the ones described in the preceding list.
A Grove LED Socket Kit, used to connect an external LED to the EV3 Intelligent Brick. You can find this part at Seeed Studio (https://www.seeedstudio.com/) or from electronic parts distributors such as RobotShop (https://www.robotshop.com/). These kits are sold with a particular color LED, with a name like Grove Green LED. You can get any color, since you’ll be replacing the visible light LED with an infrared LED.
A holder for the Grove LED Socket Kit, such as a 3 × 3 Grove Wrapper (also made by Seeed Studio). Openings in the back of the Grove Wrapper let you mount it to LEGO pieces via Technic pins 1/2.
A Grove Sensor Adapter that allows the EV3 Intelligent Brick to control Grove devices. This is available from Mindsensors.com (http://www.mindsensors.com/).
An infrared LED at a wavelength of 940 nm. This is available from the online electronics store Jameco Electronics (https://www.jameco.com/) as part number 2275839. Any infrared LED with a 3 mm or 5 mm base and a wavelength between 700 nm and 1000 nm will work, though you should make sure it has a light intensity of at least 50 milliwatts per steradian (mW/st). Light intensity is sometimes alternately listed in terms of millicandela (mcd); you’ll want at least 100 mcd with a viewing angle of no more than 30 degrees.
You’ll also need the LEGO components in Figure 5-3, which include the same parts as those you used in Chapter 1 to mount the EV3 Infrared Sensor to the side of the EV3 Intelligent Brick.
Although certain parts aren’t found in the MINDSTORMS EV3 #31313 set, you could replace the locking turntable with a Technic pin and liftarm design using parts from that set. This alternate approach is described in Chapter 1.

FIGURE 5-3: LEGO parts used for experiments with infrared light. Parts marked with an asterisk are not in the MINDSTORMS EV3 #31313 set.
the covert Morse code transmitter
An automated Morse code transmitter, like the one built in Chapter 4, that uses invisible infrared light would be a great innovation on the espionage concept of the dead drop. A dead drop is a designated place for spies to leave messages to each other. Spies can use it to communicate without having to meet in person. But using the dead drop can be risky if the spies have to physically touch the dead drop location point.
A safer way to leave a message would be to program the message in Morse code with a blinking infrared LED and set the light in a window. The recipient of the message can view the window from a safe distance, such as from the inside of a car. To see the infrared, they could use a night vision monocular or record the message with a smartphone or camcorder.
building the covert Morse code transmitter
To build the Covert Morse Code Transmitter, you’ll connect an infrared LED to the EV3 Intelligent Brick with the Grove Sensor Adapter and Grove LED Socket Kit, shown in Figure 5-4.
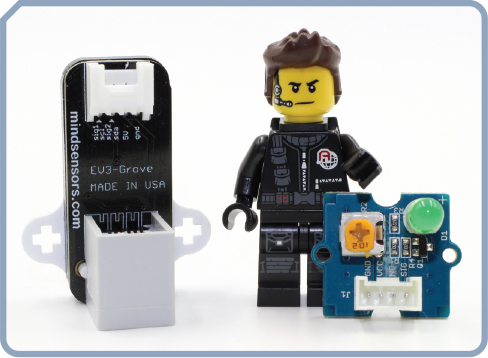
FIGURE 5-4: The Grove Sensor Adapter (at left) allows the EV3 Intelligent Brick to interface with various Grove devices, such as the LED Socket Kit (at right).
First, replace the visible color LED of the Grove device in Figure 5-4 with an infrared LED, such as the one shown in Figure 5-5.

FIGURE 5-5: Replace the visible-wavelength LED with an infrared LED, such as this device from Jameco (part number 2275839).
Note that the new infrared LED you purchased has one lead that is longer than the other. The longer lead is the positive connection, which goes into the positive socket, labeled + on the Grove LED Socket Kit. Another way to distinguish polarity is that some LEDs indicate negative polarity with a straight edge in the LED’s rounded base—the lead by the straight edge is the negative connection.
Before installing your new infrared LED, trim its leads to about the same length as those from the visible LED you removed from the Grove LED Socket Kit, but keep track of which lead is positive. Then insert it into the Grove socket.
Next, attach the modified Grove LED Socket Kit and Grove Sensor Adapter onto the EV3 Intelligent Brick, as shown in Figure 5-6.

FIGURE 5-6: The Grove Sensor Adapter is on the left side of the EV3 Intelligent Brick. The Grove LED Socket Kit, held in a Grove Wrapper, is on the right.
Follow the building instructions to attach the Grove devices.


writing the software for the covert Morse code transmitter
The software for sending infrared Morse code messages resembles the program for the Automated Message Transmitter in Chapter 4, except that you’ll control the infrared LED rather than lights and sound on the EV3 Intelligent Brick.
To control the Grove LED, download the Grove Sensor Adapter programming block available from Mindsensors.com at http://www.mindsensors.com/ev3-and-nxt/20-grove-sensor-adapter-for-ev3-or-nxt. This will download a file onto your computer called GroveSensorAdapter.ev3b. Import it into the MINDSTORMS EV3 programming environment by going to the toolbar and selecting Tools ▸ Block Import. Select the GroveSensorAdapter.ev3b Grove block from the location where you downloaded it. The Grove Sensor Adapter block will now appear in the Sensor tab, and you can drag it into programs like any other MINDSTORMS EV3 programming block.
As you did in Chapter 4, you’ll build separate programs for displaying the Morse code dashes and dots, and then turn those programs into My Blocks that you can use to create programs representing each letter in the alphabet. You can then make My Blocks of these programs and write your own message with them.
building the dot and dash programs
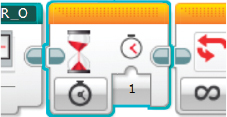
Figure 5-7 shows the dot and dash programs.
The dot program will create a short flash of the infrared LED, and the dash program will create a long flash. To build the programs, use the following blocks:
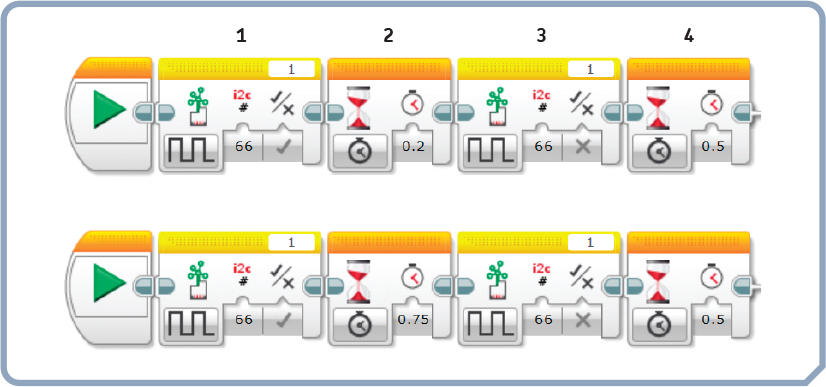
FIGURE 5-7: The dot and dash programs
GroveSensorAdapter block This turns on the Grove LED.

Go to the Sensors tab at the bottom of the screen and click the GroveSensorAdapter block. Place the Grove block next to the program Start. Set Mindsensors GroveSensorAdapter to Digital, Port to 1, I2CAddr to 66, and Digital Output On? to True.
The Grove Sensor Adapter’s digital mode lets it turn on or off the device connected to a port—in this case, the Grove LED Socket Kit connected to port 1. The drop-down menu command for Digital Output On? tells the LED to turn on (for the true setting) or turn off (for the false setting). You’ll use this on-and-off combination to blink the infrared LED.
Wait block This keeps the infrared LED on for 0.2 seconds for a dot or 0.75 seconds for a dash.
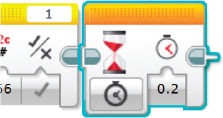
Select a Wait block from the Flow Control tab and place it after the GroveSensorAdapter block. Set Wait to Time and Seconds to 0.2 for a dot or 0.75 for a dash.
GroveSensorAdapter block This turns off the infrared LED.

Place a GroveSensorAdapter block after the Wait block. Set Mindsensors GroveSensorAdapter to Digital, Port to 1, I2CAddr to 66, and Digital Output On? to False.
Wait block This pauses for 0.5 seconds before the next dot or dash.

For the Wait block, set Wait to Time and Seconds to 0.5.
building the alphabet blocks
To create blocks that flash each letter of the alphabet in Morse code, you must first create My Blocks for the dot and dash subroutines. Follow the steps in Chapter 4 if you’re not sure how to do this. Call your new My Blocks IR_dot and IR_dash.
Next, use these new blocks to write programs for each Morse code letter. (Consult Chapter 4 if you need a Morse code refresher.) Figure 5-8 shows the programs for the letters A and B.
Because you won’t be able to insert a different-colored flash to mark the end of each letter, you’ll separate the letters with a time delay instead.
Use the following process to create each letter. These specific blocks create the letter A:
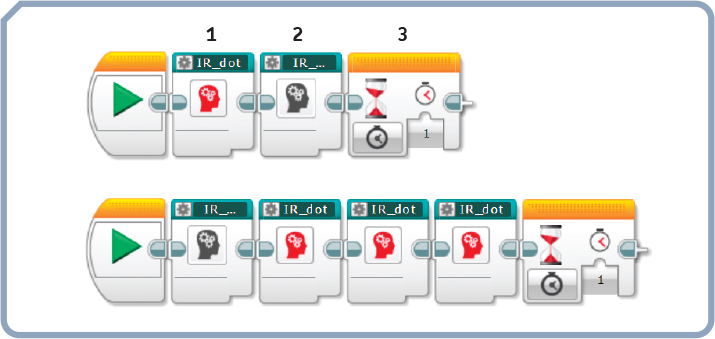
FIGURE 5-8: Programs for flashing the letters A and B in Morse code
My Block IR_dot This blinks a dot by using the dot My Block.
Drag the IR_dot block from the My Blocks tab at the bottom of the screen and place it next to the program Start.
My Block IR_dash This blinks a dash by using the dash My Block.

Place the IR_dash My Block after the dot.
Wait block This pauses for 1 second before flashing the next letter. This delay gives the message viewer a pause to get ready for the next letter.

Set Wait to Time and Seconds to 1.
Make My Blocks for all the letters of the alphabet, following the procedure for creating My Blocks described in Chapter 4.
writing a message program
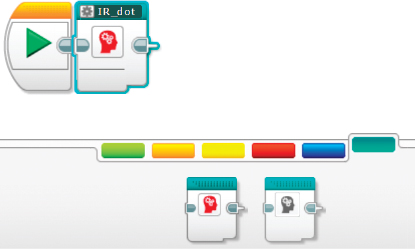
Once you have your Morse code alphabet, compose a message by stringing together letter My Blocks. For example, Figure 5-9 creates a program for flashing the word LEGO.
Use the following blocks to create your message program:
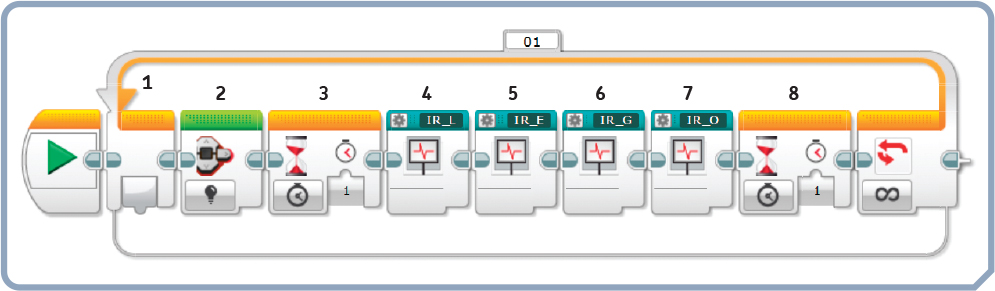
FIGURE 5-9: A program that flashes the word LEGO in infrared light Morse code
Loop block This repeats the Morse code message infinitely.

Insert the Loop block after the program Start.
Brick Status Light block This turns off the EV3 Intelligent Brick’s front panel lights that would ordinarily flash during operation. This flashing light would ruin the secret transmission.

Select the Brick Status Light block from the Action tab, place it inside the loop, and set Brick Status Light to Off.
Wait block This pauses for 1 second before starting the message so that the recipient knows the message is starting over.

Place the Wait block after the Brick Status Light. Set Wait to Time and Seconds to 1.
4–7. My Blocks Blink the Morse code letters for your message.

Go to the My Blocks tab at the bottom of the screen to select the letters for your message. Line up the letters after the Wait block.
Wait block This pauses for 1 second before starting the message over again.
Place the Wait block after your letter My Blocks. Set Wait to Time and Seconds to 1.
viewing your covert Morse code
The infrared LED will start blinking as soon as you’ve downloaded your Morse code message onto the EV3 Intelligent Brick—but, of course, you won’t see the blinking LED since it’s infrared. To see your message, you’ll have to use one of the devices discussed earlier in this chapter. Viewing the infrared LED with these devices becomes easier in darker environments, but you can still see the beam in a room with the lights on. Figure 5-10 shows the image viewed through an iPhone SE. You can record a video of the blinking light on a smartphone or camcorder to decode or replay later as needed.
The message is easiest to see on a night vision monocular. Figure 5-11 shows an example using the monocular from Figure 5-2. Viewed through a night vision monocular, the blinking LED shows up quite clearly in white. The night vision monocular also illuminates the area surrounding the EV3 Intelligent Brick.
If you’re having a problem seeing the infrared LED blinking, you’ve most likely inserted the LED into the Grove LED Socket in the wrong positive/negative orientation. You can solve this by pulling out the infrared LED, rotating it, and plugging it back in. If this doesn’t work, remove the infrared LED and temporarily replace it with the visible wavelength LED that came with the Grove LED Socket. If the LED still doesn’t blink, the problem is likely with the software.
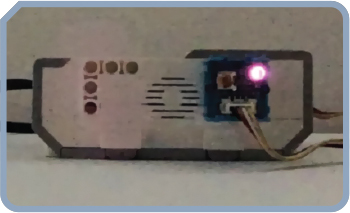
FIGURE 5-10: The blinking LED shows up as a purple light when viewed through an infrared-capable camera on a smartphone.

FIGURE 5-11: Through a night vision device, the infrared LED appears as a white pulse.
infrared Morse code receiver
Another way you could view an infrared message is to build a receiver that converts infrared blinking into visible light and audible tones. In this section, you’ll build such a receiver by making use of the EV3 Infrared Sensor and the EV3 Intelligent Brick. You’ll use the EV3 Infrared Beacon as a remote to manually flash Morse code infrared messages. The receiver’s sensor should detect the signals and play the message.
You could use this device to receive secret messages transmitted by someone who has the EV3 Infrared Beacon. With the Infrared Morse Code Receiver, you can send and receive messages tapped out in real time.
building the infrared Morse code receiver
The hardware for the Infrared Morse Code Receiver, pictured in Figure 5-12, is the same as for the infrared sensor head in Chapter 1, so you can consult those building instructions to put it together.
The sensor will detect Morse code messages sent from the remote control.
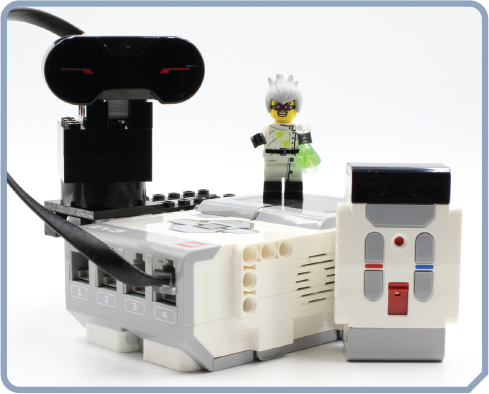
FIGURE 5-12: The Infrared Morse Code Receiver
writing the infrared Morse code receiver software
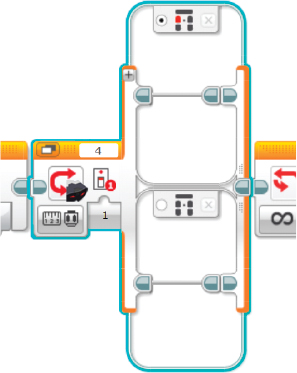
Figure 5-13 shows the software to make a receiver out of the EV3 Intelligent Brick. The Infrared Morse Code Receiver uses the EV3 Infrared Sensor to detect when a button is pressed on the EV3 Infrared Beacon. When the button is pressed, the EV3 Intelligent Brick will sound a tone and light up the front panel lights. You’ll use the same light and sound activation inside the Switch block as you did for the Manual Message Transmitter of Chapter 4.

FIGURE 5-13: The Infrared Morse Code Receiver program is based on an Infrared Sensor Switch block.
Build the program with the following blocks:
Loop block This infinitely waits for a button to be pressed on the EV3 Infrared Beacon.

Place a Loop block after the program Start.
Switch block This creates true and false paths. If someone presses a button on the EV3 Infrared Beacon, the true path should execute. Otherwise, the false path should run.
Install the Switch block inside the Loop. Set it to Infrared Sensor–Measure–Remote, Port to 4, and Channel to 1. Make sure the EV3 Infrared Beacon is also set for Channel 1 by using the slide switch on the front of the device.
Brick Status Light block This activates a red light on the front panel of the EV3 Intelligent Brick. This light will stay on for as long as the EV3 Infrared Beacon’s button is pressed.

Place a Brick Status Light block inside the true path of the Switch. Set Brick Status Light to On, Color to 2, and Pulse to False.
Sound block This plays a sound through the EV3 Intelligent Brick’s speaker for as long as the EV3 Infrared Beacon’s button is pressed.

Place a Sound block after the Brick Status Light. Set Sound to Play Tone, Frequency to 261.626, Duration to 0.01, Volume to 10, and Play Type to 1.
Brick Status Light block This turns off the light on the EV3 Intelligent Brick’s front panel. This block begins the false path of the Switch block, which runs when no button is pressed on the EV3 Infrared Beacon.

Place a Brick Status Light block in the false path of the Switch block and set Brick Status Light to Off.
using the infrared Morse code receiver
After downloading the program onto the EV3 Intelligent Brick, you’re ready to send messages across a room. Place the receiver with the EV3 Infrared Sensor rotated to face roughly in the direction from which you intend to transmit. Press any of the four buttons on the EV3 Infrared Beacon to activate the LED front panel lights and speaker of the EV3 Intelligent Brick. Experiment with how far away you can be and still successfully transmit messages, or test whether you can send messages through window glass.
what you learned
In this chapter, you worked with infrared light, which is invisible to the human eye. You used infrared light sources to covertly send messages. Only someone who knows how to detect light from the infrared spectrum will be able to decode your signals. You also learned how to add a wide array of devices to MINDSTORMS EV3 elements with the Grove system. Later chapters will explore more capabilities of Grove devices.