Chapter 7: Shooting in Live View Mode
At times, composing images with the viewfinder can be inconvenient or even impossible. That’s when Live View shooting offers a good alternative. With Live View shooting mode ( ![]() ), you can use the camera’s large 3-inch LCD monitor to compose and capture images. Further, with the addition of Canon’s revolutionary Dual Pixel CMOS Autofocus technology, focusing is both fast and accurate. The new autofocus technology, also used in Movie mode, may be enough to convert photographers from viewfinder to Live View shooting.
), you can use the camera’s large 3-inch LCD monitor to compose and capture images. Further, with the addition of Canon’s revolutionary Dual Pixel CMOS Autofocus technology, focusing is both fast and accurate. The new autofocus technology, also used in Movie mode, may be enough to convert photographers from viewfinder to Live View shooting.
Live View shooting ( ![]() ) is a good option for still-life, product, macro shooting, and more. As you shoot, you can monitor the exposure using the live histogram. You can also change settings, such as the white balance, and Picture Style, or apply Creative filters and see the effect immediately by using exposure simulation.
) is a good option for still-life, product, macro shooting, and more. As you shoot, you can monitor the exposure using the live histogram. You can also change settings, such as the white balance, and Picture Style, or apply Creative filters and see the effect immediately by using exposure simulation.
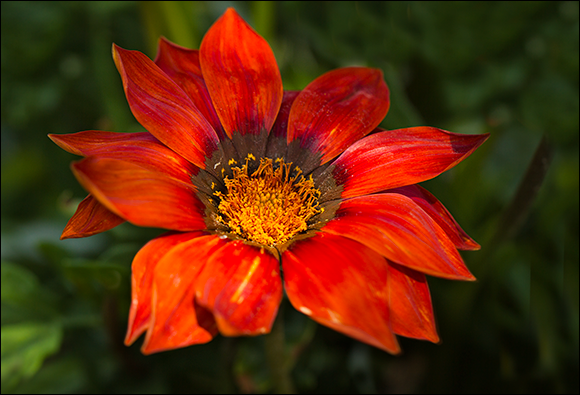
I composed this scene in Live View mode and used the histogram to confirm it was a good exposure. Exposure: ISO 200, f/5.0, 1/200 second, -2/3 exposure compensation.
About Live View Shooting
Using the LCD screen to shoot images has become commonplace, whether you’re using a cell phone or a point-and-shoot digital camera. Until the past several years, viewing a live scene on the LCD screen of a dSLR wasn’t possible because the shutter and reflex mirror blocked the view to the image sensor. However, the 70D overcomes this blind spot with a mechanical shutter that stays completely open and a mirror that stays up during Live View shooting to give you a real-time view of the scene.
Live View mode ( ![]() ) offers several advantages over viewfinder shooting. For example, you can use the new Dual Pixel CMOS Autofocus feature in several focus modes, zoom in, and set precise focus manually, or use the option for silent shooting that reduces the noise of the shutter cocking. You can also position the camera in places you cannot get to, and use the articulated LCD screen to view and compose images when you cannot use the viewfinder.
) offers several advantages over viewfinder shooting. For example, you can use the new Dual Pixel CMOS Autofocus feature in several focus modes, zoom in, and set precise focus manually, or use the option for silent shooting that reduces the noise of the shutter cocking. You can also position the camera in places you cannot get to, and use the articulated LCD screen to view and compose images when you cannot use the viewfinder.
The Live View shooting mode ( ![]() ) is handy, but it comes with the following caveats:
) is handy, but it comes with the following caveats:
• Temperature affects the number of shots you can get. With a fully charged LP-E6 battery, you can expect 230 shots without flash use in normal temperatures of 73 degrees. In freezing temperatures, expect 210 shots without flash use. If you use the flash half the time, then you’ll get approximately 210 shots in normal temperatures and 200 in cold temperatures. With a fully charged battery, you get approximately 1 hour and 50 minutes of continuous Live View shooting in normal temperatures before the battery is exhausted.
• High temperatures, high ISO speeds, and long exposures can degrade image quality. In short, anything that heats up the sensor — whether it’s high internal or external temperatures — can cause image problems, as can high ISO settings. Even before the camera warns you of a high internal temperature, using high ISO settings with high temperatures can result in images with both digital noise and inaccurate image colors. A little common sense prevents most problems. If the camera has been in the sun or in hot temperatures, then let it cool before you use it. If you’re shooting long exposures, let the camera cool down between exposures. The camera warns you when the temperature is high. The first warning displays a white thermometer on the LCD screen warning you to let the camera cool. If you continue shooting, a blinking red icon warns you that the camera will automatically stop shooting very soon (and it does). Then you have to wait for the camera to cool down before you can use it again.
When you shoot in Live View mode ( ![]() ), the camera heats up, and it can irritate or even blister your skin if you hold the camera too long without changing position. This is true even if the camera doesn’t feel like it’s too hot to hold. Using a tripod helps prevent irritation from handholding the camera for extended times, and it helps you capture more sharply focused images.
), the camera heats up, and it can irritate or even blister your skin if you hold the camera too long without changing position. This is true even if the camera doesn’t feel like it’s too hot to hold. Using a tripod helps prevent irritation from handholding the camera for extended times, and it helps you capture more sharply focused images.
• Certain conditions can cause Live View mode (![]() ) not to reflect the captured image accurately. Image brightness may not be accurately reflected in low- and bright-light conditions. If you move from low to a bright light and if the LCD brightness level is high, the Live View may display chrominance (color) noise, but the noise will not appear in the captured image. Also, suddenly moving the camera in a different direction can throw off accurate rendering of the image brightness. Light source changes can also cause the image to flicker. Just stop Live View shooting mode (
) not to reflect the captured image accurately. Image brightness may not be accurately reflected in low- and bright-light conditions. If you move from low to a bright light and if the LCD brightness level is high, the Live View may display chrominance (color) noise, but the noise will not appear in the captured image. Also, suddenly moving the camera in a different direction can throw off accurate rendering of the image brightness. Light source changes can also cause the image to flicker. Just stop Live View shooting mode ( ![]() ), and then restart it. If you focus and capture an image in magnified view, the exposure and focus may not be correct. Be sure to return to normal display before shooting.
), and then restart it. If you focus and capture an image in magnified view, the exposure and focus may not be correct. Be sure to return to normal display before shooting.
• Some settings and features don’t work in Live View mode (![]() ). You cannot use the focus preset on super-telephoto lenses. You also cannot use Flash Exposure Lock (
). You cannot use the focus preset on super-telephoto lenses. You also cannot use Flash Exposure Lock ( ![]() ) or modeling flash if you shoot with a Speedlite. However, if the accessory Speedlite has an LED, it will light to help the camera find focus when necessary. Certain Custom Function settings (
) or modeling flash if you shoot with a Speedlite. However, if the accessory Speedlite has an LED, it will light to help the camera find focus when necessary. Certain Custom Function settings ( ![]() ) are also ignored in Live View shooting mode (
) are also ignored in Live View shooting mode ( ![]() ).
).
Custom Functions are detailed in Chapter 6.
Enabling Live View Shooting
Before you begin using Live View mode ( ![]() ), it’s good to know what is the same and what is different as compared to viewfinder shooting. The following sections cover the differences and similarities. As you read, you can also set the options that you want to use.
), it’s good to know what is the same and what is different as compared to viewfinder shooting. The following sections cover the differences and similarities. As you read, you can also set the options that you want to use.
The exposure mode you choose affects how many features and options that will be available to you on the camera menus and on the Quick Control screen. In the Creative Zone modes such as Aperture-priority AE ( ![]() ) or Shutter-priority AE (
) or Shutter-priority AE ( ![]() ) mode, all the features are available. In Basic Zone modes, fewer menus and settings are available.
) mode, all the features are available. In Basic Zone modes, fewer menus and settings are available.
The settings in Live View shooting menus 1 and 2 ( ![]() ) activate the Live View shooting mode (
) activate the Live View shooting mode ( ![]() ) and enable you to set your preferences. If you are anxious to get started, follow these steps to enable Live View shooting mode (
) and enable you to set your preferences. If you are anxious to get started, follow these steps to enable Live View shooting mode ( ![]() ):
):
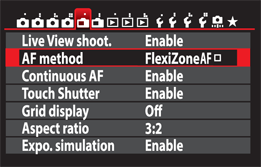
7.1 The options available on Live View Shooting menu 1. If you’re using a Basic Zone exposure mode, fewer options are available.
1. Set the camera to the shooting mode you want. I typically use Aperture-priority AE ( ![]() ) or Shutter-priority AE (
) or Shutter-priority AE ( ![]() ) mode, but you can choose any of the 70D’s exposure modes.
) mode, but you can choose any of the 70D’s exposure modes.
2. Set the Live View/Movie shoot-ing switch to Live View shooting mode (![]() ).
).
3. Press the Menu button (![]() ), and then go to Live View Shooting menu 1 (
), and then go to Live View Shooting menu 1 (![]() ). Live View Shooting menu 1 (
). Live View Shooting menu 1 ( ![]() ) is displayed.
) is displayed.
4. Press down on the Multi-controller (![]() ) to highlight Live View shoot., and then press the Setting button (
) to highlight Live View shoot., and then press the Setting button (![]() ). The Enable and Disable options appear.
). The Enable and Disable options appear.
5. Select Enable, and then press the Setting button (![]() ).
).
6. On the back of the camera, press the Start/Stop button (![]() ). A real-time view of the scene appears on the LCD screen.
). A real-time view of the scene appears on the LCD screen.
Before you begin shooting in earnest, be sure to set up the camera using the options on Live View Shooting menus 1 and 2 ( ![]() ), which are detailed later in this chapter.
), which are detailed later in this chapter.
The operation of the camera during Live View shooting mode ( ![]() ) is easy once you get started. However, just a few minutes of watching the real-time view on the LCD screen will convince you that a tripod is necessary. With any focal length approaching telephoto, Live View mode (
) is easy once you get started. However, just a few minutes of watching the real-time view on the LCD screen will convince you that a tripod is necessary. With any focal length approaching telephoto, Live View mode ( ![]() ) provides a real-time gauge of just how steady or unsteady your hands are.
) provides a real-time gauge of just how steady or unsteady your hands are.
Additionally, the Live View Quick Control screen offers handy access to commonly used controls. With a live view of the scene displayed, press the Quick Control button ( ![]() ) to display the Quick Control screen. From the Live View Quick Control screen in any exposure mode, you can set the AF method, Drive mode, Image-recording quality, and Creative Filters. In Program AE (
) to display the Quick Control screen. From the Live View Quick Control screen in any exposure mode, you can set the AF method, Drive mode, Image-recording quality, and Creative Filters. In Program AE ( ![]() ), Shutter-priority AE (
), Shutter-priority AE ( ![]() ), Aperture-priority AE (
), Aperture-priority AE ( ![]() ), Manual (
), Manual ( ![]() ), and Bulb (
), and Bulb ( ![]() ) exposure modes, you can also set the Metering mode, White balance, Picture Style, and Auto Lighting Optimizer. In the Basic Zone modes, additional functions are available depending on the exposure mode you’re using.
) exposure modes, you can also set the Metering mode, White balance, Picture Style, and Auto Lighting Optimizer. In the Basic Zone modes, additional functions are available depending on the exposure mode you’re using.
Picture Styles and Creative Filters are detailed in Chapter 5.
To use the Quick Control screen press up or down on the Multi-controller ( ![]() ) to select a function. The options appear at the bottom of the screen. Then turn the Main dial (
) to select a function. The options appear at the bottom of the screen. Then turn the Main dial ( ![]() ) to choose the option. For Picture Style, you can press the Info. button (
) to choose the option. For Picture Style, you can press the Info. button ( ![]() ) to change the Picture Style parameters.
) to change the Picture Style parameters.
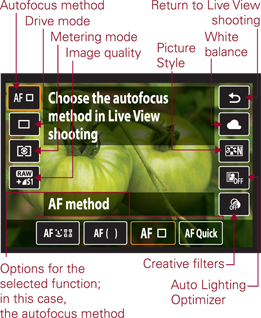
7.2 The Live View Quick Control screen.
The Quick Control screen also gives you access to Creative Filter Effects, such as Grainy B/W, Soft focus, Toy camera, and others. These filters are available in all shooting modes except HDR Backlight Control ( ![]() ) and Handheld night scene (
) and Handheld night scene ( ![]() ). Creative filters can be used for JPEG images, but not for RAW (
). Creative filters can be used for JPEG images, but not for RAW ( ![]() ) or any of the RAW plus JPEG settings. Filters also cannot be used if Auto Exposure Bracketing (
) or any of the RAW plus JPEG settings. Filters also cannot be used if Auto Exposure Bracketing ( ![]() ), White Balance Auto Bracketing (
), White Balance Auto Bracketing ( ![]() ), or Multi Shot Noise Reduction (
), or Multi Shot Noise Reduction ( ![]() ) is set. The live histogram isn’t displayed during use of the filters.
) is set. The live histogram isn’t displayed during use of the filters.
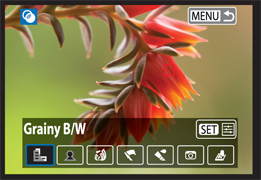
7.3 The Creative filters on the Live View Quick Control screen.
To display a live histogram on the LCD screen, be sure to enable Exposure simulation (Expo. simulation), which is available in Creative Zone modes on Live View Shooting menu 1 ( ![]() ).
).
The buttons above the LCD panel on top of the camera work in Live View mode ( ![]() ) just as you would expect. Just press the button, and the settings screen for the function is displayed. Then you can turn the Quick Control (
) just as you would expect. Just press the button, and the settings screen for the function is displayed. Then you can turn the Quick Control ( ![]() ) or Main (
) or Main ( ![]() ) dial to adjust the settings. If you set Partial (
) dial to adjust the settings. If you set Partial ( ![]() ) or Spot (
) or Spot ( ![]() ) metering modes, then a metering circle appears in the center of the LCD screen. Use that center area for metering in these modes. In Basic Zone modes such as Portrait (
) metering modes, then a metering circle appears in the center of the LCD screen. Use that center area for metering in these modes. In Basic Zone modes such as Portrait ( ![]() ) and Landscape (
) and Landscape ( ![]() ), some of these functions cannot be set.
), some of these functions cannot be set.
Setting up for and Shooting in Live View Mode
Now that you’ve had a chance to work with Live View mode ( ![]() ), take some time to learn about the different focus options, Continuous AF, using the Metering timer, grid, Exposure simulation, and setting an aspect ratio. The following sections will help you get the most out of Live View mode (
), take some time to learn about the different focus options, Continuous AF, using the Metering timer, grid, Exposure simulation, and setting an aspect ratio. The following sections will help you get the most out of Live View mode ( ![]() ).
).
Live View focus options
Among the differences between viewfinder and Live View shooting ( ![]() ) are the focus options. Without question, Canon’s new Dual Pixel CMOS Autofocus technology, which is available in the Live View (
) are the focus options. Without question, Canon’s new Dual Pixel CMOS Autofocus technology, which is available in the Live View ( ![]() ) and Movie (
) and Movie ( ![]() ) modes merits discussion.
) modes merits discussion.
Dual Pixel CMOS Autofocus uses phase-detect focusing. Right off the bat, that sounds like geek mumbo jumbo. However, this technology is a big deal, even if you’re not technically inclined. For example, if you’ve ever wished the camera would just hurry up and focus, this technology can make that a reality.
With Canon’s breakthrough implementation of phase-detect focusing, the camera can measure precisely how far out of focus the subject is and quickly tell the lens exactly how much correction is needed to get the subject in focus. This can also make focus hunting — when the lens moves back and forth trying to find focus — outdated. With its precise measurements, it can also put an end to back- and front-focusing — both of which do just what the names say, they focus behind or in front of the subject.
With phase detection, the camera evaluates the light rays coming in from opposite sides of the lens and determines if they line up. And if they do not, it knows by how much they are off and can tell the lens precisely what direction to move and by how much to achieve sharp focus. If you’ve ever used the old split-screen focusing of film cameras, then you have a mental model of how phase detection works, but today’s version is, of course, electronic.
The bottom line is that Dual Pixel CMOS Autofocus is fast and precise. It also holds the promise of providing focus over a very large area of the sensor because every pixel on the sensor has phase-detect capability. Just the lure of Dual Pixel CMOS Autofocus could be enough to convert even die-hard viewfinder photographers to Live View mode ( ![]() ) photographers. The Dual Pixel CMOS Autofocus technology is available when you use the Face Detection+Tracking (
) photographers. The Dual Pixel CMOS Autofocus technology is available when you use the Face Detection+Tracking ( ![]() ), FlexiZoneMulti AF (
), FlexiZoneMulti AF ( ![]() ), and FlexiZoneSingle AF (
), and FlexiZoneSingle AF ( ![]() ) focus methods in Live View shooting mode (
) focus methods in Live View shooting mode ( ![]() ). The Quick mode focus option uses the onboard autofocus sensor that’s also used with traditional viewfinder (non-Live View) shooting.
). The Quick mode focus option uses the onboard autofocus sensor that’s also used with traditional viewfinder (non-Live View) shooting.
Canon notes that even if you choose one of the Dual Pixel Autofocus modes, the camera may change from phase detection to contrast detection depending on the lens you’re using and the options you’ve chosen, such as whether you’re using magnified view or digital zoom (in Movie mode ![]() ). If the method switches, you’ll likely notice a slowdown in focus speed.
). If the method switches, you’ll likely notice a slowdown in focus speed.
Contrast detection is an older focusing technique in which the camera looks at the scene to determine how much edge contrast (that is, the difference in brightness) there is between side-by-side pixels across the AF frame. Focusing then is a matter of getting the maximum overall contrast in the subject. So, the camera moves the lens a bit in one direction or the other, and checks to see if it increases the contrast until maximum contrast is reached. While contrast detection works, it’s a time-consuming process.
As you review the options in Live View shooting mode ( ![]() ), be sure to try them so that you know which is best for different scenes and subjects. Then, you can choose the one you want on Live View Shooting menu 1 (
), be sure to try them so that you know which is best for different scenes and subjects. Then, you can choose the one you want on Live View Shooting menu 1 ( ![]() ) or the Quick Control screen. Many of these focus modes are also used for shooting movies.
) or the Quick Control screen. Many of these focus modes are also used for shooting movies.
The Live View shooting mode ( ![]() ) focusing options are:
) focusing options are:
• Face Detection+Tracking (![]() ). In this mode, the camera automatically looks for and focuses on a human face, and then tracks it if the person moves. A large AF point (rectangle) appears on top of the face the camera selects. If the camera does not choose the face of the subject you want or if there are multiple faces in the scene, then you can press the direction keys on the Multi-controller (
). In this mode, the camera automatically looks for and focuses on a human face, and then tracks it if the person moves. A large AF point (rectangle) appears on top of the face the camera selects. If the camera does not choose the face of the subject you want or if there are multiple faces in the scene, then you can press the direction keys on the Multi-controller ( ![]() ) to move the focusing frame to the correct face. If multiple faces are found, then the AF point displays arrows on the left and right indicating that you can move the AF point over another face using the Multi-controller (
) to move the focusing frame to the correct face. If multiple faces are found, then the AF point displays arrows on the left and right indicating that you can move the AF point over another face using the Multi-controller ( ![]() ). If the camera cannot detect a face, then the AF point reverts to the center AF point, and you can manually move the AF point to the face you want, or tap the screen to select the face. Then half-press the shutter button to focus. The AF point turns green when focus is achieved and a beep confirms focus. (The AF point turns orange if the camera can’t establish focus.) The camera may have trouble finding faces in the scene if your subjects are far from the camera. You can turn on Continuous AF on Live View Shooting menu 1 (
). If the camera cannot detect a face, then the AF point reverts to the center AF point, and you can manually move the AF point to the face you want, or tap the screen to select the face. Then half-press the shutter button to focus. The AF point turns green when focus is achieved and a beep confirms focus. (The AF point turns orange if the camera can’t establish focus.) The camera may have trouble finding faces in the scene if your subjects are far from the camera. You can turn on Continuous AF on Live View Shooting menu 1 ( ![]() ), so the camera keeps the scene generally in focus. This prevents subjects from going into severe defocus range. However, using Continuous AF is costly in terms of battery life, so use this with caution. Face detection does not work with extreme close-ups of a face, with distant subjects, or when subjects are too bright or dark, partially obscured, or tilted horizontally or diagonally. Also, the camera can’t focus if the subject is at the edges of the frame, and you cannot magnify the scene with this focus method. In low light, establishing focus may slow down. Unfortunately, you also cannot use the AF-assist beam on an EX Speedlite to help the camera focus. However, if you have an EX-series Speedlite with an LED, such as the 320EX, then the LED will automatically light to help the camera find focus.
), so the camera keeps the scene generally in focus. This prevents subjects from going into severe defocus range. However, using Continuous AF is costly in terms of battery life, so use this with caution. Face detection does not work with extreme close-ups of a face, with distant subjects, or when subjects are too bright or dark, partially obscured, or tilted horizontally or diagonally. Also, the camera can’t focus if the subject is at the edges of the frame, and you cannot magnify the scene with this focus method. In low light, establishing focus may slow down. Unfortunately, you also cannot use the AF-assist beam on an EX Speedlite to help the camera focus. However, if you have an EX-series Speedlite with an LED, such as the 320EX, then the LED will automatically light to help the camera find focus.
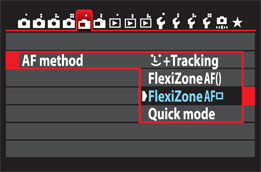
7.4 The focusing options available on Live View Shooting menu 1.
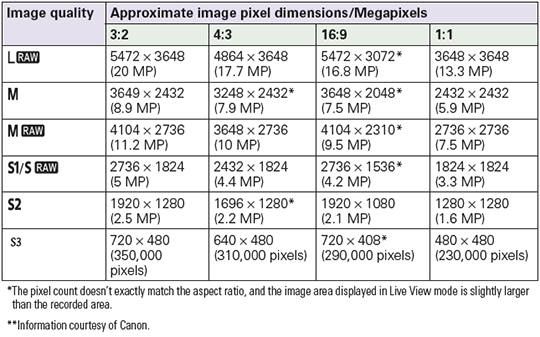
The number of AF points differ if you have changed the aspect ratio from the default 3:2 that offers 31 AF points. There are 25 AF points when the 4:3 and 1:1 ratios are set. There are 21 AF points and three rather than nine zones with the 16:9 aspect ratio.
• FlexiZoneMulti AF (![]() ). The focusing method is the same as that for Face Detection+Tracking (
). The focusing method is the same as that for Face Detection+Tracking ( ![]() ), except that it does not look for a human face, and the focus area can cover up to 31 AF points. The first response after reading the last sentence may be to argue that the camera has only 19 AF points. That’s also true for viewfinder focusing, but with this mode, the number increases significantly. In addition, the 31-AF point area can be subdivided into nine zones so you can focus by selecting one of the zones. To switch between the full 31-AF point area and zone selection, press the Setting (
), except that it does not look for a human face, and the focus area can cover up to 31 AF points. The first response after reading the last sentence may be to argue that the camera has only 19 AF points. That’s also true for viewfinder focusing, but with this mode, the number increases significantly. In addition, the 31-AF point area can be subdivided into nine zones so you can focus by selecting one of the zones. To switch between the full 31-AF point area and zone selection, press the Setting ( ![]() ) or Erase (
) or Erase ( ![]() ) button. Press the direction keys on the Multi-controller (
) button. Press the direction keys on the Multi-controller ( ![]() ) to select the zone you want. To move quickly to the center zone, press the Setting (
) to select the zone you want. To move quickly to the center zone, press the Setting ( ![]() ) or Erase (
) or Erase ( ![]() ) button again. Press the shutter button halfway to focus. The AF point turns green when focus is achieved. (The AF point turns orange if the camera cannot establish focus.) Then press the shutter button completely to make the picture. You can also select or tap Magnify (
) button again. Press the shutter button halfway to focus. The AF point turns green when focus is achieved. (The AF point turns orange if the camera cannot establish focus.) Then press the shutter button completely to make the picture. You can also select or tap Magnify ( ![]() ) on the screen one to three times to focus while the scene is magnified (up to 10X). This is the focus method I use for macro shooting.
) on the screen one to three times to focus while the scene is magnified (up to 10X). This is the focus method I use for macro shooting.
In FlexiZoneMulti AF ( ![]() ), do not focus in a non-zoomed view, and then magnify the scene and try to focus again. Instead, zoom in on the subject first, and then focus to get tack-sharp results. It’s a good practice to use a tripod anytime the scene is magnified.
), do not focus in a non-zoomed view, and then magnify the scene and try to focus again. Instead, zoom in on the subject first, and then focus to get tack-sharp results. It’s a good practice to use a tripod anytime the scene is magnified.
• FlexiZoneSingle AF (![]() ). This focusing method is the same as FlexiZoneMulti AF (
). This focusing method is the same as FlexiZoneMulti AF ( ![]() ), but it uses a single AF point for focusing. This is my choice for portraits, still-life, and nature images because I can set the focus more precisely than with the other methods. To move the AF point, just press the direction keys on the Multi-controller (
), but it uses a single AF point for focusing. This is my choice for portraits, still-life, and nature images because I can set the focus more precisely than with the other methods. To move the AF point, just press the direction keys on the Multi-controller ( ![]() ). To move quickly to the center zone, press the Setting (
). To move quickly to the center zone, press the Setting ( ![]() ) or Erase (
) or Erase ( ![]() ) button again. To focus, press the shutter button halfway to focus, and then press it completely to take the picture.
) button again. To focus, press the shutter button halfway to focus, and then press it completely to take the picture.
• Quick focus mode (![]() ). This focusing mode uses the camera’s autofocus sensor, the same one that’s used with viewfinder shooting. To use the onboard autofocus sensor, the camera has to flip up the reflex mirror long enough to establish focus, and during that brief time, your view of the live scene is blocked. As with viewfinder shooting, you can manually select the AF point unless you are using 19-point automatic selection AF. And when you’re shooting in the automatic modes, automatic AF point selection is used by default. If you have Continuous AF enabled on Live View Shooting menu 1 (
). This focusing mode uses the camera’s autofocus sensor, the same one that’s used with viewfinder shooting. To use the onboard autofocus sensor, the camera has to flip up the reflex mirror long enough to establish focus, and during that brief time, your view of the live scene is blocked. As with viewfinder shooting, you can manually select the AF point unless you are using 19-point automatic selection AF. And when you’re shooting in the automatic modes, automatic AF point selection is used by default. If you have Continuous AF enabled on Live View Shooting menu 1 ( ![]() ), and you then choose Quick focus mode (
), and you then choose Quick focus mode ( ![]() ), Continuous AF is automatically disabled. To maintain continuous focus, the autofocus sensor must have a view of the scene. However, that view is disrupted when the reflex mirror flips down to establish focus in Quick focus mode (
), Continuous AF is automatically disabled. To maintain continuous focus, the autofocus sensor must have a view of the scene. However, that view is disrupted when the reflex mirror flips down to establish focus in Quick focus mode ( ![]() ). To focus with Quick focus mode (
). To focus with Quick focus mode ( ![]() ), press the AF Area Selection Mode button (
), press the AF Area Selection Mode button ( ![]() ) one or more times to select the selection mode you want. If you set the focus method to FlexiZoneSingle AF (
) one or more times to select the selection mode you want. If you set the focus method to FlexiZoneSingle AF ( ![]() ), the AF point is a small, white rectangle, and you can select which AF point you want to use. In FlexizoneMulti AF (
), the AF point is a small, white rectangle, and you can select which AF point you want to use. In FlexizoneMulti AF ( ![]() ) with Zone AF, a larger bracketed focus area is displayed on the screen, and you can choose the zone you want to use. In both cases, just press the direction keys on the Multi-controller (
) with Zone AF, a larger bracketed focus area is displayed on the screen, and you can choose the zone you want to use. In both cases, just press the direction keys on the Multi-controller ( ![]() ) in the direction of the AF point or zone you want. To focus, half-press the shutter button. The reflex mirror flips up, the camera establishes focus, and the mirror flips down. If focus is established, the AF point or zone momentarily turns green. When the live view image appears on the LCD screen again, you can press the shutter button completely to take the picture.
) in the direction of the AF point or zone you want. To focus, half-press the shutter button. The reflex mirror flips up, the camera establishes focus, and the mirror flips down. If focus is established, the AF point or zone momentarily turns green. When the live view image appears on the LCD screen again, you can press the shutter button completely to take the picture.
The Touch shutter button ( ![]() ) on the lower left of the LCD screen turns the Touch shutter on and off. If you turn on the Touch shutter, you can focus and release the shutter simply by touching the LCD screen with your finger.
) on the lower left of the LCD screen turns the Touch shutter on and off. If you turn on the Touch shutter, you can focus and release the shutter simply by touching the LCD screen with your finger.
• Manual focus (![]() ). Manual focusing, while not a menu option, is a precise way to focus in Live View mode (
). Manual focusing, while not a menu option, is a precise way to focus in Live View mode ( ![]() ), and you get the best results when you magnify the image for focusing. With manual focusing, the live view is not interrupted as with Quick Focus mode (
), and you get the best results when you magnify the image for focusing. With manual focusing, the live view is not interrupted as with Quick Focus mode ( ![]() ). The prerequisite is having a lens that offers Manual focus (
). The prerequisite is having a lens that offers Manual focus ( ![]() ). To focus manually, set the lens switch to Manual focus (
). To focus manually, set the lens switch to Manual focus ( ![]() ), and then move the focusing frame by pressing the direction keys on the Multi-controller (
), and then move the focusing frame by pressing the direction keys on the Multi-controller ( ![]() ) or by tapping to move it. Press the Magnify button (
) or by tapping to move it. Press the Magnify button ( ![]() ) or tap the icon on the screen one to three times to zoom in to 1X, 5X, or 10X. Then, turn the focusing ring on the lens to focus.
) or tap the icon on the screen one to three times to zoom in to 1X, 5X, or 10X. Then, turn the focusing ring on the lens to focus.
If you use Live View mode ( ![]() ) with Continuous drive mode (
) with Continuous drive mode ( ![]() ), the exposure is set for the first shot, and is used for all images in the burst.
), the exposure is set for the first shot, and is used for all images in the burst.
Continuous AF
When you enable Continuous AF, the camera maintains general focus on the subject so that when it comes times to focus sharply, the lens is not in significant defocus range. Enabling Continuous AF speeds up focusing, but it also drains the battery quickly, as the lens must continue to operate even when you’re not shooting.
Continuous AF works with all of the AF methods except Quick focus mode ( ![]() ). If you have Continuous AF enabled, and you switch from one focus mode to Quick focus mode (
). If you have Continuous AF enabled, and you switch from one focus mode to Quick focus mode ( ![]() ), and then back again, Continuous AF begins operating again. If you want to switch to Manual focus (
), and then back again, Continuous AF begins operating again. If you want to switch to Manual focus ( ![]() ) while Continuous AF is operating, switch out of Live View mode (
) while Continuous AF is operating, switch out of Live View mode ( ![]() ) first, and then set the lens switch to Manual focus (
) first, and then set the lens switch to Manual focus ( ![]() ).
).
Touch shutter
By enabling this option, you can touch the LCD screen to both focus and release the shutter to make the picture. To enable it, choose Touch shutter on Live View Shooting menu 1 ( ![]() ), press the Setting button (
), press the Setting button ( ![]() ), and then choose Enable. You can also start Live View shooting mode (
), and then choose Enable. You can also start Live View shooting mode ( ![]() ), and then tap the Touch shutter icon (
), and then tap the Touch shutter icon ( ![]() ) on the lower left of the LCD screen. Then, just touch the LCD to place the AF point or zone where you want it, focus, and release the shutter.
) on the lower left of the LCD screen. Then, just touch the LCD to place the AF point or zone where you want it, focus, and release the shutter.
With Touch shutter enabled, the drive mode automatically switches to Single-shot ( ![]() ) regardless of what other drive mode you’ve set. You can’t use Touch shutter when the LCD view is magnified. Also, if you have set the camera controls to functions other than their defaults using Custom Function III-4, Custom Controls, then half-pressing the shutter button may not cause the camera to focus.
) regardless of what other drive mode you’ve set. You can’t use Touch shutter when the LCD view is magnified. Also, if you have set the camera controls to functions other than their defaults using Custom Function III-4, Custom Controls, then half-pressing the shutter button may not cause the camera to focus.
You can use Touch shutter to start a Bulb exposure ( ![]() ), but I’m not convinced that I would ever do this since the last thing you want during a long exposure is movement of any kind on the camera. However, you can try it if you’re so inclined. Just tap the LCD screen twice to start a Bulb exposure (
), but I’m not convinced that I would ever do this since the last thing you want during a long exposure is movement of any kind on the camera. However, you can try it if you’re so inclined. Just tap the LCD screen twice to start a Bulb exposure ( ![]() ), and then tap it twice again to stop the exposure.
), and then tap it twice again to stop the exposure.
Grid display
With this option, you can choose among three grids that will be superimposed on the LCD screen. These help you keep the vertical and horizontal lines in the scene square with the frame to help you compose the scene. The choices are 3 × 3, 6 × 4, or 3 × 3+diag. If you do not want to use a grid, select Off.
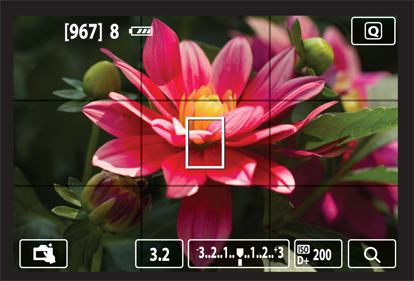
7.5 The Live View screen with a grid.
Aspect ratio
Another feature unique to Live View mode (![]() ) is the ability to set an aspect ratio so that you can capture JPEG images pre-cropped to a specific size. Aspect ratio refers to the relationship of the image width to height. Standard print sizes have aspect ratios that may be different from the image’s aspect ratio. For example, a 4 × 6-inch print has a 3:2 aspect ratio, while an 8 × 10-inch print has a 5:4 aspect ratio. By setting an aspect ratio for JPEG images, you can fit the image to the print’s aspect ratio with varying amounts of cropping to make the image fit the paper size. To figure out the print size that each aspect ratio produces, multiply each number in the ratio by 2. A 3:2 aspect ratio translates to 6 × 4, or if you transpose the numbers, a 4 × 6-inch print.
) is the ability to set an aspect ratio so that you can capture JPEG images pre-cropped to a specific size. Aspect ratio refers to the relationship of the image width to height. Standard print sizes have aspect ratios that may be different from the image’s aspect ratio. For example, a 4 × 6-inch print has a 3:2 aspect ratio, while an 8 × 10-inch print has a 5:4 aspect ratio. By setting an aspect ratio for JPEG images, you can fit the image to the print’s aspect ratio with varying amounts of cropping to make the image fit the paper size. To figure out the print size that each aspect ratio produces, multiply each number in the ratio by 2. A 3:2 aspect ratio translates to 6 × 4, or if you transpose the numbers, a 4 × 6-inch print.
When you set the aspect ratio, a non-printing black mask is added to the Live View display to show the cropped image area and help you compose the image. If you’re shooting JPEG images, the images are saved at the aspect ratio you choose. If you shoot RAW, the aspect ratio can be applied during RAW image conversion if you use the Canon Digital Photo Professional software that comes with the camera.
The aspect ratio you set affects only images shot in Live View mode ( ![]() ). Table 7.1 shows the aspect ratios from which you can choose and the resulting image resolutions.
). Table 7.1 shows the aspect ratios from which you can choose and the resulting image resolutions.
Table 7.1 Live View Mode Aspect Ratio Options**
Exposure simulation
If you enable Exposure simulation ( ![]() ), the image you see on the LCD screen replicates what the final image will look like at the current exposure settings and with exposure modifications, including Auto Lighting Optimizer (
), the image you see on the LCD screen replicates what the final image will look like at the current exposure settings and with exposure modifications, including Auto Lighting Optimizer ( ![]() ) and Highlight tone priority (
) and Highlight tone priority ( ![]() ). In addition, the image approximates the effect of the selected Picture Style, white balance and correction if set, Creative filters, Ambience and Lighting/scene options, exposure and metering, Peripheral illumination correction, Chromatic aberration correction, and aspect ratio, if you’ve set one.
). In addition, the image approximates the effect of the selected Picture Style, white balance and correction if set, Creative filters, Ambience and Lighting/scene options, exposure and metering, Peripheral illumination correction, Chromatic aberration correction, and aspect ratio, if you’ve set one.
You have the following three choices for exposure simulation on Live View Shooting menu 1 ( ![]() ):
):
• Enable (![]() ). Turns on exposure simulation. The final exposure is simulated on the LCD display during Live View shooting (
). Turns on exposure simulation. The final exposure is simulated on the LCD display during Live View shooting ( ![]() ).
).
• During DOF (![]() ). With this option, you can choose to view the exposure simulation only when you hold the Depth-of-Field preview button (
). With this option, you can choose to view the exposure simulation only when you hold the Depth-of-Field preview button ( ![]() ). Otherwise, the image is displayed at standard LCD brightness.
). Otherwise, the image is displayed at standard LCD brightness.
• Disable (![]() ). The image is displayed at the standard LCD brightness with no exposure simulation. While the image is easy to view, you can’t see the result of exposure modifications you make, such as applying exposure compensation or using Auto Lighting Optimizer (
). The image is displayed at the standard LCD brightness with no exposure simulation. While the image is easy to view, you can’t see the result of exposure modifications you make, such as applying exposure compensation or using Auto Lighting Optimizer ( ![]() ). If you choose this option, be sure to press the Info button (
). If you choose this option, be sure to press the Info button ( ![]() ) to display the Brightness histogram so you know if the exposure needs adjustment.
) to display the Brightness histogram so you know if the exposure needs adjustment.
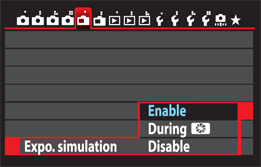
7.6 The Exposure simulation options.
Silent shooting modes
On Live View Shooting menu 2 ( ![]() ), you can set one of two Silent shooting modes, and you can even use quiet shooting during continuous shooting. In either Silent LV shooting mode 1 or 2, the shutter noise is noticeably reduced. One caveat, though, is that silent shooting isn’t possible with flash units.
), you can set one of two Silent shooting modes, and you can even use quiet shooting during continuous shooting. In either Silent LV shooting mode 1 or 2, the shutter noise is noticeably reduced. One caveat, though, is that silent shooting isn’t possible with flash units.
The following is a summary of the two Silent shooting modes and the Disable option:
• Mode 1. In this mode, the shutter cocking noise is reduced significantly. In Quick focus mode ( ![]() ), the sound of the mirror action is still noisy, but the shutter sound is significantly reduced. If you’re shooting an event and keeping the noise level low is important, then use this mode because you can use High-speed continuous shooting (
), the sound of the mirror action is still noisy, but the shutter sound is significantly reduced. If you’re shooting an event and keeping the noise level low is important, then use this mode because you can use High-speed continuous shooting ( ![]() ) at 7 fps.
) at 7 fps.
• Mode 2. This mode delays shutter noise after you take a picture as long as you keep the shutter button pressed, thus delaying the recocking sound of the shutter. If the camera is in Continuous drive mode ( ![]() ), only one image is made because the shutter does not re-cock until you release the shutter button. If you choose this option and use remote control shooting with the accessory RS-60E3 remote release, then the result is like using Mode 1.
), only one image is made because the shutter does not re-cock until you release the shutter button. If you choose this option and use remote control shooting with the accessory RS-60E3 remote release, then the result is like using Mode 1.
• Disable. This is the setting to choose if you use a tilt-and-shift (TS-E) lens other than the TS-E17mm f/4L or the TS-E 24mm f/3.5L II lenses, and you make vertical shift or tilt movements. You would also choose this setting if you’re using extension tubes on the lens or a non-Canon flash; otherwise, the flash will not fire.
Metering timer
The second option on Live View Shooting menu 2 ( ![]() ) is the Metering timer. This is where you determine how long the last meter reading is used by the camera. This essentially determines the AE lock (
) is the Metering timer. This is where you determine how long the last meter reading is used by the camera. This essentially determines the AE lock ( ![]() ) duration from the last time you pressed the shutter button halfway. If the light in the scene remains constant, then you can speed up shooting by using the existing meter reading for a longer amount of time. If the light changes frequently, then set a shorter amount of time.
) duration from the last time you pressed the shutter button halfway. If the light in the scene remains constant, then you can speed up shooting by using the existing meter reading for a longer amount of time. If the light changes frequently, then set a shorter amount of time.
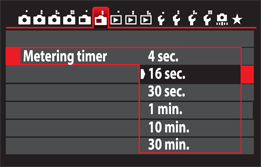
7.7 The Metering timer options in Live View shooting menu 2.
