
Chapter 9
Making the Rounds with Loops
In This Chapter
![]() Considering the need for loops
Considering the need for loops
![]() Working with for loops
Working with for loops
![]() Working with while loops
Working with while loops
![]() Looping through objects
Looping through objects
![]() Creating nested loops
Creating nested loops
Repetitive actions appear everywhere in the real world, so they also appear in applications. For example, you don’t do a single pushup and stop — you do a number of pushups to achieve a specific fitness goal. You’d be really surprised if an application allowed you to select a single menu item, performed the required task, and then ended so that it couldn’t perform any other tasks. Applications repeatedly ask you to select menu or other options to complete a particular goal that consists of many individual tasks. Repetition also appears inside the application. An application downloads individual pieces of a graphic, one piece at a time, until all the pieces appear on the local computer and the application displays them onscreen.
JavaScript supports several kinds of loops: for, while, do...while, and for...in. Each loop type has specific advantages in certain situations. For example, the for loop offers the advantage of providing a specific start and stop expression. This chapter starts with a discussion of why loops are useful and how to avoid problems when using them. The remaining sections describe each of the loop types in detail and show you how to use them. Most importantly, these sections help you understand when each loop is most useful in an application.
Discovering Loops
The term loop brings up visions of circles. In some respects, when you create a loop in your application, the application goes in circles. It keeps going in circles until you tell it to stop. As it continues to loop, the application performs the tasks that you set for it within the code block defined by the loop structure.
Just as decision structures have a statement that defines an expression used to determine whether the code block executes, loops also rely on the truth value of expressions. A for statement defines the terms under which the loop will execute. The associated code block contains the code that the for loop executes. The combination of for statement and code block is a for structure, but most developers call this combination a for loop.
Now that you have some idea of what the terminology means, it’s time to look at loops in general. The following sections describe why loops are useful and how you can avoid problems when using them.
Learning why loops are useful
Loops make it possible to perform repetitive tasks easily. There are ways you could re-create the usefulness of a loop, but it would be a painful process. For example, if you knew that you would need to call a function five times, you could place five calls to it in your code. Of course, the result would be a fragile piece of code that would break every time conditions changed even a little. In some cases, such as a situation where you simply don’t know how many times to repeat a task, you must have a loop to control the number of repetitions that the code makes.
However, loops do more than simply repeat a list of tasks. You use loops to control the way in which the repetition occurs. For example, you can choose to end a loop early when an error exists, or you might choose to skip a particular sequence of tasks when the conditions warrant (such as not processing strings but instead processing only numbers). In other words, loops are also about controlling a situation in a unique way — by monitoring the data and then reacting to it dynamically.
The ability to end a loop early or to skip a particular loop cycle makes loops uniquely suited to processing arrays and other collections. Because array data changes relatively often in some applications and you can’t really depend on an array to maintain a specific length, you must have some sort of loop processing to manage them successfully. This need matches the real-world environment that objects model. For example, your bookcase or music collection grows when you buy new items and shrinks when you give items away, sell them, or throw them out. The real world constantly changes and so do your applications, so loops have an incredibly important role to fulfill.
Running from the dangers of loops
Loops can run amok. Yes, like some demented robot on an old science fiction movie, a loop can cause all sorts of problems when managed incorrectly. The most common loop-related problems involve the number of cycles that the loop performs. Processing data is a Goldilocks scenario: You want neither too much nor too little — it has to be just right.
The most common problem for loops is the infinite loop — one that never ends. All loops have two significant expressions associated with them. The first expression defines when the loop should start, and the second expression defines when the loop should stop. Sometimes a developer thinks that the loop has the right logic defined for both, but the stop expression can prove difficult to create for these reasons:
![]() The loop never reaches the stopping point because the stop expression is wrong.
The loop never reaches the stopping point because the stop expression is wrong.
![]() The loop actually exceeds the stop expression because the stop expression was expecting one result and the loop produced another.
The loop actually exceeds the stop expression because the stop expression was expecting one result and the loop produced another.
![]() An error causes the loop to malfunction.
An error causes the loop to malfunction.
The easiest loop-related problem to find is one in which the loop never starts. The developer doesn't see any output, so it's obvious something is wrong. In many cases, an alert() that shows the starting state of a variable compared to the start expression for the loop quickly shows the problem. When the start condition is never met, the loop will never start.
The hardest and most subtle loop problem is one in which the loop stops too soon. The loop does some amount of work, and it doesn’t get stuck in an infinite loop, but it also doesn’t perform the number of cycles you anticipated. The result is often damaged data. The data may look acceptable, but there’s something wrong with it. Many applications go into the production environment with subtle loop problems. The worst-case scenario is when the stop expression works sometimes but not in all situations — leading developers to yank out their hair. The next time you see a hairless developer, think about the loop error that the developer was unable to fix.
Creating for Loops
A for loop is best used in situations where you know you want to perform a specific number of cycles. You don't necessarily know the number of cycles when you create the application, but the number of cycles is fixed at runtime, when the user interacts with the application. A for loop can be interrupted or told to bypass a specific cycle. However, you can be certain that a properly constructed for loop always starts at a specific point and ends at a specific point.
Making your first for loop
The section on creating functions with optional and required arguments in Chapter 7 discusses the need to provide some sort of handling for both optional and required arguments in some functions. There are situations where a function must take a variable number of arguments. You simply don't know how many arguments the caller will send at the outset. The following example demonstrates one technique for creating a function that handles a variable number of arguments. (You can find complete code for this example in the Chapter 09ForLoop folder of the downloadable code as SimpleFor.HTML.)
function OptionalArgument(param)
{
// Determine whether there were any params passed.
if (arguments.length == 0)
{
// Display an error message and exit.
document.getElementById("Result").innerHTML =
"Nothing Passed!";
return;
}
// Create a string to hold the arguments.
var Result = new String();
// Process each of the arguments in turn.
for (var i = 0; i < arguments.length; i++)
{
// Verify that the argument is of the right type.
if (typeof(arguments[i]) == 'string')
{
// Add to the argument string.
Result += arguments[i] + "<br />";
}
}
// Display the results onscreen.
document.getElementById("Result").innerHTML = Result;
}
The code begins by checking the arguments.length property. When this property is 0, it means that the caller hasn't passed any arguments to the function. The code displays an error message and exits.
The for loop in this example will actually create a string that contains a combination of text and HTML tags in it, so the next step is to create Result as a new String(). After the for loop completes, the application displays the content of Result onscreen.
The for statement begins with three expressions. Each of these expressions is separated by a semicolon (;). The first expression, var i = 0, is the starting point. It creates a variable named i and sets its value to 0. The second expression, i < arguments.length, tells the for loop to continue processing arguments until i is equal to or greater than the value of arguments.length. In other words, the for loop will perform one cycle for each element in arguments. The third expression, i++, tells the for loop how to update i after completing each cycle. If you didn't include this expression, the value of i would never change, and the loop would never end.
The code block begins by checking the type of variable contained within the current arguments element, which is expressed as arguments[i]. When this type is a string, the code adds the string, along with an HTML tag, to Result. Each loop cycle adds more strings to Result, and when the for loop ends, Result contains every string passed to the OptionalArgument() function. Figure 9-1 shows typical output from this example.
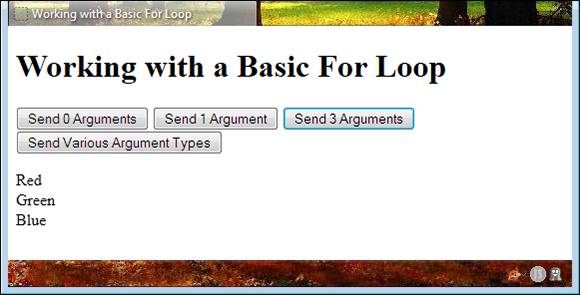
Figure 9-1: This example not only shows the for loop but also includes some formatting.
Using the break statement
The break statement lets you stop loop execution, even if the stop expression conditions aren't met. There are many reasons to use the break statement. For example, you might want to stop loop execution when the application experiences an error. The following example shows how to use a break statement to stop application execution. In this case, processing stops immediately when the application finds data of the incorrect type. (You can find complete code for this example in the Chapter 09ForLoop folder of the downloadable code as BreakStatement.HTML.)
function OptionalArgument(param)
{
// Determine whether there were any params passed.
if (arguments.length == 0)
{
// Display an error message and exit.
document.getElementById("Result").innerHTML =
"Nothing Passed!";
return;
}
// Create a string to hold the arguments.
var Result = new String();
// Process each of the arguments in turn.
for (var i = 0; i < arguments.length; i++)
{
// Verify that the argument is of the right type.
if (typeof(arguments[i]) != 'string')
{
// When the argument is incorrect, stop
// loop execution.
break;
}
// Add to the argument string.
Result += arguments[i] + "<br />";
}
// Display the results onscreen.
document.getElementById("Result").innerHTML = Result;
}
In this case, the example stops processing the input arguments immediately after finding an input argument of a type other than string. Consequently, when the application calls OptionalArgument('Red', 'Green', 'Blue'), the application displays all three arguments. However, when the application calls OptionalArgument('Red', 'Green', true, 'Orange'), it displays only Red and Green. Even though Orange is also a correct argument, it appears after true, which is an incorrect argument. Execution stops with true. If the application were to call OptionalArgument(true, 'Red', 'Yellow', 'Orange'), the output would be blank because the first argument is incorrect.
 The
The break statement is used as an exceptional condition. You stop execution because the loop can't continue for some reason. As a consequence, the break statement normally appears as part of an if structure. The if statement defines the exceptional condition. Any loop cleanup you want to perform, such as finalizing a variable's state, must appear before the break statement.
Using the continue statement
The continue statement stops processing for the current loop cycle. However, processing continues with the next loop cycle. Although you would generally use a break statement to stop loop processing in the event of a non-recoverable error, the continue statement lets you create a loop that can recover from errors. In this respect, loops can differentiate between hard errors (those that the application can't recover from) and soft errors (those that are recoverable).
The continue statement is also quite useful for a number of programming techniques, such as filtering. When the loop encounters a situation where an argument, a data item, or an array element is outside the filtering criteria, it can exclude that element by not processing it but continuing on with the next argument, data item, or array element. Filtering is an exceptionally important task for applications to perform because users rarely provide clean data — that is, data without erroneous artifacts included.
Because filtering is such an important feature of applications, the following sections review the use of arrays with a for loop. The first section reviews the Array object properties and methods. The second section shows an example of using a for loop to filter an Array object to clean up undesirable elements.
Working with Array objects in depth
Array objects often require complex handling of data to produce the desired results. For example, the array could contain different data types, and you might need to sort through them to find only the data you need. Fortunately, the Array object provides a number of methods and properties to make interacting with them in loops easier. The following list describes the Array object properties:
![]()
constructor: Displays a string showing the prototype used to define the object. In this case, you see "function Array() { [native code] }".
![]()
length: Returns the length of the array in elements.
![]()
prototype: Provides the means for adding both properties and methods to an object.
The Array object also provides a number of useful methods. You can use these methods to modify the array dynamically during processing and to enhance the ability of the for loop to produce useful results. The following list describes each of the Array object methods:
![]()
concat(): Creates a single array by joining two or more arrays.
![]()
indexOf(): Locates a specific element within an array and returns the position of that element.
![]()
join(): Creates a single string from all of the elements within an array.
![]()
lastIndexOf(): Locates the last location of a specific element within an array and returns the position of that element.
![]()
pop(): Removes the last element of an array and returns that element.
![]()
push(): Adds new elements to the end of an array and returns the new array length.
![]()
reverse(): Reverses the order of the elements in an array.
![]()
shift(): Removes the first element of an array and returns that element.
![]()
slice(): Produces a copy of part of an array and returns that part.
![]()
sort(): Sorts the elements of an array.
![]()
splice(): Adds or removes elements to or from an array as specified in the arguments.
![]()
toString(): Outputs the individual values of each element of an array as a string.
![]()
unshift(): Adds new elements to the beginning of an array and returns the new length.
![]()
valueOf(): Outputs the native value of each of the elements of an array.
Interacting with an array
One of the more interesting ways to use the continue statement is as a means for filtering data. When the incoming data doesn't meet some requirement, you filter it out. The following example demonstrates a technique for filtering array data to produce a clean array that you can then process without error. The main reason to perform this task is that you need to use the array repetitively and filtering it each time would prove time consuming, needlessly slowing application performance. (You can find complete code for this example in the Chapter 09ForLoop folder of the downloadable code as ContinueStatement.HTML.)
function FilterArray()
{
// Define the original array.
var OriginalData = new Array(
"Red", "Orange", "Yellow", 1,
"Green", true, "Blue");
// Define an array to receive the filtered data.
var FilteredData = new Array();
nbps;
// Show the original data.
DisplayArray(OriginalData, "Original");
// Filter the data.
for (var i = 0; i < OriginalData.length; i++)
{
// Check for the correct data type.
if (typeof(OriginalData[i]) != 'string')
{
// Go to the next item.
continue;
}
// Add the matching item to the array.
FilteredData.push(OriginalData[i]);
}
// Show the filtered data.
DisplayArray(FilteredData, "Filtered");
}
The example begins by creating an array, OriginalData, with some errant data in it. The array is supposed to contain strings, but you can see that it includes both numeric and Boolean data items. The example also creates FilteredData, which currently contains nothing but will eventually contain all the useful data from OriginalData.
Filtering occurs in the for loop. If the current array element isn't of type string, then the code continues to the next loop iteration. However, when the element is of type string, the code uses the push() method to add the current array element to FilteredData.
Notice the calls to DisplayArray(). This is an example of taking code out of a function and placing it in a supplementary function to make the code easier to understand. In addition, it ensures that each function performs a single task. In this case, DisplayArray() outputs the array data to a specific location onscreen as shown here:
function DisplayArray(TheArray, DisplayID)
{
// Create an output string.
var DisplayString = "<ul>"
// Build the display string.
for (var i = 0; i < TheArray.length; i++)
{
DisplayString += "<li>" + TheArray[i] + "</li>";
}
// Complete the list.
DisplayString += "</ul>";
// Display the data.
document.getElementById(DisplayID).innerHTML =
DisplayString;
}
DisplayArray() accepts two inputs: an array to process and the identifier of a screen element to receive the data. The usual checks were omitted from this function for the sake of clarity, but if you were creating this function for a production environment, you'd definitely include them.
In this case, DisplayArray() used an unordered (bulleted) list to display the data onscreen. So, DisplayString receives the starting tag to initialize the string. The array adds list items (<li> tags) to DisplayString — one for each array element. The ending <ul> tag is added after the for loop completes, and the item is displayed onscreen in the correct display element. Figure 9-2 shows typical output from this example.
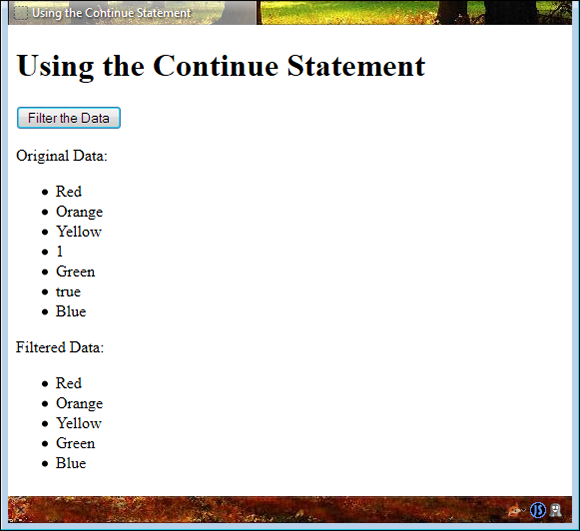
Figure 9-2: Filtering is an important feature of many applications.
Creating while Loops
Developers commonly use while loops when there's no definite ending for a loop. The environment or data must meet a specific condition before the loop stops. With this in mind, it's easier to create an infinite loop with a while loop than it is with a for loop because you're not always sure about the condition that will end the loop. It's important to plan while loops carefully. The following sections discuss how to use the two forms of while loops and tell how each while loop type is commonly used in applications.
Using the basic while loop
A basic while loop tests for the ending condition immediately. If the ending condition is met, then the loop never executes. This type of loop is useful when you may or may not need to perform processing on some type of variable data. For example, a while loop of this sort works perfectly with a function that accepts zero or more optional arguments. The fact that there may not be any arguments to process means that the while loop will never execute. The following example shows such a scenario. (You can find complete code for this example in the Chapter 09WhileLoop folder of the downloadable code as SimpleWhile.HTML.)
function OptionalArgument(param)
{
// Display the default output.
document.getElementById("Result").innerHTML =
"Nothing Passed!";
// Create a string to hold the arguments.
var Result = new String();
// Process each of the arguments in turn.
while (param.length > 0)
{
// Remove the current argument.
var Argument = param.shift();
// Verify that the argument is of the right type.
if (typeof(Argument) == 'string')
{
// Add to the argument string.
Result += Argument + "<br />";
}
}
// Display the results onscreen.
document.getElementById("Result").innerHTML = Result;
}
In this example, OptionalArgument() receives an array as input. When someone sends something other than an array, the function acts as if the user didn't send anything at all. The array can contain any number of elements — the function doesn't care how many or how few.
The while loop checks the length of param. When param contains even a single element, the loop begins processing the data. The call to shift() removes the first element from the array, making the array shorter by one element. When this Argument is of type string, it's added to Result. When the loop ends, the output is displayed onscreen in the same way that the for loop example does in the Making your first for loop section, earlier in this chapter.
 The interesting features of this example are that it's shorter than the
 for loop example and that this version will execute slightly faster because there are fewer comparisons performed during each loop. However, whether it's actually easier to understand depends on how you write applications. Some developers would probably find this form easier to understand as well, but you should use the forms that work best for you as a developer.
Using the do...while loop
A do...while loop works precisely the same as a standard while loop except that the ending expression is evaluated at the end of the loop. This means that a do...while loop always executes at least once. Developers commonly use do...while loops for menus, reading files, and other processes that may require some setup within the loop before the loop can evaluate the expression. The following example shows how you could use a do...while loop to create a continuous processing scenario. (You can find complete code for this example in the Chapter 09WhileLoop folder of the downloadable code as SimpleDoWhile.HTML.)
function AddItems()
{
// Create an input variable.
var Input = new String();
// Keep accepting input until the user
// types quit.
do
{
// Obtain new input.
Input = prompt("Type a new value (quit to exit):");
// Verify the user hasn't typed quit.
if (Input.toUpperCase() != 'QUIT')
{
// Add the input to the array.
DataStore.push(Input);
// Display the result onscreen.
DisplayArray(DataStore, "Result")
}
} while (Input.toUpperCase() != 'QUIT')
}
The example relies on a global Array named DataStore to hold the entries. Obviously, there's no input to process when the application begins, so the user makes a request to add an item. At this point, Input has no data, and there's nothing to define whether there's anything to do. The do...while loop works perfectly because you don't want Input to contain anything until the user puts it there. The user keeps adding items. When the application sees the word quit in any form, the data entry stops. This example reuses the DisplayArray() function described in the Interacting with an array section, earlier in this chapter.
Notice how the application checks for the ending condition in this case. You should always convert input to uppercase or lowercase and then check it against a standardized capitalization. Otherwise, you can’t be sure whether the user will type quit, QUIT, Quit, or even qUit. This approach ensures you capture the keyword whatever form the user types it in. (Of course, the user could also click Cancel to stop inputting new values — the code provides a method for exiting the loop by typing a value.)
Examining Objects Using for/in
Collections, object literals, and classes can prove difficult to process using standard loops because you have to figure out a way to monitor the application's progress through them. Fortunately, JavaScript provides an easier method of dealing with objects of various sorts: the for/in loop. Begin with the class description shown in the following code. (You can find complete code for this example in the Chapter 09ForIn folder of the downloadable code as SimpleForIn.HTML.)
// Define a customer.
function Customer(FirstName, LastName, Age)
{
// Add the properties.
this.FirstName = FirstName;
this.LastName = LastName;
this.Age = Age;
}
All that this class contains is some properties. You can now iterate through the properties and their associated values using a for/in loop as shown here:
// Process the customers.
function ProcessCustomer()
{
// Create a new customer.
MyCustomer = new Customer("Josh", "Adams", 49);
// Define a table for output.
var Output = "<table>";
// Add a header row.
Output += "<tr>";
// Process the headers.
for (ThisProperty in MyCustomer)
{
Output += "<th>" + ThisProperty + "</th>";
}
// End the row.
Output += "</tr>";
// Add a data row.
Output += "<tr>";
// Process the customer.
for(ThisProperty in MyCustomer)
{
// Add each data element.
Output += "<td>" + MyCustomer[ThisProperty] +
"</td>";
}
// End the row.
Output += "</tr>";
// End the table.
Output += "</table>";
// Display the results onscreen.
document.getElementById("Result").innerHTML =
Output;
}
This example creates an instance of Customer, MyCustomer, and fills it with data. The output in this example is configured as an HTML5 table. The property names are processed as the header using the first for/in loop. Notice that the for/in loop doesn't appear to have either a starting or an ending expression. It's implied that you want to start with the first member of whatever object you process and end with the last member.
When working with an object of the kind shown here, ThisProperty contains the name of a property, not the property value. Therefore, you can obtain the property names directly and display them onscreen as the header using the <th> tag.
Note the difference in the second for/in loop. In this case, ThisProperty is used as an index into the object. The output is the property value, which appears as part of a data row. Figure 9-3 shows typical output from this example.
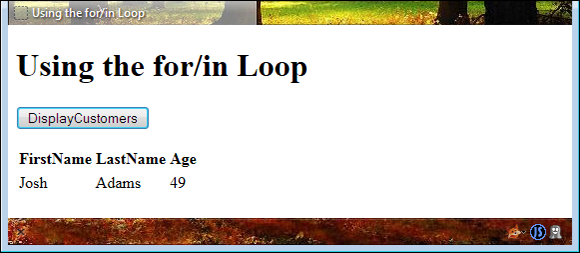
Figure 9-3: Using the for/in loop makes it possible to process collections and classes.
Nesting Loops
Sometimes you need to nest loops in order to accomplish useful work. For example, you may need to process a number of items a certain number of times. A multiplication table is a perfect example of a situation where you'd need to nest loops. The following example shows one way to perform the task. (You can find complete code for this example in the Chapter 09ForLoop folder of the downloadable code as NestedLoop.HTML.)
<script language="JavaScript">
// Start the table.
document.write("<table>");
// Start a heading row.
document.write("<tr>");
// Create a heading.
for (var i = 0; i <= 10; i++)
{
if (i == 0)
{
document.write("<th />");
}
else
{
document.write("<th>" + i + "</th>");
}
}
// End the heading row.
document.write("</tr>");
for (var i = 1; i <= 10; i++)
{
// Start a data row.
document.write("<tr>")
nbps;
// Create the row header.
document.write("<th>" + i + "</th>");
for (var j = 1; j <= 10; j++)
{
// Add each data element.
document.write("<td>" + i * j + "</td>");
}
// End a data row.
document.write("</tr>")
}
// End the table.
document.write("</table>");
</script>
The example begins by creating a header of column values using a simple for loop. Notice the use of an if statement to determine when to display a value and when to keep the cell blank.
The rows are where you need the nested loop. Multiplication is the product of multiplicand and multiplier. The outer for loop provides the row heading and the multiplicand. The inner for loop provides the multiplier and each of the data cells within the table. The product is i * j. Figure 9-4 shows typical output from this example.
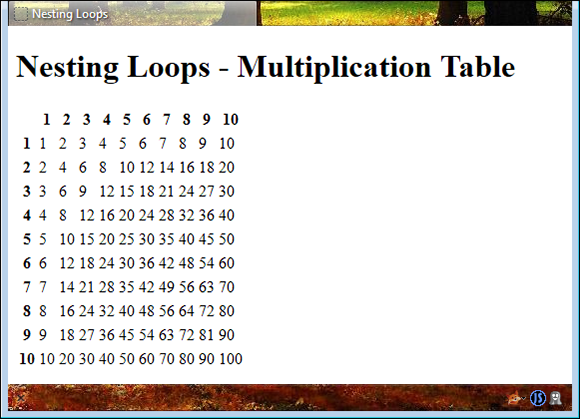
Figure 9-4: Multiplica-tion tables are a good example for nested loops.