
Chapter 21
Ten Incredible HTML5 and JavaScript Examples
In This Chapter
![]() Using XML-based menuing systems
Using XML-based menuing systems
![]() Using XML-based tabbed interfaces
Using XML-based tabbed interfaces
![]() Employing slideshows
Employing slideshows
![]() Creating and using custom spinners
Creating and using custom spinners
![]() Using a third-party timepicker
Using a third-party timepicker
![]() Standardizing the appearance of a site by using CSS
Standardizing the appearance of a site by using CSS
![]() Developing a category and detail interface
Developing a category and detail interface
![]() Working with selectable calendars
Working with selectable calendars
![]() Designing a user-configurable interface
Designing a user-configurable interface
![]() Working with surveys
Working with surveys
This chapter brings many of the elements in the rest of the book together into useful pieces that you could combine to create a site of your own. The examples are short, practical ways to use HTML5 and JavaScript together to add interest, functionality, and flexibility to any site. The examples do rely on jQuery (described in Chapter 18) and jQuery UI (explored in Chapter 20) to perform tasks, as will most production sites you visit today. No one wants to reinvent the wheel, so using third-party libraries such as jQuery and jQuery UI just makes sense.
 If you find that one of the examples doesn’t work directly from the downloaded code folder, try placing it on your test server. Many browsers won’t display information unless it is received from a server. For example, most of these examples fail in Chrome unless you place them on your test server (see Chapter 2 for instructions on installing the Apache server). The platform can make a difference as well. Linux appears to be the pickiest when it comes to using a test server rather than simply opening the example from the downloaded code folder.
Creating an XML-Based Menu
Many browser-based applications employ menus to make it easier for users to make selections. Hard-coding these menus may seem like a good idea, but doing so makes updates more difficult. Using a database or XML file to hold the menu options makes it possible to update the menus by using a tool without actually changing the application code. The following example shows one technique for creating a menu that stores its data in an external XML file. (You can find complete code for this example in the Chapter 21XMLMenu folder of the downloadable code as XMLMenu.HTML.)
$(function()
{
$(window).load(
function()
{
// Create a connection to the file.
var Connect = new XMLHttpRequest();
// Define which file to open and
// send the request.
Connect.open("GET", "XMLMenuData.xml", false);
Connect.setRequestHeader(
"Content-Type", "text/xml");
Connect.send(null);
// Place the response in an XML document.
var Response = Connect.responseXML;
// Place the root node in an element.
var MenuEntries = Response.childNodes[0];
// Start at the upper levels and move down.
if (MenuEntries.children.length > 0)
ProcessEntries(MenuEntries.children);
// Make the menu entries public.
$("#Menu").append(MenuData);
// Create the menu onscreen.
$("#Menu").menu();
}
);
var MenuData = "";
function ProcessEntries(Nodes)
{
for (var i = 0; i < Nodes.length; i++)
{
// Store the current node and add it
// to the menu.
var ThisNode = Nodes[i];
MenuData +=
"<li id='" + $(ThisNode).attr("id")
+ "'>" +
"<a href='" + $(ThisNode).attr("target")
+ "'>" +
$(ThisNode).attr("caption") + "</a>";
// Check for submenus and process them.
if (ThisNode.children.length > 0)
{
MenuData += "<ul>";
ProcessEntries(ThisNode.children);
MenuData += "</ul>";
}
// End the current node.
MenuData += "</li>";
}
// Return to the caller.
return;
}
});
The (window).load() event handler looks like it contains a lot of code, but you've already worked through quite a bit of it in the section on loading XML with JavaScript in Chapter 16. Instead of loading a customer data file, the example loads menu entries. After the code loads the menu entries, it processes them into the HTML unordered list format required to create a menu. You can see typical source code for such a menu at http://jqueryui.com/menu. In fact, the HTML isn't much different from the menu demonstrated in the section on creating JavaScript-based menus in Chapter 13. After creating the unordered list dynamically, the code appends it to a <ul> element, Menu, and turns Menu into a jQuery UI menu by calling menu(). Typical output from this example looks like the menu in Figure 21-1.
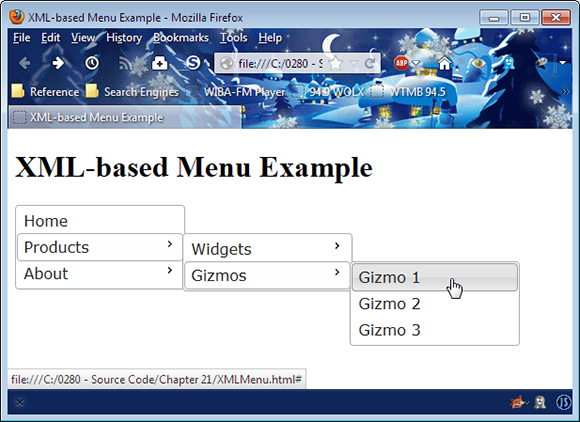
Figure 21-1: This dynamic menu can change without changing the underlying code.
The secret to this menuing system is the recursive function, ProcessEntries(). This function creates the unordered list content dynamically by parsing the XML entries that you provide. It doesn't matter what the XML contains, as long as the entries are formatted correctly. Each list entry appears within an <li> tag that includes an id attribute. You use the id to enable or disable menu entries as needed later. The tag content consists of an <a> tag with an href attribute that points to the location where the menu will take the user when clicked. The only part the user sees is the caption attribute of the XML entry.
Recursion occurs when the XML entry contains children, or submenus. When the current node contains children, the ThisNode.children.length property is greater than 0, and the code calls ProcessEntries() recursively with the children of the current node. Because of the way that this feature is constructed, you can create menus of any depth without special programming as long as the host system has the required resources.
The XML file must be constructed in a specific way to work with the example. The elements must appear in the order you want them presented onscreen, and submenus must appear nested appropriately within their parent menus, as shown here:
<?xml version="1.0" encoding="UTF-8"?>
<Menu>
<Entry id="Home"
caption="Home"
target="#" />
<Entry id="Products"
caption="Products"
target="#">
<Entry id="ProductsWidgets"
caption="Widgets"
target="#">
<Entry id="ProductsWidgets1"
caption="Widget 1"
target="#" />
<Entry id="ProductsWidgets2"
caption="Widget 2"
target="#" />
</Entry>
<Entry id="ProductsGizmos"
caption="Gizmos"
target="#">
<Entry id="ProductsGizmos1"
caption="Gizmo 1"
target="#" />
<Entry id="ProductsGizmos2"
caption="Gizmo 2"
target="#" />
<Entry id="ProductsGizmos3"
caption="Gizmo 3"
target="#" />
</Entry>
</Entry>
<Entry id="About"
caption="About"
target="#">
<Entry id="AboutLocation"
caption="Location"
target="#" />
<Entry id="AboutContact"
caption="Contact Us"
target="#" />
<Entry id="AboutSupport"
caption="Customer Support"
target="#" />
</Entry>
</Menu>
This XML contains all the menu entries for the example. As you can see, there is nothing to differentiate the menu entries except their position in the hierarchy. This generic method of laying out the menu makes it possible to move menu elements around as needed without having to change anything except the entry's position. Every entry must include the id, caption, and target attributes shown. The target always points to the location where the user goes when the menu entry is clicked.
Creating an XML-Based Tabbed Interface
It's possible to use XML files (or databases) to hold just about anything related to a browser-based application. In this example, you see how to create a jQuery UI tabbed interface by using data stored in an XML file. However, this example incorporates a major difference from the previous XML example — it relies on jQuery to get the XML file rather than relying on handwritten code to perform the task (as is shown in the example in the preceding section). The code is shorter; somewhat easier to understand; and, most important of all, more likely to work with browsers that you didn't originally test as part of the initial application design. The following code shows the jQuery method of creating a tabbed interface. (You can find complete code for this example in the Chapter 21XMLTab folder of the downloadable code as XMLTab.HTML.)
$(function()
{
// Create variables to hold temporary data.
var TabHeads = "";
var TabContent = "";
// Obtain the XML data file and process it.
$.get("XMLTabData.xml", function(data)
{
// Locate each Heading entry and use it to
// create a tab heading.
$(data).find("Heading").each(function()
{
TabHeads +=
"<li><a href='" +
$(this).attr("href") +
"'>" + $(this).attr("caption") +
"</a></li>";
});
// Append the data to the heading area.
$("#Headings").append(TabHeads);
// Locate each Content entry and use it to
// create the tab content.
$(data).find("Content").each(function()
{
TabContent +=
"<div id='" + $(this).attr("id") +
"'>" + $(this).text() + "</div>";
});
// Append the data to the tab content area.
$("#Tabs").append(TabContent);
// Complete the process by displaying the
// tabs.
$("#Tabs").tabs();
});
});
This example isn't doing anything radically new. It's still retrieving and parsing an XML file — it just makes jQuery perform all the heavy lifting. The get() method obtains the XML file, XMLTabData.XML, and places the content in data. The function is executed when the data retrieval is complete, so it acts as a callback for an asynchronous data read.
Parsing the file is as easy as asking jQuery to use find() to locate something in the XML file. Here is the XML file used for this example:
<?xml version="1.0" encoding="UTF-8"?>
<Tabs>
<TabData>
<Heading id="Tab1"
href="#Tabs1"
caption="Tab 1" />
<Heading id="Tab2"
href="#Tabs2"
caption="Tab 2" />
<Heading id="Tab3"
href="#Tabs3"
caption="Tab 3" />
</TabData>
<TabContent>
<Content id="Tabs1">
This is some content for Tab 1.
</Content>
<Content id="Tabs2">
This is some content for Tab 2.
</Content>
<Content id="Tabs3">
This is some content for Tab 3.
</Content>
</TabContent>
</Tabs>
All of the heading information appears within the <Heading> elements. So, the code asks jQuery to find() each of the <Heading> elements and process them one at a time using the each() method. The each() method creates a loop that automatically provides access to individual <Heading> elements through the this variable. Tab headings are stored in an unordered list (<ul>), Headings, that is already part of the HTML for the example page.
The content for each tab appears in <div> elements that are appended after the <ul> element, Headings. The content could be anything — including controls as used for the previous tabbed interface example demonstrated in the section on using the Tabs widget in Chapter 20. The most important issue to consider is how to store information in the XML file. You escape any tags so that they're not misinterpreted as XML elements. (See Chapter 16 for a table of typical replacement characters.)
As with the headings, the code uses find() to locate each of the <Content> elements in the XML file and convert them to the HTML required to create the tab content. The each() method creates the loop used to process each element one at a time. Figure 21-2 show typical output from this example.
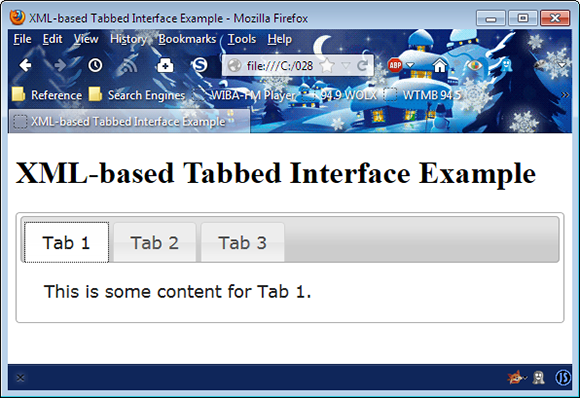
Figure 21-2: Dynamic tab configuration is just as easy as creating dynamic menus.
Displaying a Slideshow
Slideshows have become a method for doing everything from displaying pictures to describing processes to advertising. You find slideshows all over the place for good reason — graphics can communicate in ways that words can't. No one is quite sure who said, "A picture is worth a thousand words" (although you can get some ideas at http://www.phrases.org.uk/meanings/a-picture-is-worth-a-thousand-words.html), but the phrase certainly holds true. The right graphic says quite a lot to the right person.
 It shouldn't be too surprising to find that jQuery aficionados have created a host of slideshow add-ins to make working with slideshows significantly easier. The example in this section relies on an easy-to-use plug-in from SlidesJS (
http://www.slidesjs.com). To use the plug-in with your own code, you need to download a copy of the current product from the developer's site. However, this plug-in is just the tip of the iceberg. You can find 20 interesting slideshow plug-ins on the Vandelay Design site at http://vandelaydesign.com/blog/web-development/jquery-slideshow. There are 25 plug-ins described on the Webdesigner Depot site at http://www.webdesignerdepot.com/2011/08/25-jquery-image-galleries-and-slideshow-plug-ins. These are just some of the slideshow plug-ins available for jQuery, which is just one of many JavaScript libraries. In short, slideshows are important enough to warrant all sorts of attention.
This example helps you create a slideshow using five images and the SlideJS plug-in for jQuery. Make sure you download SlideJS by clicking Download on the host site described in the first paragraph, unarchive the downloaded .ZIP file, and place the slides.jquery.JS file found in the slidesSlidessource folder in the Chapter 21Slideshow folder of the downloadable source code. You also need to copy the global.CSS file found in the slidesSlidesexamplesStandardcss to the example directory. These references incorporate the files into the example:
<link rel="stylesheet" href="global.css">
<script src="slides.min.jquery.js"></script>
The following code shows the HTML for this example. (You can find complete code for this example in the Chapter 21Slideshow folder of the downloadable code as Slideshow.HTML.)
<div id="container">
<div id="example">
<div id="slides">
<div class="slides_container">
<a href="#">
<img src="CactusBlossom.jpg"
width="600"
height="450" /></a>
<a href="#">
<img src="FirstSnow.jpg"
width="600"
height="450" /></a>
<a href="#">
<img src="MountainView.jpg"
width="600"
height="450" /></a>
<a href="#">
<img src="NankingCherry.jpg"
width="600"
height="450" /></a>
<a href="#">
<img src="SquashHarvest.jpg"
width="600"
height="450" /></a>
</div>
</div>
</div>
</div>
The organization of the HTML is important because the plug-in expects to see certain elements in certain places and with specific names. You can overcome many of these issues by modifying the global.CSS file, but the best option is to simply use the author's naming scheme in your own code. The HTML shown here is extremely simplified from the samples that come with the product. Consider this a "Hello World" sort of example — it shows the simplest implementation you can create. The SlidesJS plug-in provides considerable flexibility in displaying the slideshow, which is one reason you want to try this plug-in for your application.
The default CSS for the plug-in does create a few problems, and the author documents several places in global.CSS where you need to make changes. For example, you need to modify the styles to accommodate the size of your pictures. Rather than actually change the global.CSS file, this example places the changes directly in the Slideshow.HTML file like this:
<style>
.slides_container
{
width: 600px;
}
.slides_container a
{
width: 600px;
height: 450px;
}
#slides .prev
{
font-size: medium;
}
#slides .next
{
left: 615px;
font-size: medium;
}
h1
{
font-size: 20px;
font-family: serif;
text-align: center;
}
</style>
The main purpose for these changes is to make the output a little more readable and accommodate the size of the pictures. The actual code used to make the example work is short. Here is all you need to display the pictures in a slideshow format:
$(function()
{
$("#slides").slides(
{
generateNextPrev: true,
});
});
The generateNextPrev option tells the plug-in to add Next and Prev buttons to the output. You can also use graphic buttons if desired. There are all sorts of options you can use, but they're all optional. However, you must provide some method for moving between pictures, and adding the Next and Prev buttons is the simplest way to accomplish this task. Figure 21-3 shows the output from this example.
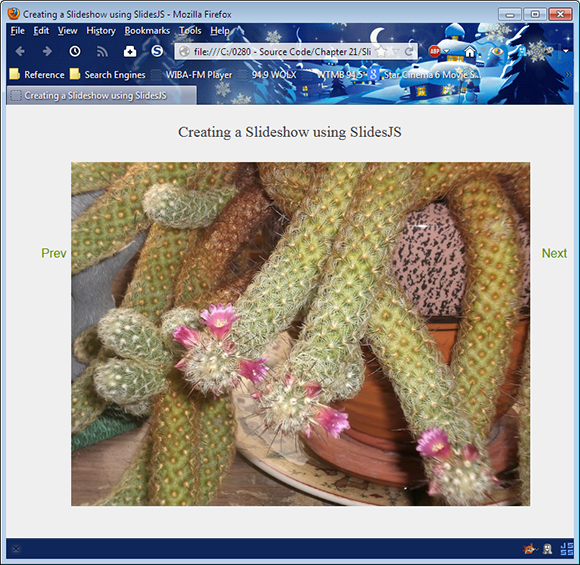
Figure 21-3: Slideshows can help you convey all sorts of information by using graphics.
Employing Custom Spinners
All the jQuery UI widgets lend themselves to customization. Most of the changes you make deal with using built-in features correctly. You can also work with the CSS that jQuery UI employs to format the widgets to produce special effects. Of course, if nothing else, you can always use JavaScript to modify the actual widget behavior as needed. The point is that you can change widgets, such as Spinner, to meet specific needs without having to reinvent the wheel. The modifications are usually short and easy to do, which means you don’t have to start from scratch with an idea you have to code by hand.
Spinners are popular because you can use them to control user input in a number of ways. The idea is to provide control for data that is normally variable, so you can't use something like a drop-down list. One of the most interesting uses of spinners is shown on the Ben Knows Code site at http://benknowscode.wordpress.com/2012/10/18/exploring-the-new-jquery-ui-spinner-beyond-the-basics. In this case, the author shows how to perform tasks such as moving the location of the arrows and creating an alphabetical spinner.
Spinners normally deal with numeric input. However, you might have a need for alphabetic input instead. To create an alphabetic input, you need to give the appearance of letters without actually using letters, because the Spinner widget works only with numbers. (You can find complete code for this example in the Chapter 21Spinner folder of the downloadable code as Spinner.HTML.)
$(function()
{
var CurrentValue = 65;
var ThisSpinner = $("#Spinner").spinner(
{
// Set the minimum to the code for A
// and the maximum to the code for Z.
min: 65,
max: 90,
// When the user starts to spin the spinner,
// convert the value to a number and hide the
// text from view.
start: function(ui, event)
{
ThisSpinner.spinner("value", CurrentValue);
$("#Spinner").css("color", "white");
},
// When the user stops spinning the spinner,
// save the numeric value, convert it to a
// letter and display the text onscreen.
stop: function(ui, event)
{
CurrentValue =
ThisSpinner.spinner("value");
ThisSpinner.spinner("value",
String.fromCharCode(CurrentValue));
$("#Spinner").css("color", "green");
}
});
});
The code begins by creating a variable, CurrentValue, that tracks the numeric value of the spinner. The value, 65, is the numeric equivalent of the letter A. So, the spinner starts with a value of A, but it stores this value as the number 65.
Creating the spinner, ThisSpinner, comes next. You must set minimum and maximum values that reflect the numeric values of A and Z. This same technique can work for any series of letters. You could just as easily use lowercase letters, if desired. For that matter, any series will work, including special characters. It's even possible to use this approach for enumerated values.
The simplest approach provides handlers for the start and stop events. When the user clicks one of the two arrows, it starts a spin event. The change occurs, and then the spin stops. For the spinner to work correctly, the value attribute must contain a numeric value. The code sets value to CurrentValue, which is the code that equates to the currently selected letter. However, at this point, you can see the numeric value as text in the spinner, which is distracting. To keep this from happening, the event handler also sets the text color to white, so the user can't actually see the text onscreen.
The stop event handler stores the new spinner value in CurrentValue. It then converts the numeric value from a number, such as 65, to a letter, such as A. The code then changes the text color to green so the user can see the letter onscreen.
This example also changes a few of the widget styles. These styles are listed as part of the jQuery UI CSS file at http://code.jquery.com/ui/1.9.2/themes/base/jquery-ui.css. In this case, you don't want the user to be able to type more than one character, so the width of the widget is changed to accept just one letter. In addition, the text color is changed to green, as shown here:
.ui-spinner
{
width: 45px;
}
nbps;
.ui-spinner-input
{
color: green;
}
Using a combination of events and CSS lets you create all sorts of custom effects with any of the jQuery UI widgets. All you need to do is experiment a little to create some really interesting output.
Working with Timepickers
Users need to enter time values as well as date values. The jQuery UI library comes with a Datepicker widget (see http://jqueryui.com/datepicker), which is fine but not quite enough for modern applications. Fortunately, there is a solution in the form of a third-party plug-in on the Trent Richardson site at http://trentrichardson.com/examples/timepicker. To use this plug-in, you add the following reference to your code. (You can find complete code for this example in the Chapter 21Timepicker folder of the downloadable code as Timepicker.HTML.)
<script
src="http://trentrichardson.com/examples/timepicker/jquery-ui-timepicker-addon.js">
</script>
All you need to do is add a simple <input> tag to your code and provide an id value for it. This widget has a number of forms. For example, you can request both a date and time if desired. The simplest form is to request the time by using the following code:
$(function()
{
$("#TimeSet").timepicker();
})
As with most widgets, you can configure the Timepicker using various options, which are considerable. There aren’t any events to handle except those that are provided by jQuery UI natively. The default settings present a 24-hour clock, but you can override the presentation and use a 12-hour clock if desired. Figure 21-4 shows typical output from this example.
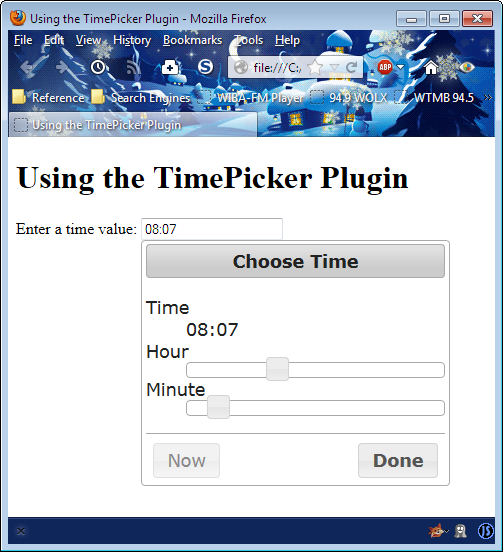
Figure 21-4: Users now have an easy method for adding time values to forms.
Creating a Standardized Look with CSS
Hand-coding the design for your site is a perfect way to create inconsistencies that will drive your users crazy. Unfortunately, not everyone is an artist or has the aesthetic sense of a designer. You may find that you require help with creating a good look for your site. Using any of the publicly available CSS samples can help you create a standardized look. It’s easy to customize these samples to meet your specific needs. Add a few graphics of your own (or mix and match those you find in the public domain online), and the site looks completely customized.
The following list of sites can provide you with a great start toward creating a standardized look (you can also perform a search online for “free CSS3 templates” to find more ideas). (Some of these suggestions are free — others require a payment of some type.)
![]() Blueprint:
Blueprint: http://www.blueprintcss.org
![]() Dynamic Drive CSS Library:
Dynamic Drive CSS Library: http://www.dynamicdrive.com/style
![]() Free CSS:
Free CSS: http://www.free-css.com
![]() Free CSS Templates:
Free CSS Templates: http://www.freecsstemplates.org
![]() Malo:
Malo: http://code.google.com/p/malo
![]() templatemo.com:
templatemo.com: http://www.templatemo.com
![]() templateworld:
templateworld: http://www.templateworld.com/free_templates.html
![]() YUI:
YUI: http://yuilibrary.com/yui/docs/cssgrids
In addition to actual CSS style sites, it pays to visit sites that provide access to tools for generating CSS and associated HTML5 code. For example, you find a list of such tools on the Smashing Magazine site at http://coding.smashingmagazine.com/2011/06/10/useful-html-css-and-javascript-tools-and-libraries. It's also possible to create a custom form of the jQuery UI interface for your particular needs using the ThemeRoller tool at http://jqueryui.com/themeroller. Simply configure the interface as you want it to appear and download the custom version of jQuery UI for your site. Adobe also provides a number of interesting tools and services on the Edge Tools and Services site at http://html.adobe.com/edge/.
Displaying a Category and Detail Data View
There are many situations where you need to provide a master/detail view. Of course, the most common use for such a view is in database applications where you present data such as the orders associated with a particular client. The view is used in many other places though. The Windows Explorer application uses a master/detail view in presenting the folder hierarchy in one pane and the content of the select folder in the other. The example application shows categorized data and the details of that data. Like every other master/detail view you’ve ever seen, the categories and their associated content appear in the left pane and the selected item in the right, as shown in Figure 21-5.
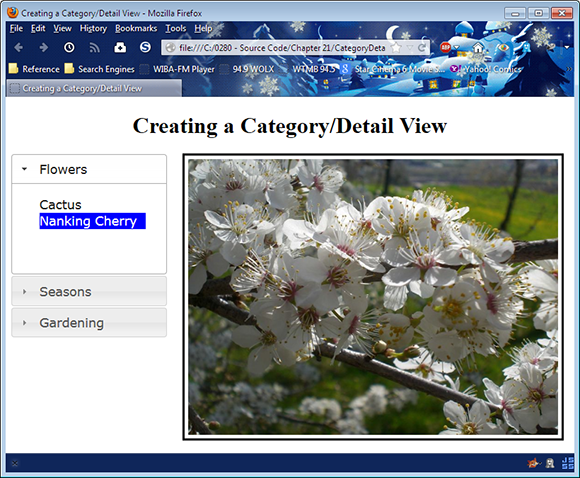
Figure 21-5: A category/detail view provides a useful method of presenting information to the user.
What you're actually seeing here is a combination of the jQuery UI Accordion widget and the Selectable interaction — both of which are discussed in Chapter 20. The following code shows how to create the HTML for the left pane shown in Figure 21-5. (You can find complete code for this example in the Chapter 21CategoryDetail folder of the downloadable code as CategoryDetail.HTML.)
<div id="Categories">
<h2>Flowers</h2>
<div>
<ol id="FlowerSelect" class="Selections">
<li id="Cactus">Cactus</li>
<li id="Nanking">Nanking Cherry</li>
</ol>
</div>
<h2>Seasons</h2>
<div>
<ol id="SeasonSelect" class="Selections">
<li id="Nanking">Nanking Cherry</li>
<li id="Mountain">Mountain View</li>
<li id="Harvest">Squash Harvest</li>
<li id="Snow">First Snow</li>
</ol>
</div>
<h2>Gardening</h2>
<div>
<ol id="SeasonSelect" class="Selections">
<li id="Nanking">Nanking Cherry</li>
<li id="Harvest">Squash Harvest</li>
</ol>
</div>
</div>
The right pane consists of a <div> and <img> combination. The <div> has an id of DrawingContainer, whereas the <img> has an id of Drawing. Normally, these components would appear one over the other. You need to create some CSS in order to obtain the required appearance. Here is the CSS for this example:
<style>
h1
{
text-align: center;
}
#Categories
{
width: 220px;
}
.Selections .ui-selected
{
background: blue;
color: white;
}
.Selections
{
margin: 0;
padding: 0;
width: 150px;
list-style-type: none;
}
#DrawingContainer
{
width: 533px;
height: 400px;
border: solid;
position: absolute;
left: 250px;
top: 80px;
}
#Drawing
{
width: 523px;
height: 390px;
margin: 5px;
}
</style>
Notice that the width of Categories is such that the DrawingContainer can appear to the right of it. The Selections are set up to fit fully in Categories. When setting the width of Selections, you must account for the indent that jQuery UI automatically provides as part of the Accordion widget. The most important part of the DrawingContainer setup is the left setting, which must be configured to accommodate the Accordion widget to the left of it. The size of Drawing is such that the application can maintain the aspect ratio of the images it will display. With some additional work, you could allow for images of multiple sizes to fit easily within the space — the example images are all the same size.
The example requires surprisingly little code to perform its work. That's because jQuery UI does most of the heavy lifting for you. The act of displaying the image is surprisingly easy because of the way the <img> tag work. Here is all the code you need to make this example work:
$(function()
{
// Create an Accordion as a means to
// organize the data.
$("#Categories").accordion();
// Choose a particular image based on the
// user's selection. Display it using the
// src attribute of the <img> tag.
$(".Selections").selectable(
{
selected: function(event, ui)
{
switch(ui.selected.id)
{
case "Cactus":
$("#Drawing").attr(
"src", "CactusBlossom.jpg");
break;
case "Nanking":
$("#Drawing").attr(
"src", "NankingCherry.jpg");
break;
case "Mountain":
$("#Drawing").attr(
"src", "MountainView.jpg");
break;
case "Harvest":
$("#Drawing").attr(
"src", "SquashHarvest.jpg");
break;
case "Snow":
$("#Drawing").attr(
"src", "FirstSnow.jpg");
break;
}
}
});
});
A production application might perform some additional work with the input handling, but testing will show you that the application is fully functional now, and there is little the user can do to cause the application to crash. The trick is in the ui.selected.id. Each of the selections has a unique id value that the switch statement can capture. All that you need to do then is modify the src attribute of the <img> tag to match the desired drawing.
Selecting Data Using a Calendar
Calendars are an essential part of daily living. Everyone uses them for various purposes. It’s not just a matter of keeping track of appointments — calendars are used for all sorts of other date-related uses. For example, most blogs include a calendar where you can choose from posts made during a specific timeframe.
It's entirely possible that someone could write a short book on calendar usage in applications. When it comes to JavaScript-compatible calendars, most developers would probably start with an event-based calendar such as Full Calendar (http://arshaw.com/fullcalendar). However, you should keep your options open. The list of 35 different calendar plug-ins found on the Tripwire Magazine site at http://www.tripwiremagazine.com/2012/11/jquery-calendar-date-pickers.html is only the tip of the iceberg. There are literally hundreds of different calendar plug-ins you could use for your application. The example in this section relies on the Date Picker jQuery plug-in found at http://www.eyecon.ro/datepicker. It's a simple plug-in that you can use for something like a blog to choose content based on the date it was produced.
To start this example, download the Date Picker plug-in and place the datepicker.CSS and datepicker.JS files in the downloaded source code folder. Before you can use the Date Picker jQuery plug-in, you need to add some references for it to your page. The following code adds the correct references. (You can find complete code for this example in the Chapter 21CalendarSelect folder of the downloadable code as CalendarSelect.HTML.)
<link rel="stylesheet"
media="screen"
type="text/css"
href="datepicker.css" />
<script type="text/javascript"
src="datepicker.js"></script>
The Date Picker plug-in is quite flexible. For example, you can set it to allow single or multiple date selections. The default is to use multiple dates. You can also choose features such as the starting day of the week. The full set of options and events appears at http://www.eyecon.ro/datepicker/#implement. The calendar appears as part of a container tag, such as <div>, <span>, or <p>. Here is the code used to create the calendar for this example:
$(function()
{
$("#DateSelect").DatePicker(
{
// Set the initial configuration.
flat: true,
date: "2013-03-01",
current: "2013-03-01",
calendars: 1,
starts: 0,
// Process date changes.
onChange: function(formatted, dates)
{
// Display the selected date.
$("#SelectedDate").text(
dates.toDateString());
// Display a thought for the day.
switch (dates.toDateString())
{
case "Fri Mar 01 2013":
$("#Thought").text("Thought One");
break;
case "Mon Mar 04 2013":
$("#Thought").text("Thought Two");
break;
case "Tue Mar 05 2013":
$("#Thought").text("Thought Three");
break;
default:
$("#Thought").text("No Thought");
break;
}
}
});
});
In this case, the calendar is set up to present the days in the current month, with Sunday as the starting day of the week. It displays only one calendar at a time, and the selected date is 1 March 2013.
The important event to handle is onChange(). This event is fired whenever the user chooses another date. The event handler receives a Boolean value, formatted, that defines whether the dates are formatted in some way. The dates argument contains a single date, when the calendar is in single-selection mode, or a date array, when the calendar is in multiple-selection mode. The example displays the selected date, along with a string selected by certain dates. You can change this code to match any selection requirement you might have. Figure 21-6 shows typical output from this example.
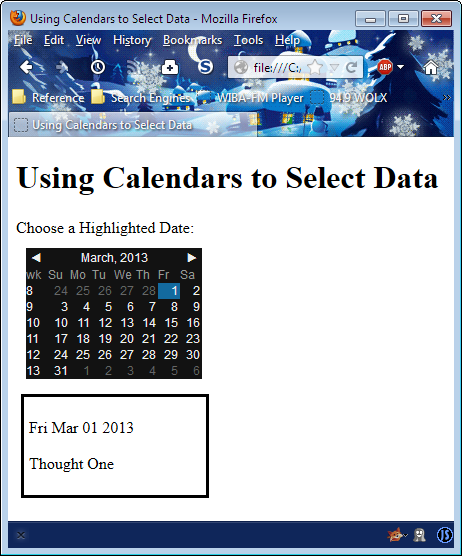
Figure 21-6: Use a calendar to help users visualize date-oriented information choices.
Developing a User-Configurable Interface
jQuery UI provides a number of methods for creating a user-configurable interface. The draggable interaction, demonstrated in the example of dragging content in Chapter 20, is the best place to begin. After a user drags an interface component from one location to another, you can store the user’s choices in a cookie (as demonstrated in the section on using cookies in Chapter 15). Using just these two techniques together would allow you to create a basic user-configurable interface.
Most developers don’t have time or resources to write a user-configurable interface completely from scratch. The best approach is to locate a third-party library, preferably one that’s free, that meets your specific needs. Of course, you need to perform some configuration to get the look you want, but the basic library should provide most of what you need. Fortunately, there are many libraries and templates available to make your job easier. The following list tells you about a few of the more common and usable libraries and templates available (although, there are many others):
![]() Alloy UI:
Alloy UI: http://www.liferay.com/community/liferay-projects/alloy-ui/overview
![]() Dijit (based on dojo):
Dijit (based on dojo): http://dojotoolkit.org/reference-guide/1.8/dijit/index.html
![]() JxLib:
JxLib: http://jxlib.org
![]() LivePipe UI:
LivePipe UI: http://livepipe.net
![]() script.aculo.us:
script.aculo.us: http://script.aculo.us
![]() Sigma AJAX UI Builder:
Sigma AJAX UI Builder: http://sourceforge.net/projects/ajaxuibuilder
![]() xui:
xui: http://xuijs.com
It’s important to remember that hand-writing JavaScript code is necessary only when you need particular effects. Many developers rough out their designs by using a Content Management System (CMS). A CMS provides a word processor-like interface for creating content online. They were initially used to create blog posts, but many developers have turned to them for site content as well. The three most popular CMSs are
![]() Drupal:
Drupal: http://drupal.org
![]() Joomla!:
Joomla!: http://www.joomla.org
![]() WordPress:
WordPress: http://wordpress.org
Devising a Simple Survey Form
Most sites include a number of forms. You find forms used for contact information, surveys, sales, and a host of other tasks. A form provides a means for two-way communication between the user and the site owner.
As with many other JavaScript programming requirements, you can find third-party products to help you create surveys. For example, The Wufoo Form Gallery (http://www.wufoo.com/gallery/templates/surveys/market-research-survey) contains a number of templates focused on market research.
 Developers make more work for themselves than necessary when creating forms by using text boxes instead of other controls. Whenever possible, reduce the risk of incorrect entries by users by limiting the user's choices to specific answers. Using controls with predetermined values (check boxes, option [radio] buttons, drop-down lists, and many others described in this book) is always a better choice than using a text box. When you must use a text box, make sure you use features such as
 maxlength to reduce the potential for security issues.
The simple survey for this example asks four questions: name, age, gender, and reason for visit. The point of this example is the technique rather than creating something fancy. Except for the name, the other three inputs use controls that strictly control user input so there isn't any chance of getting incorrect information from a type perspective. Of course, the user can still choose to use options that don't reflect real-world values. The following code shows how to submit the form by using jQuery syntax. (You can find complete code for this example in the Chapter 21Survey folder of the downloadable code as Survey.HTML.)
$(function()
{
// Submit the form.
$("#Submit").click(function()
{
$("#Test").submit(
function()
{
// Verify that the name field
// contains information.
if ($("#Name").val().length == 0)
{
alert("You must provide a name!");
return false;
}
// If the name field contains data,
// allow the submission.
return true;
});
});
});
Notice that the example still validates the Name field to ensure that the user has typed a value. The Name field is also length limited. You could possibly verify that the user hasn’t typed numbers or special characters. However, at some point, you simply can’t add any more validation and must deal with incorrect entries should the user want to make them. Figure 21-7 shows how this form appears.
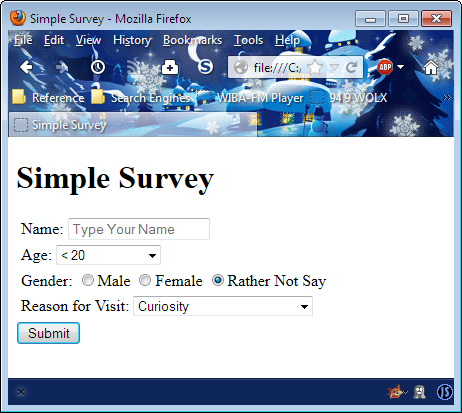
Figure 21-7: A simple form used to provide feedback on a site.
The example shows a few other interesting techniques. In this case, the form uses the get method and sends the output to another page. Figure 21-8 shows typical output from this example when the user clicks Submit on the form.
The code retrieves the data directly from the location object. A complete URL consists of the location, followed by a question mark (?), followed by the data. Each name/value pair is separated by ampersands (&) from the other data elements. In addition, the name/value pairs consist of a variable name, the equals sign (=), and a value. The following code shows how the example separates this information to display it onscreen. (You can find complete code for this example in the Chapter 21Survey folder of the downloadable code as ReadData.HTML.)
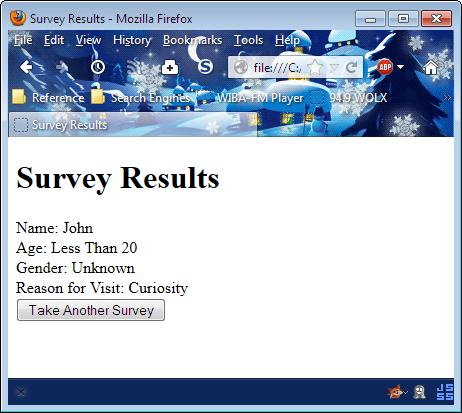
Figure 21-8: The example shows an output page containing the survey data.
$(function()
{
// Obtain access to the data and place
// each item in an array.
var Variables =
$(location).attr("href").split("?")[1];
var VarArray = Variables.split("&");
// Display the data items onscreen.
$("#Name").text(VarArray[0].split("=")[1]);
$("#Age").text(
VarArray[1].split("=")[1].replace(/+/g, " "));
$("#Gender").text(VarArray[2].split("=")[1]);
$("#Reason").text(VarArray[3].split("=")[1]);
// Go back to the previous form.
$("#GoBack").click(function()
{
window.location = "Survey.html";
})
});
The Age data is especially interesting because the spaces are replaced by plus signs (+) during transmission. To put the spaces back in, you use a global replace (using the /g switch). However, the + also has to be escaped. So, to specify a global replacement of the +, you must use /+/g.
The example also makes it possible to go back to the survey form. It does this by providing a button. Clicking the button changes the window.location value to the URL of the survey.