
Chapter 8
Finding the Objects, Methods, and Properties You Need
In this chapter, you'll learn how to find the objects you need in the applications you're using. To learn the material in this chapter, you'll build on what you've learned in the earlier chapters. You'll start by examining the concepts involved: what objects and collections are, what properties are, and what methods are. You'll then learn how to find the objects, collections, properties, and methods you need to make your code work. To identify these items, you'll use a number of tools you've already read about, including the Object Browser (which you used briefly in Chapter 4, “Creating Code from Scratch in the Visual Basic Editor”) and the VBA online Help resources.
Along the way, this chapter explains how to use Object variables to represent objects in your code. In this chapter you will learn to do the following:
- Understand and use objects, properties, and methods
- Use collections of objects
- Find objects, properties, and methods
- Use Object variables to represent objects
What Is an Object?
VBA-enabled applications (and many other modern applications) consist of a number of discrete objects, each with its own characteristics and capabilities.
The Benefits of OOP
Building an application out of objects is called object-oriented programming (OOP). In theory, object-oriented programming has a number of benefits—for example, the code is easier to build and maintain (update) because you break it down into objects of a manageable size.
Object-oriented programs should also be easier to understand than monolithic programs because it's less difficult for most people to grasp the concept of individual objects with associated characteristics and actions than to remember a far longer list of capabilities for the application as a whole.
Figuring out which commands to use to accomplish your programming goals can also be faster thanks to OOP taxonomy. For example, a table in Word is represented by a Table object, and a column is represented by a Column object. The Column object has a Width property that sets or returns its width. It's simpler to manage this information when it's broken down into small pieces than to deal with some complex command such as WordTableSetColumnWidth or WordTableGetColumnWidth.
A third benefit of object-oriented programming is that the VBA language itself can be extended. The programmer can build custom objects to implement functionality that the language itself didn't originally contain. For example, you can use VBA to build your own objects that do things that the Office applications themselves can't do.
Another, rather different, use for OOP is somewhat clerical: OOP can be of help when a group of programmers are working together on a single program. They can easily step on each other's toes in various ways—using the wrong version, changing each other's code, and so on. We'll look at the ways OOP is employed in team programming at the end of this chapter.
Objects can—and frequently do—contain other objects. Typically, the objects in an object-oriented application are arranged into a hierarchy called the object model of the application. This hierarchy is intended to make it easier to figure out where—within a large library of objects—you'll find a particular object that you want to use in your macros. It's similar to the way a biography is likely to be found in the library's nonfiction area.
OBJECT MODELS COVERED IN DEPTH LATER IN THE BOOK
This chapter discusses object models only a little, at the conceptual level: You need to know what an object model is in order to make sense of what you'll be learning in the following chapters, but you don't need to know the specifics of each object model to manipulate the objects used in the examples. Part 5 of this book, “Creating Effective Code,” examines the object models of each of the applications covered in this book in enough detail to get you started on exploring the depths of each object model on your own.
Most VBA host applications, including all the major Office applications, have an Application object that represents the application as a whole. The Application object has properties and methods for things that apply to the application as a whole. For example, many applications have a Quit method that exits the application and a Visible property that controls whether the application is visible or hidden.
In a typical object model, the Application object essentially contains all the other objects (and collections—groups—of objects) that make up the application. For example, Excel has an Application object that represents the Excel application, a Workbook object (grouped into the Workbooks collection) that represents a workbook, and a Worksheet object (grouped into the Sheets collection) that represents a worksheet. The Workbook object is contained within the Application object because you normally need to have the Excel application open to work with an Excel workbook.
In turn, the Worksheet object is contained within the Workbook object because you need to have an Excel workbook open to use a worksheet. Walking further down the object model, the Worksheet object contains assorted other objects, including Row objects that represent the individual rows in the worksheet, Column objects that represent columns in the worksheet, and Range objects (which represent ranges of cells). And these objects in turn contain further objects.
To get to an object, you typically walk down through the hierarchy of the object model until you reach the object you're looking for.
To get to a Range object in Excel, for example, you would go through the Application object to the Workbook object, through the Workbook object to the appropriate Sheet object, and then finally to the Range object. The following statement shows how to select the range A1 in the first worksheet in the first open workbook (more on this in a minute):
Application.Workbooks(1).Sheets(1).Range("A1").Select
Understanding Creatable Objects
The Application object, however, is optional and is usually left out of code lines. Why? Because you'd have to go through the Application object to get to pretty much anything in the application, most applications expose (make available to you) a number of creatable objects. Creatable merely means that you can access something without having to type the word Application in your code. It's assumed. This is similar to the fact that you don't have to include the word Earth when addressing an envelope. There's only that one possibility.
These creatable objects are usually the most-used objects for the application, and by going through them, you can access most of the other objects without having to refer to the Application object. For example, Excel exposes the Workbooks collection as a creatable object, so you can use the following statement, which doesn't require that you type in Application. See the alternative example a couple of paragraphs earlier in this chapter.
Workbooks(1).Sheets(1).Range("A1").Select
Any object can have properties and methods. The next sections discuss these items in detail.
Properties
In VBA, a property is an attribute or characteristic of an object. Most objects have multiple properties that specify each aspect of it.
Each property has a specific data type for the information it stores. For example, the objects that represent files (such as documents, workbooks, or presentations) typically have a Boolean property named Saved that stores a value denoting whether all changes in the object have been saved (a value of True) or not (a value of False). These two values encompass the entire range of possibilities for the object: it can either contain unsaved changes or not contain unsaved changes. There is no third state. And a Boolean data type is used because that type has only two possible values.
Similarly, most objects that represent files have a Name property that contains the name of the file in question. The Name property contains a String data type because it needs to contain text. And that text can be just about anything, limited only by the 255-character path that Windows permits for files and by certain characters—such as colons and pipe (|) characters—that Windows forbids in filenames.
To work with a property, you get (fetch or return) it to find out its current value or set (change) it to a value of your choosing. Many properties are read/write, meaning that you can both get and set their values, but some properties are read-only, meaning that you can view their values but not change them.
The Saved property is read/write for most applications, so you can set it. This means that you can tell the application that a file contains unsaved changes when it really doesn't or that it contains no unsaved changes when it actually has some. (Changing the Saved property can be useful when you're manipulating a file without the user's knowledge.) But the Name property of a file object is read-only—you'll typically set the name by issuing a Save As command, after which you cannot change the name from within the application while the file is open. So you can get (read, return, or fetch) the Name property but not set it. You'll also encounter some write-only properties, properties that you can set but not get.
When an object contains another object, or contains a collection, it typically has a property that you call (invoke) to return the contained object or collection. For example, the Word Document object includes a PageSetup property that returns the PageSetup object for the document (the PageSetup object contains settings such as paper size, orientation, lines per page, and margins for the document) and a Tables property that you call to return the Tables collection. Here's how you can call the PageSetup object (which is contained in the Document object):
Sub GetLinesPage()

  Dim sngLinesPerPage As Single

  sngLinesPerPage = ActiveDocument.PageSetup.LinesPage

  MsgBox sngLinesPerPage

End Sub
Each object of the same type has the same set of properties but stores its own particular values for them. For example, if you're running PowerPoint and have three Presentation objects open, each has its own Name property. The value in each Name property is specific to each Presentation object. In other words, the value in a property in one object has nothing to do with the value in that property in another object: each object is independent of the other objects.
Methods
A method is an action that an object can perform, a capability an object has. For example, the Document object in various applications has a Save method that saves the document. You can use the Save method on different Document objects—Documents(1).Save saves the first Document object in the Documents collection, and Documents(2).Save saves the second Document object—but the Save method does the same thing in each case. An object can have one or more methods associated with it. Some objects have several dozen methods to implement all the functionality they need.
The Save method is very common. It appears in many applications, as do other methods, such as SaveAs (which saves the file with a different name, location, or both) and Close (which closes the file).
But other methods are unique to each application. For example, the Presentation object in PowerPoint has an AddBaseline method that applies a baseline (consisting either of the active presentation or of a specified presentation file) that enables you to track changes for a merge. The Document object in Word has no AddBaseline method, but it has an AcceptAllRevisions method that accepts all revisions in the document. PowerPoint doesn't have an AcceptAllRevisions method.
Just as methods like Save are common to multiple applications, some methods are found in more than one object. For example, the Delete method is associated with many different objects. As its name suggests, the Delete method usually deletes the specified object. But other implementations of the Delete method behave somewhat differently, depending on the object they're working with. So even if you're familiar with a method from using it with one object, you need to make sure that it will have the effect you expect when you use it with another object.
Some methods take no arguments. Other methods take one or more arguments (to supply necessary information). Just as with built-in VBA functions like MsgBox, some methods' arguments are required, while others are optional.
When a method applies to multiple objects, it may have different syntax for different objects. Again, even if you're familiar with a method, you need to know exactly what it does with the object for which you're planning to use it.
To use a method, you access it through the object involved. For example, to close the ActivePresentation object, which represents the active presentation in PowerPoint, you use the Close method (but you must specify the ActivePresentation object, like this):
ActivePresentation.Close
 Real World Scenario
MAX THE DOG: VISUALIZING OBJECTS, METHODS, AND PROPERTIES
If you have a hard time getting a grip on objects, their properties, and methods, here's a somewhat strained comparison between the virtual objects, properties, and methods in VBA and physical objects, properties, and actions in the real world. Consider this example.
Let's say you have a massive dog named Max—a Pyrenean mountain dog, white, 200 pounds, four years old, male, and not fixed.
Max performs all the usual dog actions—sleep, run, eat, bark, growl, chew things, various unmentionable actions that we'll skip over—but also has a couple of unusual (for dogs) actions built in, such as slobbering on command, knocking people down, and biting mail carriers.
If Max were implemented in VBA, he'd be a Dog object in a Dogs collection. The Dog object for Max would have properties such as these:
Name This is a read-only String with a value of Max.
Sex This is a read-only String with a value of Male.
Fixed This is a read/write Boolean with a value of False.
Height This is a read/write Long with a value of 36.
Weight This is a read/write Long with a value of 200.
Age This is a read/write Integer with a value of 4.
Type This is a read/write String with a value of Pyrenean Mountain.
Color This is a read/write String with a value of White.
Max would have methods such as Slobber, Bark, KnockDown, Intimidate, Chew, Run, and so on. Some of these methods would require arguments. The Slobber method would definitely need arguments like this, probably using Dog-specific constants that start with the dog designation:
Dogs("Max").Slobber OnWhat:="MyKnee", How:=dogSlobberDisgustingly
The Dog object would contain objects representing the many components of the dog—ears, eyes, tongue, brain, stomach, legs, tail, and so on. Each of these objects in turn would have its own properties and methods as appropriate. For example, the Tail object would need a Wag method, which you would probably invoke (call) something like this:
Dogs("Max").Tail.Wag Direction:=dogWagHorizontal, Frequency:=200
Working with Collections
When an object contains more than one object of the same type, the contained set of objects is said to be grouped into a collection. For example, Word uses Document objects, which are grouped into the Documents collection; PowerPoint has a Presentations collection for Presentation objects, and Excel has the Workbooks collection.
As in these examples, the names of most collections are simply the plural of the outer, container object. There are some exceptions, such as the Sheets collection in Excel that contains the Worksheet objects. But by and large the names of most collections are easy to derive from the name of the objects they contain—and vice versa.
A collection—taken as a whole—is an object too and can have its own properties and methods. For example, many collections have a Count property that tells you how many objects are in the collection. This next example tells you how many documents are in the Documents collection:
Sub GetDocCount()

  Dim lngCount As Long

  lngCount = Documents.Count

  MsgBox lngCount

End Sub
Collections tend to have fewer properties and methods than individual objects. Most collections have an Add method for adding another object to the collection. Some collections, however, are read-only and do not have an Add method. Most collections have an Item property (the default property) for accessing an item within the collection.
Most collections in VBA have the core group of properties listed in Table 8.1.
TABLE 8.1: Core properties for collections in VBA
| PROPERTY | EXPLANATION |
| Application | A read-only property that returns the application associated with the object or collection—the root of the hierarchy for the document. For example, the Application property for objects in PowerPoint returns Microsoft PowerPoint. |
| Count | A read-only Long property that returns the number of items in the collection—for example, the number of Shape objects in the Shapes collection in a PowerPoint slide. |
| Creator | In Microsoft applications, a read-only Long property that returns a 32-bit integer indicating the application used to create the object or collection. |
| Item | A read-only property that returns a specified member of the collection. Item is the default property of every collection, which means that you seldom need to specify it. |
| Parent | In Microsoft applications, a read-only String property that returns the parent object for the object or collection. The parent object is the object that contains t the object in question; the contained object is the child object. For example, a Document object is a child of the Documents collection. |
Working with an Object in a Collection
To work with an object in a collection, you identify the object within the collection either by its name or by its position in the collection. For example, the following statement returns the first Document object in the Documents collection and displays its Name property in a message box:
MsgBox Documents(1).Name
MOST COLLECTIONS ARE ZERO-BASED
Recall that arrays are zero-based by default in VBA. They employ a 0 index number for the first item in the array (unless you use the Option Base 1 statement to force the first index number to 1 as we did in Chapter 7, “Using Array Variables”).
Fortunately, most VBA collections default to the more sensible 1 for the first item in the collection. This makes it easy to identify the object you need. For example, Documents(1) gives you the first document, Workbooks(2) gives you the second workbook, and so on.
But notice the word most. Sadly, there are exceptions to this rule. Be warned that some collections in VBA implementations are zero-based—their numbering starts at 0 (zero) rather than 1. For example, Access—nearly always the special case in VBA—employs zero-based collections. If you're not sure whether a particular collection is one- or zero-based, consult the Help topic for that collection.
You can optionally use the Item property to return an object from the collection, but because Item is the default property of a collection, you don't need to use it. It's assumed. The following two statements have the same effect, so there's no advantage to using the Item method:
strName = Documents(1).Name
strName = Documents.Item(1).Name
Adding an Object to a Collection
To create a new object in a collection, you add an object to the collection. In many cases, you use the Add method to do so. For example, the following statement creates a new Document object in Word:
Documents.Add
Finding the Objects You Need
The Visual Basic Editor provides a number of tools for finding the objects you need:
- The Macro Recorder, which you used to record macros in some Microsoft Office applications in Chapter 1, “Recording and Running Macros in the Office Applications”
- The Object Browser, which you used briefly in Chapter 4
- The online Help system, which can provide detailed help on the objects in the application
- The Auto List Members feature in the Visual Basic Editor
The following sections show you how to use these tools to find objects.
Using the Macro Recorder to Add Code for the Objects You Need
If you're using a Microsoft application, chances are that the easiest way to find the objects you need is to run the Macro Recorder to record a quick macro using the objects you're interested in. While you perform various actions in the application, the Macro Recorder creates code that you can then open in the Visual Basic Editor, examine, and modify if necessary.
In spite of its advantages, the Macro Recorder does have two drawbacks:
- First, you can't record every action that you might want. Let's say you're working in Excel and want to create a statement that performs an action on a specified workbook in the Workbooks collection rather than on the active workbook. With the Macro Recorder, you can record only actions performed on the active workbook. (This is the case because the Macro Recorder can record only those actions you can perform interactively in Excel, and you can't work interactively with any workbook other than the active one.) Here's another example: Some Ribbon actions are not recorded. In Word, clicking the Review
 Show Markup Formatting feature to deselect it results in no recorded code. You would need to write the following code in the Editor yourself:
ActiveWindow.View.ShowFormatChanges = False
- Second, the Macro Recorder is apt to record more statements than you need, particularly when you're trying to record a setting in a dialog box.
You saw an example of the second problem in Chapter 4. Here's another example. This time we'll record a macro to create an AutoCorrect entry. Let's say that you often have to type the word references in your job. Dozens of times every day. You can speed up your work by merely typing reffs (or some other abbreviation of your choice). Then Word will automatically replace reffs with references as you type. Here's how to create this macro:
- Start Word.
- Click the Record Macro button on the status bar, or click the Developer tab on the Ribbon and then click the Record Macro button in the Code section. This displays the Record Macro dialog box. Type Add_Item_to_AutoCorrect in the Macro Name text box, and type a description in the Description text box. Make sure All Documents (Normal.dotm) is selected in the Store Macro In drop-down list, and then click the OK button to start recording.
- Press Alt+F then I. Then click the Proofing button and the AutoCorrect Options button to display the AutoCorrect dialog box. Type reffs in the Replace box and references in the With box, and click the Add button. Then click OK twice to close both open dialog boxes.
- Click the Stop Recording button on the Ribbon or the status bar to stop the Macro Recorder.
Now press Alt+F8 to display the Macros dialog box, select the Add_Item_to_AutoCorrect entry, and click the Edit button to open the macro in the Visual Basic Editor. The code should look like this:
Sub Add_Item_to_AutoCorrect()
' Add_Item_to_AutoCorrect Macro
' Change reffs to references
'
   AutoCorrect.Entries.Add Name:="reffs", Value:="references"
   With Options
       .AutoFormatAsYouTypeApplyHeadings = False
       .AutoFormatAsYouTypeApplyBorders = True
       .AutoFormatAsYouTypeApplyBulletedLists = True
       .AutoFormatAsYouTypeApplyNumberedLists = True
       .AutoFormatAsYouTypeApplyTables = True
       .AutoFormatAsYouTypeReplaceQuotes = True
       .AutoFormatAsYouTypeReplaceSymbols = True
       .AutoFormatAsYouTypeReplaceOrdinals = True
       .AutoFormatAsYouTypeReplaceFractions = True
       .AutoFormatAsYouTypeReplacePlainTextEmphasis = False
       .AutoFormatAsYouTypeReplaceHyperlinks = True
       .AutoFormatAsYouTypeFormatListItemBeginning = True
       .AutoFormatAsYouTypeDefineStyles = False
       .TabIndentKey = True
    End With
    With AutoCorrect
        .CorrectInitialCaps = True
        .CorrectSentenceCaps = True
        .CorrectDays = True
        .CorrectCapsLock = True
        .ReplaceText = True
        .ReplaceTextFromSpellingChecker = True
        .CorrectKeyboardSetting = False
        .DisplayAutoCorrectOptions = True
        .CorrectTableCells = True
    End With
    With OMathAutoCorrect
        .UseOutsideOMath = False
        .ReplaceText = True
    End With
    With Options
        .AutoFormatApplyHeadings = True
        .AutoFormatApplyLists = True
        .AutoFormatApplyBulletedLists = True
        .AutoFormatApplyOtherParas = True
        .AutoFormatReplaceQuotes = True
        .AutoFormatReplaceSymbols = True
        .AutoFormatReplaceOrdinals = True
        .AutoFormatReplaceFractions = True
        .AutoFormatReplacePlainTextEmphasis = True
        .AutoFormatReplaceHyperlinks = True
        .AutoFormatPreserveStyles = True
        .AutoFormatPlainTextWordMail = True
    End With
    Options.LabelSmartTags = False
End Sub
Here, the Recorder has created dozens of lines of unnecessary code. The only statement you actually need to accomplish your task is this:
AutoCorrect.Entries.Add Name:="reffs", Value:="references"
This line shows you that to add an AutoCorrect entry, you need to work with the Entries collection object in the AutoCorrect object. You use the Add method on the Entries collection to add an AutoCorrect entry to the list.
All the other lines of code specifying the status of various options are unnecessary because you are not interested in changing any of them in this macro.
By removing these extraneous lines from this recorded macro, you can reduce it to just the single line it needs to contain (together with the comment lines, which you can also remove if you want):
Sub Add_Item_to_AutoCorrect()
' Add_Item_to_AutoCorrect Macro
' Change reffs to references
'
    AutoCorrect.Entries.Add Name:="reffs",Value:="references"
End Sub
You used the Recorder to see the correct syntax for adding an entry to the AutoCorrect feature. There's no point to leaving in lines of code unrelated to your purposes. What's more, such extraneous code would make it harder at some future date to read and understand the macro's purpose. Even worse, these extra lines can set properties to conditions that you, or someone else using this macro, might not want. Let's say you run this macro in the future and you are working in a document that must not have any bullet symbols in it. So you've clicked the File tab on the Ribbon, then chosen File ![]() Options
Options ![]() Proofing
Proofing ![]() AutoCorrect Options
AutoCorrect Options ![]() AutoFormat As You Type and turned off bullets. However, when you run this macro, bullets are turned back on by this unneeded line in the code:
AutoFormat As You Type and turned off bullets. However, when you run this macro, bullets are turned back on by this unneeded line in the code:
.AutoFormatAsYouTypeApplyBulletedLists = True
In spite of its limitations, the Macro Recorder does provide quick access to the objects you need to work with, and you can always modify the resulting code in the Visual Basic Editor. What's more, the code that the Recorder generates is, if nothing else, guaranteed to execute without bugs.
Using the Object Browser
For many programmers, the primary tool for writing code for objects is the Object Browser, which you used briefly in Chapter 4. In the following sections, you'll get to know the Object Browser better and learn to use it to find the information you need about objects. To see the Object Browser, press F2 in the Editor.
COMPONENTS OF THE OBJECT BROWSER
The Object Browser provides the following information about both built-in objects and custom objects you create:
- Classes (formal definitions of objects)
- Properties (the attributes of objects or aspects of their behavior)
- Methods (actions you can perform on objects)
- Events (for example, the opening or closing of a document)
- Constants (named items that keep a constant value while a program is executing)
Figure 8.1 shows the components of the Object Browser.
FIGURE 8.1 The Object Browser provides information on built-in objects and custom objects. Here, the application is Excel.
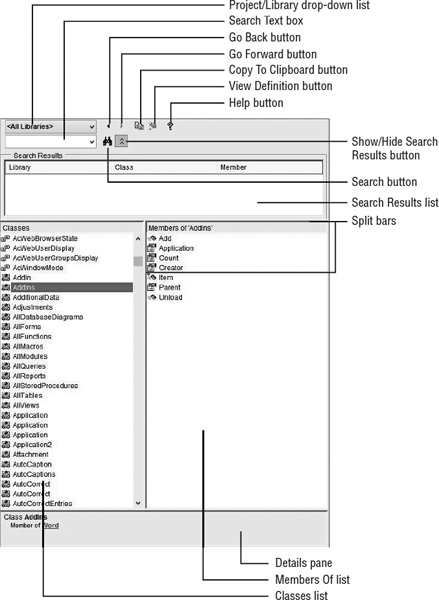
Here's what the different elements of the Object Browser do:
- The Project/Library drop-down list provides a list of object libraries available to the current project. (An object library is collection of objects made available to programs. There can be several libraries in use at a given time. For example, one library might contain objects that specialize in rendering graphics, a second library might contain objects that assist with security features, and so on.) Use the drop-down list to choose the object libraries you want to view. For example, you might choose to view only objects in Outlook by choosing Outlook in the Project/Library drop-down list. Alternatively, you could stay with the default choice of <All Libraries>.
- In the Search Text box, enter the string you want to search for: Either type it in or choose a previous string in the current project session from the drop-down list. Then either press Enter or click the Search button to find members containing the search string.
IMPROVE YOUR SEARCHES WITH THESE TECHNIQUES
To make your searches less specific, you can use wildcards such as ? (to represent any single character) and * (to represent any group of characters). You can also choose to search for a whole word only (rather than matching your search string with part of another word) by right-clicking anywhere in the Object Browser (except in the Project/Library drop-down list or in the Search Text box) and choosing Find Whole Word Only from the context menu. The Find Whole Word Only choice has a check mark next to it in the context menu when it's active; to deactivate it, choose Find Whole Word Only again on the context menu.
- Click the Go Back button to retrace one by one your previous selections in the Classes list and the Members Of list. Click the Go Forward button to move forward through your previous selections one by one. The Go Back button becomes available when you go to a class or member in the Object Browser; the Go Forward button becomes available only when you've used the Go Back button to go back to a previous selection.
- Click the Copy To Clipboard button to copy the selected item from the Search Results list, the Classes list, the Members Of list, or the Details pane to the Clipboard so that you can paste it into your code.
- Click the View Definition button to display a Code window containing the code for the object selected in the Classes list or the Members Of list. The View Definition button is available (undimmed) only for objects that contain code, such as procedures and user forms that you've created.
- Click the Help button to display any available help for the currently selected item. Alternatively, press the F1 key.
- Click the Search button to search for the term entered in the Search Text box. If the Search Results pane isn't open, VBA opens it at this point.
- Click the Show/Hide Search Results button to toggle the display of the Search Results pane on and off.
- The Search Results list in the Search Results pane contains the results of the latest search you've conducted for a term entered in the Search Text box. If you've performed a search, the Object Browser updates the Search Results list when you use the Project/Library drop-down list to switch to a different library. Choosing a different library in the Project/Library drop-down list is a handy way of narrowing, expanding, or changing the focus of your search.
- The Classes list shows the available classes in the library or project specified in the Project/Library drop-down list.
- The Members Of list displays the available elements of the class selected in the Classes list. A method, constant, event, property, or procedure that has code written for it appears in boldface. The Members Of list can display the members either grouped into their different categories (methods, properties, events, and so on) or ungrouped as an alphabetical list of all the members available. To toggle between grouped and ungrouped, right-click in the Members Of list and choose Group Members from the context menu; click either to place a check mark (to group the members) or to remove the check mark (to ungroup the members).
- The Details pane displays the definition of the member selected in the Classes list or in the Members Of list. For example, if you select a procedure in the Members Of list, the Details pane displays its name, the name of the module and template or document in which it's stored, and any comment lines you inserted at the beginning of the procedure. The module name and project name contain hyperlinks (jumps) so that you can quickly move to them. You can copy information from the Details pane to the Code window by using either copy and paste or drag and drop.
- Drag the three split bars to resize the panes of the Object Browser to suit yourself. (You can also resize the Object Browser window as needed or maximize it so that it docks itself in the Code window.)
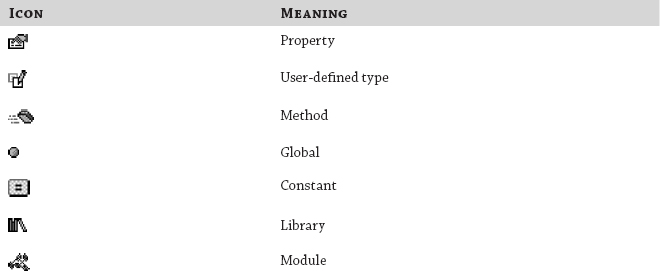
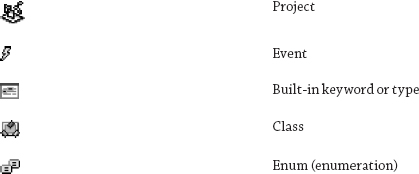
The Object Browser uses different icons to indicate the various types of object that it lists. Figure 8.1 shows several icons; Table 8.2 shows the full range of icons and what they represent.
A blue dot in the upper-left corner of a Property icon or a Method icon indicates that that property or method is the default.
ADDING AND REMOVING OBJECT LIBRARIES
The default object libraries are sufficient for most typical macros, so you generally need not worry about adding any specialized libraries. If you get into some kinds of advanced macro programming, however, you will need to add other libraries (you'll modify the Ribbon in Chapter 31, “Programming the Office 2010 Ribbon,” and to do that you have to add a special library). You can add and remove object libraries by choosing Tools ![]() References in the editor and using the References dialog box to make your selections:
References in the editor and using the References dialog box to make your selections:
- By adding object libraries, you can make available additional objects to work with.
- By removing object libraries that you don't need to view or use, you can reduce the number of object references that VBA needs to resolve when it is compiling the code in a project. This allows the code to run faster, though as I've mentioned before, today's computers are so fast that finding ways to increase speed of macro execution is never an issue for most people.
When you start the Visual Basic Editor, it automatically loads the object libraries required for using VBA and user forms with the host application. You don't have to change this set of object libraries until you need to access objects contained in other libraries. For example, if you create a procedure in Word that needs to employ a feature found in Excel, you'll have to add to Word's VBA Editor a reference to an Excel object library to make Excel's objects available.
You can adjust the priority (or order of precedence) of different references by adjusting the order in which the references appear in the References dialog box. The priority of references matters when you use in your code an object whose name appears in more than one reference: VBA checks the References list to determine the order of the references that contain that object name and uses the first one unless specifically told to do otherwise by use of an unambiguous name.
To add or remove object libraries, follow these steps:
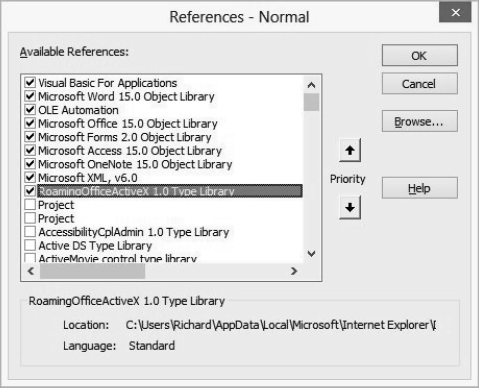
- In the Visual Basic Editor, choose Tools References to display the References dialog box (see Figure 8.2). You can also display the References dialog box by right-clicking in the Object Browser and choosing References from the context menu.
FIGURE 8.2 You add and remove object libraries by using the References dialog box.
- In the Available References list box, select the check boxes for the object libraries you want to have access to, and clear the check boxes for the references you want to remove because you don't need them. You should find a reference for an object library for each application that supports automation and is installed on your computer. Automation, in this context, means that an application permits the automation of tasks (in other words, macros). Another way to put this is an application that supports automation exposes its objects, meaning that the application makes its objects available to programmers.
- The references that are in use appear together at the top of the Available References list box, not in alphabetical order (in order of precedence, as described earlier in this chapter).
- Adjust the order of precedence of the references if necessary by selecting a reference and using the up- and down-arrow Priority buttons to move it up or down the list. Usually, you'll want to keep Visual Basic for Applications and the object library of the application you're working with at the top of your list.
ADDING A REFERENCE LIBRARY
You can even add new reference libraries to the list of available references in the References dialog box by clicking the Browse button to display the Add Reference dialog box, selecting the library file, and then clicking the Open button.
- Click OK to close the References dialog box and return to the Object Browser.
NAVIGATING WITH THE OBJECT BROWSER
To browse the objects available to a project, follow these steps:
- First, activate a code module by double-clicking it in the editor's Project Explorer.
- Display the Object Browser by choosing View Object Browser, by pressing the F2 button, or by clicking the Object Browser button on the Standard toolbar. (If the Object Browser is already displayed, make it active by clicking it or by selecting it from the list at the bottom of the Window menu.)
- In the Project/Library drop-down list, select the name of the project or the library that you want to view. The Object Browser displays the available classes in the Classes list.
- In the Classes list, select the class you want to work with. For example, if you chose a project in step 3, select the module you want to work with in the Classes list.
- If you want to work with a particular member of the class or project, select it in the Members Of list. For example, if you're working with a template project, you might want to choose a specific procedure or user form to work with.
Once you've selected the class, member, or project, you can perform the following actions on it:
- View information about it in the Details pane at the bottom of the Object Browser window.
- View the definition of an object by clicking the View Definition button. Alternatively, right-click the object in the Members Of list and choose View Definition from the context menu. The View Definition button and the View Definition command are enabled (available, undimmed) only for objects that contain code, such as procedures and user forms that you've created.
A “DEFINITION” IS CONTAINED CODE
The definition of a procedure is the code that it contains. The definition of a module is all the code in all the procedures that it contains. The definition of a user form is the code in all the procedures attached to it. To see how the View Definition button works, type the name of one of your macros in the Object Browser's Search field (to the left of the icon). Then click the icon to locate this macro. Then click the View Definition button, and the Code window will open, displaying this macro's code.
- Copy the text for the selected class, project, or member to the Clipboard by clicking the Copy button or by issuing a standard Copy command (pressing Ctrl+C or Ctrl+Insert).
Using Help to Find the Object You Need
VBA's online Help system provides another easy way to access the details of the objects you want to work with. The Help files provide a hyperlinked reference to all the objects, methods, and properties in VBA, including graphics that show how the objects are related to each other, and plenty of code samples to show you the correct syntax.
The quickest way to access VBA Help is to press the F1 key while working in the Visual Basic Editor.
PRESSING F1 TO GO TO A GENERAL VBA HELP PAGE
F1 works two different ways. Press F1 with the cursor on a blank line, and you're taken to the VBA portal shown in Figure 8.3. However, press F1 with the cursor on a language keyword such as Variant or InputBox, and you're taken to a Help page with specific information about that particular keyword.
First, try clicking a blank line in the Code window, then press F1. Your browser opens a generic Office website shown in Figure 8.3.
FIGURE 8.3 The generic VBA portal
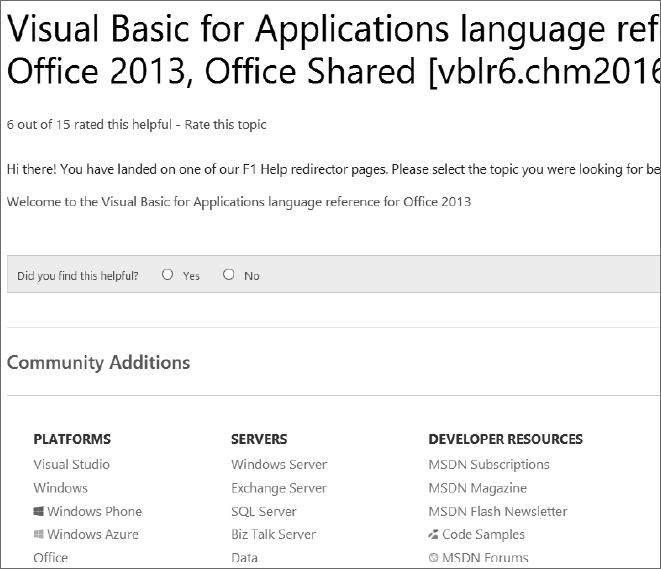
For us Office programmers in the web page shown in Figure 8.3 are two links: the Office link under Platforms shown down at the bottom and the Welcome to the Visual Basic for Applications language reference for Office 2013 link shown in the middle of the page.
Click the Office link and you're taken to the Office for Developers help page, shown in Figure 8.4. There you'll find many useful links to code samples, Office application–specific pages, video lessons, and whatnot.
PRESSING F1 TO GO DIRECTLY TO A COMMAND'S HELP PAGE
The second way to use F1 takes you directly to the Help page for the keyword you're interested in. If you want to see how to manipulate the active window, for example, just type activewindow into the Editor's Code window, and then, with the blinking insertion cursor somewhere in that word, press F1. See Figure 8.5.
FIGURE 8.4 This Help page contains many valuable links.

FIGURE 8.5 Put your insertion cursor on a command, then Press F1 to get context-sensitive help.
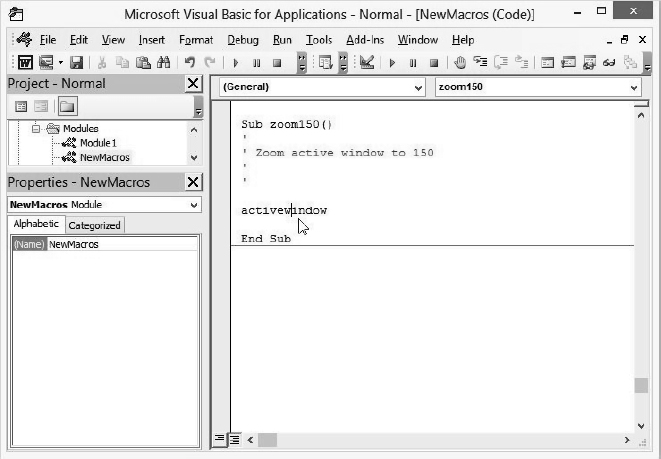
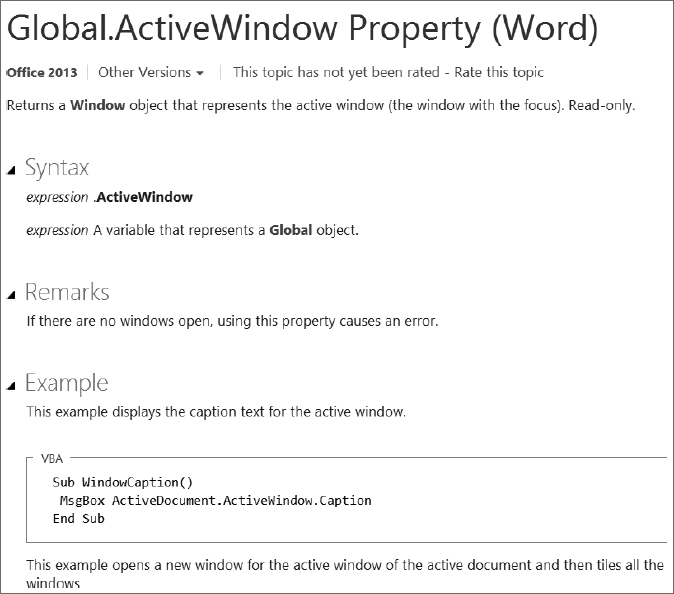
After you press F1 on the activewindow command, as shown in Figure 8.5, the Help page for this command opens, as you can see in Figure 8.6.
FIGURE 8.6 Here's the main Help page for the ActiveWindow property.
Apart from the regular Help information you'll find in the Help pages online, here are a few additional ways to find help:
- At the top of most Microsoft help windows, you'll see a field titled Search MSDN With Bing. Try this: Type Word 2013 selection object into the Bing search field. A page is displayed with plenty of links. Click the top link, and you'll see several helpful code examples.
- When looking for help, you can also try clicking the Help menu in the Editor, then choosing one of the two help options listed: Microsoft Visual Basic Applications Help or MSDN On The Web. These two options open different entrees into the Help system, from which you can drill down until you locate the explanations or code samples you're after.
- Finally, when looking for help with objects, don't forget you can press F2 to display the built-in Object Browser.
Using the Auto List Members Feature
You've already used the Auto List Members feature a couple of times in the previous chapters. To recap, in VBA code—as with most other programming languages—objects and their members (properties and methods) are separated by periods. This punctuation helps you see the relationships between parent objects, child objects, and members. Notice the two periods in this code:
sngLinesPerPage = ActiveDocument.PageSetup.LinesPage
When you're entering a statement in the Visual Basic Editor and you type the period at the end of the current object, the Auto List Members feature displays a list of properties and methods appropriate to the statement you've entered so far. (Turn this feature on in the Visual Basic Editor by choosing Tools ![]() Options, then selecting the Auto List Members check box.)
Options, then selecting the Auto List Members check box.)
Technically, there's a distinction between Auto List Members and a somewhat similar List Properties/Methods feature. The former feature is triggered by typing a period (.) following the name of an object in a line of code. The latter is triggered by pressing Ctl+J or by right-clicking the name of an object in a line of code and choosing List Properties/Methods from the menu that appears. Of the two, I find Auto List Members more useful.
The Auto List Members feature provides a quick way of completing statements, but you need to know which object you should work with before you can work with its members. Sometimes using this feature is a bit like finding your way through a maze and being given detailed directions that end with the phrase, “But you can't get there from here.”
Once you know the object from which to start, though, you can easily find the property or method you need. For example, to put together the statement Application.Documents(1).Close to close the first document in the Documents collection in Word, you could work as follows:
- Place the insertion point on a fresh line in an empty procedure (between the Sub and End Sub statements). Create a new procedure if necessary.
- Type the word application, or type appl and press Ctrl+spacebar to have the Complete Word feature complete the word for you.
- Type the period (.) after Application. The Auto List Members feature displays the list of properties and methods available to the Application object.
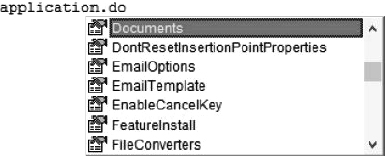
- Choose the Documents item in the Auto List Members list. You can scroll to it using the mouse and then double-click it to enter it in the Code window, scroll to it by using the arrow keys and enter it by pressing Tab, or type the first few letters of its name (to automatically locate it) and then enter it by pressing Tab. The latter method is shown in Figure 8.7, which uses Word.
FIGURE 8.7 Using the Auto List Members feature to enter code
- Type (1). after Documents. When you type this period, the Auto List Members feature displays the list of properties and methods available to a Document object. Note that without the (1), you're working with the documents collection, but as soon as you add the (1), you're then working with a specific document, namely the first one in the collection.
- Choose the Close method in the Auto List Members list by scrolling to it with the mouse or with the down arrow key. Because this is the end of the statement, press the Enter key to enter the method and start a new line (rather than pressing the Tab key, which enters the method but continues the same line of code).
AUTOMATIC SELECTION HELPS YOU KEEP YOUR HANDS ON THE KEYBOARD
For most people, the quickest way to enter statements in the Code window is to keep their hands on the keyboard. After all, you're typing your programming. To help you do this, the Visual Basic Editor automatically selects the current item in the Auto List Members list when you type a period or an opening parenthesis. In the previous example, you can type Application. to display the list, Do to select the Documents item, and ( to enter the Documents item.
Using Object Variables to Represent Objects
As you learned in Chapter 6, “Working with Variables, Constants, and Enumerations,” one of the data types available for variables in VBA is the Object type. You use an Object variable to represent an object in your code: instead of referring to the object directly, you can employ the Object variable to access or manipulate the object it represents.
Here's one major benefit of this approach: Using Object variables makes your code easier to read. It's simpler to see which object a section of code is working with, especially when you're working with multiple objects in the same section of code. Plus, you can give names to these variables that are descriptive and easily understood. What's more, object variables are often a necessity when you need to manipulate collections of objects.
For example, say you create a procedure that manipulates the three open workbooks in Excel, copying a range of cells from one to the other two. If you have only those three workbooks open, you'll be able to refer to them directly as Workbooks(l), Workbooks(2), and Workbooks (3), respectively, because they'll occupy the first (and only) three slots in the Workbooks collection.
But if your procedure changes the order of the workbooks, closes one or more workbooks, or creates one or more new workbooks, things rapidly get confusing. If, however, you've created Object variables (named, say, xlWorkbookl, xlWorkbook2, and xlWorkbook3) to refer to those specific workbooks, it will be much easier to keep them straight. This is because no matter which workbook moves to first position in the Workbooks collection, you'll be able to refer to the object represented by the Object variable xlWorkbookl and know that you'll be accessing the workbook you're after. In other words, when you create Object variables, you get to name them, using words that are more easily understood than index numbers. More important, once it's named, an Object variable's name does not change. Index numbers can change.
To create an Object variable, you declare it in almost exactly the same way as you declare any other variable, using a Dim, Private, or Public statement. For example, the following statement declares the Object variable objMyObject:
Dim objMyObject As Object
As usual for the Dim statement, if you use this declaration within a procedure, it creates a variable with local scope. If you use it in the declarations section at the top of a code sheet, it creates a variable with module-level private scope. Similarly, the Private and Public keywords create module-level private and public Object variables, respectively.
Once you've declared the Object variable, you can assign an object to it. (Assigning objects works a bit differently from the way you use just an equal sign to assign a value to an ordinary variable.) To assign an object to an Object variable, you use a Set statement. The syntax for a Set statement is as follows:
Set objectvariable = {[New] expression|Nothing}
Here's how that syntax breaks down:
- objectvariable is the name of the Object variable to which you're assigning the object.
- New is an optional keyword that you can use to implicitly create a new object of the specified class. However, usually it's better to create objects explicitly and then assign them to Object variables rather than use New to create them implicitly.
- expression is a required expression that specifies or returns the object you want to assign to the Object variable.
- Nothing is an optional keyword that you assign to an existing Object variable to obliterate its contents and release the memory they occupied.
For example, the following statements declare the Object variable objMyObject and assign to it the active workbook in Excel:
Dim objMyObject As Object
Set objMyObject = ActiveWorkbook
The following statement uses the Nothing keyword to release the memory occupied by the objMyObject Object variable:
Set objMyObject = Nothing
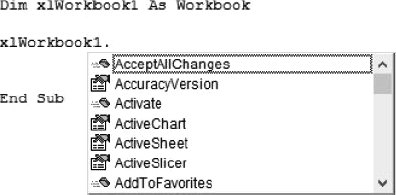
What's different about declaring an Object variable versus declaring other types of variables is that not only can you declare the Object variable as being of the type Object and then use the Set command, but you can also specify which type of object it is. For example, if an Object variable will always represent a Workbook object, you can declare it as being of the Workbook data type. The following statement declares the Object variable xlWorkbookl as being of the Workbook data type:
Dim xlWorkbook1 As Workbook
Strongly associating a type with an Object variable like this has a couple of advantages. First, once you've strongly typed (as it's called) the Object variable, the Visual Basic Editor can provide you with full assistance for the Object variable, just as if you were dealing with the object directly. For example, once you've created that Object variable xlWorkbookl of the Workbook object type, the Visual Basic Editor displays the Auto List Members drop-down list when you type that Object variable's name followed by a period, as shown in Figure 8.8.
Second, when you strongly type an Object variable, you make it a bit harder to get things wrong in your code. If you try to assign the wrong type of object to a strongly typed Object variable, VBA gives an error. For example, if you create a Worksheet Object variable in Excel, as in the first of the following statements, but assign to it a Workbook object, as in the second statement, VBA displays a “Type Mismatch” error message when you execute this code—as well it should:
Dim wksSheet1 As Worksheet
Set wksSheet1 = ActiveWorkbook
FIGURE 8.8 When you strongly type your Object variables, you get the full benefit of the Visual Basic Editor's code-completion features for those Object variables.
Finding out at this testing stage that you've created a problem is usually preferable to finding out later (for example, when you go to manipulate the wksSheet1 object and discover it doesn't behave as you expect it to).
The main argument for not strongly typing an Object variable is that you might not be sure ahead of time (while writing the code) what kind of object that variable will eventually reference during execution or if the kind of object it will store may vary from one execution of the code to another. (If either is the case, your code will need to be flexible enough to accommodate objects of different types for the same Object variable.) Usually, though, you'll want to strongly type all your Object variables.
If you're not sure which object type to use for an Object variable, start by declaring the Object variable as being of the Object data type. Then run through the code a couple of times with the Locals window (View ![]() Locals) displayed, and note the data type that VBA assigns to the Object variable. For example, if you press F8 repeatedly to step through the following statements in a Visual Basic Editor session hosted by Excel, the readout in the Locals window at first identifies the Object variable wks only as Object (as shown on the left in Figure 8.9). That's not too useful. However, press F8 again to execute the Set command, and you see loads of information (press the + icon next to wks). You now see Object/Sheet1 (as shown on the right in Figure 8.9) when executing the second statement assigns the first sheet in the active workbook to it. You also can see all the members, their current values, and their type.
Locals) displayed, and note the data type that VBA assigns to the Object variable. For example, if you press F8 repeatedly to step through the following statements in a Visual Basic Editor session hosted by Excel, the readout in the Locals window at first identifies the Object variable wks only as Object (as shown on the left in Figure 8.9). That's not too useful. However, press F8 again to execute the Set command, and you see loads of information (press the + icon next to wks). You now see Object/Sheet1 (as shown on the right in Figure 8.9) when executing the second statement assigns the first sheet in the active workbook to it. You also can see all the members, their current values, and their type.
Dim wks As Object
Set wks = ActiveWorkbook.Sheets(1)
FIGURE 8.9 You can use the Locals window to help identify the object type that an Object variable will contain.

THERE ARE DRAWBACKS TO WEAKLY TYPED VARIABLES
As you learned earlier in the book, you can avoid specifying data types altogether. For example, the statement Dim varMyVariant creates a Variant variable because the statement does not specify a data type. Variant variables can contain objects as well as other data types—but as before, using Variants requires VBA to do a little more work each time it encounters the variable (because VBA has to determine what data type the variable currently is) and denies you the benefits of strongly typing your variables. Weak typing also makes your code harder to read.
Team Programming and OOP
VBA is used by individual programmers as well as teams. OOP can offer some advantages when you are trying to manage a group of programmers working together on a large, complex VBA solution. OOP can help people avoid stepping on each other's toes—duplicating global variable names, creating version problems—because everyone's individual copy of the code is their latest version but not the latest official version of the group, and other kinds of interference.
Group programming needs management, and OOP, among its other benefits, assists in avoiding chaos when a team needs to work together on a common goal.
One feature of OOP is encapsulation. This means that an object is self-contained and sealed off. It's like a black box that is plugged into your video system to improve the picture. You don't open the box. Nobody is supposed to modify the innards. You just use it.
As an example, say that the boss wants all documents from now on to emphasize the company's name. You give Sandra the task of creating an object that is supposed to italicize and capitalize all references to ACME WINDOWORKS in all company documents. And you ask Joe to create an object that ensures that any use of the company name is displayed in green rather than the normal black letters. (In reality, you would likely want to code these simple manipulations into functions—see Chapter 10, “Creating Your Own Functions,”—rather than objects. Objects tend to perform multiple related jobs rather than a single, simple job like turning something green. But this is just an example, so we'll keep it simple here.)
When this code is encapsulated into sealed-off objects, nobody has to worry that Sandra and Joe might use the same variable names or otherwise interfere with each other's code. Instead, within their totally separate, sealed-off objects, they can go ahead and write code as they please. This is because the scope of the code is local to the object, and also, neither Joe nor Sandra can view, much less modify, each other's code.
A document is passed to Sandra's ItalAndCap object, and the document comes out the other end (returns) with all instances of ACME WINDOWORKS italicized and capitalized. Then the document is passed to Joe's object and in turn spit out with ACME WINDOWORKS in green. Thus, each component of the overall solution, the larger program, does its own job without interference from any other component (object). You thus avoid a lot of problems if people are working on individual tasks with the assurance that nobody else will be able to mess with their code or accidentally interact with it in some unpredictable way. Also, it's easier to track down bugs because each job is isolated from other jobs—and if the company name is only turning green half the time, you can tell Joe to take another look at his object.
It's true that over the years OOP theory has grown quite arcane, abstract, and academic. OOP can be, in the upper reaches of universities, a terribly complex subject of study. In fact, they say that, like quantum mechanics, advanced OOP theory is understood by only 12 people in the world—and they're fooling themselves. Nonetheless, if you are in charge of a team that's responsible for building a large application for Office, take some time to employ OOP features. Each individual programmer will be responsible for how their object works. The other programmers can merely use that object without worrying about debugging it. They are not even allowed to see its internal code. Consider the objects that are built into VBA itself, such as Word's Selection object. It was written by somebody at Microsoft. You can put this object in your code and ask it to do things for you, such as move the cursor one word to the left:
Selection.MoveLeft Unit:=wdWord, Count:=1
But you never see the actual code within the Selection object. You aren't allowed to modify it. And its code does not interact with your code's variables or cause other unwanted side effects. In other words, the built-in VBA objects are encapsulated—usable as black boxes, but sealed off.
To create your own encapsulated objects in VBA, you add class modules to a project, which are distinct from regular code modules. You'll see how to do this in Chapter 16, “Building Modular Code and Using Classes.”
The Bottom Line
Understand and use objects, properties, and methods. Contemporary programming employs a hierarchical method of organization known as object-oriented programming (OOP). At the very top of the hierarchy for any given application is the Application object. You go through this object to get to other objects that are lower in the hierarchy.
Master It By using creatable objects, you can often omit the Application object when referencing it in code. What are creatable objects?
Use collections of objects. Collections are containers for a group of related objects, such as the Documents collection of Document objects.
Master It Are collections objects? Do they have their own methods and properties?
Find objects, properties, and methods. The Visual Basic Editor offers several ways to locate objects' members and add them to your programming code. There's an extensive Help system, the Object Browser, a List Properties/Methods feature, and the Auto List Members tool.
Master It How do you employ Auto List Members to find out which properties and methods are available for Word's Document object?
Use Object variables to represent objects. You can create variables that contain objects rather than typical values like strings or numbers.
Master It What keywords do you use to declare an Object variable?